This is the multi-page printable view of this section. Click here to print.

Return to the regular view of this page.

Identity Providers

Overview of IDPs supported by Central NAC and the interactions with IDP for authentication and authorization

Central NAC supports the following cloud based identity provider for user identity:

  • Microsoft Entra ID
  • Google Workspace
  • Okta Workforce Identity Cloud

The identity stores in Central NAC are used for both authentication and authorization. Onboarding devices and generating user based MPSK requires the user to first authenticate againt an IDP. Authentication against IDP uses OAuth while authorization lookups use REST APIs.

Configuring IDP in Central NAC

Central NAC uses OAuth with grant type as client_credentials to connect to the IDPs. To configure an identity source in Central NAC, first a client ID and secret would have to be configured. The steps to add each identity source is documented at:

https://arubanetworking.hpe.com/techdocs/new-central/content/nac/config-identity-store.htm


INFO

Configuring IDP is optional for BYOC and MPSK workflows. Admin managed MPSK workflow does not require an IDP to be configured. User managed MPSK workflow requires an IDP to be configured.

Central NAC interactions with IDPs

Central NAC uses REST APIs to fetch group membership from IDPs. Central NAC also uses webhook notifications from IDPs to track changes to user accounts like account being deleted, account being disabled or change in group membership. When an account is either deleted or disabled, Central NAC will revoke any client certificates issued to the user and will also delete all the MPSK keys associated with the user. If the user has devices connected to the network, Central NAC will also disconnect the devices from the network as well.

The interaction with IDPs during authorization can be summarized in the following steps:

  1. Central NAC receives authentication request from a new user
  2. Lookup IDP to check if user account is enabled and to fetch group membership.
    • If the client certificate is issued by the Onboard CA, the certificate’s Common Name (CN) is used for authorization lookup.
    • If the client certificate is from an external PKI, the Subject Alternative Name (SAN) attribute (in MSN:UPN format) is used for authorization lookup
    • For user managed MPSK workflow,the authentication is done by validating the PSK being used after which the user ID (UPN) associated with the MPSK key is used to fetch group membership for authorization
  3. Cache the group membership locally for 24 hours
  4. Evaluate policies and apply the appropriate role
  5. If user account is disabled or deleted, revoke client certificates, delete MPSK keys and disconnect client from network
  6. If group membership changes, a re-auth is forced so that the policies are re-evaluated and appropriate role is assigned to the user

Frequently Asked Questions

Q: How often does Central NAC fetch group membership from IDP?
A: Central NAC would fetch group membership in real time for every new authentication request. After that, there is a quiet period of 60 seconds. Any requests coming in during the quiet period would use the local cached information. Any requests coming after the quiet period will again trigger another real-time lookup against IDP

Q: What happens if the IDP is not reachable?
A: Group membership information is cached locally for 24 hours. So if there was a previous authentication request within 24 hours, then authorization is done based on the local cache. If there is no information in local cache, the authorization would fail.

Q: Can Central NAC fetch authorization attributes for client devices from IDP?
A: Central NAC does not do authorization lookups for client devices. Client tags from HPE Aruba Central Client Insights module can be used as part of the authorization policies.

Q: How many IDPs can be added to Central NAC?
A: You can add multiple IDPs, there is no hard limit.

Q: If i delete and re-add the IDP, will users have to go through onboarding again?
A: As long as the IDP belongs to the same domain and contains the same user accounts, provisioned certificates should continue to work fine.
1 - Google Workspace

Adding Google Workspace as Identity Provider in Central NAC

To configure Google Workspace as Idenity Provider in Central NAC, you will need the following information:

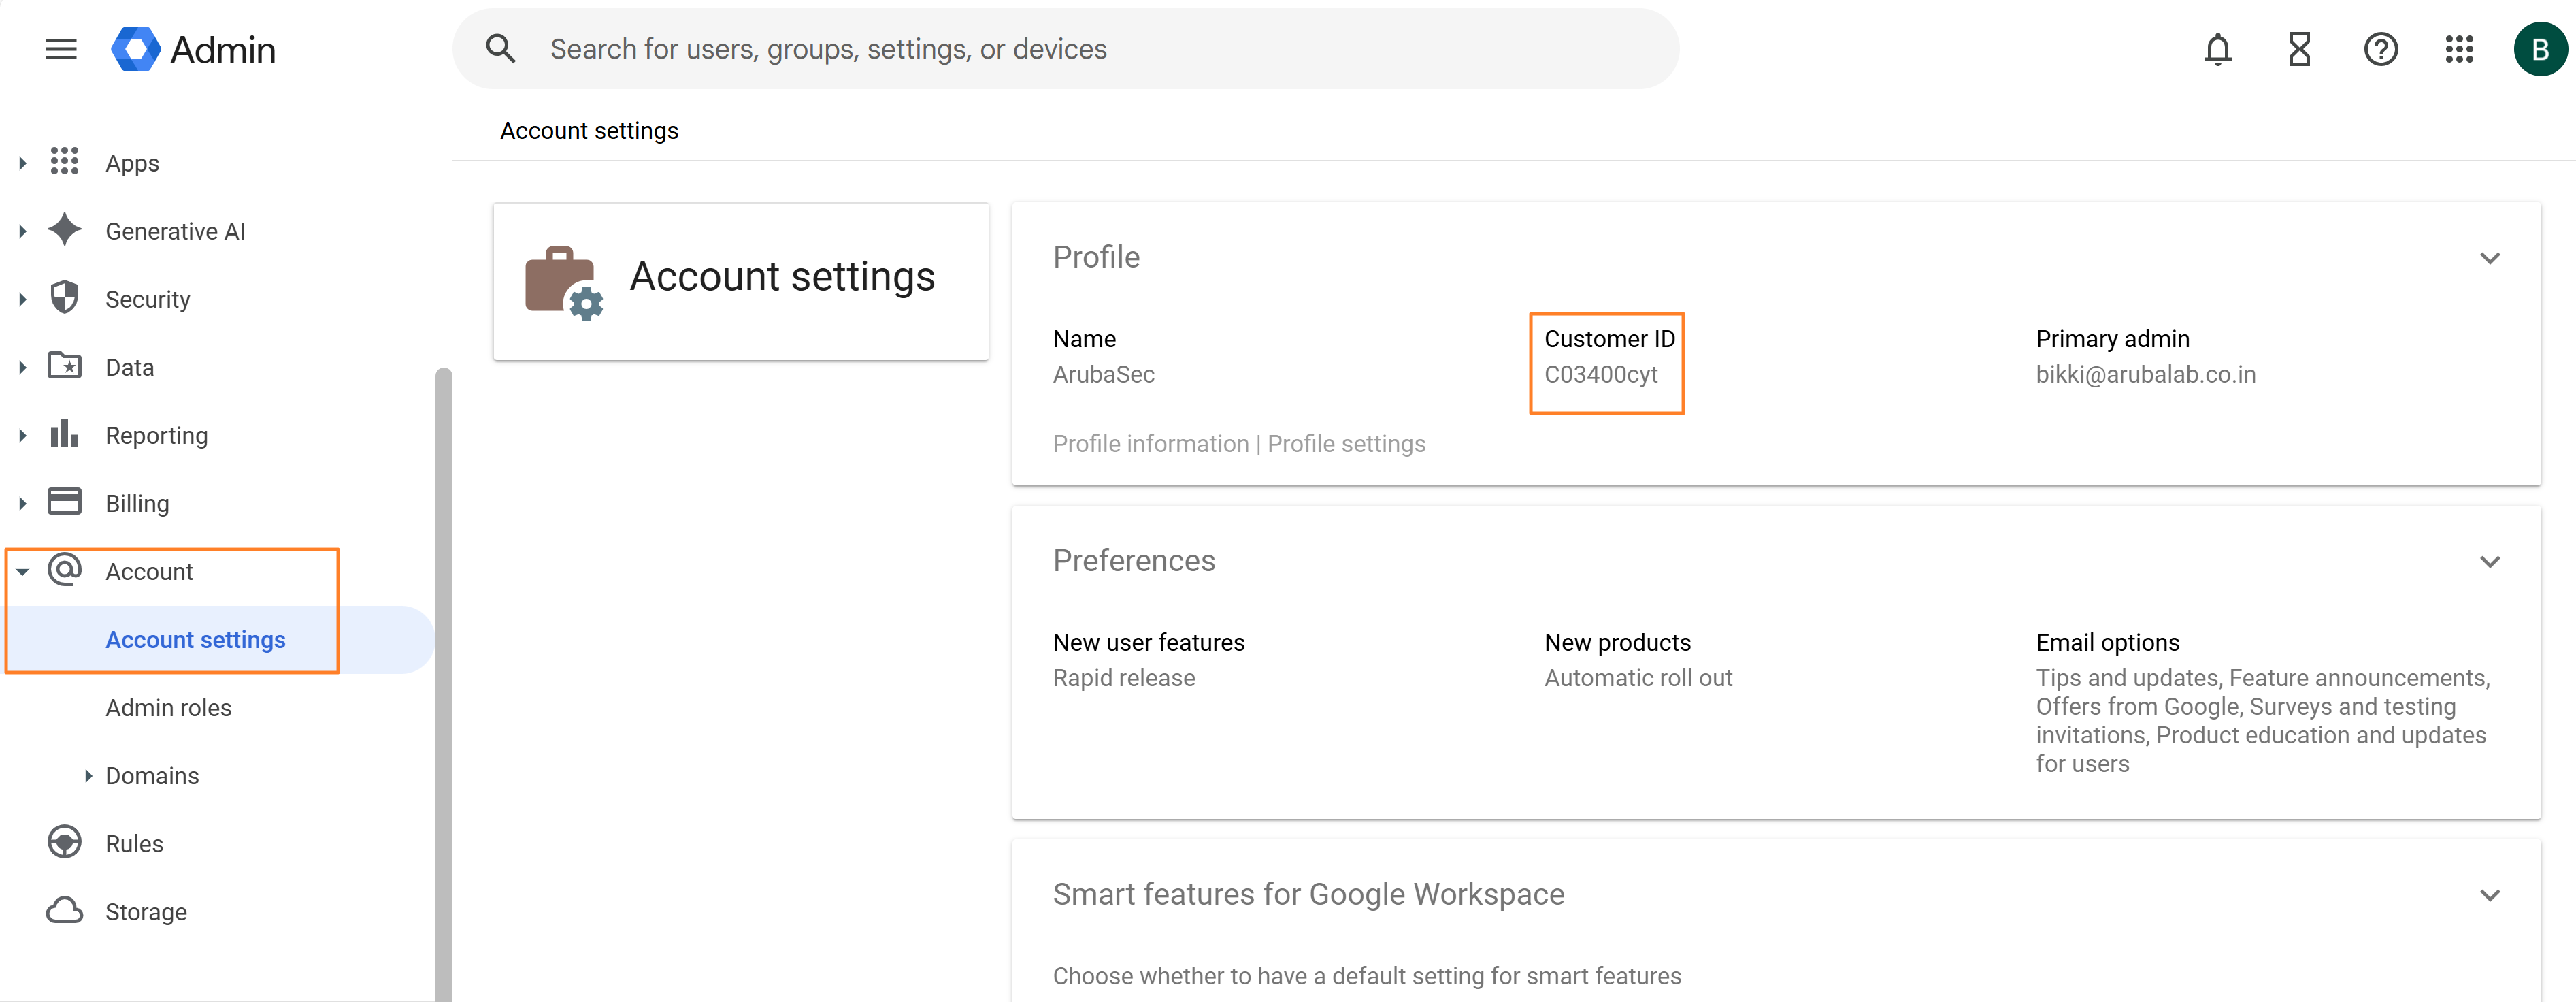
  • Customer ID
  • Google Workspace Domain
  • Administrator Email
  • OAuth2.0 Client ID
  • Client Secret
  • Service Account Crentials File

Getting the Customer ID and Domain Information

  1. Login to Google Admin Console and navigate to Account > Account settings. Copy the Customer ID from the Profile section.

    Copying customer ID
    Copying customer ID


  2. Navigate to Account > Domains > Manage domains and copy the domain name.

    Copying domain name
    Copying domain name


Creating a Project for Central NAC in Google Cloud Console

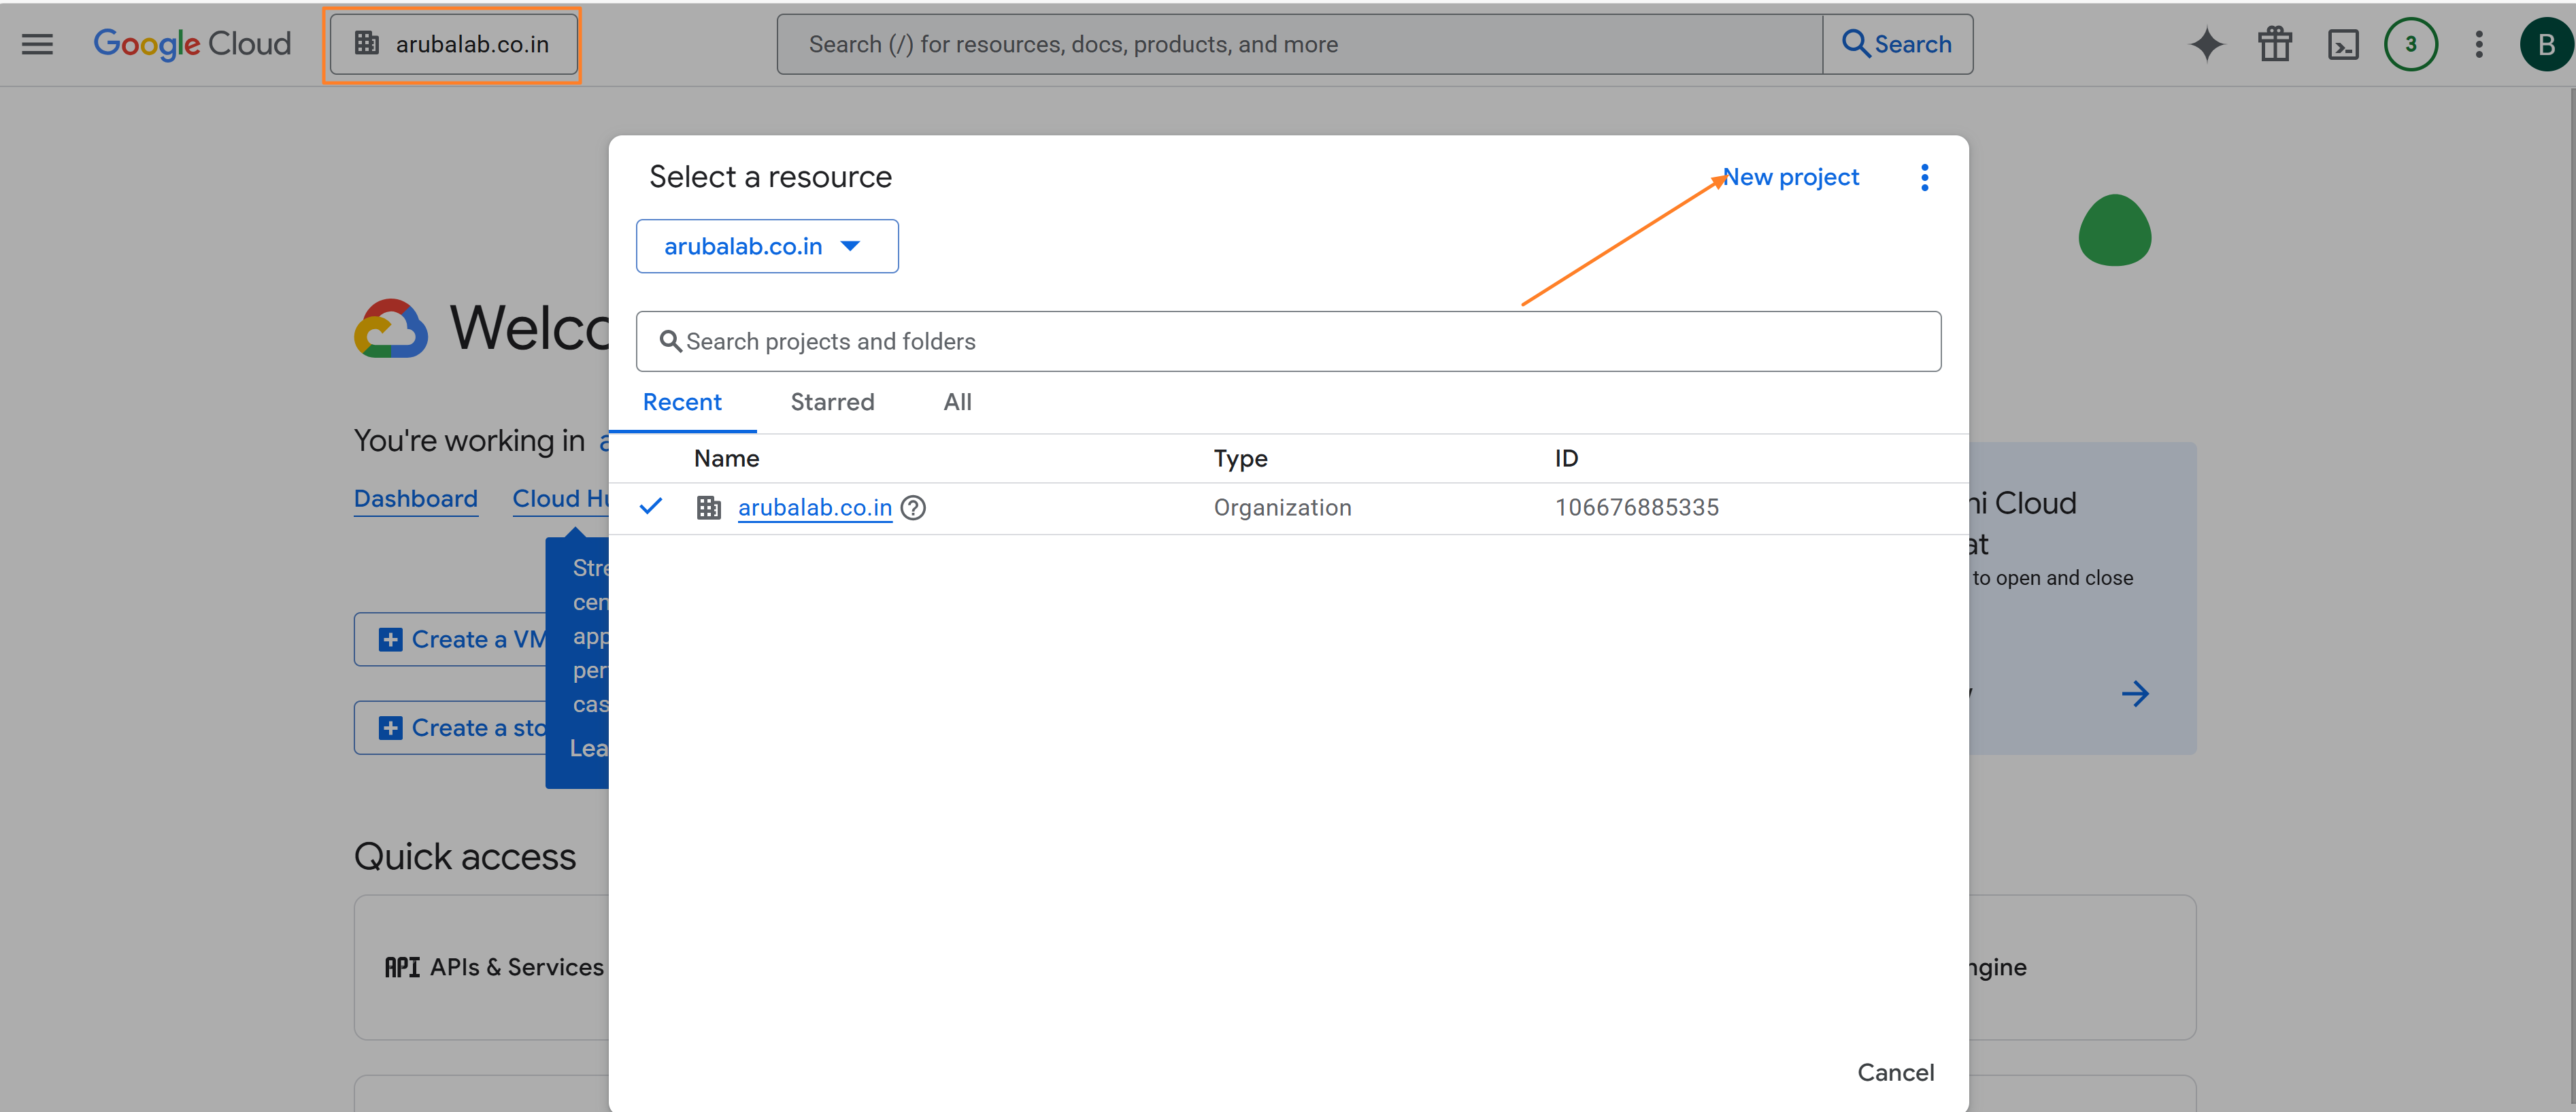
  1. Login to your Google Cloud Console as an administrator and navigate to Project Picker > New Project from the home screen.

    Create a new project
    Create a new project


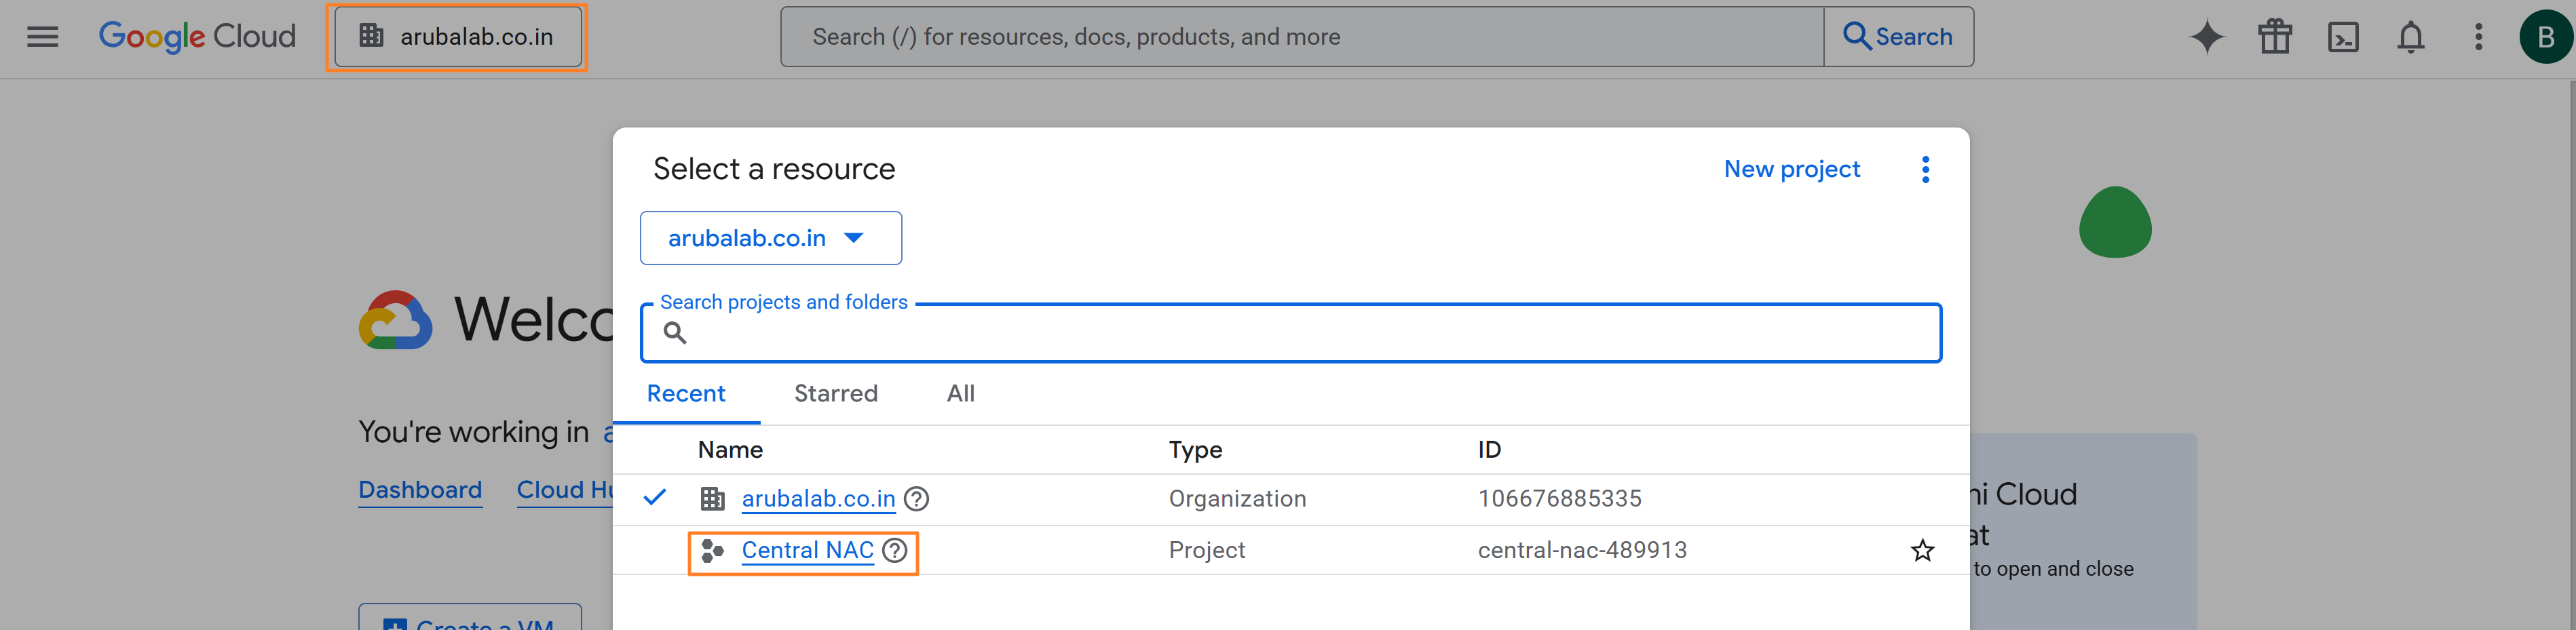
  2. Provide a suitable Project Name (for example, Central NAC), select the Organization and Parent Resource, and then click Create.

    Create a new project
    Create a new project


  3. Now switch to the project that was created from the Project Picker.


Create OAuth 2.0 Client ID and Client Secret

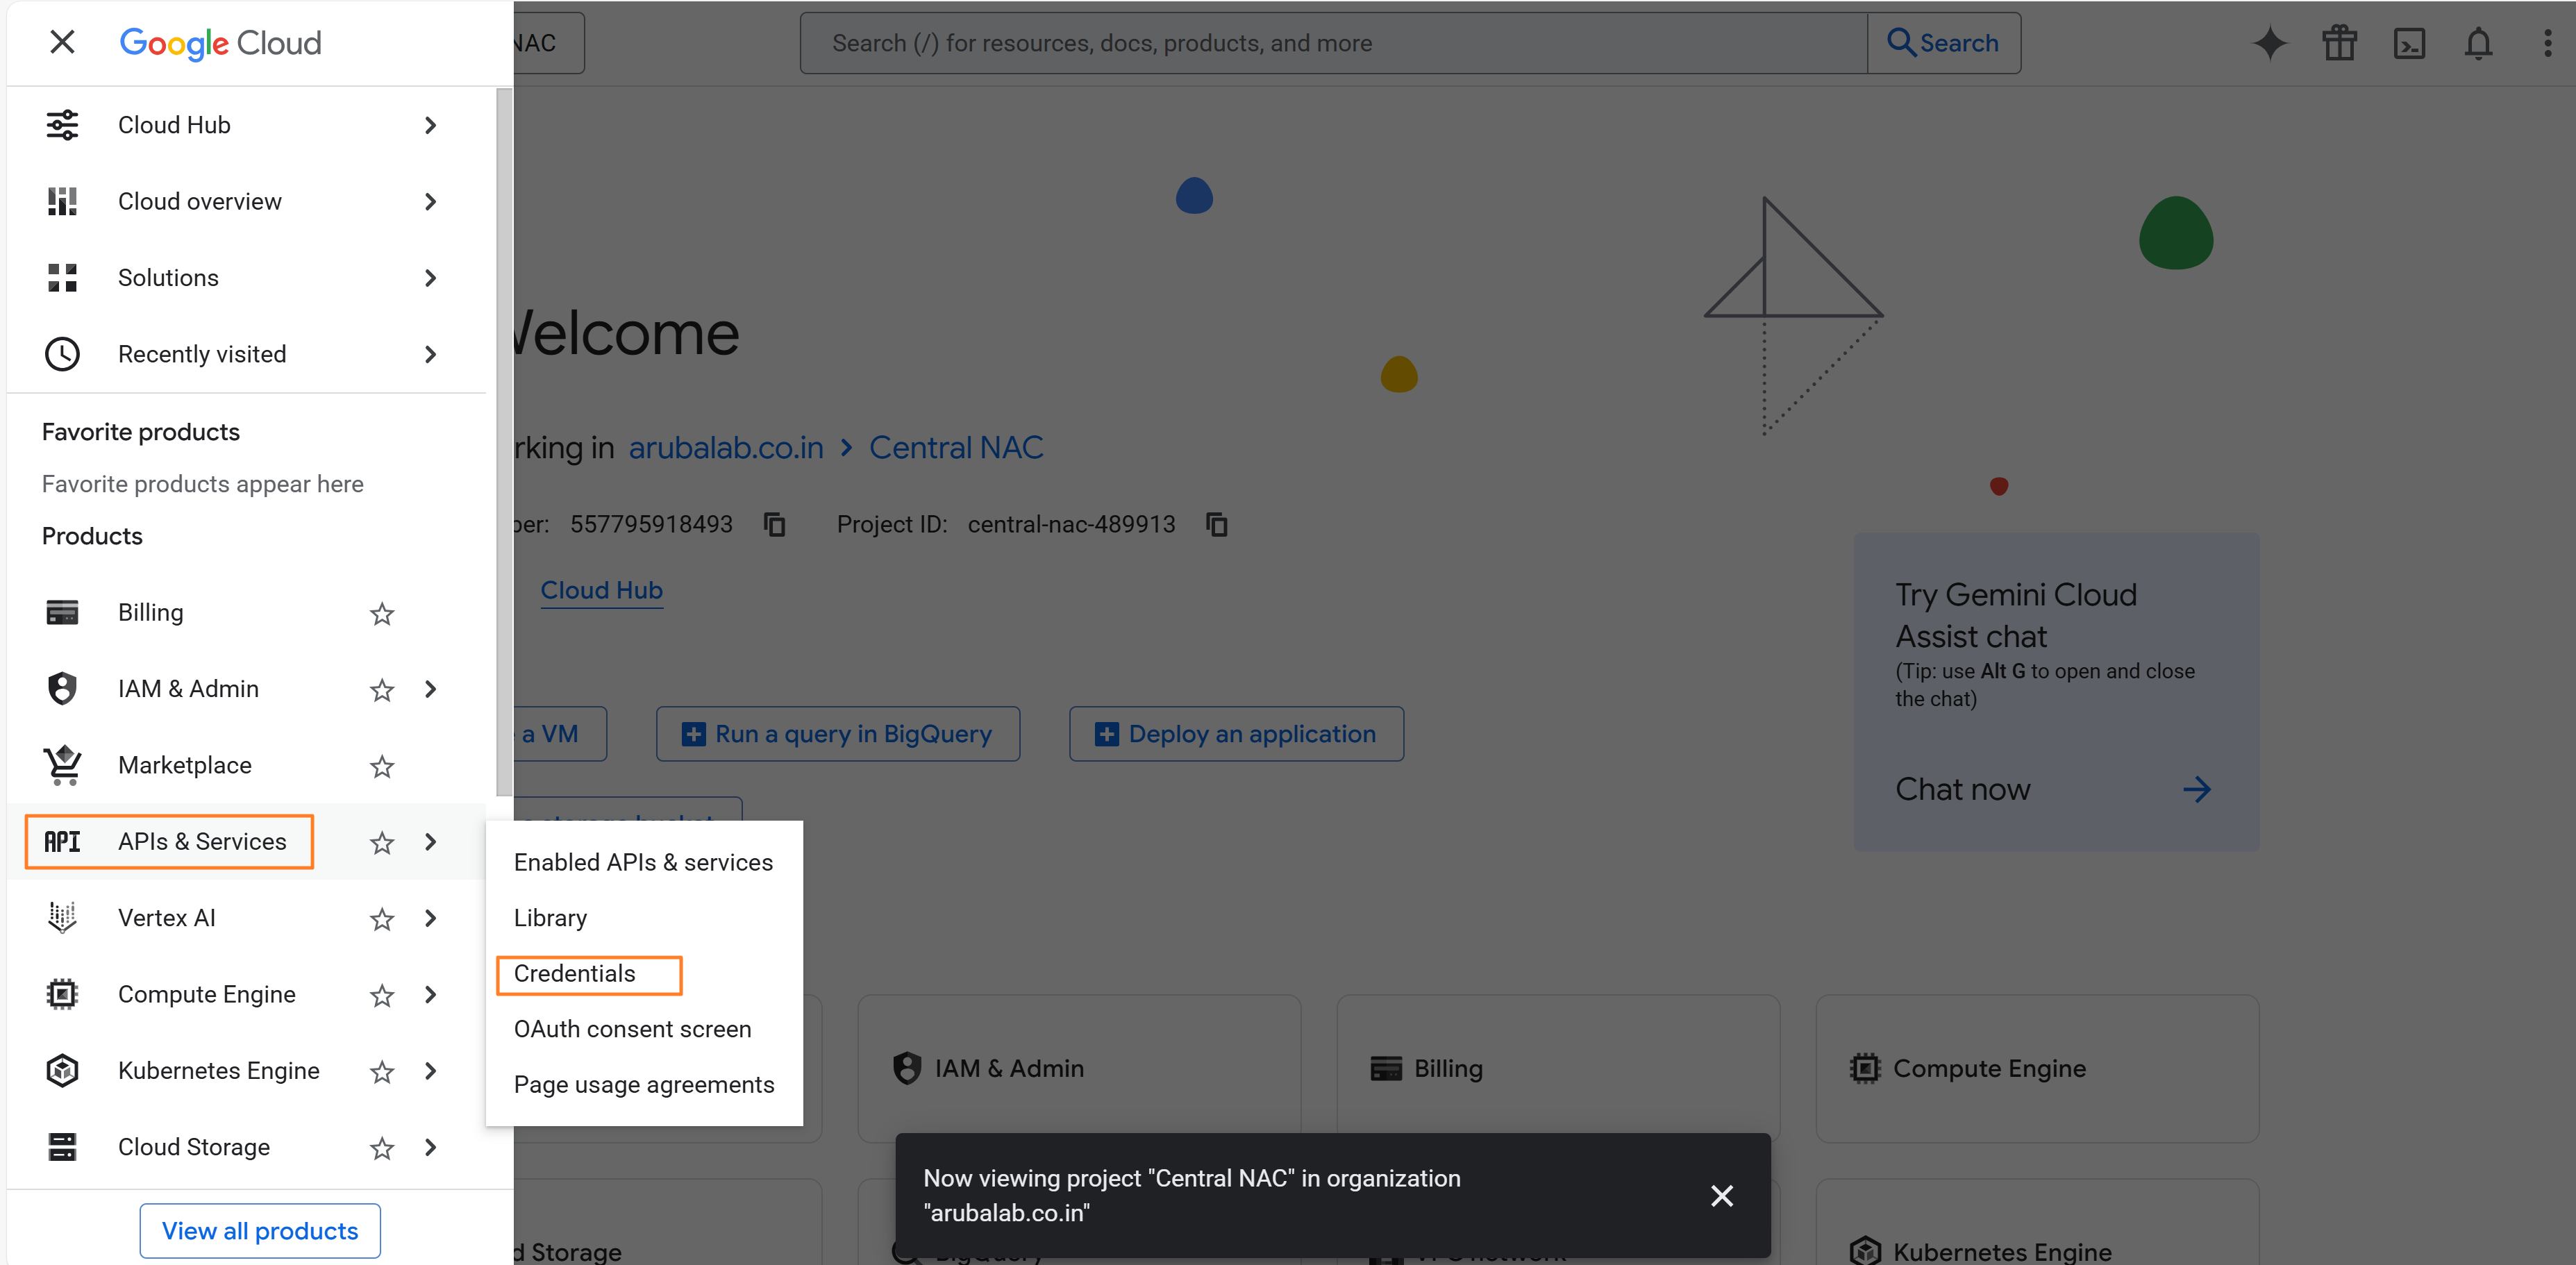
  1. From the hamburger menu in the top-left corner, go to APIs & Services > Credentials.

    Creating OAuth 2.0 Client ID and Client Secret
    Creating OAuth 2.0 Client ID and Client Secret


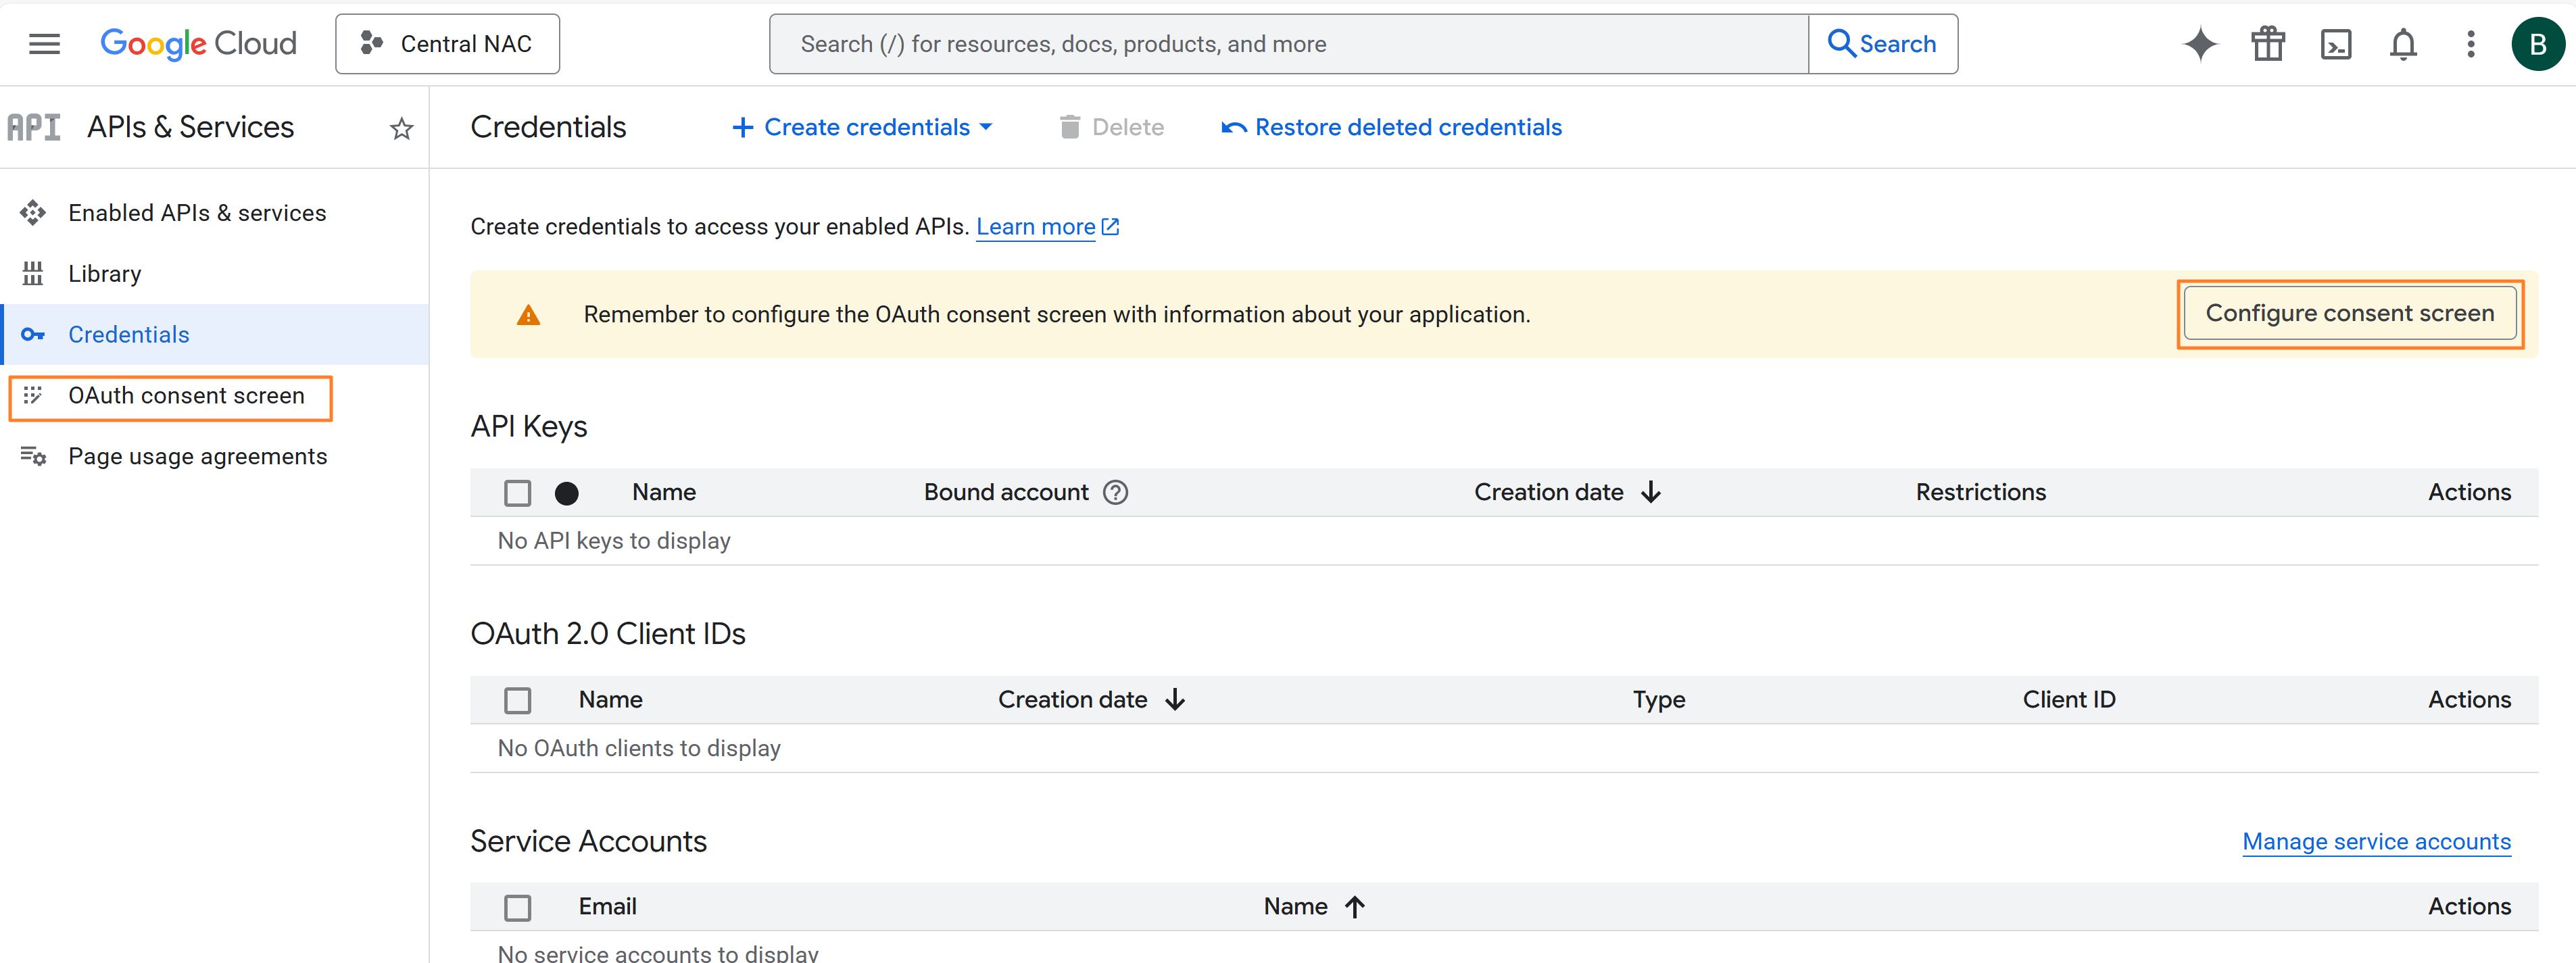
  2. The OAuth consent screen must be configured before you can create an OAuth Client ID and Client Secret. To configure the consent screen, either click Configure consent screen from the banner displayed on the page or navigate to the OAuth consent screen menu, as shown below.

    Configure consent screen
    Configure consent screen


  3. Click on Get Started from the Overview Page or follow the onscreen instructions. Enter a suitable App name and a User support email and click Next.


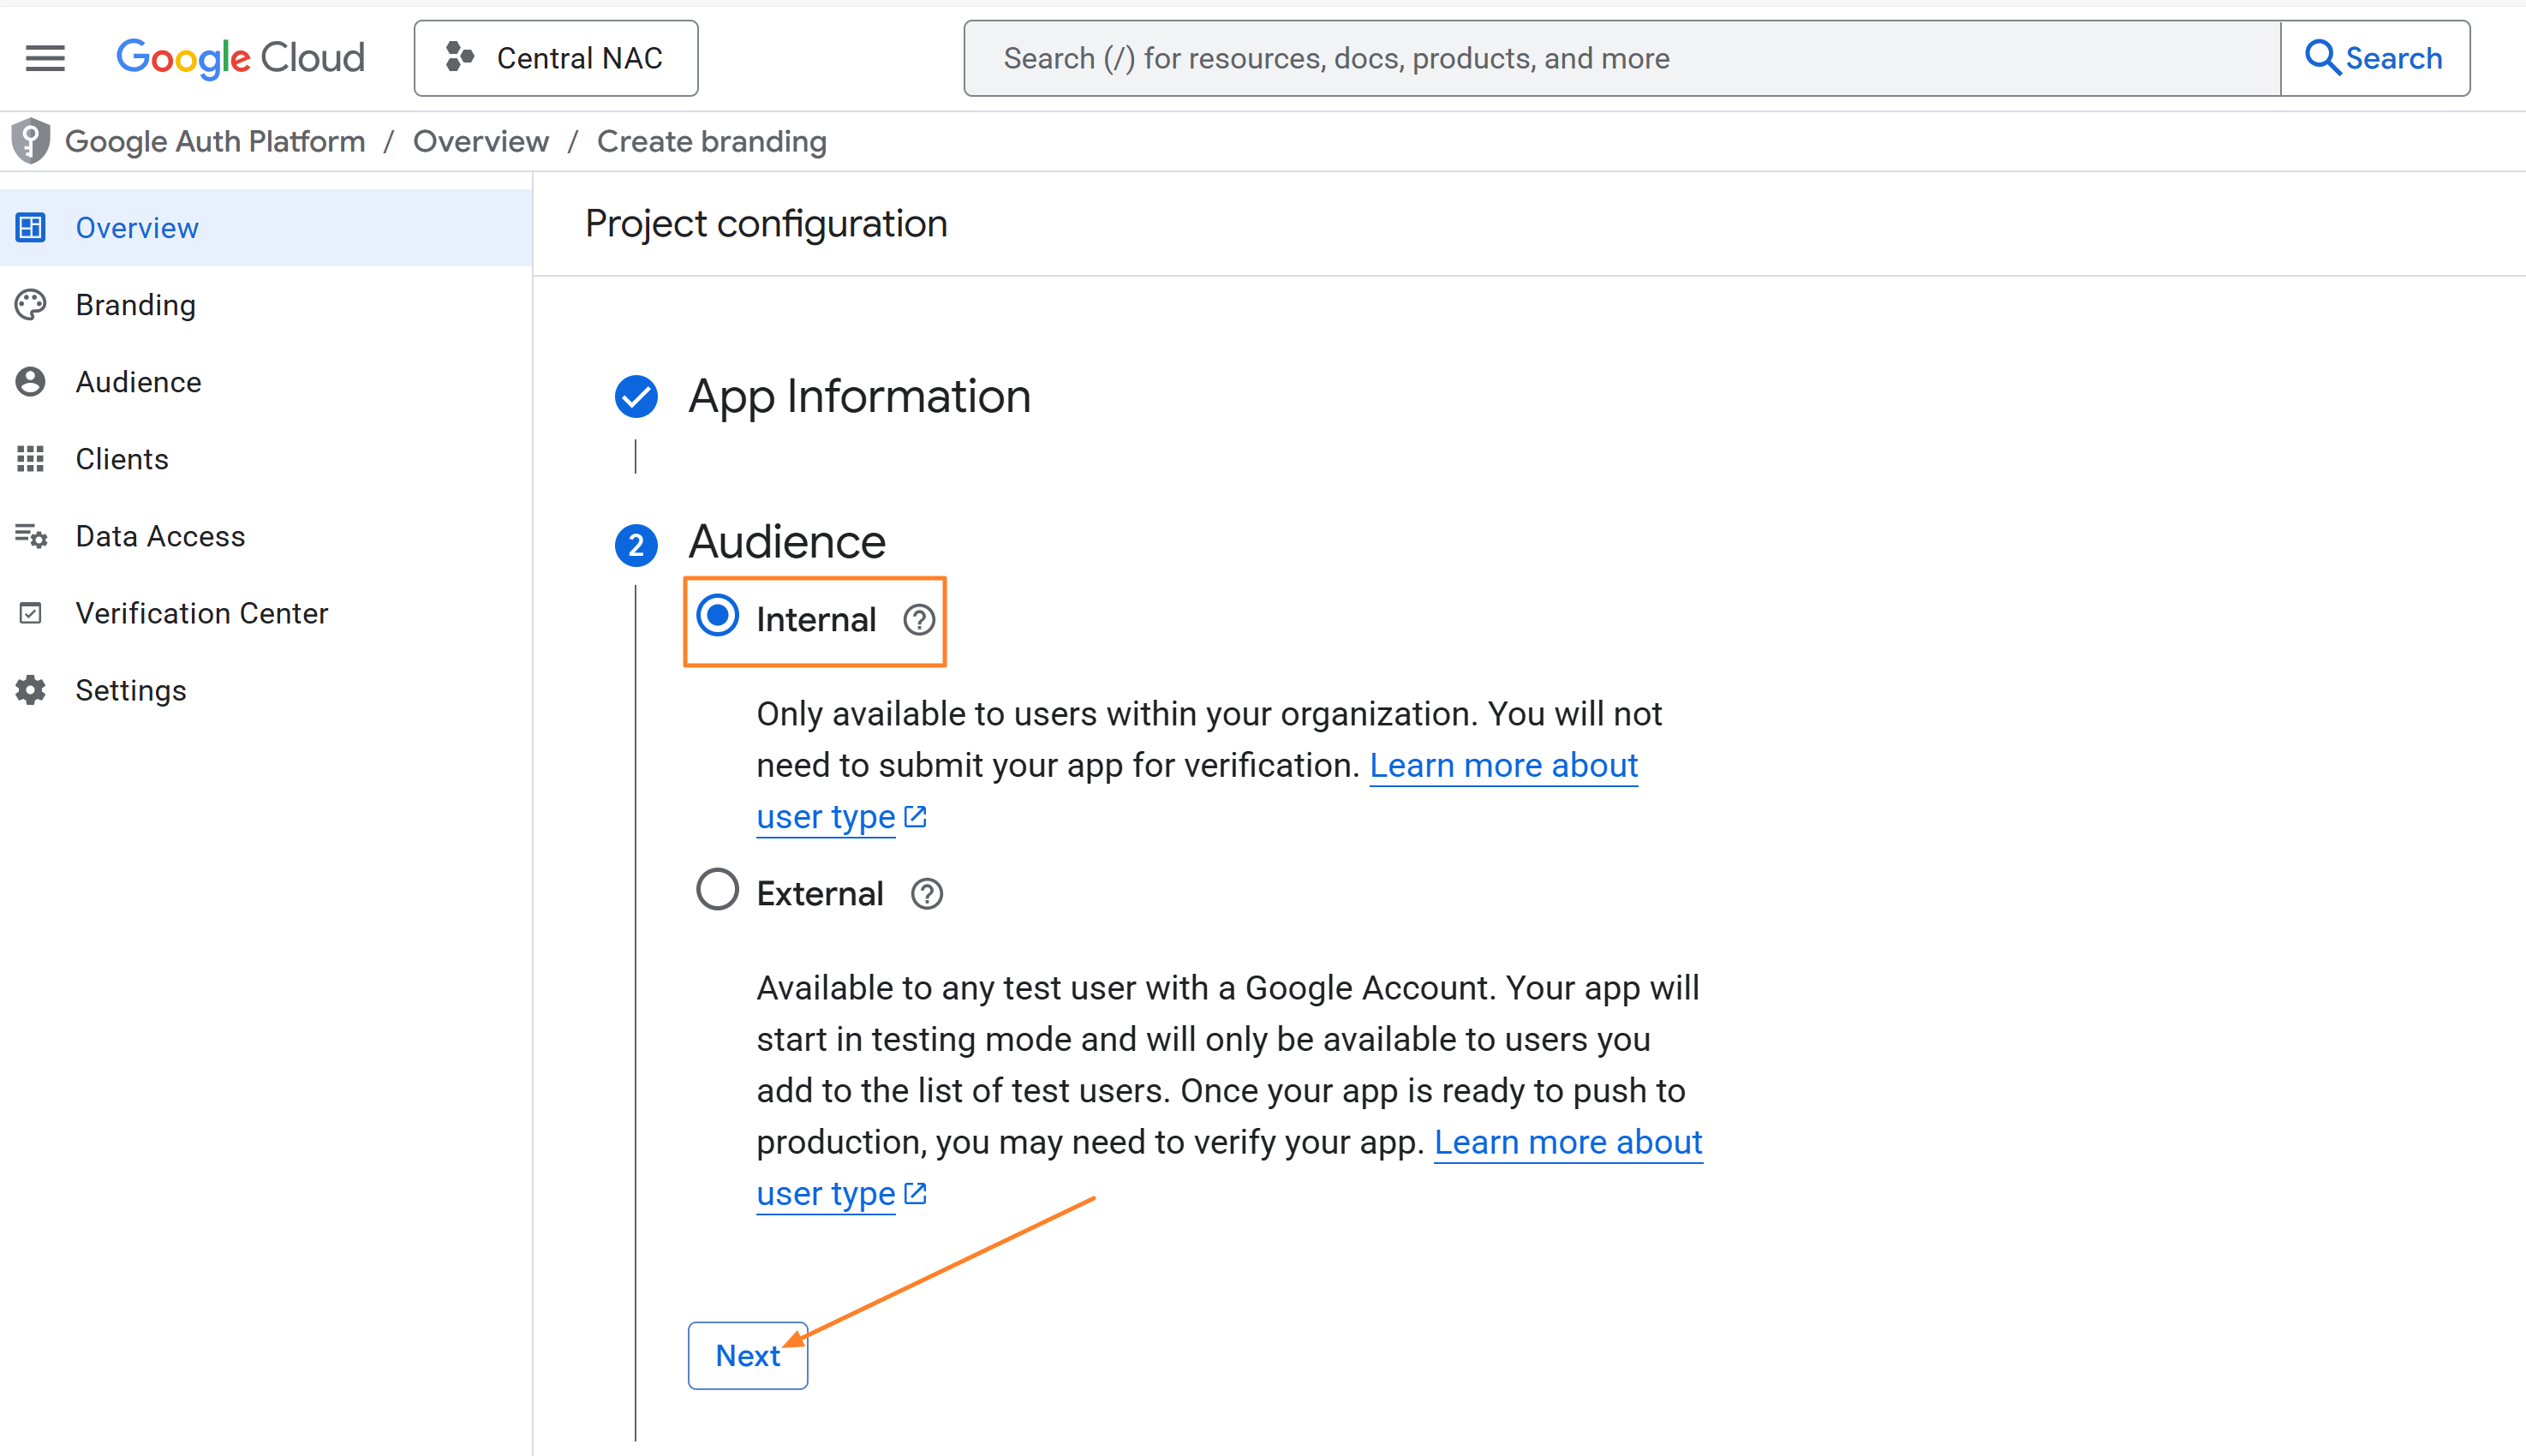
  4. Choose Internal as the Audience and click Next.


5.Enter the email addresses that should receive notifications from Google for any changes to your project under Contact Information, Agree to the Google API Services:User Data Policy on the Finish page and then click Create.


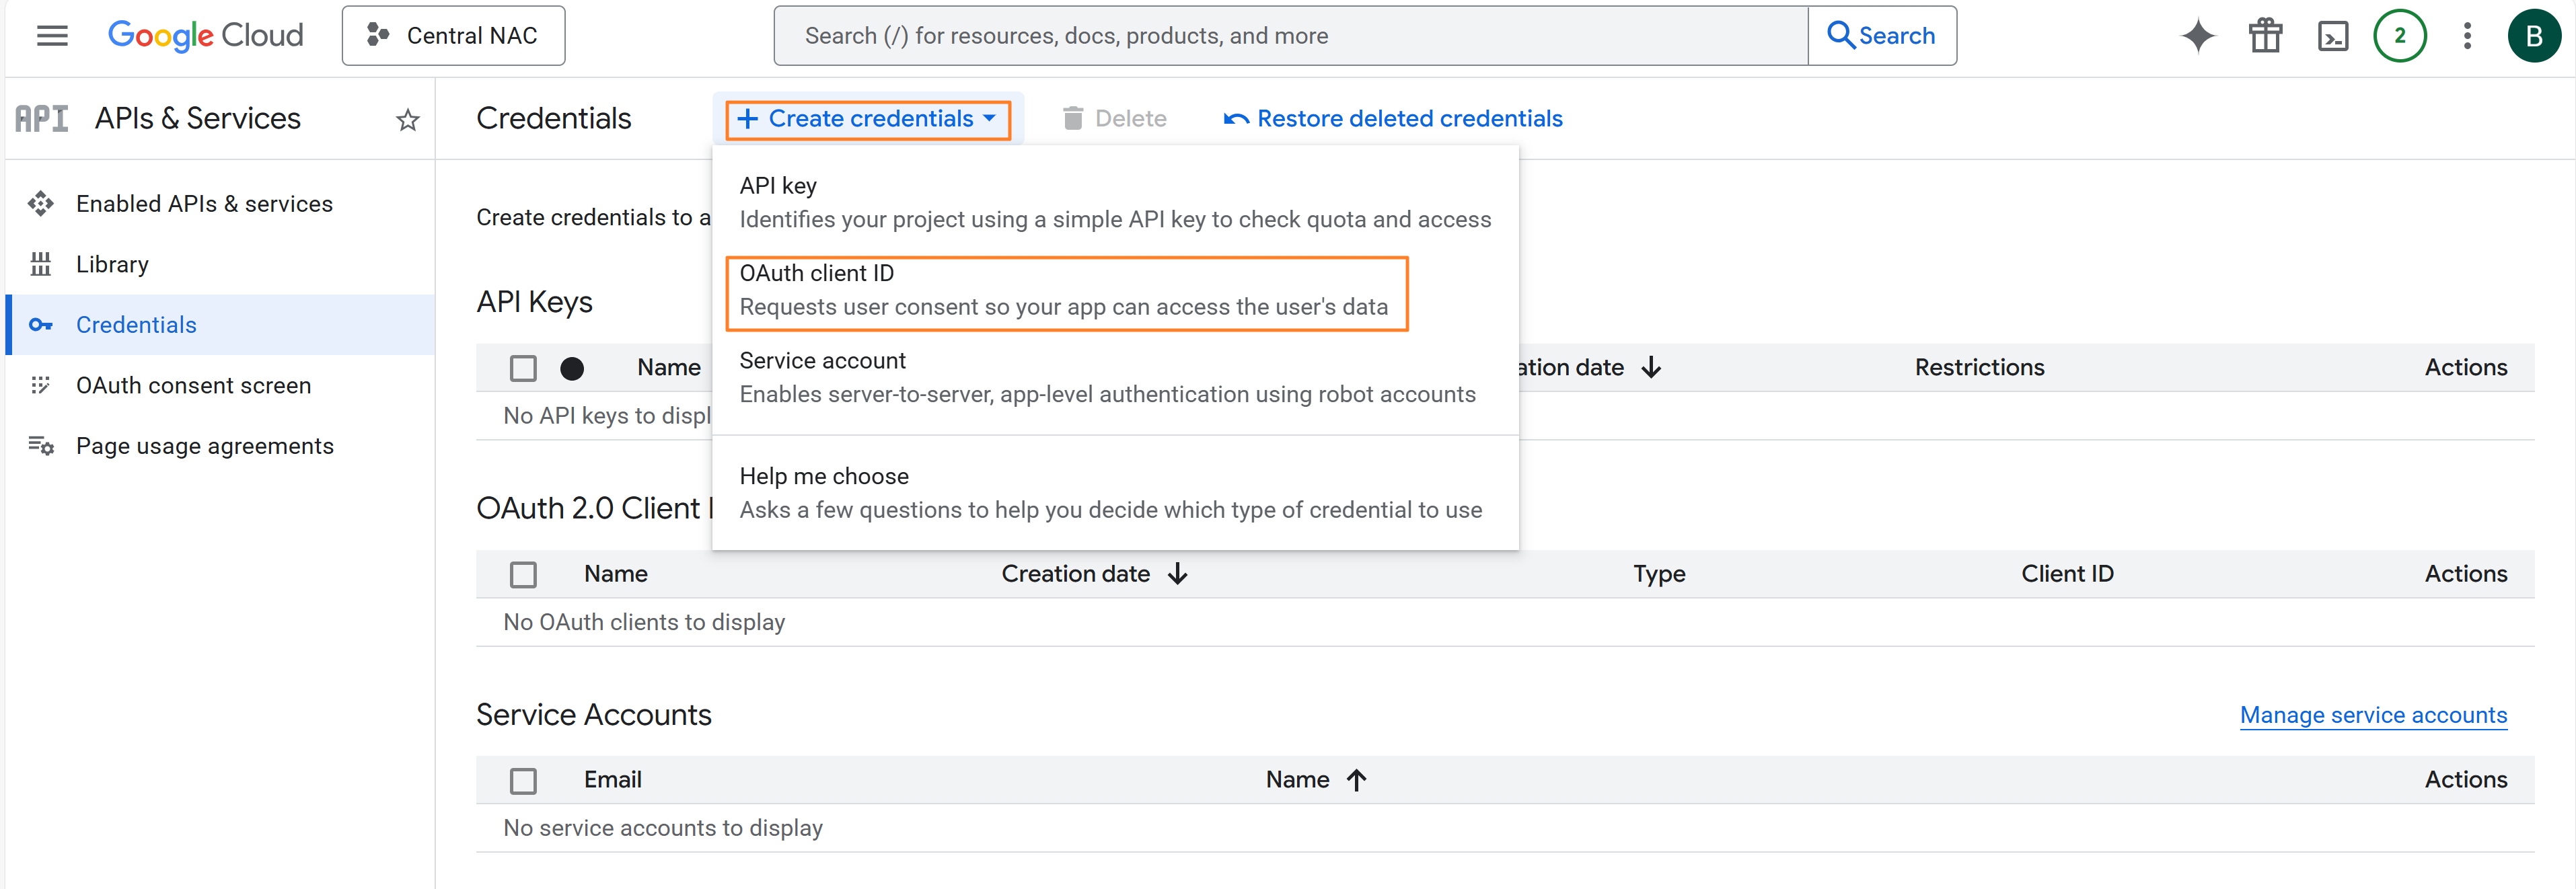
  1. You can now create the OAuth Client Credentials. Click on Create OAuth client from the Overview page or Navigate back to the hamburger menu in the top-left corner, go to APIs & Services > Credentials > Create Credentials > OAuth client ID.


  2. Choose Web application as the Application type, Give a Name to your OAuth 2.0 client and scroll down.


  3. Click on Add URI under the Authorized redirect URIs, enter the redirect URI and click Create. You can find the redirect URI from Central NAC by navigating to Central NAC > Configuration > Identity Management > Create Identity Store as shown below.


    Getting the redirect URI from Central NAC
    Getting the redirect URI from Central NAC


  4. Copy the Client ID and Client Secret displayed after the OAuth client is created. These will be used later while configuring the IdP in Central NAC.


Creating a Service Account

  1. From the hamburger menu in the top-left corner, go to IAM & Admin > Service Accounts.


  2. Click Create Service Account to start creating a new service account for the project.


  3. Give a name to the Service account, The Service account ID should be auto generated. Click Create and continue to advance to the next steps.


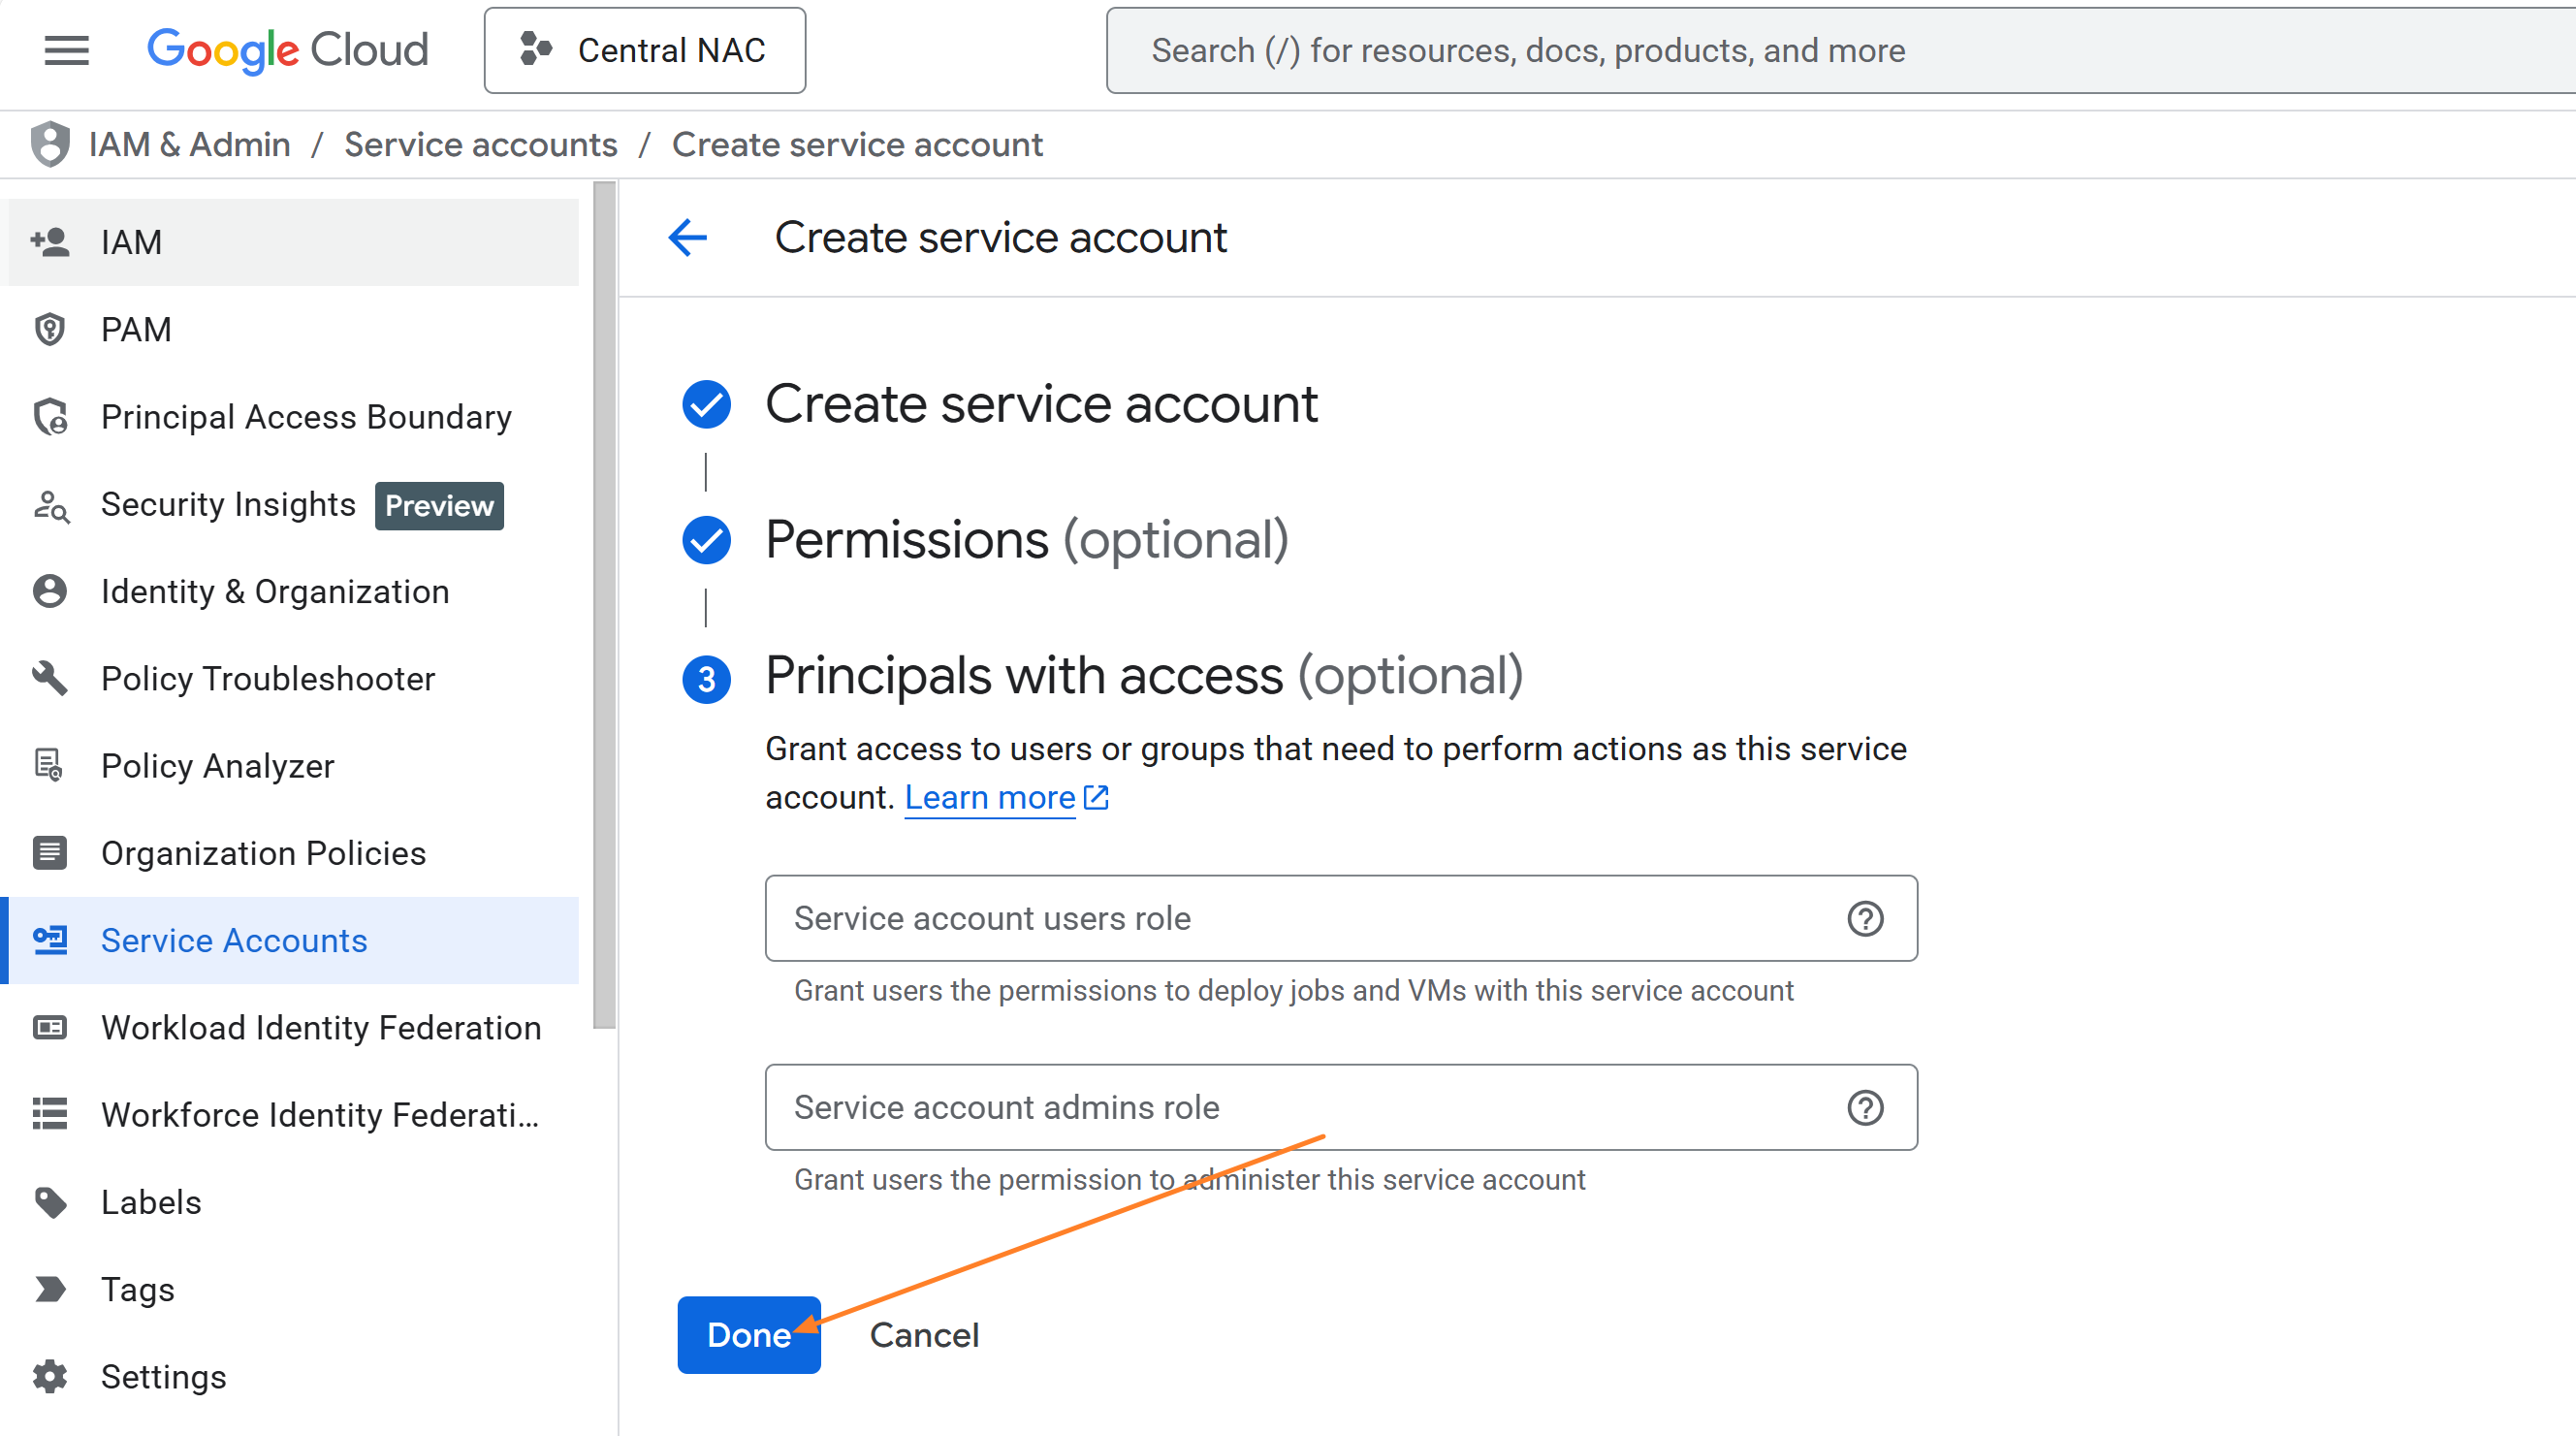
  4. The Permissions and Principals with access section is optional and can be skipped by clicking on Continue. Click Done to complete the service account creation.


  5. Once the account is created, it will be listed on the Service Accounts page. For the service account created for Central NAC, click the Actions menu and select Manage keys.


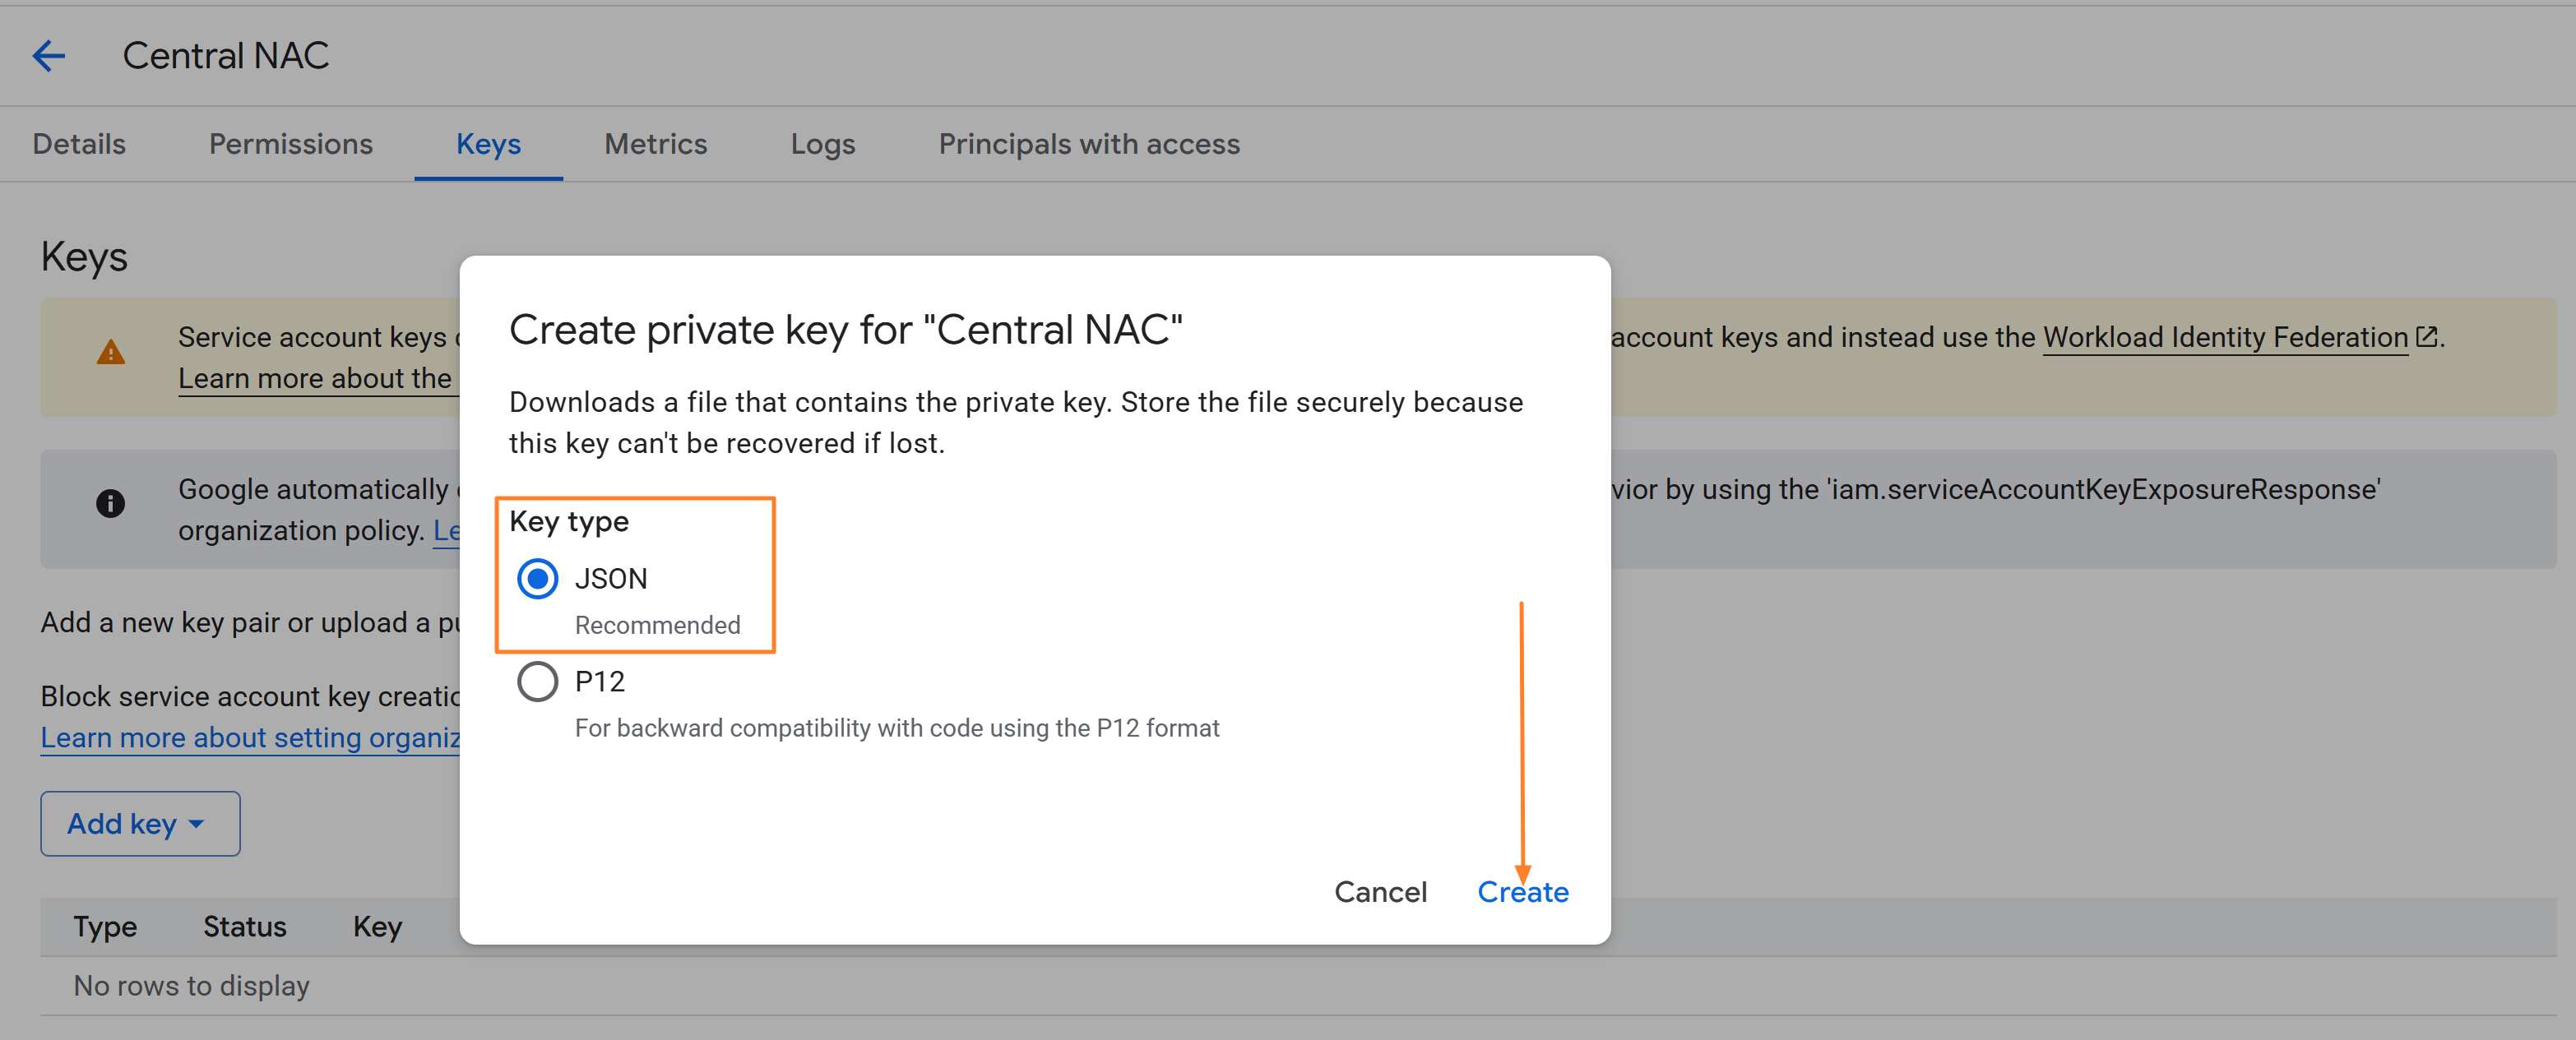
  6. Click on Add Key and select Create new key. Choose Key type as JSON and click on Create. The keys should be downloaded to your computer.


INFO

If the service account or key creation fails due to the iam.managed.disableServiceAccountCreation or iam.managed.disableServiceAccountKeyCreation policies being enforced at the organization level, you may need to temporarily disable these policies. This action must be performed by a user with the Organization Policy Administrator role. Once the policies are set to inactive, retry creating the service account or key.

Configuring Google Workspace as IDP in Central NAC

  1. Within Central NAC, Navigate to Configuration > Identity Mangement > Manage as shown below.


  2. Click on Create Identity Store to create the IDP


  3. Provide a Name, select Google Workspace as the identity provider and fill the form using the Customer ID, Domain, Administator Email, Client ID, Client Secret and Credentials file copied from Google Workspace.


2 - Microsoft Entra ID

Adding Microsoft Entra ID as Identity Provider in Central NAC

Microsoft Entra ID App registration

To configure Entra ID as Idenity Provider in Central NAC, you will need the following information:

- Client ID

- Client Secret

- Tenant ID

  1. Log into Entra ID and navigate to Entra ID > App registrations > New registration

    Create new App Registration
    Create new App Registration


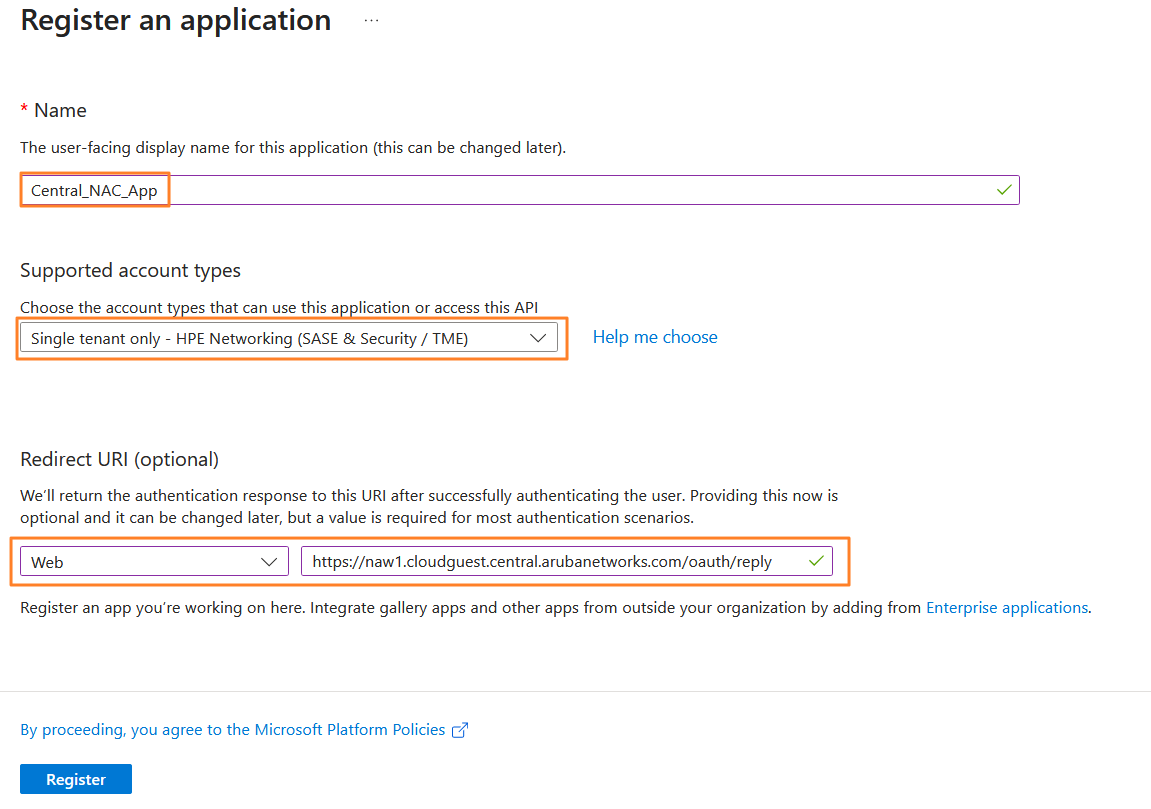
  2. Register a New Application by filling in the form using below details.

Name → Enter your application name

Supported account types → Single tenant only

Redirect URI (Web) → Copy the Redirect URI from the configuration page of Central NAC → Identity Provider Card

Getting the Redirect URI


  1. Click Register


  2. Next, Click on Add a certificate or secret to generate the client secret.

    Adding client credentials
    Adding client credentials


Click on New client secret > Add a client secret, define a description and click Add

Generating client secret


Copy the Value of client secret to use it later on the Central NAC while adding the Identity Provider.


Configuring API permissions

  1. Click on API permissions > Add a permission > Microsoft Graph to start adding permissions required to make API calls to Entra ID from your Central NAC tenant.


  2. Select the permissions shown in the table below and click on Add Permissions


Microsoft Graph API permissions:

Permission Type Description
Directory.Read.All Application Read directory data
Group.Read.All Application Read all groups
User.Read Delegated Sign in and read user profile
User.Read.All Application Read all users’full profiles
  1. Grant admin consent to the permissions added in the earlier step. Note that you will require administrative privileges to be able to Grant admin consent for the permissions.


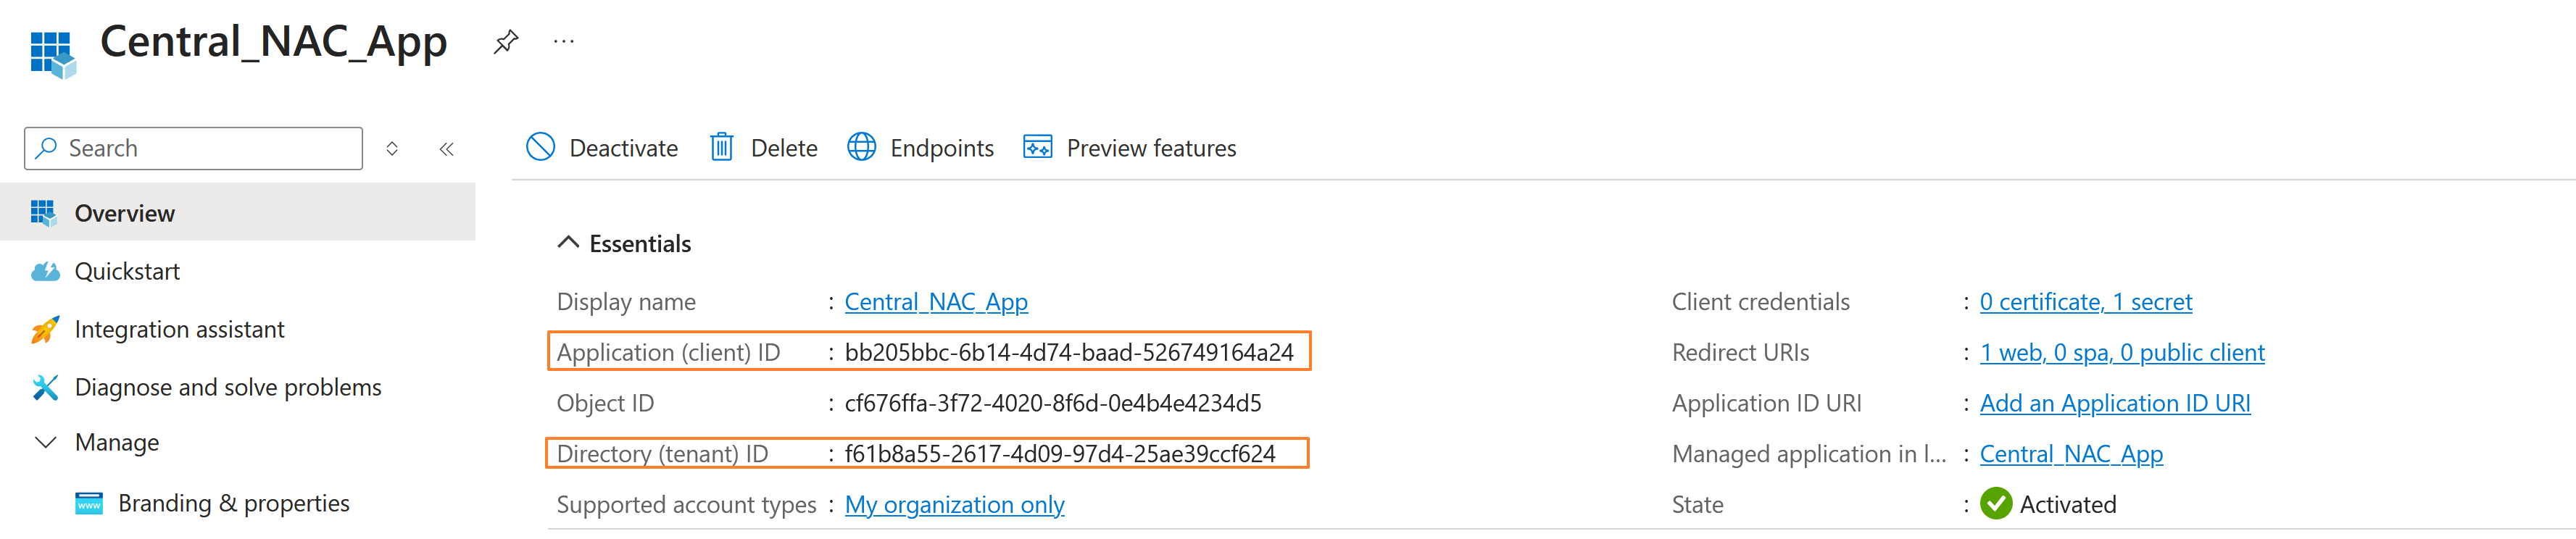
You can now copy the TenantID and ClientID from the overview page of the added application. Use the Client secret copied earlier along with the Tenant ID and Client ID to configure Entra ID as an IDP in Central NAC.


Configuring Entra ID as IDP

Within Central NAC, Navigate to Configuration > Identity Mangement > Manage as shown below.


Click on Create Identity Store to create the IDP


Provide a Name, select Microsoft Entra ID as the identity provider, and enter the Tenant ID along with the Client ID and Client Secret generated for the registered application in your Entra tenant and click on Create.


3 - Microsoft Intune Extension

Adding Microsoft Intune as Extension in New Central

The Microsoft Intune integration with HPE Aruba Networking Central strengthens endpoint visibility, security and compliance by combining cloud-based device management with network-level intelligence. HPE Aruba Networking Central aggregates and analyzes client attributes sourced from Microsoft Intune to enhance device classification across the network. This enriched classification enables more accurate identification of endpoints based on compliance status, device posture, and management attributes. Once classified, endpoints are automatically assigned client tags, which can be leveraged as conditional attributes within Network Access Control (Central NAC) policies to enforce granular, context-aware access decisions.

Microsoft Entra ID App registration

Steps for Microsoft Entra ID App registration is detailed in the Adding Microsoft Entra ID as Identity Provider in Central NAC technote in the following link https://arubanetworking.hpe.com/techdocs/NAC/central-nac/central-nac-idps/microsoft-entra-id/

Configuring API permissions

It is important to note that the application registered for the Microsoft Intune integration requires a distinct set of API permissions compared to the permissions used when configuring Microsoft Entra ID as an Identity Provider (IdP) in Central NAC. The Intune extension leverages specific Microsoft Graph permissions to retrieve device management and compliance attributes necessary for endpoint classification. The following permissions are required when installing and configuring the Intune integration.

Microsoft Graph API permissions:

Permission Type Description
DeviceManagementManagedDevices.Read.All Application Read Microsoft Intune device configuration and policies
User.Read Delegated Sign in and read user profile

INFO

If the same app registration in Microsoft Entra ID is used both for configuring Microsoft Entra ID as an Identity Provider (IdP) in Central NAC and for installing the Intune extension, the required API permissions can be consolidated within a single app registration. In this case, the permissions required for the Intune integration can be combined with those needed for the Entra ID IdP configuration, ensuring that all necessary Microsoft Graph access rights are granted under one unified application object..

Installing the Intune Extension on New Central

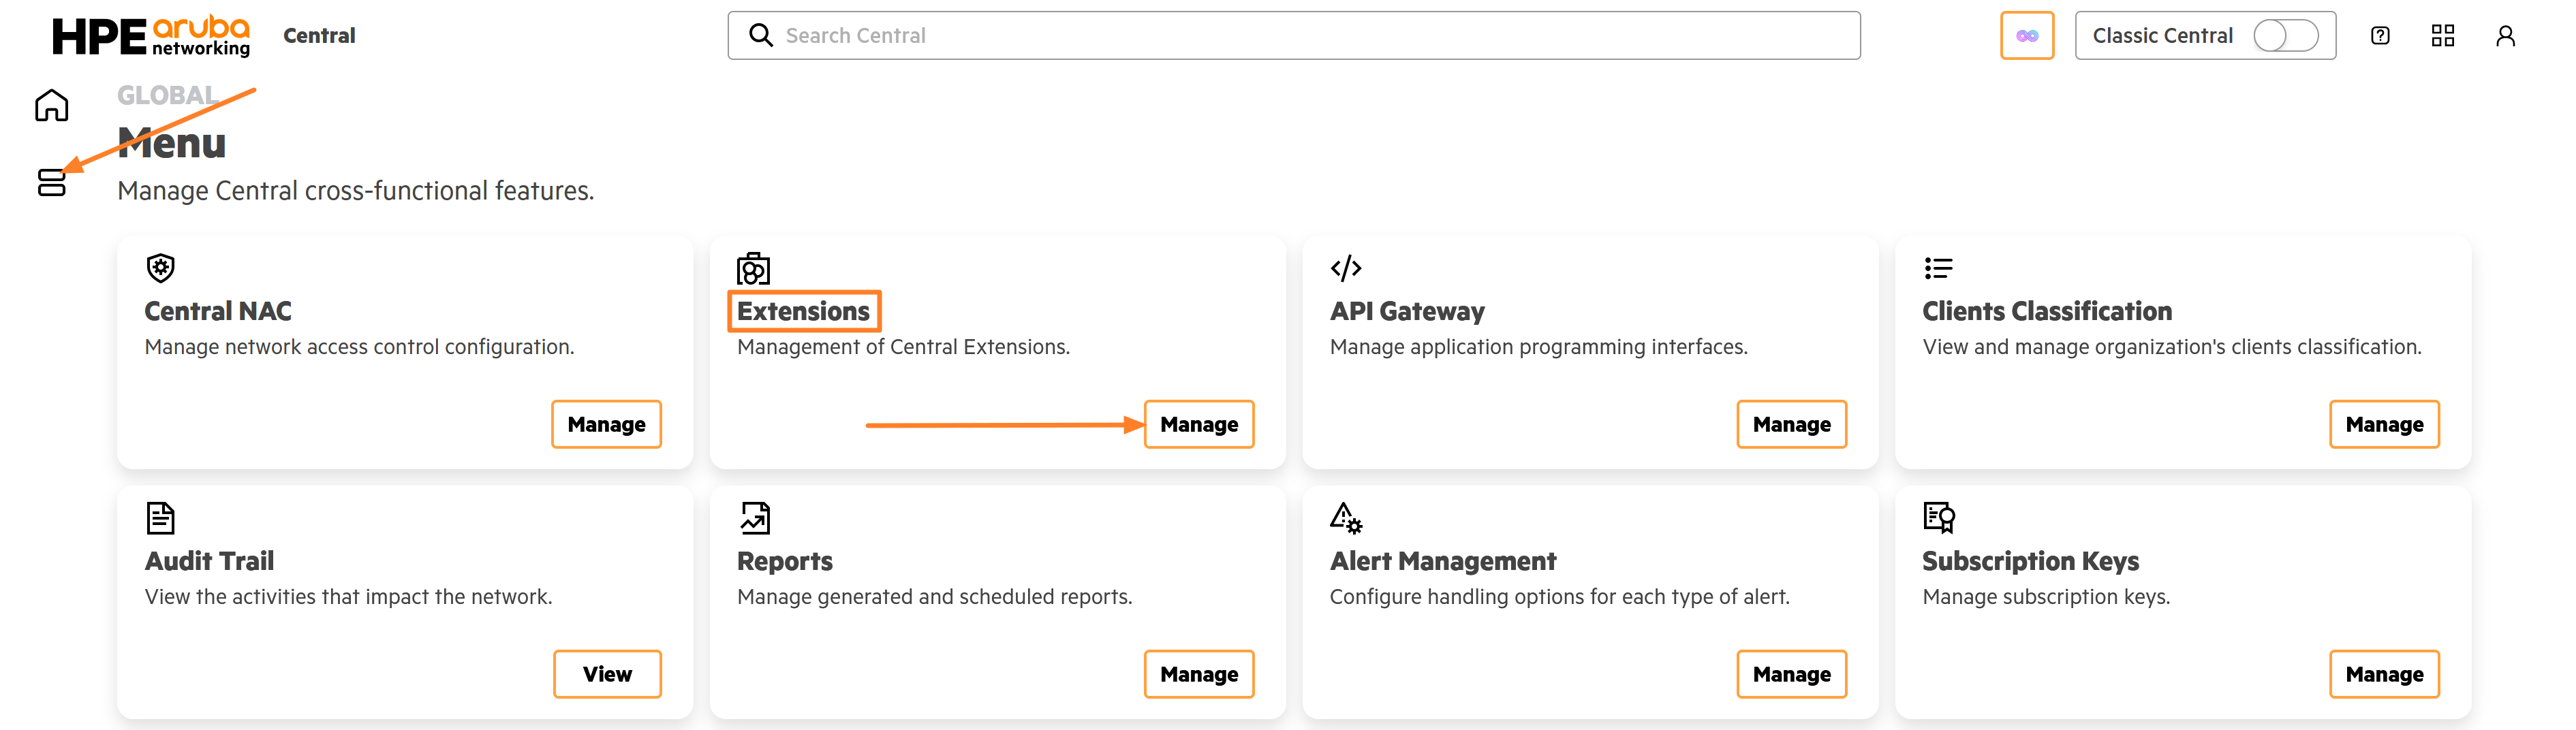
  1. Login to New Central and navigate to Menu > Extensions > Manage


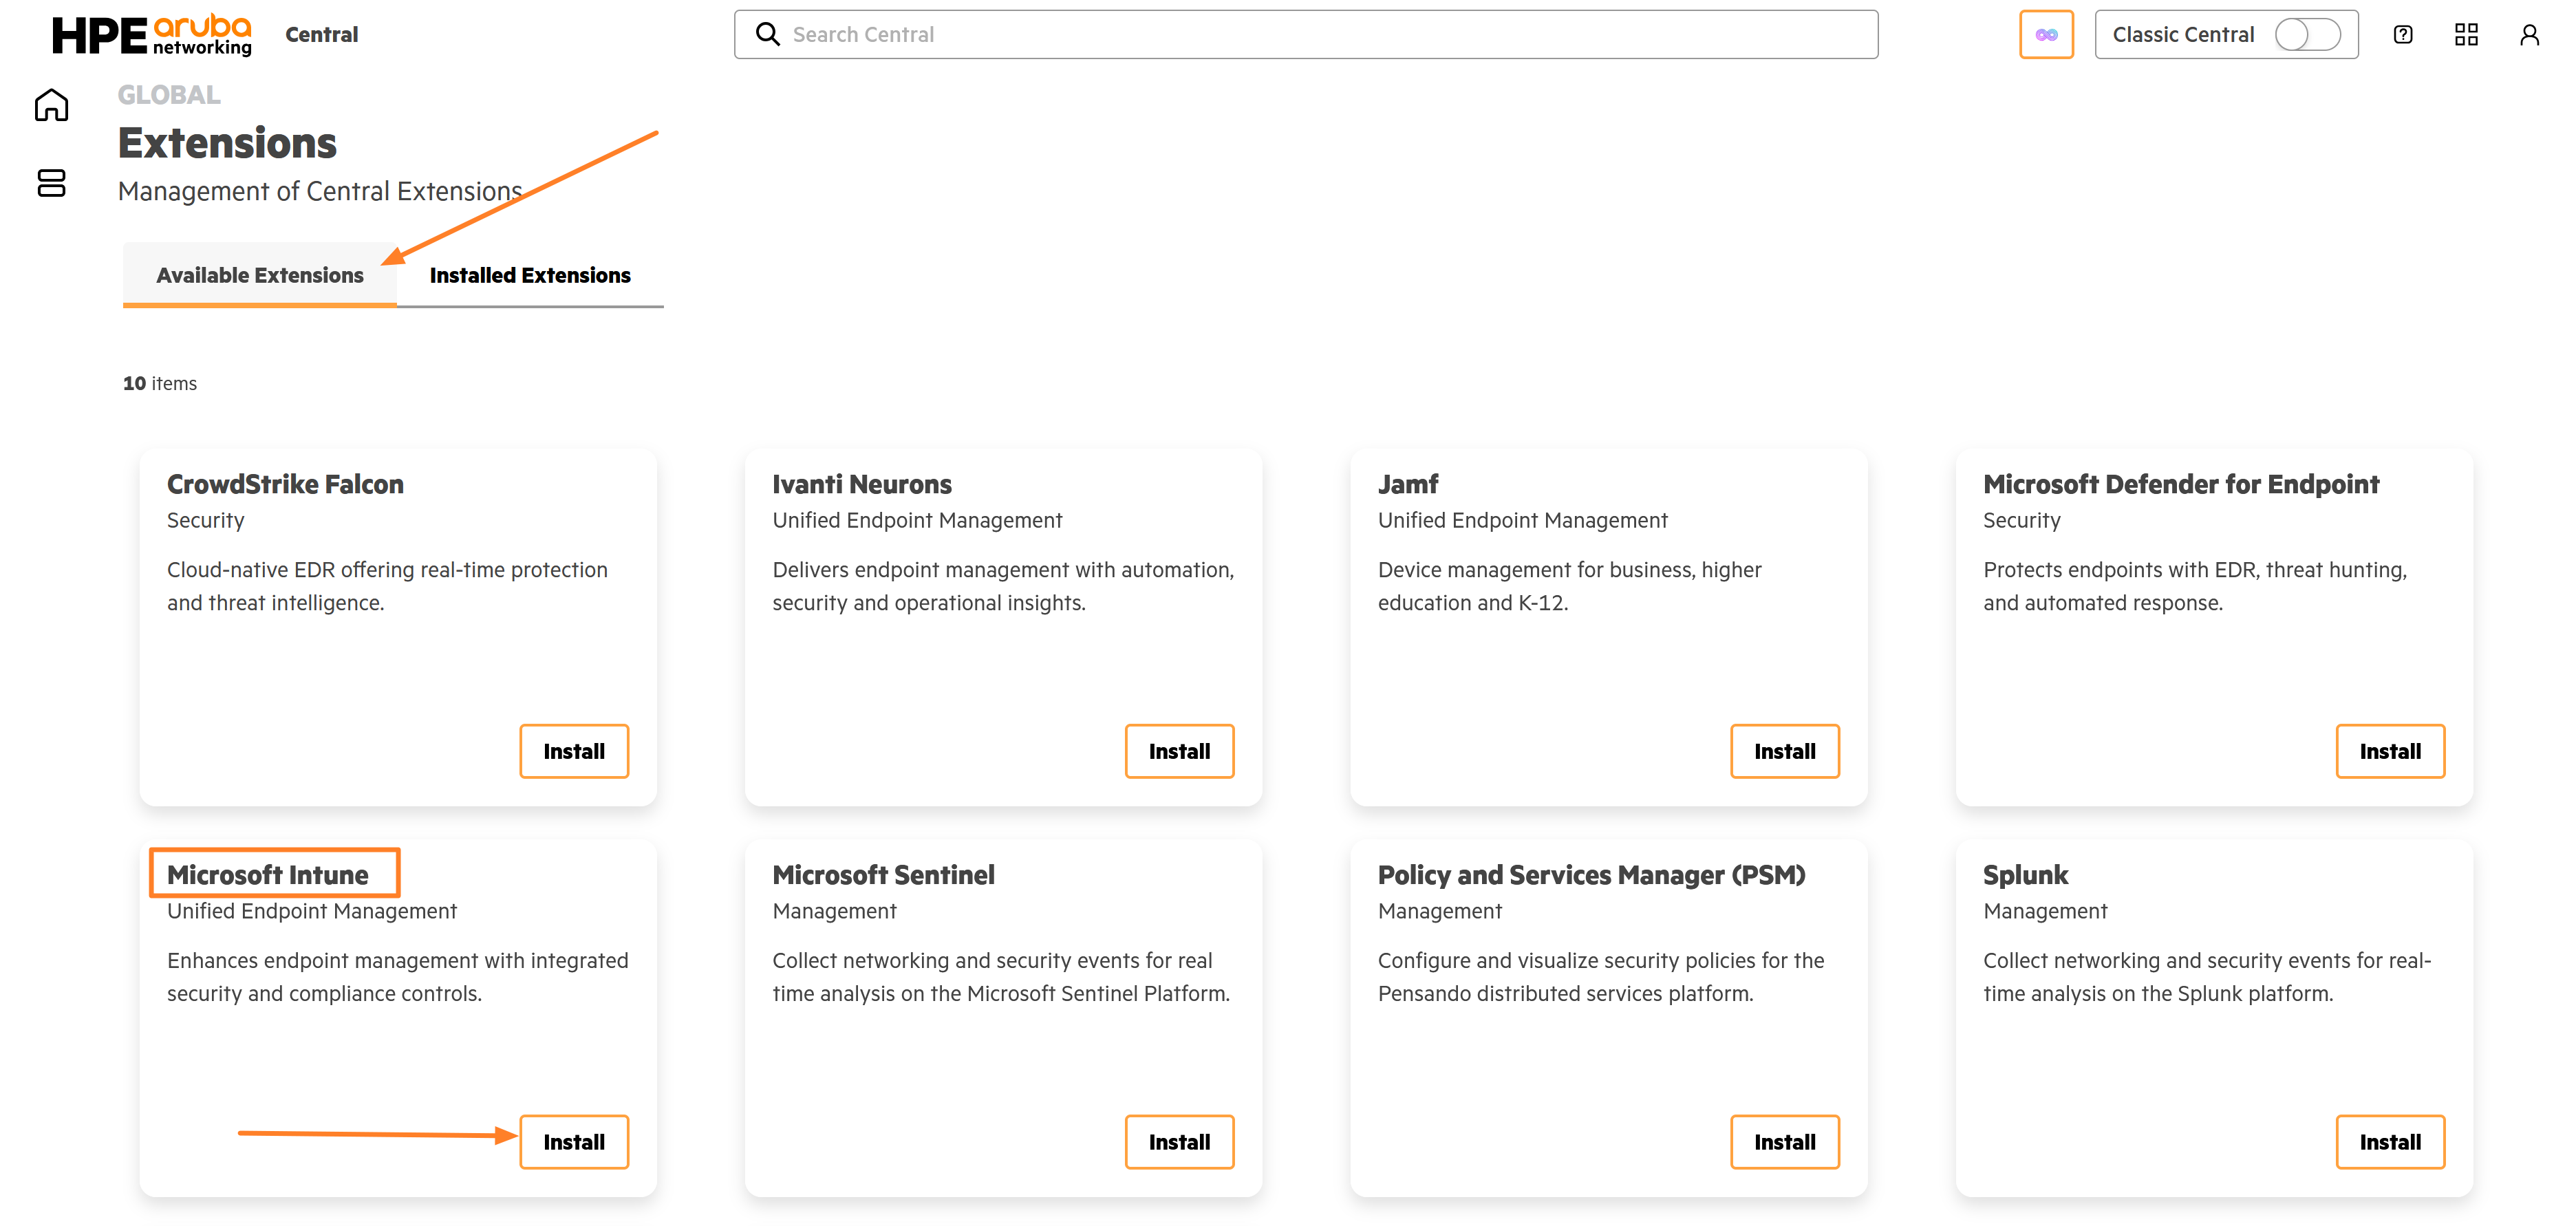
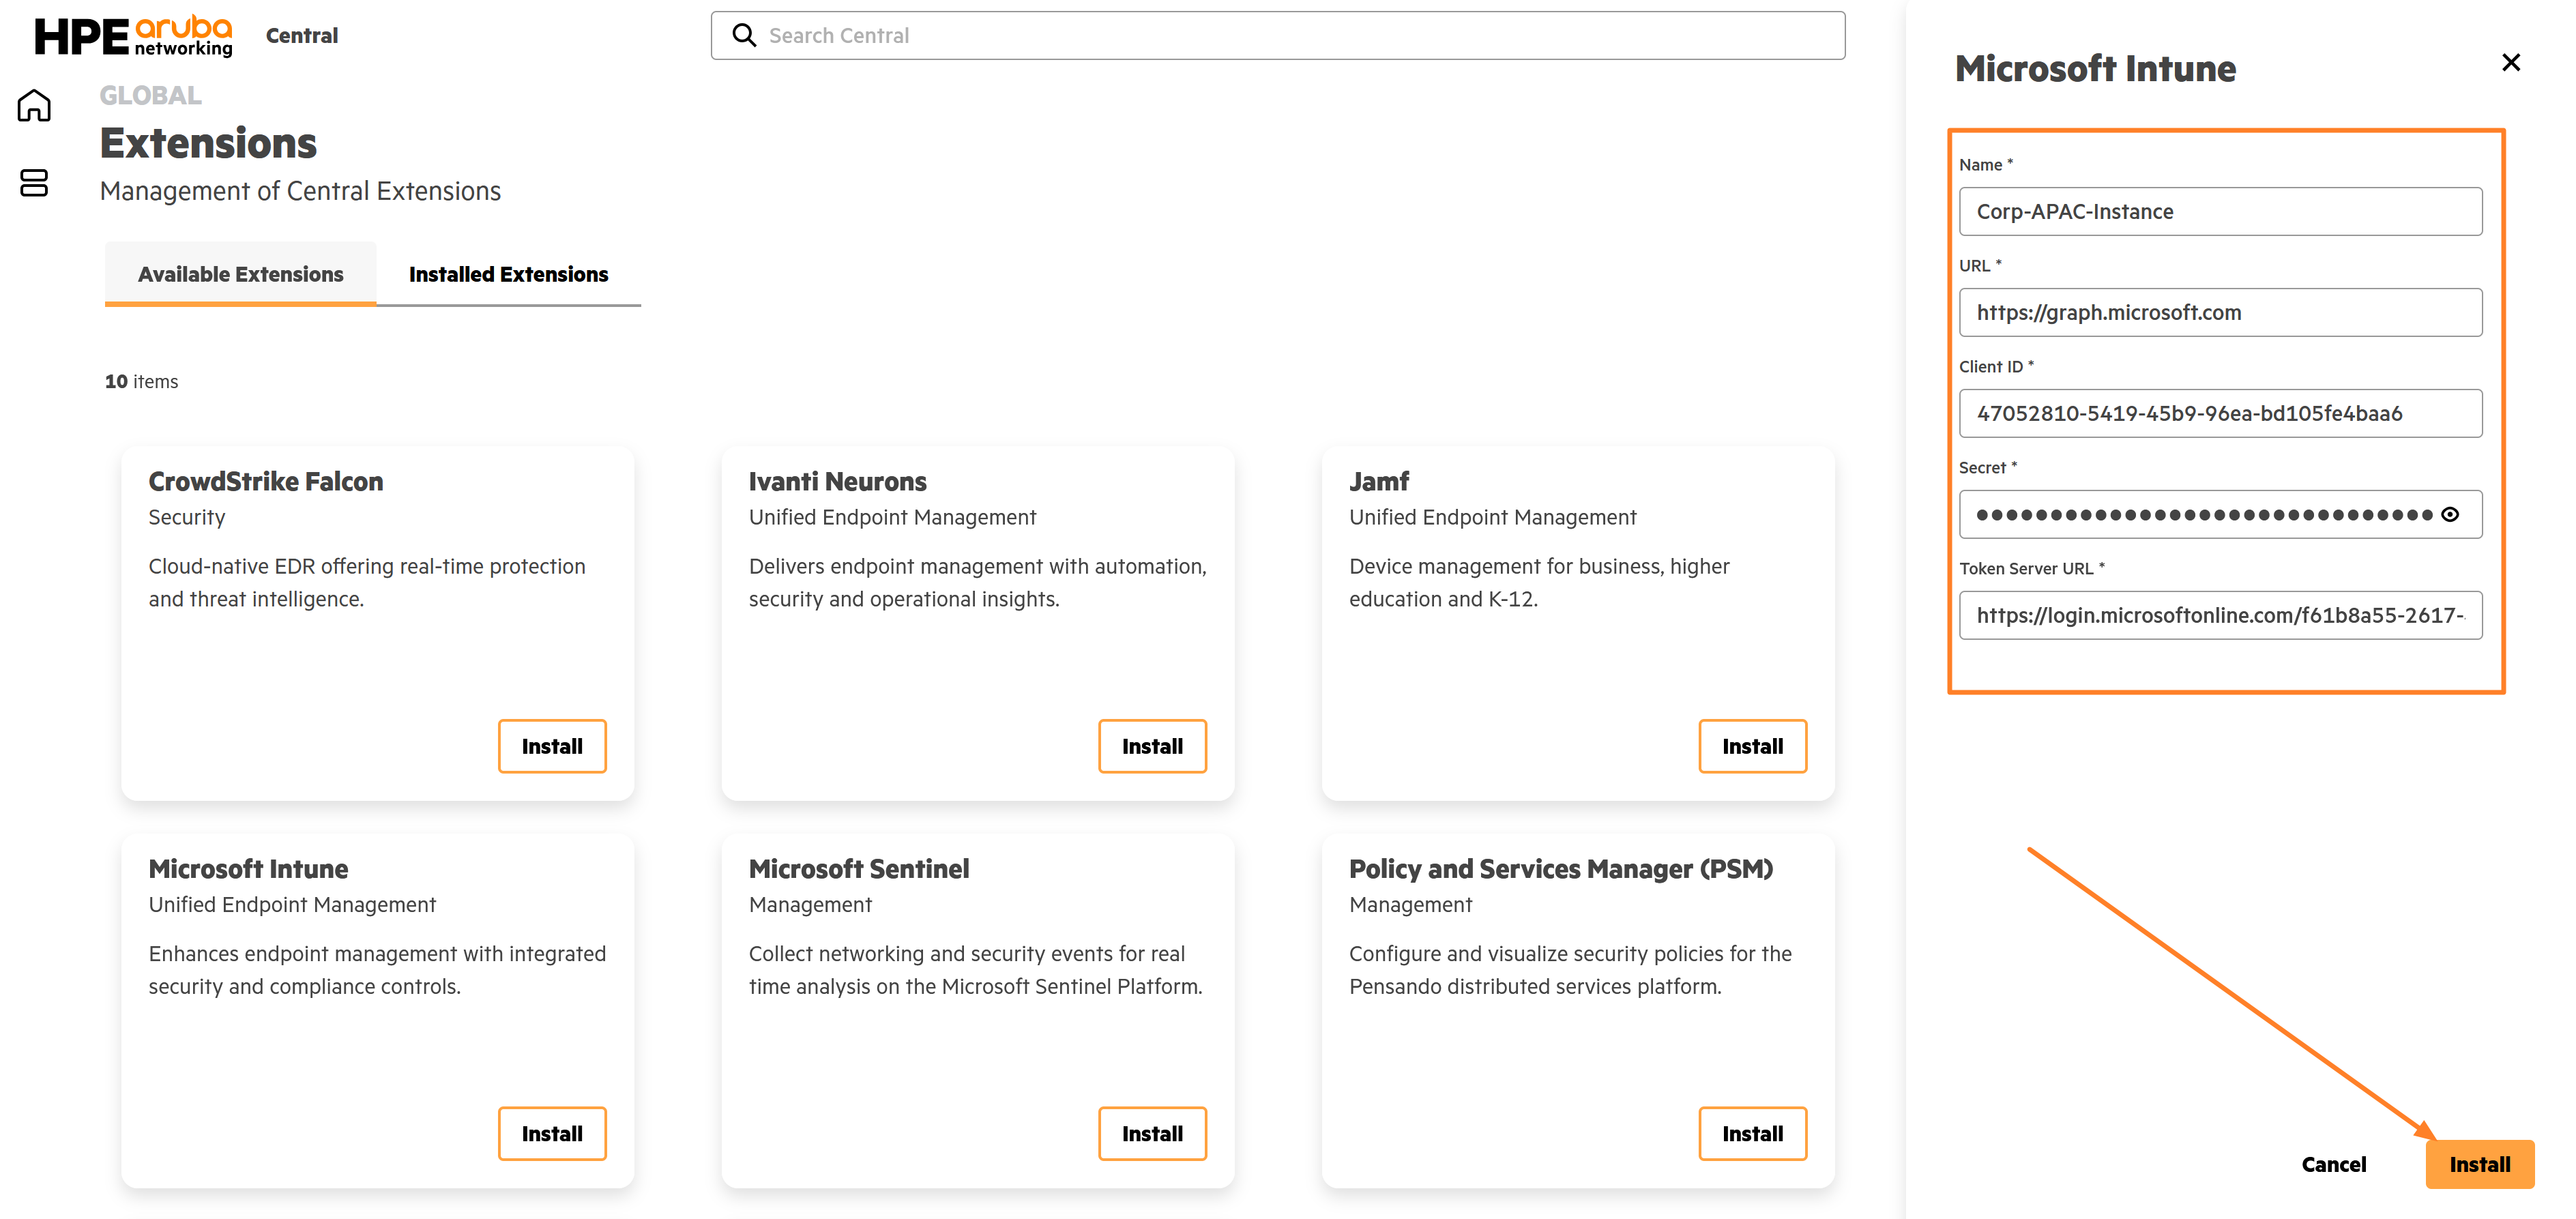
  2. Click on Available Extensions > Microsoft Intune > Install


  3. Fill the below details in the installation window and click on Install

Name → Give a suitable name for the extension instance

URL → Enter https://graph.microsoft.com as the URL value

Client ID → Use the Client ID generated during the application registration process in Microsoft Entra ID.

Secret → Use the Client Secret generated during the application registration process in Microsoft Entra ID.

Token Server URL → Enter https://login.microsoftonline.com/microsoft-entra-tenant-id/oauth2/v2.0/token Replace «microsoft-entra-tenant-id» with the actual tenant-id of your Entra ID tenant.


4 - Okta Workforce Identity Cloud

Adding Okta Workforce Identity Cloud as Identity Provider in New Central

Registering Apps on Okta Workforce Identity Cloud

To configure Okta Workforce Identity Cloud as an identity provider, you must install the following applications.

-Cloud Auth OIDC

-Cloud Auth API Service

Adding Cloud Auth OIDC application

  1. Log in to the Okta Workforce Identity Cloud administration console.

  2. Navigate to the Applications > Browse App Catalog.


  3. Select OIDC in the Functionality section.


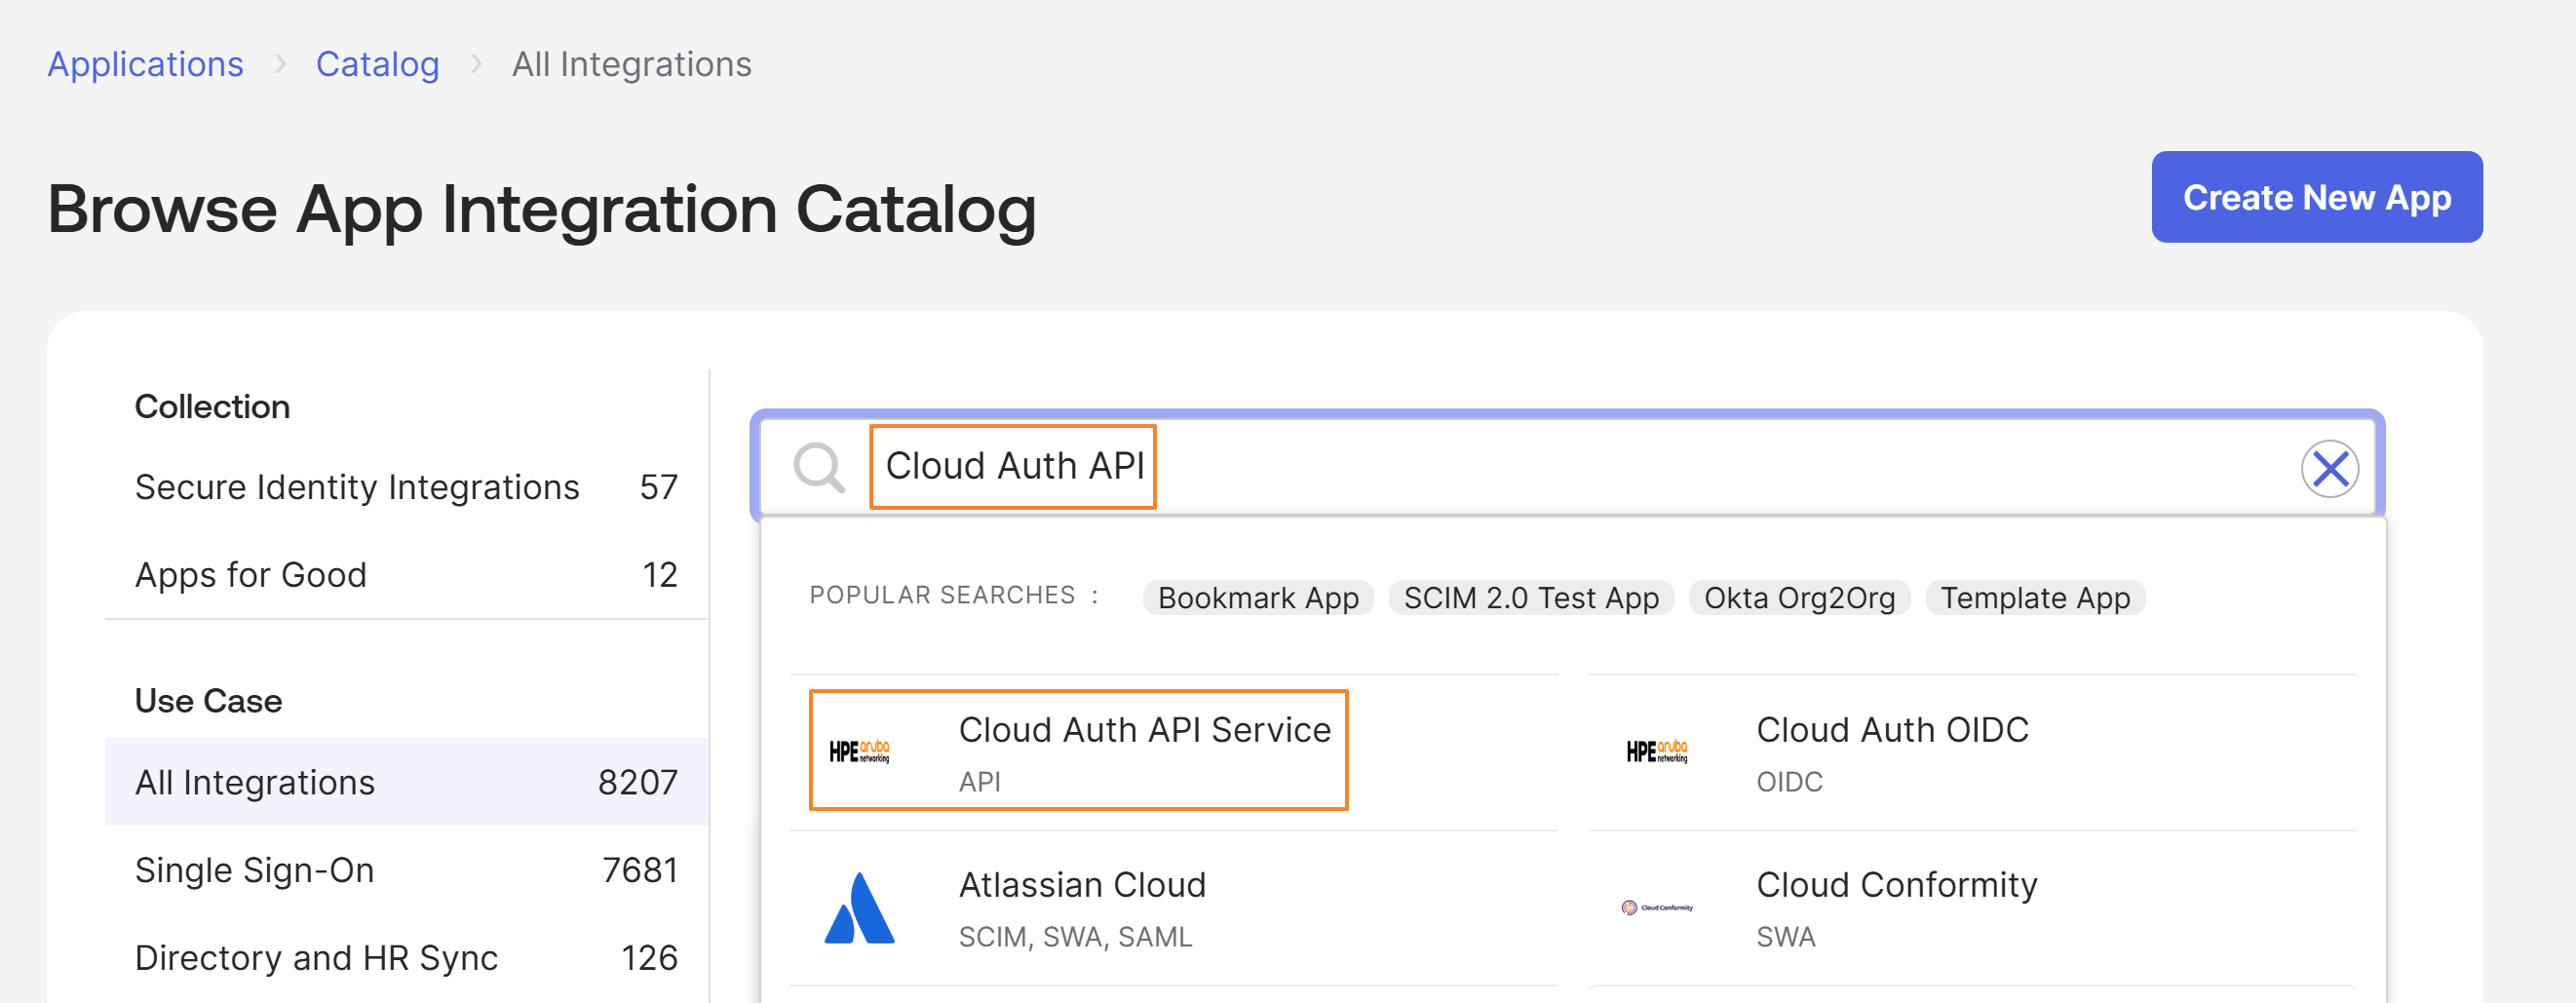
  4. Search for Cloud Auth OIDC and select the Cloud Auth OIDC application.


  5. Select Add Integration and click Done.


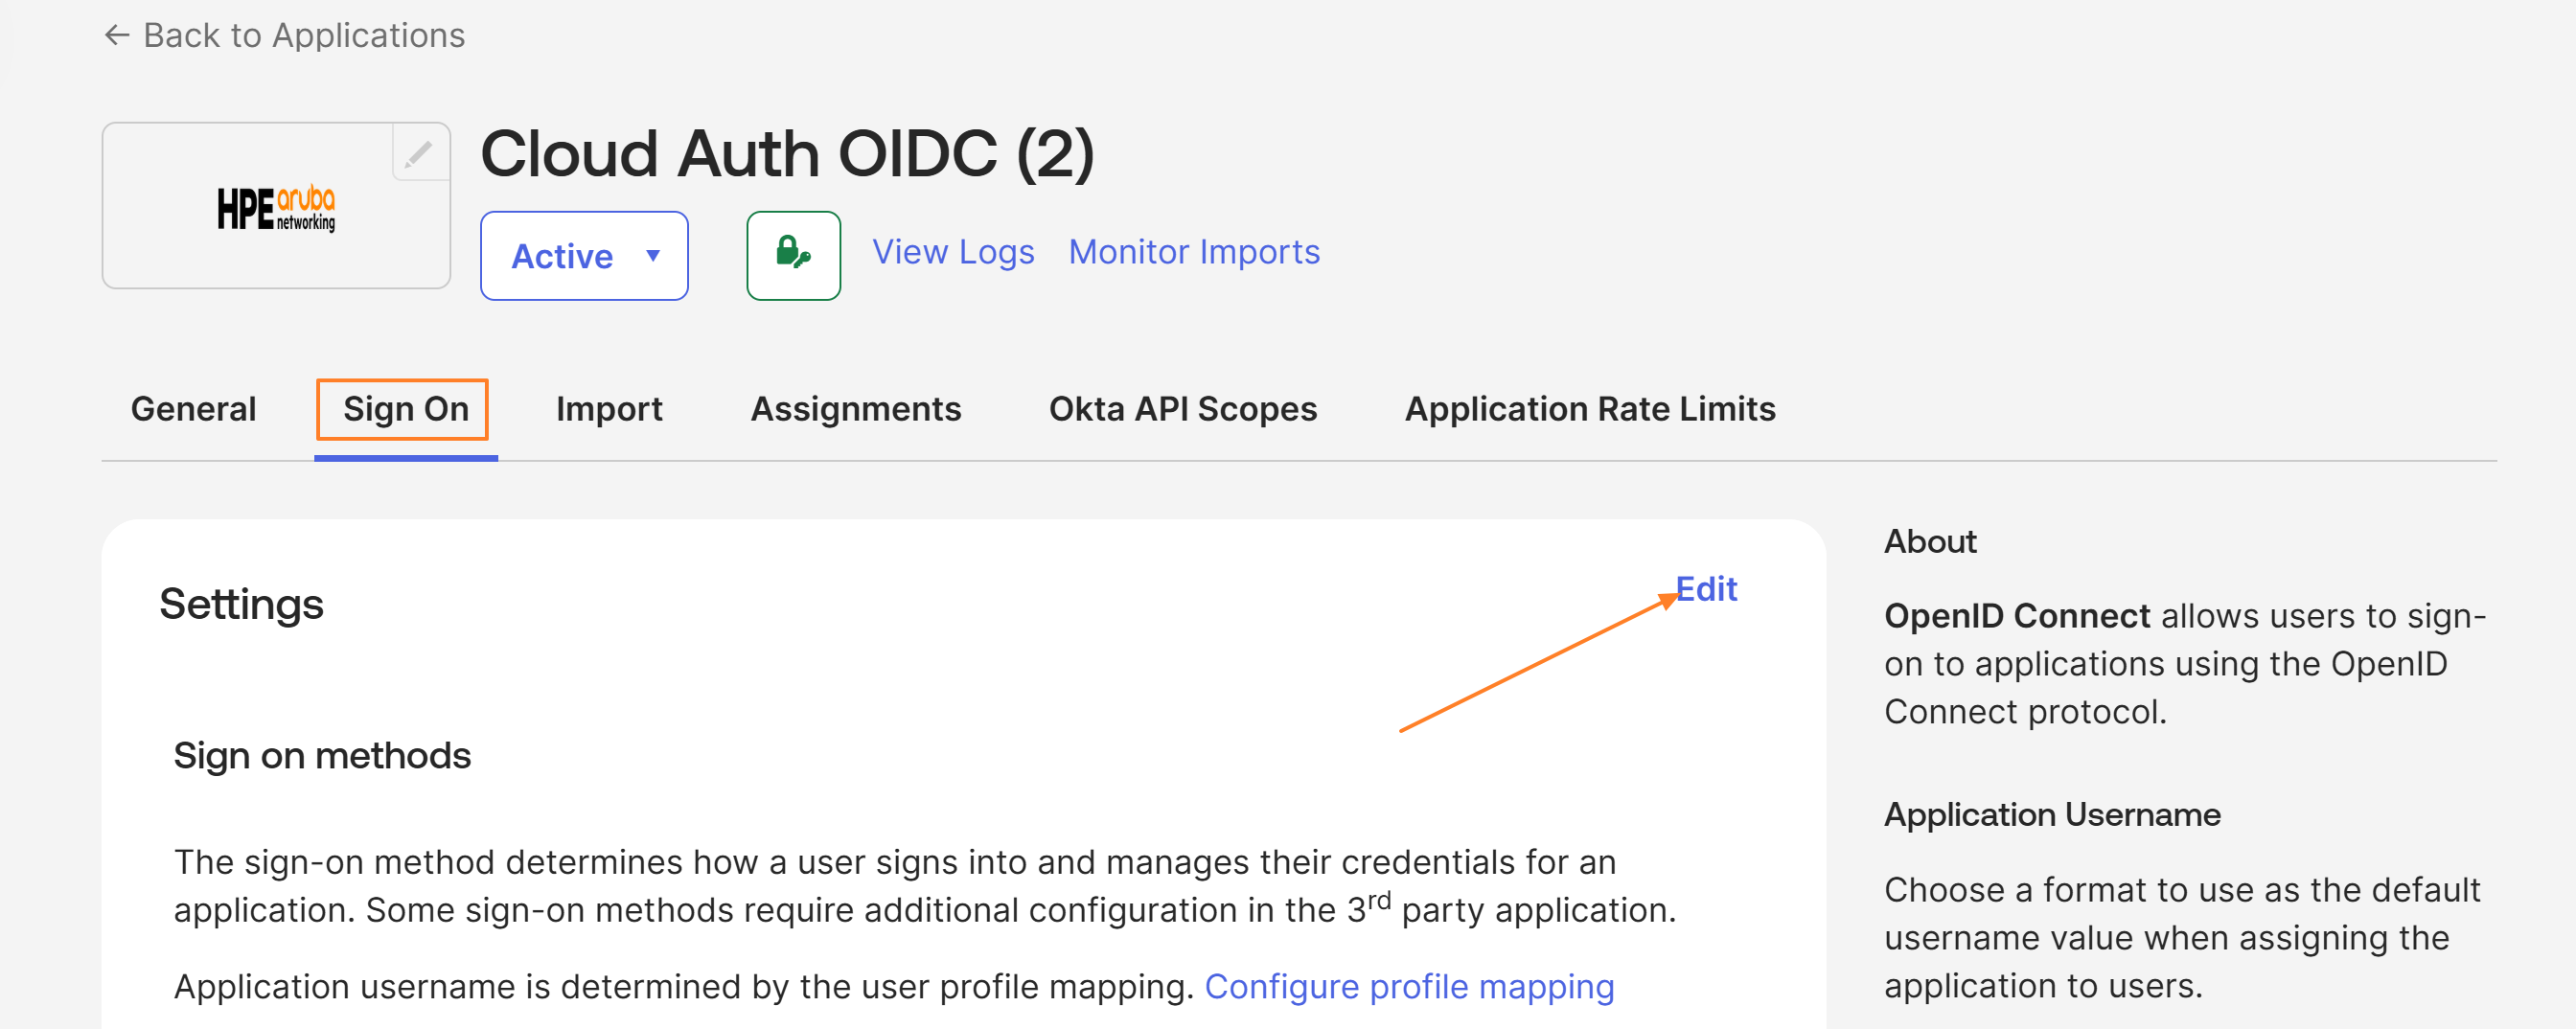
  6. Select Sign On, In the Settings section select Edit.


8.Login to New Central and navigate to Central NAC > Configuration > Identity Management > Create Identity Store.


  1. Choose Okta Workforce Identity Cloud as the Provider and copy the Redirect URI.


  2. In the Okta console, Scroll down to the Advanced Sign-on Settings. Copy the Redirect URI obtained from the Central NAC identity store and paste it in the Redirect URI field and click on Save.


  3. Click on the Assignments tab and go to Assign > Assign to People


INFO

For the Cloud Auth OIDC application to authenticate a user, the user must be assigned the application.You may choose to assign the application to Groups for ease of configuration as selecting every individual user may not be feasible in production Okta tenants.

  1. Search for the User or Group you want to assign the application to and Click Assign > Done.


  2. Click on Sign On and copy the Client ID and Client Secret. This will be used as Client ID and Client Secret when adding Okta Workforce Identity Cloud as an IDP in Central NAC.


Adding Cloud Auth API service

  1. Go to the homepage of your Okta Workforce Identity Cloud administration console.

  2. Navigate to the Applications > Browse App Catalog.


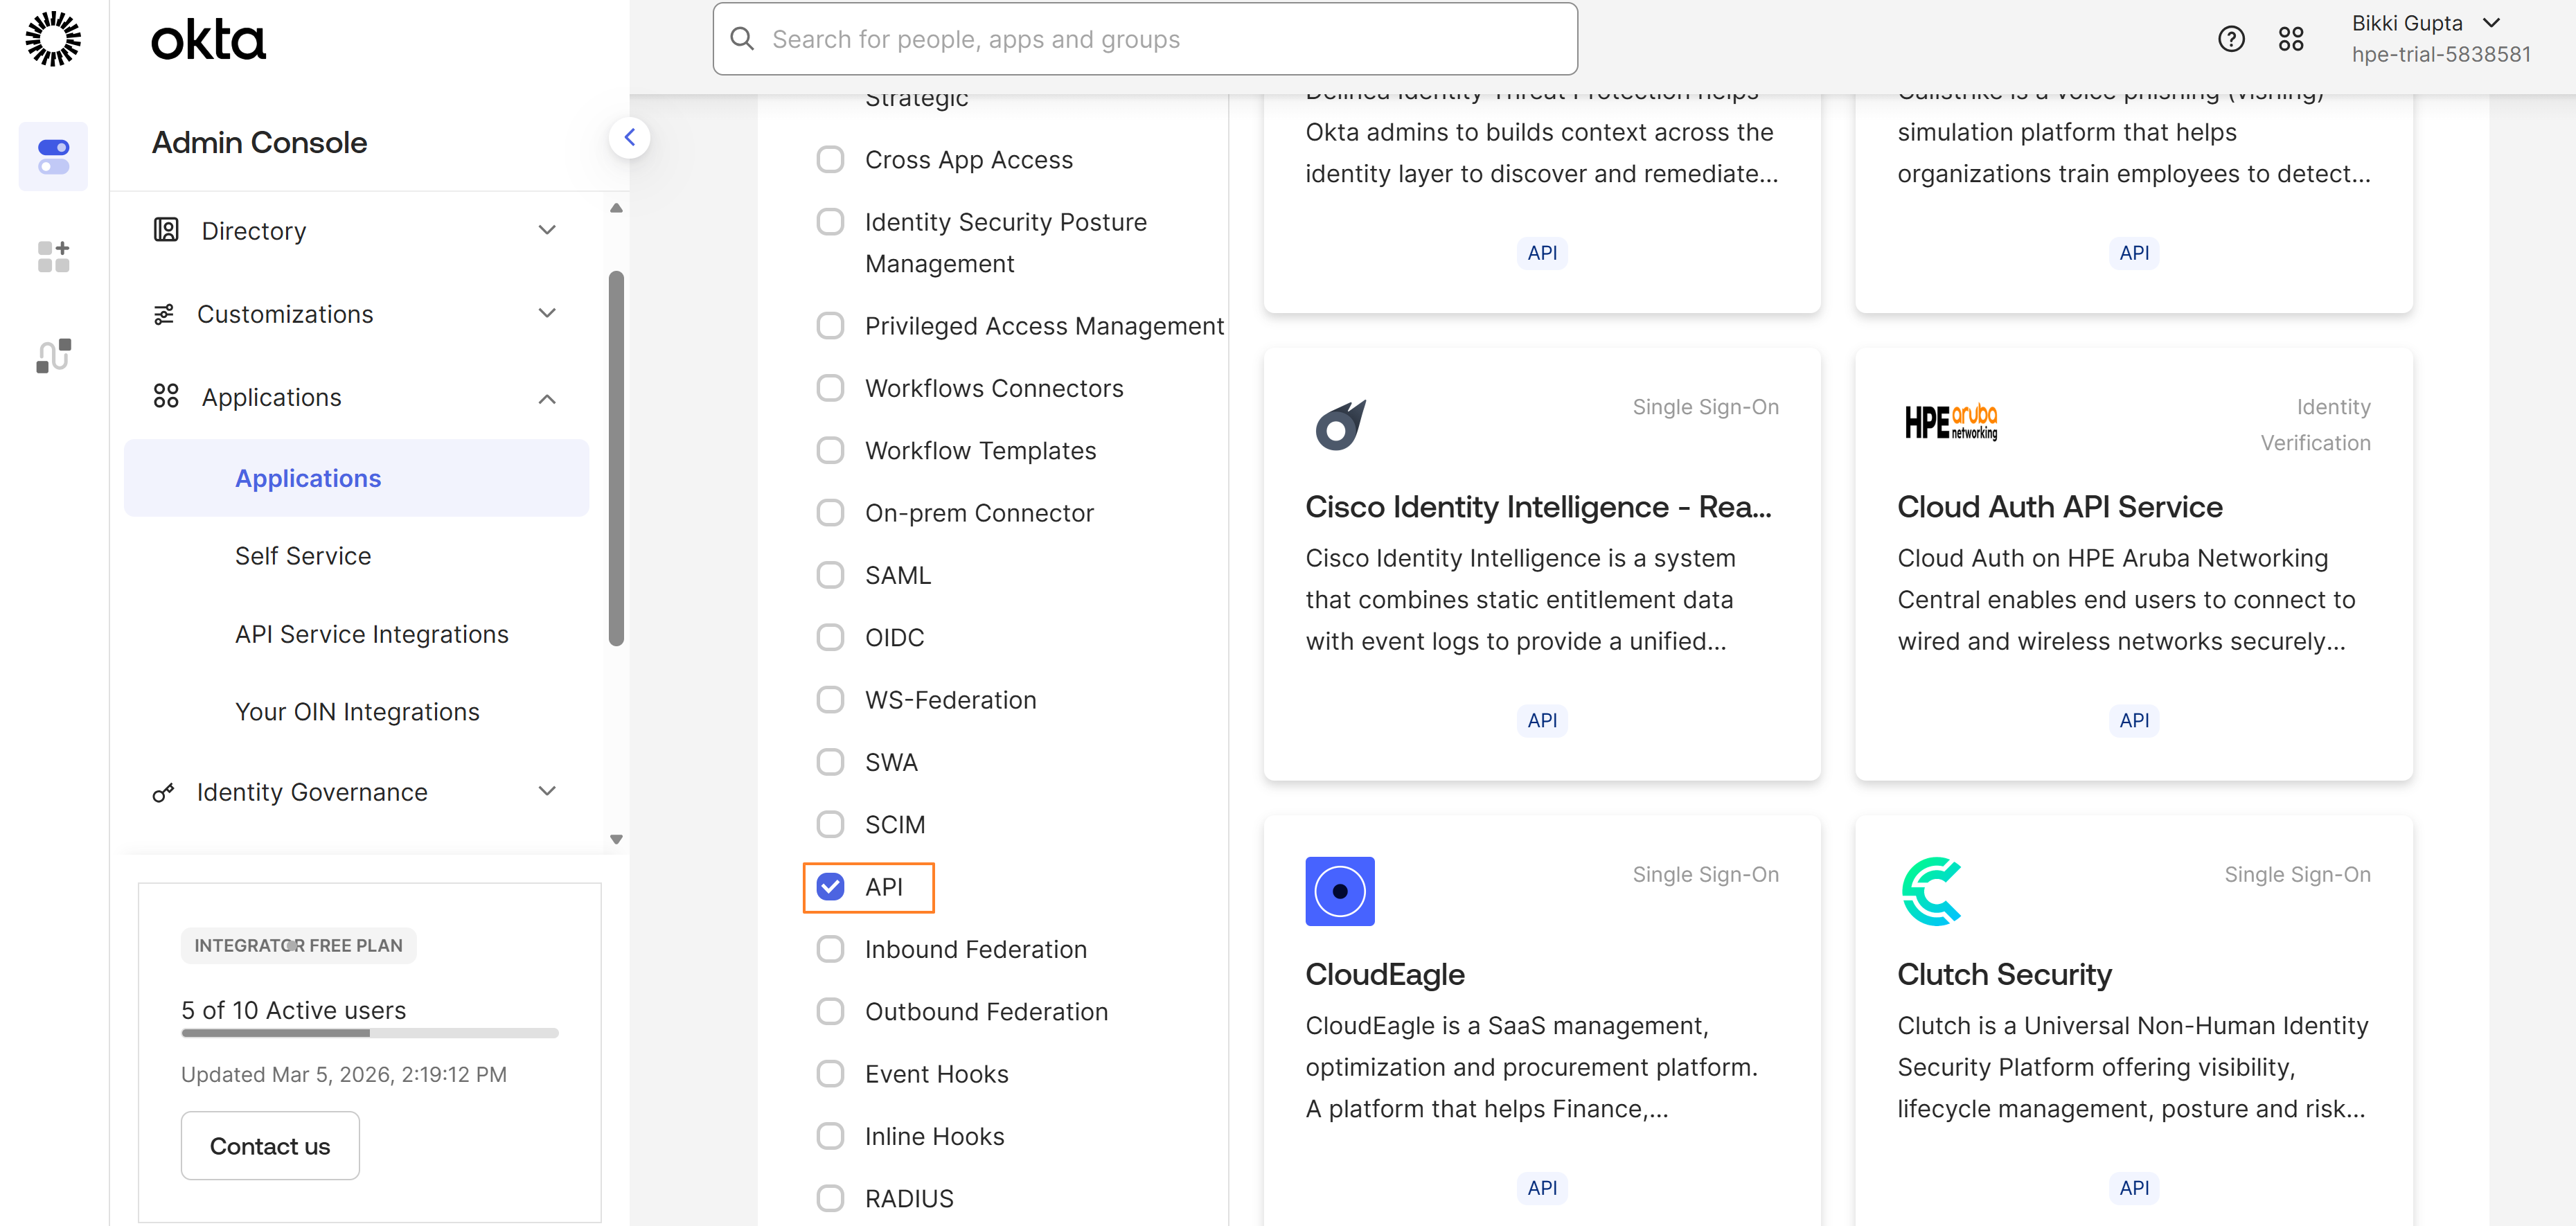
  3. Select API in the Functionality section.


  4. Search for Cloud Auth API Service and select the Cloud Auth API Service application.


  5. Click Add Integration to proceed to the next step.


  6. Click Install & Authorize, The Client Secret is then displayed. Copy it and store it safely as this will later be used as Service Client Secret while adding Okta Workforce Identity Cloud as an IDP in Central NAC.


  7. From the following page, Copy the Okta Domain and Client ID. These will be needed at later steps while while adding Okta Workforce Identity Cloud as an IDP in Central NAC. Client ID copied from here will be used as Service Client ID in Central NAC.


Configuring Okta Workforce Identity Cloud as IDP in Central NAC

  1. Within Central NAC, Navigate to Configuration > Identity Mangement > Manage as shown below.


  2. Click on Create Identity Store to create the IDP


  3. Provide a Name, select Okta Workforce Identity Cloud as the identity provider and fill the form using the Okta Domain, Client IDs and Client Secrets copied earlier from Okta Workforce Identity Cloud.