This is the multi-page printable view of this section. Click here to print.
Integrations
- 1: Certificate Management
- 2: Endpoint Compliance
- 2.1: Tanium
- 2.2: BigFix
- 2.3: CrowdStrike Falcon
- 3: Firewall Context Sharing
- 4: OT/ICS/IIoT/MIoT
- 4.1: SOTI Connect
- 5: Unified Endpoint Management
- 5.1: Jamf Pro
- 5.2: Jamf School
- 5.3: Meraki System Manager
- 5.4: Microsoft Intune
- 5.5: VMware Workspace ONE (Airwatch)
- 5.6: Ivanti MDM (formerly MobileIron)
- 5.7: Mosyle
- 5.8: SOTI MobiControl
- 6: Visitor Management / Webhook Processing
- 6.1: Envoy
- 6.2: SinePro
- 6.3: Teem LobbyConnect
- 6.4: Skyhook Generic Processor
- 7: Multi Factor Authentication
- 7.1: PingID MFA
- 8: Asset Management
- 8.1: Service Now CMDB
- 9: ClearPass Extension
1 - Certificate Management
1.1 - Certificate Enrollment Manager
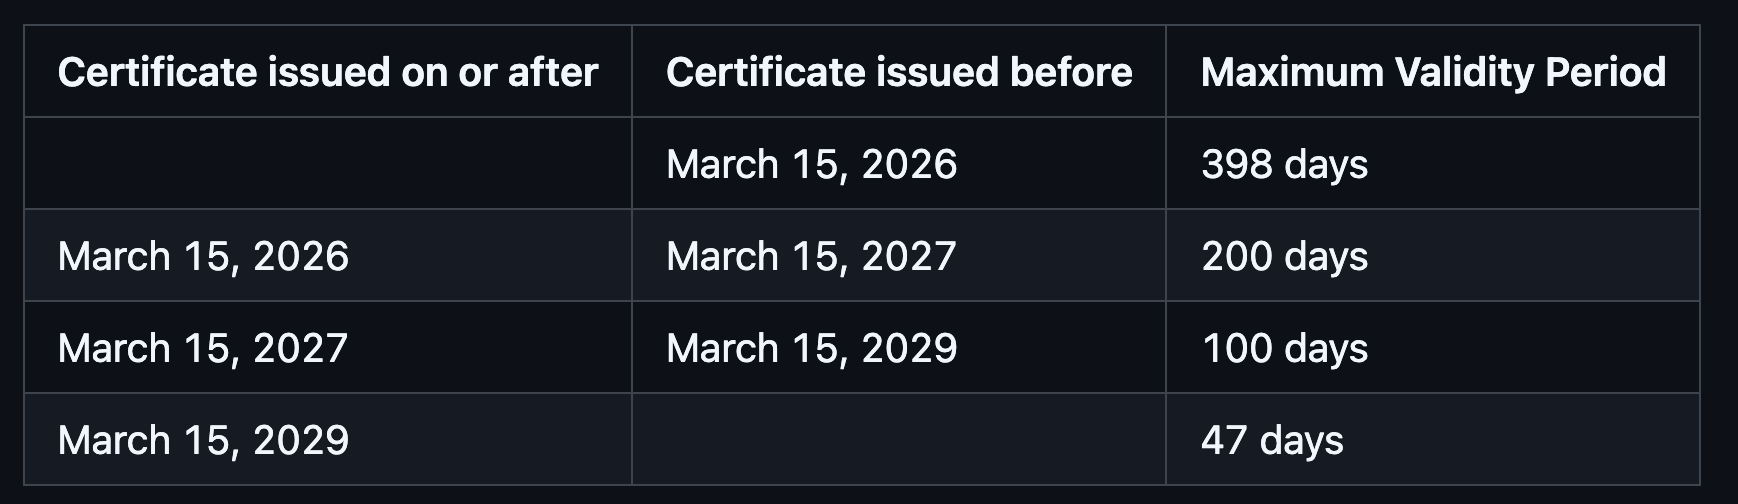
Public TLS certificate lifetimes have been steadily decreasing as part of an industry-wide effort to strengthen internet security and improve the reliability of certificate management. Historically, publicly trusted TLS certificates could be issued with lifetimes of several years, but these limits have been progressively reduced through policies defined by the CA/Browser Forum and enforced by major browser vendors such as Apple, Google, and Mozilla. As of March 2026, the maximum validity period for publicly trusted TLS certificates has been reduced to 200 days, reflecting an ongoing industry trend toward shorter certificate lifecycle to reduce the risk associated with compromised keys, outdated cryptographic parameters, or changes in domain ownership. The CA/Browser Forum has officially set a schedule for shortening the lifetime of TLS certificates as shown in the table below.
A ClearPass deployment typically relies on server certificates for multiple services, including management access to ClearPass over HTTPS, captive portal logins over HTTPS, 802.1X authentication using different EAP methods like EAP-TLS, PEAP, etc., and secure RADIUS (RadSec) transport using RADIUS over TLS. Especially the HTTPS certs in most cases are publicly trusted so that devices connecting to guest network can validate the identity of the ClearPass servers without requiring custom trust configuration. As certificate lifetimes become shorter, the frequency with which these server certificates must be renewed and redeployed across ClearPass clusters correspondingly increases.
Managing these certificate renewals manually can introduce operational risk. If a certificate expires or is not updated consistently across all nodes in a ClearPass cluster, services such as administrative HTTPS access, guest portals, or certificate-based network authentication may fail. In environments that use RadSec to securely transport RADIUS traffic between network devices and authentication servers, an expired certificate could also disrupt authentication requests between network access devices and the RADIUS infrastructure.
For this reason, implementing an automated certificate lifecycle management process is becoming increasingly important for systems like ClearPass. Automated mechanisms allow certificates to be requested, renewed, and deployed before expiration, reducing the risk of service interruptions. Modern certificate automation protocols such as Automated Certificate Management Environment(ACME), Enrollment over Secure Transport(EST), Secure Certificate Enrollment Protocol(SCEP), and enterprise certificate lifecycle platforms can help organizations maintain valid certificates across HTTPS, RADIUS, and RadSec services while minimizing operational overhead and ensuring compliance with evolving public certificate lifetime requirements.
Certificate Enrollment Manager (CEM) Extension
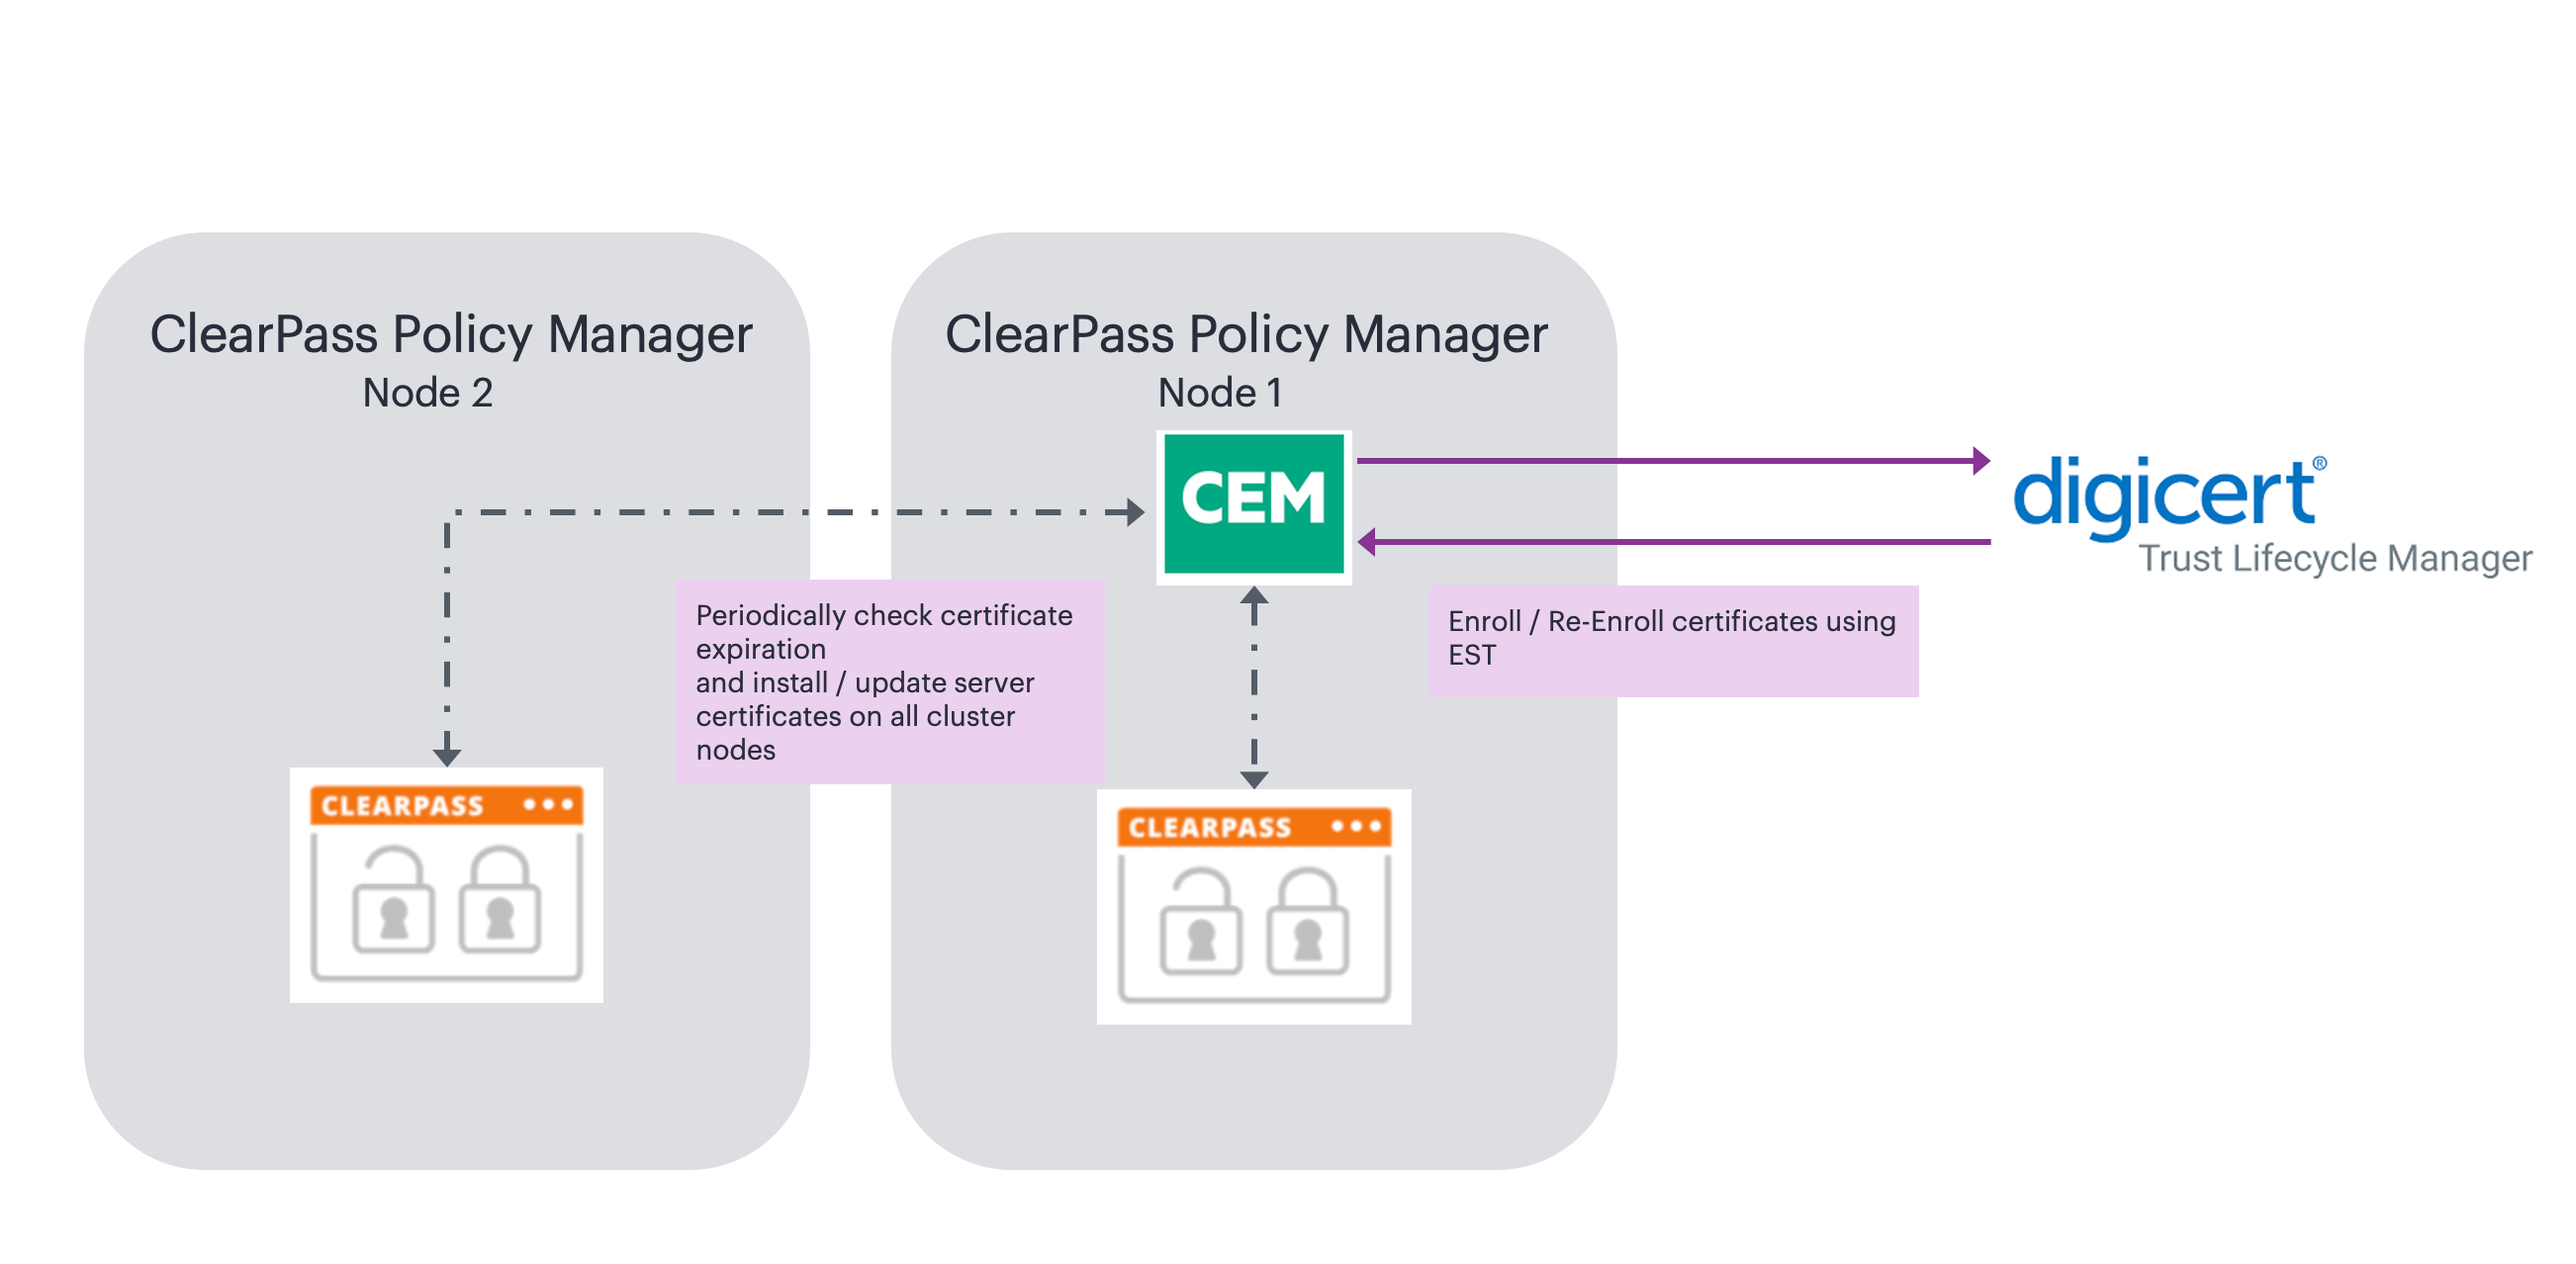
Certificate Enrollment Manager (CEM) Extension provides an extensible way to integrate with different enterprise certificate lifecycle management platforms using EST / SCEP protocols and REST APIs to automatically renew the server certificates in ClearPass. Although the enrollment protocols like EST and SCEP are standardized, the implementation between different vendors have differences in terms of the URLs, authentication methods and types of certificates issued. Hence support for each CA vendor has to be validated separately.
The extension only needs to be installed on any one of the ClearPass nodes in the cluster and it can monitor the HTTPS / RADIUS / RadSec certificates on all the cluster nodes and trigger enrollment / re-enrollment appropriately. The extension can be installed on any ClearPass node in the cluster regardless of whether its the publisher, standby publisher, subscriber or dedicated insight node.
 INFO
INFO
The first iteration of CEM extension adds support for automatic enrollment and renewal of certificates issued by DigiCert Trust Lifecycle Manager (TLM) using EST protocol framework.
How integration with DigiCert TLM works
DigiCert Trust Lifecycle Manager is a digital trust solution for CA-agnostic certificate management and PKI services. Trust Lifecycle Manager centralizes visibility and control over an organization’s certificate landscape, reduces risk of business disruption from certificate expiration or human error, streamlines operations with automation and configurable workflows, and increases agility for fast remediation or adaptation to changes in cybersecurity standards.
DigiCert Trust Lifecycle Manager supports EST to provide secure, automated certificate enrollment across diverse devices and applications. With EST, organizations gain standards-based enrollment, renewal, and revocation workflows, reducing human error while ensuring scalable trust management in hybrid IT environments. Trust Lifecycle Manager’s EST protocol implementation is based on IETF’s RFC7030 EST standard.
With EST based enrollment, all operations are submitted over HTTPS and DigiCert TLM supports the issuance of both RSA and ECDSA certificates. The EST service supports the following operations/client requests:
cacerts: To obtain the CA certificates and establish the trust anchor.
simpleenroll: To enroll new end-entity certificates.
simplereenroll: To renew existing end-entity certificates.
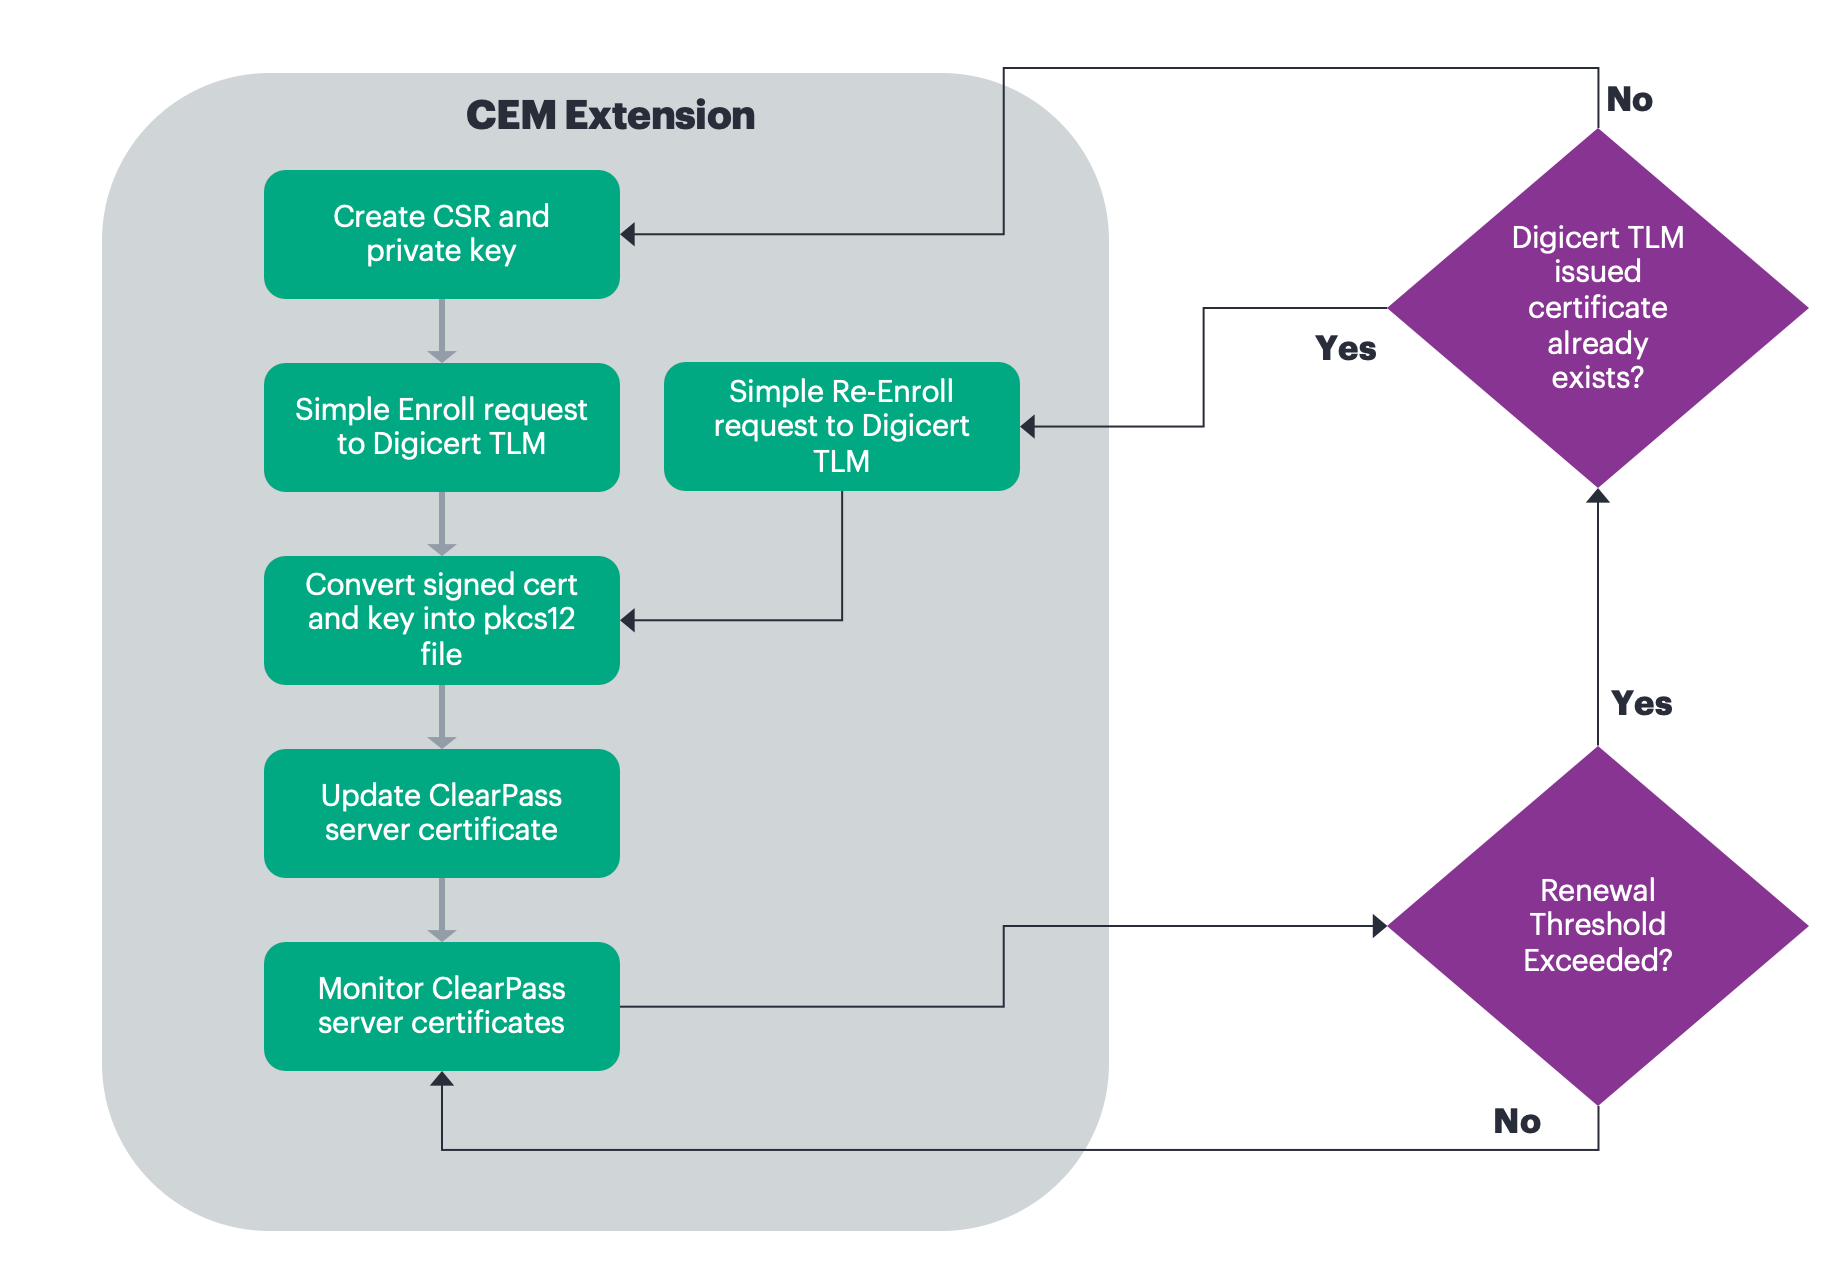
CEM extension uses EST protocol to enroll new certificates and to renew existing ones. It can be configured to enroll / re-enroll the certificates at startup or based on certificate validity checks done periodically.
INFO
The very first time the extension runs, it does a full enrollment by requesting for a new certificate from DigiCert TLM. The subsequent runs would only do a renewal or re-enrollment. Even if the extension were to be restarted or backed up and restored, it would remember the previous state and perform only re-enrollment.
If the extension were to be deleted and re-installed, it would do a full enrollment, the first time.
Software Requirements
The minimum software version required for CPPM is 6.11.0 . At the time of writing, version 6.11.10 is available as the long supported release and 6.12.4 is available as the short supported release. CPPM runs on hardware appliances with pre-installed software or as a Virtual Machine under the following hypervisors. Hypervisors that run on a client computer such as VMware Player are not supported.
-
VMware vSphere Hypervisor (ESXi) 7.0 U3c and 8.0
-
Windows Server 2019 with Hyper‑V and Windows Server 2022 with Hyper‑V.
-
KVM on CentOS Stream 8, CentOS Stream 9, Ubuntu 20.04 LTS, and Ubuntu 22.04 LTS.
ClearPass Installation and Deployment Guide
This document assumes your ClearPass environment is already configured and operational. If you require assistance with basic deployment, refer to the following deployment guide:
https://arubanetworking.hpe.com/techdocs/ClearPass/6.11/Installation-Guide/Default.htm
ClearPass Extensions
The integration between ClearPass Policy Manager and external systems is driven through a ClearPass capability known as Extensions, a sub-component of the ClearPass Exchange Integration framework. ClearPass Extensions are micro-services running on top of the base ClearPass platform. These micro-services enable HPE Aruba Networking to deliver new features outside of the main software release cycle and facilitate a faster time to market for specific features and integrations. Configuration and control of ClearPass Extensions is accomplished through the ClearPass Guest GUI, as covered later in this document.
Installing Extension
ClearPass Extensions are easy to install from the ClearPass Extensions Store. In a cluster, ClearPass Extensions can be installed on a subscriber independently of the publisher. Multiple copies of the same extension can be installed if needed as well.
INFO
Internet access is required for ClearPass Policy Manager to install the ClearPass Extensions from the Extension Store. Starting with ClearPass 6.12, extensions can be can be installed offline as well. Offline ClearPass Extension images are available on HPE networking support portal.
Access to the extension store
Access the Extension Store to download and install ClearPass extensions. The Extension store utilizes the same HPE Passport account credentials used to validate support entitlement in the Software Updates Por- tal. This is configured under Administration > Agents and Software Updates > Software Updates as shown below. Ensure that valid HPE Passport credentials have been entered in these fields to enable Ex- tension download capabilities.

Installing the Extension from Store
Extensions are installed from the extension page in ClearPass Guest, as shown below. Access it from Guest > Administration > Extensions

From here, click on ‘Install Extension’, and the search box below appears.

Enter “Intune” and click on ‘Search’, see the example below.
INFO
Here we are using Intune as an example. The installation steps are the same for all the extensions. For your deployment, please search for the appropriate extension like Jamf, Mosyle, Crowdstrike, etc.
All currently available extensions are listed in the page: https://www.arubanetworks.com/techdocs/NAC/clearpass/integrations/clearpass-extension/extensions-list/

Click on the extension name and then click “Install.”

In the “Install Extension” dialog box, set the IP address if necessary, as described in section “Extensions and IP address configuration support” below. Do not check the box to start the extension at this time. Click the “Install” button.

In this example, we’ve not entered an IP address for the extension to use, if there is intent to use the extension as an authorization source set this value and ensure its set the same on all nodes where the Extension is deployed.
The extension will download and appear in a “Stopped” state. Notice the options to Start, Delete, Reinstall, Show Logs, and view Configuration. Click on “Configuration” to view settings.
After the extension has been installed, proceed to configure the extension

A copy of the default Extension configuration is shown above, this will need to be modified for your deployment.
INFO
Password and sensitive configuration items are obfuscated when presented in both the Extension GUI or in the Explorer configuration.
 WARNING
The configuration attributes are case sensitive. It is recommended to refer the default configuration sample while editing your configuration.
Extensions and web proxy support
Extensions support communications with 3rd parties via a web proxy. This adds incremental proxy functionality. If a proxy is defined in ClearPass Policy Manager, then an extension will inherit that configuration. See later in the document on how to disable the proxy inherited configuration.
INFO
Note that the Policy Manger web proxy configuration is ONLY read by the extension at installation time. If the web proxy configuration is changed in Policy Manager, then the extension must be re-installed so the new settings are re-read and bonded to the extension.
Extensions and IP address configuration support
ClearPass uses a non-externally routed IP address range to communicate with the Extension. The default is 172.17.0.0/16. You may configure a different range, if desired. This is especially useful when deploying extensions across nodes within a cluster where there is the requirement for a fixed consistent IP address for the extension across the cluster.
Changing the “Extensions Network Address” range is only necessary if either the ClearPass MGMT or DATA interface are using an IP address in the extension default range of 172.17.x.x/12, or if ClearPass needs to communicate with some external device in that range.
To Configure the base Extension IP subnet within Policy Manager navigate to Administration > Server Manager > Server Configuration [chose your node] Service Parameters [ClearPass system service].
INFO
The subnet defined here for the extension framework must fall within the following subnet range 10.0.0.0/8, 172.16.0.0/12, 192.168.0.0/16 as defined by RFC1918. For best results, set the network address range to a subnet that does not exist in your enterprise, and restart the extension service for this change to take effect.
Never set the DATA or MGMT IP address to use an address that matches the Extension Network

INFO
Note that changing the extension base IP address will require the extension service to be restarted.
Configuring DigiCert TLM
These are the configuration steps required on DigiCert TLM to setup auto enrollment for certificates. Log into DigiCert ONE and open Digicert Trust Lifecycle Manager to complete the configuration steps below.
Add Trusted Root CA
EST enrollment uses either an enrollment code or client certificate for authentication. The re-enroll functionality mandates using a client certificate for authentication and hence a certificate with EKU TLS Client Authentication is required to authenticate the enrollment request. This client certificate can be created in many different ways. Some options are:
- Generate a client certificate from DigiCert TLM
- Generate a client certificate from ClearPass Onboard
- Generate a client certificate using openssl
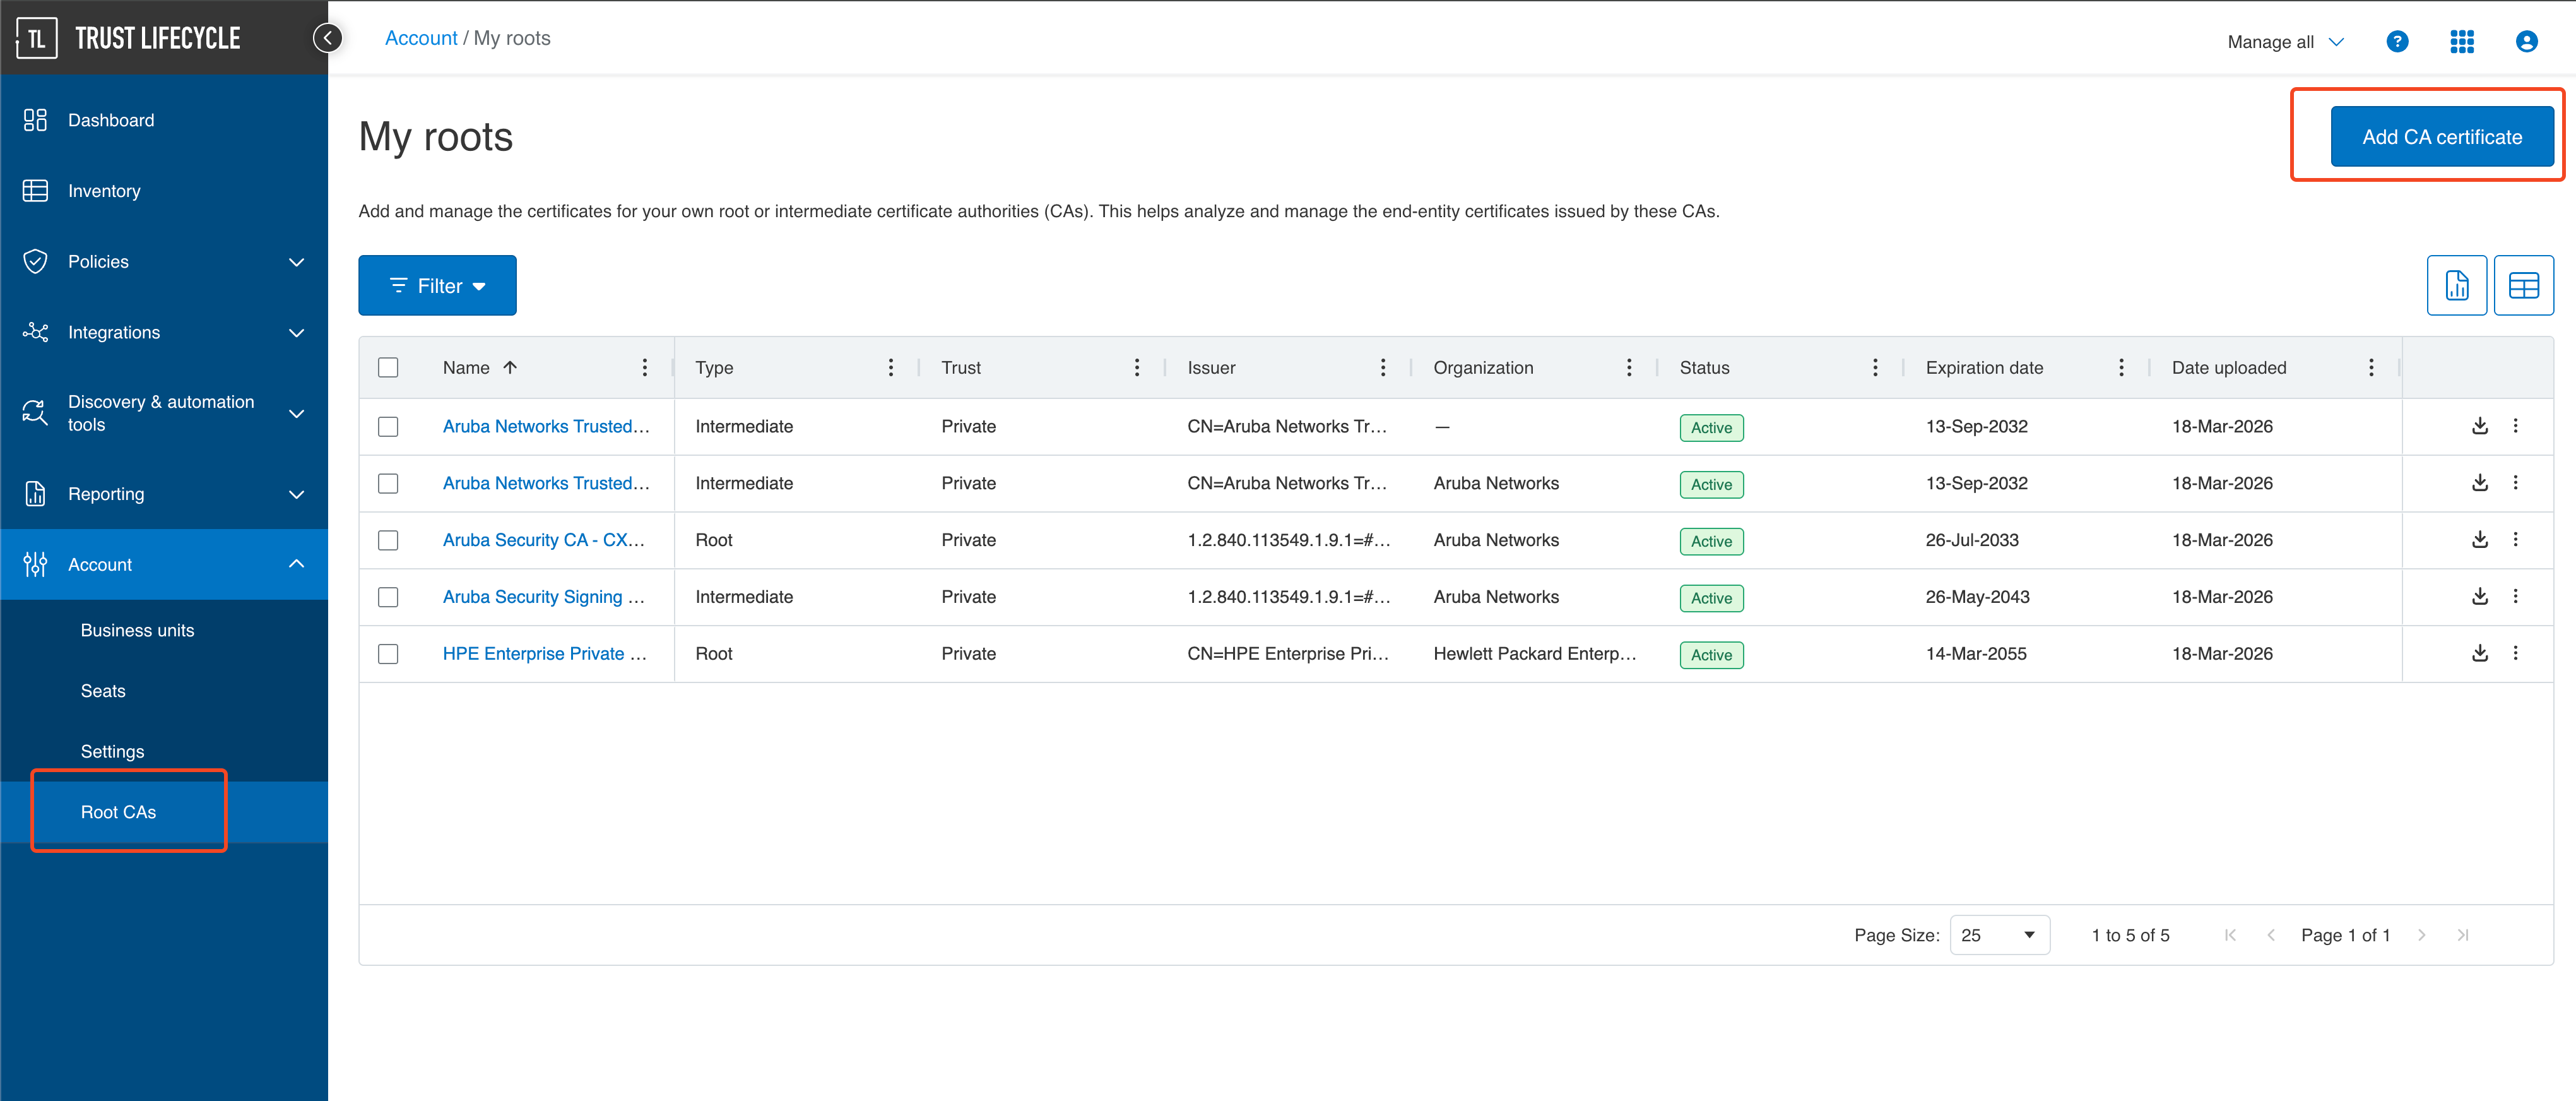
The root CA that issued the client certificate needs to be uploaded to Digicert TLM as a trust certificate authority.
Navigate to Account > Root CAs and add the CA certificate.
Configure Certificate Profile
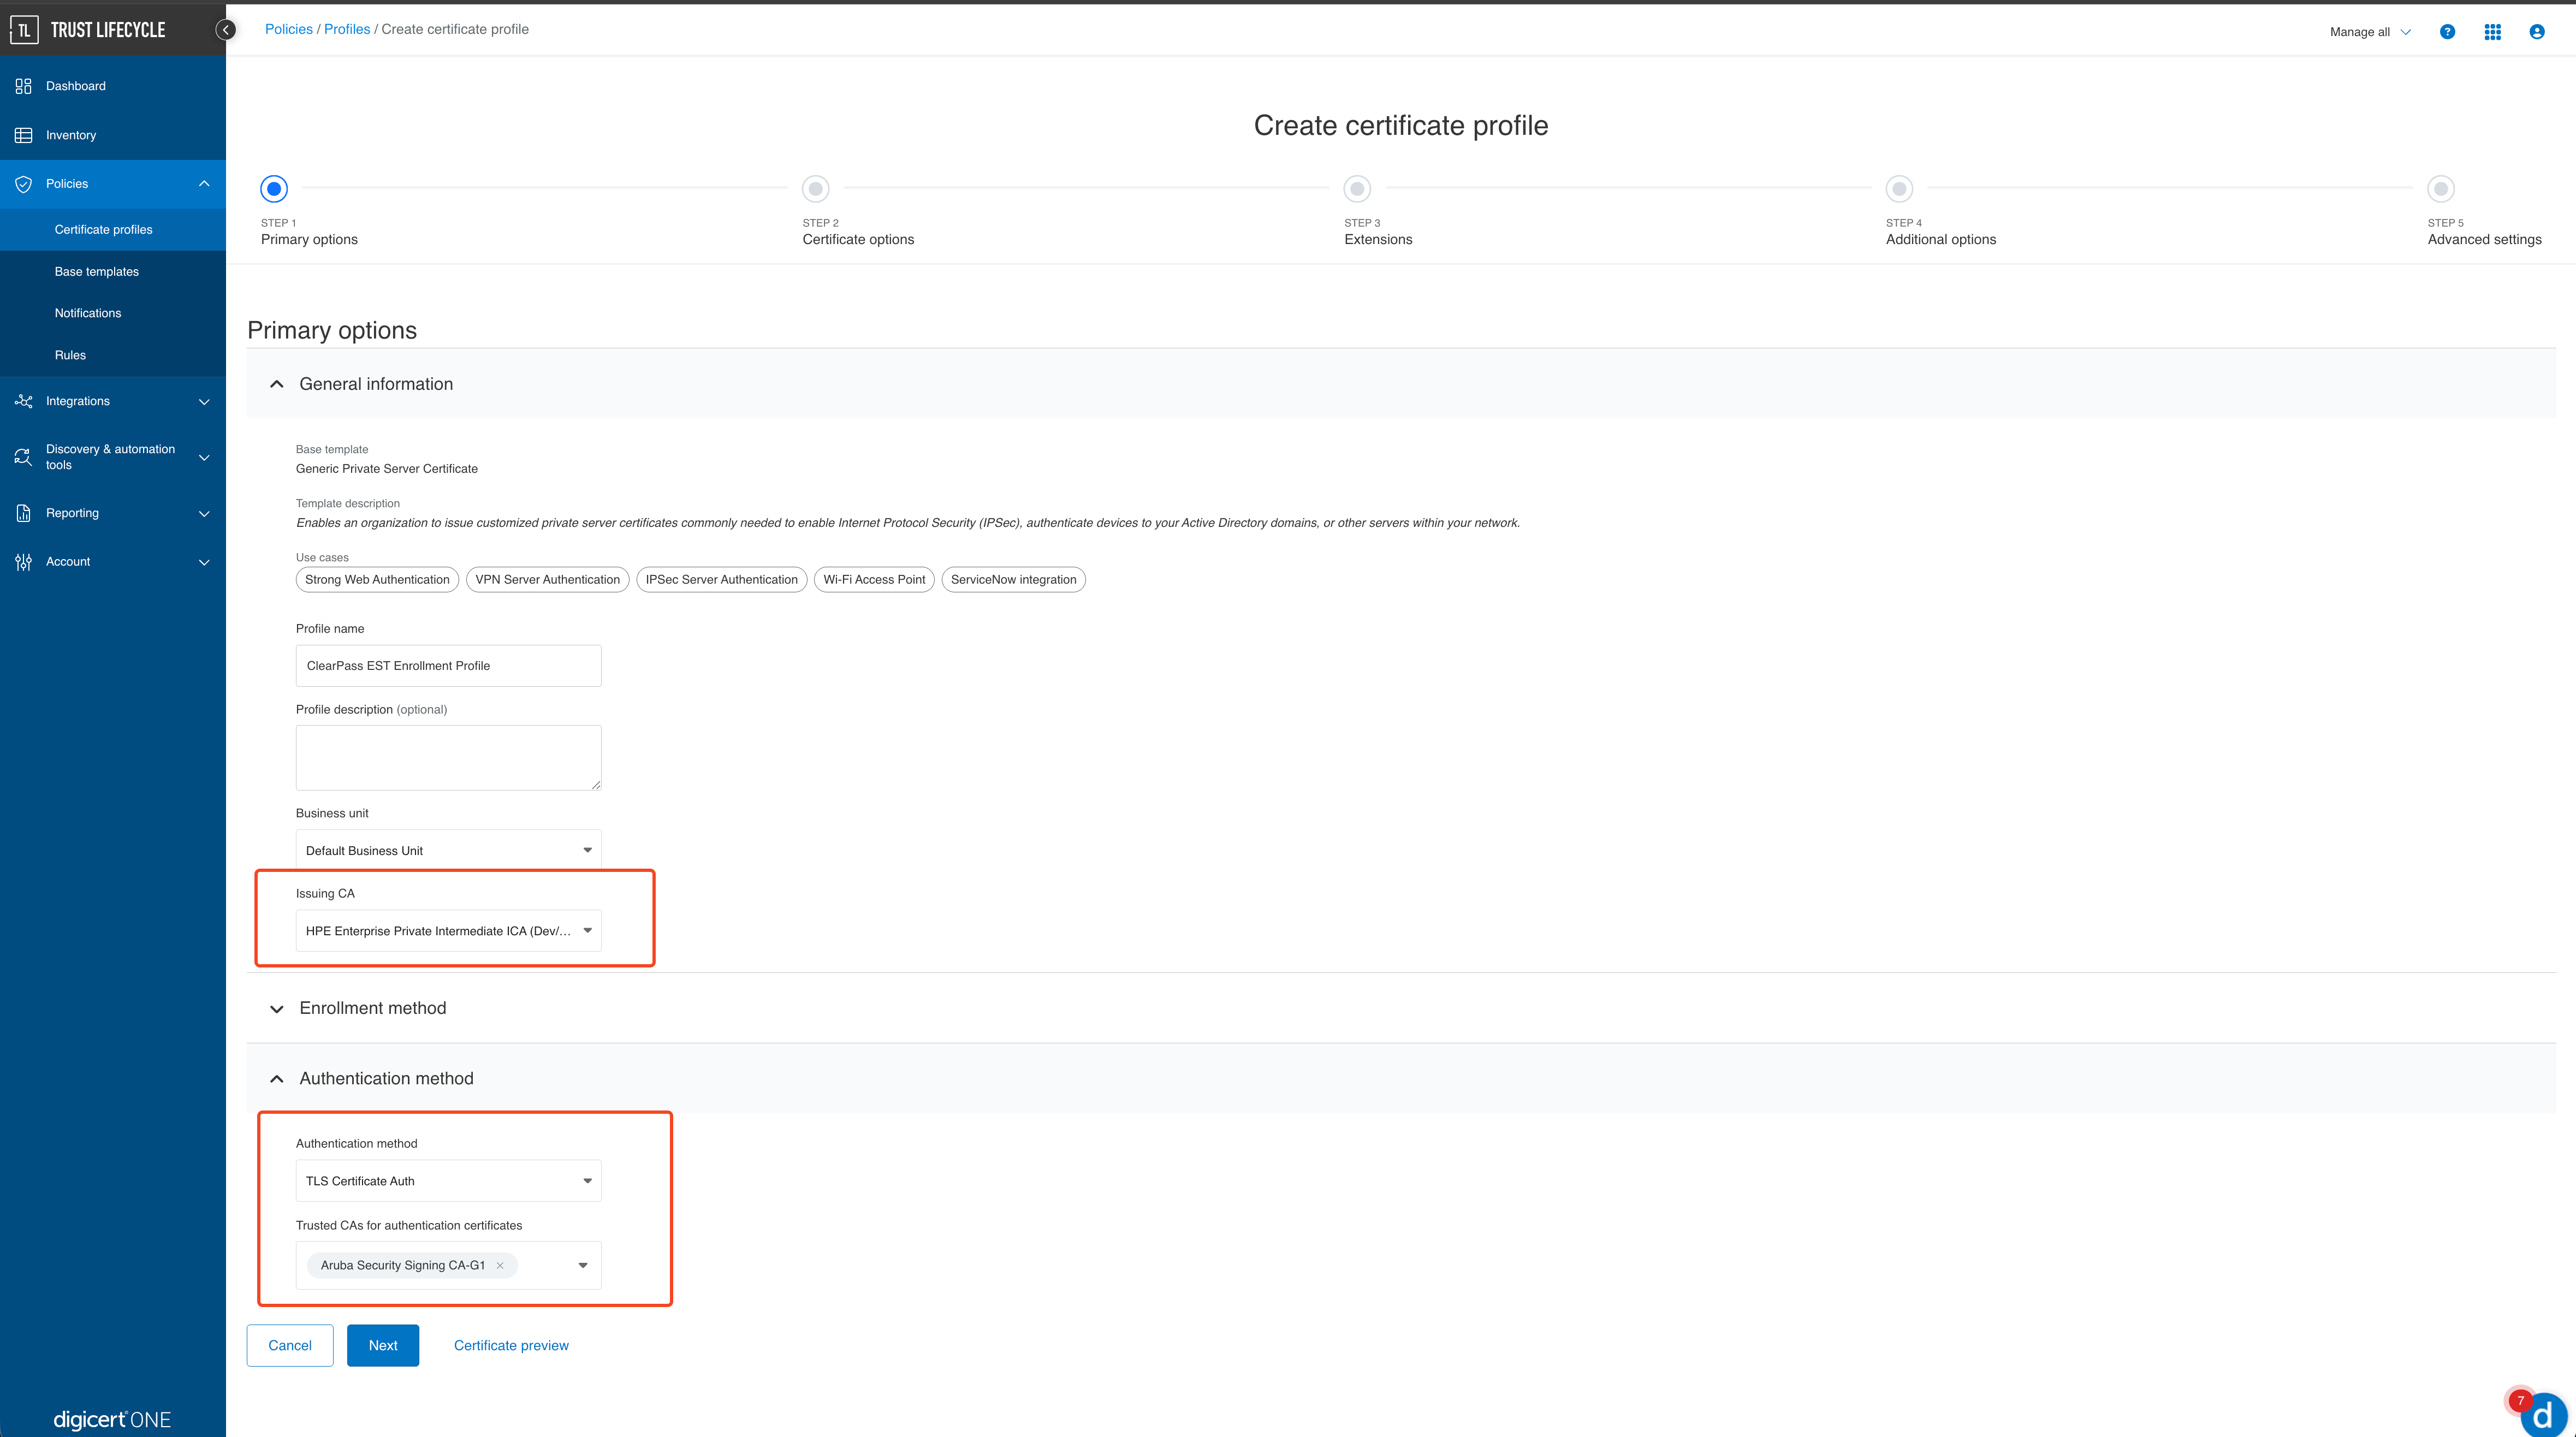
Navigate to Policies > Certificate Profiles and Create profile from template
Select the appropriate template like “Generic Private Server Certificate”. Note that not all templates support EST based enrollment. The first release only supports EST and hence only the EST based templates are supported. Support for REST API and SCEP will be added later.
Within the profile, select the enrollment method as EST, select the Trusted CA added in previous step.
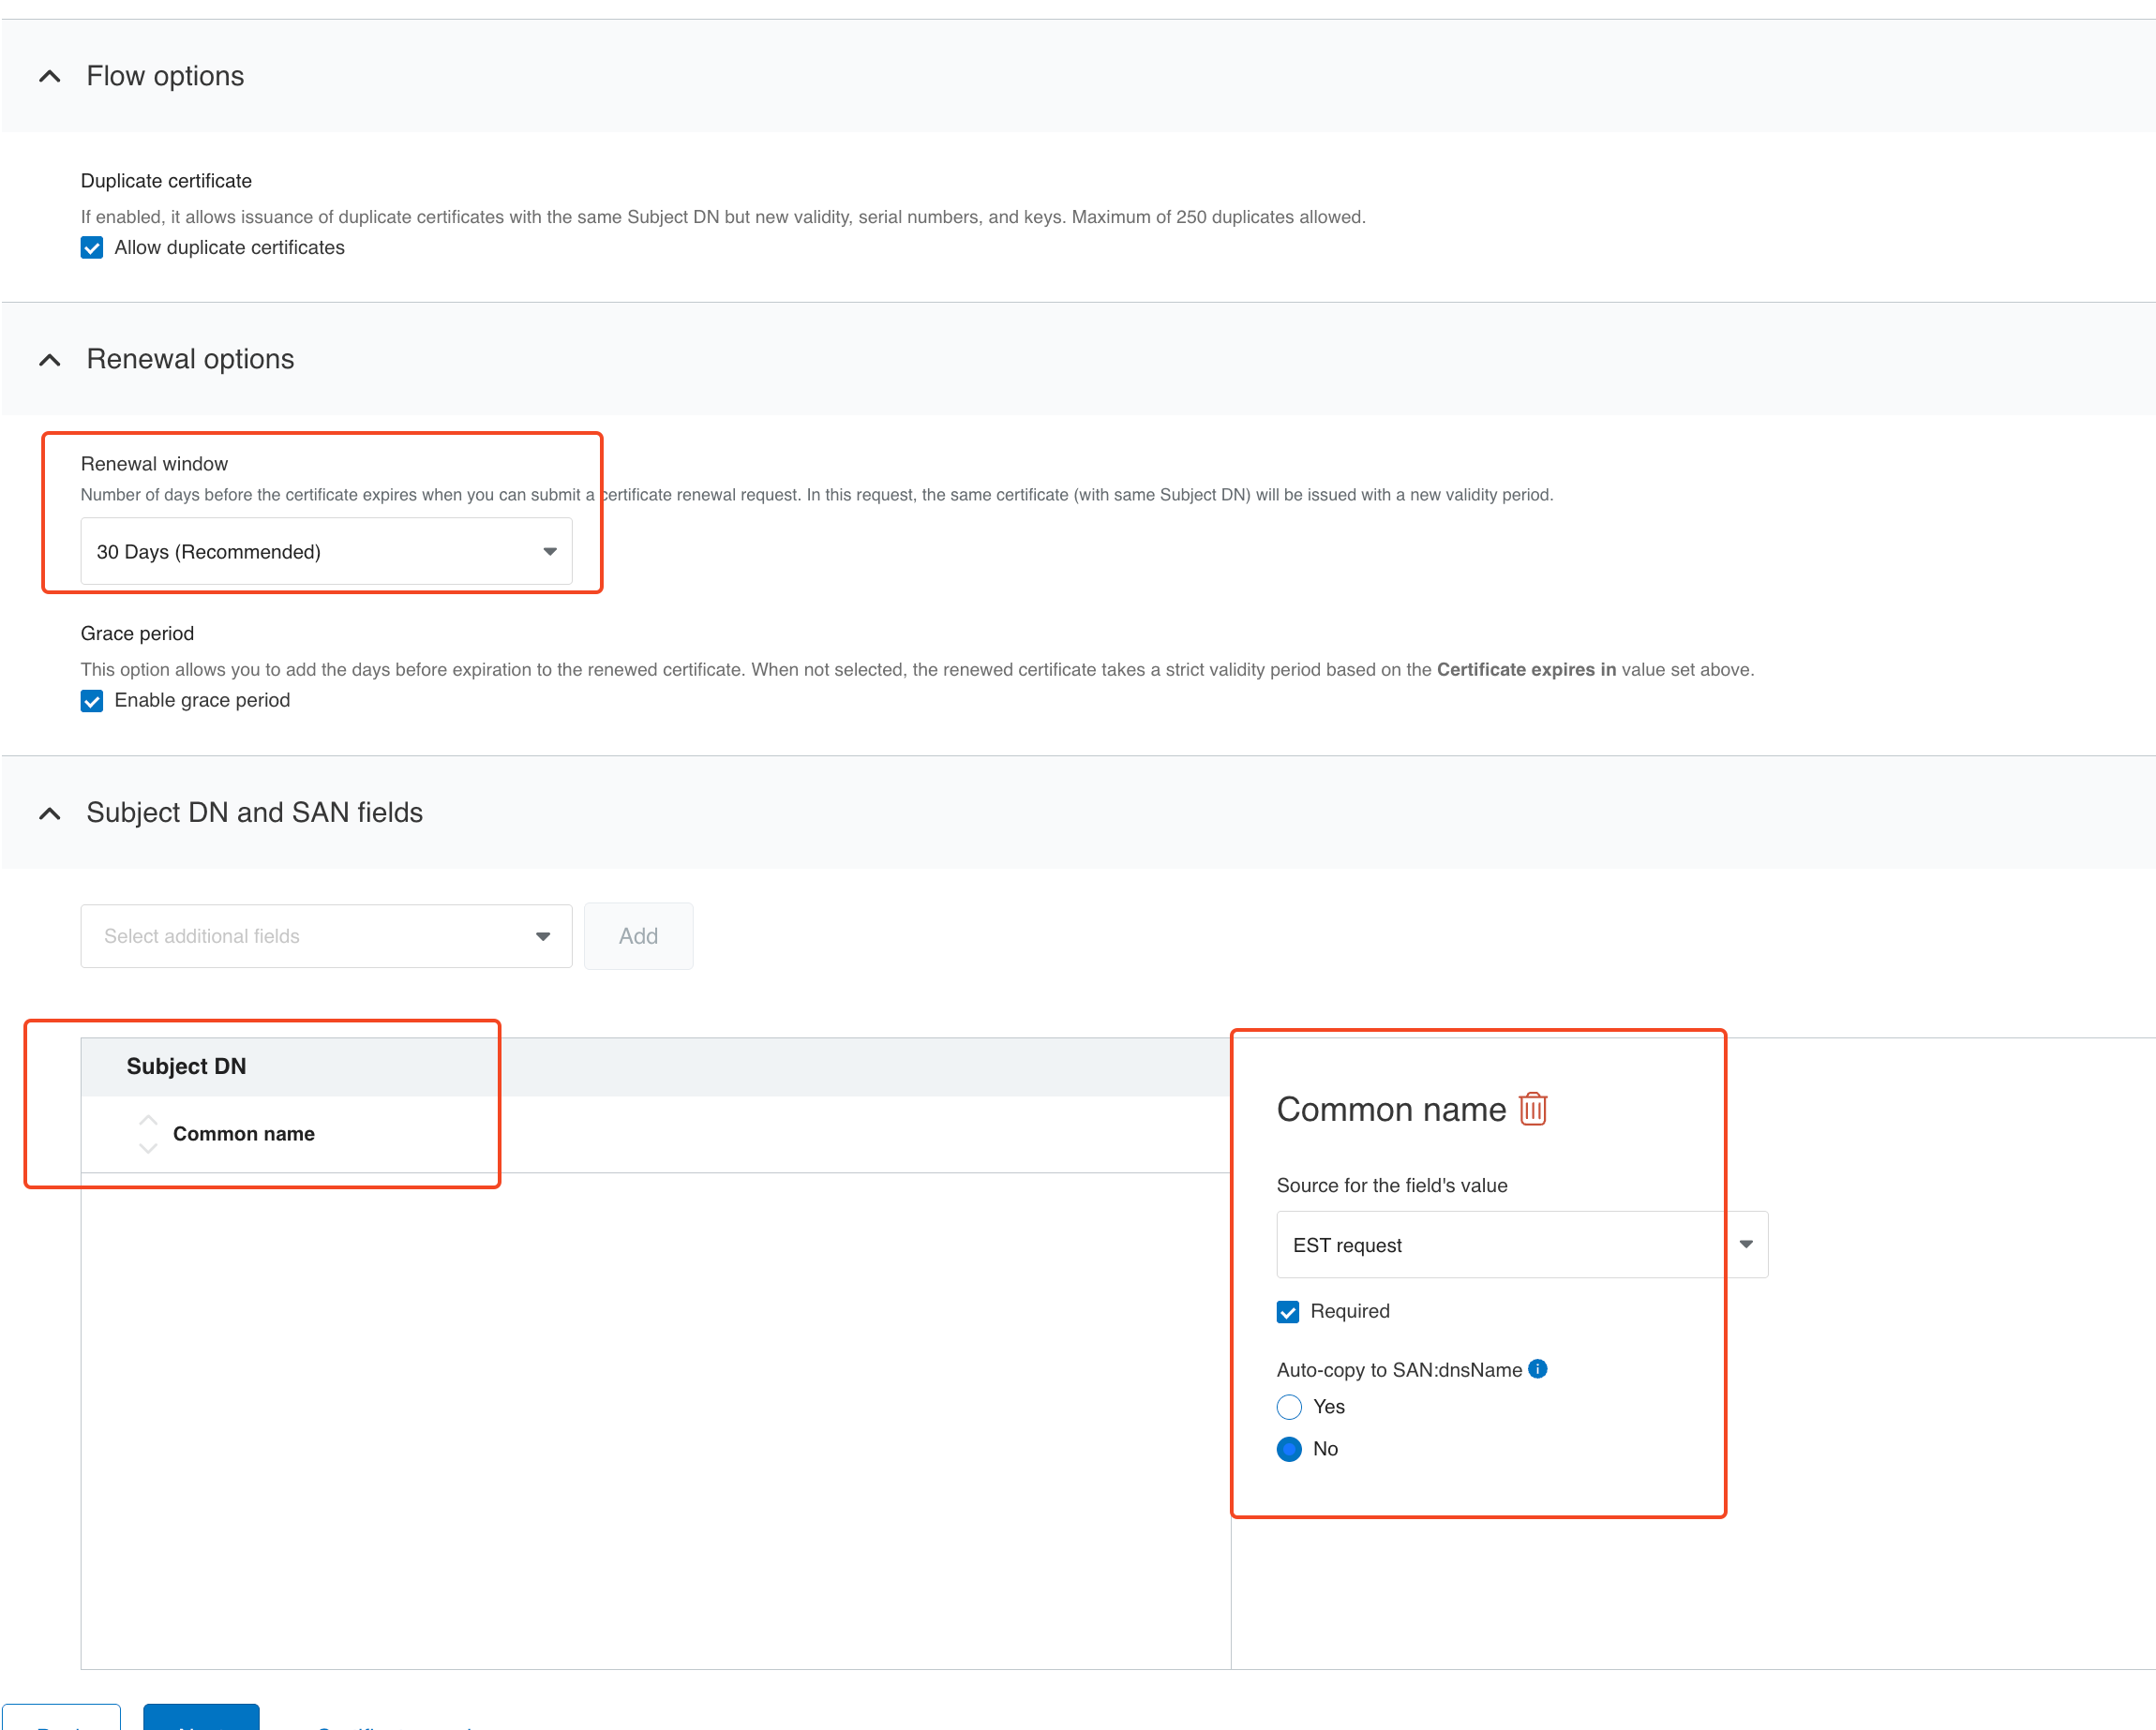
Select the appropriate renewal period and Subject common name
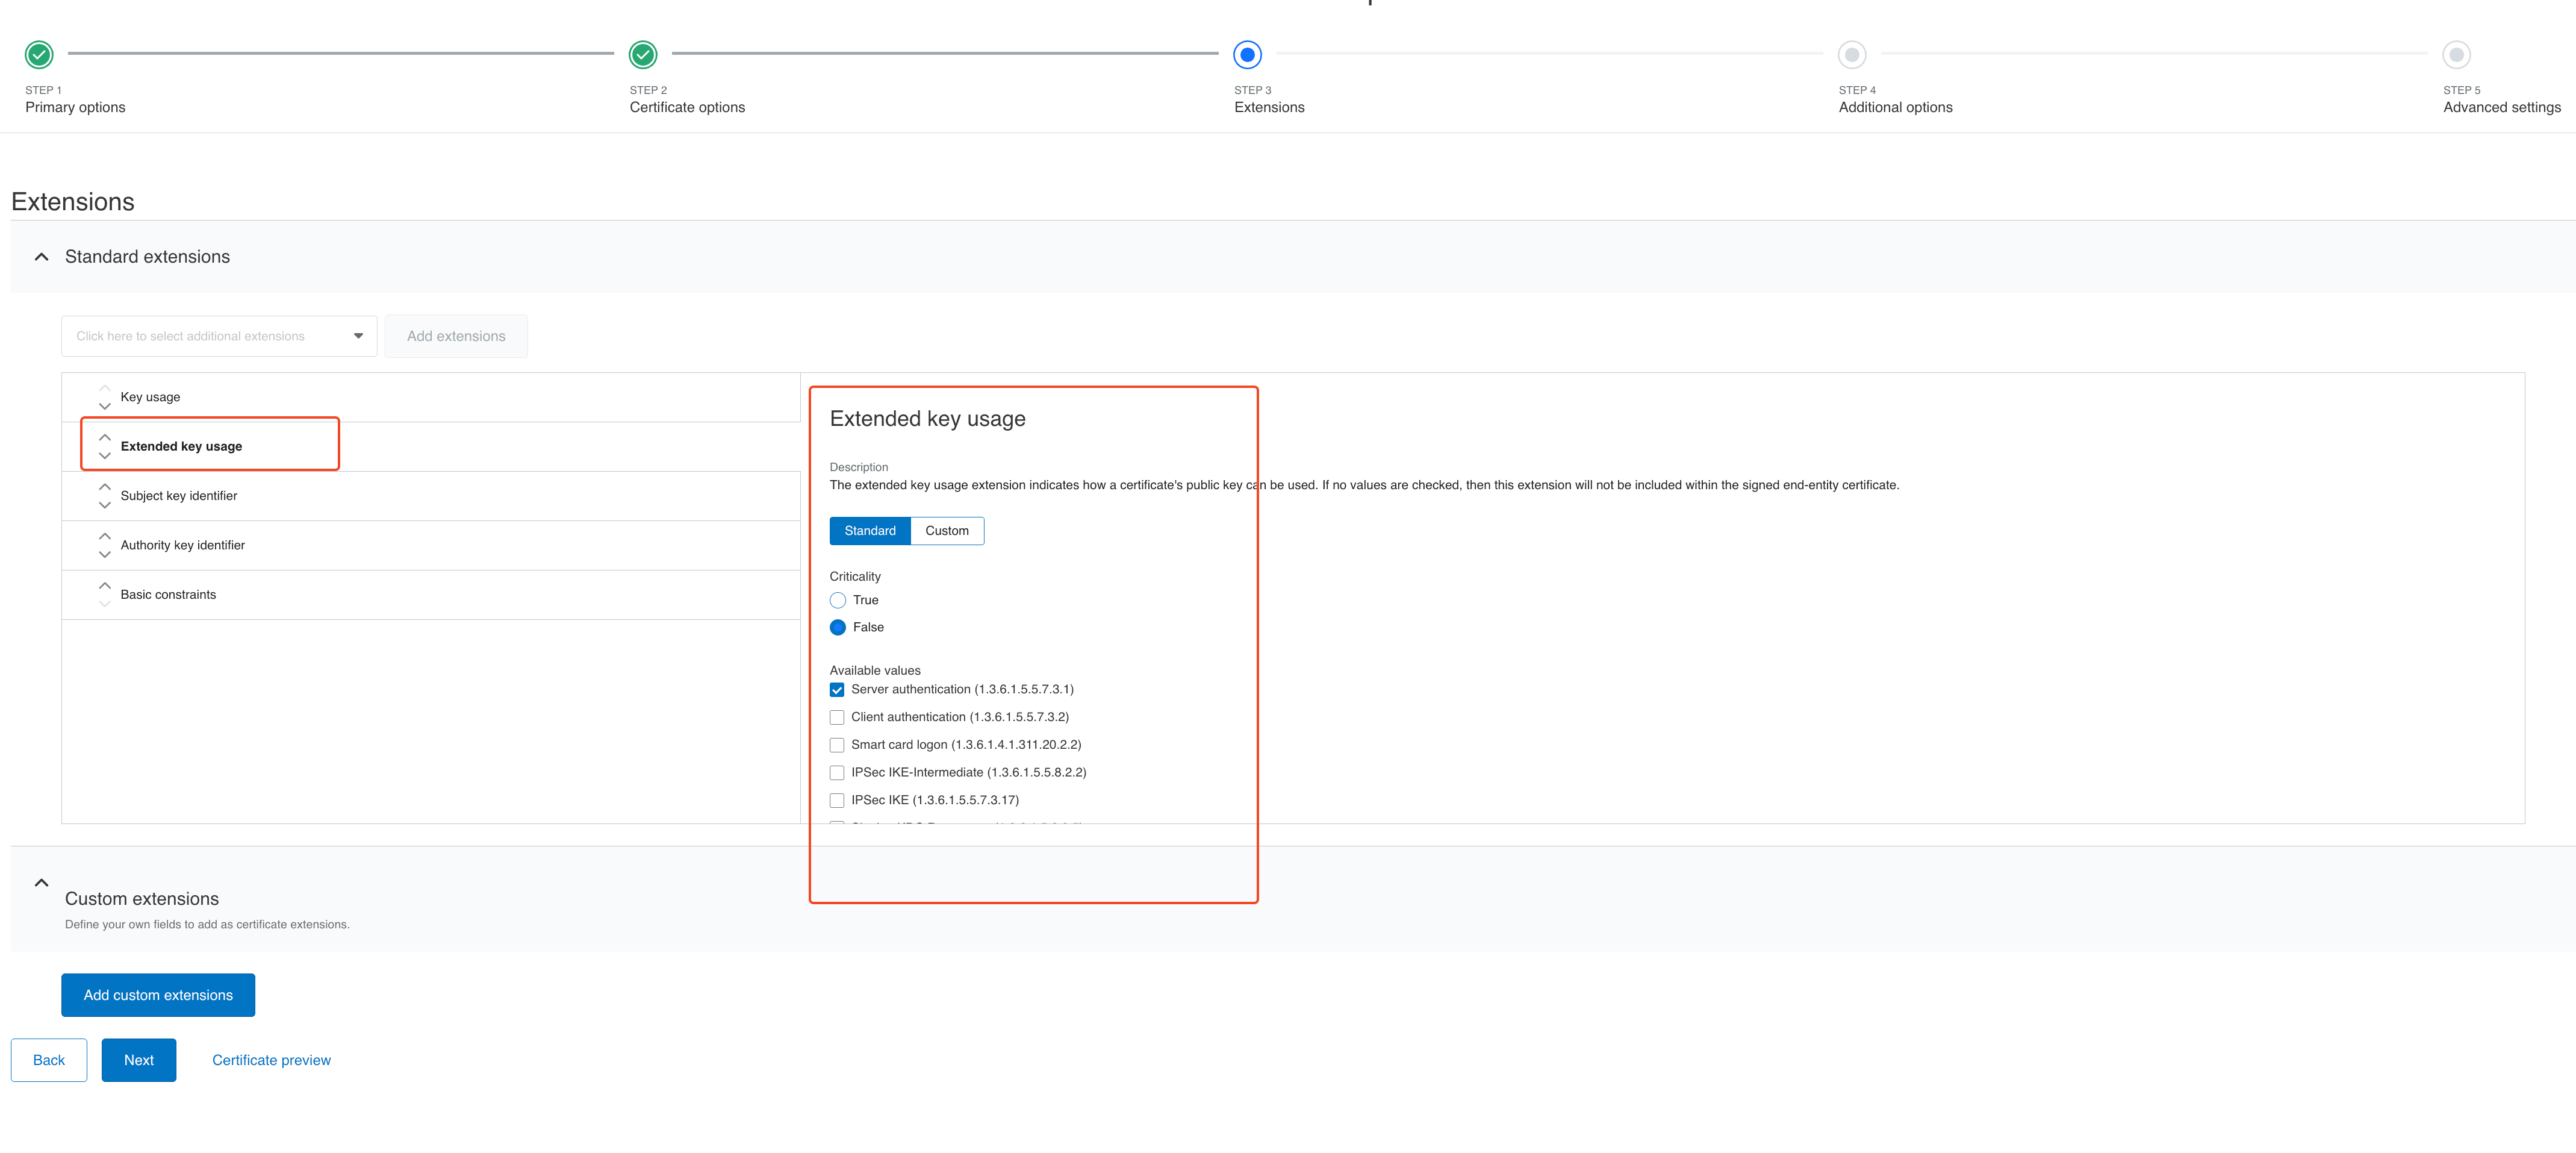
Select the server authentication EKU and other extensions as needed
Configure appropriate seat ID mapping

Configuring CEM Extension
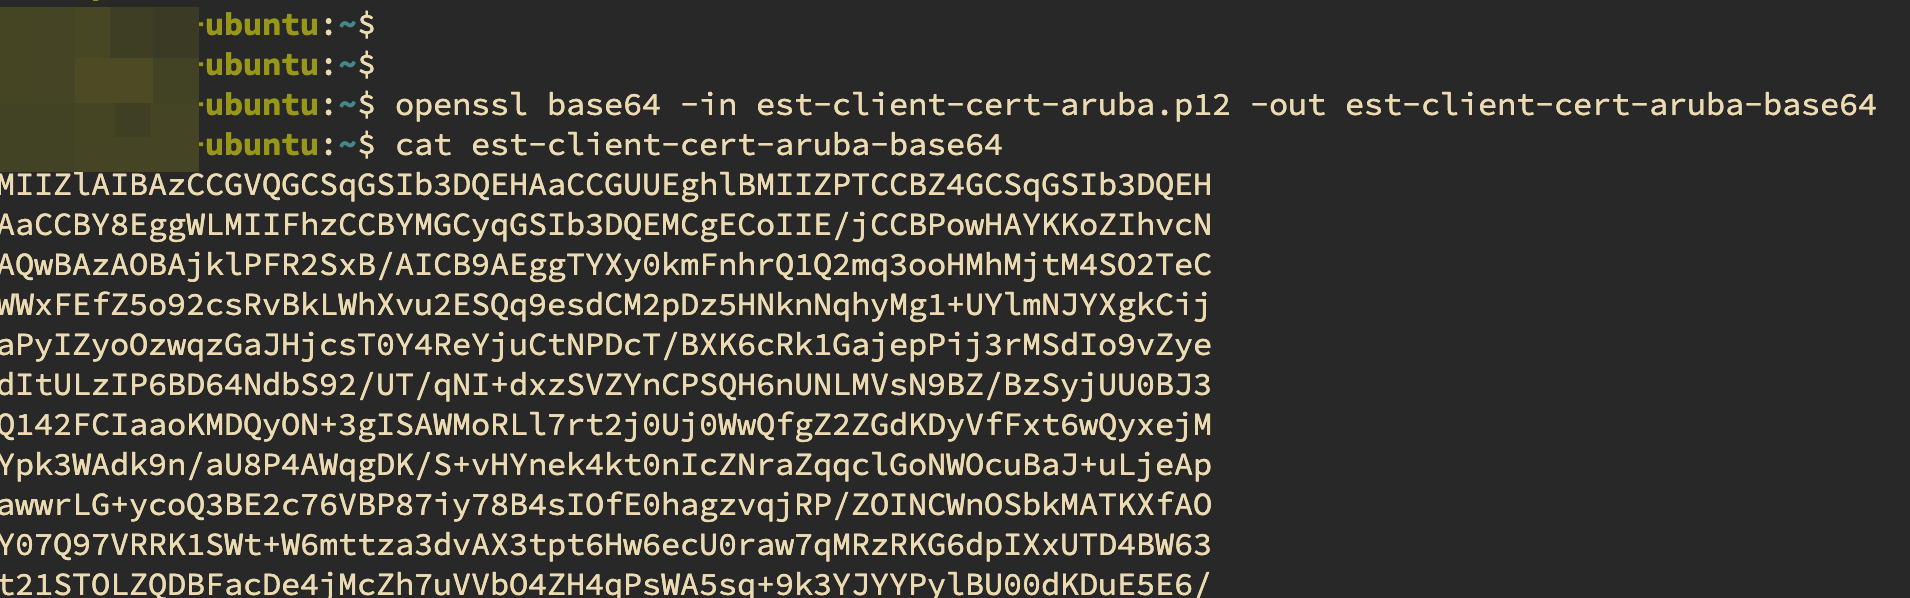
The extension needs to be configured to make simple enroll and simple re-enroll requests to DigiCert TLM. First we need to convert the client certificate created for EST enrollment into base 64 format. This can be done using openssl or other tools. Openssl command to convert certificate into base 64 is given below. Note that the pkcs12 file containing the certificate and private key should be converted to base64 and used within the extension config.
openssl base64 -in certificate.p12 -out certificate.txt
Sample output showing base64 encoded pkcs12 certificate:
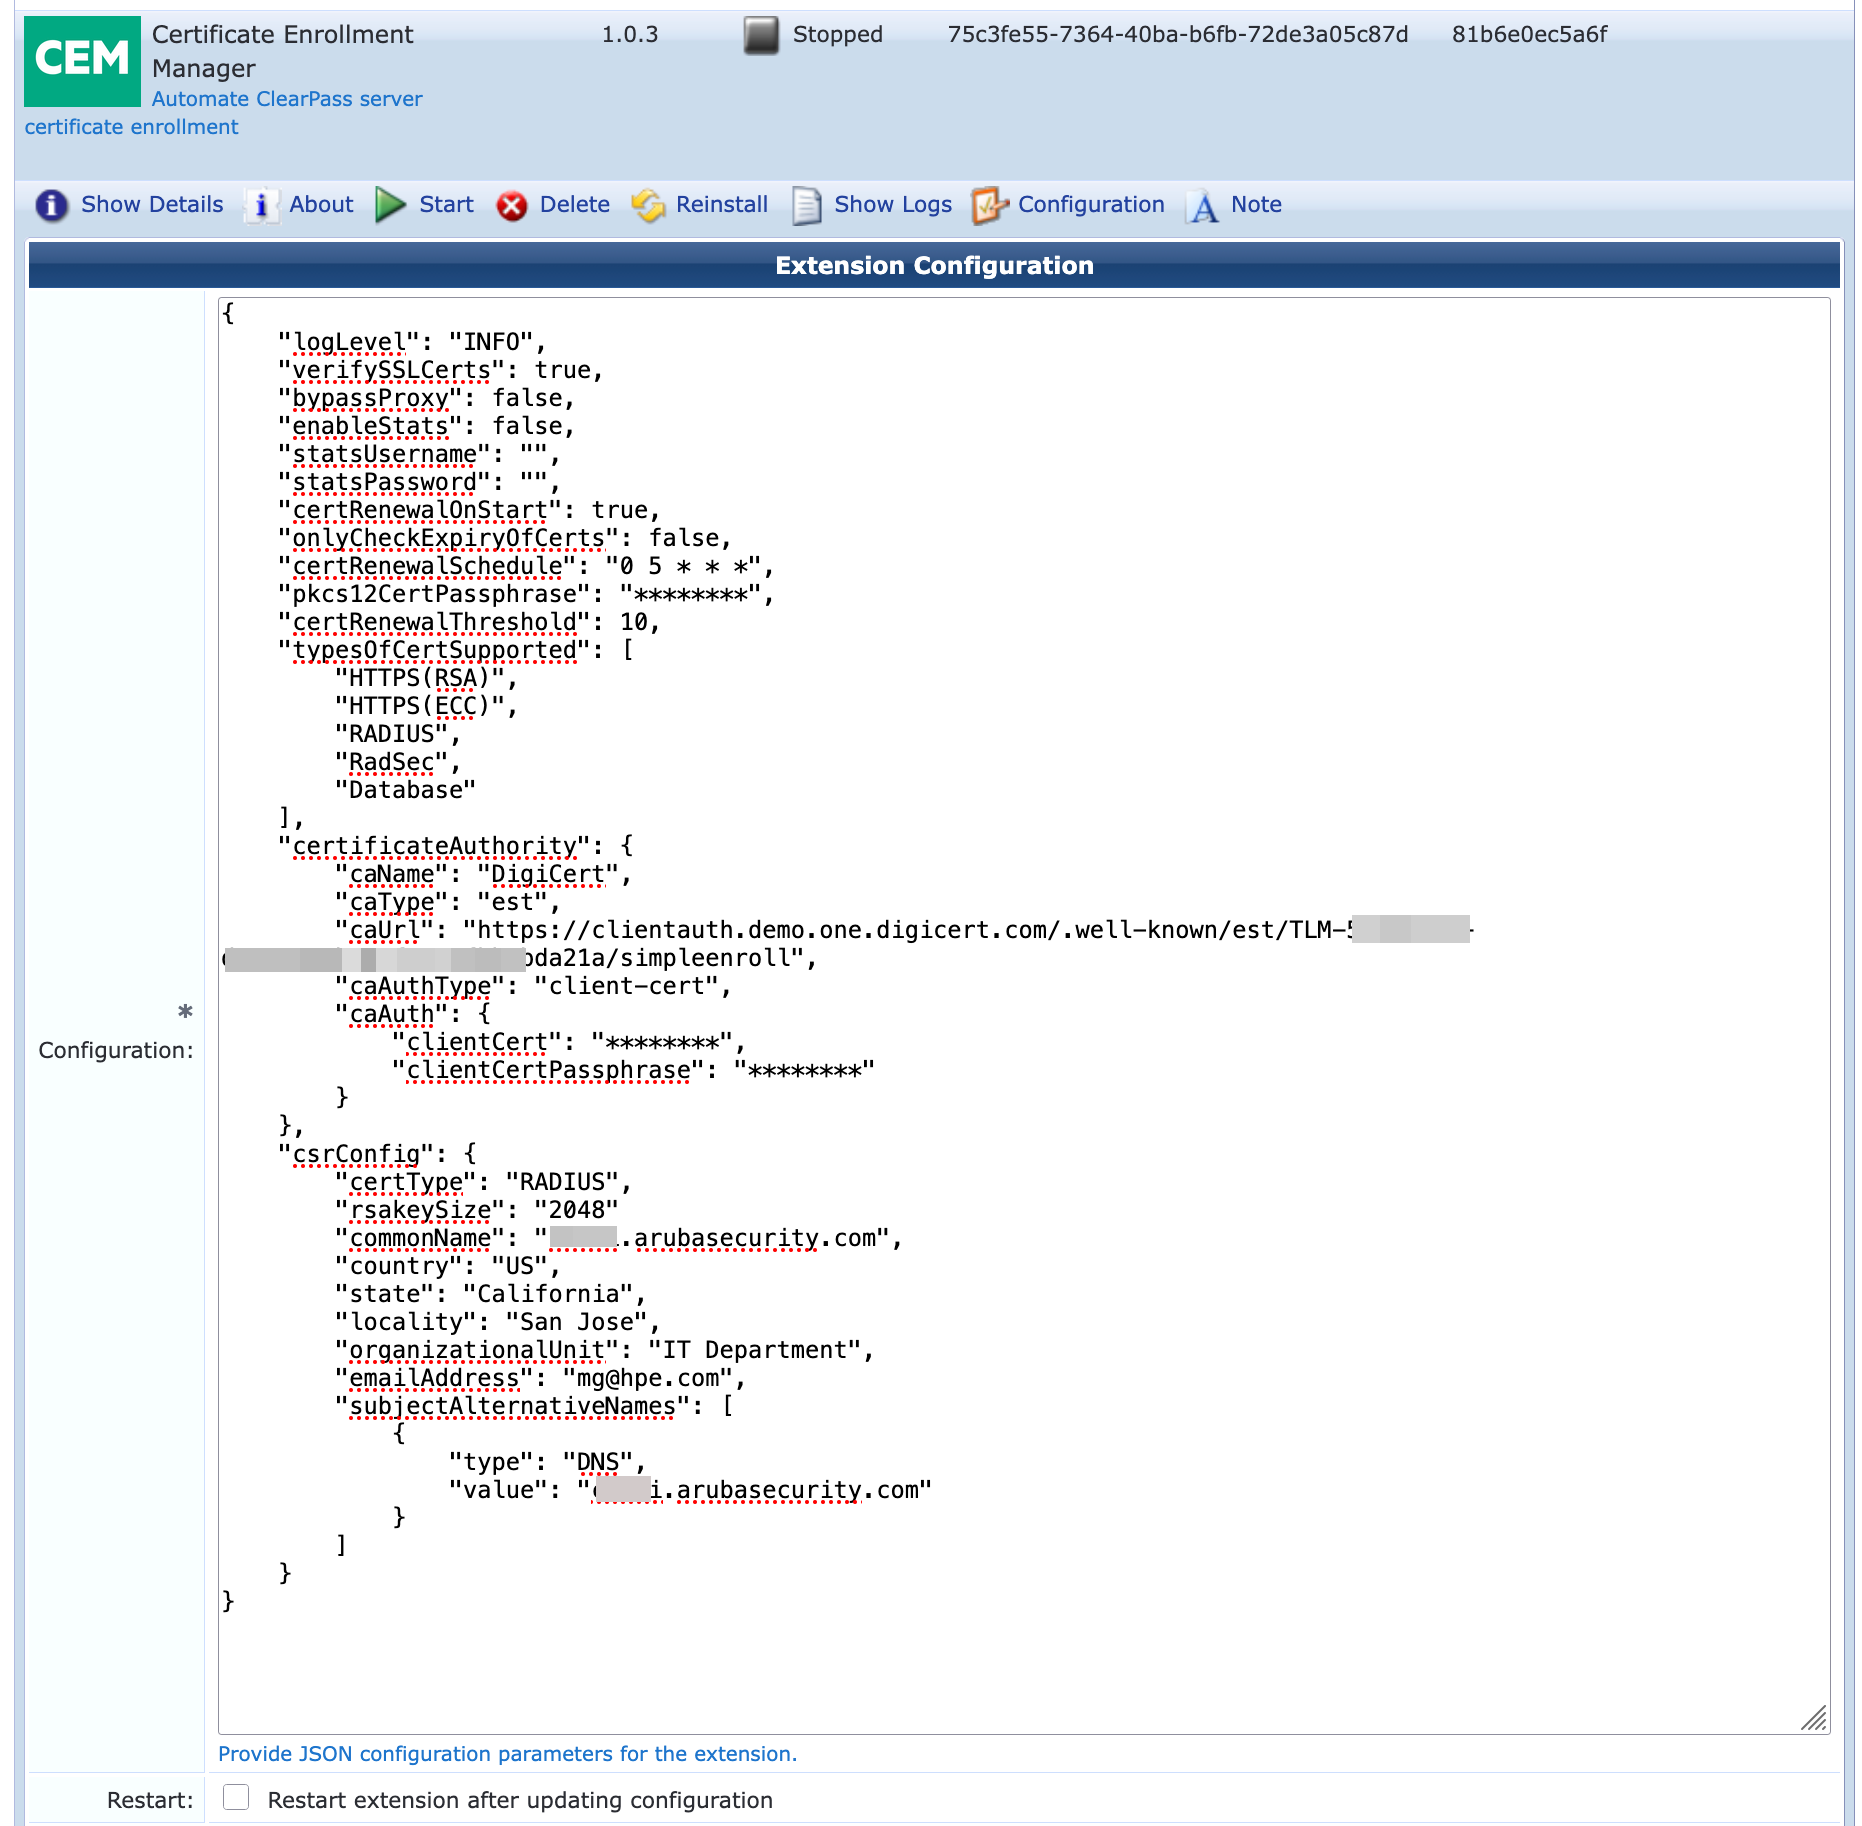
Listed below are the extension configuration items specific to CEM Extension
Figure 12: Extension configuration parameters
| Configuration attribute | Description | Default Values |
|---|---|---|
| logLevel | Logging level for troubleshooting. Change to "DEBUG" to see more detailed logs | “INFO” |
| certRenewalOnStart | If set to true, enrollment / renewal would be done as the extension starts up. If false, enrollment / renewal would be done based on certRenewalSchedule cron job | false |
| onlyCheckExpiryOfCerts | When set to true, extension only checks validity of certs without doing the actual renewal. Use this option to check if any of the certs are to be renewed and to validate connectivity to DigiCert without doing actual enrollment / renewal. If toggling this value, ensure to check the box to restart the extension | false |
| certRenewalSchedule | Configure a cron job to schedule when the cert renewal should be done. This ensures that renewal is done outside of business hours. Recommended to configure the cron to run once a day during off peak hours to check validity of certificates and trigger renewal | 0 5 * * * |
| pkcs12CertPassphrase | Password to be used while generating the CSR and private key. This is the password for the certificate being installed in ClearPass | ****** |
| certRenewalThreshold | Percentage value of certificate lifetime to trigger certificate renewal. Note that this value should be configured in such a way that renewal happens within the renewal window configured in DigiCert TLM Certificate Profile | 80 |
| typesOfCertSupported | Lists all the type of certificates the extension supports. The actual certificate type is selected under csrConfig > certType described further down | ["HTTPS(RSA)", "HTTPS(ECC)", "RADIUS", "RadSec", "Database"] |
| caName | Name of the Certificate Authority. DigiCert is the only supported CA at initial release | |
| caType | Specify the enrollment method. est is the only supported enrollment method at initial release | est |
| caUrl | Specify the enrollment URL | https://example.com/.well-known/est/TLM-{uuid}/simpleenroll |
| caAuthType | Specify the auth method used for EST Enrollment. "client-cert" is the only supported auth method at initial release | client-cert |
| clientCert | base 64 encoded client certificate for EST authentication | "base-64-encoded-pem-string" |
| clientCertPassphrase | Password used to encrypt the client certificate private key used to authenticate against DigiCert | |
| csrConfig | Attributes for the server certificate to be included in the CSR | |
| csrConfig > certType | Select from one of the supported CAs listed under typesOfCertSupported attribute. Note that the extension only supports renewing one type of certificate. If the goal is to automate the renewal for multiple certificate types (example both RADIUS and HTTPS(RSA)) then separate instances of the extension should be installed with each extension handling the renewal for one type of certificate. You can add a note to differentiate between multiple copies of CEM extension | HTTPS(RSA} |
| csrConfig > subjectAlternativeNames | SAN attributes of the type DNS and IP can be configured | { "type": "DNS", "value": "example.com" } |
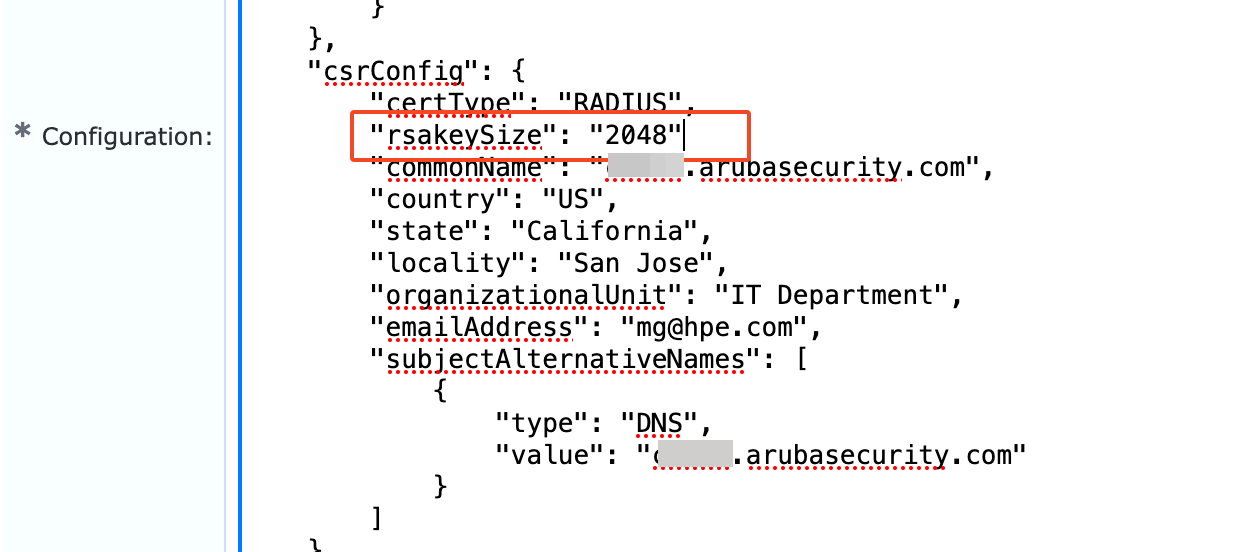
Note that by default key type is automatically derived from certType attribute with “HTTPS(ECC)” using Elliptic Curve keys and All others (HTTPS(RSA), RADIUS, RadSec, Database) using RSA keys. If you wish to specify the key type manually, use these additional attributes within csrConfig
rsakeySize: Supported values ‘2048’, ‘3072’, ‘4096’
ecCurve: Supported values ‘prime256v1’, ‘secp384r1’, ‘secp521r1’
Example:
INFO
If the certificate renewal runs into any errors, the extension will stop running. This would print an alert message in ClearPass Event Viewer which can then be exported as syslog or sent as email to notify ClearPass administrators / NOC teams
INFO
Note that installing a HTTPS certificate will cause the ClearPass Admin UI service to restart. Installing a RADIUS certificate will cause a soft reload of the RADIUS service and installing a RadSec certificate will cause the RadSec tunnels to be restarted. Hence care must be taken to ensure that the certRenewalSchedule is setup in such a way that the enrollment / renewal happens during off-peak hours to minimize any impact to the workflows supported by ClearPass.
Validation
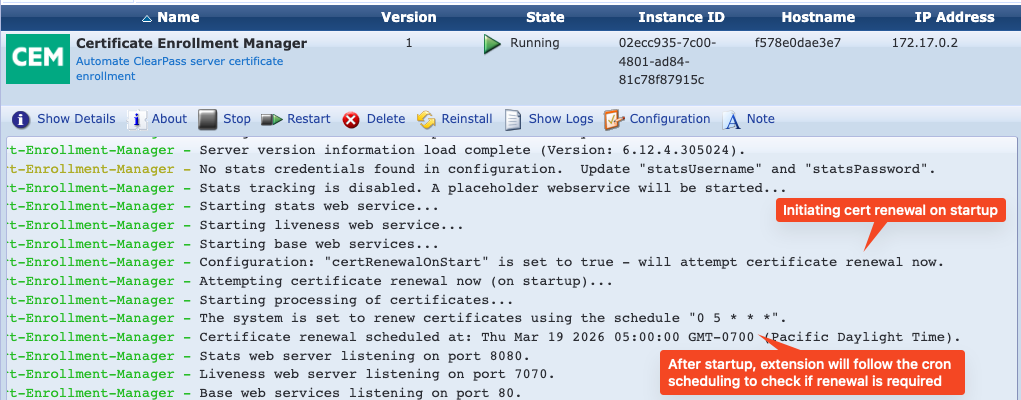
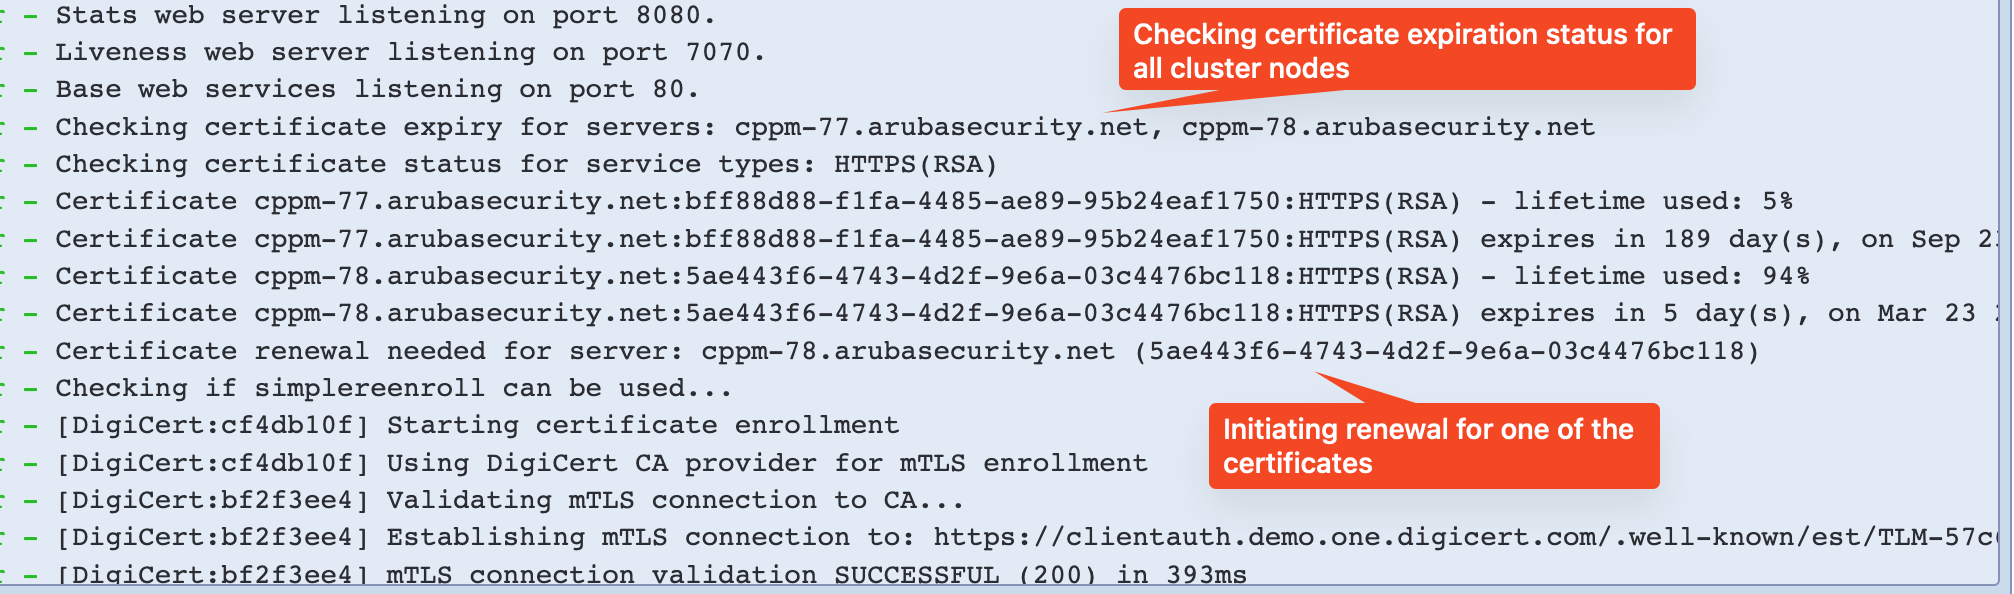
CEM extension log print details messages about each step of the enrollment / renewal process as shown below. If certRenewalOnStart is true, a renewal / enrollment is attempted when the extension starts. Otherwise its attempted at the scheduled cron interval.
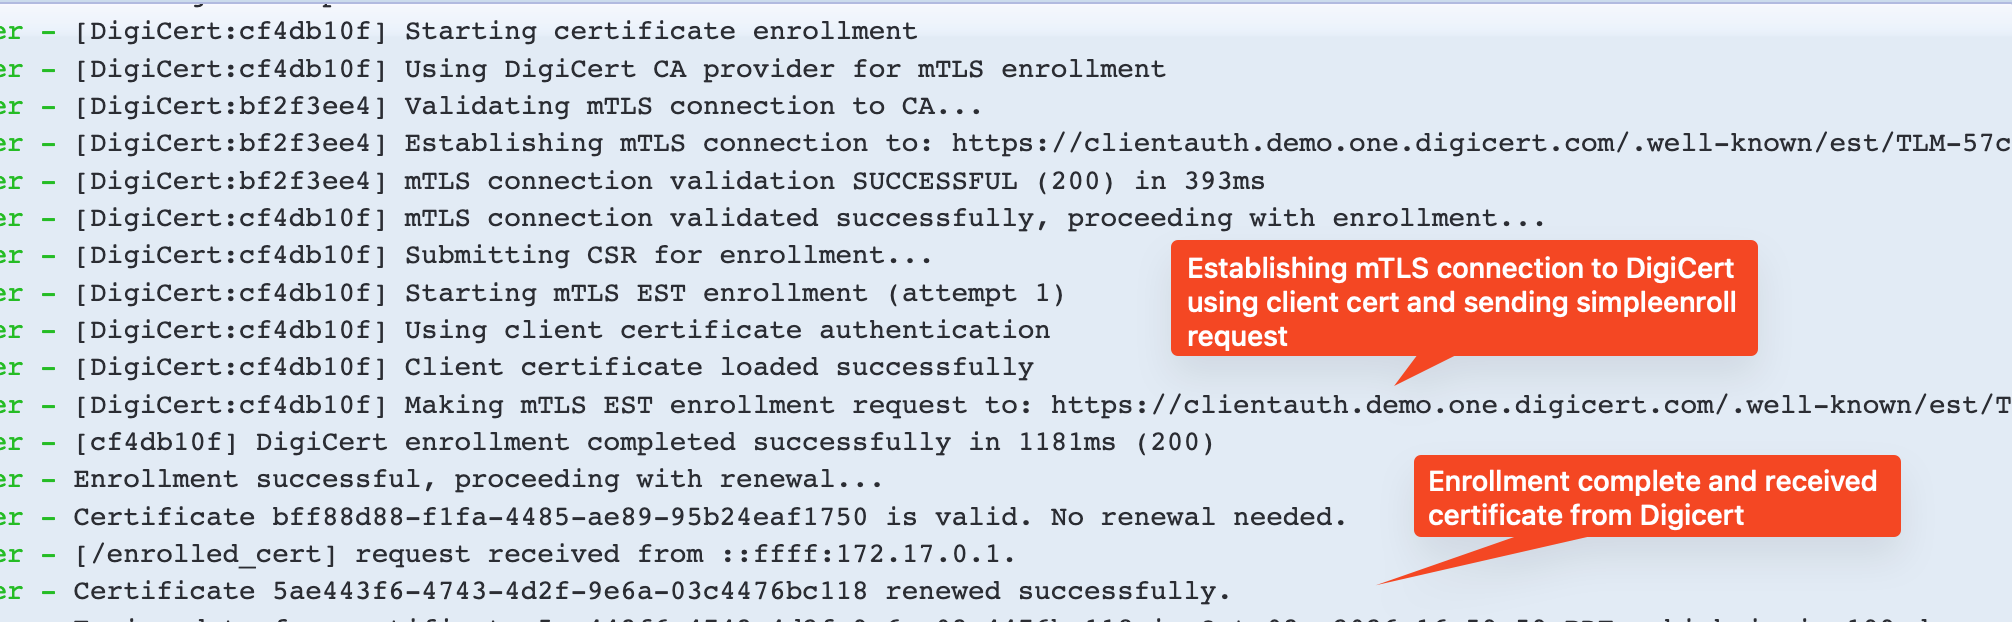

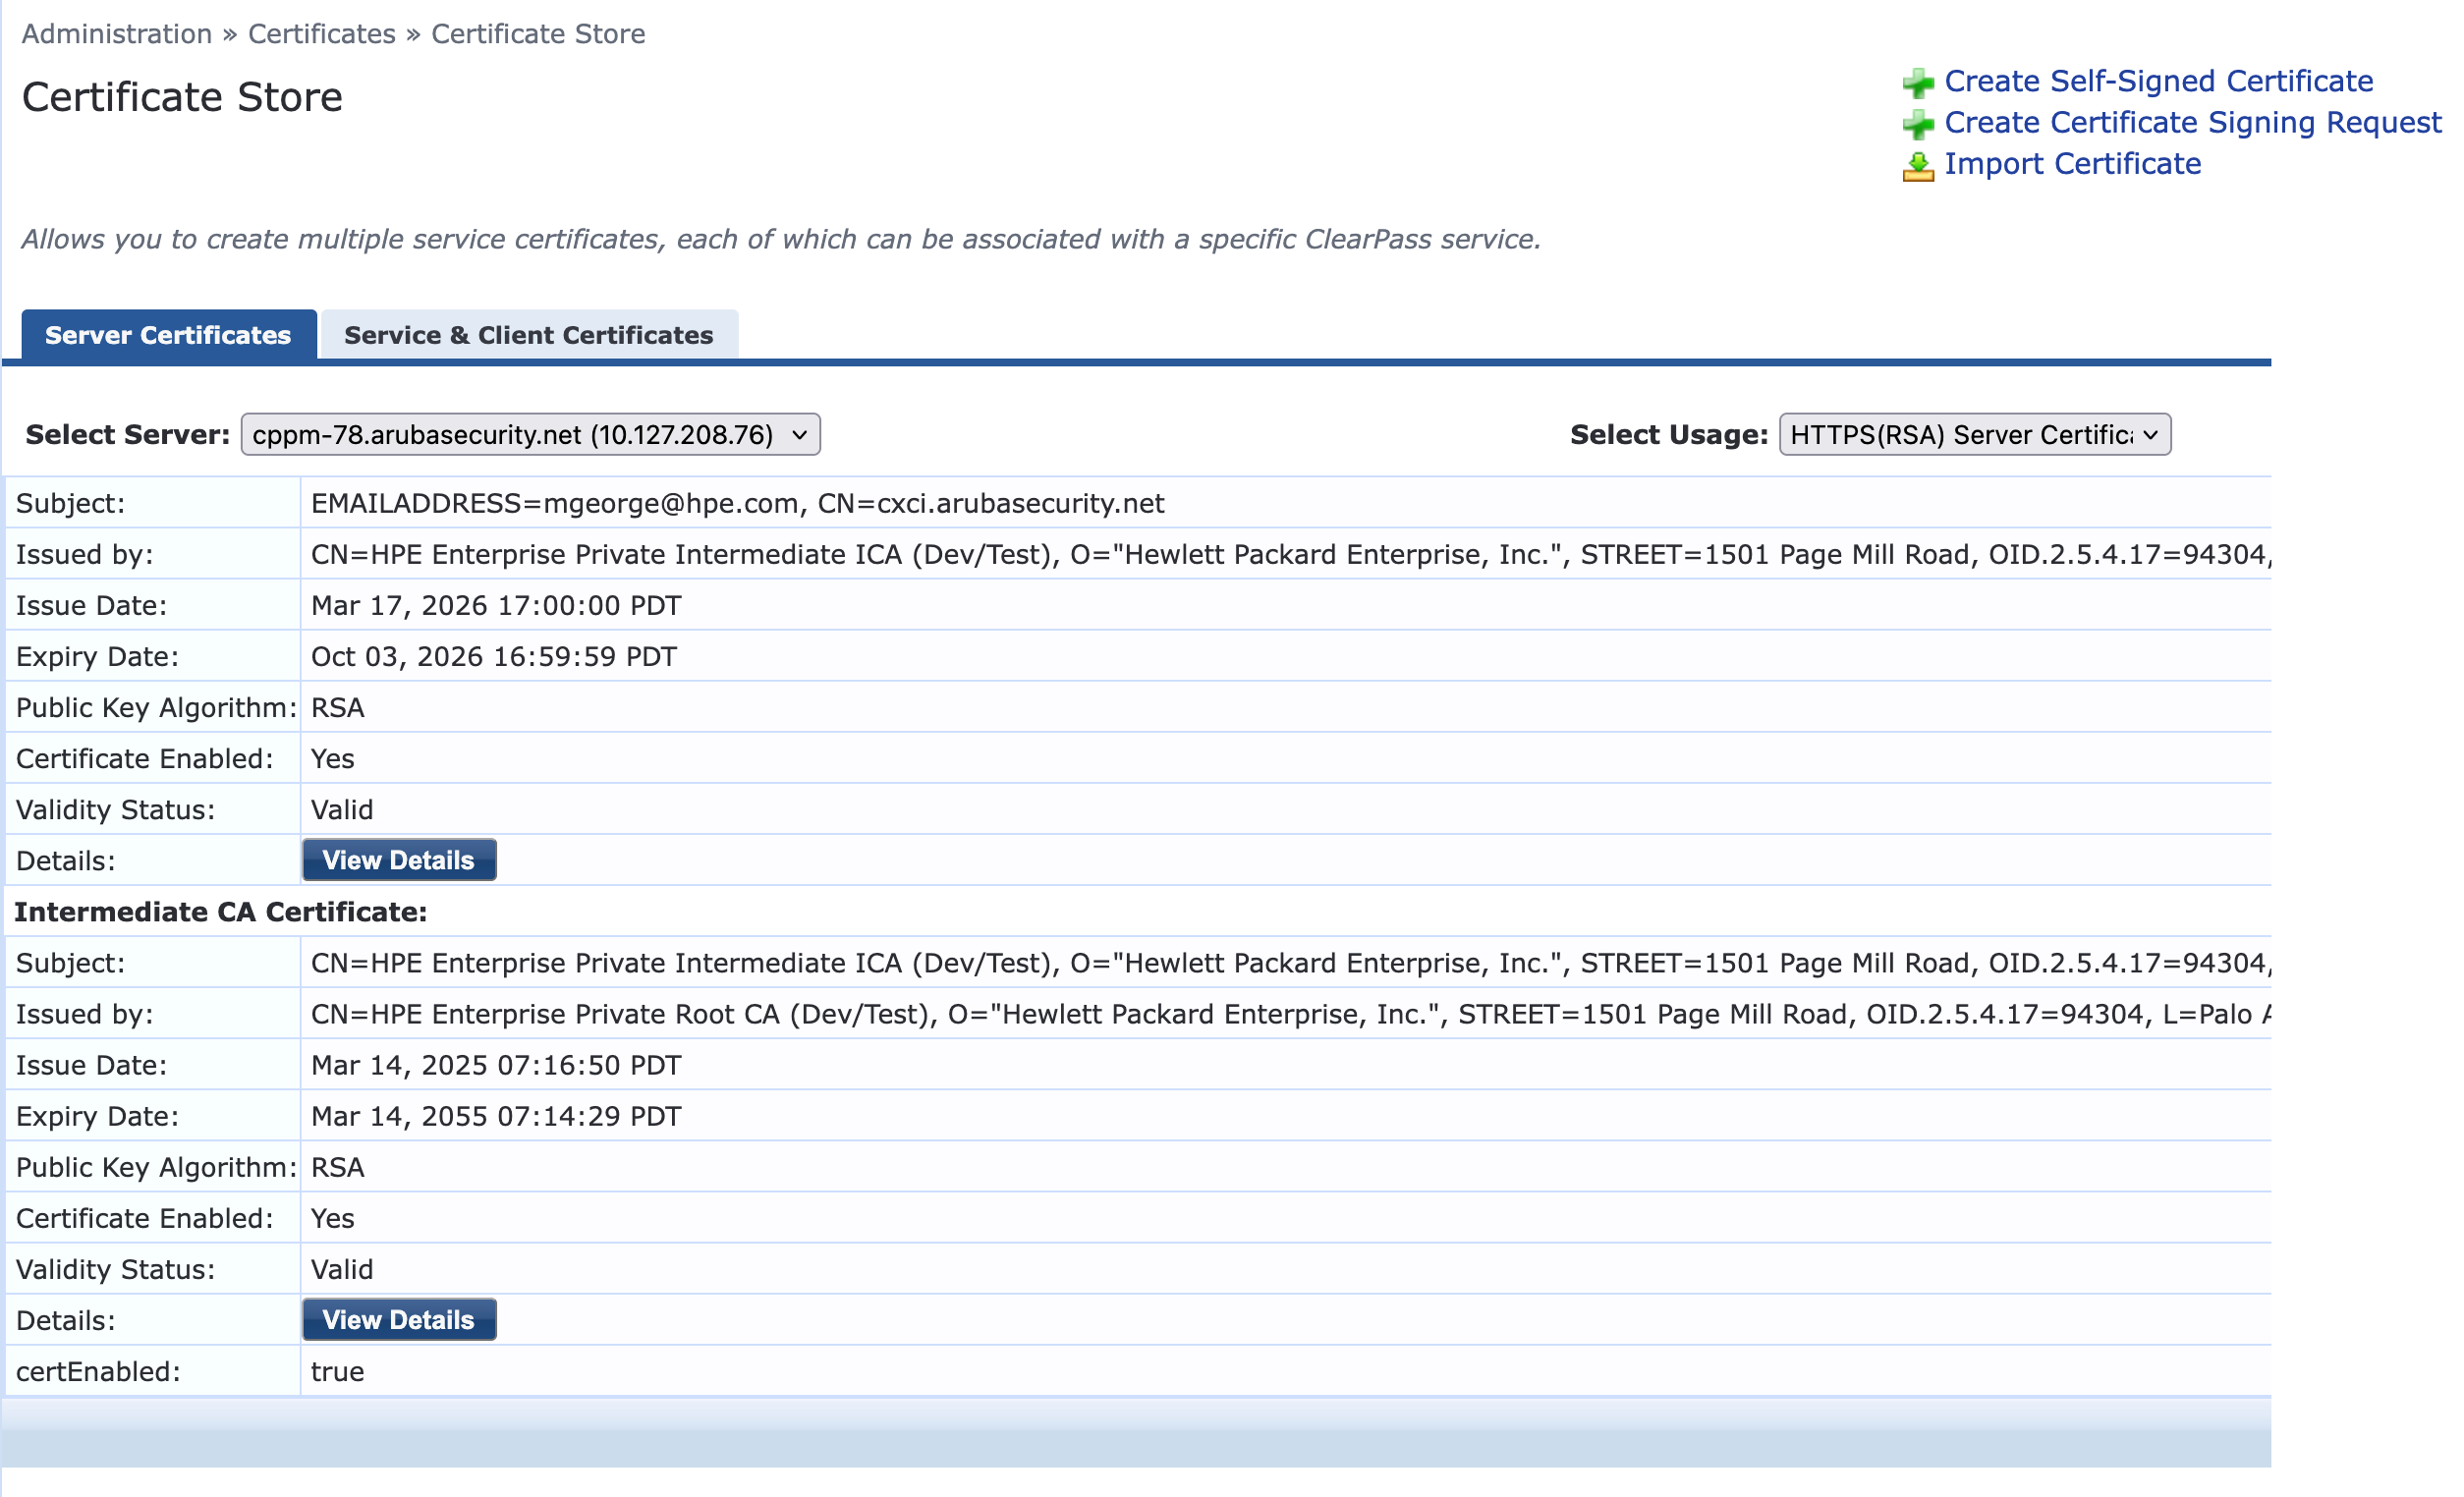
Confirm that the certificate has been installed / renewed on ClearPass
2 - Endpoint Compliance
ClearPass integrates with a wide range for endpoint compliance solutions to ensure continous monitoring and enforcement as part of HPE Aruba Networking Zero Trust framework
A detailed list of third party interoperability can be found here: https://www.arubanetworks.com/support-services/clearpass-interoperability/
2.1 - Tanium
Introduction and Overview
Tanium platform provides unified endpoint security and management with modules that can discover and inventory assets, manage endpoints, track risk and compliance and help investigate and remediate threats. The endpoint context from Tanium is leveraged by ClearPass Policy Manager to make network access decisions.
This integration guide covers the deployment and configuration of a ClearPass Extension to interface with both cloud and on-prem instances of Tanium. The Extension integrates with Tanium Gateway which provides API access to endpoint attributes including risk and compliance obtained from scan results.
Extension uses APIs that query data stored in Tanium Data Service (TDS). TDS is a near real-time cached data store that maintains historical query results for both online and offline machines. This enables users to get precise, near real-time visibility on all machines in their environment, regardless of whether an endpoint is online or not.
Tanium APIs allow the Extension to provide the following integration capabilities.
-
Poll Tanium periodically for endpoint information which is then added to ClearPass endpoint repository
-
Real time query against Tanium to fetch endpoint attributes at the time of authentication which can then be used as part of policy evaluation
Pictorial view of the Integration
The diagram below shows a pictorial overview of the components and how they interact with each other.

Software Requirements
The minimum software version required for CPPM is 6.11.0 . At the time of writing, version 6.11.10 is available as the long supported release and 6.12.4 is available as the short supported release. CPPM runs on hardware appliances with pre-installed software or as a Virtual Machine under the following hypervisors. Hypervisors that run on a client computer such as VMware Player are not supported.
-
VMware vSphere Hypervisor (ESXi) 7.0 U3c and 8.0
-
Windows Server 2019 with Hyper‑V and Windows Server 2022 with Hyper‑V.
-
KVM on CentOS Stream 8, CentOS Stream 9, Ubuntu 20.04 LTS, and Ubuntu 22.04 LTS.
ClearPass Installation and Deployment Guide
This document assumes your ClearPass environment is already configured and operational. If you require assistance with basic deployment, refer to the following deployment guide:
https://arubanetworking.hpe.com/techdocs/ClearPass/6.11/Installation-Guide/Default.htm
ClearPass Extensions
The integration between ClearPass Policy Manager and external systems is driven through a ClearPass capability known as Extensions, a sub-component of the ClearPass Exchange Integration framework. ClearPass Extensions are micro-services running on top of the base ClearPass platform. These micro-services enable HPE Aruba Networking to deliver new features outside of the main software release cycle and facilitate a faster time to market for specific features and integrations. Configuration and control of ClearPass Extensions is accomplished through the ClearPass Guest GUI, as covered later in this document.
Installing Extension
ClearPass Extensions are easy to install from the ClearPass Extensions Store. In a cluster, ClearPass Extensions can be installed on a subscriber independently of the publisher. Multiple copies of the same extension can be installed if needed as well.
INFO
Internet access is required for ClearPass Policy Manager to install the ClearPass Extensions from the Extension Store. Starting with ClearPass 6.12, extensions can be can be installed offline as well. Offline ClearPass Extension images are available on HPE networking support portal.
Access to the extension store
Access the Extension Store to download and install ClearPass extensions. The Extension store utilizes the same HPE Passport account credentials used to validate support entitlement in the Software Updates Por- tal. This is configured under Administration > Agents and Software Updates > Software Updates as shown below. Ensure that valid HPE Passport credentials have been entered in these fields to enable Ex- tension download capabilities.
Installing the Extension from Store
Extensions are installed from the extension page in ClearPass Guest, as shown below. Access it from Guest > Administration > Extensions
From here, click on ‘Install Extension’, and the search box below appears.
Enter “Intune” and click on ‘Search’, see the example below.
INFO
Here we are using Intune as an example. The installation steps are the same for all the extensions. For your deployment, please search for the appropriate extension like Jamf, Mosyle, Crowdstrike, etc.
All currently available extensions are listed in the page: https://www.arubanetworks.com/techdocs/NAC/clearpass/integrations/clearpass-extension/extensions-list/
Click on the extension name and then click “Install.”
In the “Install Extension” dialog box, set the IP address if necessary, as described in section “Extensions and IP address configuration support” below. Do not check the box to start the extension at this time. Click the “Install” button.
In this example, we’ve not entered an IP address for the extension to use, if there is intent to use the extension as an authorization source set this value and ensure its set the same on all nodes where the Extension is deployed.
The extension will download and appear in a “Stopped” state. Notice the options to Start, Delete, Reinstall, Show Logs, and view Configuration. Click on “Configuration” to view settings.
After the extension has been installed, proceed to configure the extension
A copy of the default Extension configuration is shown above, this will need to be modified for your deployment.
INFO
Password and sensitive configuration items are obfuscated when presented in both the Extension GUI or in the Explorer configuration.
WARNING
The configuration attributes are case sensitive. It is recommended to refer the default configuration sample while editing your configuration.
Extensions and web proxy support
Extensions support communications with 3rd parties via a web proxy. This adds incremental proxy functionality. If a proxy is defined in ClearPass Policy Manager, then an extension will inherit that configuration. See later in the document on how to disable the proxy inherited configuration.
INFO
Note that the Policy Manger web proxy configuration is ONLY read by the extension at installation time. If the web proxy configuration is changed in Policy Manager, then the extension must be re-installed so the new settings are re-read and bonded to the extension.
Extensions and IP address configuration support
ClearPass uses a non-externally routed IP address range to communicate with the Extension. The default is 172.17.0.0/16. You may configure a different range, if desired. This is especially useful when deploying extensions across nodes within a cluster where there is the requirement for a fixed consistent IP address for the extension across the cluster.
Changing the “Extensions Network Address” range is only necessary if either the ClearPass MGMT or DATA interface are using an IP address in the extension default range of 172.17.x.x/12, or if ClearPass needs to communicate with some external device in that range.
To Configure the base Extension IP subnet within Policy Manager navigate to Administration > Server Manager > Server Configuration [chose your node] Service Parameters [ClearPass system service].
INFO
The subnet defined here for the extension framework must fall within the following subnet range 10.0.0.0/8, 172.16.0.0/12, 192.168.0.0/16 as defined by RFC1918. For best results, set the network address range to a subnet that does not exist in your enterprise, and restart the extension service for this change to take effect.
Never set the DATA or MGMT IP address to use an address that matches the Extension Network
INFO
Note that changing the extension base IP address will require the extension service to be restarted.
Configuration Steps
These are the main steps involved in configuring this integration:
-
Create custom role in Tanium with required permissions
-
Create Tanium API Token
-
Install Tanium extension on ClearPass
-
Configure extension to fetch information from Tanium Data Service
Create Tanium Custom Role
It is recommended to create a custom role and a service account for the integration so that the API token is created using an account that has the minimum permissions required for syncing endpoint attributes. Navigate to Administration > Permissions > Roles and click on “New Role”

Assign “read” permissions for Asset and “execute” permissions for Gateway as shown below:


Scroll down to Sensor permissions, click on the orange button, and watch it turn green to enable the sensors as shown below. Once this is done you can proceed to add appropriate content sets.

Under Content Sets, click on “Apply Content Sets” and select “Interact” and “Tanium Data Service”. In one of the examples described later, we will be fetching risk scores which requires selecting the “Risk” content set as well. If you wish to fetch additional attributes or sensor readings, appropriate content sets must be enabled under the role.

Next, the role should be mapped to the appropriate service account created for ClearPass integration from Administration > Permissions > Users as shown below:

The user should also be given permissions to appropriate Computer Groups as shown below:

Create Tanium API token
ClearPass uses APIs to fetch endpoint attributes from Tanium Data Service. The Tanium Gateway solution must be at a minimum version of 1.8 and an API token must be created for API Authentication.
Log into Tanium using the service account and navigate to Administration > Permissions > API Tokens and click on “New API Token” button.

Create API token by entering ClearPass IP addresses or subnets. Tanium supports using 0.0.0.0/0 as allow all IPs. For production setups, it is strongly recommended to lock down access to the specific ClearPass IP addresses.
INFO
If you are just polling for endpoints, specify only the publisher and standby publisher IPs. If you are using the real time authorization lookups, specify IP address of each ClearPass node.

Click “Save”, copy the token displayed and store it in a safe location to be used later while configuring the extension on ClearPass.

By default, the token is valid for 7 days. ClearPass will rotate the tokens automatically. If you have to re-install the extension after 7 days, the original token would have expired, and you would have to rotate the old token manually and use the new one.

Installing Tanium Extension
A Graphical User Interface (GUI) is available to make the process of interacting with the extension framework easier. To access the extension GUI, from the Guest System, under Administration find the Extension user interface as shown below.

From here, click on ‘Install Extension’, and the search box below appears. Enter the keyword “Tanium” and click on Search.

INFO
In a cluster environment extension can be installed on the subscriber nodes directly. For endpoint sync operation, the extension just needs to be installed on the Publisher and Standby Publisher. Using extensions for real time authorization lookup requires it to be installed on all the nodes.
Click on the Extension and then the Install option.

Set a specific IP address for the extension if required. It will automatically pick an IP address if not assigned.

Configuring the Tanium Extension
It is important to set the configuration within the Extension to meet your needs. The extension can be configured to sync data in multiple ways as well as be used as for “real-time” authorization against Tanium. As shown on the previous page there are several parameters required to configure this extension. Not all configuration settings need to be set but some are mandatory. We have divided the parameters into two tables, one for Tanium Extension-specific configuration parameters and the other for Extension framework configuration parameters that are common across multiple vendor Extensions.
Table 1: Tanium Extension-specific configuration parameters
| Attribute | Description | Values/Examples |
|---|---|---|
| taniumHost | FQDN / IP to access tanium instance | https://tanium.nacsecurity.net |
| taniumApiToken | API token from Tanium | token-c5hsdxxxxxxxxxxxxxx |
| taniumEndpointAttributes | Additional endpoint attributes to be fetched from Tanium. Supports fetching nested attributes. | [ "lastLoggedInUser", { "os": [ "language", "name" ] }, "ipAddresses", { "risk": [ "riskLevel", "totalScore" ] } ] |
| taniumEndpointNameValuesSensors | List of sensors that return a single name and value | [ "Username", "Tanium Client Version", "Total Memory", "Free Memory", "Logged In Users", "Last Logged In User", "USB Storage Devices" ] |
| ignoreEndpointDifferences | List of attributes, changes to which are not considered true delta | EID Last Seen |
Mandatory fields are: taniumHost and taniumApiToken
INFO
Any sensor listed in the attribute taniumEndpointNameValuesSensors should be registered for collection in Tanium Data Service.
Table 2: Extension framework configuration parameters (common configuration)
| Attribute | Description | Default Values |
|---|---|---|
| logLevel | Logging level for troubleshooting | “INFO” |
| verifySSLCerts | Should SSL certificates be validated when communicating with external context sources | true |
| enableEndpointCache | Cache endpoint attributes to optimize authorization queries, avoid repeated DB queries and reduce API calls to external context sources | true |
| endpointCacheTimeSeconds | The duration in seconds to cache the endpoint attributes | 300 |
| syncUpdatedOnly | If this option is set to true, only the endpoints updated after the previous sync would be fetched from the context source. Note that this option only works for the third-party context sources that have APIs to support this functionality. If this option is set to false, all endpoints are fetched at every sync interval. |
true |
| syncAllOnStart | If this option is set to true, when the extension starts, the system will attempt to sync all endpoints in the external context source to ClearPass. Note that if you have a large number device context to be fetched, it will take a long time for the initial sync to complete. When used along with syncUpdatedOnly, the subsequent syncs should be faster. |
true |
| enableSyncAll | Enable periodic sync of all endpoints | true |
| syncAllSchedule | The schedule for when the Sync All Endpoints process should run. Note: This uses CRON type scheduling. |
0 2 * * 6 |
| enableStats | Enable display of extension statistics | false |
| statsUsername | Create a username to access the extension statistics page | Give any username you want to use |
| statsPassword | Create a password to access the extension statistics page | Give any password you want to use |
| bypassProxy | Bypass the web proxy configured on ClearPass Policy Manager | false |
| attributePrefix | Prefix added to attributes to identify from which MDM the attribute was fetched | Leave empty for default “Tanium”. Enter any custom string for a custom value. |
Configuration of syncAllSchedule is covered in more detail in Appendix D at the end of this documentation, this is used to control the frequency of when the sync process runs. syncUpdatedOnly when set to true, will only ingest changes for managed endpoints. syncAllOnStart determines if when the extension is started or restarted should it immediately run the sync process or wait until the syncAllSchedule job is run.
The two attributes enableEndpointCache and endpointCacheTimeSeconds are specifically used in the extension to retrieve real-time data for a known endpoint. Then these switches will ensure that if the extension is asked to refresh data, it will check the endpointCacheTimeSeconds to decide if the data currently held is fresh or stale.
Leave syncPageSize, verifySSLCerts and logLevel at their default else otherwise advised.
An example of Tanium extension configuration is below. Include appropriate values for your environment based on the information gathered before, select Restart, and click on Save Changes to start the extension.

Following the restart, click on “Show Logs”. If contact is made, and access is granted based upon the configuration above with your Tanium credentials, you should see something like shown below:

Use Cases
The extension can serve multiple use cases as described in the Introduction section as well as the Pictorial. Each use case would require some further configuration based on the requirement. Some example configurations are shown below for each use case.
Periodic Poll
This is a commonly used method where the extension is configured to sync all the endpoints to begin with. Once finished, the extension is configured to periodically gather updated data at fixed intervals based on the configuration parameters as discussed in the table in previous section.
Below is the list of attributes fetched by the default extension configuration:

Additional attributes and sensor values can be fetched by editing “taniumEndpointAttributes” and “taniumEndpointNameValuesSensors” in the extension configuration. Following is a sample configuration used to fetch additional attributes like lastLoggedInUser, ipAddresses, os.language, os.name and additional sensor readings like “USB Storage Devices”, “Username” etc.
Note that the example below fetches risk attributes like riskLevel and totalScore. This requires Benchmark module in Tanium. If you wish to fetch additional attributes or sensor values, ensure that the appropriate solutions are enabled in Tanium.
INFO
Syntax for taniumEndpointAttributes and taniumEndpointNameValuesSensors are based on the GraphQL query language. If you need additional sensor values or attributes, please refer to Tanium Gateway documentation.
https://help.tanium.com/bundle/ug_gateway_cloud/page/gateway/index.html
{
“logLevel”: “INFO”,
“verifySSLCerts”: false,
“taniumHost”: “tanium.nacsecurity.net”,
“taniumApiToken”: “********”,
“taniumEndpointAttributes”: [
“lastLoggedInUser”,
{
“os”: [
“language”,
“name”
]
},
“ipAddresses”,
{
“risk”: [
“riskLevel”,
“totalScore”
]
}
],
“taniumEndpointNameValuesSensors”: [
“Username”,
“Tanium Client Version”,
“Total Memory”,
“Free Memory”,
“Logged In Users”,
“Last Logged In User”,
“USB Storage Devices”
],
“endpointCacheTimeSeconds”: 300,
“enableSyncAll”: true,
“syncAllSchedule”: “*/30 * * * *”,
“syncPageSize”: 100,
“syncAllOnStart”: true,
“syncUpdatedOnly”: true,
“syncUpdatedField”: “lastLoggedInUser,ipAddresses,Client Version,risk.riskLevel,risk.totalScore”,
“syncUpdatedSensor”: “Last Logged In User”,
“ignoreEndpointDifferences”: “EID Last Seen”,
“enableEndpointLookupCache”: false,
“macAddressSeparator”: “:”,
“bypassProxy”: false,
“enableStats”: false,
“statsUsername”: “statsadmin”,
“statsPassword”: “********”
}
The above configuration enables periodic sync every 30 minutes. This could be aggressive and should be configured based on the requirement for each scenario to ensure that Tanium is not inundated with requests and to manage the resource utilization on ClearPass Policy Manager.
A parameter that further helps with optimization is syncUpdatedOnly. Set this value to true to get updates only if there is a change associated with the endpoint. The value of pageSize should not be changed unless recommended by customer support.
Validation of the endpoint context being updated after the initial sync can be done by navigating to Configuration > Identity > Endpoints. Filter using the attribute Source = Tanium as shown below.

Shown below is a sample of parameters obtained from Tanium for an endpoint, these attributes can be evaluated by the enforcement policy within ClearPass Policy Manager. The full list of endpoint attributes is documented in Appendix C.


A sample enforcement policy leveraging the endpoint attributes which can be used in a service is shown below.

Tanium as an Authorization Source
With Tanium as an Authorization Source, ClearPass Policy Manager can query Tanium Data Service in real time to determine if the endpoint is managed by Tanium at the time of Authorization and grant access. It can leverage other endpoint attributes returned by Tanium within the enforcement policy. For example, a device with high-risk score can be denied access, a device with Last Update or EID Last Seen timestamps lower than the expected value can be quarantined etc.
This use case requires further configuration which includes an addition of Authentication Source which will be used for Authorization. It also necessitates modification of a service to use this new source for Authorization and a modification of role mapping to use this Authorization source which will be covered below.
To add Tanium as an Authorization source can be done under Configuration > Authentication > Sources, click “Add”.

Click on Next. This will advance to the Primary Tab which requires connection details. First an internal POST is made to the extension. The extension then calls Tanium APIs to retrieve the attributes associated with the endpoint.
The Base URL is http://<Extension IP>. The extension IP is highlighted in extension installation section. The Login Username and Login Password are mandatory fields but never used here since the contents are posted internally to an extension. Please use dummy values for username and password.

Click on “Next”. This will advance you to the Attributes Tab where you need to provide the authorization attributes. Click on “Add More Filters”. Provide a Name for the filter and then a Filter Query. It’s extremely important that the Filter Query is defined correctly. This is the query string that is sent to the Tanium extension asking for context about the endpoint. The query can be indexed off the mac-address or any other endpoint attribute like serial number, UUID etc. of the authenticating endpoint using the following syntax:
/{Tanium attribute name}/%{ClearPass attribute name}
For completeness, few sample filter queries are provided below.
To lookup based on MAC Address in RADIUS request:
/macAddresses/%{Connection:Client-Mac-Address-Colon}
To lookup based on device serial number embedded in client certificate attribute like Subject-AltName-DirName-OnboardDeviceSerial
/serialNumber/%{Certificate:Subject-AltName-DirName-OnboardDeviceSerial}
To lookup based on device UUID embedded in client certificate attribute like Subject-AltName-DirName-OnboardDeviceUDID
/systemUUID/%{Certificate:Subject-AltName-DirName-OnboardDeviceUDID}
Next build out the definitions of the attributes that will be returned from the Filter Query. These attributes will subsequently be used within policy-evaluation and ultimately the enforcement policy applied.

Once the HTTP authorization source is defined, the returned attributes can be leveraged in a service using an enforcement policy or role mapping. A sample role mapping is shown below. Remember to add the newly added Authorization Source under the Authorization tab of the service.

The above policy assigns appropriate role to an endpoint based on the attributes fetched real time from Tanium.
A point to note is that ClearPass Policy Manager would query the Authorization Source every time the client authenticates. The downside with this approach is that if there is a latency in the response from Tanium, it would result in a delay in authentication and if the delay was beyond an acceptable limit, it would result in timeouts. For best performance it is always recommended to leverage the ability of ClearPass to cache the attributes for a configurable time. This is particularly useful in scenarios where clients roam frequently triggering frequent authentication requests. Use these parameters in customer environment based on their requirements.
The parameters of interest are enableEndpointLookupCache and enableCacheTimeSeconds. The values are explained in the table under the section “Configuration Steps”.
{
“logLevel”: “INFO”,
“verifySSLCerts”: true,
“taniumHost”: “”,
“taniumApiToken”: “********”,
“taniumEndpointAttributes”: null,
“taniumEndpointNameValuesSensors”: null,
“ignoreEndpointDifferences”: “EID Last Seen”,
“enableEndpointLookupCache”: true,
“endpointCacheTimeSeconds”: 300,
“enableSyncAll”: false,
“syncAllSchedule”: “0 3 * * *”,
“syncPageSize”: 100,
“syncAllOnStart”: false,
“syncUpdatedOnly”: false,
“syncUpdatedField”: “”,
“syncUpdatedSensor”: “”,
“macAddressSeparator”: “:”,
“bypassProxy”: false,
“enableStats”: false,
“statsUsername”: “”,
“statsPassword”: “********”
}
The access tracker results with the Authorization attributes are shown below.

Appendix A – Troubleshooting and Support
Here we list some basic troubleshooting steps. If you need any help beyond this, please reach out to HPE Aruba Networking Support.
Check API Access Application Control restrictions
If you’ve previously hardened your ClearPass deployment with Application Access Controls, it’s possible that the Extension will not work. Reviewing the Extension Log might show something like the following after immediately starting the Extension. This likely indicates the ClearPass Application API’s are in place.
Example of Extension authorization failure due to Policy Manager Application Control:
[2020-03-16T15:42:21.083] [INFO] Intune - Server listening on port 80.
[2020-03-16T15:42:21.243] [DEBUG] Intune - Request “GET ‘https://172.17.0.1/api/server/version’” took 51.91ms.
[2020-03-16T15:42:21.245] [DEBUG] Intune - <!DOCTYPE html><html>
<head>
<title>
Error 403 (Forbidden)
</title>
<script language=“javascript”>
function reloadPage() {
var locHref = window.location.protocol + “//” + window.location.hostname;
window.location.href = locHref;
}
</script>
To resolve this issue, add the IP address of the Extension to the list of nodes permitted to access the API by navigating to Administration > Server Manager > Server Configuration {choose your node} > Network

INFO
For this reason its good practice to fix the IP address of the extension at installation time such that it doesn’t change over time and break the application controls.
Checking on the Extension Service
The ClearPass Extensions are supported by a system service which must be running.
Restarting this service will affect all deployed and running extensions.
To check on the state of the Extension Service, or to restart the service, go to Administration > Server Manager > Server Configuration > [SERVER] > Service Control. By default this service is automatically started.

Extensions and web proxy / firewall whitelisting
If ClearPass Policy Manager has been configured with a proxy, it’s still possible that domain whitelists are required, the same for some datacenter firewall to allow the installation of Extensions. Some enterprise customers maintain a whitelist of domain that are allowed to transit the proxy/firewall. The underlying docker configuration process uses standard docker registry access to pull images (hosted in docker hub). In general, the following hosts are used:
INFO
-
extensions.clearpassbeta.com
-
registry-1.docker.io
-
index.docker.io
-
auth.docker.io
-
production.cloudflare.docker.com
This is all also geo dependent to some degree and based on various AWS services, so AWS redirects and geo location services will vary. Finally, this all runs via standard HTTPS (port 443).
Extension Logs/Enable Debugging
If you have a requirement to access and view the logs from the Extension, you can turn on different logging levels from the Extension GUI. Adjust the logLevel to ‘DEBUG’ and restart the extension as shown below.
Logs can then be viewed from the ‘Show Logs’.

Remember after changing the logging level, as with any extension configuration change the extension will need to be restarted for this change to take effect.
Accessing the extension logs using ‘Collect Logs’ system function
In addition to viewing the logs as shown above, logs can also be collected and examined via the Policy Manager Collect Logs system function (Administration > Server Manager > Server Configuration > [Select SERVER] > Collect Logs). This is extremely useful should you have a need to call for technical assistance.
If the support team needs to investigate a system issue, one of the items they regularly ask for is the system logs to aid with their diagnostic investigation. By default the “logLevel” is set to INFO, but TRACE, DEBUG, INFO, WARN, ERROR, FATAL can also be set as required. Any of the levels will display the information for the selected state and lower; if INFO is selected, it will show messages for INFO, WARN, ERROR, FATAL.
After the logs have been collected, downloaded and expanded, you can locate the extension logs in the following location in the folder structure PolicyManagerLogs > extension > your-extension-id as shown below. Note the file-name is the same as the running instance ID of the extension.

Monitoring extension statistics
There is a way to monitor extension’s critical resource statistics with the configurable parameter added as part of the extension’s configuration. To enable extension statistics set the “enableStats” parameter to true. Remember a restart of the extension is need to activate the change anytime the config is modified.

To navigate to statistics page, click Show Details.


This will show statistics similar to the following:


Monitoring authorization performance
Since we are authorizing against an external system, it could be relevant to monitor the performance of these transactions as you setup and deploy. If you suspect there is a performance issue, ClearPass provides a way to monitor the authorization processing time. The graph below shows an example of this data, navigate to Monitoring > Live Monitor > System Monitor [click on ClearPass Tab, then select [Authorization]….

Appendix B – Considerations for Installing in a Cluster
Extensions are not synced between ClearPass cluster members, and thus must be installed on each member separately.
Some Extensions can run in two modes: Periodic Sync Mode and Authorization Source Mode.
Periodic Sync Mode
If you are configuring the extension to poll external system periodically and utilize the resulting ClearPass Endpoint database during endpoint Authorization, then you only need to install the extension on one cluster member, often the publisher.
You may wish to install the extension on a second cluster member as a backup, but remember that both extensions will individually be updating the endpoint database. You may want to stagger the updates between the two extensions, for example, Subscriber1 updates at the top of the hour and Subscriber2 updates at 30 minutes after the hour.
Also, in this mode there is no need to explicitly enter an IP address during installation. The defaults will suffice and ClearPass will select an IP in the range specified in the server configuration.
HTTP Authorization Source Mode
In this mode we configure an HTTP Auth source that results in a HTTPS call to external system during endpoint authorization. In this deployment model the extension must be installed on every cluster node that process authentications. Also in this scenario every cluster member’s extension must be set to the exact same IP address during installation time, as the HTTP Auth source configuration is propagated globally across all cluster members.
For example, if the extension IP range is 172.17.0.0/16, we would set the extension to 172.17.0.5 on every cluster member during installation of the extension.
While we normally want to avoid duplicate IP addresses in a network, this is not a concern with ClearPass extensions. Each ClearPass node communicates internally only with its own extension, and this traffic is not routed outside of ClearPass.
Subscriber nodes support the same ability as publishers to install an Extension from the Extension store.
Appendix C – endpoint sync schedule settings
The syncSchedule and similar scheduling parameters sets how often ClearPass executes certain actions like syncing or pushing endpoints. This setting is based on a slightly modified version of the CRON job scheduler found in Unix-like operating systems. It can be used to schedule jobs to run periodically at fixed times, dates or intervals.
A ‘cron’ is a job scheduler. Any scheduled task is called a ‘cron job’. The syntax for a cron job schedule is as follows:

In our use of the cron scheduler, we’ve dropped the use of the last instruction ≤command to execute> and use only the time/date functions, see below for a number of examples of scheduling a sync process.
-
Schedule a sync to run at 2am daily:- 0 2 * * *
-
Schedule a sync to run twice a day at 5am and 5pm:- 0 5,17 * * *
-
Schedule a sync to run on every Sunday at 5pm:- 0 17 * * sun
-
Schedule a sync to run every 30 minutes:- */30 * * * *
-
Schedule a sync to run at 5pm on selected days:- 0 17 * * sun,fri
You can see from the above that the scheduling process is extremely flexible, alternatively https://crontab.guru/ is a great page for learning more about CRON scheduling.
Appendix D – Extension performance optimizations
Extensions are a critical part of ClearPass deployments today and with the increased dependency on extension interactions that involve periodic polling or real-time lookups, here are some of the best practice recommendations around optimizing overall performance when using extensions:
-
If the extension is used to periodically poll external systems and populate endpoint repository, ensure that it is not installed in all the nodes in the cluster. Ideally these type of extensions should only be installed on the publisher node since only publisher node can add endpoint entries to the database. For redundancy, it can be installed on another additional node but it is recommended to stagger the polling interval so that both do not attempt to poll and update endpoint database at the same time.
Example: 0 * * * *, This cron job runs at minute 0 of every hour (e.g., 00:00, 01:00, 02:00, etc.).
30 * * * *, This cron job runs at minute 30 of every hour (e.g., 00:30, 01:30, 02:30, etc.). -
If the extension is used for looking up attributes from external systems in real time during authentication, it should be installed in all the nodes handling authentication. Note that the context server config is replicated from the publisher. When using extension for real time lookup, ensure that the extension has the same IP address in all the cluster nodes.
-
If the extension is expected to do both real-time lookup and periodic polling, ensure that polling is enabled only on the publisher while the extension in subscribers can have the polling disabled by setting the “enableSyncAll” attribute to false.
"enableSyncAll": false,
WARNING
Having the extension installed on all the cluster nodes with enableSyncAll set to true would cause each cluster node to independently poll the external system and update endpoint repository. This could impact the performance of ClearPass. Hence it is strongly recommended to enable endpoint sync only on the extension installed on the publisher and on another cluster node for redundancy.
-
Some 3rd party systems support fetching delta updates vs fetching all of the device information every polling cycle. The extensions that support fetching delta updates are: Workspace ONE Crowdstrike Falcon Microsoft Intune Mosyle SentinelOne Service Now
For these extensions, the syncUpdatedOnly attribute should be set to true in extension config so that the number of DB updates in ClearPass is minimized
"syncUpdatedOnly": true,For extensions that do not support syncUpdatedOnly, ensure that the sync interval is not aggressive. We recommend syncing at most twice a day and that too during off peak hours whenever a full sync is performed.
-
Some 3rd party systems can be very noisy in terms of attribute updates. There could be certain attributes that keep changing every sync interval like “Free Memory in Bytes”, “Last Check in Time” etc. There is no value in updating endpoints when such trivial attributes change for the device. Hence it is recommended to use “ignoreEndpointDifferences” attribute in extension configuration to ignore change in attributes that you do not care about in terms of ClearPass policies.
You can review the Audit Viewer in ClearPass under Monitoring > Audit Viewer to see what attributes are being updated for endpoints to check if there are unnecessary updates.
Sample for JAMF extension:
"ignoreEndpointDifferences": "Last Update, Report Date UTC, Last Contact Time UTC, Last Inventory Update UTC, Last Reported IP, IP Address",Default for Microsoft Intune extension:
"ignoreEndpointDifferences": "Last Sync Date Time, Free Storage Space in Bytes", -
To further optimize the number of endpoints being updated in ClearPass, you can specify which attributes are being used in the ClearPass policies so that only changes to those attributes would trigger an update to the endpoint. This is done by listing out the specific attributes under endpointAttributes in extension configuration.
Sample for JAMF extension:
"endpointAttributes": "Group names, MDM Enabled, Managed, Remote Managed, Supervised, Serial Number", -
Setup extension to restart unless it was intentionally stopped. A restart policy can be defined in extension configuration to ensure that the extension starts up automatically after server reboots and such. Restart policy of “unless-stopped” would ensure the extension always starts up unless it was manually stopped.
“restartPolicy”: “no” — The extension will not be automatically restarted after the server is restarted.
“restartPolicy”: “always” — The extension will always be restarted after the server is restarted.
“restartPolicy”: “unless-stopped” — The extension will be restarted unless it was stopped prior to the server restart, in which case it will maintain that state.
“restartPolicy”: “on-failure:N” — If the extension fails to restart, the value for “N” specifies the number of times the extension should try to restart. If you do not provide a value for “N”, the default value will be “0”.
The “restartPolicy” parameter is not present by default in extension configurations. When it is not present, if the system is restarted a default policy is applied to the extension to maintain the state it was in before the restart. If the “restartPolicy” parameter is added to the configuration but later removed, the extension will then revert to the default restart policy.
Appendix E – Default attributes fetched from Tanium
Following is the sample list of the attributes fetched from Tanium using the default configuration.
{
“Source”: “Tanium”
“Tanium EID First Seen”: “Thu, 09 Mar 2023 07:53:07 +0000”
“Tanium EID Last Seen”: “Sun, 26 Nov 2023 20:00:45 +0000”
“Tanium Last Update”: “2023-11-26 20:33:12”
“Tanium System Found”: true
“Tanium computerID”: 695858940
“Tanium domainName”: “tmelab.com”
“Tanium id”: 6
“Tanium ipAddress”: 172.16.10.190
“Tanium macAddresses”: “30:03:C8:49:7C:BB”
“Tanium manufacturer”: “LENOVO”
“Tanium model”: “Lenovo V14 G3 ABA”
“Tanium name”: “tme-win-11.tmelab.com”
“Tanium os.generation”: “Windows 11”
“Tanium os.name”: “Windows 11 Pro”
“Tanium os.platform”: “Windows”
“Tanium serialNumber”: “PF3TG7DQ”
“Tanium systemUUID”: “AE90C181-ED53-11EC-80F2-6C2408C2965C”
}
2.2 - BigFix
Introduction and Overview
BigFix is one of the leading endpoint management and security platforms. It quickly identifies and discovers information about endpoints, patches operating systems and monitors the inventory continuously to ensure compliance of endpoints in the infrastructure. BigFix aims at keeping the endpoints secure by ensuring they are patched on the network. Unpatched systems are a big threat to organizations as hackers frequently look for ways to leverage known vulnerabilities for malicious activities. It has a rich set of device attributes gathered from the agents running on an endpoint. These attributes can be used by ClearPass Policy Manager to get more context for the endpoint trying to connect onto the network. Unpatched or non-compliant systems can be sent to a Quarantine zone to ensure they do not have access to valuable assets on the network. This integration guide covers the deployment and configuration of a ClearPass Extension to interface with BigFix. The Extension leverages BigFix APIs to obtain attributes associated with an endpoint. This allows the Extension to provide the following integration capabilities.
-
Periodic Poll: enable periodic polling of endpoints in BigFix with a valid mac address. This allows Policy Manager to access a number ofendpoint attributes which can be leveraged for creating policies. For example
a. Check if the endpoint is known to BigFix
b. Check if the Last Update was less than 7 days
c. Check if the endpoint has been locked by BigFix
-
Authorization source: Trigger the Extension to get the attributes for the authenticated endpoint, this query can be based upon the mac-address or the IP address of the endpoint.
Pictorial View of the Integration

Software Requirements
The minimum software version required for CPPM is 6.11.0 . At the time of writing, version 6.11.10 is available as the long supported release and 6.12.4 is available as the short supported release. CPPM runs on hardware appliances with pre-installed software or as a Virtual Machine under the following hypervisors. Hypervisors that run on a client computer such as VMware Player are not supported.
-
VMware vSphere Hypervisor (ESXi) 7.0 U3c and 8.0
-
Windows Server 2019 with Hyper‑V and Windows Server 2022 with Hyper‑V.
-
KVM on CentOS Stream 8, CentOS Stream 9, Ubuntu 20.04 LTS, and Ubuntu 22.04 LTS.
ClearPass Installation and Deployment Guide
This document assumes your ClearPass environment is already configured and operational. If you require assistance with basic deployment, refer to the following deployment guide:
https://arubanetworking.hpe.com/techdocs/ClearPass/6.11/Installation-Guide/Default.htm
ClearPass Extensions
The integration between ClearPass Policy Manager and external systems is driven through a ClearPass capability known as Extensions, a sub-component of the ClearPass Exchange Integration framework. ClearPass Extensions are micro-services running on top of the base ClearPass platform. These micro-services enable HPE Aruba Networking to deliver new features outside of the main software release cycle and facilitate a faster time to market for specific features and integrations. Configuration and control of ClearPass Extensions is accomplished through the ClearPass Guest GUI, as covered later in this document.
Installing Extension
ClearPass Extensions are easy to install from the ClearPass Extensions Store. In a cluster, ClearPass Extensions can be installed on a subscriber independently of the publisher. Multiple copies of the same extension can be installed if needed as well.
INFO
Internet access is required for ClearPass Policy Manager to install the ClearPass Extensions from the Extension Store. Starting with ClearPass 6.12, extensions can be can be installed offline as well. Offline ClearPass Extension images are available on HPE networking support portal.
Access to the extension store
Access the Extension Store to download and install ClearPass extensions. The Extension store utilizes the same HPE Passport account credentials used to validate support entitlement in the Software Updates Por- tal. This is configured under Administration > Agents and Software Updates > Software Updates as shown below. Ensure that valid HPE Passport credentials have been entered in these fields to enable Ex- tension download capabilities.
Installing the Extension from Store
Extensions are installed from the extension page in ClearPass Guest, as shown below. Access it from Guest > Administration > Extensions
From here, click on ‘Install Extension’, and the search box below appears.
Enter “Intune” and click on ‘Search’, see the example below.
INFO
Here we are using Intune as an example. The installation steps are the same for all the extensions. For your deployment, please search for the appropriate extension like Jamf, Mosyle, Crowdstrike, etc.
All currently available extensions are listed in the page: https://www.arubanetworks.com/techdocs/NAC/clearpass/integrations/clearpass-extension/extensions-list/
Click on the extension name and then click “Install.”
In the “Install Extension” dialog box, set the IP address if necessary, as described in section “Extensions and IP address configuration support” below. Do not check the box to start the extension at this time. Click the “Install” button.
In this example, we’ve not entered an IP address for the extension to use, if there is intent to use the extension as an authorization source set this value and ensure its set the same on all nodes where the Extension is deployed.
The extension will download and appear in a “Stopped” state. Notice the options to Start, Delete, Reinstall, Show Logs, and view Configuration. Click on “Configuration” to view settings.
After the extension has been installed, proceed to configure the extension
A copy of the default Extension configuration is shown above, this will need to be modified for your deployment.
INFO
Password and sensitive configuration items are obfuscated when presented in both the Extension GUI or in the Explorer configuration.
WARNING
The configuration attributes are case sensitive. It is recommended to refer the default configuration sample while editing your configuration.
Extensions and web proxy support
Extensions support communications with 3rd parties via a web proxy. This adds incremental proxy functionality. If a proxy is defined in ClearPass Policy Manager, then an extension will inherit that configuration. See later in the document on how to disable the proxy inherited configuration.
INFO
Note that the Policy Manger web proxy configuration is ONLY read by the extension at installation time. If the web proxy configuration is changed in Policy Manager, then the extension must be re-installed so the new settings are re-read and bonded to the extension.
Extensions and IP address configuration support
ClearPass uses a non-externally routed IP address range to communicate with the Extension. The default is 172.17.0.0/16. You may configure a different range, if desired. This is especially useful when deploying extensions across nodes within a cluster where there is the requirement for a fixed consistent IP address for the extension across the cluster.
Changing the “Extensions Network Address” range is only necessary if either the ClearPass MGMT or DATA interface are using an IP address in the extension default range of 172.17.x.x/12, or if ClearPass needs to communicate with some external device in that range.
To Configure the base Extension IP subnet within Policy Manager navigate to Administration > Server Manager > Server Configuration [chose your node] Service Parameters [ClearPass system service].
INFO
The subnet defined here for the extension framework must fall within the following subnet range 10.0.0.0/8, 172.16.0.0/12, 192.168.0.0/16 as defined by RFC1918. For best results, set the network address range to a subnet that does not exist in your enterprise, and restart the extension service for this change to take effect.
Never set the DATA or MGMT IP address to use an address that matches the Extension Network
INFO
Note that changing the extension base IP address will require the extension service to be restarted.
The default configuration used for v3 of the extension is below.
{
"logLevel": "INFO",
"verifySSLCerts": true,
"bigFixHost": "",
"bigFixPort": 52311,
"bigFixUserName": "",
"bigFixPassword": "********",
"bigFixAdditionalProperties": [],
"bigFixIncludePatchSummary": false,
"enableEndpointCache": false,
"cacheExpirationMinutes": 30,
"enableCacheSync": false,
"cacheSyncSchedule": "0 5 * * 1",
"syncOnStart": false,
"cppmUserName": "",
"cppmPassword": "********",
"bypassProxy": false,
"enableStats": false
}
INFO
BigFix v2 of the extension provides the ability to fetch the patch summary details for an endpoint. This is an important attribute for policy decisions. This was not possible using v1 of the extension. The configuration option used to enable this is “bigFixIncludePatchSummary”.
Each of the attributes are explained in the table below in detail.
| Configuration attribute | Description | Example/Values |
| bigFixHost | The host name or IP address of your BigFix system. | 192.168.1.10 bigfix.arubasecurity.net |
| bigFixPort | The port number for the BigFix API. | Default: 52311 |
| bigFixUserName | The user name of an account in BigFix with access to Computer Properties and the Query API. | Username for account created (see Appendix E) |
| bigFixPassword | The password for the user entered in the bigFixUserName setting. | Password for account created (see Appendix E) |
| bigFixAdditional-Properties |
A JSON array of additional properties to pull from BigFix. Default properties are included automatically and cannot be removed. Additional values may be added. |
["Property Name", "Property Name"] |
| bigFix-IncludePatchSummary |
Enables the extension to add patch summary information to device attributes. Patch summary is the numeric count of missing patches classified as Critical, Important, Moderate, and Low. |
true / false |
| enableEndpointCache | Enables the endpoint cache process when performing a single MAC Address or IP Address based device lookup. | true / false |
| enableExpirationMinutes | The amount of time an endpoint's data is considered "valid" when using enableEndpointCache. | Default: 30 |
| enableCacheSync |
Enables the caching of all available endpoints in BigFix. Uses differential updates — only systems that checked in since the last update are refreshed. |
true / false |
| cacheSyncSchedule |
CRON-formatted schedule for updating the endpoint cache. See Appendix C for more details. |
"0 5 * * 1" (Updates every Monday at 05:00) |
| syncOnStart | Starts a cache sync every time the extension is started or restarted. | true / false |
| cppmUserName | The user name of an Admin user in ClearPass. Used for device profiling. | Administrator username |
| cppmPassword | The password for the user entered in cppmUserName. | Administrator password |
| logLevel | Logging level for troubleshooting. | "DEBUG", "INFO", "WARN", "ERROR" |
| bypassProxy | If a proxy is configured, bypass it for API calls to BigFix. | true / false |
| enableStats | Enable basic extension statistics dashboard. | true / false |
When leveraging the sync capabilities of the Extension to get the device attributes from BigFix, use the attribute enableCacheSync and specify cacheSyncSchedule. These 2 attributes are leveraged for periodic poll of endpoints from BigFix. The syncOnStart attribute can be leveraged as well to sync everything upon the start or re-start of the extension.
When doing single device lookups by MAC Address, if enableEndpointCache is true, the mac address will be looked up in ClearPass to see if the information for the computer is in the database and up-to-date as determined by the cacheExpirationMinutes, this being the amount of time an endpoints data will be considered "fresh" when using the enableEndpointCache option. If false, all requests will be sent to BigFix.
The bigFixUserName and bigFixPassword are credentials of the operator on BigFix which will give access to endpoints discovered by BigFix via REST APIs. A default administrator account can be used for this setup or a separate local operator can be created. For steps on creating this operator on BigFix, see next page.
The cppmUserName and cppmPassword should be for an Administrator account. The device profiling attributes obtained from BigFix need to be written into the endpoint repository leveraging a profiling APIs which requires an Administrator account.
INFO
In 6.9 a new REST API was introduced to replace the functionality of the legacy XML API above. If your running 6.9 or greater than the above two parameters can be removed from the configuration.
A ClearPass Network Administrator account can be created under
Administration > Users and Privileges > Admin Users. Click on
Add. A user with the following Privilege Level needs to be
created.
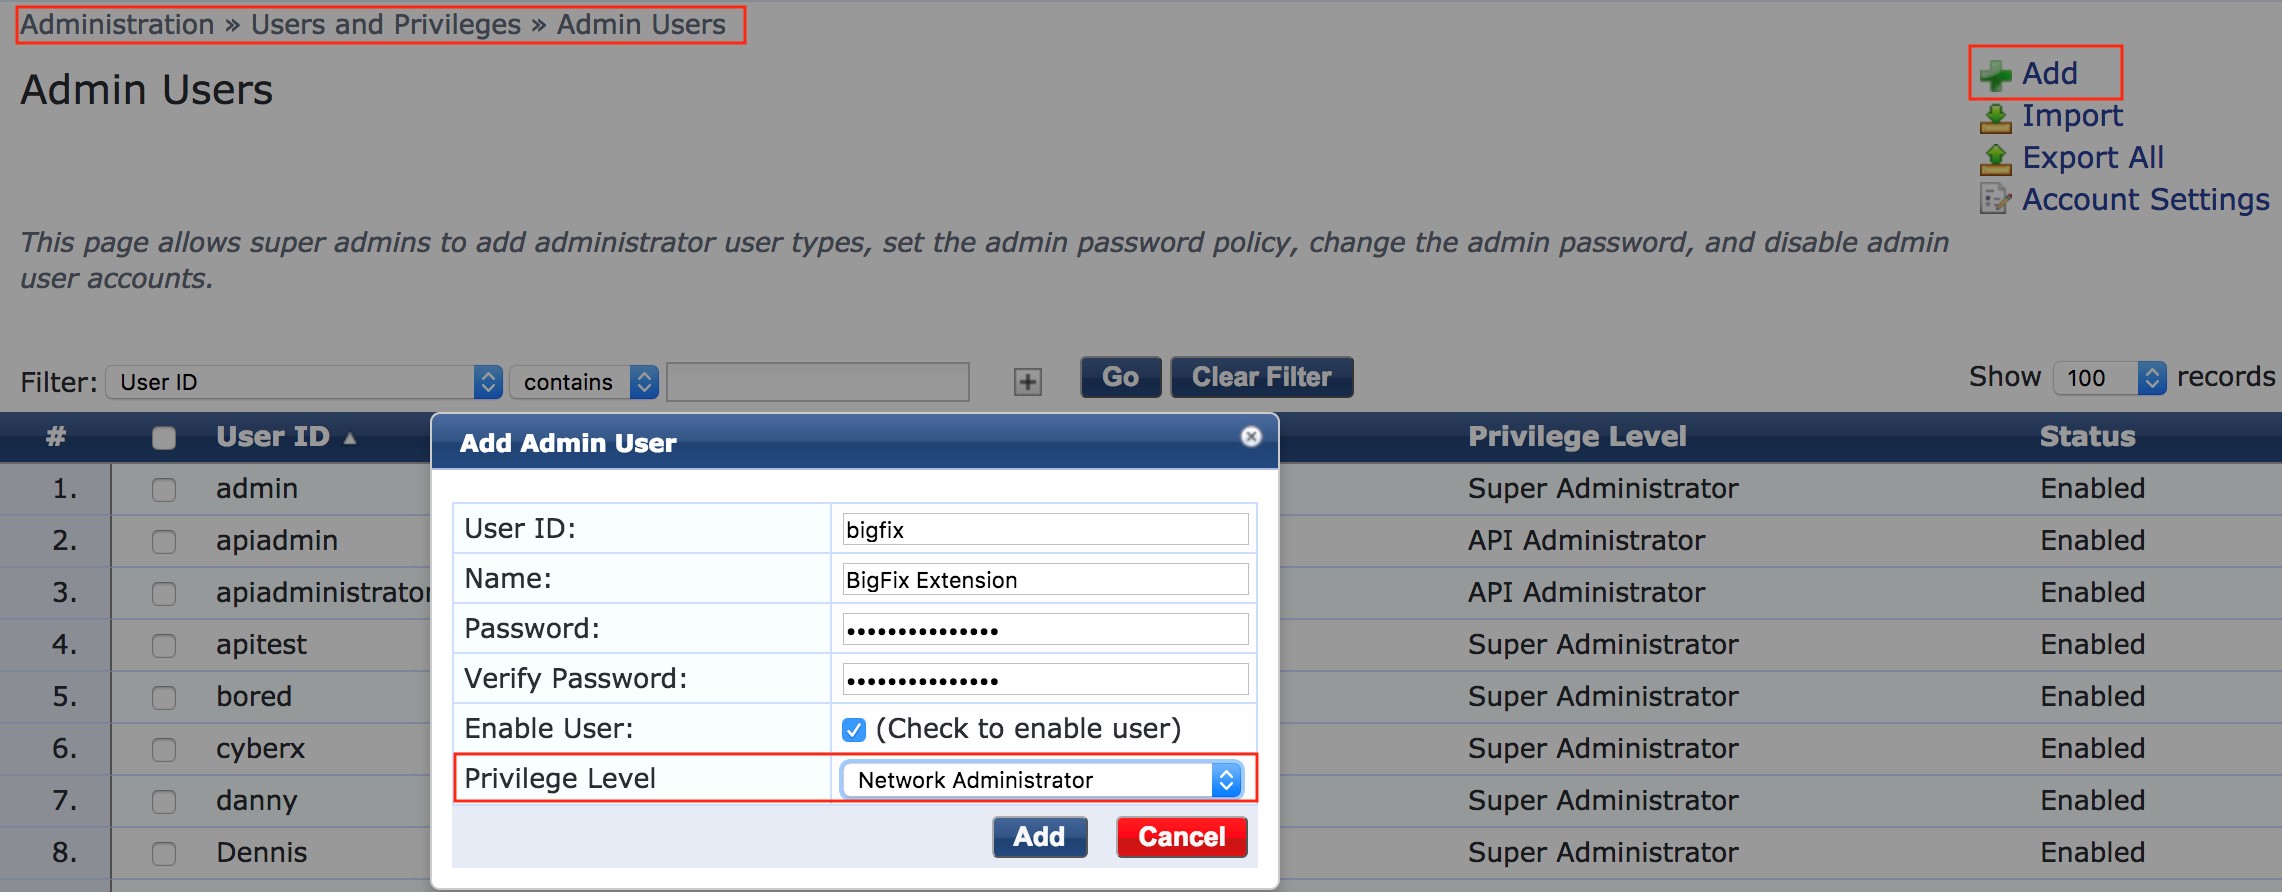
A Network Administrator privilege level is sufficient for the action of adding device profiling information into the endpoint database of ClearPass.
A copy of the BigFix Extension with the desired configuration is shown below, this has to be modified for your as a minimum. Include the bigFixHost, bigFixPort, bigFixUserName, bigFixPassword, cppmUserName and cppmPassword that will be specific to your environment.
Change or include any other values based on the description of each in the above table as necessary to your deployment. Select Restart and click on Save Changes to restart the extension.
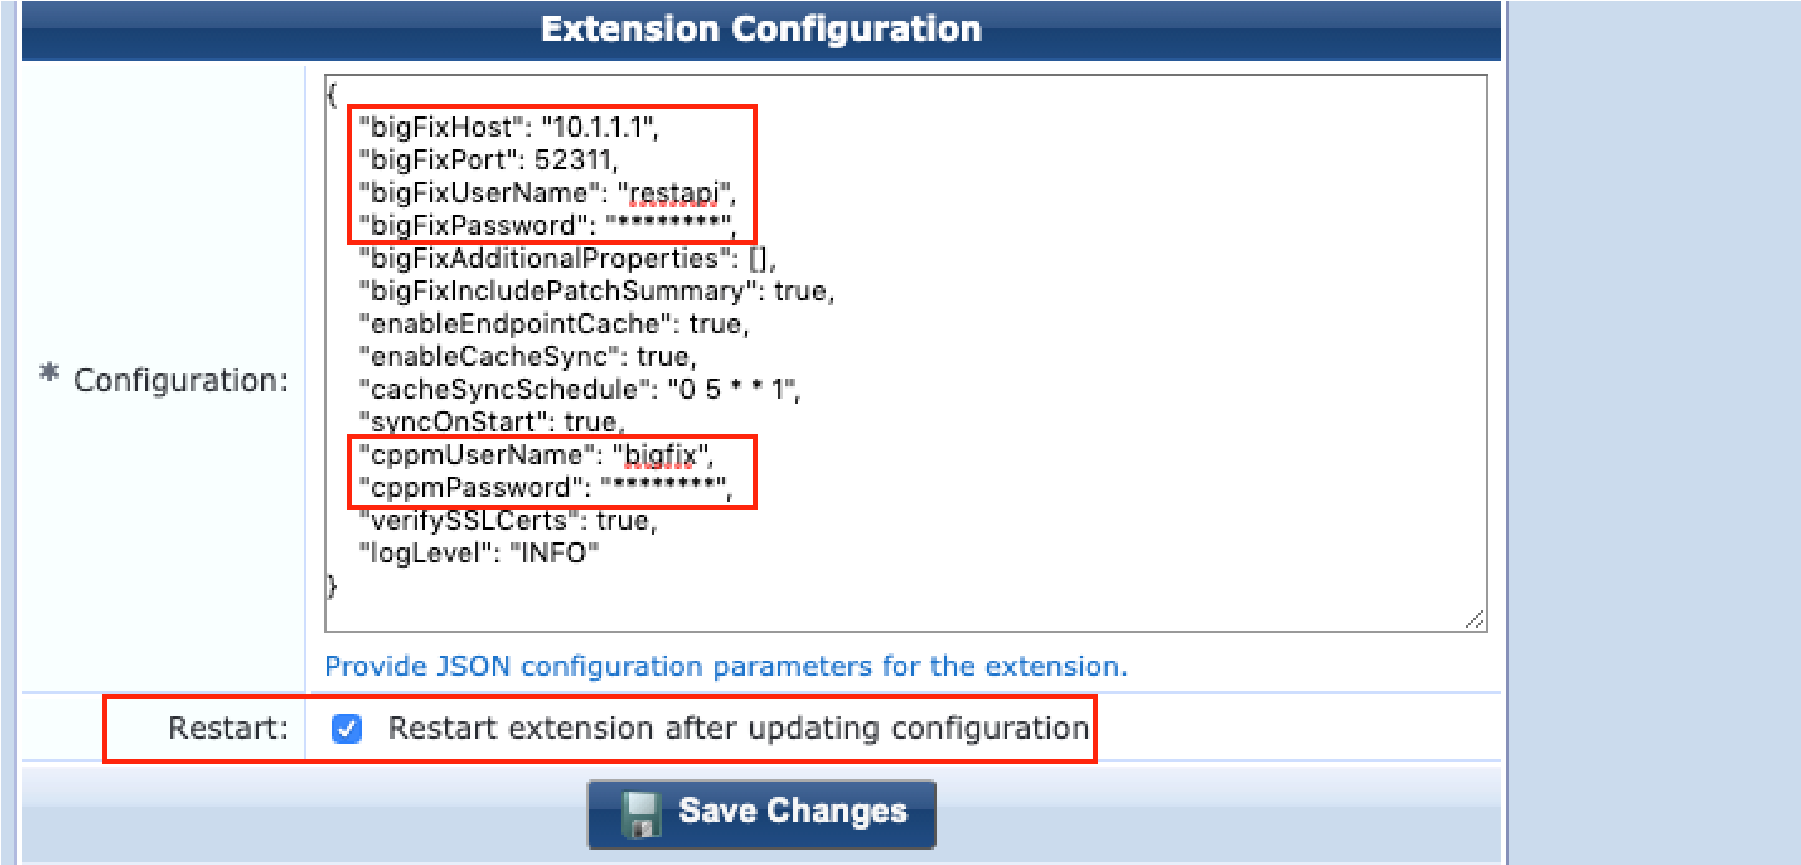
An optional but extremely powerful parameter to note is bigFixAdditionalProperties. By default, the parameter has the value of [] which basically indicates that the sync would only get the default attributes.
However, BigFix includes an extensive list of attributes from an endpoint. Some of these attributes might not be very useful or relevant for ClearPass and would increase the payload to be ingested from BigFix. Customization options are available with this parameter so that an administrator can identify and pull values apart from the default which are important in their environment. Navigate to the BigFix Extension and click on Show Details as shown below.

Click on the Extension URL under the details. This gives a list of all
the attributes that can be fetched from BigFix. If the information is
available for the endpoint on BigFix, ClearPass can pull it.

The URL above gives a long list of available attributes. The ones marked in bold are mandatory and fetched by default. If any of the other properties are useful in a particular environment, they can be fetched using the bigFixAdditionalProperties parameter. They can be then be leveraged in ClearPass Policy.
For example, here we have added BIOS and Client Settings to the list of additional attributes that need to be fetched from BigFix.
Following is the change in the Extension configuration. Remember this change is only required if additional attributes need to be fetched from BigFix. This can be totally skipped for the basic setup of this integration.
{ "bigFixHost": "10.2.98.40",
"bigFixPort": 52311,
"bigFixUserName": "admin",
"bigFixPassword": "********",
"bigFixAdditionalProperties": [
"Client Settings", "BIOS"
],
"bigFixIncludePatchSummary": true,
"enableEndpointCache": true,
"enableCacheSync": true,
"cacheSyncSchedule": "0 5 * * 1",
"syncOnStart": true,
"cppmUserName": "admin",
"cppmPassword": "********",
"verifySSLCerts": false,
"logLevel": "INFO",
"bypassProxy": false,
"enableStats": false
}
Ensure the Extension is restarted upon a configuration change. After
the restart of the extension, click on Show Logs.
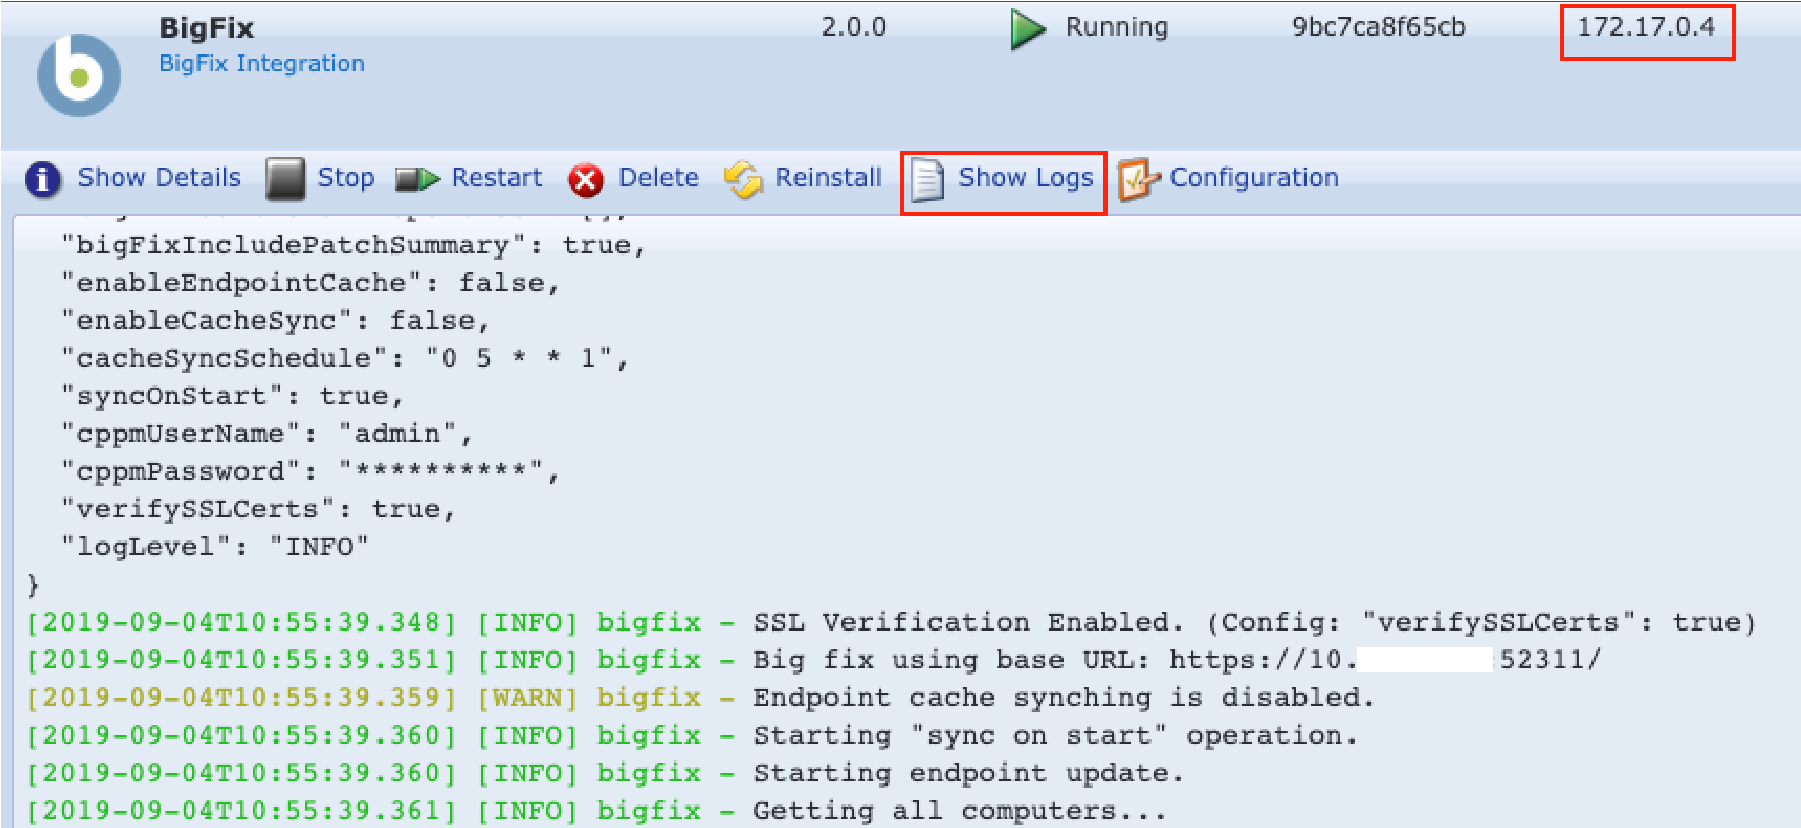
The above log states that the Extension has sync’d the endpoint data from BigFix. The above steps sync endpoint details at the time of starting the Extension and then regular updates are fetched at the interval specified by cacheSyncSchedule, see Appendix C for more information on configuring this value. Please note the IP address of the Extension. This will be used in the next section where we leverage BigFix Extension as an Authorization source. A sample of attributes fetched for an endpoint is shown below.

Configure ClearPass Policy Manager
Multiple methods exist for how ClearPass can utilize the returned data from HCL BigFix, such as:
Ensure that the endpoint is managed by BigFix. If not, perhaps restrict access for the device on the
Corporate Network with a role that only allows the user to remediate and install the BigFix endpoint agent. This provides a controlled environment where all endpoints are known to be in line with corporate security policy, around patching and OS updates.
Check if the endpoint has the latest BigFix agent installed. If not, perhaps quarantine the device with the option to remediate and install an updated client.
More importantly validate whether the endpoint is missing any patches, subdivided into Critical, Important, Low and Moderate, separate policy can be written against any of the counts.
Additionally, policy can be written against a wealth of additional endpoint attributes that are important to you, if for example you wanted to check the BiOS version of devices connecting, you can have BigFix return that data which can then be compared in policy to decide if an endpoint maybe vulnerable to a BiOS exploit.
As mentioned previously, the extension can be run in two modes.
Periodic Sync Mode: Using stored attributes
The Extension can sync data from BigFix periodically, write this data into the ClearPass EndpointDB, then use the EndpointDB as an authorization source. Be aware that this data will not be completely ‘real-time,’ but may be adequate for many if not all use cases.
Here’s an example of a ClearPass Role Mapping Policy that utilizes
these BigFix Endpoint Attributes.

HTTP Authorization Source Mode: A Real-Time authorization check
In this mode we build an HTTP authorization source, add it to an existing Service Policy, then process the returned data from BigFix, typically utilizing a role-mapping or an enforcement profile action. Note that with an HTTP authorization source configured in a Service, ClearPass will make a call to BigFix every time an authenticating device matches this Service, unless the cacheExpirationMinutes timer for the endpoint is still qualifying the data as “fresh”. Making real-time API calls to BigFix every time a device authenticates may not be scalable if there are network delay constraints or you have a high number of authentications/sec.
The HTTP Authorization source is the conduit between the extension and ClearPass Policy Manager. It’s through the authorization source that we expose the BigFix endpoint attributes to Policy Manager so they can be used to perform role-mapping or an enforcement policy action.
Defining a BigFix HTTP Authorization Source
The first step is to add the authorization source. Under
Configuration > Authentication > Sources, click Add and
choose type HTTP.
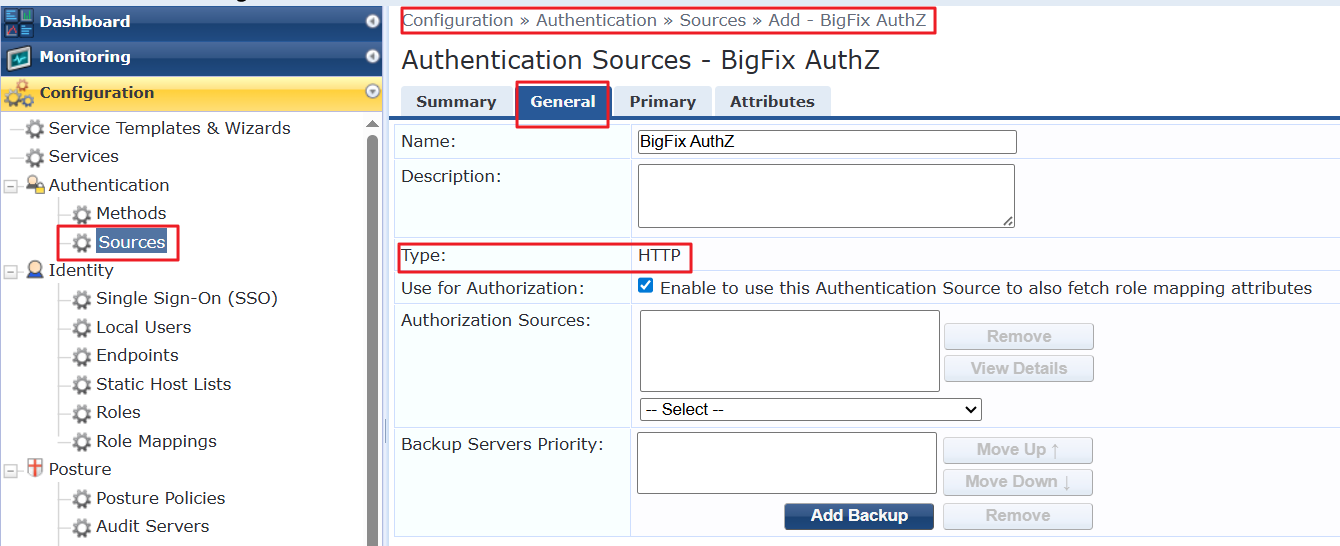
Provide a Name for the Authentication Source and click Next. On the Primary Tab, provide the IP Address of the extension as discussed earlier. Ensure a trailing ‘/mac/’ is added after the extension IP address.
INFO
The Base URL is the IP address of the running extension, if using the extension in this mode it’s good practice to fix the extension to a static IP address. The Login Username and Password can be set to ANYTHING; they are not used by this extension but the parameters are mandatory.
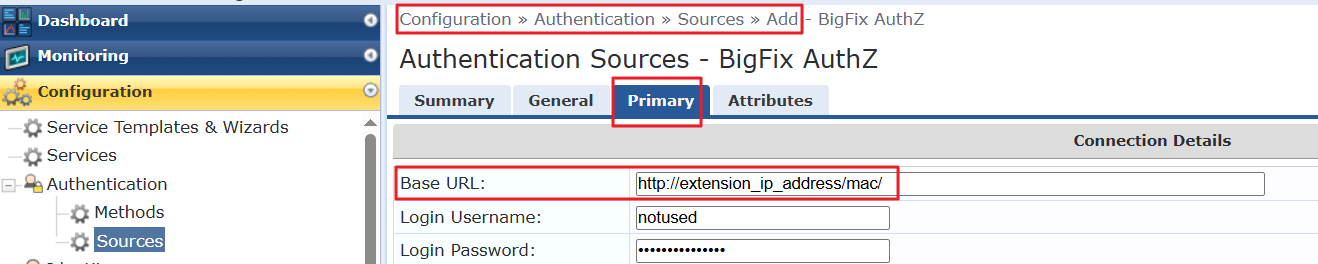
Click on Next. This will advance to the Attributes Tab where you must configure at least one attribute. Click on Add More Filters. Provide a Name for the filter and then a Filter Query. The query is indexed off the MAC Address of the endpoint. Copy the line below and paste into the Filter Query box.
%{Connection:Client-Mac-Address-Hyphen}
INFO
It’s extremely important that the Filter Query is defined correctly. This is the query string sent to the BigFix Extension requesting context about the endpoint.

The data returned from BigFix can be extensive, but not all the data
is relevant to making a security policy decision about the endpoint.
Choose which attributes are required for your enforcement profile. As
an example, the filter shown below has eleven attributes configured.
Your filter may differ depending on the use-cases you are trying to
meet. Remember if you want to check additional attributes via the HTTP
authZ then they need to be added in the array un the extension under
bigFixAdditionalProperties.
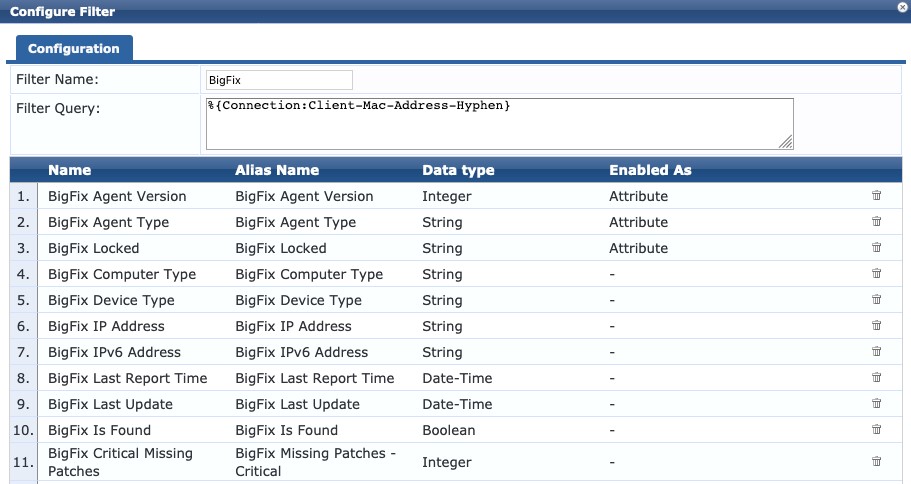
Using Results from the BigFix HTTP Auth Source
Below is an example of using these attributes in a ClearPass Role
Mapping Policy.
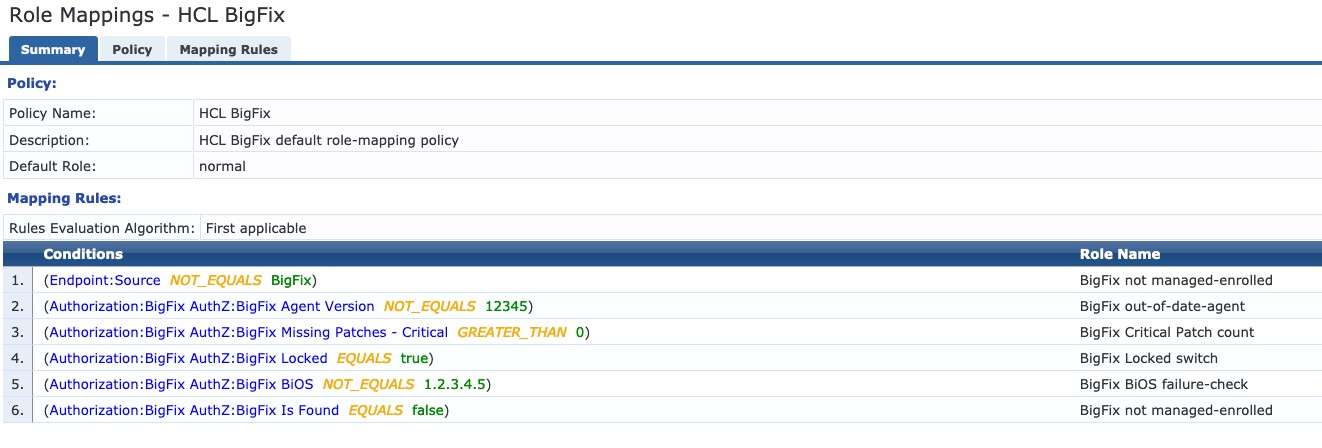
This is just a simple configuration to show what you can do with the returned attributes.
Previously we discussed about an optional parameter called bigFixAdditionalProperties. It is used to fetch more attributes than the default ones available above. In order to use that attribute with Authorization source it is necessary to add the same using the option “Add More Filters”. Without doing this, it will not be available for use with Authorization.
Let’s look at the example below where the BigFix Missing Patches-Critical attribute fetched is mapped within the Authorization source
as shown below.
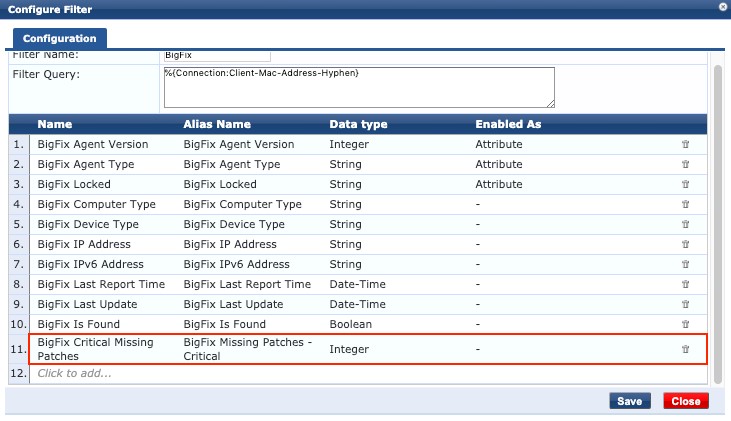
Let’s look at the service configuration within ClearPass to see this
HTTP source being leveraged as an Authorization source within a
service. Ensure to check the option for enabling Authorization.
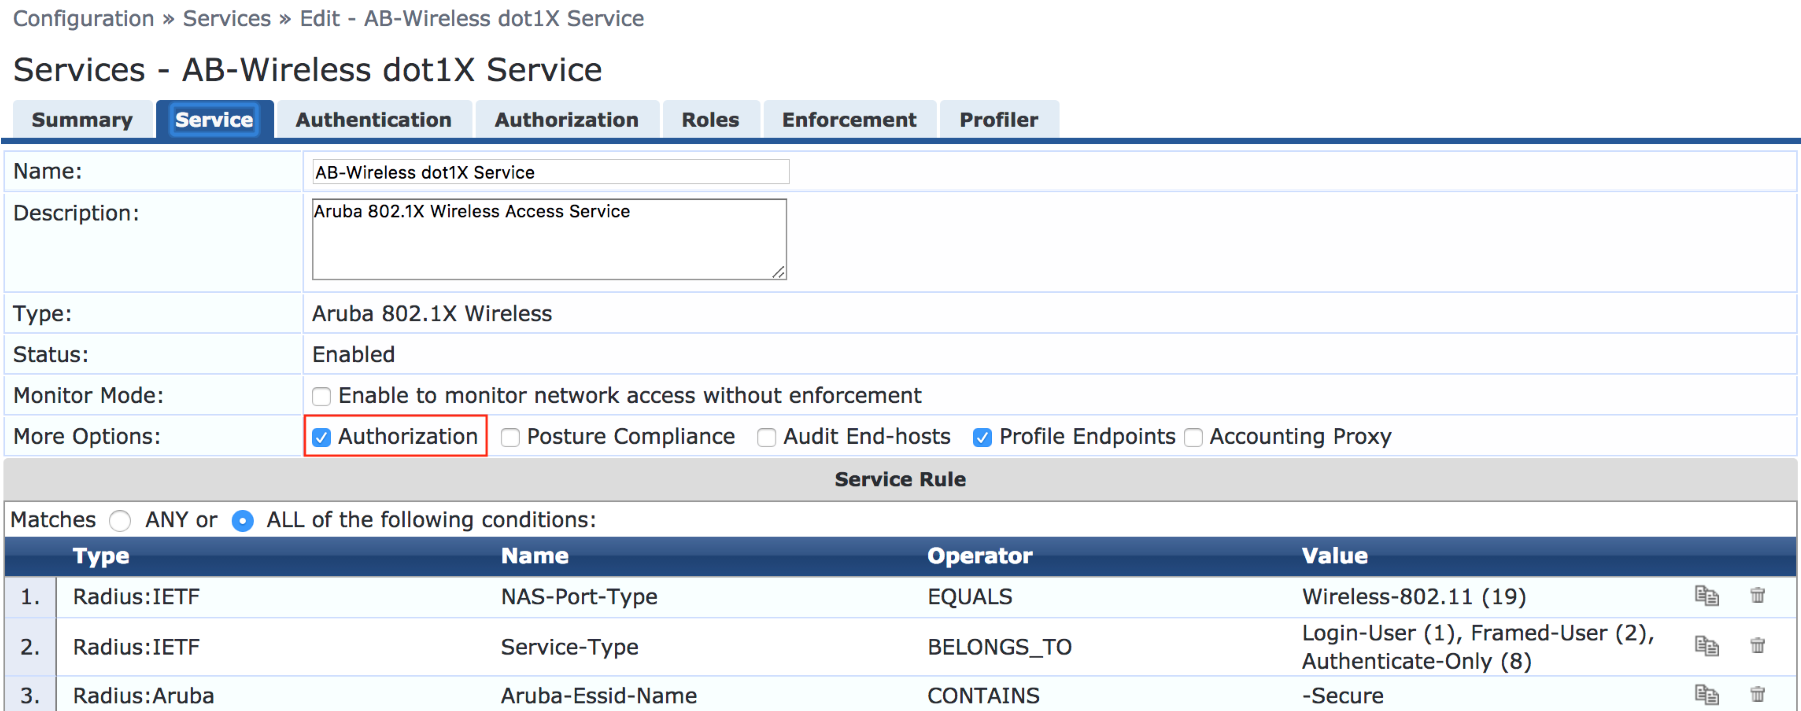
The next step is to add this source under Authorization. The
Authorization tab for the service is shown below.
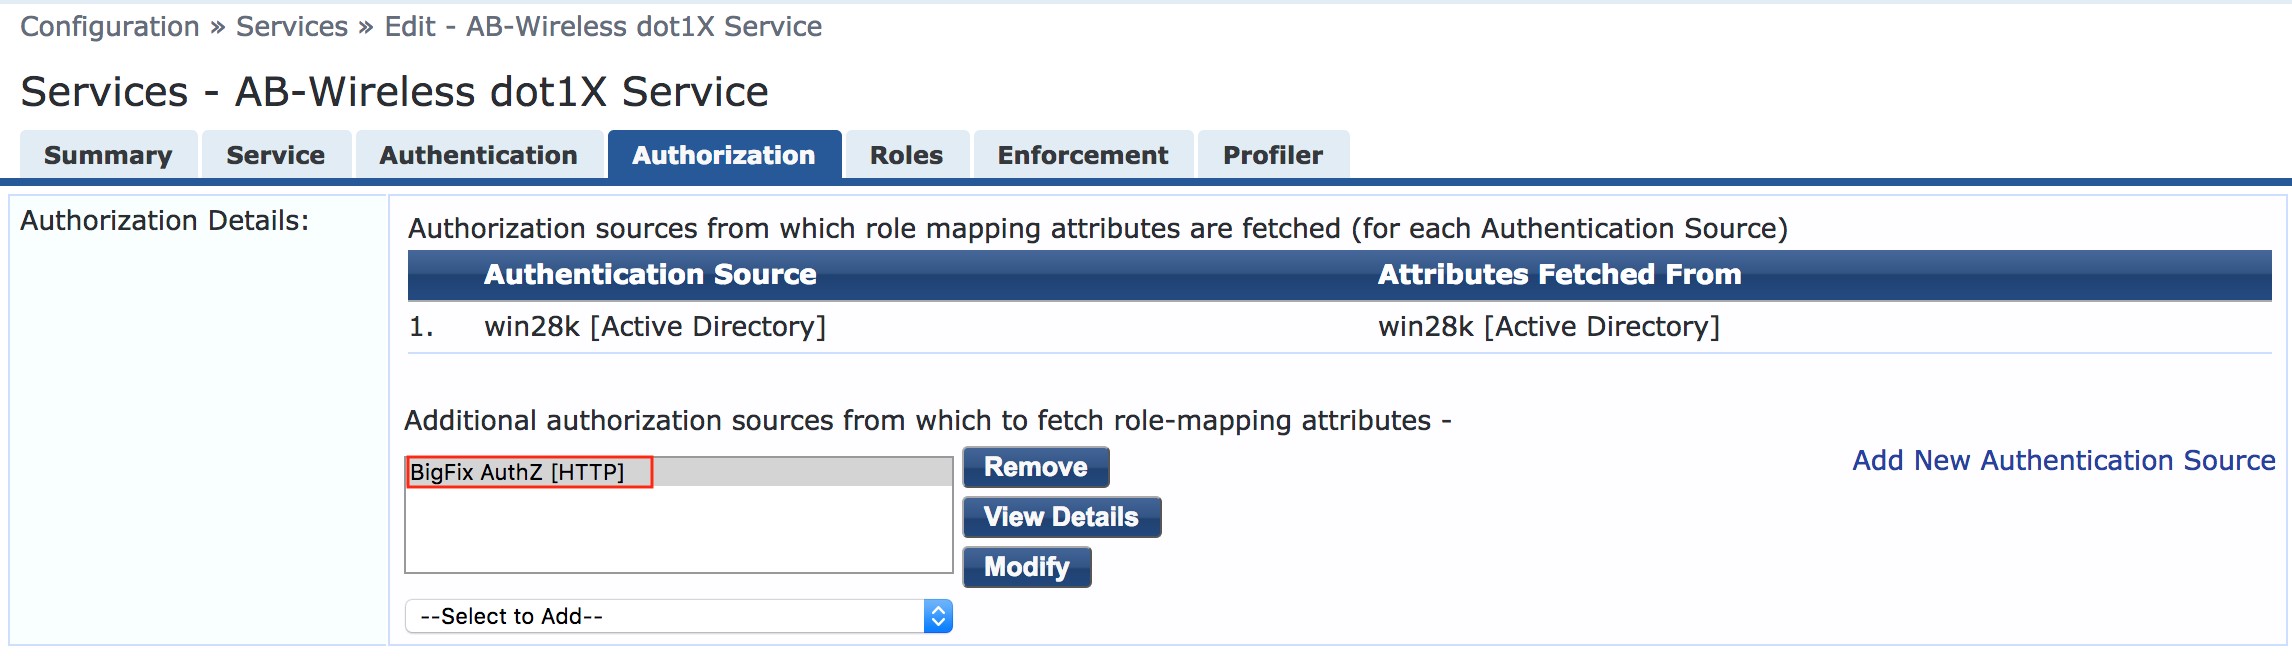
Finally, the authorization source is leveraged under Enforcement for
the policies to be defined. A sample Enforcement Policy for this
service is shown below.
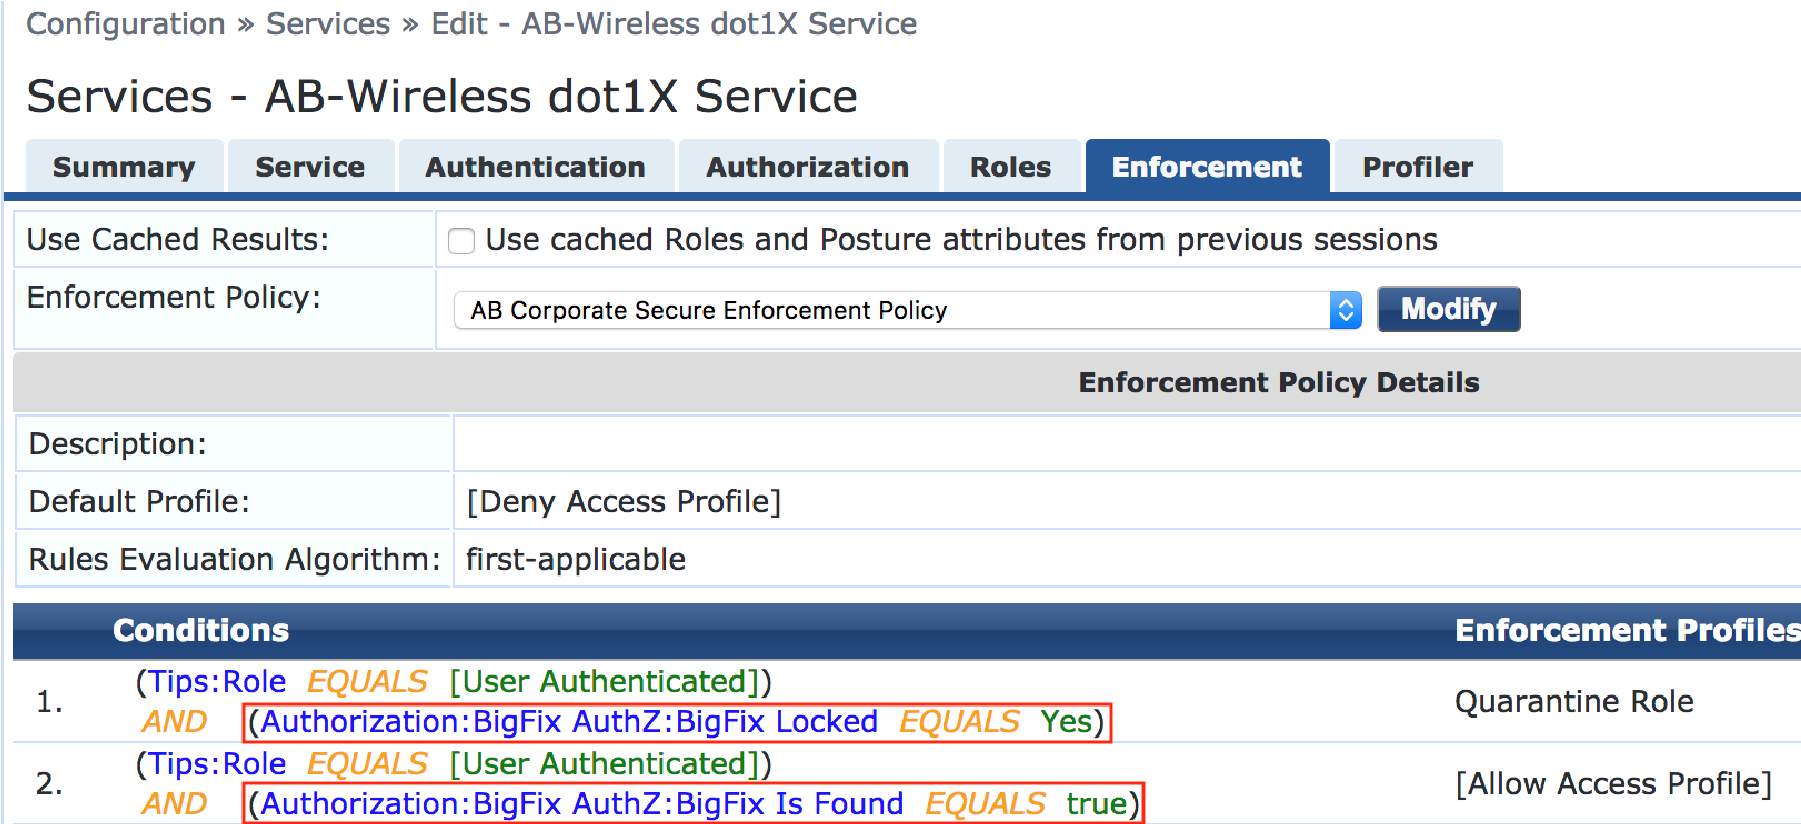
In the above policy if BigFix marks an endpoint as Locked, the endpoint is assigned a Quarantine role with restricted Access. A full access role is granted only if the Endpoint “Is Found” by BigFix. If not, a default of [Deny Access Profile] is assigned.
Appendix A – Troubleshooting and Support
Here we list some basic troubleshooting steps. If you need any help beyond this, please reach out to HPE Aruba Networking Support.
Check API Access Application Control restrictions
If you’ve previously hardened your ClearPass deployment with Application Access Controls, it’s possible that the Extension will not work. Reviewing the Extension Log might show something like the following after immediately starting the Extension. This likely indicates the ClearPass Application API’s are in place.
Example of Extension authorization failure due to Policy Manager Application Control:
[2020-03-16T15:42:21.083] [INFO] Intune - Server listening on port 80.
[2020-03-16T15:42:21.243] [DEBUG] Intune - Request “GET ‘https://172.17.0.1/api/server/version’” took 51.91ms.
[2020-03-16T15:42:21.245] [DEBUG] Intune - <!DOCTYPE html><html>
<head>
<title>
Error 403 (Forbidden)
</title>
<script language=“javascript”>
function reloadPage() {
var locHref = window.location.protocol + “//” + window.location.hostname;
window.location.href = locHref;
}
</script>
To resolve this issue, add the IP address of the Extension to the list of nodes permitted to access the API by navigating to Administration > Server Manager > Server Configuration {choose your node} > Network
INFO
For this reason its good practice to fix the IP address of the extension at installation time such that it doesn’t change over time and break the application controls.
Checking on the Extension Service
The ClearPass Extensions are supported by a system service which must be running.
Restarting this service will affect all deployed and running extensions.
To check on the state of the Extension Service, or to restart the service, go to Administration > Server Manager > Server Configuration > [SERVER] > Service Control. By default this service is automatically started.
Extensions and web proxy / firewall whitelisting
If ClearPass Policy Manager has been configured with a proxy, it’s still possible that domain whitelists are required, the same for some datacenter firewall to allow the installation of Extensions. Some enterprise customers maintain a whitelist of domain that are allowed to transit the proxy/firewall. The underlying docker configuration process uses standard docker registry access to pull images (hosted in docker hub). In general, the following hosts are used:
INFO
-
extensions.clearpassbeta.com
-
registry-1.docker.io
-
index.docker.io
-
auth.docker.io
-
production.cloudflare.docker.com
This is all also geo dependent to some degree and based on various AWS services, so AWS redirects and geo location services will vary. Finally, this all runs via standard HTTPS (port 443).
Extension Logs/Enable Debugging
If you have a requirement to access and view the logs from the Extension, you can turn on different logging levels from the Extension GUI. Adjust the logLevel to ‘DEBUG’ and restart the extension as shown below.
Logs can then be viewed from the ‘Show Logs’.
Remember after changing the logging level, as with any extension configuration change the extension will need to be restarted for this change to take effect.
Accessing the extension logs using ‘Collect Logs’ system function
In addition to viewing the logs as shown above, logs can also be collected and examined via the Policy Manager Collect Logs system function (Administration > Server Manager > Server Configuration > [Select SERVER] > Collect Logs). This is extremely useful should you have a need to call for technical assistance.
If the support team needs to investigate a system issue, one of the items they regularly ask for is the system logs to aid with their diagnostic investigation. By default the “logLevel” is set to INFO, but TRACE, DEBUG, INFO, WARN, ERROR, FATAL can also be set as required. Any of the levels will display the information for the selected state and lower; if INFO is selected, it will show messages for INFO, WARN, ERROR, FATAL.
After the logs have been collected, downloaded and expanded, you can locate the extension logs in the following location in the folder structure PolicyManagerLogs > extension > your-extension-id as shown below. Note the file-name is the same as the running instance ID of the extension.
Monitoring extension statistics
There is a way to monitor extension’s critical resource statistics with the configurable parameter added as part of the extension’s configuration. To enable extension statistics set the “enableStats” parameter to true. Remember a restart of the extension is need to activate the change anytime the config is modified.
To navigate to statistics page, click Show Details.
This will show statistics similar to the following:
Monitoring authorization performance
Since we are authorizing against an external system, it could be relevant to monitor the performance of these transactions as you setup and deploy. If you suspect there is a performance issue, ClearPass provides a way to monitor the authorization processing time. The graph below shows an example of this data, navigate to Monitoring > Live Monitor > System Monitor [click on ClearPass Tab, then select [Authorization]….
Appendix B – Considerations for Installing in a Cluster
Extensions are not synced between ClearPass cluster members, and thus must be installed on each member separately.
Some Extensions can run in two modes: Periodic Sync Mode and Authorization Source Mode.
Periodic Sync Mode
If you are configuring the extension to poll external system periodically and utilize the resulting ClearPass Endpoint database during endpoint Authorization, then you only need to install the extension on one cluster member, often the publisher.
You may wish to install the extension on a second cluster member as a backup, but remember that both extensions will individually be updating the endpoint database. You may want to stagger the updates between the two extensions, for example, Subscriber1 updates at the top of the hour and Subscriber2 updates at 30 minutes after the hour.
Also, in this mode there is no need to explicitly enter an IP address during installation. The defaults will suffice and ClearPass will select an IP in the range specified in the server configuration.
HTTP Authorization Source Mode
In this mode we configure an HTTP Auth source that results in a HTTPS call to external system during endpoint authorization. In this deployment model the extension must be installed on every cluster node that process authentications. Also in this scenario every cluster member’s extension must be set to the exact same IP address during installation time, as the HTTP Auth source configuration is propagated globally across all cluster members.
For example, if the extension IP range is 172.17.0.0/16, we would set the extension to 172.17.0.5 on every cluster member during installation of the extension.
While we normally want to avoid duplicate IP addresses in a network, this is not a concern with ClearPass extensions. Each ClearPass node communicates internally only with its own extension, and this traffic is not routed outside of ClearPass.
Subscriber nodes support the same ability as publishers to install an Extension from the Extension store.
Appendix C – endpoint sync schedule settings
The syncSchedule and similar scheduling parameters sets how often ClearPass executes certain actions like syncing or pushing endpoints. This setting is based on a slightly modified version of the CRON job scheduler found in Unix-like operating systems. It can be used to schedule jobs to run periodically at fixed times, dates or intervals.
A ‘cron’ is a job scheduler. Any scheduled task is called a ‘cron job’. The syntax for a cron job schedule is as follows:
In our use of the cron scheduler, we’ve dropped the use of the last instruction ≤command to execute> and use only the time/date functions, see below for a number of examples of scheduling a sync process.
-
Schedule a sync to run at 2am daily:- 0 2 * * *
-
Schedule a sync to run twice a day at 5am and 5pm:- 0 5,17 * * *
-
Schedule a sync to run on every Sunday at 5pm:- 0 17 * * sun
-
Schedule a sync to run every 30 minutes:- */30 * * * *
-
Schedule a sync to run at 5pm on selected days:- 0 17 * * sun,fri
You can see from the above that the scheduling process is extremely flexible, alternatively https://crontab.guru/ is a great page for learning more about CRON scheduling.
Appendix D – Extension performance optimizations
Extensions are a critical part of ClearPass deployments today and with the increased dependency on extension interactions that involve periodic polling or real-time lookups, here are some of the best practice recommendations around optimizing overall performance when using extensions:
-
If the extension is used to periodically poll external systems and populate endpoint repository, ensure that it is not installed in all the nodes in the cluster. Ideally these type of extensions should only be installed on the publisher node since only publisher node can add endpoint entries to the database. For redundancy, it can be installed on another additional node but it is recommended to stagger the polling interval so that both do not attempt to poll and update endpoint database at the same time.
Example: 0 * * * *, This cron job runs at minute 0 of every hour (e.g., 00:00, 01:00, 02:00, etc.).
30 * * * *, This cron job runs at minute 30 of every hour (e.g., 00:30, 01:30, 02:30, etc.). -
If the extension is used for looking up attributes from external systems in real time during authentication, it should be installed in all the nodes handling authentication. Note that the context server config is replicated from the publisher. When using extension for real time lookup, ensure that the extension has the same IP address in all the cluster nodes.
-
If the extension is expected to do both real-time lookup and periodic polling, ensure that polling is enabled only on the publisher while the extension in subscribers can have the polling disabled by setting the “enableSyncAll” attribute to false.
"enableSyncAll": false,
WARNING
Having the extension installed on all the cluster nodes with enableSyncAll set to true would cause each cluster node to independently poll the external system and update endpoint repository. This could impact the performance of ClearPass. Hence it is strongly recommended to enable endpoint sync only on the extension installed on the publisher and on another cluster node for redundancy.
-
Some 3rd party systems support fetching delta updates vs fetching all of the device information every polling cycle. The extensions that support fetching delta updates are: Workspace ONE Crowdstrike Falcon Microsoft Intune Mosyle SentinelOne Service Now
For these extensions, the syncUpdatedOnly attribute should be set to true in extension config so that the number of DB updates in ClearPass is minimized
"syncUpdatedOnly": true,For extensions that do not support syncUpdatedOnly, ensure that the sync interval is not aggressive. We recommend syncing at most twice a day and that too during off peak hours whenever a full sync is performed.
-
Some 3rd party systems can be very noisy in terms of attribute updates. There could be certain attributes that keep changing every sync interval like “Free Memory in Bytes”, “Last Check in Time” etc. There is no value in updating endpoints when such trivial attributes change for the device. Hence it is recommended to use “ignoreEndpointDifferences” attribute in extension configuration to ignore change in attributes that you do not care about in terms of ClearPass policies.
You can review the Audit Viewer in ClearPass under Monitoring > Audit Viewer to see what attributes are being updated for endpoints to check if there are unnecessary updates.
Sample for JAMF extension:
"ignoreEndpointDifferences": "Last Update, Report Date UTC, Last Contact Time UTC, Last Inventory Update UTC, Last Reported IP, IP Address",Default for Microsoft Intune extension:
"ignoreEndpointDifferences": "Last Sync Date Time, Free Storage Space in Bytes", -
To further optimize the number of endpoints being updated in ClearPass, you can specify which attributes are being used in the ClearPass policies so that only changes to those attributes would trigger an update to the endpoint. This is done by listing out the specific attributes under endpointAttributes in extension configuration.
Sample for JAMF extension:
"endpointAttributes": "Group names, MDM Enabled, Managed, Remote Managed, Supervised, Serial Number", -
Setup extension to restart unless it was intentionally stopped. A restart policy can be defined in extension configuration to ensure that the extension starts up automatically after server reboots and such. Restart policy of “unless-stopped” would ensure the extension always starts up unless it was manually stopped.
“restartPolicy”: “no” — The extension will not be automatically restarted after the server is restarted.
“restartPolicy”: “always” — The extension will always be restarted after the server is restarted.
“restartPolicy”: “unless-stopped” — The extension will be restarted unless it was stopped prior to the server restart, in which case it will maintain that state.
“restartPolicy”: “on-failure:N” — If the extension fails to restart, the value for “N” specifies the number of times the extension should try to restart. If you do not provide a value for “N”, the default value will be “0”.
The “restartPolicy” parameter is not present by default in extension configurations. When it is not present, if the system is restarted a default policy is applied to the extension to maintain the state it was in before the restart. If the “restartPolicy” parameter is added to the configuration but later removed, the extension will then revert to the default restart policy.
Appendix E BigFix configuration
It is assumed that a working BigFix environment is leveraged for this extension. The configuration of BigFix is beyond the scope of this guide.
The Extension configuration requires a valid BigFix administrator account to leverage BigFix APIs. This account can be created on BigFix as shown below.
Go to Tools Menu on top of your screen and click on Create Operator . Add a user with credentials as shown below.
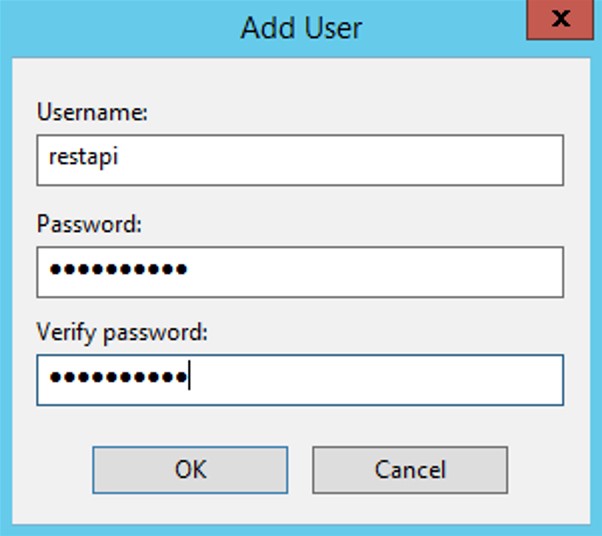
The next step involves assigning permissions for this account. It is
important that the account has the permissions for Can use REST API. Also, the account should have a list of Administered Computers". In our lab, a user with restricted permissions was used
and should be preferred. For details on this, please contact your
local BigFix representative.
Under the “Details” tab for this account, provide restricted
access as shown below.
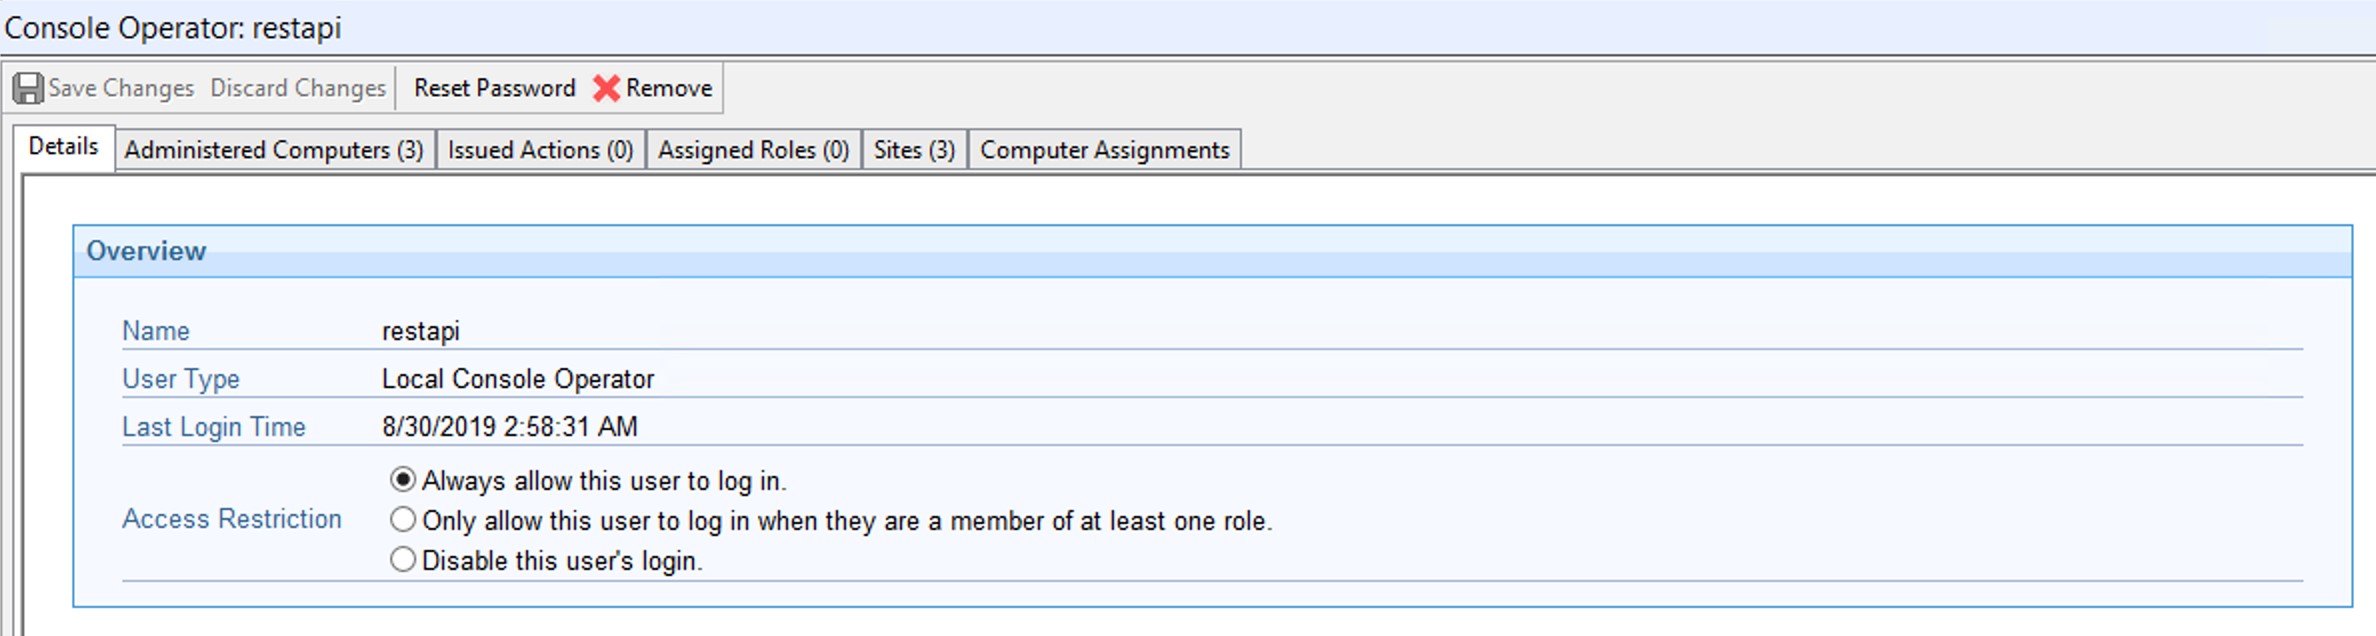
If there are permission issues when trying to fetch computers, one can
check or troubleshoot by giving this account the Master Operator
permission as shown below or use an administrator account for testing
only.
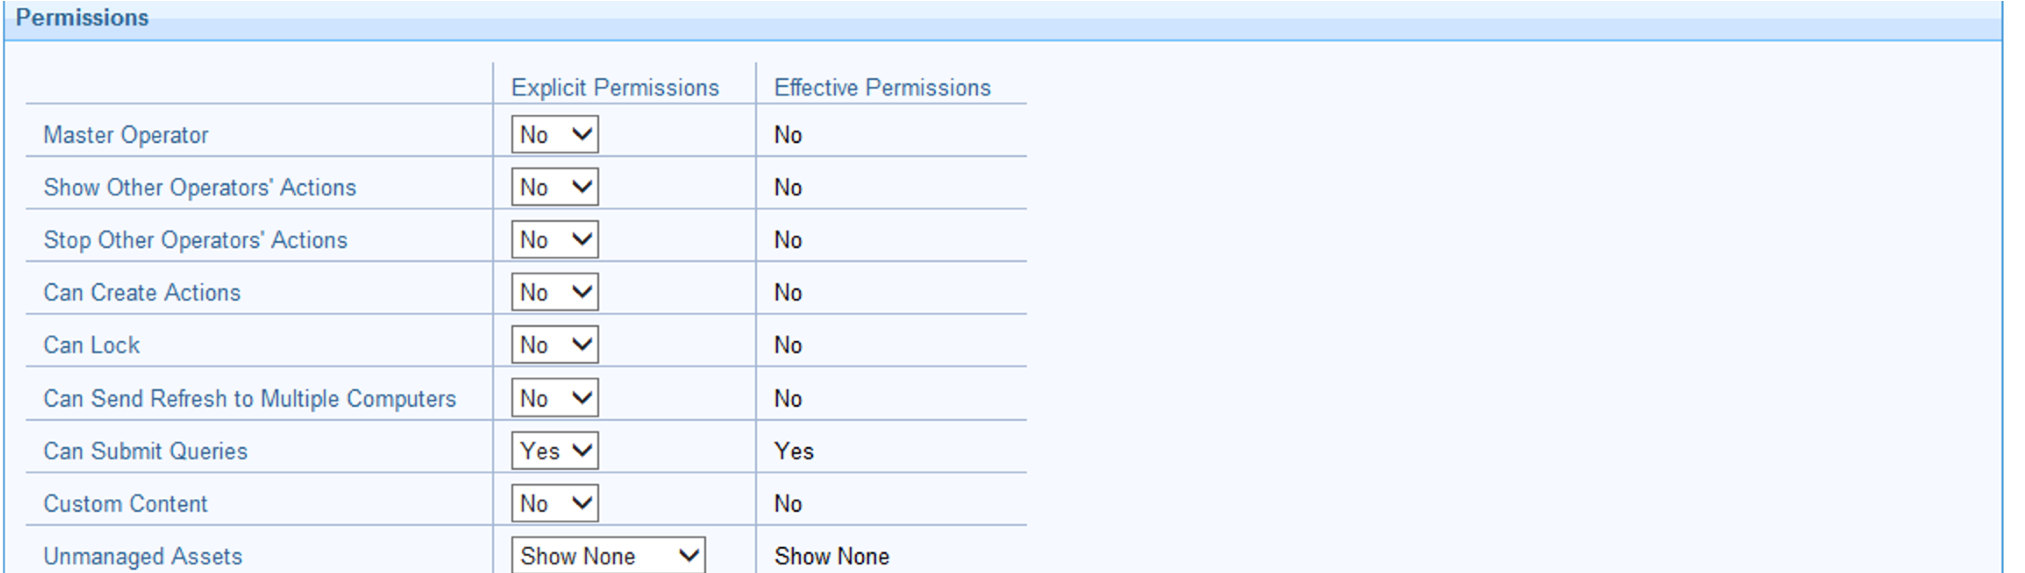

Navigate to the “Computer Assignments” tab. Add the computers in
scope for this Extension or select all computers. It is important that
after the settings are saved, the “Administered Computers” tab
gets updated. An empty list of Administered Computers would always
result in extension fetching no computers.

Further restrictions can be assigned to this account by granting a
Reader permission only to the sites within the scope.

Appendix F XMLs
The Authentication Source can be easily imported into ClearPass so that it can be leveraged to use the BigFix
Extension as an Authorization source in a service. The XML file can be downloaded from https://github.com/aruba/clearpass-exchange-snippets/tree/master/extensions/ibm-bigfix
-
Download the XML profile > “clearpass-extension_tenable-securitycenter_enf-profile.xml”.
-
Open this file in your favorite editor.
-
Use the Find and Replace feature of the editor to replace "<BigFix Extension IP>" with the actual IP address of the BigFix Extension configured. Refer Figure 24.
-
Save the file and Import.
The file can be imported from Configuration > Enforcement >Profiles.
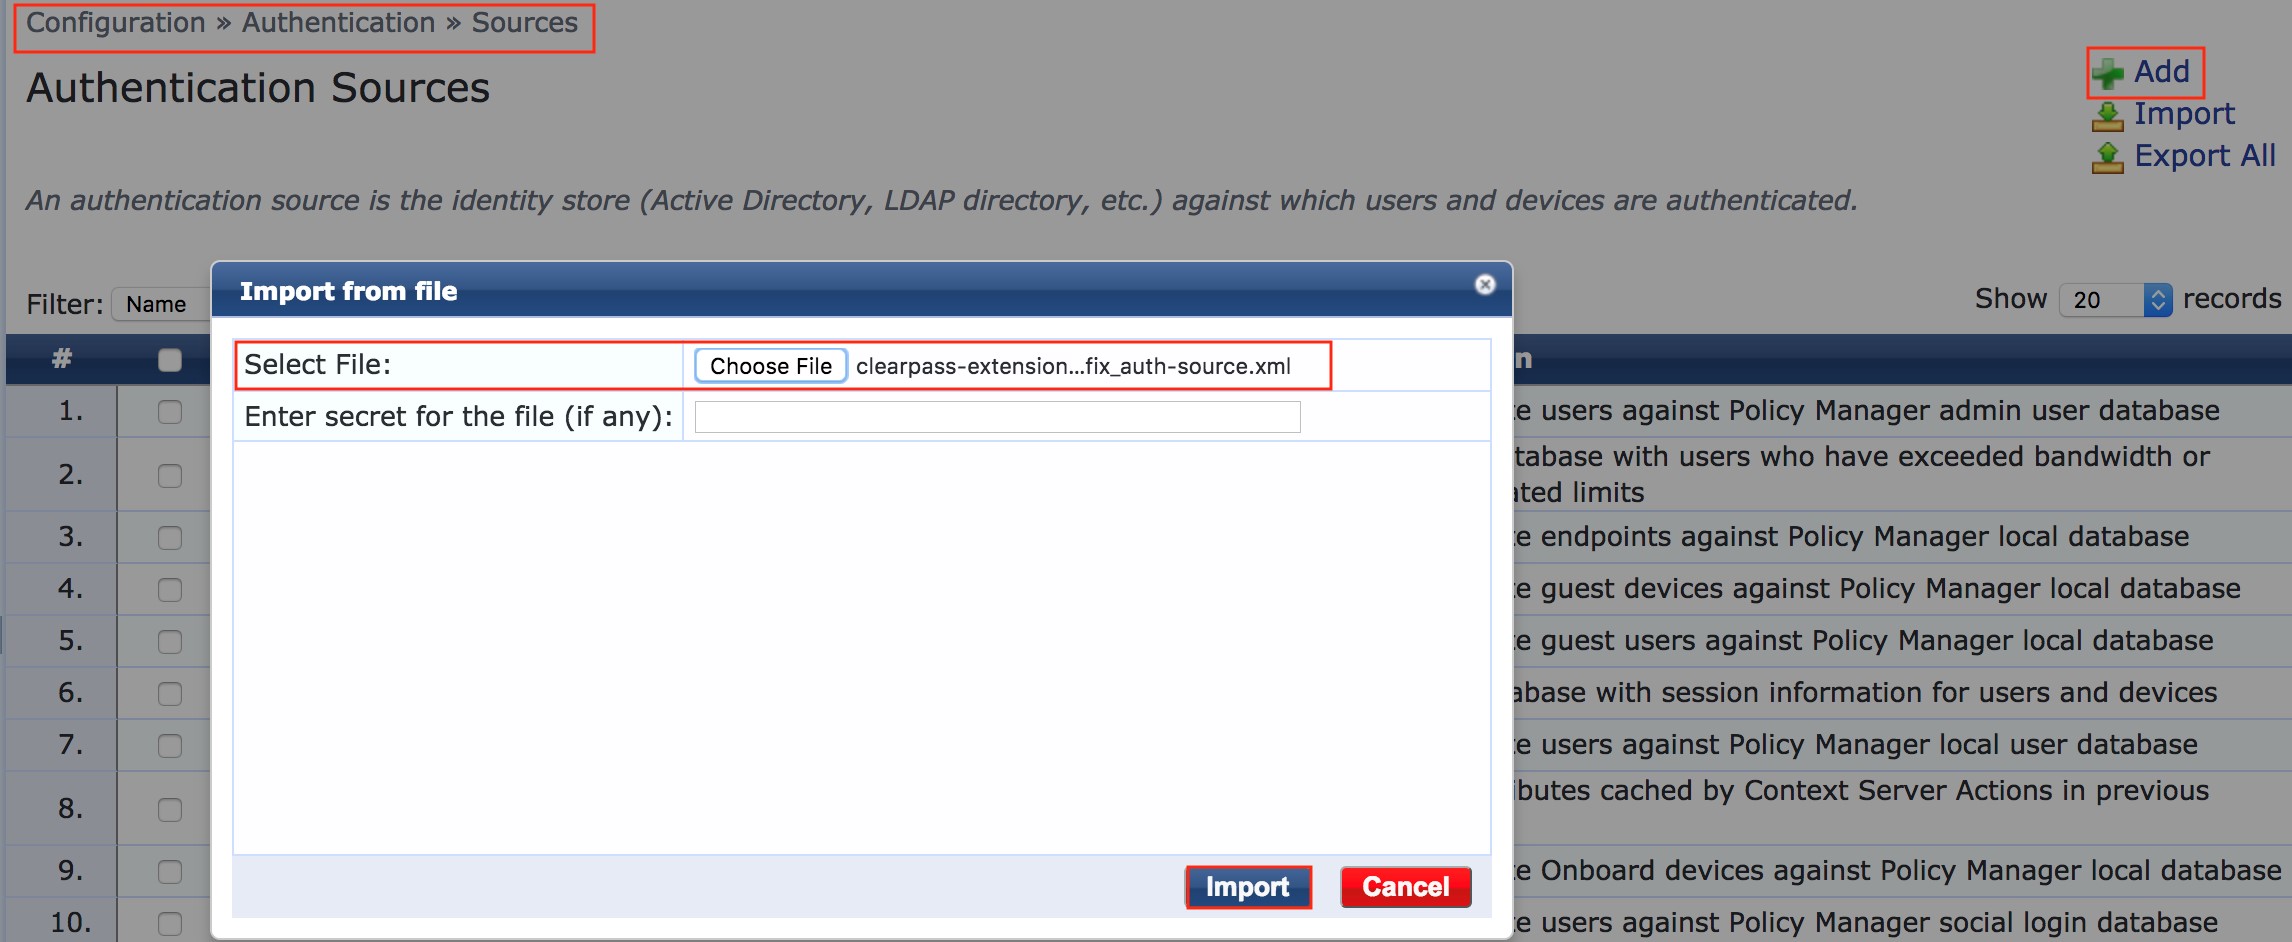
The above action will import an ‘basic’ HTTP Authentication Source in ClearPass which can be leveraged as an Authorization source for a service, you may want to add additional fields/attributes as previously discussed.
2.3 - CrowdStrike Falcon
Introduction and Overview
CrowdStrike Falcon Endpoint Protection is a cloud-based security platform that combines the capabilities of a next-gen Antivirus (NGAV) and Endpoint Detection and Response (EDR) using a single cloud-delivered agent. This release of document focuses on the new SDK based CrowdStrike Falcon extension in the ClearPass Policy Manager. A few enhancements that are added with the new SDK based extension help with the efficient integration of CrowdStrike Falcon Endpoint Protection and ClearPass Policy Manager with the existing methods.
-
CrowdStrike Falcon Integration with ClearPass Policy Manager with the new SDK based extension now conform with the User Agent information that is used by CrowdStrike for internal tracking.
-
The syncing of endpoints from CrowdStrike Falcon now provides the CrowdStrike device ID as well as attribute along with MAC. The authentication source and context server action URL’s can now leverage both MAC and Device ID in real-time lookup for authorization and context server action-based containments.
-
The new extension now also supports bypassing proxy.
ClearPass Policy Manager integrates with CrowdStrike Falcon in multiple ways;
-
Perform a real-time lookup of the device attributes which can be leveraged for Authorization.
-
Bulk import of all the endpoints leveraging flexible polling definition based on crontab
-
Trigger containment or lift the containment for the quarantined devices using the CrowdStrike Falcon agent.
The above use-cases are covered in this integration and documented in this Integration Guide.
What’s new in CrowdStrike v2.1 Extension? -Important Changes
Deprecation of GET /devices/entities/devices/v1(GetDeviceDetails) - CrowdStrike has announced the deprecation of v1 GET host details operation. Integrations leveraging the v1 endpoint API’s must be updated to use one of the new v2 versions by February 9, 2023. This means that all earlier versions of extensions will fail collecting device details causing the integration to break. This release v2.1.0 is updated to use the v2 version of the GET host details operation and is a go to version before February 9, 2023 without fail to continue using the integration between ClearPass and CrowdStrike.
Support for Zero Trust Assessment attributes – CrowdStrike has supported Zero Trust Assessment of endpoints for a while which can be leveraged by this version of extension to fetch the risk scores of an endpoint as endpoint attributes. There are numerous assessment items that CrowdStrike evaluates to give evaluated results like OS assessment, Sensor assessment and Overall assessment scores. We have added support for following Zero Trust assessment attributes in this version of extension which can be called into ClearPass policies for profile enforcements based on CrowdStrike Zero Trust Assessment scores in addition to the existing attributes that we have from past CrowdStrike extension versions.
-
“CrowdStrike Assessment OS”
-
“CrowdStrike Assessment Overall”
-
“CrowdStrike Assessment Sensor Config”

A new configuration knob is added to this version of extension which can be set to true to fetch the Zero Trust scores of an endpoint. This option is set to false by default.
crowdStrikeSyncZeroTrust": true,
Pictorial View of the Integration
The diagram below shows a pictorial overview of the components and how they interact with each other.

Software Requirements
The minimum software version required for CPPM is 6.11.0 . At the time of writing, version 6.11.10 is available as the long supported release and 6.12.4 is available as the short supported release. CPPM runs on hardware appliances with pre-installed software or as a Virtual Machine under the following hypervisors. Hypervisors that run on a client computer such as VMware Player are not supported.
-
VMware vSphere Hypervisor (ESXi) 7.0 U3c and 8.0
-
Windows Server 2019 with Hyper‑V and Windows Server 2022 with Hyper‑V.
-
KVM on CentOS Stream 8, CentOS Stream 9, Ubuntu 20.04 LTS, and Ubuntu 22.04 LTS.
ClearPass Installation and Deployment Guide
This document assumes your ClearPass environment is already configured and operational. If you require assistance with basic deployment, refer to the following deployment guide:
https://arubanetworking.hpe.com/techdocs/ClearPass/6.11/Installation-Guide/Default.htm
ClearPass Extensions
The integration between ClearPass Policy Manager and external systems is driven through a ClearPass capability known as Extensions, a sub-component of the ClearPass Exchange Integration framework. ClearPass Extensions are micro-services running on top of the base ClearPass platform. These micro-services enable HPE Aruba Networking to deliver new features outside of the main software release cycle and facilitate a faster time to market for specific features and integrations. Configuration and control of ClearPass Extensions is accomplished through the ClearPass Guest GUI, as covered later in this document.
Installing Extension
ClearPass Extensions are easy to install from the ClearPass Extensions Store. In a cluster, ClearPass Extensions can be installed on a subscriber independently of the publisher. Multiple copies of the same extension can be installed if needed as well.
INFO
Internet access is required for ClearPass Policy Manager to install the ClearPass Extensions from the Extension Store. Starting with ClearPass 6.12, extensions can be can be installed offline as well. Offline ClearPass Extension images are available on HPE networking support portal.
Access to the extension store
Access the Extension Store to download and install ClearPass extensions. The Extension store utilizes the same HPE Passport account credentials used to validate support entitlement in the Software Updates Por- tal. This is configured under Administration > Agents and Software Updates > Software Updates as shown below. Ensure that valid HPE Passport credentials have been entered in these fields to enable Ex- tension download capabilities.
Installing the Extension from Store
Extensions are installed from the extension page in ClearPass Guest, as shown below. Access it from Guest > Administration > Extensions
From here, click on ‘Install Extension’, and the search box below appears.
Enter “Intune” and click on ‘Search’, see the example below.
INFO
Here we are using Intune as an example. The installation steps are the same for all the extensions. For your deployment, please search for the appropriate extension like Jamf, Mosyle, Crowdstrike, etc.
All currently available extensions are listed in the page: https://www.arubanetworks.com/techdocs/NAC/clearpass/integrations/clearpass-extension/extensions-list/
Click on the extension name and then click “Install.”
In the “Install Extension” dialog box, set the IP address if necessary, as described in section “Extensions and IP address configuration support” below. Do not check the box to start the extension at this time. Click the “Install” button.
In this example, we’ve not entered an IP address for the extension to use, if there is intent to use the extension as an authorization source set this value and ensure its set the same on all nodes where the Extension is deployed.
The extension will download and appear in a “Stopped” state. Notice the options to Start, Delete, Reinstall, Show Logs, and view Configuration. Click on “Configuration” to view settings.
After the extension has been installed, proceed to configure the extension
A copy of the default Extension configuration is shown above, this will need to be modified for your deployment.
INFO
Password and sensitive configuration items are obfuscated when presented in both the Extension GUI or in the Explorer configuration.
WARNING
The configuration attributes are case sensitive. It is recommended to refer the default configuration sample while editing your configuration.
Extensions and web proxy support
Extensions support communications with 3rd parties via a web proxy. This adds incremental proxy functionality. If a proxy is defined in ClearPass Policy Manager, then an extension will inherit that configuration. See later in the document on how to disable the proxy inherited configuration.
INFO
Note that the Policy Manger web proxy configuration is ONLY read by the extension at installation time. If the web proxy configuration is changed in Policy Manager, then the extension must be re-installed so the new settings are re-read and bonded to the extension.
Extensions and IP address configuration support
ClearPass uses a non-externally routed IP address range to communicate with the Extension. The default is 172.17.0.0/16. You may configure a different range, if desired. This is especially useful when deploying extensions across nodes within a cluster where there is the requirement for a fixed consistent IP address for the extension across the cluster.
Changing the “Extensions Network Address” range is only necessary if either the ClearPass MGMT or DATA interface are using an IP address in the extension default range of 172.17.x.x/12, or if ClearPass needs to communicate with some external device in that range.
To Configure the base Extension IP subnet within Policy Manager navigate to Administration > Server Manager > Server Configuration [chose your node] Service Parameters [ClearPass system service].
INFO
The subnet defined here for the extension framework must fall within the following subnet range 10.0.0.0/8, 172.16.0.0/12, 192.168.0.0/16 as defined by RFC1918. For best results, set the network address range to a subnet that does not exist in your enterprise, and restart the extension service for this change to take effect.
Never set the DATA or MGMT IP address to use an address that matches the Extension Network
INFO
Note that changing the extension base IP address will require the extension service to be restarted.
Configuration Steps in CrowdStrike to enable API communication
There are primarily 2 steps involved in getting this integration configured.
-
Configuration of CrowdStrike for Integration
-
Installation and Configuration of CrowdStrike extension using the ClearPass Policy Manager GUI
INFO
Setup and configuration of CrowdStrike is beyond the scope of this guide. Here we specify the steps necessary to configure the integration.
Getting API Credentials
Login to the CrowdStrike tenant, using your administrator credentials.
Create a new API Client. Navigate to Support > API Clients and Keys. Click on “Add new API client”.

Save the API Client ID and Client Key on a notepad. Client Key is not displayed again. This will be used while configuring the Extension in ClearPass Policy Manager.
Enter a Client Name. Under API Scopes, add the following permissions
-
Read/Write permissions for Hosts
-
Read for Event streams
Check for Managed Hosts
This configuration step is optional and is only required if there are no Endpoints managed by CrowdStrike.
Go to Hosts > Host Management. Ensure there are hosts being managed by CrowdStrike. These are the hosts that will be pulled by ClearPass Policy Manager, if the sync function is enabled in the Extension configuration.

If no hosts are managed by CrowdStrike, one needs to install the Falcon Sensor on the endpoints to be managed. These steps vary based on the endpoint Operating System. The installers are available under Hosts > Sensor Downloads.
Steps for sensor installation are available under the section “Sensor Deployment and Maintenance” here https://falcon.crowdstrike.com/support/documentation
CrowdStrike Extension Installation and Configuration on ClearPass
A Graphical User Interface (GUI) is available to make the process of interacting with the extension framework easier. To access the extension GUI, from the Guest System, under Administration find the Extension user interface as shown below.

From here, click on ‘Install Extension’, and the search box below appears. Enter the keyword “CrowdStrike” and click on Search.

INFO
In a cluster environment an extension can be installed on the subscriber nodes directly.
Click on the Extension and then the Install option.

Set a specific IP address for the extension if required. It will automatically pick an IP address if not assigned.

After the extension has been installed, review the configuration and adjust as needed. Notice the options to Start, Delete, Reinstall or Show Logs and the option to edit and set the extension configuration.
The default configuration used for the extension is shown below
{
“logLevel”: “INFO”,
“verifySSLCerts”: true,
“crowdStrikeApiHost”: “api.crowdstrike.com”,
“clientId”: “[Client ID]”,
“clientSecret”: “********”,
“crowdStrikeSyncZeroTrust”: false,
“enableEndpointCache”: false,
“endpointCacheTimeSeconds”: 300,
“syncAllOnStart”: false,
“enableSyncAll”: false,
“syncAllSchedule”: “0 2 * * 6”,
“syncUpdatedOnly”: true,
“syncPageSize”: 100,
“attributePrefix”: “”,
“bypassProxy”: false,
“enableStats”: true,
“statsUsername”: “”,
“statsPassword”: “********”
}
Each of the attributes are explained in the table below in detail.
Figure 12: Extension configuration parameters
| Configuration attribute | Description | Default Values |
|---|---|---|
| logLevel | Logging level for troubleshooting | “INFO” |
| verifySSLCerts | Should SSL Certificates be validated | true |
| crowdStrikeApiHost | The hostname or IP address of the CrowdStrike API | Default: api.crowdstrike.com |
| clientId | The Client ID used to access the CrowdStrike Oauth API | [Client ID] |
| clientSecret | The Client Secret for the provided Client ID | ******** |
| enableEndpointLookupCache | Cache endpoint attributes to optimize authorization queries, avoid repeated DB queries and reduce API calls to external context sources | true |
| endpointCacheTimeSeconds | The duration in seconds to cache the endpoint attributes | 300 |
| syncAllOnStart | If this option is set to true, when the extension starts, the system will attempt to sync all endpoints in the external context source to ClearPass. Note that if you have a large number device context to be fetched, it would take a long time for the initial sync to complete. When used along with syncUpdatedOnly, the subsequent syncs should be faster. |
true |
| enableSyncAll | Enable periodic sync of all endpoints | true |
| syncAllSchedule | The schedule for when the Sync All Endpoints process should run. Note: This uses CRON type scheduling. |
0 2 * * 6 |
| syncUpdatedOnly | If this option is set to true, only the endpoints updated after the previous sync would be fetched from the context source. Note that this option only works for the third-party context sources that have APIs to support this functionality. If this option is set to false, all endpoints are fetched at every sync interval. |
true |
| pageSize | Used to limit the amount of data returned by each sync request in a single attempt. This prevents issues pertaining to timeouts when the dataset to be ingested is large. The value should not be changed unless recommended by customer support. |
500 |
| attributePrefix | Add prefix to endpoint attributes to be able to identify attributes synced from two different CrowdStrike extension instances for parallel systems. | Null |
| bypassProxy | Bypass the web proxy configured on ClearPass Policy Manager | false |
| enableStats | Enable display of extension statistics | false |
| statsUsername | Create a username to access the extension statistics page | Give any username you want to use |
| statsPassword | Create a password to access the extension statistics page | Give any password you want to use |
| crowdStrikeSyncZeroTrust | Enable/Disable fetching of Zero Trust score attributes | false |
A copy of the CrowdStrike Falcon extension with the desired configuration is shown below, this has to be modified for your deployment. Modify the clientId, clientSecret and other options that will be specific to your environment. Change or include any other values based on the description of each in the above table
Select Restart and click on Save Changes to restart the extension.

After completing the configuration, click on ‘Save Changes’ and restart of the extension, click on Show Logs.

The above log shows that the extension has been configured and has ingested endpoints from CrowdStrike leveraging sync on start. These logs can be seen in detail if the loglevel setting is changed to DEBUG.
Use Cases
The extension can serve multiple use cases as described in the Introduction section as well as the Pictorial. Each use case would require some further configuration based on the requirement. Some example configurations are shown below for each use case.
Periodic Poll
This is a commonly used method where the extension is configured to sync all the endpoints to begin with. Once finished, the extension is configured to periodically gather updated data at fixed intervals leveraging the configuration parameters as discussed in the table in previous section. Following is the sample configuration used.
{
“logLevel”: “INFO”,
“verifySSLCerts”: true,
“crowdStrikeApiHost”: “api.crowdstrike.com”,
“clientId”: “[Client ID]”,
“clientSecret”: “********”,
“crowdStrikeSyncZeroTrust”: false,
“enableEndpointCache”: false,
“endpointCacheTimeSeconds”: 300,
“syncAllOnStart”: false,
“enableSyncAll”: false,
“syncAllSchedule”: “0 2 * * 6”,
“syncUpdatedOnly”: true,
“syncPageSize”: 100,
“attributePrefix”: “”,
“bypassProxy”: false,
“enableStats”: true,
“statsUsername”: “”,
“statsPassword”: “********”
}
The above configuration enables periodic sync and triggers it every 2 hours. This could be aggressive and should be changed based on the requirement in a particular scenario to ensure that CrowdStrike is not inundated with requests and also to manage the resource utilization on ClearPass Policy Manager.
A parameter that further helps with optimization is syncUpdatedOnly. Set this value to true to get updates only if there is a change associated with the endpoint. The value of pageSize should not be changed unless recommended by customer support.
Validation of the endpoint context being updated after the initial sync can be done by navigating to Configuration > Identity > Endpoints. Filter using the attribute Source = CrowdStrike as shown below.

Shown below is a sample of security contextual parameters obtained from CrowdStrike for an endpoint, these attributes can be evaluated by the enforcement policy within ClearPass Policy Manager. These attributes are obtained leveraging the default policy on CrowdStrike. The Falcon agent should be capable of capturing further attributes which could be leveraged as well. The full list of endpoint attributes is documented in Appendix C on Page 27.

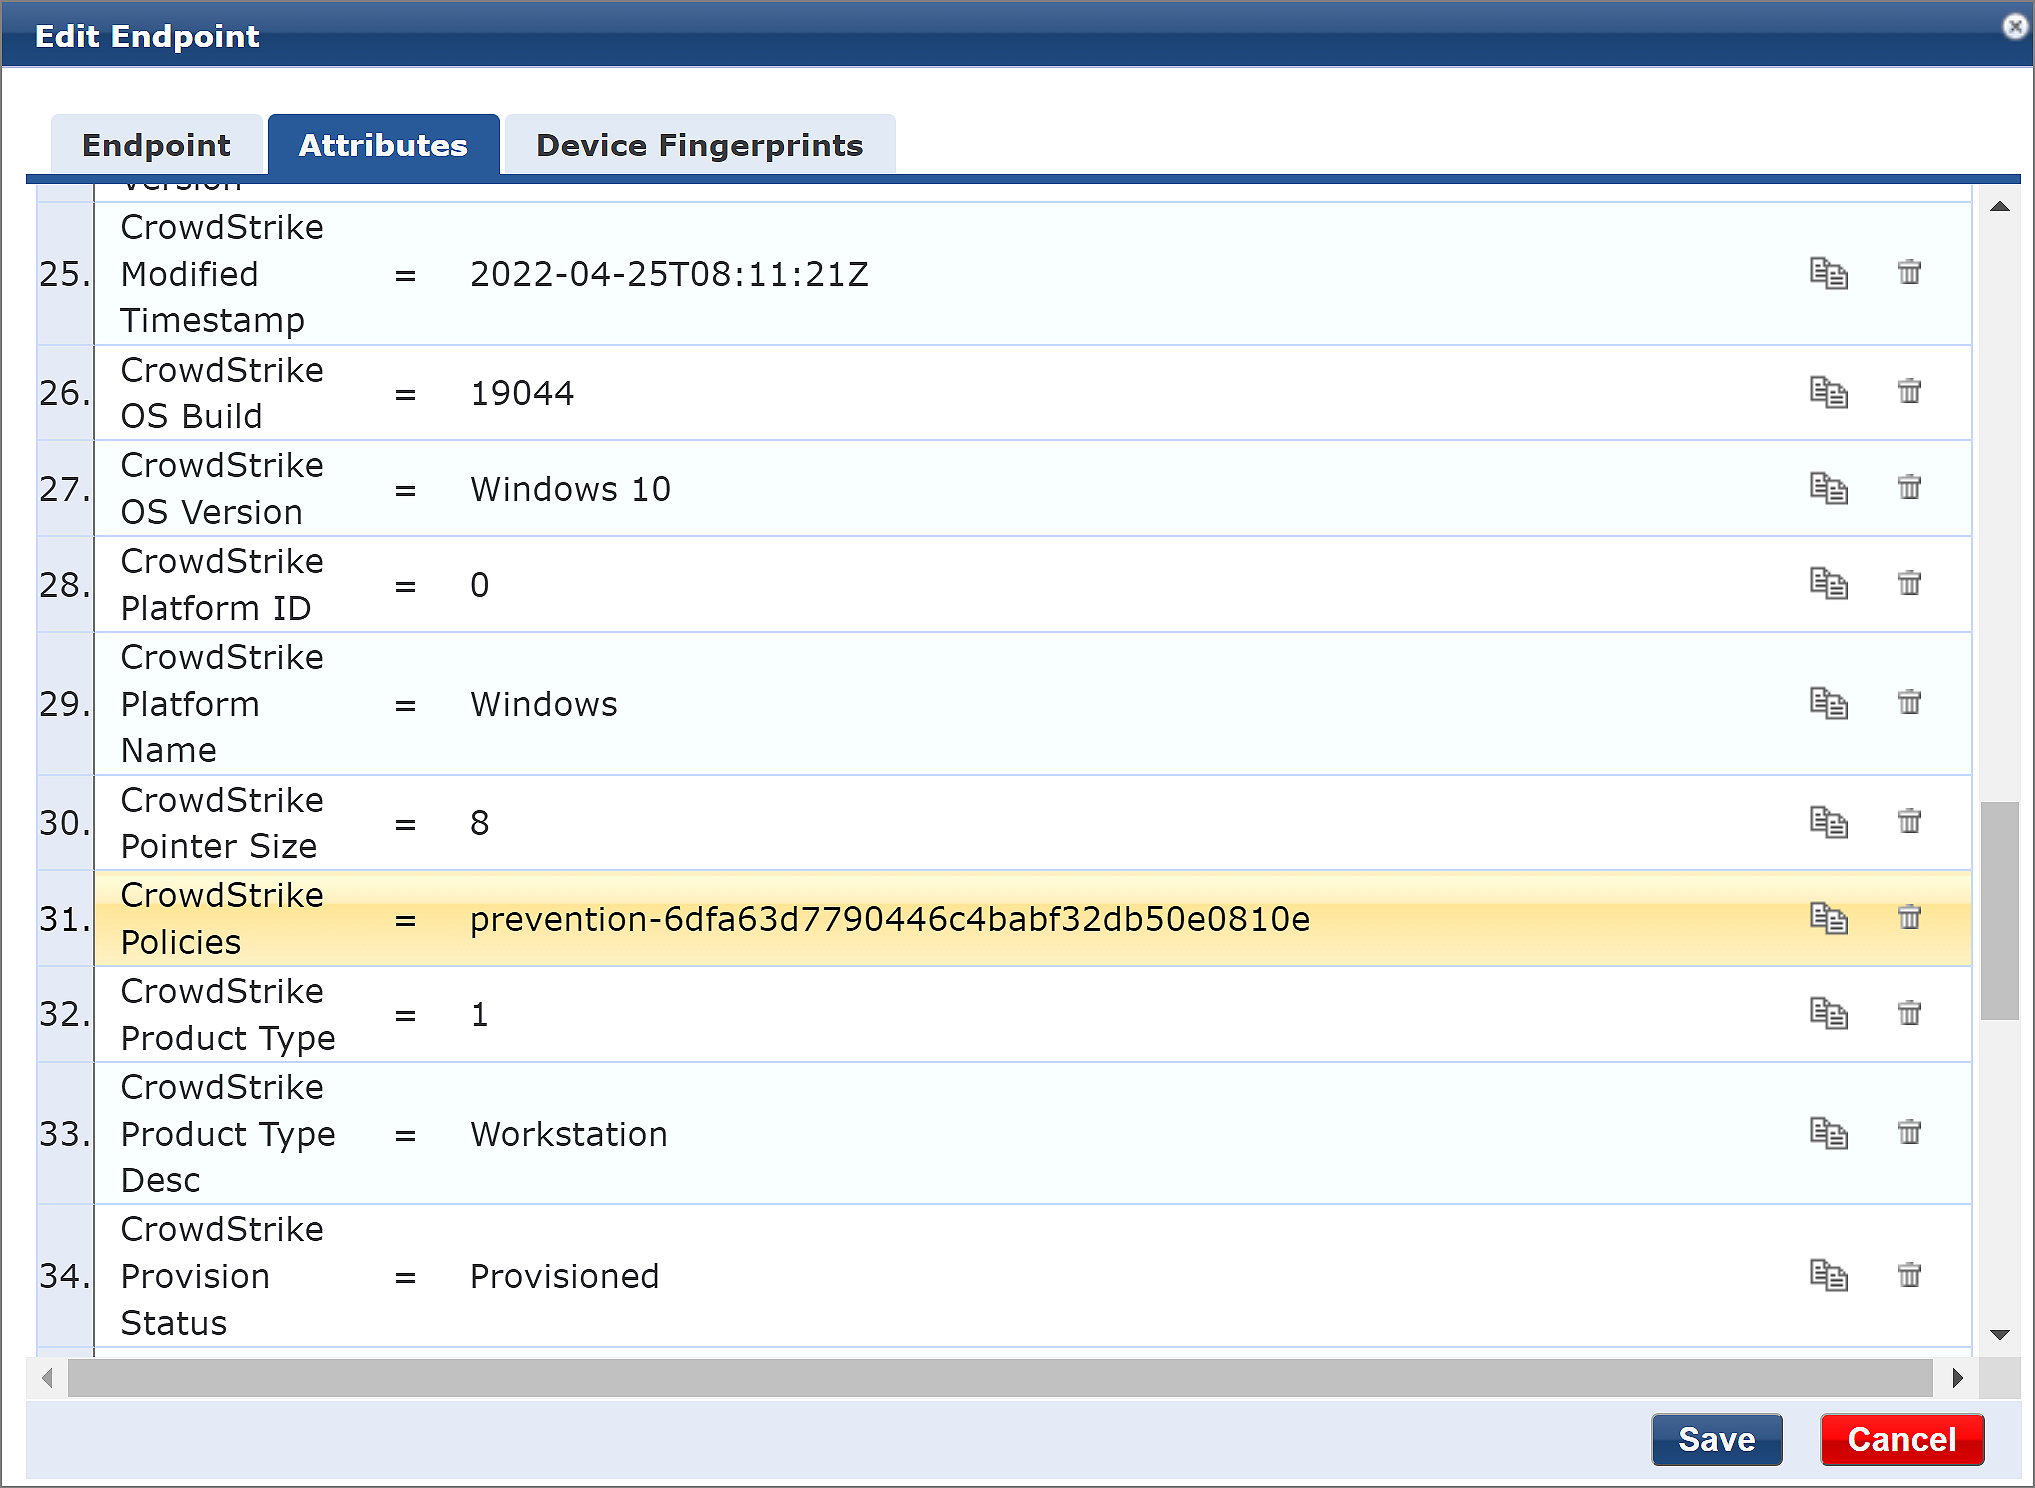
A sample enforcement policy leveraging the endpoint attributes which can be used in a service is shown below.
Note that the common endpoint attributes related to Zero Trust Assessment would make sense in enforcement policies when they are of data-type integer. For example, if one needs to check if the overall Zero Trust Assessment score of an endpoint is greater than 20 then such policy conditions will need the attributes to be of type integer. By default, all the attributes sent by CrowdStrike get added as data-type String for an endpoint. Therefore, for certain use cases such attributes need to be deleted from the Dictionary attributes and re-added with the data-type set to integer manually.
To delete the attributes, one needs to first stop the extension, delete the existing endpoints from the ClearPass DB as the endpoints will be referencing these attributes from the dictionary preventing an administrator to delete them. After which these attributes can be added manually as shown below with the data-type set to integer.
Since the Zero Trust Assessment scores are available as endpoint attributes only starting version 2.1.0 of the extension one needs to first upgrade the extension. So, the step to delete the endpoints and dictionary attributes can be done prior to the upgrade which will prevent restarting the extension multiple times.

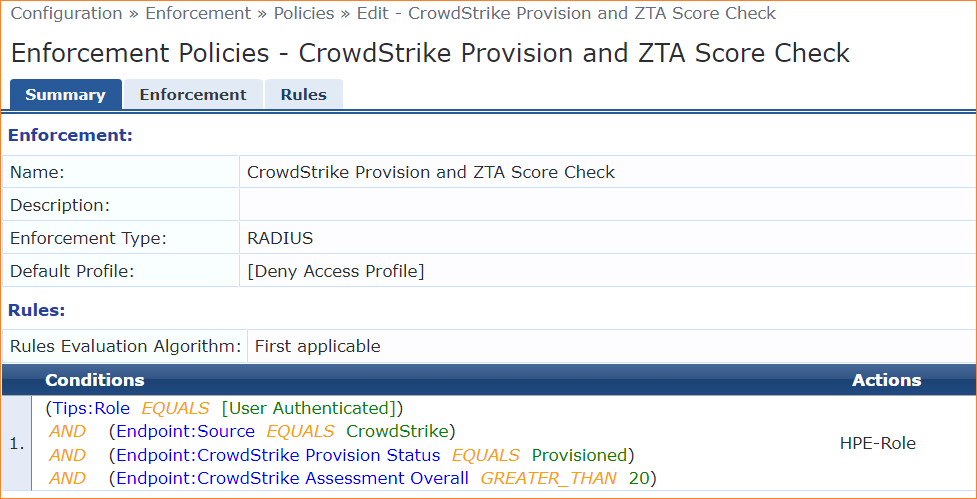
CrowdStrike as an Authorization Source
With CrowdStrike as an Authorization Source, ClearPass Policy Manager can query CrowdStrike Real-Time to determine if the endpoint is managed by CrowdStrike at the time of Authorization and grant access accordingly. It can leverage other security attributes returned by CrowdStrike within the enforcement policy. For example, a contained device can be denied access, a device with Last Update higher than the expected value can be quarantined etc.
This use case requires further configuration which includes an addition of Authentication Source which will be used for Authorization. It also necessitates modification of a service to use this new source for Authorization and a modification of Enforcement Policy to use this Authorization source which will be covered below.
The addition of Authentication source can be easily configured by importing the XML available on HPE Aruba Networking GitHub. Kindly refer Appendix B for details.
Adding CrowdStrike as an Authorization source can be done under Configuration > Authentication > Sources, click “Add”.

Click on Next. This will advance to the Primary Tab which requires connection details. Here an internally POST is made to the extension. The extension then calls CrowdStrike APIs to retrieve the security attributes associated with the endpoint.
The Base URL is http://<Extension IP>. The extension IP is highlighted in Figure 14. The Login Username and Login Password are mandatory fields but never used here since the contents are posted internally to an extension. This value has to be defined and could be anything.

Click on “Next”. This will advance you to the Attributes Tab where you need to provide the authorization attributes. Click on “Add More Filters”. Provide a Name for the filter and then a Filter Query. It’s extremely important that the Filter Query is defined correctly. This is the query string that is sent to the CrowdStrike extension asking for context about the endpoint. The query is indexed off the mac-address of the authenticating endpoint. For completeness, the filter query is provided here, copy it carefully.
/%{Connection:Client-Mac-Address-NoDelim}
Next build out the definitions of the attributes that will be returned from the Filter Query. These attributes will subsequently be used within our policy-evaluation and ultimately the enforcement policy applied.

For. Zero Trust Assessment Score attributes below are the definitions of the attributes from a second query that needs to be added.
/zero-trust/%{Endpoint:CrowdStrike Device ID}
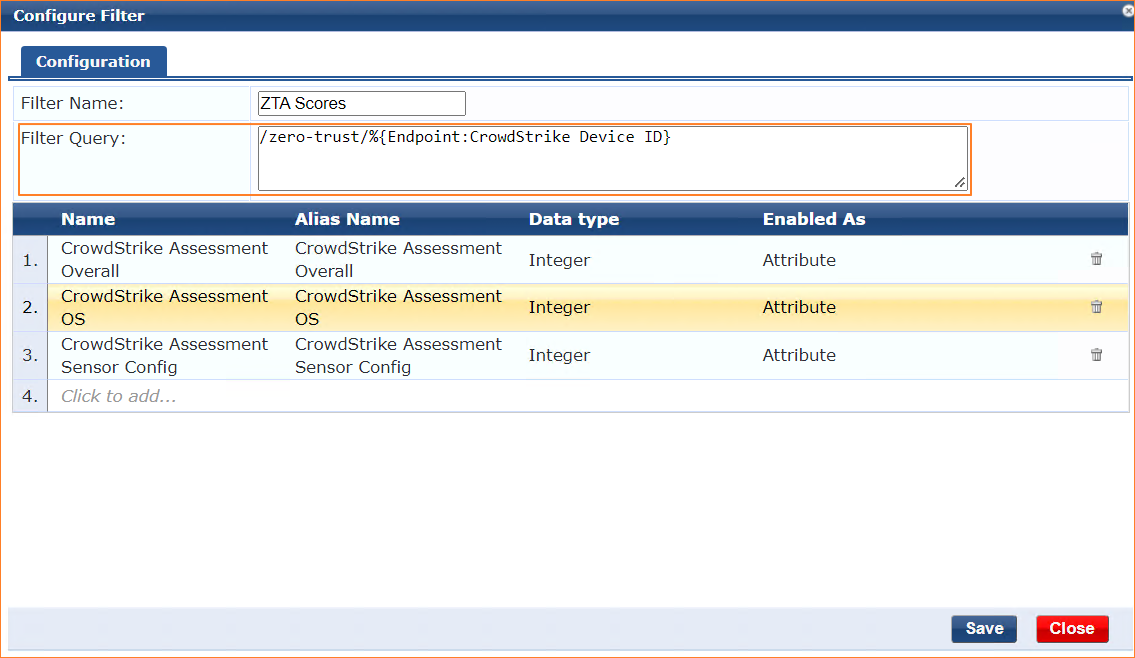
Further attributes can be added here if necessary for the policy. Appendix C has a list of attributes captured by the extension.
Once the HTTP authorization source is defined, the returned attributes can be leveraged in a service using an enforcement policy or role mapping. A sample enforcement policy is shown below. Remember to add the newly added Authorization Source under the Authorization tab of the service.

The above policy grants full access to an endpoint if it is provisioned with a CrowdStrike Falcon agent and the agent has not contained the endpoint and the Zero Trust Overall Assessment score is greater than 20.
INFO
A point to note is that ClearPass Policy Manager would query the Authorization Source every time it authenticates. The problem with this approach is that if there is a latency in the response from CrowdStrike which is hosted in cloud, it would result in a delay for an endpoint to get onto the network. If the delay is beyond an acceptable limit it would result in timeouts. Also, for best performance it is always recommended to leverage the ability of ClearPass to cache the attributes for a configurable time period.
Let’s revisit the configuration parameters of the extension. The parameters of interest are enableEndpointLookupCache and enableCacheTimeSeconds. The values are explained in the table under the section “Configuration Steps”.
{
“logLevel”: “INFO”,
“verifySSLCerts”: true,
“crowdStrikeApiHost”: “api.crowdstrike.com”,
“clientId”: “[Client ID]”,
“clientSecret”: “********”,
“crowdStrikeSyncZeroTrust”: false,
“enableEndpointCache”: false,
“endpointCacheTimeSeconds”: 300,
“syncAllOnStart”: false,
“enableSyncAll”: false,
“syncAllSchedule”: “0 2 * * 6”,
“syncUpdatedOnly”: true,
“syncPageSize”: 100,
“attributePrefix”: “”,
“bypassProxy”: false,
“enableStats”: true,
“statsUsername”: “”,
“statsPassword”: “********”
}
The access tracker results with the Authorization attributes are shown below.
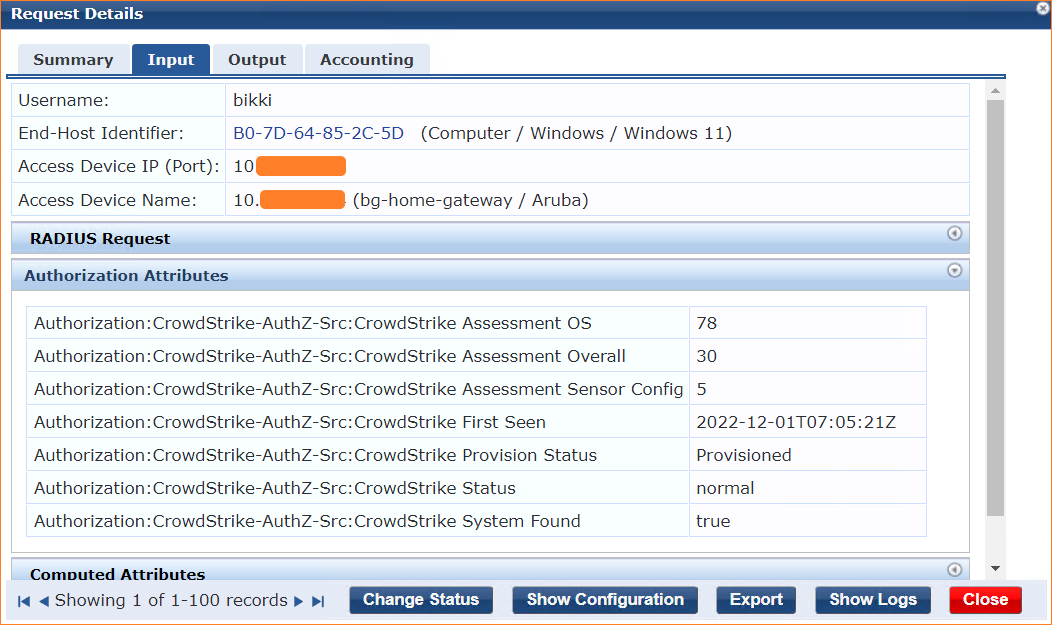
Leverage the benefits of caching the attributes for faster authentication results. This is particularly useful in scenarios where clients roam frequently triggering frequent authentication requests. Use these parameters best suited in a customer environment based on their requirements.
Contain an endpoint using CrowdStrike APIs
ClearPass Policy Manager extension can call the CrowdStrike APIs to trigger containment on the endpoint leveraging the Falcon agent. APIs can also be leveraged to lift the containment.
Configuration for containment includes 3 steps on ClearPass Policy Manager. These steps can be ignored if the Enforcement Policies are exported directly as an XML. The steps are available in Appendix B.
-
Define Endpoint Context Server
-
Add Context Server Action
-
Create an Enforcement Profile to trigger the action
Endpoint Context Server
The first step is to define an Endpoint Context Server. This can be added under Administration > External Servers > Endpoint Context Servers click on Add and use the extension IP address highlighted in Figure 14.

WARNING
Select the Server Type as “Generic HTTP”. The Server Name is the IP address of the Extension. Once you enter that, the Server Base URL gets automatically populated and adds https to begin with.
Ensure you change this to http else the internal POST fails. Please note that this is an internal post within ClearPass from the Policy Manager to the Extension.
Context Server Action
The next step is to define a Context Server Action within ClearPass Policy Manager which will internally POST to the extension. The extension will trigger an API call to CrowdStrike and fetch the information associated with it which can be used for Authorization. The context server action allows us to define the HTTP Method, the URL and the JSON contents that will be used to post the mac address to the extension.
This can be added under Administration > Dictionaries > Context Server Actions. Click on Add and use the details shown below. All the other tabs are blank.
The URL used below has to match for the API calls to be successful. Kindly copy paste the URL from below
Contain: /contain/%{Connection:Client-Mac-Address-NoDelim}
Lift Containment: /lift-containment/%{Connection:Client-Mac-Address-NoDelim}

Similarly, a Context Server Action for lifting the containment is shown below.

Enforcement Profile
The next step involves using the Context Server Action in an Enforcement Profile as below. The Enforcement Profile for containing an endpoint leveraging CrowdStrike APIs action is shown below.

INFO
Containment would only work if the attribute CrowdStrike Device ID exists in the Endpoint repository in CPPM. The attribute is not stored if CrowdStrike is only used as an Authorization source without poll/sync and enableEndpointLookupCache is set to false.
The Access Tracker result is shown below. CPPM triggers an internal API call to the extension configured.
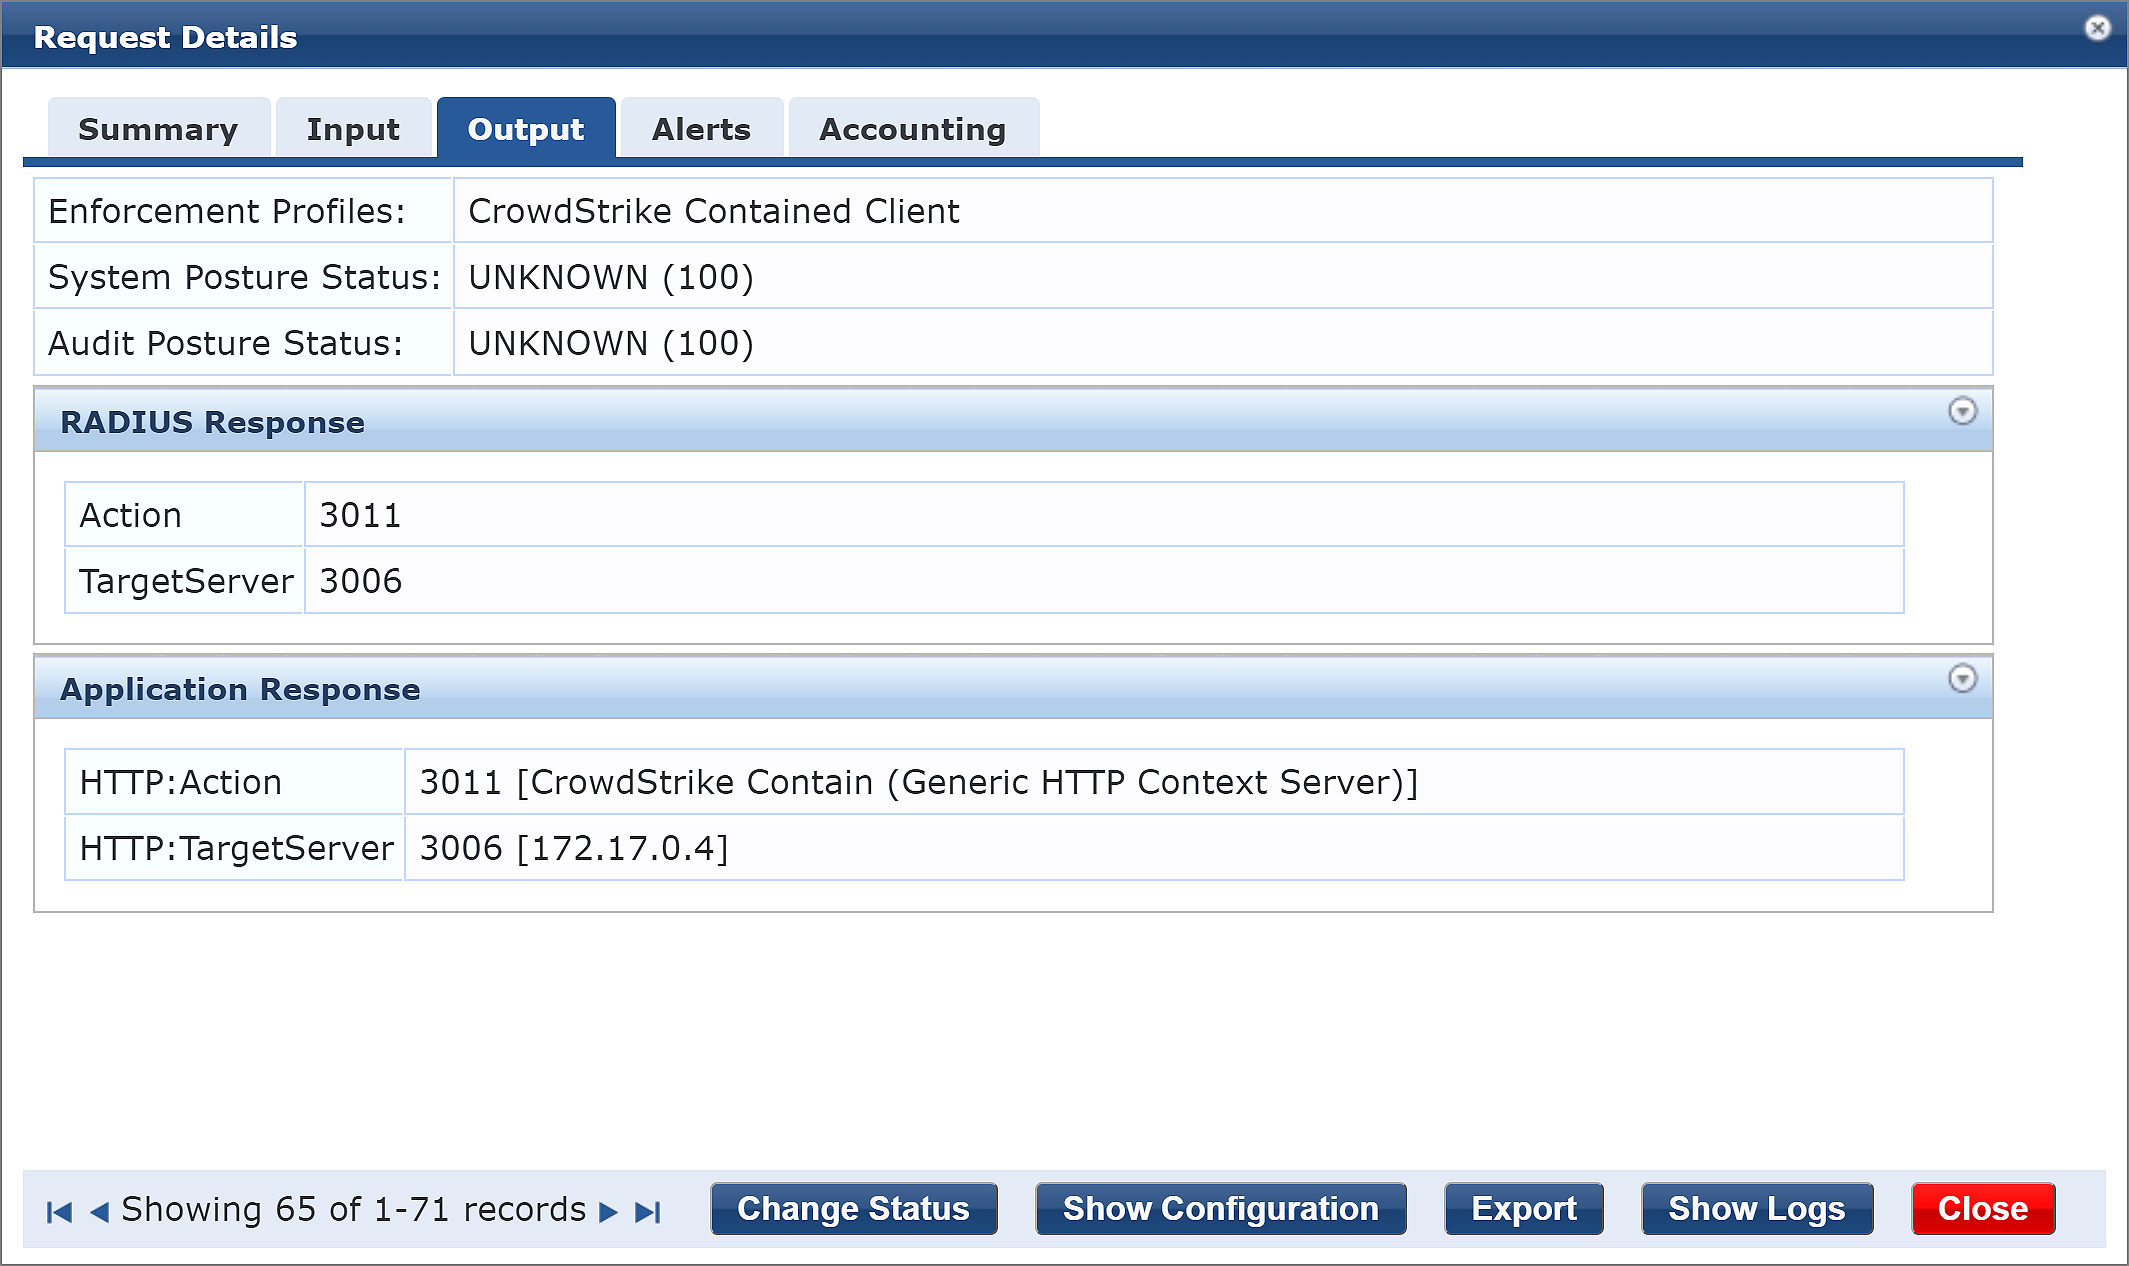
Similarly, containment can be lifted from the hosts using the Lift Containment action or Enforcement Policy within CPPM.
Appendix A – Troubleshooting and Support
Here we list some basic troubleshooting steps. If you need any help beyond this, please reach out to HPE Aruba Networking Support.
Check API Access Application Control restrictions
If you’ve previously hardened your ClearPass deployment with Application Access Controls, it’s possible that the Extension will not work. Reviewing the Extension Log might show something like the following after immediately starting the Extension. This likely indicates the ClearPass Application API’s are in place.
Example of Extension authorization failure due to Policy Manager Application Control:
[2020-03-16T15:42:21.083] [INFO] Intune - Server listening on port 80.
[2020-03-16T15:42:21.243] [DEBUG] Intune - Request “GET ‘https://172.17.0.1/api/server/version’” took 51.91ms.
[2020-03-16T15:42:21.245] [DEBUG] Intune - <!DOCTYPE html><html>
<head>
<title>
Error 403 (Forbidden)
</title>
<script language=“javascript”>
function reloadPage() {
var locHref = window.location.protocol + “//” + window.location.hostname;
window.location.href = locHref;
}
</script>
To resolve this issue, add the IP address of the Extension to the list of nodes permitted to access the API by navigating to Administration > Server Manager > Server Configuration {choose your node} > Network
INFO
For this reason its good practice to fix the IP address of the extension at installation time such that it doesn’t change over time and break the application controls.
Checking on the Extension Service
The ClearPass Extensions are supported by a system service which must be running.
Restarting this service will affect all deployed and running extensions.
To check on the state of the Extension Service, or to restart the service, go to Administration > Server Manager > Server Configuration > [SERVER] > Service Control. By default this service is automatically started.
Extensions and web proxy / firewall whitelisting
If ClearPass Policy Manager has been configured with a proxy, it’s still possible that domain whitelists are required, the same for some datacenter firewall to allow the installation of Extensions. Some enterprise customers maintain a whitelist of domain that are allowed to transit the proxy/firewall. The underlying docker configuration process uses standard docker registry access to pull images (hosted in docker hub). In general, the following hosts are used:
INFO
-
extensions.clearpassbeta.com
-
registry-1.docker.io
-
index.docker.io
-
auth.docker.io
-
production.cloudflare.docker.com
This is all also geo dependent to some degree and based on various AWS services, so AWS redirects and geo location services will vary. Finally, this all runs via standard HTTPS (port 443).
Extension Logs/Enable Debugging
If you have a requirement to access and view the logs from the Extension, you can turn on different logging levels from the Extension GUI. Adjust the logLevel to ‘DEBUG’ and restart the extension as shown below.
Logs can then be viewed from the ‘Show Logs’.
Remember after changing the logging level, as with any extension configuration change the extension will need to be restarted for this change to take effect.
Accessing the extension logs using ‘Collect Logs’ system function
In addition to viewing the logs as shown above, logs can also be collected and examined via the Policy Manager Collect Logs system function (Administration > Server Manager > Server Configuration > [Select SERVER] > Collect Logs). This is extremely useful should you have a need to call for technical assistance.
If the support team needs to investigate a system issue, one of the items they regularly ask for is the system logs to aid with their diagnostic investigation. By default the “logLevel” is set to INFO, but TRACE, DEBUG, INFO, WARN, ERROR, FATAL can also be set as required. Any of the levels will display the information for the selected state and lower; if INFO is selected, it will show messages for INFO, WARN, ERROR, FATAL.
After the logs have been collected, downloaded and expanded, you can locate the extension logs in the following location in the folder structure PolicyManagerLogs > extension > your-extension-id as shown below. Note the file-name is the same as the running instance ID of the extension.
Monitoring extension statistics
There is a way to monitor extension’s critical resource statistics with the configurable parameter added as part of the extension’s configuration. To enable extension statistics set the “enableStats” parameter to true. Remember a restart of the extension is need to activate the change anytime the config is modified.
To navigate to statistics page, click Show Details.
This will show statistics similar to the following:
Monitoring authorization performance
Since we are authorizing against an external system, it could be relevant to monitor the performance of these transactions as you setup and deploy. If you suspect there is a performance issue, ClearPass provides a way to monitor the authorization processing time. The graph below shows an example of this data, navigate to Monitoring > Live Monitor > System Monitor [click on ClearPass Tab, then select [Authorization]….
Appendix B – Considerations for Installing in a Cluster
Extensions are not synced between ClearPass cluster members, and thus must be installed on each member separately.
Some Extensions can run in two modes: Periodic Sync Mode and Authorization Source Mode.
Periodic Sync Mode
If you are configuring the extension to poll external system periodically and utilize the resulting ClearPass Endpoint database during endpoint Authorization, then you only need to install the extension on one cluster member, often the publisher.
You may wish to install the extension on a second cluster member as a backup, but remember that both extensions will individually be updating the endpoint database. You may want to stagger the updates between the two extensions, for example, Subscriber1 updates at the top of the hour and Subscriber2 updates at 30 minutes after the hour.
Also, in this mode there is no need to explicitly enter an IP address during installation. The defaults will suffice and ClearPass will select an IP in the range specified in the server configuration.
HTTP Authorization Source Mode
In this mode we configure an HTTP Auth source that results in a HTTPS call to external system during endpoint authorization. In this deployment model the extension must be installed on every cluster node that process authentications. Also in this scenario every cluster member’s extension must be set to the exact same IP address during installation time, as the HTTP Auth source configuration is propagated globally across all cluster members.
For example, if the extension IP range is 172.17.0.0/16, we would set the extension to 172.17.0.5 on every cluster member during installation of the extension.
While we normally want to avoid duplicate IP addresses in a network, this is not a concern with ClearPass extensions. Each ClearPass node communicates internally only with its own extension, and this traffic is not routed outside of ClearPass.
Subscriber nodes support the same ability as publishers to install an Extension from the Extension store.
Appendix C – endpoint sync schedule settings
The syncSchedule and similar scheduling parameters sets how often ClearPass executes certain actions like syncing or pushing endpoints. This setting is based on a slightly modified version of the CRON job scheduler found in Unix-like operating systems. It can be used to schedule jobs to run periodically at fixed times, dates or intervals.
A ‘cron’ is a job scheduler. Any scheduled task is called a ‘cron job’. The syntax for a cron job schedule is as follows:
In our use of the cron scheduler, we’ve dropped the use of the last instruction ≤command to execute> and use only the time/date functions, see below for a number of examples of scheduling a sync process.
-
Schedule a sync to run at 2am daily:- 0 2 * * *
-
Schedule a sync to run twice a day at 5am and 5pm:- 0 5,17 * * *
-
Schedule a sync to run on every Sunday at 5pm:- 0 17 * * sun
-
Schedule a sync to run every 30 minutes:- */30 * * * *
-
Schedule a sync to run at 5pm on selected days:- 0 17 * * sun,fri
You can see from the above that the scheduling process is extremely flexible, alternatively https://crontab.guru/ is a great page for learning more about CRON scheduling.
Appendix D – Extension performance optimizations
Extensions are a critical part of ClearPass deployments today and with the increased dependency on extension interactions that involve periodic polling or real-time lookups, here are some of the best practice recommendations around optimizing overall performance when using extensions:
-
If the extension is used to periodically poll external systems and populate endpoint repository, ensure that it is not installed in all the nodes in the cluster. Ideally these type of extensions should only be installed on the publisher node since only publisher node can add endpoint entries to the database. For redundancy, it can be installed on another additional node but it is recommended to stagger the polling interval so that both do not attempt to poll and update endpoint database at the same time.
Example: 0 * * * *, This cron job runs at minute 0 of every hour (e.g., 00:00, 01:00, 02:00, etc.).
30 * * * *, This cron job runs at minute 30 of every hour (e.g., 00:30, 01:30, 02:30, etc.). -
If the extension is used for looking up attributes from external systems in real time during authentication, it should be installed in all the nodes handling authentication. Note that the context server config is replicated from the publisher. When using extension for real time lookup, ensure that the extension has the same IP address in all the cluster nodes.
-
If the extension is expected to do both real-time lookup and periodic polling, ensure that polling is enabled only on the publisher while the extension in subscribers can have the polling disabled by setting the “enableSyncAll” attribute to false.
"enableSyncAll": false,
WARNING
Having the extension installed on all the cluster nodes with enableSyncAll set to true would cause each cluster node to independently poll the external system and update endpoint repository. This could impact the performance of ClearPass. Hence it is strongly recommended to enable endpoint sync only on the extension installed on the publisher and on another cluster node for redundancy.
-
Some 3rd party systems support fetching delta updates vs fetching all of the device information every polling cycle. The extensions that support fetching delta updates are: Workspace ONE Crowdstrike Falcon Microsoft Intune Mosyle SentinelOne Service Now
For these extensions, the syncUpdatedOnly attribute should be set to true in extension config so that the number of DB updates in ClearPass is minimized
"syncUpdatedOnly": true,For extensions that do not support syncUpdatedOnly, ensure that the sync interval is not aggressive. We recommend syncing at most twice a day and that too during off peak hours whenever a full sync is performed.
-
Some 3rd party systems can be very noisy in terms of attribute updates. There could be certain attributes that keep changing every sync interval like “Free Memory in Bytes”, “Last Check in Time” etc. There is no value in updating endpoints when such trivial attributes change for the device. Hence it is recommended to use “ignoreEndpointDifferences” attribute in extension configuration to ignore change in attributes that you do not care about in terms of ClearPass policies.
You can review the Audit Viewer in ClearPass under Monitoring > Audit Viewer to see what attributes are being updated for endpoints to check if there are unnecessary updates.
Sample for JAMF extension:
"ignoreEndpointDifferences": "Last Update, Report Date UTC, Last Contact Time UTC, Last Inventory Update UTC, Last Reported IP, IP Address",Default for Microsoft Intune extension:
"ignoreEndpointDifferences": "Last Sync Date Time, Free Storage Space in Bytes", -
To further optimize the number of endpoints being updated in ClearPass, you can specify which attributes are being used in the ClearPass policies so that only changes to those attributes would trigger an update to the endpoint. This is done by listing out the specific attributes under endpointAttributes in extension configuration.
Sample for JAMF extension:
"endpointAttributes": "Group names, MDM Enabled, Managed, Remote Managed, Supervised, Serial Number", -
Setup extension to restart unless it was intentionally stopped. A restart policy can be defined in extension configuration to ensure that the extension starts up automatically after server reboots and such. Restart policy of “unless-stopped” would ensure the extension always starts up unless it was manually stopped.
“restartPolicy”: “no” — The extension will not be automatically restarted after the server is restarted.
“restartPolicy”: “always” — The extension will always be restarted after the server is restarted.
“restartPolicy”: “unless-stopped” — The extension will be restarted unless it was stopped prior to the server restart, in which case it will maintain that state.
“restartPolicy”: “on-failure:N” — If the extension fails to restart, the value for “N” specifies the number of times the extension should try to restart. If you do not provide a value for “N”, the default value will be “0”.
The “restartPolicy” parameter is not present by default in extension configurations. When it is not present, if the system is restarted a default policy is applied to the extension to maintain the state it was in before the restart. If the “restartPolicy” parameter is added to the configuration but later removed, the extension will then revert to the default restart policy.
Appendix E – XMLs
The following steps are required to add CrowdStrike as an Authentication Source by importing it into ClearPass Policy Manager using the XML file available in our GitHub repository
https://github.com/aruba/clearpass-exchange-snippets/tree/master/extensions/CrowdStrike
-
Download the XML profile > “clearpass-extension_crowdstrike_auth-source.xml”.
-
Open the XML file using a simple editor and replace X.X.X.X with your EXTENSION IP ADDRESS (Refer Figure 14).
-
You can also import the XML without making any edits and then change the “Base URL:” from “http://X.X.X.X” to your extension IP address using the ClearPass Policy Manager UI. This can be changed under the Primary tab of the imported Authentication Source (Refer 0).
-
The XML file can be imported into ClearPass by navigating to Configuration > Authentication > Sources. Click on Import and use the file downloaded.
The Enforcement Profile, Context Server Action and the Endpoint Context Server configured in the section “Contain an endpoint using CrowdStrike APIs” can easily be imported using the XML available on HPE Aruba Networking GitHub
https://github.com/aruba/clearpass-exchange-snippets/tree/master/extensions/CrowdStrike
- Download the XML profile > “clearpass-extension_crowdstrike_enf-profile.xml”.
- Open this file in your favorite editor. Use the Find and Replace feature of the editor to replace “<<Extension IP>>” with the actual IP address of the extension configured. Refer Figure 14.
- The XML file can be imported into ClearPass by navigating to Configuration > Enforcement > Profiles. Click on Import and use the file downloaded.
Appendix F – Attributes Fetched from CrowdStrike
Following is the sample list of the default attributes fetched from CrowdStrike using the default policy. {
“CrowdStrike Cid”: “643b2392ec494d948e9c879c4fe11f3a”,
“CrowdStrike Status”: “normal”,
“CrowdStrike Hostname”: “B07D64852C5D-BG”,
“CrowdStrike Local IP”: “10.x.x.1x”,
“CrowdStrike OS Build”: “22000”,
“CrowdStrike Policies”: “prevention-6dfa63d7790446c4babf32db50e0810e”,
“CrowdStrike Device ID”: “27b832e592ab4e739583acfba1aaa004”,
“CrowdStrike Last Seen”: “2023-01-04T16:42:31Z”,
“CrowdStrike First Seen”: “2022-12-01T07:05:21Z”,
“CrowdStrike Group Hash”: “e3b0c44298fc1c149afbf4c8996fb92427ae41e4649b934ca495991b7852b855”,
“CrowdStrike OS Version”: “Windows 11”,
“CrowdStrike External IP”: “49.205.32.38”,
“CrowdStrike Last Update”: “2023-01-04 16:45:00”,
“CrowdStrike MAC Address”: “b0-7d-64-85-2c-5d”,
“CrowdStrike Platform ID”: “0”,
“CrowdStrike BIOS Version”: “X571GT.311”,
“CrowdStrike Build Number”: “22000”,
“CrowdStrike Pointer Size”: “8”,
“CrowdStrike Product Type”: “1”,
“CrowdStrike System Found”: “true”,
“CrowdStrike Agent Version”: “6.48.16205.0”,
“CrowdStrike Assessment OS”: “78”,
“CrowdStrike Connection IP”: “10.x.10.x”,
“CrowdStrike Cpu Signature”: “591594”,
“CrowdStrike Major Version”: “10”,
“CrowdStrike Minor Version”: “0”,
“CrowdStrike Platform Name”: “Windows”,
“CrowdStrike Serial Number”: “M4N0CX12R927169”,
“CrowdStrike Config ID Base”: “65994753”,
“CrowdStrike Kernel Version”: “10.0.22000.1335”,
“CrowdStrike Config ID Build”: “16205”,
“CrowdStrike Device Policies”: “Prevention-6dfa63d7790446c4babf32db50e0810e, Sensor Update-b7178b018dcb4a8d83cec39401acfb5c, Device Control-5d3813ac29c44e54b48987b25c361bda, Global Config-67643d17e357489c8d6a08d38c07f1b4, Remote Response-22b6b4e42b6b4333bdb2f8112d1f7dea, Firewall-671577970e284f019faf83d9fa690842”,
“CrowdStrike Agent Load Flags”: “1”,
“CrowdStrike Agent Local Time”: “2023-01-04T19:36:42.247Z”,
“CrowdStrike Provision Status”: “Provisioned”,
“CrowdStrike BIOS Manufacturer”: “American Megatrends Inc.”,
“CrowdStrike Product Type Desc”: “Workstation”,
“CrowdStrike Assessment Overall”: “30”,
“CrowdStrike Assessment Version”: “3.5.1”,
“CrowdStrike Config ID Platform”: “3”,
“CrowdStrike Default Gateway IP”: “10.234.1.1”,
“CrowdStrike Modified Timestamp”: “2023-01-04T16:44:16Z”,
“CrowdStrike Sensor File Status”: “not deployed”,
“CrowdStrike Service Pack Minor”: “0”,
“CrowdStrike System Manufacturer”: “ASUSTeK COMPUTER INC.”,
“CrowdStrike System Product Name”: “VivoBook_ASUSLaptop X571GT_F571GT”,
“CrowdStrike Connection MAC Address”: “b0-7d-64-85-2c-5d”,
“CrowdStrike Assessment Modified Time”: “2022-12-30T07:55:03Z”,
“CrowdStrike Assessment Sensor Config”: “5”,
“CrowdStrike Reduced Functionality Mode”: “no”
}
3 - Firewall Context Sharing
ClearPass integrates with several firewalls to ensure continuous monitoring and enforcement as part of HPE Aruba Networking Zero Trust framework
A detailed list of third party interoperability can be found here: https://www.arubanetworks.com/support-services/clearpass-interoperability/
3.1 - Juniper SRX Integration
A HPE Juniper Networking SRX firewall is a high-performance, next-generation security platform from HPE Juniper Networks that combines advanced firewall capabilities with routing, VPN, and threat intelligence features in a single, scalable appliance or virtual device for enterprise and service provider networks.
ClearPass can authenticate users across wired, wireless, and VPN infrastructures. The integration with Juniper SRX allows ClearPass and the SRX Series device to collaborate in environments in which they are deployed together.
Integrating ClearPass with Juniper SRX endpoint context server typically tags the username context, as well as the external devices being authenticated, along with its respective IP address, which further simplifies IP address management on the Juniper SRX endpoint context server side.
Author: Zak Emerick, Herman Robers
Introduction and Overview
INFO
This document does not cover the basic steps of deploying the SRX, configuring zones, basic policy etc. There is an assumption that these steps are already completed.
In preparation for the integration with the ClearPass Policy Manager certain minimum configuration is required on the SRX firewall to allow ClearPass and the SRX to communicate, share context and optionally allow the SRX to query ClearPass for session information.
The integration with the SRX supports two separate workflows:
-
Push model with webapi: ClearPass pushing context directly into the SRX.
-
Pull model with user-query: SRX to pull or query context from ClearPass. There are certain use cases when it is relevant for the SRX to query user context, such as when the SRX has been out of service for a software upgrade or when a new firewall comes online and needs to be aware of the current active network sessions.
Either workflows, or both, can be configured. Note that the pull model will add additional load to the ClearPass appliance.
Configuration of SRX webapi (Push Model)
Since SRX versions starting with 25.0 deprecated the WebUI, it’s currently recommended to configure the SRX via the CLI or configure the equivalent using Juniper Security Director.
Login to SRX using SSH to access the CLI. From the root prompt (for example, root@SRX650-TME%), enter the command cli to enter operational mode, then type configure or edit to enter configuration mode.
From configuration mode, configure the webapi service. Some of the information entered here will be used later when configuring ClearPass. The username and password will be used again when configuring ClearPass, so record them.
set system service webapi user <UserName> password <Password>

set system service webapi client <ClearPass IP>
NOTE: If you have multiple ClearPass instances, a client must be created for each IP address.
set system service webapi https port <8443>
INFO
Do not set the HTTPS port to 443. This will conflict with the WEBUI port.
set system service webapi http port <8080>
INFO
Do not set the HTTP port to 80. This will conflict with the WEBUI port. Also it is recommended to use HTTPS to keep the communication secure. webapi over HTTP should only be used for testing in lab.
set system service webapi https default-certificate
Generating a custom certificate is outside the scope of this document but is strongly recommended for production deployments.
set system service webapi debug-level error
Confirming configuration.
matt@nac-srx.arubasecurity.net# show system services webapi
user {
    cppm-api-user;
    password "$9$unNcOBESrvx-wp0BESeXxjHqmQF69A01R"; ## SECRET-DATA
}
client {
    10.127.208.77;
    10.127.208.76;
}
http {
    port 8080;
}
https {
    port 8443;
    default-certificate;
}
debug-level {
    error;
}

[edit]
INFO
-
Only one user account can be defined. This is the account configured on ClearPass within the Endpoint Context Server that is used to authenticate to the SRX.
-
A maximum of 20 clients can be defined. Also, note the default http [8080] and https [8443] ports are configured.
Configuring ClearPass for SRX Integration (Push Model)
The following items are a prerequisite for the integration to function properly.
-
Enable Insight at Administration -> Server Configuration -> Click Server -> Enable Insight
-
Enable Interim Accounting-Update Packet logging at Administration -> Server Configuration -> Click Server -> Service Parameters -> Radius Server -> Log Accounting Interim-Update Packets
-
Review Eager-Handler polling frequency setting at Administration -> Server Configuration -> Click Server -> Service Parameters -> Async network services -> Eager handler polling frequency. This defines how often updates are sent to SRX. Note that only true delta is sent which means if the device goes down and immediately comes up within the polling interval, the net effect is that nothing has changed and hence no update is sent.
Add the Juniper SRX as a Context Server
Navigate to Administration -> External Servers -> Endpoint Context Servers -> Add
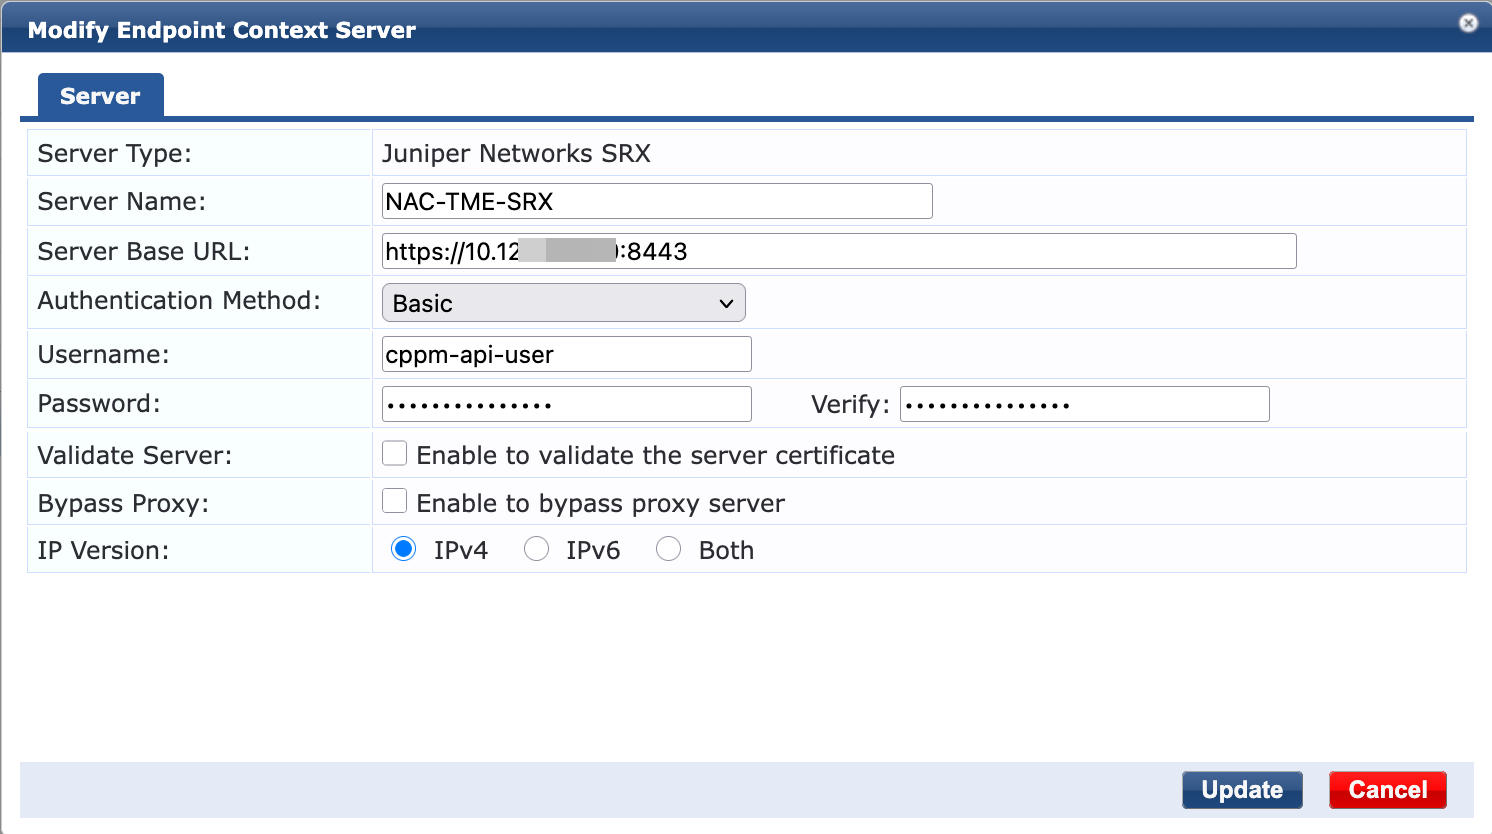
Add the port to the URL that was configured on the SRX (for example,8443). Next, add the Username and Password as configured previously.
 NOTE
NOTE
It is best practice to use a trusted certificate on the webapi service of the SRX firewall and to validate that certificate in ClearPass. The root CA that issued the WebAPI server certificate, would need to be installed in the ClearPass Certificate Trust List with Usage type: Endpoint Context Servers.
ClearPass Enforcement Policy and Profile
An Enforcement Profile and Enforcement Policy must now be created to send the context update to SRX based on specific policy conditions. For example if the use case is to apply specific firewall policies to IoT devices, the enforcement policy can be setup in such a way that the update is triggered only for such devices.
To create enforcement profile, navigate to Configuration -> Enforcement -> Profiles -> Add
Select the “Session Notification Enforcement” template.
Select Session-Notify as the type for each entry
Select Juniper Networks SRX as the Server-Type
Select Server-IP and the SRX host previously defined.
For the final two Session-Notify fields (“Login/Logout Action”), select the Juniper Networks SRX Login and Juniper Networks SRX Logout values respectively. If the expected Login/Logout server actions do not appear, verify the previous configuration steps.
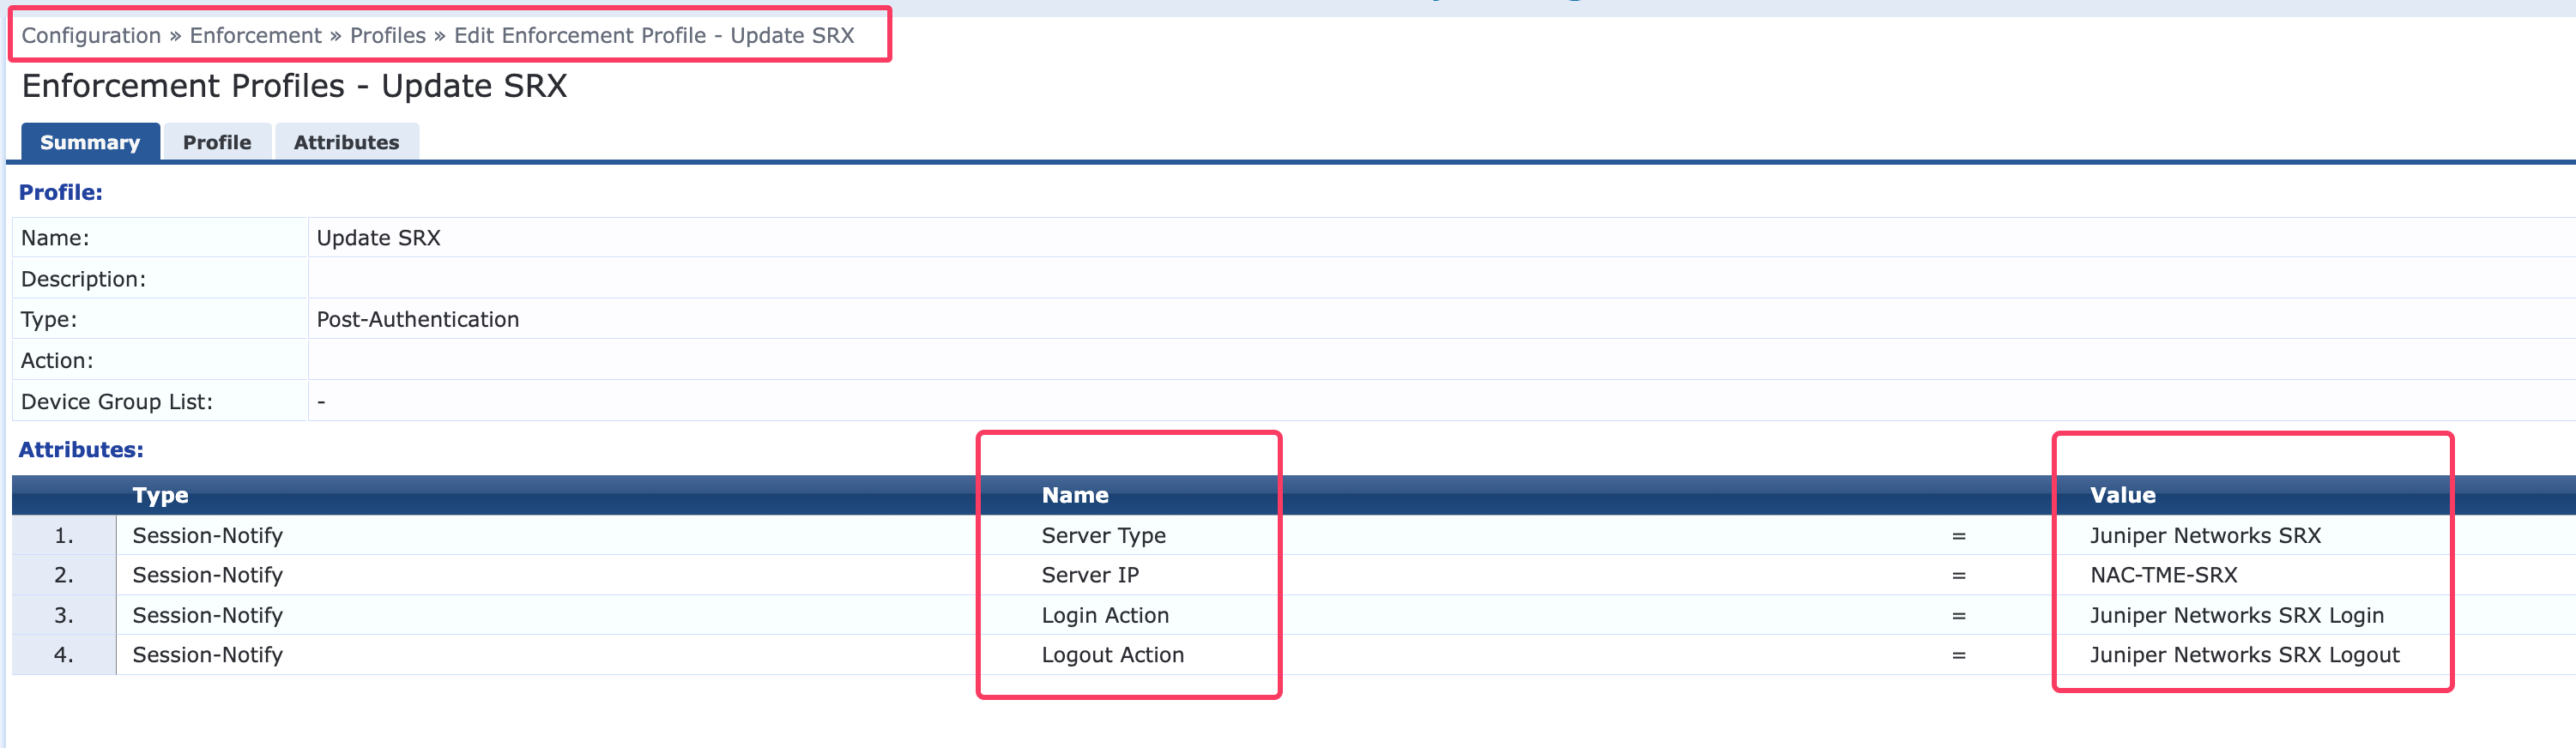
To create an Enforcement Policy, navigate to Configuration -> Enforcement -> Policies -> Add
INFO
If an established Enforcement Policy already exists, the newly created Enforcement Profile can simply be added to it. There is no need to create a custom Enforcement Policy solely for this workflow.
In the example below, there are different policy conditions that triggers the Post-Authentication Enforcement Profile “Update SRX” created above when the device is both compliant as well as non-compliant
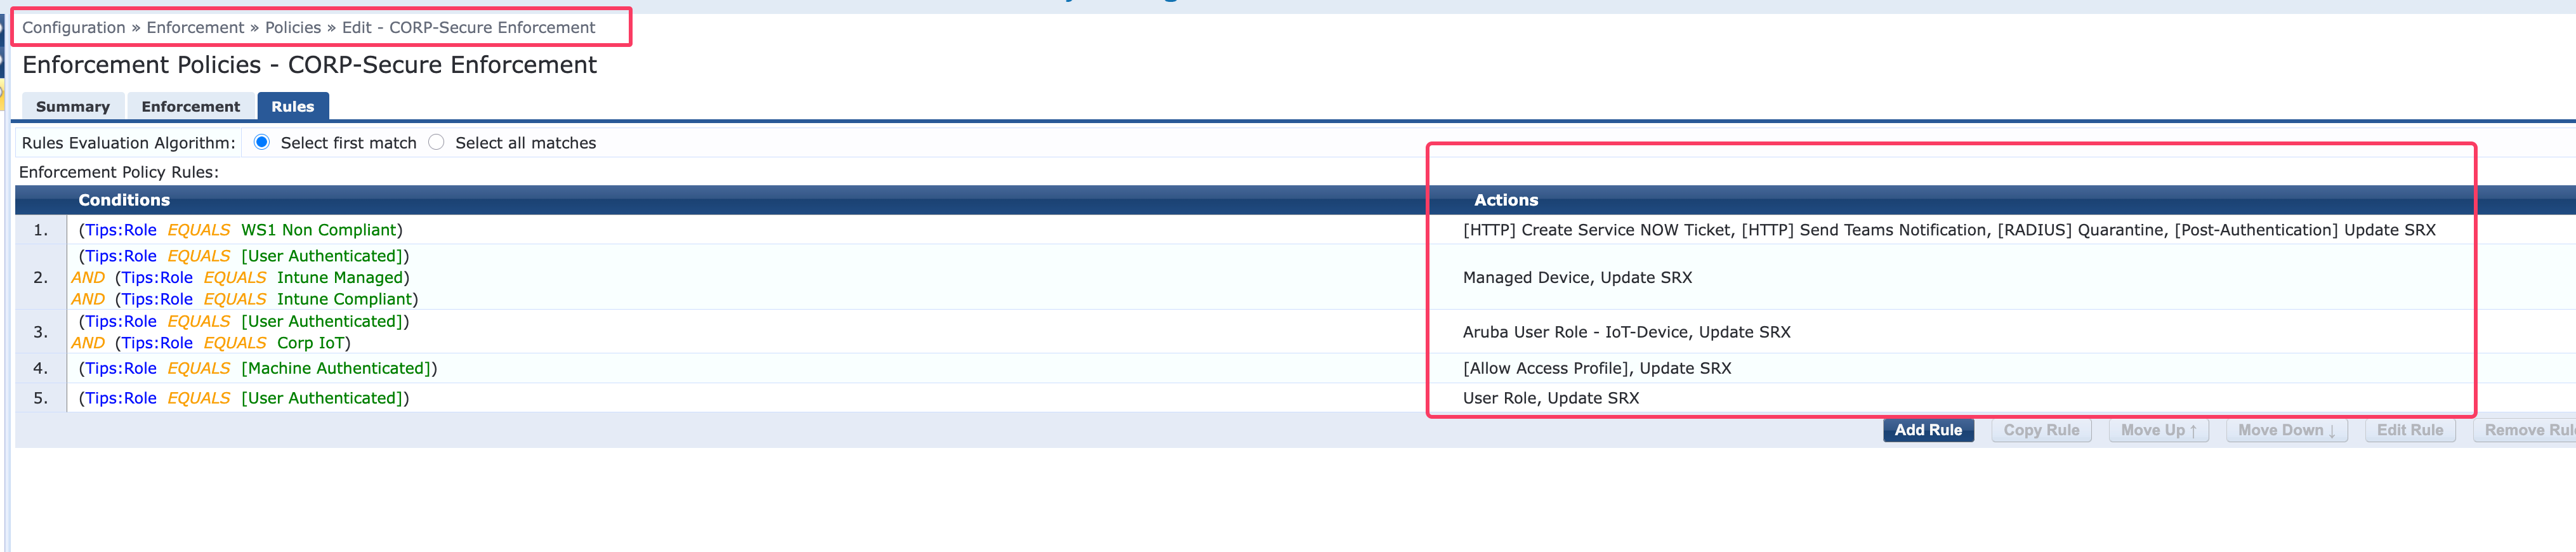
The Enforcement policy must then be attached to the relevant Services.
Validating that the enforcement policy and profile is working correctly from ClearPass Access Tracker
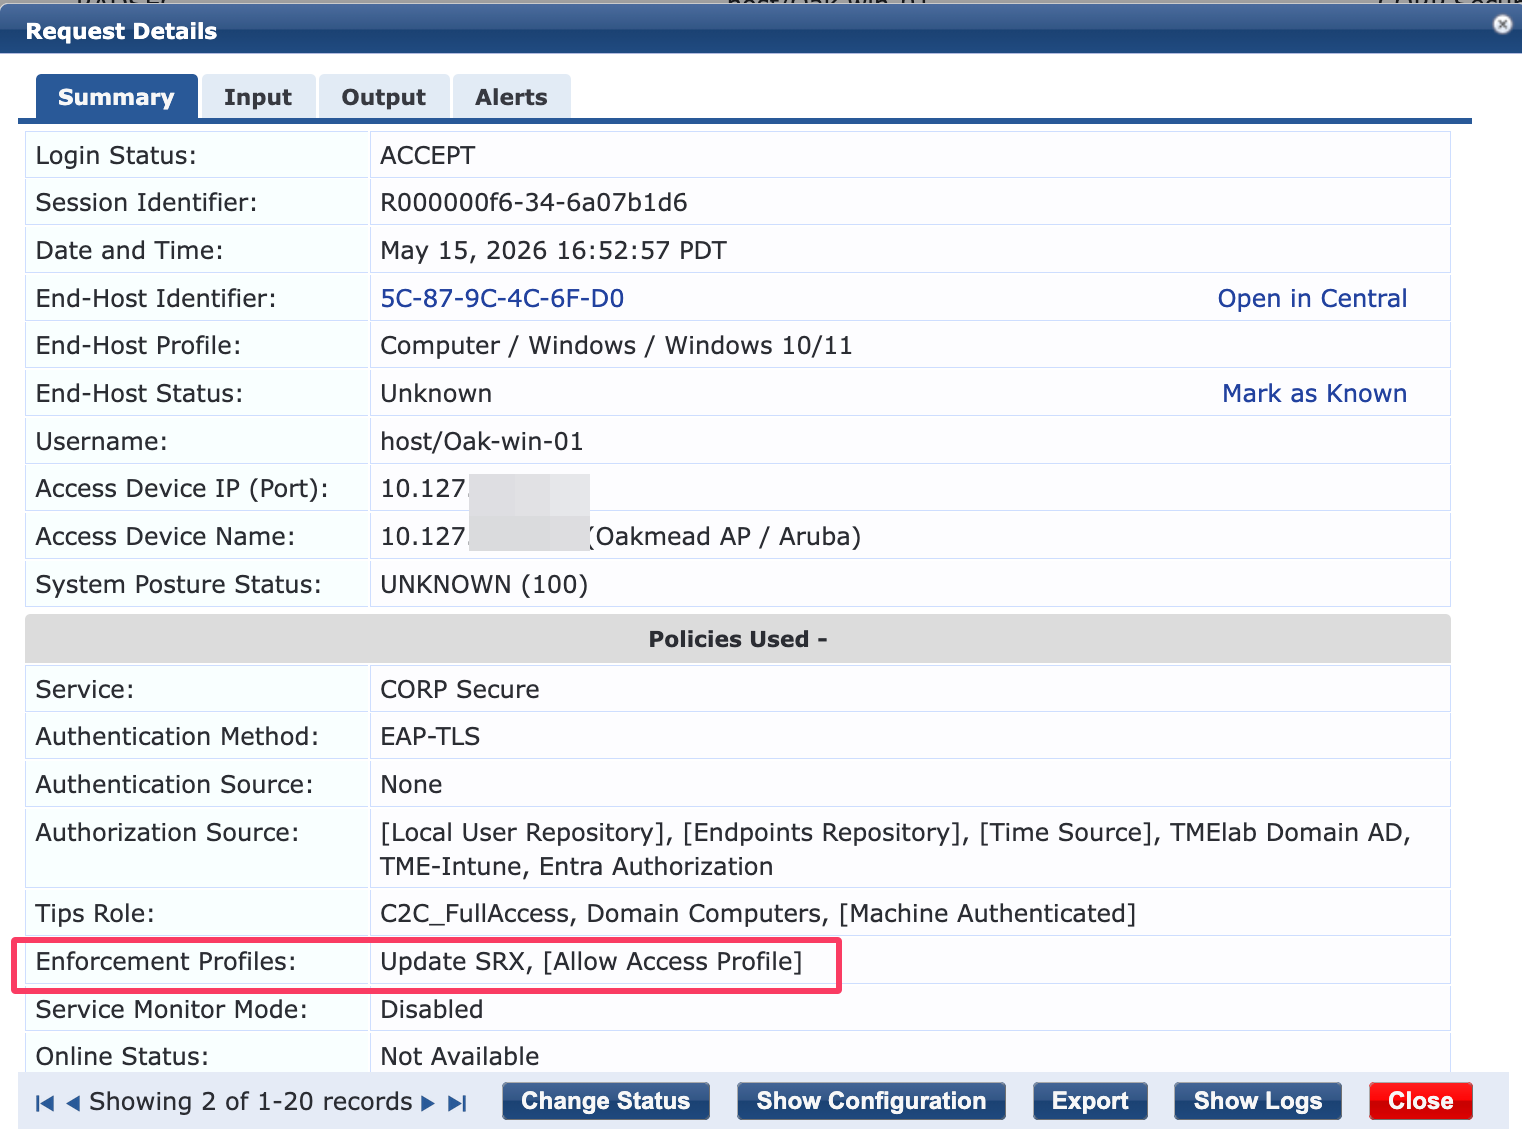
Configuration of ClearPass for SRX Integration (Pull Model)
The HPE Juniper SRX can also query ClearPass to obtain authentication session information. Powered in part by REST and OAuth2, the SRX can query the ClearPass Insight Database to obtain the needed data for session context on the firewall. It is possible, though unlikely, that the SRX will not have context for an active network user. When the SRX is required to police a traffic flow and does not have the user’s context, it can query ClearPass. After receiving the query result, the SRX updates its auth-table and applies policy to the user appropriately.
The process to query a ClearPass appliance uses OAuth2 as the authentication method. This must be configured first to allow the user-authentication process.
Configure OAuth2 Client on ClearPass
The first part of this configuration is to set up OAuth2 as an API client. Log in to ClearPass and access the Guest module from the Menu in top right corner
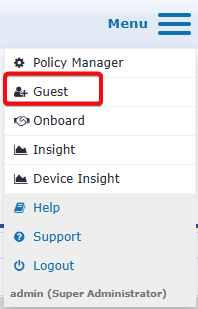
Navigate to Administration -> API Services -> API Clients ->
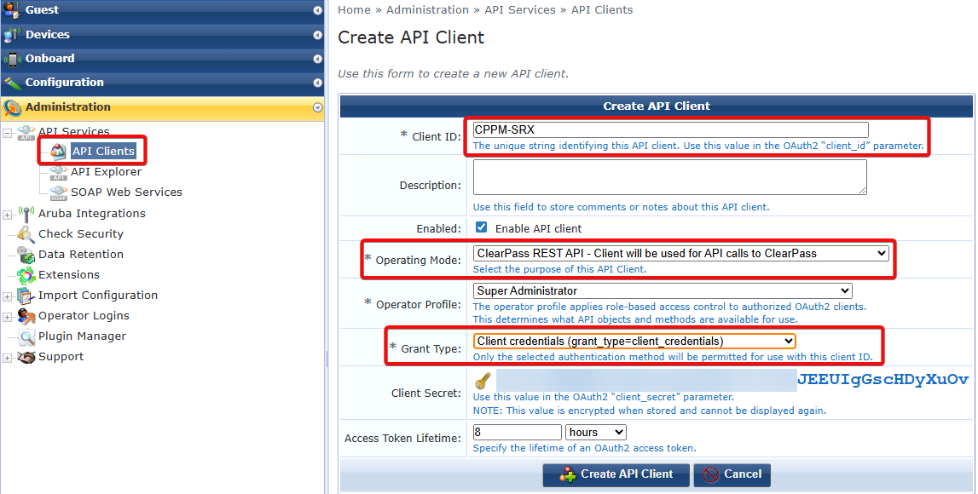
INFO
-
Record the Client ID. It will be needed later.
-
Copy the Client Secret immediately. Once the API client is created and the screen is exited, the Client Secret cannot be displayed again. A new client secret can be generated if needed.
-
Super Administrator privileges are not necessary. This profile should be scoped appropriately in a production environment. Sample operator privileges documented below.
Sample Operator Privileges Set the following permissions though Custom Access to the Operator Privileges Sections:
API Services > Allow API Access: Allow Access
Guest Manager > Active Sessions: Read Only
Guest Manager > Active Sessions History: Read Only
Policy Manager > Active Session for a MAC: Read
Policy Manager > Identity - Deny Listed Users: Read
Policy Manager > Identity – Endpoints: Read
Policy Manager > Insight – Endpoints: Read
Policy Manager > Insight – Alert: Read
All other settings should be set to: No Access.
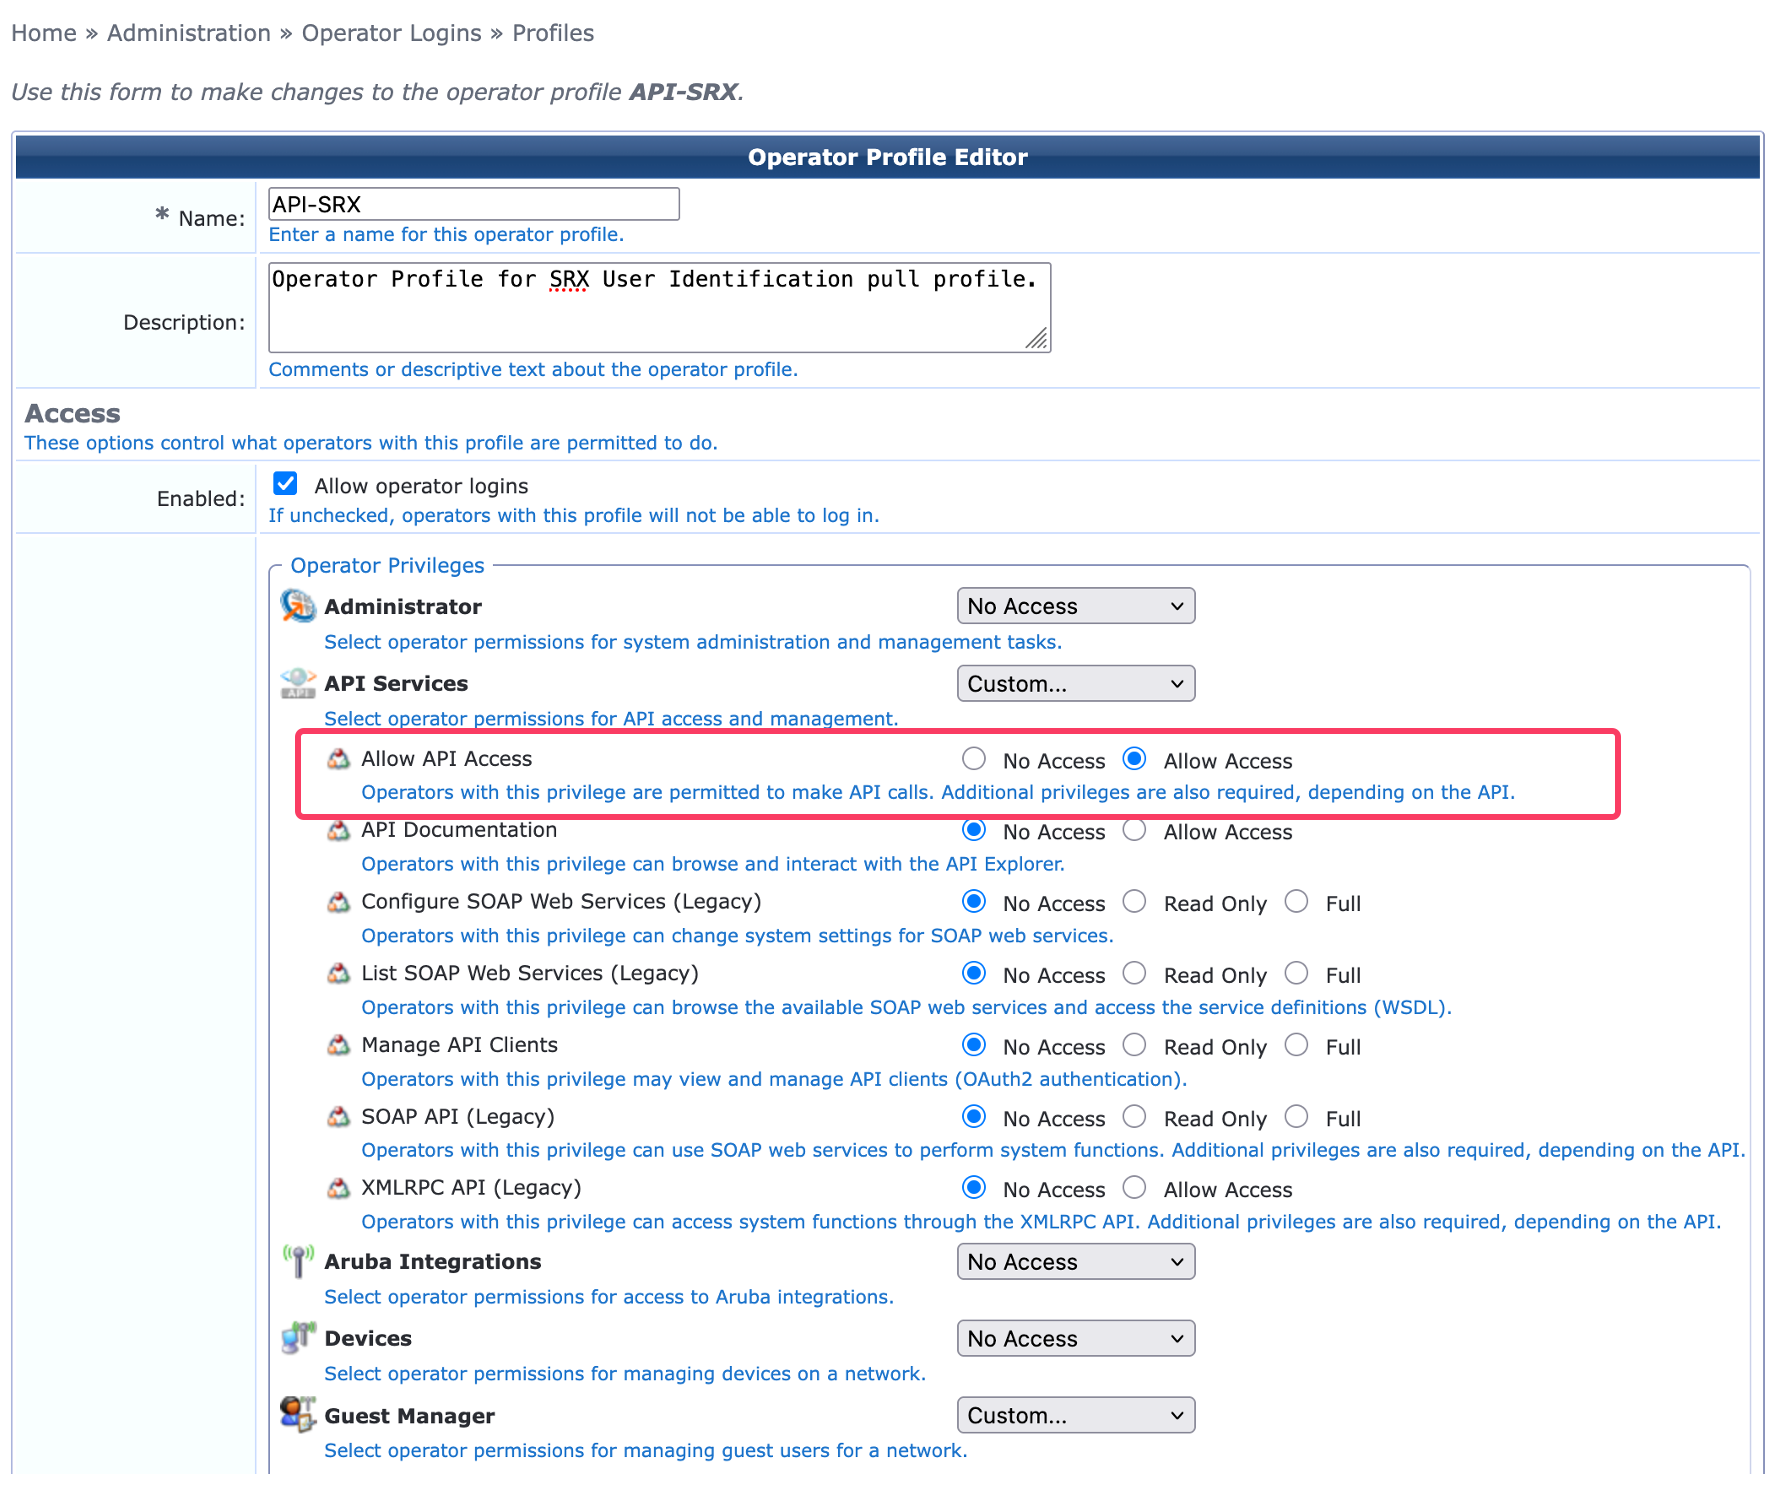
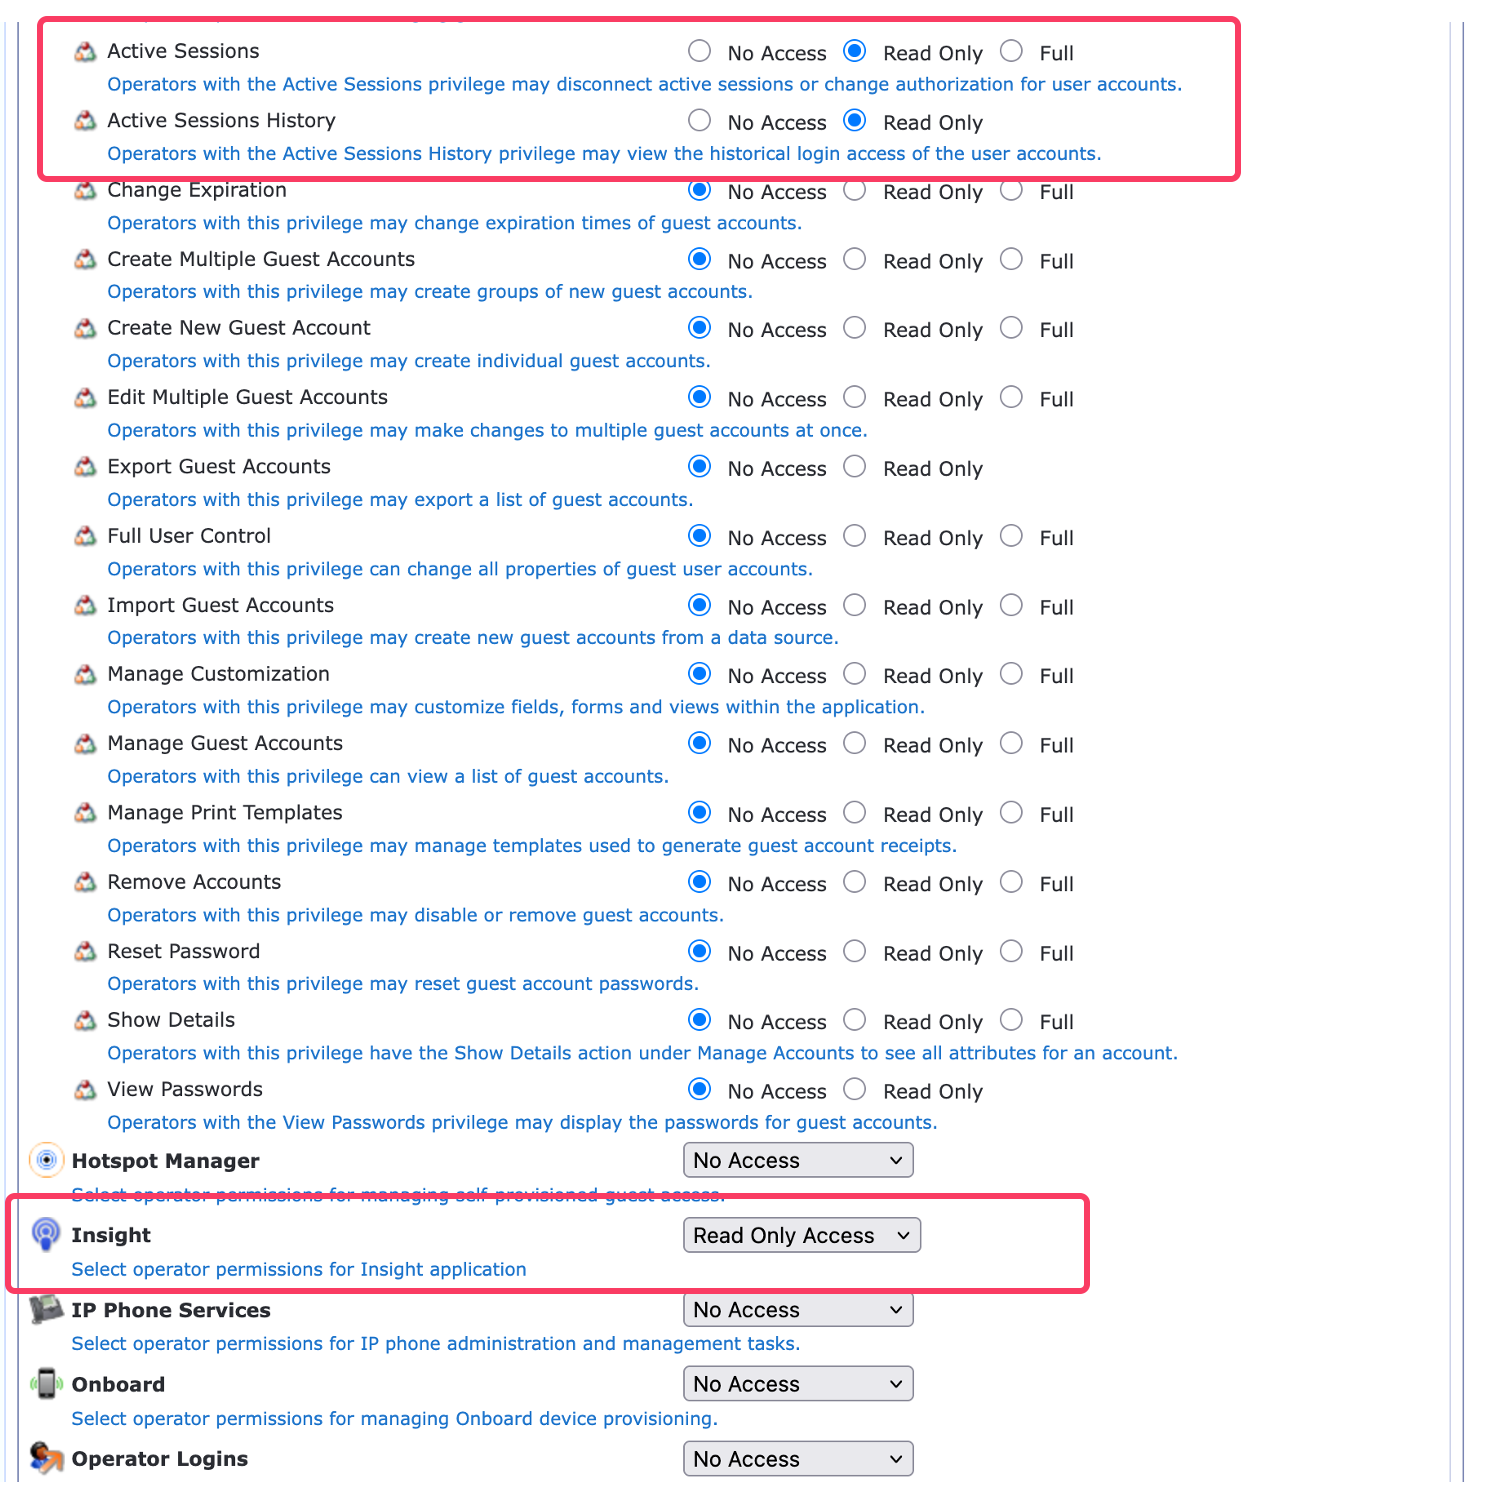
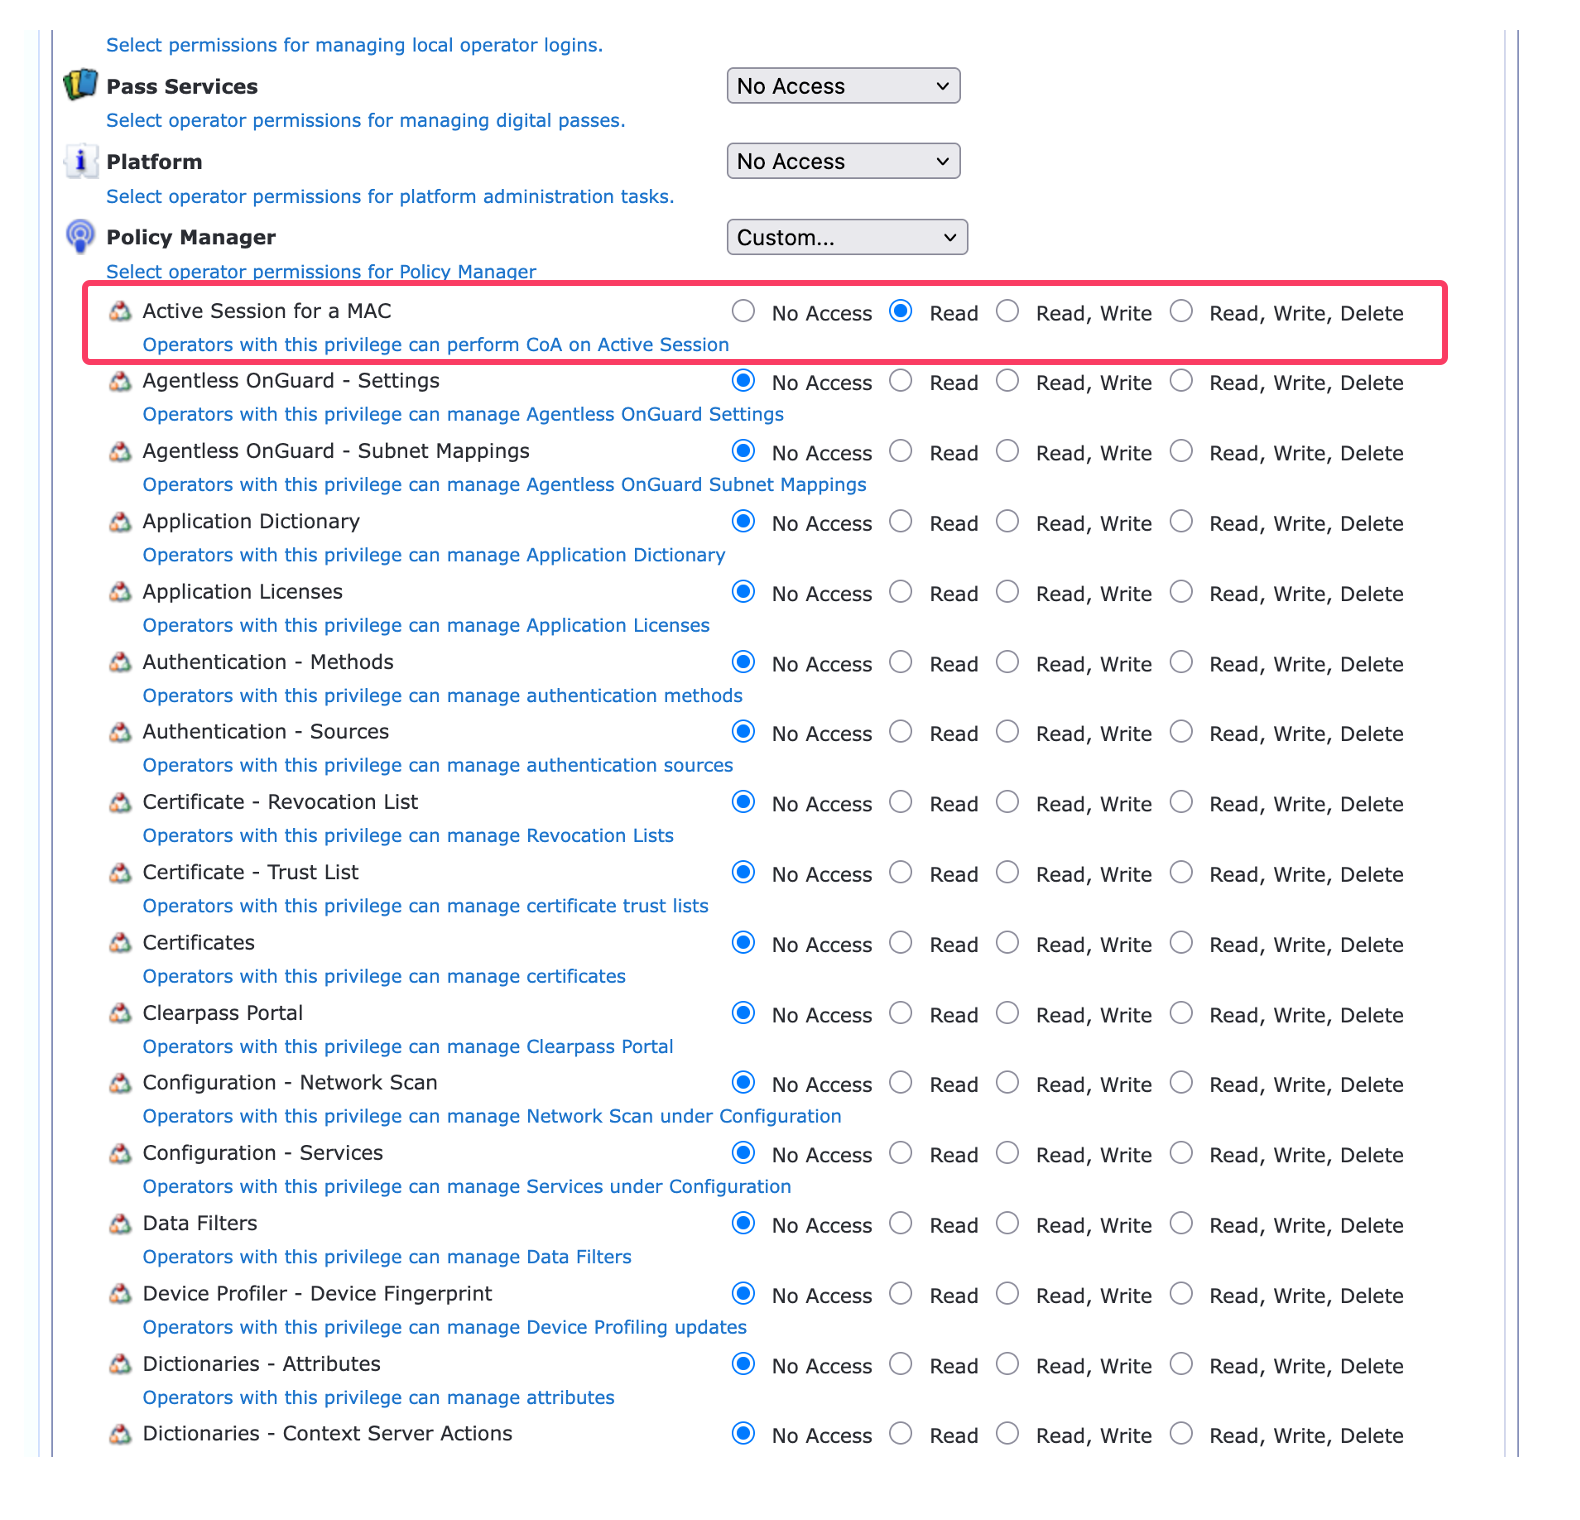
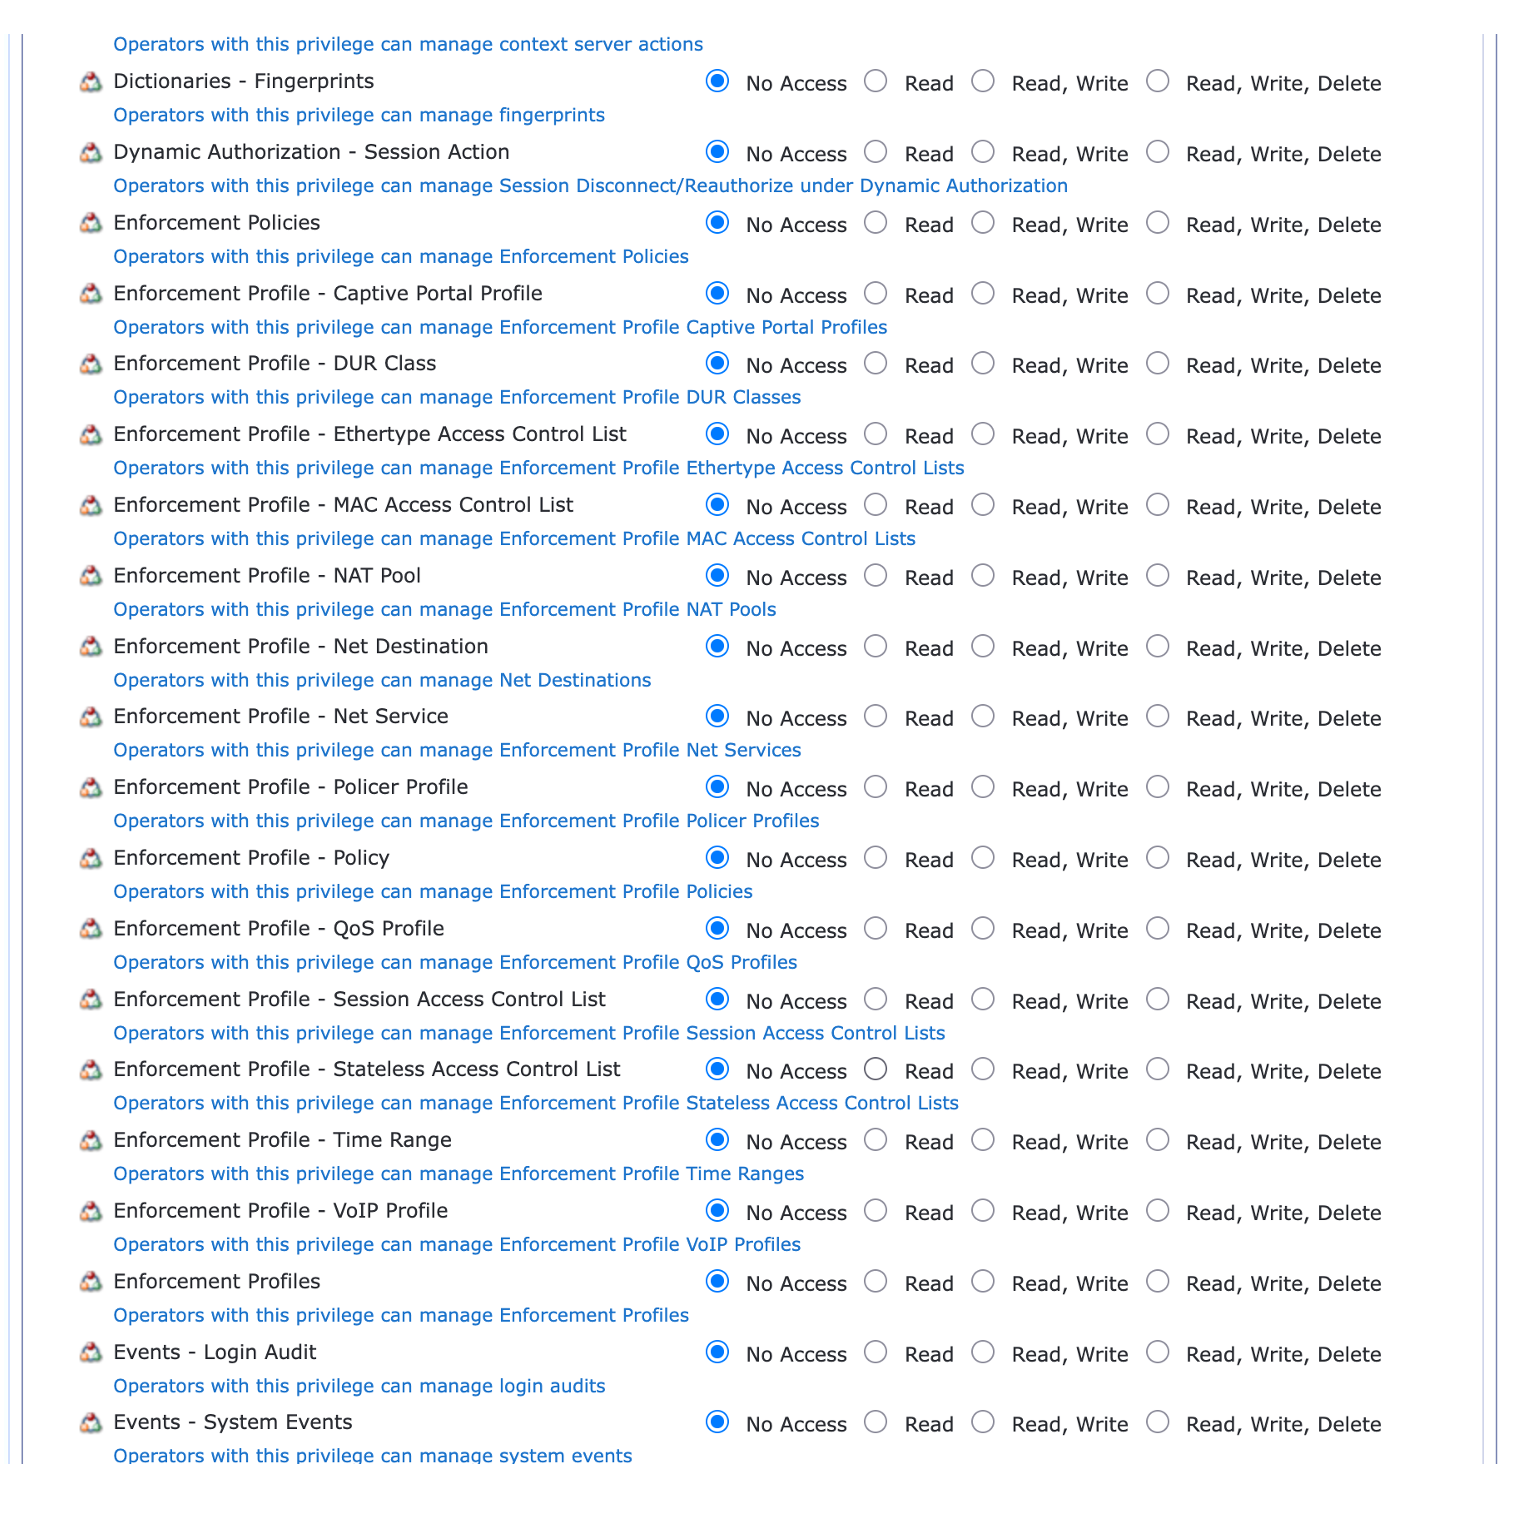
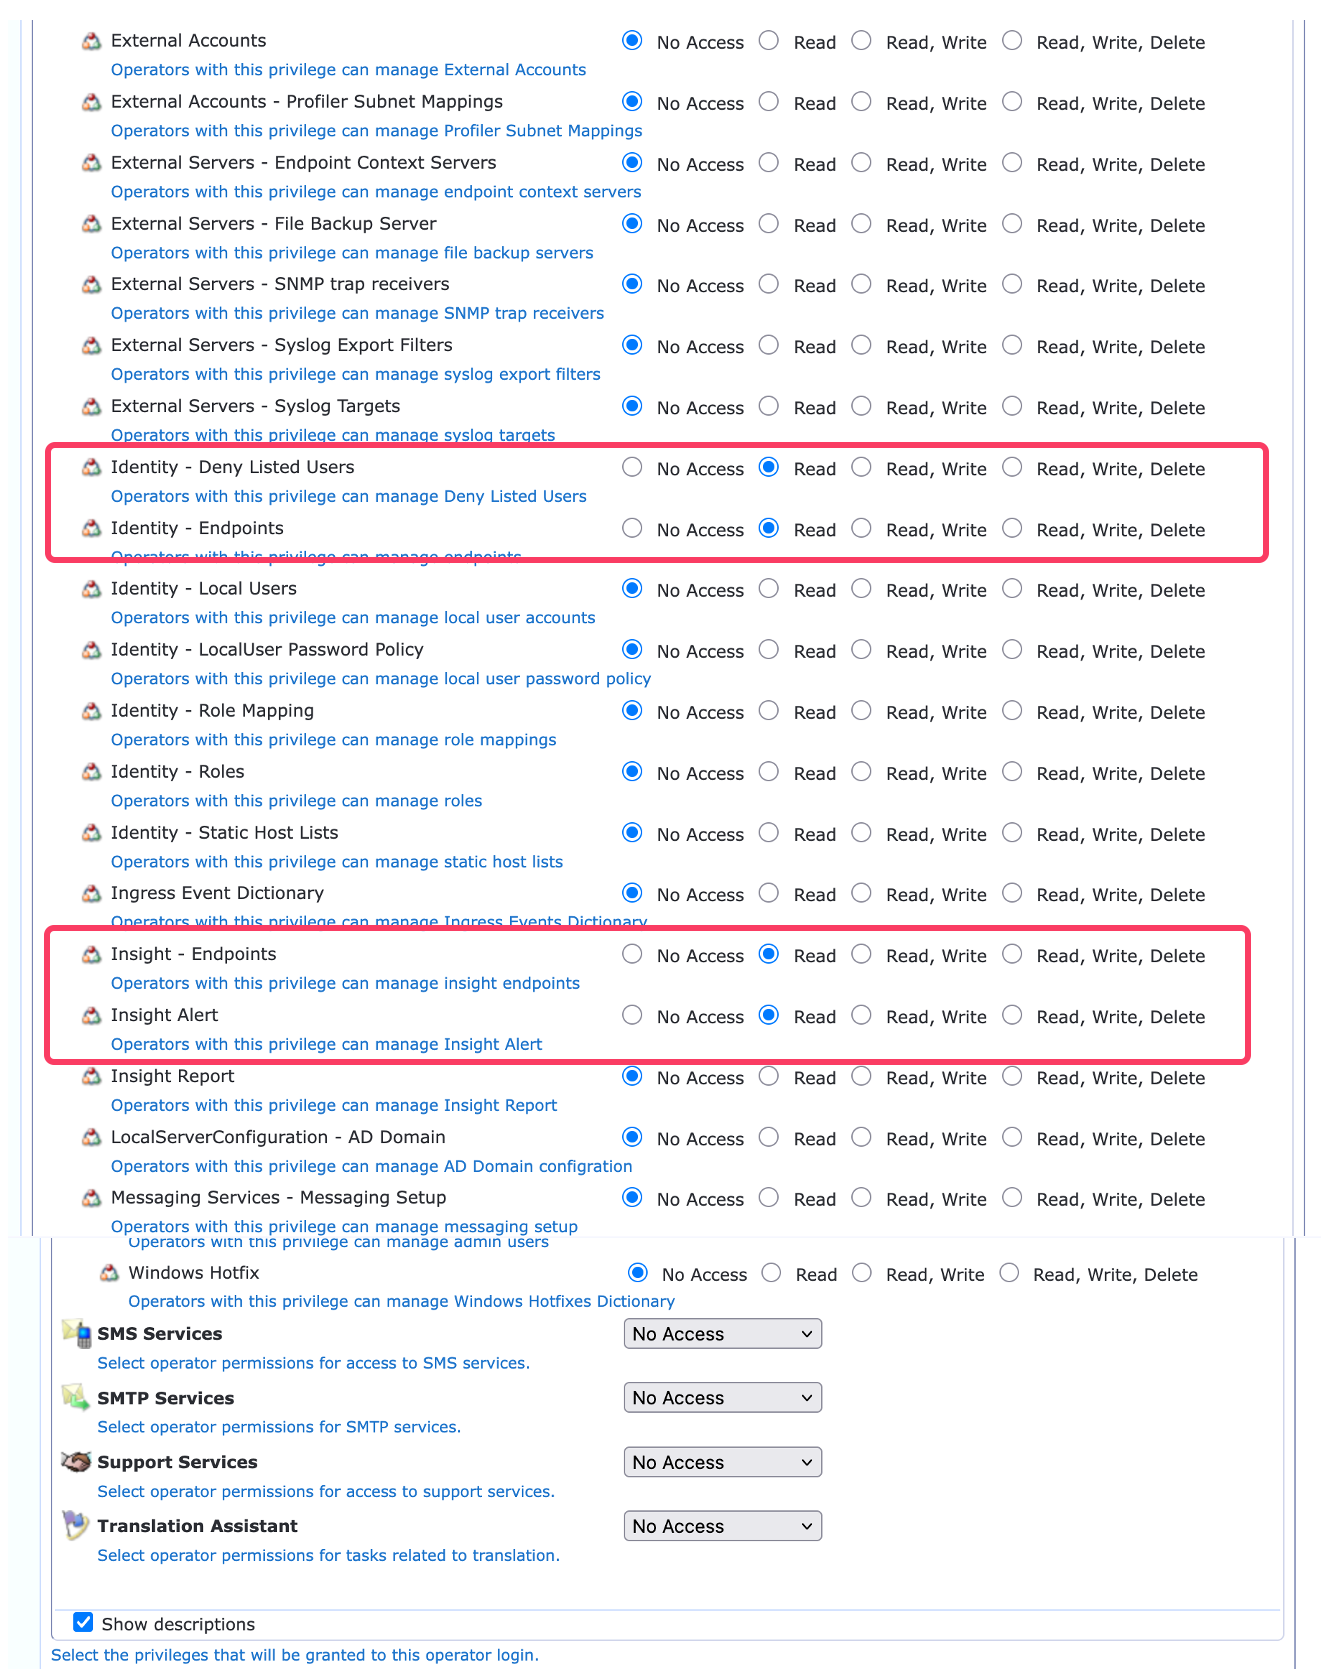
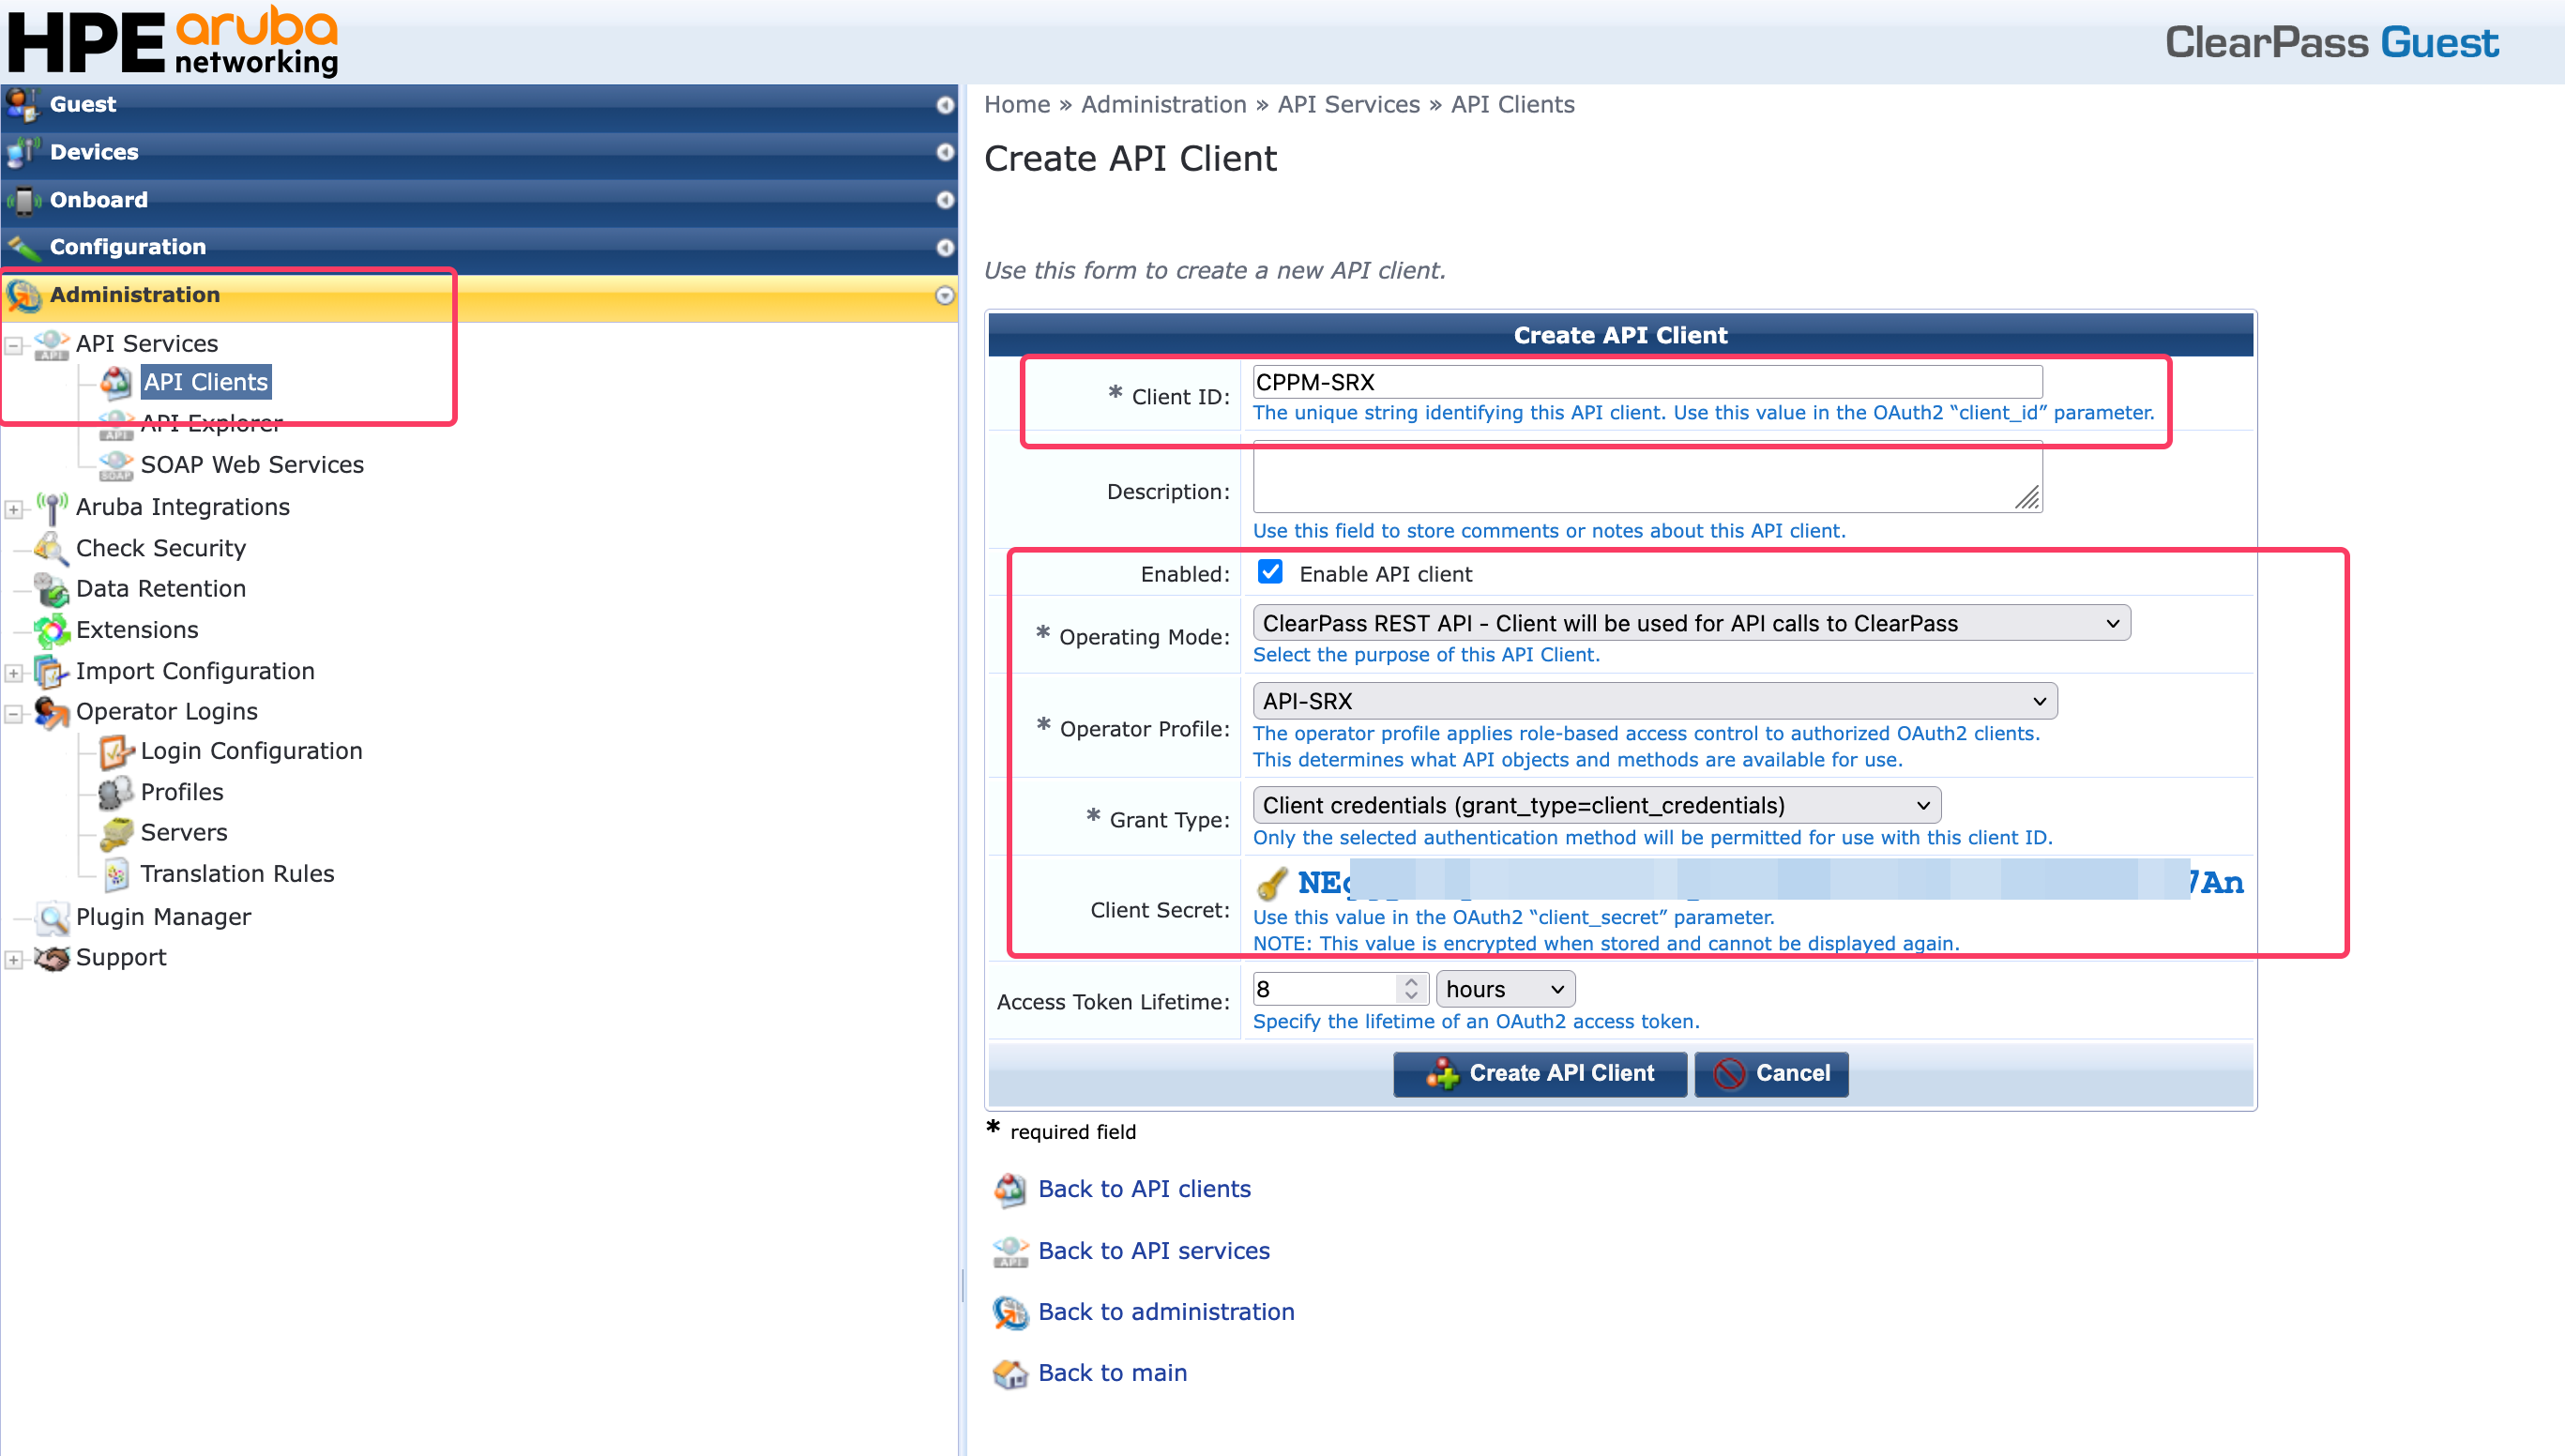
Note that there is an option to generate an Access Token. This step is not required for this integration. The access token used by the SRX is generated dynamically by the SRX using the Client Secret.
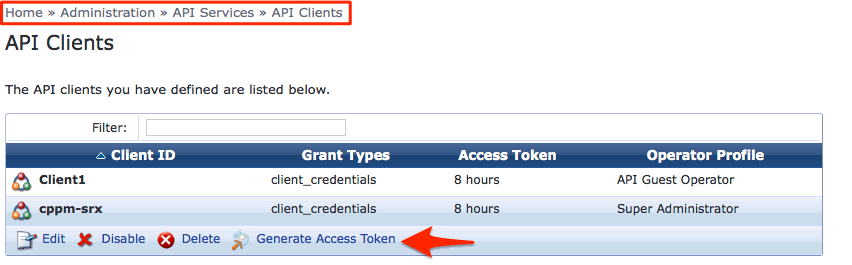
No need to Generate Access-Token here
HPE Juniper SRX Configuration
Add ClearPass as a user identification authentication source. The name used is only a label. It is not tied to an FQDN, etc.
set services user-identification authentication-source aruba-clearpass
user-query web-server CPPM-Label
Define the connection method to be used (https or http).
set services user-identification authentication-source aruba-clearpass
user-query web-server connect-method https
Define the IP address of the ClearPass appliance the SRX will communicate with.
set services user-identification authentication-source aruba-clearpass
user-query web-server address <ClearPass IP>
Define the Client ID created previously in the Guest API Services.
set services user-identification authentication-source aruba-clearpass
user-query client-id CPPM-SRX
Use the previously copied Client Secret generated by ClearPass.
set services user-identification authentication-source aruba-clearpass
user-query client-secret <Client Secret>
Define the token-api, this is always the same value.
set services user-identification authentication-source aruba-clearpass
user-query token-api api/oauth
Define the query-api, this is always the same value
set services user-identification authentication-source aruba-clearpass
user-query query-api api/v1/insight/endpoint/ip/$IP$
The commands above will generate the following configuration (the client secret will be encrypted):
root@SRX650-TME> show configuration services user-identification

authentication-source aruba-clearpass {

authentication-entry-timeout 100;

user-query {

web-server {

cppmserver160;

connect-method https;

address 10.2.100.160;

}

client-id CPPM-SRX;

client-secret
"$9$PTznCAuhSlaZqfzFtp8Lx7VYZUif5zZU9A0Bhc4oJUH.5QFn/tJGF6ApB1NdVwaG.P53n9jHORcyMWik.PTFREceMLRhv87-wsJZUj.f69ApORFncyre8LkqmPz69Ap";
\## SECRET-DATA

token-api api/oauth;

query-api "api/v1/insight/endpoint/ip/$IP$";
Configuring Ingress Event Processing for SRX
ClearPass can consume inbound syslog messages, parse them, and trigger an action such as an enforcement update for a user or endpoint. For example, an update regarding the posture or health of an endpoint can trigger an enforcement update for the device or user role, or it can trigger an update to a data center or internet access firewall based on the new context.
This feature allows event-driven, real-time enforcement within the enterprise network and enables a more effective protection framework.
Multiple steps are required to configure the Ingress Event Notification Framework. One of the more complex steps relates to the definition of the inbound parsing dictionary. Several dictionaries are supplied by default.
Note that Ingress Events Dictionaries can be added or created at any time. They do not require a ClearPass software release or patch.
Enable Ingress Events Processing
Navigate to Administration -> Server Manager -> Server Configuration -> [Your ClearPass Node] -> System
When enabling this feature a warning message is displayed as shown below which highlights and warns of the potential consequences. This feature can generate a significant CPU load on the ClearPass appliance.
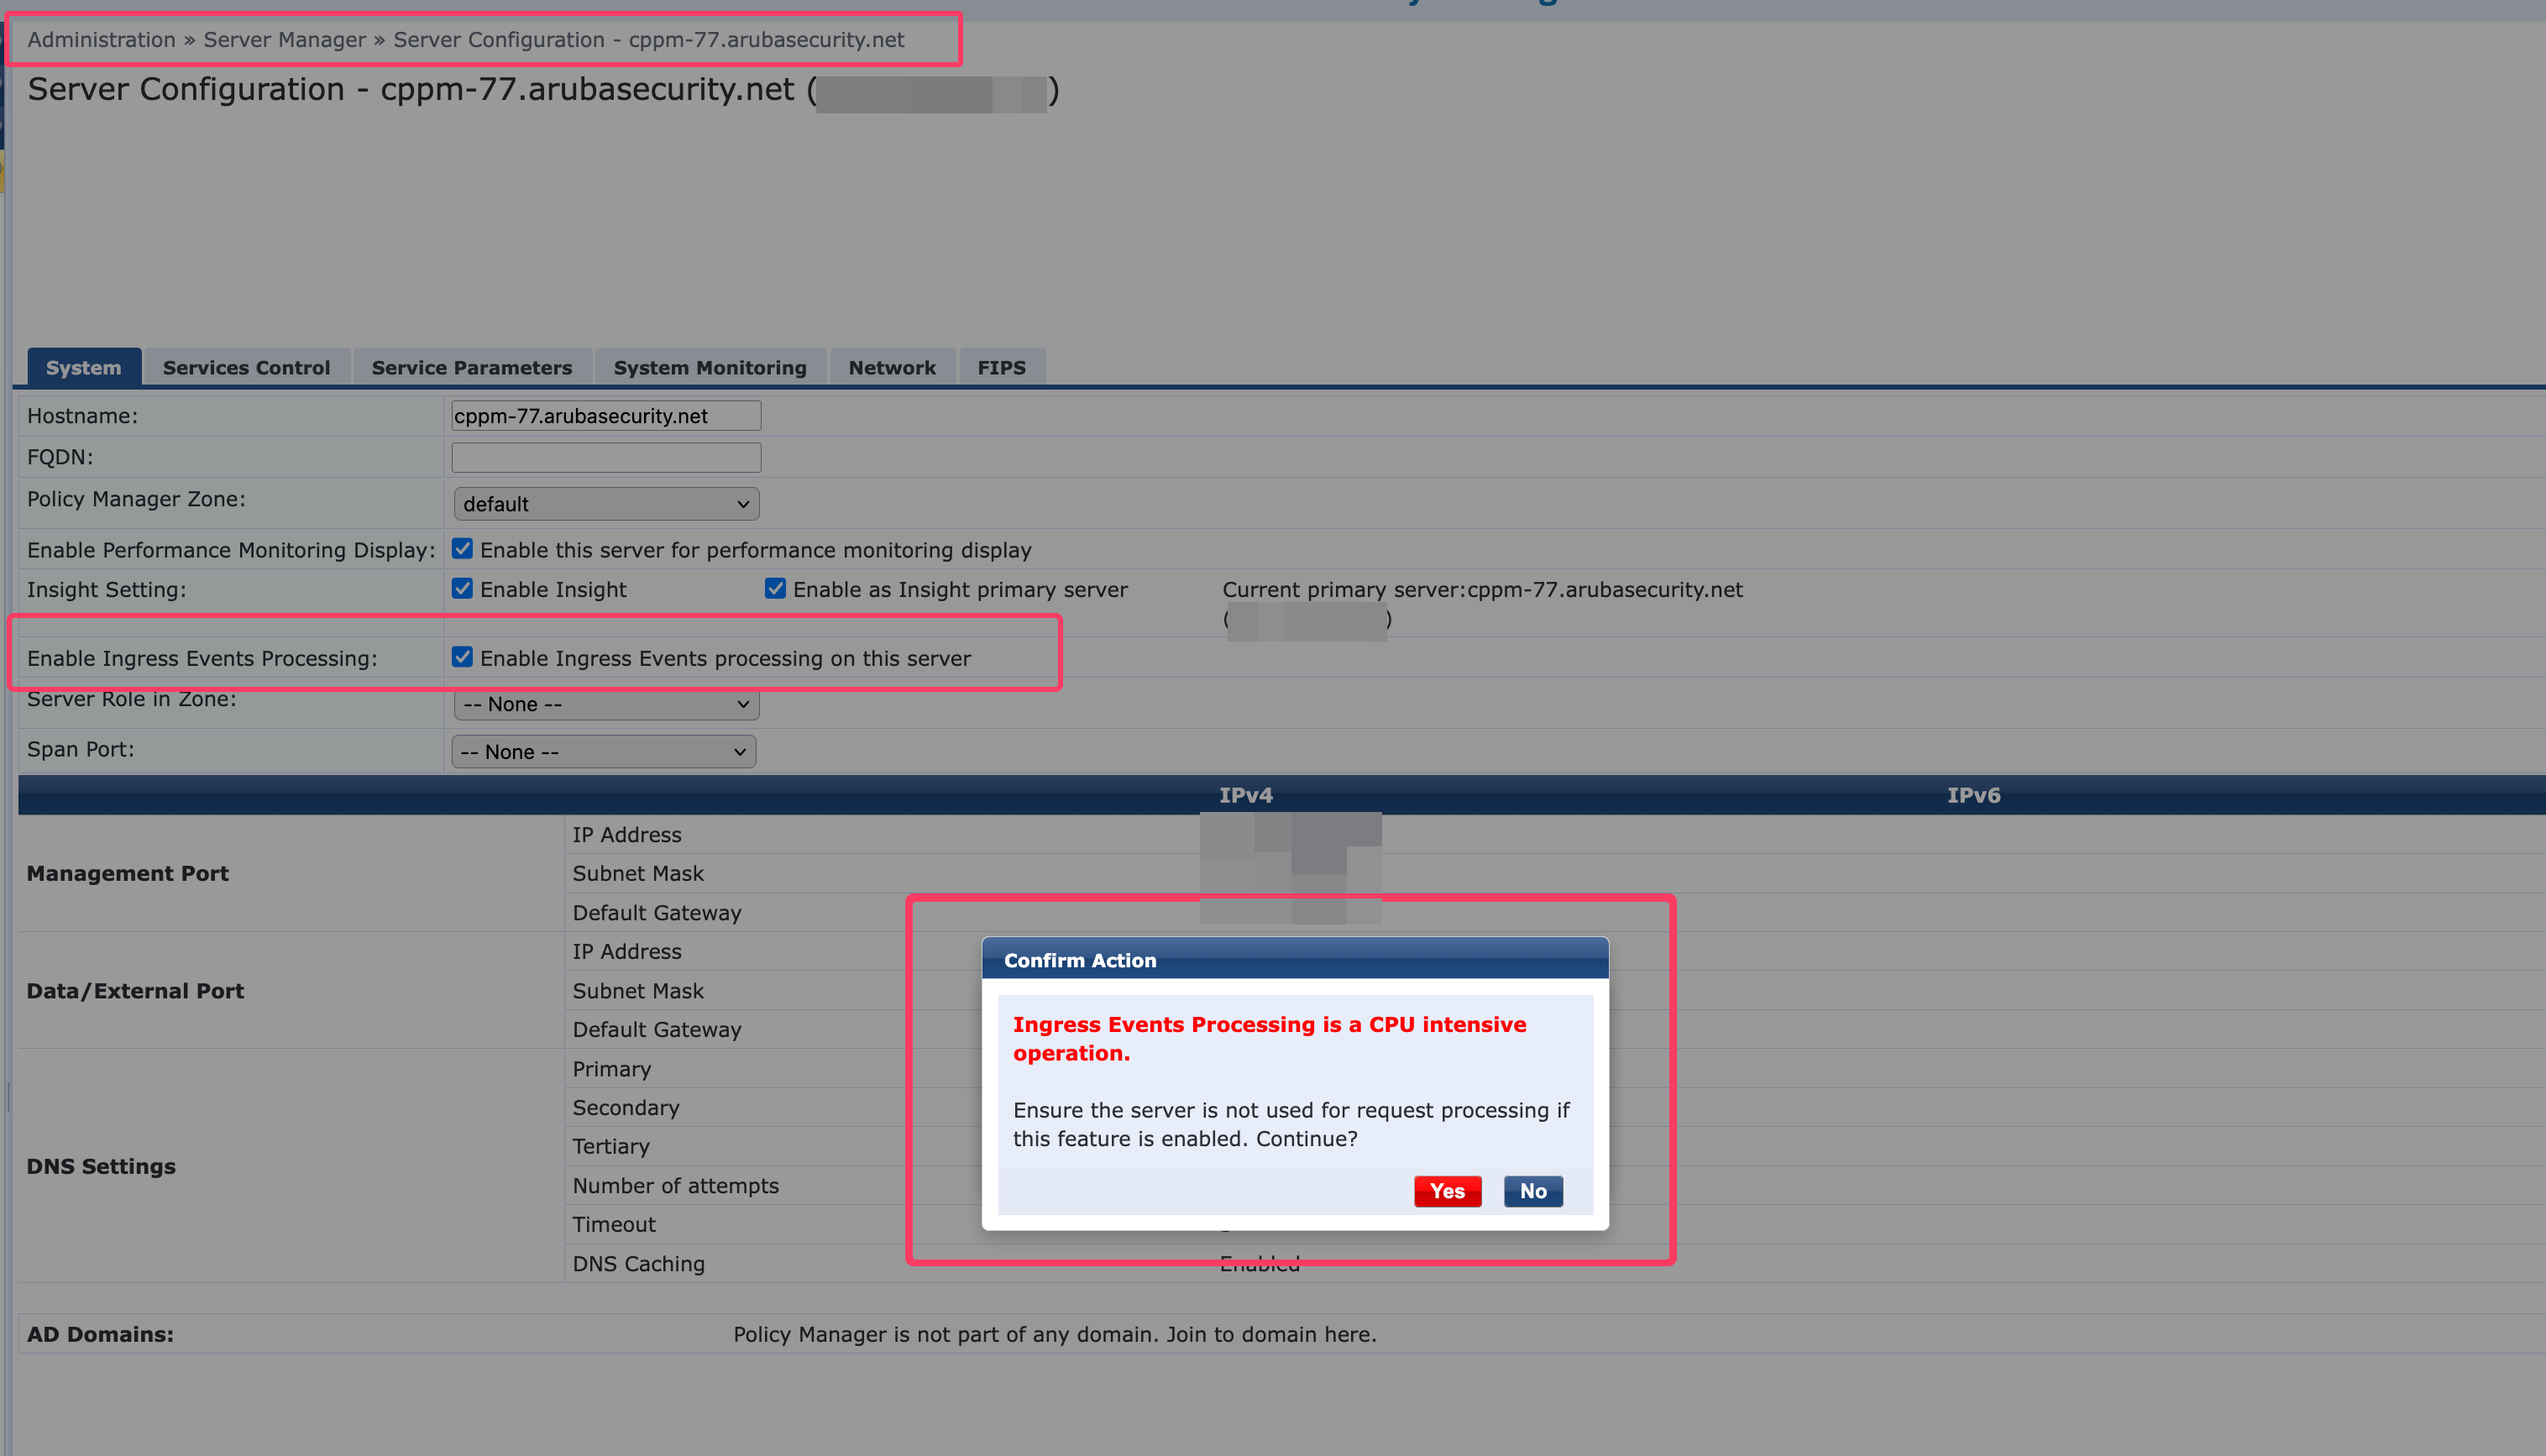
NOTE
Careful consideration and planning are required before using this feature. ClearPass should only receive syslog messages by exception that require processing and action. A constant stream of syslog messages will likely cause the appliance to become unresponsive and may lead to failure or timeout of the primary authentication function.
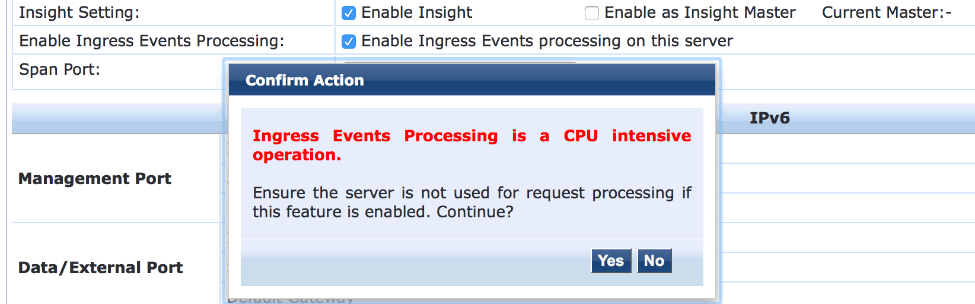
Guidelines around enabling Ingress Event processing
Care must be taken when using this feature. While there are no exact deployments where it cannot be enabled, the following guidelines provide direction. The overriding resource issue is CPU cycles. It is possible for an appliance running at 80% CPU load to handle this feature without issue, while an appliance at 50% CPU load may experience problems. The key factor is not the current CPU load but the additional load that inbound syslog messages will generate. Appliances with multiple CPUs will perform better.
The intent behind this feature is for ClearPass to take a remediation action in response to a critical event seen in the network which typically does not happen in a constant stream. If the syslog messages received by ClearPass is highly curated and not a constant stream, it should be fine to enable this feature. ClearPass should be able to handle up to 1 event per second without issues. High rate of events or high load on the server can cause ingress event parsing to slow down considerably and even fail completely.
Hardware
Specific care needs to be taken when using C1000 / N1000 appliances. Especially if you plan to enable this on the older hardware, again the gating factor is “What CPU load will this generate on the appliance?”.
Virtual Machine
For virtual machines, it has always been difficult to control allocated resources, especially CPUs. Because this is a CPU-intensive workload, extra attention must be paid to the CPUs assigned to the virtual machine and current CPU usage.
General
In a cluster of multiple appliances or when the syslog messages might be numerous, it may be practical to dedicate an appliance to processing Ingress events.
If this feature is expected to be a major part of the deployment, a process should be undertaken to model the expected load and determine whether a dedicated appliance is required. If the deployment uses hardware appliances and a dedicated hardware appliance is not available for load modeling, deploy a temporary virtual machine to establish a baseline and better understand the demands of the Ingress workload. It is not recommended to deploy this feature on an appliance that is already running TCP Profiling. The combination of these two CPU-intensive tasks should be avoided.
Confirm Ingress Services are running
Start the services if they are stopped.
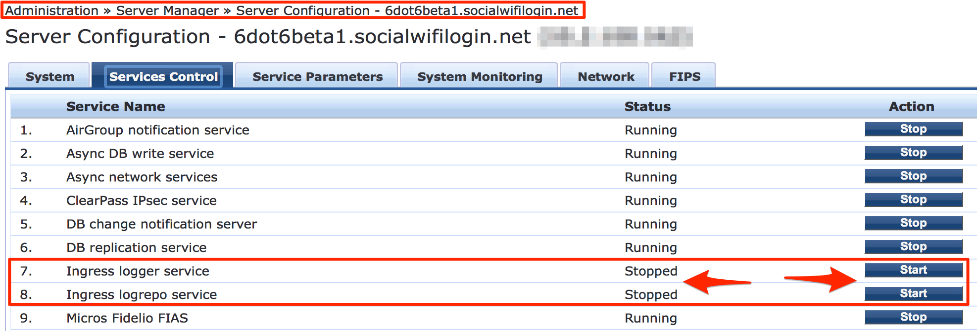
If the services do not start check under Monitoring -> Event Viewer for additional messages.
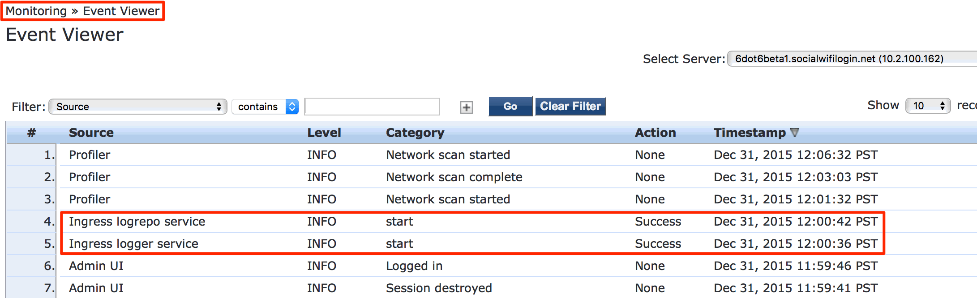
Configure Ingress port.
The logger service is responsible for listening on the defined port
(default 514) and ingesting the syslog messages. Configure the TCP/UDP
port at:
Administration -> Server Manager -> Server Configuration ->
[Your ClearPass Appliance] -> Service Parameters [Ingress logger
service]
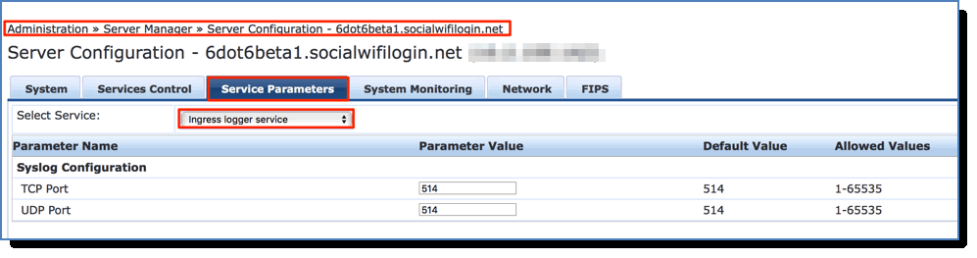
Configuring the Ingress Events Dictionary
This file takes the structured or unstructured syslog messages and turns them into fields or attributes that can be referenced within a namespace.
Multiple Ingress Event Dictionaries are supplied by default. For the Juniper SRX integration, several dictionaries are available because the firewall can send syslog in multiple formats (primarily structured and traditional). By default, the SRX dictionaries are disabled and must be enabled. Only the required dictionaries should be enabled.
INFO
If the syslog format do not match what is defined in the default dictionaries, please reach out to product team via support for help with creating a custom one.
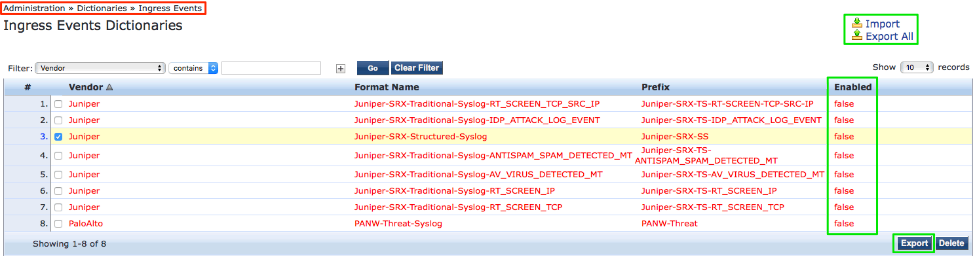
Enable the required dictionary at: Administration-> Dictionaries -> Ingress Events.
Click the desired dictionary and enable it.
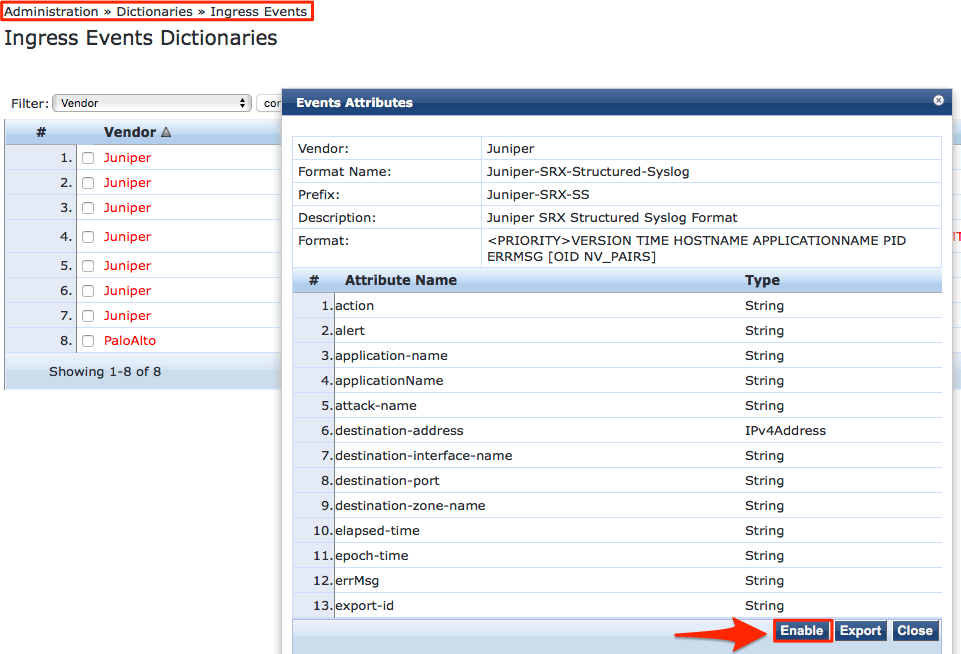
Note the Attribute Names in the screenshot. These are the fields that parse the incoming syslog data. These fields can later be referenced in policy processing.
Add the Event Source
Define the event source at: Configuration -> Network -> Events Sources -> Add
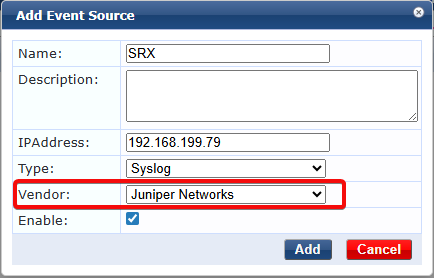
Choose the correct vendor from the drop-down and make sure to enable the Event Source.
Building the Actions and Events
The following section describes how to add the necessary Enforcement Policies, Profiles, and Services to ClearPass. This configuration allows ClearPass to ingest the logs, parse the data, extract content and context from the syslog messages, and take action based on the received data.
The examples below may differ from the exact methods used in your environment to take advantage of the Ingress Events engine. However, they illustrate the framework and methodology offered by the Ingress engine and explain the core concept behind it.
Add the Enforcement Profile – Update Endpoint
Create a policy that is used to update an endpoint attribute when a “threat” has been detected. Create an Enforcement Policy under Configuration -> Enforcement -> Profiles -> Add and use the template ClearPass Entity Update Enforcement.
An endpoint attribute can be created or one that is supplied can be used. If a custom attribute is required, create it first in the Endpoint Attributes Dictionary. Depending on the logic used, an endpoint attribute may be updated or an attribute may be added to show the endpoint is in an unresolved state.
Consideration must be given to how these attributes will be removed or reset once the threat has been resolved or remediated.
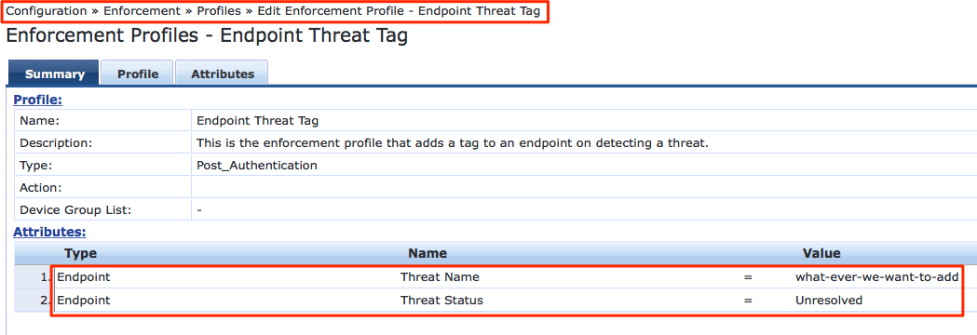
Add the Event Enforcement Policy
Create an Event Enforcement Policy at: Configuration -> Enforcement -> Policies -> Add and confirm that the Enforcement Type is Event
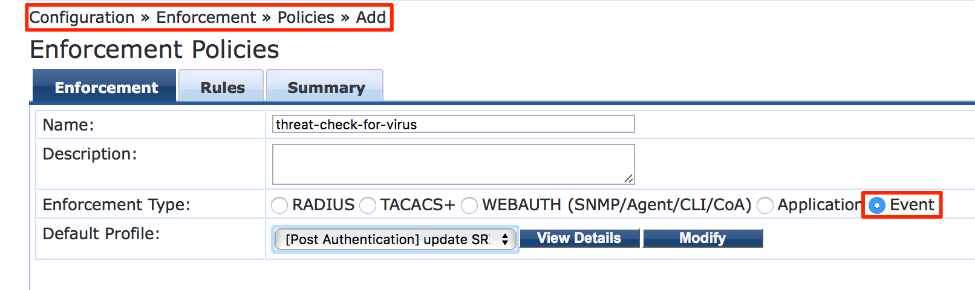
The Rules tab is where the events to key off are defined. The available options depend on which Event Dictionaries have been enabled. For this example, two SRX dictionaries and one PANW dictionary were enabled. If a custom Ingress Events dictionary has been created and enabled, it will appear here.
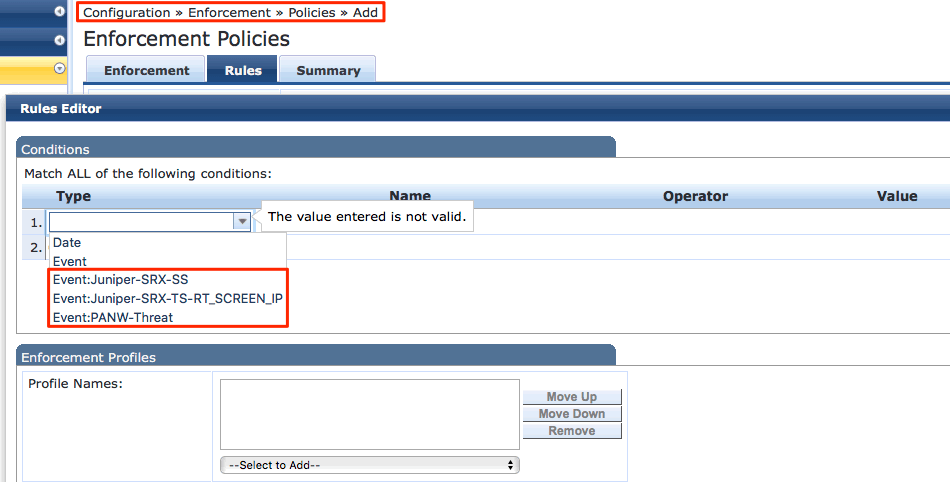
Choosing ‘Juniper-SRX-SS’ and expanding the namespace ‘Name’ displays
all fields configured in that Ingress Event Dictionary.
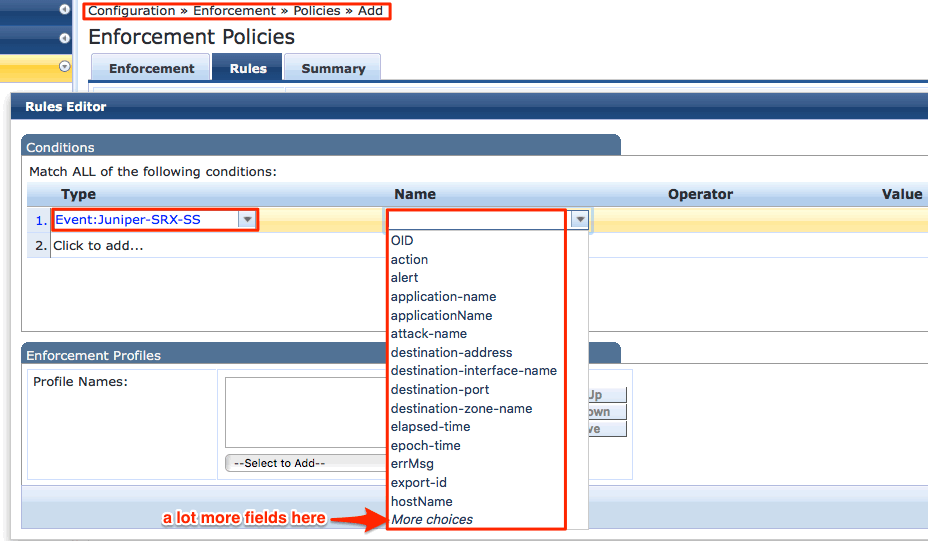
In the example a simple check is used to demonstrate the configuration. You can set the policy to trigger an update to the endpoint if the word “threat” is seen in the alert field.
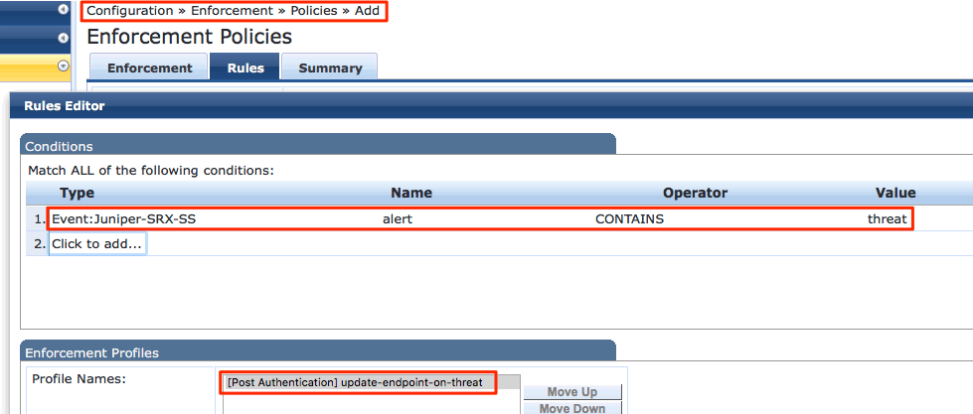
Numerous fields are available and any field in the namespace ‘Name’ can be used to trigger an event with operators such as CONTAINS, EQUALS, EXISTS, BEGINS_WITH, NOT_EQUAL, NOT_CONTAINS, NOT_BELONGS_TO, etc.
Add the Event Service
Create this under Configuration -> Services -> Add with the type as Event-based Enforcement.
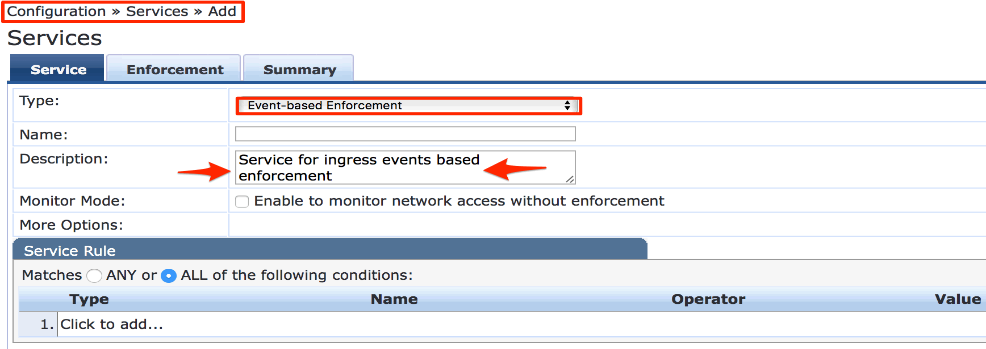
Setup is now complete to receive and parse syslog messages from an HPE Juniper SRX firewall. In the example, an endpoint in the Endpoint Database is marked as malicious or out-of-policy. ClearPass then triggers an enforcement action. Typically, for a device flagged as malicious, the desired outcome is to quarantine or isolate the device or user. A typical enforcement action is to issue a Change of Authorization (CoA) so that ClearPass can re-evaluate the device based on its updated status.
Tuning the Ingress Event Engine [IEE] Processing
The process of ingesting syslog messages, parsing the data, and writing it to the Event Database before triggering an event can take time. This process is heavily dependent on the physical resources available on the appliance, the number of dictionaries enabled, and the Batch Processing Interval.
The Batch Processing Interval determines how frequently the Event Engine checks the Event Database for new entries. On lower-powered or older hardware, the default of 30 seconds should suffice, but it may need to be increased.
For the C3010, N3001 hardware appliance, or an appliance dedicated to
IEE processing, this parameter may need to be lowered to make the
process more real-time.
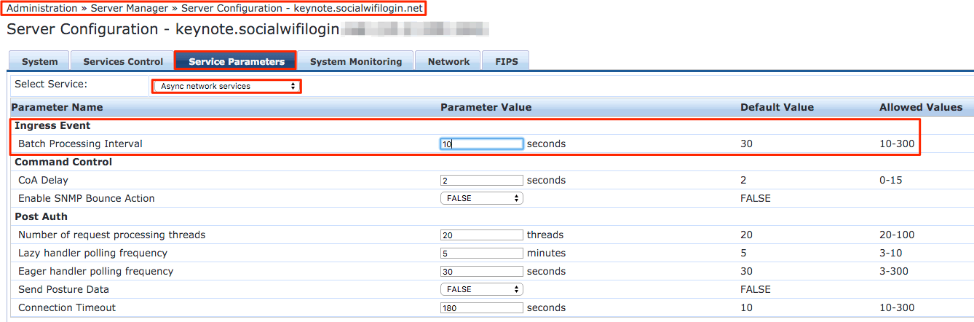
Setting up Syslog on Juniper SRX
The syslog configuration on a Juniper SRX can be extensive. Logs can be stored locally or sent to an external syslog server. Events can be logged from the system and/or from traffic. The focus for this integration is data-plane traffic logs. These logs are generated by processes that control data flow, such as the firewall and IPS processes.
INFO
For the process of integration with ClearPass, we will have to use ‘stream’ mode. The default mode is ‘event’.
Below is a basic syslog configuration.
root@SRX650-TME> show configuration system syslog

archive size 100k files 3;

user \* {

any emergency;

}

file messages {

any critical;

authorization info;

}

file interactive-commands {

interactive-commands error;

}
To configure the SRX to forward data-plane syslog messages to a ClearPass appliance, several settings are required. The example below contains the core requirements to send to two syslog servers. It demonstrates the ability of the SRX to send syslog messages to multiple targets and to differentiate by syslog type, formatting, category, etc.
The configuration shows system/node-specific settings such as stream mode and source address, along with two ClearPass appliances (to_cppm and to_beta1) that can override system-level settings.
INFO
Stream mode is normally used on high-end SRX devices but can be configured on any model. It is configured under the security stanza. In stream mode, logs are sent to the remote syslog server (in this case ClearPass) directly from the data plane and do not affect SRX device performance. Because of this, the logs cannot be saved locally (no control plane processing). However, care must be taken not to overwhelm the ClearPass appliance with syslog messages.
root@SRX650-TME> **show configuration security log**

mode stream;

format syslog;

source-address 10.2.51.132;

stream to\_cppm {

severity debug;

format sd-syslog;

filter threat-attack;

host {

10.2.51.210;

port 514;

}

}

stream to\_beta1 {

severity critical;

format syslog;

category idp;

host {

10.2.100.162;

port 514;

}

}
INFO
The SRX can rate-limit the syslog messages being sent (configuration not shown here).
ClearPass Access Tracker Logs Examples
The following examples show the logs posted in the ClearPass Access Tracker when an Event occurs. The view is filtered to show only Events.
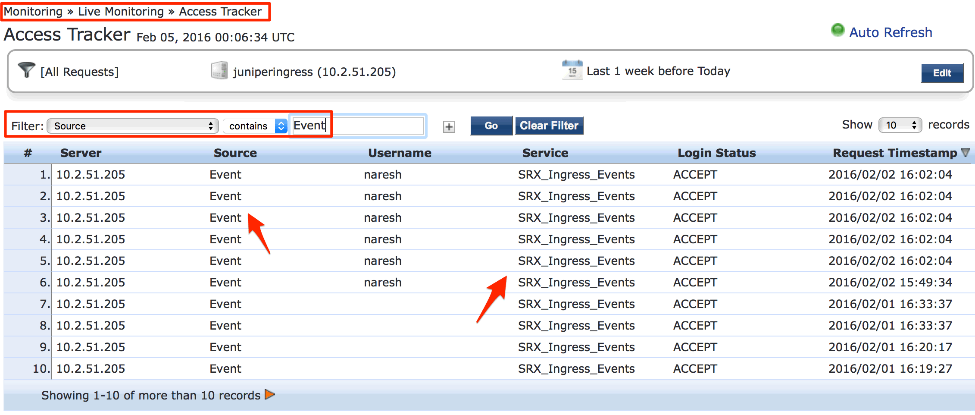
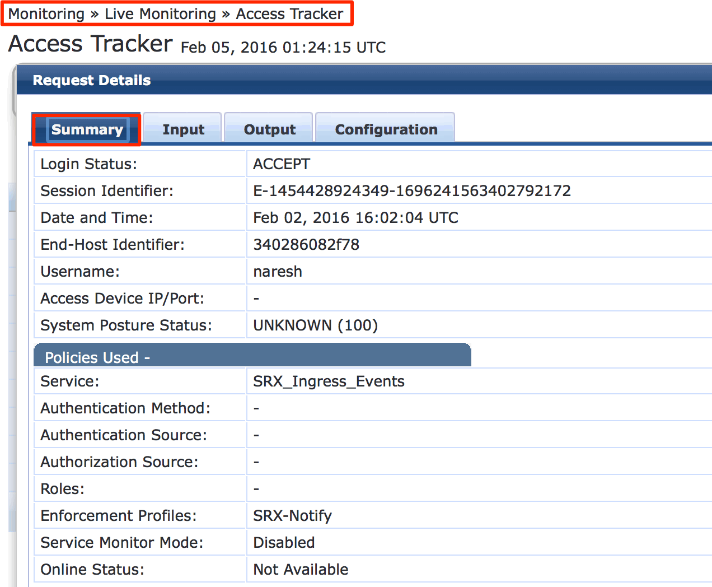
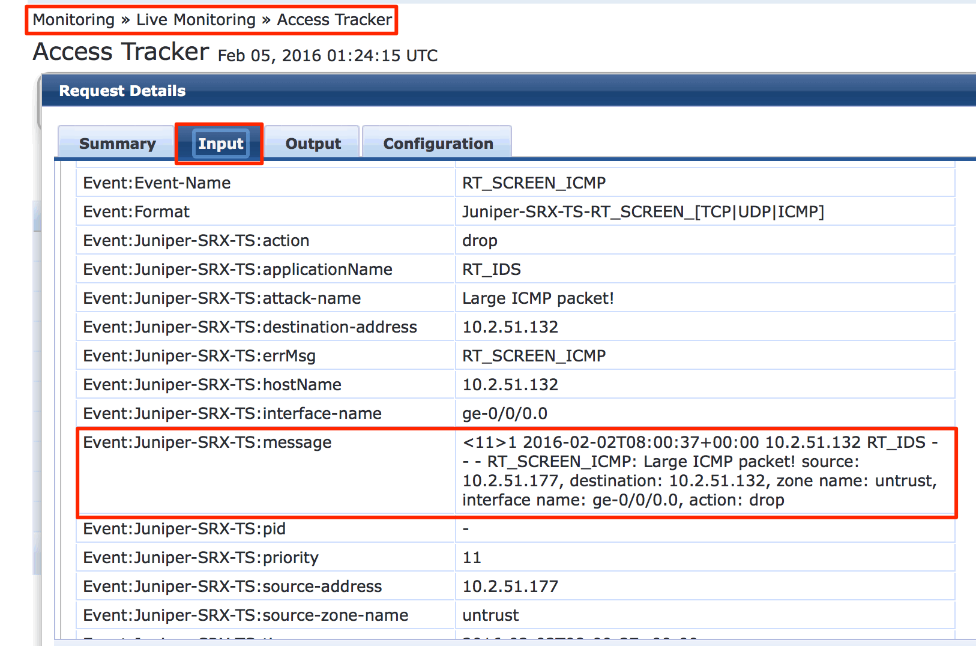
Validation
Monitoring user context under JUNOS webapi
To validate user authentication context is being received from ClearPass use the following command.
matt@nac-srx.arubasecurity.net> show services user-identification authentication-table authentication-source aruba-clearpass extensive
Logical System: root-logical-system

Domain: GLOBAL
Total entries: 1
  Key: 10.127.209.150
    Username: host/oak-win-01
    Groups:posture-unhealthy, c2c_fullaccess, domain computers, [machine authenticated]
    State: Valid
    Source: Aruba ClearPass
    Access start date: 2026-05-15
    Access start time: 16:26:56
    Last updated timestamp: 2026-05-15 23:28:10
    Age time: 28
INFO
- Groups equate to ClearPass Roles
- ClearPass Posture is sent as a Role (SRX Group).
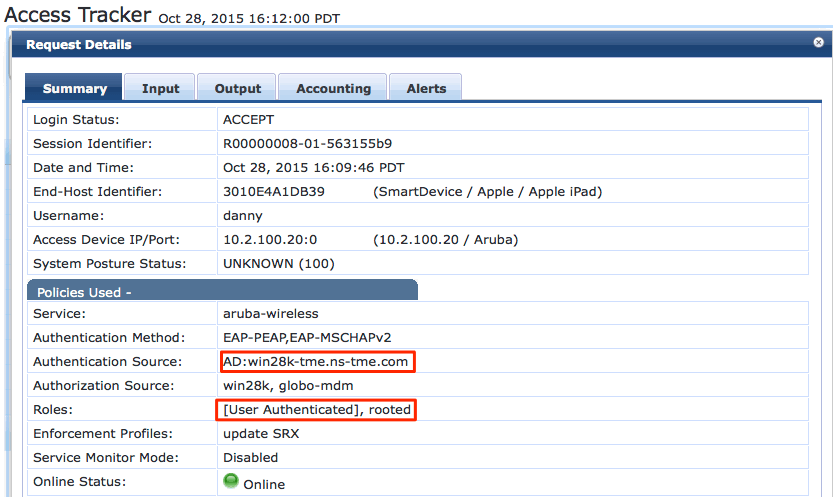
Validate user-query (Pull Method)
Use the commands below to validate the user-query method.
root@SRX650-TME> show services user-identification
authentication-table authentication-source aruba-clearpass extensive

Domain: ns-tme

Total entries: 1

Source-ip: 10.2.100.167

Username: djump

Groups:posture-unknown, \[user authenticated\], rooted

State: Valid

Source: Aruba ClearPass

Access start date: 2026-04-30

Access start time: 15:45:56

Last updated timestamp: 2026-04-30 23:45:15

Age time: 100
Clear the SRX Auth table
root@SRX650-TME> clear services user-identification
authentication-table authentication-source aruba-clearpass
Confirm the authentication-table is clear
root@SRX650-TME> show services user-identification
authentication-table authentication-source aruba-clearpass extensive

warning: "There is no authentication-table entry."
Force the SRX to request an update from ClearPass (It is actually querying ClearPass via Rest APIs)
root@SRX650-TME> request services user-identification
authentication-source aruba-clearpass user-query address 10.2.100.167
Confirm user is in authentication-table.
root@SRX650-TME> show services user-identification
authentication-table authentication-source aruba-clearpass extensive

Domain: GLOBAL

Total entries: 1

Source-ip: 10.2.100.167

Username: djump

Groups:posture-unknown, \[user authenticated\], rooted

State: Valid

Source: Aruba ClearPass

Access start date: 2026-04-30

Access start time: 15:47:37

Last updated timestamp: 2026-04-30 23:45:22

Age time: 100
Monitoring the user-query (Pull Method)
Using the below JUNOS CLI commands from operational-mode, you can check the status of the ClearPass to SRX connectivity.
root@SRX650-TME> show services user-identification
authentication-source aruba-clearpass user-query status

Authentication source: aruba-clearpass

Web server Address: 10.2.100.160
Status: Online
Current connections: 1
Monitoring the number of requests/responses between ClearPass and the SRX
root@SRX650-TME> show services user-identification
authentication-source aruba-clearpass user-query counters

Authentication source: aruba-clearpass

Web server Address: 10.2.100.160

Access token: 0f0d31e4bfcd4809d67535ecc68298f25d2ca036

Request sent number: 3

Total response received number: 3

Error response received number: 0

Time of last response: 2026-04-30 11:38:53
Appendix
SRX Query Rate to ClearPass for Session Data
In all SRX platforms, the max query rate is 600 queries / minute.
Additional Resources
Integrating ClearPass with Juniper Networks SRX Endpoint Context Server
The ClearPass RESTful API’s SRX is querying (Pull Method)
The following are the REST APIs that the SRX uses to pull user data.

Using the IP query, the API was tested via the Swagger interface. A
wealth of data is returned for the endpoint 10.2.100.167.
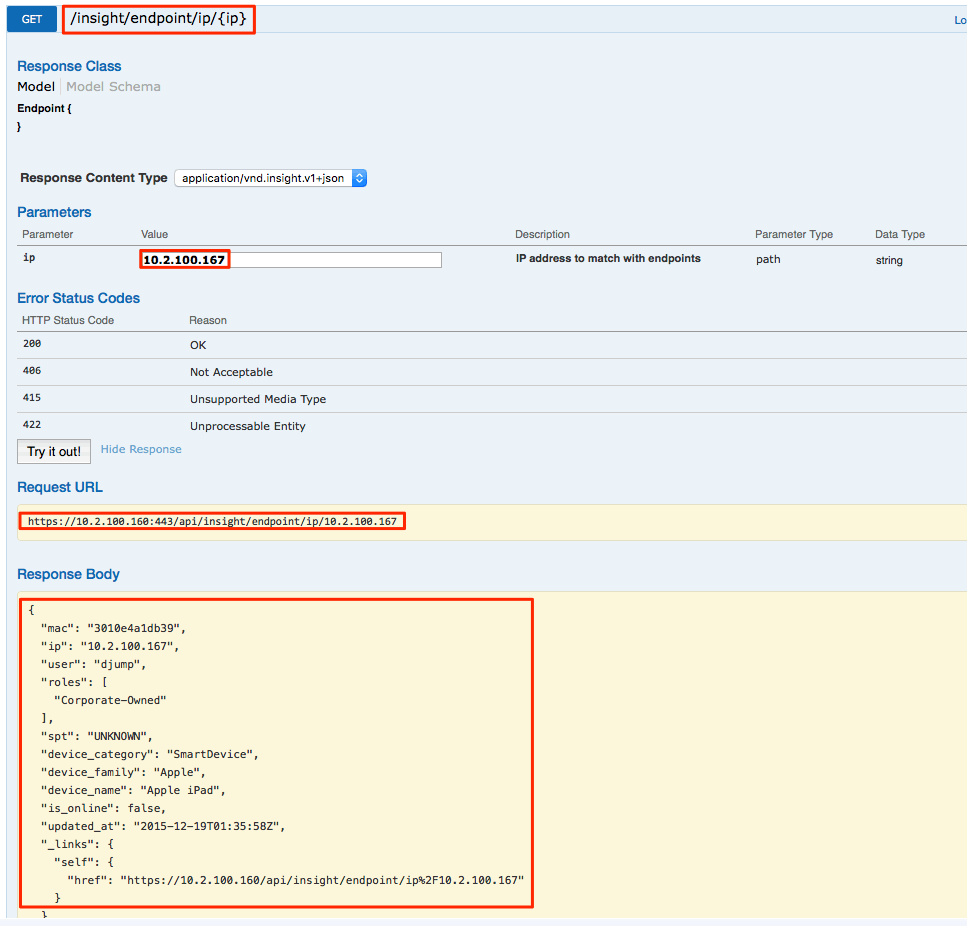
4 - OT/ICS/IIoT/MIoT
4.1 - SOTI Connect
Introduction
SOTI Connect is an enterprise IoT device management solution that provides complete lifecycle management of connected devices — including industrial and mobile printers, IoT-enabled sensors, and other OT/ICS endpoints — from a single point of control. This integration guide covers the setup, configuration, and monitoring of the SOTI Connect ClearPass Extension within ClearPass Policy Manager. The extension enables ClearPass to retrieve endpoint data managed by SOTI Connect, enriching device profiles with up-to-date attributes for use in policy enforcement and access control decisions. Note that this integration supports periodic sync mode only, where ClearPass pulls managed endpoints and their associated attributes from SOTI Connect at configured intervals.
Pictorial View of the Integration
The extension can be configured to periodically sync device information from SOTI Connect.

In this mode ClearPass polls SOTI Connect periodically and updates the ClearPass
Endpoint database with attributes obtained from SOTI Connect. These attributes
can be utilized in ClearPass during endpoint Authorization. This mode
has a simpler configuration demand, however, the data provided may not
be completely up to date at authentication time.
Software Requirements
The minimum software version required for CPPM is 6.11.0 . At the time of writing, version 6.11.10 is available as the long supported release and 6.12.4 is available as the short supported release. CPPM runs on hardware appliances with pre-installed software or as a Virtual Machine under the following hypervisors. Hypervisors that run on a client computer such as VMware Player are not supported.
-
VMware vSphere Hypervisor (ESXi) 7.0 U3c and 8.0
-
Windows Server 2019 with Hyper‑V and Windows Server 2022 with Hyper‑V.
-
KVM on CentOS Stream 8, CentOS Stream 9, Ubuntu 20.04 LTS, and Ubuntu 22.04 LTS.
ClearPass Installation and Deployment Guide
This document assumes your ClearPass environment is already configured and operational. If you require assistance with basic deployment, refer to the following deployment guide:
https://arubanetworking.hpe.com/techdocs/ClearPass/6.11/Installation-Guide/Default.htm
ClearPass Extensions
The integration between ClearPass Policy Manager and external systems is driven through a ClearPass capability known as Extensions, a sub-component of the ClearPass Exchange Integration framework. ClearPass Extensions are micro-services running on top of the base ClearPass platform. These micro-services enable HPE Aruba Networking to deliver new features outside of the main software release cycle and facilitate a faster time to market for specific features and integrations. Configuration and control of ClearPass Extensions is accomplished through the ClearPass Guest GUI, as covered later in this document.
Installing Extension
ClearPass Extensions are easy to install from the ClearPass Extensions Store. In a cluster, ClearPass Extensions can be installed on a subscriber independently of the publisher. Multiple copies of the same extension can be installed if needed as well.
INFO
Internet access is required for ClearPass Policy Manager to install the ClearPass Extensions from the Extension Store. Starting with ClearPass 6.12, extensions can be can be installed offline as well. Offline ClearPass Extension images are available on HPE networking support portal.
Access to the extension store
Access the Extension Store to download and install ClearPass extensions. The Extension store utilizes the same HPE Passport account credentials used to validate support entitlement in the Software Updates Por- tal. This is configured under Administration > Agents and Software Updates > Software Updates as shown below. Ensure that valid HPE Passport credentials have been entered in these fields to enable Ex- tension download capabilities.
Installing the Extension from Store
Extensions are installed from the extension page in ClearPass Guest, as shown below. Access it from Guest > Administration > Extensions
From here, click on ‘Install Extension’, and the search box below appears.
Enter “Intune” and click on ‘Search’, see the example below.
INFO
Here we are using Intune as an example. The installation steps are the same for all the extensions. For your deployment, please search for the appropriate extension like Jamf, Mosyle, Crowdstrike, etc.
All currently available extensions are listed in the page: https://www.arubanetworks.com/techdocs/NAC/clearpass/integrations/clearpass-extension/extensions-list/
Click on the extension name and then click “Install.”
In the “Install Extension” dialog box, set the IP address if necessary, as described in section “Extensions and IP address configuration support” below. Do not check the box to start the extension at this time. Click the “Install” button.
In this example, we’ve not entered an IP address for the extension to use, if there is intent to use the extension as an authorization source set this value and ensure its set the same on all nodes where the Extension is deployed.
The extension will download and appear in a “Stopped” state. Notice the options to Start, Delete, Reinstall, Show Logs, and view Configuration. Click on “Configuration” to view settings.
After the extension has been installed, proceed to configure the extension
A copy of the default Extension configuration is shown above, this will need to be modified for your deployment.
INFO
Password and sensitive configuration items are obfuscated when presented in both the Extension GUI or in the Explorer configuration.
WARNING
The configuration attributes are case sensitive. It is recommended to refer the default configuration sample while editing your configuration.
Extensions and web proxy support
Extensions support communications with 3rd parties via a web proxy. This adds incremental proxy functionality. If a proxy is defined in ClearPass Policy Manager, then an extension will inherit that configuration. See later in the document on how to disable the proxy inherited configuration.
INFO
Note that the Policy Manger web proxy configuration is ONLY read by the extension at installation time. If the web proxy configuration is changed in Policy Manager, then the extension must be re-installed so the new settings are re-read and bonded to the extension.
Extensions and IP address configuration support
ClearPass uses a non-externally routed IP address range to communicate with the Extension. The default is 172.17.0.0/16. You may configure a different range, if desired. This is especially useful when deploying extensions across nodes within a cluster where there is the requirement for a fixed consistent IP address for the extension across the cluster.
Changing the “Extensions Network Address” range is only necessary if either the ClearPass MGMT or DATA interface are using an IP address in the extension default range of 172.17.x.x/12, or if ClearPass needs to communicate with some external device in that range.
To Configure the base Extension IP subnet within Policy Manager navigate to Administration > Server Manager > Server Configuration [chose your node] Service Parameters [ClearPass system service].
INFO
The subnet defined here for the extension framework must fall within the following subnet range 10.0.0.0/8, 172.16.0.0/12, 192.168.0.0/16 as defined by RFC1918. For best results, set the network address range to a subnet that does not exist in your enterprise, and restart the extension service for this change to take effect.
Never set the DATA or MGMT IP address to use an address that matches the Extension Network
INFO
Note that changing the extension base IP address will require the extension service to be restarted.
ClearPass SOTI Connect Extension Configuration
After installing the Extension, the default configuration will need to be updated.
Common extension attributes
Extension framework configuration parameters (common configuration)
| Attribute | Description | Default Values |
|---|---|---|
| logLevel | Logging level for troubleshooting | “INFO” |
| verifySSLCerts | Should SSL certificates be validated when communicating with external context sources | true |
| enableEndpointCache | Cache endpoint attributes to optimize authorization queries, avoid repeated DB queries and reduce API calls to external context sources | true |
| endpointCacheTimeSeconds | The duration in seconds to cache the endpoint attributes | 300 |
| syncUpdatedOnly | If this option is set to true, only the endpoints updated after the previous sync would be fetched from the context source. Note that this option only works for the third-party context sources that have APIs to support this functionality. If this option is set to false, all endpoints are fetched at every sync interval. |
true |
| syncAllOnStart | If this option is set to true, when the extension starts, the system will attempt to sync all endpoints in the external context source to ClearPass. Note that if you have a large number device context to be fetched, it would take a long time for the initial sync to complete. When used along with syncUpdatedOnly, the subsequent syncs should be faster. |
true |
| enableSyncAll | Enable periodic sync of all endpoints | true |
| syncAllSchedule | The schedule for when the Sync All Endpoints process should run. Note: This uses CRON type scheduling. |
0 2 * * 6 |
| enableStats | Enable display of extension statistics | false |
| statsUsername | Create a username to access the extension statistics page | Give any username you want to use |
| statsPassword | Create a password to access the extension statistics page | Give any password you want to use |
| bypassProxy | Bypass the web proxy configured on ClearPass Policy Manager | false |
INFO
syncUpdatedOnly is not supported in the SOTI Connect extension due to limitations in SOTI Connect’s API.
SOTI Connect specific extension attributes
| Configuration attribute | Description | Example/Values |
|---|---|---|
| sotiHostName | This hostname of the SOTI Connect. This will be the URL used by ClearPass to communicate with SOTI Connect | https://soticonnect.example.com |
| sotiClient ID | The API Client ID from SOTI Connect | a1b2c3d4-e5f6-7890-abcd-ef1234567890 |
| sotiClientSecret | The API Client Secret from SOTI Connect | s3cr3tK3y!xY9mN2pQ |
| sotiUserName | The username of the SOTI Connect admin account | soti_admin |
| sotiPassword | The password for the SOTI Connect admin account | P@ssw0rd!2024 |
| includeProperties | List of property names to fetch as additional endpoint attributes from SOTI Connect's device properties. | base-module#device-name, printerSim-Files#AllowedTypes |
SOTI Connect Configuration
This extension communicates with your SOTI Connect tenant via publicly exposed and documented API’s. The only configuration needed on SOTI Connect is to create an API client.
Adding an API Client
To add an API client, you must have the required privileges on your SOTI Connect tenant.
Log in to the SOTI Connect tenant and navigate to SYSTEM ADMINISTRATION > Global Settings by clicking on the hamburger menu on the top left of your tenant UI.

Under Global Settings, click Security Access under General. On the right side of the screen, click the ADD A SECURITY ACCESS icon to create a new Client ID and Client Secret.

Click GENERATE to create a new Client ID and Client Secret, then click SAVE. You can click the view button in the Client Secret field to see the secret value. Copy the Client ID and Client Secret temporarily to use them while setting up the extension on ClearPass.

Using the information returned by SOTI Connect into ClearPass Policies.
The endpoint attributes returned by SOTI Connect can be used to make policy decisions in ClearPass when an endpoint authenticates on the network. These attributes can be used in Role Mapping policies to assign various roles to endpoints based on the SOTI Connect attributes and later use those roles to make access control decisions. They can also be used directly in enforcement policies to evaluate policy conditions built on these attributes and make access control decisions as needed. Let’s look at an example of building Role Mapping policies using these attributes.

Appendix A – Troubleshooting and Support
Here we list some basic troubleshooting steps. If you need any help beyond this, please reach out to HPE Aruba Networking Support.
Check API Access Application Control restrictions
If you’ve previously hardened your ClearPass deployment with Application Access Controls, it’s possible that the Extension will not work. Reviewing the Extension Log might show something like the following after immediately starting the Extension. This likely indicates the ClearPass Application API’s are in place.
Example of Extension authorization failure due to Policy Manager Application Control:
[2020-03-16T15:42:21.083] [INFO] Intune - Server listening on port 80.
[2020-03-16T15:42:21.243] [DEBUG] Intune - Request “GET ‘https://172.17.0.1/api/server/version’” took 51.91ms.
[2020-03-16T15:42:21.245] [DEBUG] Intune - <!DOCTYPE html><html>
<head>
<title>
Error 403 (Forbidden)
</title>
<script language=“javascript”>
function reloadPage() {
var locHref = window.location.protocol + “//” + window.location.hostname;
window.location.href = locHref;
}
</script>
To resolve this issue, add the IP address of the Extension to the list of nodes permitted to access the API by navigating to Administration > Server Manager > Server Configuration {choose your node} > Network
INFO
For this reason its good practice to fix the IP address of the extension at installation time such that it doesn’t change over time and break the application controls.
Checking on the Extension Service
The ClearPass Extensions are supported by a system service which must be running.
Restarting this service will affect all deployed and running extensions.
To check on the state of the Extension Service, or to restart the service, go to Administration > Server Manager > Server Configuration > [SERVER] > Service Control. By default this service is automatically started.
Extensions and web proxy / firewall whitelisting
If ClearPass Policy Manager has been configured with a proxy, it’s still possible that domain whitelists are required, the same for some datacenter firewall to allow the installation of Extensions. Some enterprise customers maintain a whitelist of domain that are allowed to transit the proxy/firewall. The underlying docker configuration process uses standard docker registry access to pull images (hosted in docker hub). In general, the following hosts are used:
INFO
-
extensions.clearpassbeta.com
-
registry-1.docker.io
-
index.docker.io
-
auth.docker.io
-
production.cloudflare.docker.com
This is all also geo dependent to some degree and based on various AWS services, so AWS redirects and geo location services will vary. Finally, this all runs via standard HTTPS (port 443).
Extension Logs/Enable Debugging
If you have a requirement to access and view the logs from the Extension, you can turn on different logging levels from the Extension GUI. Adjust the logLevel to ‘DEBUG’ and restart the extension as shown below.
Logs can then be viewed from the ‘Show Logs’.
Remember after changing the logging level, as with any extension configuration change the extension will need to be restarted for this change to take effect.
Accessing the extension logs using ‘Collect Logs’ system function
In addition to viewing the logs as shown above, logs can also be collected and examined via the Policy Manager Collect Logs system function (Administration > Server Manager > Server Configuration > [Select SERVER] > Collect Logs). This is extremely useful should you have a need to call for technical assistance.
If the support team needs to investigate a system issue, one of the items they regularly ask for is the system logs to aid with their diagnostic investigation. By default the “logLevel” is set to INFO, but TRACE, DEBUG, INFO, WARN, ERROR, FATAL can also be set as required. Any of the levels will display the information for the selected state and lower; if INFO is selected, it will show messages for INFO, WARN, ERROR, FATAL.
After the logs have been collected, downloaded and expanded, you can locate the extension logs in the following location in the folder structure PolicyManagerLogs > extension > your-extension-id as shown below. Note the file-name is the same as the running instance ID of the extension.
Monitoring extension statistics
There is a way to monitor extension’s critical resource statistics with the configurable parameter added as part of the extension’s configuration. To enable extension statistics set the “enableStats” parameter to true. Remember a restart of the extension is need to activate the change anytime the config is modified.
To navigate to statistics page, click Show Details.
This will show statistics similar to the following:
Monitoring authorization performance
Since we are authorizing against an external system, it could be relevant to monitor the performance of these transactions as you setup and deploy. If you suspect there is a performance issue, ClearPass provides a way to monitor the authorization processing time. The graph below shows an example of this data, navigate to Monitoring > Live Monitor > System Monitor [click on ClearPass Tab, then select [Authorization]….
Appendix B – Considerations for Installing in a Cluster
Extensions are not synced between ClearPass cluster members, and thus must be installed on each member separately.
Some Extensions can run in two modes: Periodic Sync Mode and Authorization Source Mode.
Periodic Sync Mode
If you are configuring the extension to poll external system periodically and utilize the resulting ClearPass Endpoint database during endpoint Authorization, then you only need to install the extension on one cluster member, often the publisher.
You may wish to install the extension on a second cluster member as a backup, but remember that both extensions will individually be updating the endpoint database. You may want to stagger the updates between the two extensions, for example, Subscriber1 updates at the top of the hour and Subscriber2 updates at 30 minutes after the hour.
Also, in this mode there is no need to explicitly enter an IP address during installation. The defaults will suffice and ClearPass will select an IP in the range specified in the server configuration.
HTTP Authorization Source Mode
In this mode we configure an HTTP Auth source that results in a HTTPS call to external system during endpoint authorization. In this deployment model the extension must be installed on every cluster node that process authentications. Also in this scenario every cluster member’s extension must be set to the exact same IP address during installation time, as the HTTP Auth source configuration is propagated globally across all cluster members.
For example, if the extension IP range is 172.17.0.0/16, we would set the extension to 172.17.0.5 on every cluster member during installation of the extension.
While we normally want to avoid duplicate IP addresses in a network, this is not a concern with ClearPass extensions. Each ClearPass node communicates internally only with its own extension, and this traffic is not routed outside of ClearPass.
Subscriber nodes support the same ability as publishers to install an Extension from the Extension store.
Appendix C – endpoint sync schedule settings
The syncSchedule and similar scheduling parameters sets how often ClearPass executes certain actions like syncing or pushing endpoints. This setting is based on a slightly modified version of the CRON job scheduler found in Unix-like operating systems. It can be used to schedule jobs to run periodically at fixed times, dates or intervals.
A ‘cron’ is a job scheduler. Any scheduled task is called a ‘cron job’. The syntax for a cron job schedule is as follows:
In our use of the cron scheduler, we’ve dropped the use of the last instruction ≤command to execute> and use only the time/date functions, see below for a number of examples of scheduling a sync process.
-
Schedule a sync to run at 2am daily:- 0 2 * * *
-
Schedule a sync to run twice a day at 5am and 5pm:- 0 5,17 * * *
-
Schedule a sync to run on every Sunday at 5pm:- 0 17 * * sun
-
Schedule a sync to run every 30 minutes:- */30 * * * *
-
Schedule a sync to run at 5pm on selected days:- 0 17 * * sun,fri
You can see from the above that the scheduling process is extremely flexible, alternatively https://crontab.guru/ is a great page for learning more about CRON scheduling.
Appendix D – Extension performance optimizations
Extensions are a critical part of ClearPass deployments today and with the increased dependency on extension interactions that involve periodic polling or real-time lookups, here are some of the best practice recommendations around optimizing overall performance when using extensions:
-
If the extension is used to periodically poll external systems and populate endpoint repository, ensure that it is not installed in all the nodes in the cluster. Ideally these type of extensions should only be installed on the publisher node since only publisher node can add endpoint entries to the database. For redundancy, it can be installed on another additional node but it is recommended to stagger the polling interval so that both do not attempt to poll and update endpoint database at the same time.
Example: 0 * * * *, This cron job runs at minute 0 of every hour (e.g., 00:00, 01:00, 02:00, etc.).
30 * * * *, This cron job runs at minute 30 of every hour (e.g., 00:30, 01:30, 02:30, etc.). -
If the extension is used for looking up attributes from external systems in real time during authentication, it should be installed in all the nodes handling authentication. Note that the context server config is replicated from the publisher. When using extension for real time lookup, ensure that the extension has the same IP address in all the cluster nodes.
-
If the extension is expected to do both real-time lookup and periodic polling, ensure that polling is enabled only on the publisher while the extension in subscribers can have the polling disabled by setting the “enableSyncAll” attribute to false.
"enableSyncAll": false,
WARNING
Having the extension installed on all the cluster nodes with enableSyncAll set to true would cause each cluster node to independently poll the external system and update endpoint repository. This could impact the performance of ClearPass. Hence it is strongly recommended to enable endpoint sync only on the extension installed on the publisher and on another cluster node for redundancy.
-
Some 3rd party systems support fetching delta updates vs fetching all of the device information every polling cycle. The extensions that support fetching delta updates are: Workspace ONE Crowdstrike Falcon Microsoft Intune Mosyle SentinelOne Service Now
For these extensions, the syncUpdatedOnly attribute should be set to true in extension config so that the number of DB updates in ClearPass is minimized
"syncUpdatedOnly": true,For extensions that do not support syncUpdatedOnly, ensure that the sync interval is not aggressive. We recommend syncing at most twice a day and that too during off peak hours whenever a full sync is performed.
-
Some 3rd party systems can be very noisy in terms of attribute updates. There could be certain attributes that keep changing every sync interval like “Free Memory in Bytes”, “Last Check in Time” etc. There is no value in updating endpoints when such trivial attributes change for the device. Hence it is recommended to use “ignoreEndpointDifferences” attribute in extension configuration to ignore change in attributes that you do not care about in terms of ClearPass policies.
You can review the Audit Viewer in ClearPass under Monitoring > Audit Viewer to see what attributes are being updated for endpoints to check if there are unnecessary updates.
Sample for JAMF extension:
"ignoreEndpointDifferences": "Last Update, Report Date UTC, Last Contact Time UTC, Last Inventory Update UTC, Last Reported IP, IP Address",Default for Microsoft Intune extension:
"ignoreEndpointDifferences": "Last Sync Date Time, Free Storage Space in Bytes", -
To further optimize the number of endpoints being updated in ClearPass, you can specify which attributes are being used in the ClearPass policies so that only changes to those attributes would trigger an update to the endpoint. This is done by listing out the specific attributes under endpointAttributes in extension configuration.
Sample for JAMF extension:
"endpointAttributes": "Group names, MDM Enabled, Managed, Remote Managed, Supervised, Serial Number", -
Setup extension to restart unless it was intentionally stopped. A restart policy can be defined in extension configuration to ensure that the extension starts up automatically after server reboots and such. Restart policy of “unless-stopped” would ensure the extension always starts up unless it was manually stopped.
“restartPolicy”: “no” — The extension will not be automatically restarted after the server is restarted.
“restartPolicy”: “always” — The extension will always be restarted after the server is restarted.
“restartPolicy”: “unless-stopped” — The extension will be restarted unless it was stopped prior to the server restart, in which case it will maintain that state.
“restartPolicy”: “on-failure:N” — If the extension fails to restart, the value for “N” specifies the number of times the extension should try to restart. If you do not provide a value for “N”, the default value will be “0”.
The “restartPolicy” parameter is not present by default in extension configurations. When it is not present, if the system is restarted a default policy is applied to the extension to maintain the state it was in before the restart. If the “restartPolicy” parameter is added to the configuration but later removed, the extension will then revert to the default restart policy.
Appendix E – Sample List of returned SOTI MobiControl endpoint attributes
{
“Active IP Address”,
“Active Protocol”,
“Approval Date”,
“Approved”,
“Certificate Action Permissions”,
“Compliance Status”,
“Connection Status”,
“Deactivated Type”,
“Deleted”,
“Description”,
“Device Type ID”,
“Device Type Internal ID”,
“Device Type Name”,
“Discover Date”,
“ID”,
“Last Connection Check Time”,
“Last Connection Update Time”,
“Last Seen Time”,
“Last Update”,
“Name”,
“New Firmware Available”,
“Normal Action Permissions”,
“Protocol Adapter Name”,
“Protocol Instance Name”,
“Protocol Name”,
“Remote Control Capability”,
“Status”,
“Supported Protocols”
}
INFO
As noted above in the SOTI Connect specific extension attributes section, if you wish to include additional attributes for an endpoint from the device “properties” section of the SOTI Connect API payload, you can list them in the “includeProperties” field of the extension configuration as shown below.
“includeProperties”: [ “base-module#device-name”, “printerSim-Files#AllowedTypes” ],
5 - Unified Endpoint Management
ClearPass integrates with a wide range for UEM / MDM solutions authorize devices as part of HPE Aruba Networking Zero Trust framework
A detailed list of third party interoperability can be found here: https://www.arubanetworks.com/support-services/clearpass-interoperability/
5.1 - Jamf Pro
Change Log
What’s new in Jamf v5.0?
In this release v5.0, support for the Jamf Pro API’s has been added to the JAMF extension. This update is introduced in response to JAMF’s announcement of the deprecation of Jamf Classic APIs, which will no longer be supported in the future. To ensure continued functionality and compatibility with JAMF’s supported interfaces, the integration now supports the Jamf Pro API while continuing to retain support for the Jamf Classic APIs. Once JAMF fully deprecates the Jamf Classic APIs, enabling the use of the Jamf Pro API will no longer be optional. Additional details regarding the Jamf Classic API deprecation can be found in JAMF’s official notice- https://developer.jamf.com/jamf-pro/docs/deprecation-of-classic-api-computer-inventory-endpoints.
A new configuration parameter, enableV2Api, has been added to control API usage. Setting this parameter to true enables the use of the Jamf Pro API, while setting it to false retains the use of the Jamf Classic APIs. Once the Jamf Classic APIs are fully deprecated, the extension will no longer function if this parameter remains set to false. Customers are therefore strongly recommended to switch to using the Jamf Pro API at their earliest convenience by setting enableV2Api to true.
A restart of the extension is required for the new configuration to take effect.

INFO
To avoid service disruption, switch to the Jamf Pro API by setting enableV2Api to true ahead of the Jamf Classic API deprecation.
There are differences in attribute naming conventions between the Jamf Classic APIs and the Jamf Pro API. As a result, it is important to review the Jamf attributes currently used within ClearPass policies and verify whether any policy logic relies on attribute names that have changed in the Jamf Pro API. Where applicable, policies must be updated to reference the new Jamf Pro API attribute names to ensure continued and correct policy evaluation. Failure to update affected policies may result in unintended behavior or service disruption due to attribute name changes between the Jamf Classic and Jamf Pro APIs. The reference table below provides a mapping of attributes between the Jamf Classic API and the Jamf Pro API to assist in identifying any required policy updates.
Please note that, depending on specific customer use cases and any custom modifications or additional attributes in use, not all Jamf attributes may be included in the provided reference list. The list primarily covers attributes returned in standard API responses. For any attributes that are not listed, it is recommended to contact Jamf Support to confirm whether there are differences in attribute naming conventions between the Jamf Classic APIs and the Jamf Pro API.
| JAMF4 (Attribute names as seen in v4 and older versions) | JAMF5 (Attribute names in v5 version) | Change Type |
|---|---|---|
| JAMF Activation Lock Enabled | JAMF Activation Lock Enabled | Unchanged |
| JAMF Asset Tag | JAMF Asset Tag | Unchanged |
| JAMF Block Level Encryption Capable | JAMF Block Level Encryption Capable | Unchanged |
| JAMF Data Protection | JAMF Data Protected | Renamed |
| JAMF Department | JAMF Department | Unchanged |
| JAMF Device Ownership Level | JAMF Device Ownership Type | Renamed |
| - | JAMF Declarative Device Management Enabled | New attribute |
| JAMF File Level Encryption Capable | JAMF File Level Encryption Capable | Unchanged |
| JAMF Group Names | JAMF Group Names | Unchanged |
| JAMF Hardware Encryption | JAMF Hardware Encryption | Unchanged |
| JAMF ID | JAMF ID | Unchanged |
| JAMF IMEI | JAMF IMEI | Unchanged |
| JAMF Initial Entry Date UTC | JAMF Initial Entry Date | Renamed |
| JAMF IP Address | JAMF IP Address | Unchanged |
| JAMF Jailbreak Detected | JAMF Jailbreak Detected | Unchanged |
| JAMF Last Contact Time UTC | JAMF Last Contact Time | Renamed |
| JAMF Last Inventory Update UTC | JAMF Last Inventory Update UTC | Unchanged |
| JAMF Last Reported IP | JAMF Last Reported IP | Unchanged |
| JAMF Last Update | JAMF Last Update | Unchanged |
| JAMF Lost Mode Enabled | JAMF Lost Mode Enforced | Renamed |
| JAMF Make | JAMF Make | Unchanged |
| JAMF Managed | JAMF Managed | Unchanged |
| JAMF Model | JAMF Model | Unchanged |
| JAMF Model Display | - | Missing |
| JAMF Model Identifier | JAMF Model Identifier | Unchanged |
| JAMF Model Number | JAMF Model Number | Unchanged |
| JAMF Name | JAMF Name | Unchanged |
| JAMF OS Name | JAMF OS Name | Unchanged |
| JAMF OS Version | JAMF OS Version | Unchanged |
| JAMF Passcode Compliant | JAMF Passcode Compliant | Unchanged |
| JAMF Passcode Present | JAMF Passcode Present | Unchanged |
| JAMF Phone Number | - | Missing |
| JAMF Platform | JAMF Platform | Unchanged |
| JAMF Remote Managed | JAMF Remote Managed | Unchanged |
| JAMF Report Date UTC | JAMF Report Date | Renamed |
| JAMF Room | JAMF Room | Unchanged |
| JAMF Serial Number | JAMF Serial Number | Unchanged |
| JAMF Supervised | JAMF Supervised | Unchanged |
| JAMF System Found | JAMF System Found | Unchanged |
| JAMF Type | JAMF Type | Unchanged |
| JAMF UDID | JAMF UDID | Unchanged |
| JAMF User Approved Enrollment | JAMF User Approved MDM | Renamed |
| JAMF Version | JAMF Version | Unchanged |
| - | JAMF Management ID | New attribute |
| - | JAMF Last Enrolled Date | New attribute |
| - | JAMF Department ID | New attribute |
| - | JAMF Tethered | New attribute |
What’s New in Jamf Extension v4.3?
Starting release v4.3.1 we have added support for data-types like Date-time, Integer and Boolean for attributes synced from Jamf to ClearPass. In the earlier releases all attributes were stored in ClearPass Policy Manager as Strings. However some attributes from Jamf are needed to be processed as Date-time, Integer and Boolean data-type attributes e.g “Jamf Last Contact Time UTC”. ClearPass policlies that use these attributes should be able to support these attributes with the correct data-type. Upgrading to extension version 4.3.1 will now update the Dictionary Attributes on ClearPass synced from Jamf with the correct data-type. This gives customers option to build policies using date and time based attributes like Jamf Last Contact Time UTC, Jamf Last Inventory update or other Integer and Boolean attributes like Jamf Managed etc with the correct operators in policies which best suits to evaluate an attribute.One such example of an enforcement policy to check whether an endpoints last contact time with Jamf is not more than a week is shown below.

Upgrading to this release requires a pre-requsite step to first delete the Date-time, Integer and Boolean attributes that have already been added with the string data-type so that the extension can then update these attributes in the endpoint database with correct data-types. It is recommended that this step is followed before upgrading the extension to avoid running into errors while updating these attributes in the endpoint database during the re-sync process. The steps to follow before upgrading the extension are detailed below.
- Stop the older version of the extension running.
- Go to Configuration > Identity > Endpoints and set filter as shown in below image to see all the endpoints synced from Jamf.
- Select all endpoints synced from Jamf. Click on ‘Bulk Delete’ and add the attributes to be deleted from the below list.

| Date-Time |
|---|
| Initial Entry Date UTC |
| Last Contact Time UTC |
| Report Date UTC |
| Last Inventory Update UTC |
| Last Update |
| Boolean |
|---|
| Remote Managed |
| Managed |
| Supervised |
| System Found |
| User Approved Enrollment |
| Data Protection |
| Activation Lock Enabled |
| Block Level Encryption Capable |
| File Level Encryption Capable |
| Passcode Compliant |
| Passcode Present |
| Lost Mode Enabled |
| Integer32 |
|---|
| Room |
| Hardware Encryption |
- Once the attributes are deleted. Go to the extensions page and upgrade to / install the new extension.
- You should now be able to see the updated Dictonary attributes from Jamf and the updated attributes in the correct Data-type format in endpoint DB.


What's New in Jamf Extension v4.2?
Beginning version 10.49.0 of Jamf Pro, the Classic API will now support Client Credentials based authorization. To conform with this, the Jamf Extension v4.2 has been updated to support Access Tokens that can be used to interact with the Jamf Pro API endpoints. The new vesion of extension has two additional fields “ClientID” and “ClientSecret”. Simlar to obtaining a bearer token using a username and password in earlier releases. The client ID and client secret will be exchanged by the extension for generating access tokens to interface with the Jamf Pro API’s. Jamf has already announced that basic authentication in the Classic API will no longer be enabled by default for the new Jamf Pro instances for enhanced security and will be deprecated after 31^st^ March 2024. All customers are recommened to update to v4.2 Extension for better security practices and to maintain best combatibility with Jamf. This release will continue to offer both the jamfUsername / jamfPassword and ClientId / ClientSecret fields in the default extension configuration to allow customers migrate smoothly as the new auth mechanism will need the API roles and clients functionality configured on the Jamf Pro side. More details on this is available in Jamf Pro documentation https://learn.jamf.com/bundle/jamf-pro-documentation-current/page/API_Roles_and_Clients.html
The privileges required to support the API endpoints needed to interact with Jamf Pro for the integration are as follows.
Privileges
Read Mobile Devices, Read Computers, Read Computer Extension Attributes, Create Computer Extension Attributes.
Read Computer Extension Attributes and Create Computer Extension Attributes are needed only when the “createMacExtensionAttribute” is set to true.
If createMacExtensionAttribute is set to true, Jamf will scan all MAC addresses on a device and string them together, ClearPass will interpret each MAC address as a separate endpoint with the same name and create separate endpoints in the ClearPass endpointDb

INFO
ClientId / ClientSecret takes precedence over jamfUserName / JamfPassword when both are configured.
Software Requirements
The minimum software version required for CPPM is 6.11.0 . At the time of writing, version 6.11.10 is available as the long supported release and 6.12.4 is available as the short supported release. CPPM runs on hardware appliances with pre-installed software or as a Virtual Machine under the following hypervisors. Hypervisors that run on a client computer such as VMware Player are not supported.
-
VMware vSphere Hypervisor (ESXi) 7.0 U3c and 8.0
-
Windows Server 2019 with Hyper‑V and Windows Server 2022 with Hyper‑V.
-
KVM on CentOS Stream 8, CentOS Stream 9, Ubuntu 20.04 LTS, and Ubuntu 22.04 LTS.
ClearPass Installation and Deployment Guide
This document assumes your ClearPass environment is already configured and operational. If you require assistance with basic deployment, refer to the following deployment guide:
https://arubanetworking.hpe.com/techdocs/ClearPass/6.11/Installation-Guide/Default.htm
ClearPass Extensions
The integration between ClearPass Policy Manager and external systems is driven through a ClearPass capability known as Extensions, a sub-component of the ClearPass Exchange Integration framework. ClearPass Extensions are micro-services running on top of the base ClearPass platform. These micro-services enable HPE Aruba Networking to deliver new features outside of the main software release cycle and facilitate a faster time to market for specific features and integrations. Configuration and control of ClearPass Extensions is accomplished through the ClearPass Guest GUI, as covered later in this document.
Installing Extension
ClearPass Extensions are easy to install from the ClearPass Extensions Store. In a cluster, ClearPass Extensions can be installed on a subscriber independently of the publisher. Multiple copies of the same extension can be installed if needed as well.
INFO
Internet access is required for ClearPass Policy Manager to install the ClearPass Extensions from the Extension Store. Starting with ClearPass 6.12, extensions can be can be installed offline as well. Offline ClearPass Extension images are available on HPE networking support portal.
Access to the extension store
Access the Extension Store to download and install ClearPass extensions. The Extension store utilizes the same HPE Passport account credentials used to validate support entitlement in the Software Updates Por- tal. This is configured under Administration > Agents and Software Updates > Software Updates as shown below. Ensure that valid HPE Passport credentials have been entered in these fields to enable Ex- tension download capabilities.
Installing the Extension from Store
Extensions are installed from the extension page in ClearPass Guest, as shown below. Access it from Guest > Administration > Extensions
From here, click on ‘Install Extension’, and the search box below appears.
Enter “Intune” and click on ‘Search’, see the example below.
INFO
Here we are using Intune as an example. The installation steps are the same for all the extensions. For your deployment, please search for the appropriate extension like Jamf, Mosyle, Crowdstrike, etc.
All currently available extensions are listed in the page: https://www.arubanetworks.com/techdocs/NAC/clearpass/integrations/clearpass-extension/extensions-list/
Click on the extension name and then click “Install.”
In the “Install Extension” dialog box, set the IP address if necessary, as described in section “Extensions and IP address configuration support” below. Do not check the box to start the extension at this time. Click the “Install” button.
In this example, we’ve not entered an IP address for the extension to use, if there is intent to use the extension as an authorization source set this value and ensure its set the same on all nodes where the Extension is deployed.
The extension will download and appear in a “Stopped” state. Notice the options to Start, Delete, Reinstall, Show Logs, and view Configuration. Click on “Configuration” to view settings.
After the extension has been installed, proceed to configure the extension
A copy of the default Extension configuration is shown above, this will need to be modified for your deployment.
INFO
Password and sensitive configuration items are obfuscated when presented in both the Extension GUI or in the Explorer configuration.
WARNING
The configuration attributes are case sensitive. It is recommended to refer the default configuration sample while editing your configuration.
Extensions and web proxy support
Extensions support communications with 3rd parties via a web proxy. This adds incremental proxy functionality. If a proxy is defined in ClearPass Policy Manager, then an extension will inherit that configuration. See later in the document on how to disable the proxy inherited configuration.
INFO
Note that the Policy Manger web proxy configuration is ONLY read by the extension at installation time. If the web proxy configuration is changed in Policy Manager, then the extension must be re-installed so the new settings are re-read and bonded to the extension.
Extensions and IP address configuration support
ClearPass uses a non-externally routed IP address range to communicate with the Extension. The default is 172.17.0.0/16. You may configure a different range, if desired. This is especially useful when deploying extensions across nodes within a cluster where there is the requirement for a fixed consistent IP address for the extension across the cluster.
Changing the “Extensions Network Address” range is only necessary if either the ClearPass MGMT or DATA interface are using an IP address in the extension default range of 172.17.x.x/12, or if ClearPass needs to communicate with some external device in that range.
To Configure the base Extension IP subnet within Policy Manager navigate to Administration > Server Manager > Server Configuration [chose your node] Service Parameters [ClearPass system service].
INFO
The subnet defined here for the extension framework must fall within the following subnet range 10.0.0.0/8, 172.16.0.0/12, 192.168.0.0/16 as defined by RFC1918. For best results, set the network address range to a subnet that does not exist in your enterprise, and restart the extension service for this change to take effect.
Never set the DATA or MGMT IP address to use an address that matches the Extension Network
INFO
Note that changing the extension base IP address will require the extension service to be restarted.
Pictorial View of the Integration
The extension can be configured in one mode of operation.
Periodic Sync Mode
In this mode ClearPass polls Jamf periodically and updates the ClearPass Endpoint database with attributes obtained from Jamf. These attributes can be utilized in ClearPass during endpoint Authorization. This mode has a simpler configuration demand, however, the data provided may not be completely up to date at authentication time and is dependent upon Jamf running a script on their side which is not well documented.

ClearPass Jamf Extension Configuration
After installing the Extension, the default configuration will need to be updated. The configuration parameters are divided into two tables, one for Jamf Extension-specific configuration parameters and the other for Extension framework configuration parameters that are common across multiple vendor Extensions.
Table 1: Jamf Extension-specific configuration parameters
| Attribute | Description | Values/Examples |
|---|---|---|
| jamfHost | This is the sub-domain of the Jamf API URL. This will be the URL used by ClearPass to communicate with Jamf. | instance.jamfcloud.com |
| jamfUserName | The Jamf username used to interface with Jamf and create Extension Attributes. Ensure this username has sufficient privileges in which to create Extension Attributes. | admin |
| jamfPassword | The password for the aforementioned Jamf username. | [password] |
| additional-attributeMapping | This array allows for more information to be retrieved from Jamf. | See Appendix A |
| macExtensionAttributeName | The name of the Extension Attribute used. In this example, it is the "cppm-alma-addresses" Extension Attribute. | cppm-alma-addresses |
| createMacExtensionAttribute | Specifies whether to run or create the extension attribute automatically. | true or false |
| skyhookTenant | The Skyhook tenant ID received in the registration email. Required when using Webhooks for real-time event updates from Jamf to ClearPass. | See Appendix F |
| dbAccessToken | The access token for Skyhook received in the registration email. Required when using Webhooks for real-time event updates from Jamf to ClearPass. | See Appendix F |
| smartGroupTrig-gerDisconnect | Tied to Webhooks events, after adding or updating devices. In the case it triggers a Webhook that matches SmartGroupMobileDeviceMembership-Change or SmartGroupComputerMembership-Change, the devices with corresponding MAC address in the configured Smart Group are sent a disconnect. | Smart Group name. For example, "OutofCompliance" is name of Smart Group for devices where Jailbreak Detected is a condition. |
Common extension attributes
Extension framework configuration parameters (common configuration)
| Attribute | Description | Default Values |
|---|---|---|
| logLevel | Logging level for troubleshooting | “INFO” |
| verifySSLCerts | Should SSL certificates be validated when communicating with external context sources | true |
| enableEndpointCache | Cache endpoint attributes to optimize authorization queries, avoid repeated DB queries and reduce API calls to external context sources | true |
| endpointCacheTimeSeconds | The duration in seconds to cache the endpoint attributes | 300 |
| syncUpdatedOnly | If this option is set to true, only the endpoints updated after the previous sync would be fetched from the context source. Note that this option only works for the third-party context sources that have APIs to support this functionality. If this option is set to false, all endpoints are fetched at every sync interval. |
true |
| syncAllOnStart | If this option is set to true, when the extension starts, the system will attempt to sync all endpoints in the external context source to ClearPass. Note that if you have a large number device context to be fetched, it would take a long time for the initial sync to complete. When used along with syncUpdatedOnly, the subsequent syncs should be faster. |
true |
| enableSyncAll | Enable periodic sync of all endpoints | true |
| syncAllSchedule | The schedule for when the Sync All Endpoints process should run. Note: This uses CRON type scheduling. |
0 2 * * 6 |
| enableStats | Enable display of extension statistics | false |
| statsUsername | Create a username to access the extension statistics page | Give any username you want to use |
| statsPassword | Create a password to access the extension statistics page | Give any password you want to use |
| bypassProxy | Bypass the web proxy configured on ClearPass Policy Manager | false |
Additional Configuration Notes
At a minimum, you’ll need to set these attributes:
-
jamfHost
-
jamfUserName
-
jamfPassword
If using the extension to sync device information to the endpoint database, set the enableSyncAll and syncAllSchedule attributes, and optionally the syncAllOnStart attribute. Note that enableSyncAll and syncAllOnStar both default to “false”, so to enable they need to be changed to “true”. Also note that in the v4 Extension the syntax for these sync attributes changed compared to previous versions, but the functionality remains the same.
If createMacExtensionAttribute is set to true, Jamf will scan all MAC addresses on a device and string them together, ClearPass will interpret each MAC address as a separate endpoint with the same name and create separate endpoints in the ClearPass endpointDb.
The logLevel, verifySSLCerts and enableStats should be left as their default settings unless advised by ClearPass TAC or your HPE Aruba Networking SE/Partner. Once you configure these parameters, you can start your extension. Any subsequent reconfiguration requires a restart of the extension.
INFO
Pay special attention to the values in the extension configuration. Where a configuration attribute is a Boolean value {true/false}, it must not be enclosed with literals..
Jamf Pro Configuration
The ClearPass Jamf Extension communicates with your Jamf/Jamf Pro tenant via publicly exposed and documented API’s.
Jamf / Jamf Pro Configuration
Collecting all mac-addresses macOS devices in Jamf-pro
When the extension is installed in ClearPass Guest, and the “createMacExtensionAttribute” attribute is set to true, the extension attribute “cppm-all-mac-addresses” will be created within the Jamf environment only if the supplied “jamfUserName” and “jamfPassword” are correct, and only if the provided “jamfUserName” has the appropriate level of access within Jamf to create the extension. If not, manual creation of the Extension Attribute will need to occur by a Jamf administrator.
Follow the below steps to validate that the Extension Attribute has been created within Jamf / Jamf Pro. After login, click on the gear at the top right of the page.

Then click Computer Management > Extension Attributes on the Jamf nav-bar as shown below.

Next, click on Extension Attributes in the Computer Management – Management Framework section.

If you do not see the “cppm-all-mac-addresses” Extension Attribute listed, the Jamf account that was configured within the ClearPass Extension does not have the appropriate level of access to create an Extension Attribute. You will need to have the customer contact their Jamf administrator for support of this issue.
Configuring ClearPass Policy Manager
Multiple methods exist for how ClearPass can utilize the returned data from Jamf, such as:
-
Ensure that the endpoint is managed by Jamf. If not, perhaps restrict access for the device on the Corporate Network with a role that only allows the user to remediate and install the Jamf endpoint agent. This provides a controlled environment where all endpoints are protected.
-
Check if the endpoint has the latest Jamf agent installed. If not, perhaps quarantine the device with the option to remediate and install and updated Jamf client.
-
Another very powerful use case is to check if the actual Jamf agent is running.
-
If you’re using the macExtensionAttributeName attribute “cppm-all-mac-addresses”, all mac-address will be collected on the MAC. This is useful to ensure all-mac-addresse are reported to ClearPass so individual records for each interface are created to ensure that regardless of the mac-address used to authenticate, ClearPass has knowledge of it*.*
As mentioned previously, the extension supports only a single mode of use, “Sync endpoint data from Jamf Pro into the ClearPass EndpointDb.
Periodic Sync Mode: Using stored attributes
The Extension will sync data from Jamf based upon a configurable schedule, write this data into the ClearPass EndpointDB, this data is then used in policy as an authorization source. Be aware that this data is not ‘real-time’. Here’s an example of a ClearPass Role Mapping Policy that utilizes these Jamf Pro Endpoint attributes.

Appendix A – List of returned Jamf Pro endpoint attributes
RootElement.ChildElement1.ChildElement2.ChildElement3.ChildElement4.ChildElement5
Example: If you wanted to pull mdm_capable and gatekeeper_status from Jamf, your extention configuration variable “additionalAttributeMapping” would look like this:

| general. | id | network_adapter_type | Other |
|---|---|---|---|
| mac_address | id | name | network_adapter_type |
| last_reported_ip | serial_number | udid | jamf_version |
| platform | barcode_1 | barcode_2 | asset_tag |
| remote_management | managed | management_username | management_password_sha256 |
| supervised | mdm_capable | mdm_capable_users | mdm_capable_user |
| management_status | enrollment_via_dep | user_approved_enrollment | user_approved_mdm |
| report_data | report_data_epoch | report_data | last_contact_time |
| initial_entry_date_epoch | initial_entry_date | last_enrolled_date_utc | last_enrolled_date_epoch |
| initial_entry_date_utc | last_cloud_backup_date_epoch | distribution_point | sus |
| site | id | name | notebook server |
| itunes_store_account_is_active | |||
| location. | username | realname | real_name |
|---|---|---|---|
| email_address | position | phone | phone_number |
| department | building | room |
| purchasing. | is_purchased | is_leased | po_number |
|---|---|---|---|
| vendor | applecareid | purchase_price | purchasing_account |
| po_date | po_date_epoch | warranty | warranty_expires |
| warranty_expires_epoch | lease_expires | lease_expires_epoch | os_applecare_id |
| lease_expires_utc | life_expactancy | attachments | purchasing_contact |
| os_maintenance_expires | |||
| peripherals. | size | ||
|---|---|---|---|
| hardware. | make | model | model_identifier |
|---|---|---|---|
| os_name | os_version | os_build | master_password_set |
| active_directory_status | service_pack | processor_type | processor_architecture |
| processor_speed | processor_speed_mhz | number_processors | number_cores |
| total_ram | total_ram_mb | boot_rom | bus_speed |
| bus_speed_mhz | battery_capacity | cache_size | cache_size_kb |
| available_ram_slots | optical_drive | nic_speed | smc_version |
| ble_capable | sip_status | gatekeeper_status | xprotect_version |
| institutional_recovery_key | disk_encryption_configuration | filevault2_users | user |
| storage | device | disk | model |
| revision | serial_number | size | drive_capacity_mb |
| connection_type | smart_status | partitions | partition |
| name | size | type | partition_capacity_mb |
| percentage_full | filevault_status | filevault_percent | filevault2_status |
| filevault2_percent | boot_drive_available_mb | lvUUID | lvUUID |
| pvUUID | mapped_printers | printer | name |
| uri | type | ||
| certificates. | certificate | common_name | identity |
|---|---|---|---|
| expires_utc | expires_epoch | name |
| security | activation_lock | secure_boot_level | external_boot_level |
|---|---|---|---|
| software. | unix_executables | licensed_software | installed_by_casper |
|---|---|---|---|
| installed_by_installer_swu | cached_by_casper | available_software_updates | available_updates |
| running_services | applications | size | application |
| name | path | version | fonts |
| plugins | |||
| extension_attributes. | extension_attribute | id | name |
|---|---|---|---|
| type | multi_value | value |
| groups_accounts. | computer_group_memberships | local_accounts | user_inventories |
|---|---|---|---|
| disable_automatic_login | user | username | password_history_depth |
| password_min_length | password_max_age | password_min_complex_characters | password_require_alphanumeric |
| iphones. | size | ||
|---|---|---|---|
| configuration_profiles. | size | configuration_profile | id |
|---|---|---|---|
| name | uuid | is_removable | |
| filevault2_percent | boot_drive_available_mb | lvUUID | lvUUID |
| pvUUID | mapped_printers | printer | name |
| uri | type | ||
Appendix A – Troubleshooting and Support
Here we list some basic troubleshooting steps. If you need any help beyond this, please reach out to HPE Aruba Networking Support.
Check API Access Application Control restrictions
If you’ve previously hardened your ClearPass deployment with Application Access Controls, it’s possible that the Extension will not work. Reviewing the Extension Log might show something like the following after immediately starting the Extension. This likely indicates the ClearPass Application API’s are in place.
Example of Extension authorization failure due to Policy Manager Application Control:
[2020-03-16T15:42:21.083] [INFO] Intune - Server listening on port 80.
[2020-03-16T15:42:21.243] [DEBUG] Intune - Request “GET ‘https://172.17.0.1/api/server/version’” took 51.91ms.
[2020-03-16T15:42:21.245] [DEBUG] Intune - <!DOCTYPE html><html>
<head>
<title>
Error 403 (Forbidden)
</title>
<script language=“javascript”>
function reloadPage() {
var locHref = window.location.protocol + “//” + window.location.hostname;
window.location.href = locHref;
}
</script>
To resolve this issue, add the IP address of the Extension to the list of nodes permitted to access the API by navigating to Administration > Server Manager > Server Configuration {choose your node} > Network
INFO
For this reason its good practice to fix the IP address of the extension at installation time such that it doesn’t change over time and break the application controls.
Checking on the Extension Service
The ClearPass Extensions are supported by a system service which must be running.
Restarting this service will affect all deployed and running extensions.
To check on the state of the Extension Service, or to restart the service, go to Administration > Server Manager > Server Configuration > [SERVER] > Service Control. By default this service is automatically started.
Extensions and web proxy / firewall whitelisting
If ClearPass Policy Manager has been configured with a proxy, it’s still possible that domain whitelists are required, the same for some datacenter firewall to allow the installation of Extensions. Some enterprise customers maintain a whitelist of domain that are allowed to transit the proxy/firewall. The underlying docker configuration process uses standard docker registry access to pull images (hosted in docker hub). In general, the following hosts are used:
INFO
-
extensions.clearpassbeta.com
-
registry-1.docker.io
-
index.docker.io
-
auth.docker.io
-
production.cloudflare.docker.com
This is all also geo dependent to some degree and based on various AWS services, so AWS redirects and geo location services will vary. Finally, this all runs via standard HTTPS (port 443).
Extension Logs/Enable Debugging
If you have a requirement to access and view the logs from the Extension, you can turn on different logging levels from the Extension GUI. Adjust the logLevel to ‘DEBUG’ and restart the extension as shown below.
Logs can then be viewed from the ‘Show Logs’.
Remember after changing the logging level, as with any extension configuration change the extension will need to be restarted for this change to take effect.
Accessing the extension logs using ‘Collect Logs’ system function
In addition to viewing the logs as shown above, logs can also be collected and examined via the Policy Manager Collect Logs system function (Administration > Server Manager > Server Configuration > [Select SERVER] > Collect Logs). This is extremely useful should you have a need to call for technical assistance.
If the support team needs to investigate a system issue, one of the items they regularly ask for is the system logs to aid with their diagnostic investigation. By default the “logLevel” is set to INFO, but TRACE, DEBUG, INFO, WARN, ERROR, FATAL can also be set as required. Any of the levels will display the information for the selected state and lower; if INFO is selected, it will show messages for INFO, WARN, ERROR, FATAL.
After the logs have been collected, downloaded and expanded, you can locate the extension logs in the following location in the folder structure PolicyManagerLogs > extension > your-extension-id as shown below. Note the file-name is the same as the running instance ID of the extension.
Monitoring extension statistics
There is a way to monitor extension’s critical resource statistics with the configurable parameter added as part of the extension’s configuration. To enable extension statistics set the “enableStats” parameter to true. Remember a restart of the extension is need to activate the change anytime the config is modified.
To navigate to statistics page, click Show Details.
This will show statistics similar to the following:
Monitoring authorization performance
Since we are authorizing against an external system, it could be relevant to monitor the performance of these transactions as you setup and deploy. If you suspect there is a performance issue, ClearPass provides a way to monitor the authorization processing time. The graph below shows an example of this data, navigate to Monitoring > Live Monitor > System Monitor [click on ClearPass Tab, then select [Authorization]….
Appendix B – Considerations for Installing in a Cluster
Extensions are not synced between ClearPass cluster members, and thus must be installed on each member separately.
Some Extensions can run in two modes: Periodic Sync Mode and Authorization Source Mode.
Periodic Sync Mode
If you are configuring the extension to poll external system periodically and utilize the resulting ClearPass Endpoint database during endpoint Authorization, then you only need to install the extension on one cluster member, often the publisher.
You may wish to install the extension on a second cluster member as a backup, but remember that both extensions will individually be updating the endpoint database. You may want to stagger the updates between the two extensions, for example, Subscriber1 updates at the top of the hour and Subscriber2 updates at 30 minutes after the hour.
Also, in this mode there is no need to explicitly enter an IP address during installation. The defaults will suffice and ClearPass will select an IP in the range specified in the server configuration.
HTTP Authorization Source Mode
In this mode we configure an HTTP Auth source that results in a HTTPS call to external system during endpoint authorization. In this deployment model the extension must be installed on every cluster node that process authentications. Also in this scenario every cluster member’s extension must be set to the exact same IP address during installation time, as the HTTP Auth source configuration is propagated globally across all cluster members.
For example, if the extension IP range is 172.17.0.0/16, we would set the extension to 172.17.0.5 on every cluster member during installation of the extension.
While we normally want to avoid duplicate IP addresses in a network, this is not a concern with ClearPass extensions. Each ClearPass node communicates internally only with its own extension, and this traffic is not routed outside of ClearPass.
Subscriber nodes support the same ability as publishers to install an Extension from the Extension store.
Appendix C – endpoint sync schedule settings
The syncSchedule and similar scheduling parameters sets how often ClearPass executes certain actions like syncing or pushing endpoints. This setting is based on a slightly modified version of the CRON job scheduler found in Unix-like operating systems. It can be used to schedule jobs to run periodically at fixed times, dates or intervals.
A ‘cron’ is a job scheduler. Any scheduled task is called a ‘cron job’. The syntax for a cron job schedule is as follows:
In our use of the cron scheduler, we’ve dropped the use of the last instruction ≤command to execute> and use only the time/date functions, see below for a number of examples of scheduling a sync process.
-
Schedule a sync to run at 2am daily:- 0 2 * * *
-
Schedule a sync to run twice a day at 5am and 5pm:- 0 5,17 * * *
-
Schedule a sync to run on every Sunday at 5pm:- 0 17 * * sun
-
Schedule a sync to run every 30 minutes:- */30 * * * *
-
Schedule a sync to run at 5pm on selected days:- 0 17 * * sun,fri
You can see from the above that the scheduling process is extremely flexible, alternatively https://crontab.guru/ is a great page for learning more about CRON scheduling.
Appendix D – Extension performance optimizations
Extensions are a critical part of ClearPass deployments today and with the increased dependency on extension interactions that involve periodic polling or real-time lookups, here are some of the best practice recommendations around optimizing overall performance when using extensions:
-
If the extension is used to periodically poll external systems and populate endpoint repository, ensure that it is not installed in all the nodes in the cluster. Ideally these type of extensions should only be installed on the publisher node since only publisher node can add endpoint entries to the database. For redundancy, it can be installed on another additional node but it is recommended to stagger the polling interval so that both do not attempt to poll and update endpoint database at the same time.
Example: 0 * * * *, This cron job runs at minute 0 of every hour (e.g., 00:00, 01:00, 02:00, etc.).
30 * * * *, This cron job runs at minute 30 of every hour (e.g., 00:30, 01:30, 02:30, etc.). -
If the extension is used for looking up attributes from external systems in real time during authentication, it should be installed in all the nodes handling authentication. Note that the context server config is replicated from the publisher. When using extension for real time lookup, ensure that the extension has the same IP address in all the cluster nodes.
-
If the extension is expected to do both real-time lookup and periodic polling, ensure that polling is enabled only on the publisher while the extension in subscribers can have the polling disabled by setting the “enableSyncAll” attribute to false.
"enableSyncAll": false,
WARNING
Having the extension installed on all the cluster nodes with enableSyncAll set to true would cause each cluster node to independently poll the external system and update endpoint repository. This could impact the performance of ClearPass. Hence it is strongly recommended to enable endpoint sync only on the extension installed on the publisher and on another cluster node for redundancy.
-
Some 3rd party systems support fetching delta updates vs fetching all of the device information every polling cycle. The extensions that support fetching delta updates are: Workspace ONE Crowdstrike Falcon Microsoft Intune Mosyle SentinelOne Service Now
For these extensions, the syncUpdatedOnly attribute should be set to true in extension config so that the number of DB updates in ClearPass is minimized
"syncUpdatedOnly": true,For extensions that do not support syncUpdatedOnly, ensure that the sync interval is not aggressive. We recommend syncing at most twice a day and that too during off peak hours whenever a full sync is performed.
-
Some 3rd party systems can be very noisy in terms of attribute updates. There could be certain attributes that keep changing every sync interval like “Free Memory in Bytes”, “Last Check in Time” etc. There is no value in updating endpoints when such trivial attributes change for the device. Hence it is recommended to use “ignoreEndpointDifferences” attribute in extension configuration to ignore change in attributes that you do not care about in terms of ClearPass policies.
You can review the Audit Viewer in ClearPass under Monitoring > Audit Viewer to see what attributes are being updated for endpoints to check if there are unnecessary updates.
Sample for JAMF extension:
"ignoreEndpointDifferences": "Last Update, Report Date UTC, Last Contact Time UTC, Last Inventory Update UTC, Last Reported IP, IP Address",Default for Microsoft Intune extension:
"ignoreEndpointDifferences": "Last Sync Date Time, Free Storage Space in Bytes", -
To further optimize the number of endpoints being updated in ClearPass, you can specify which attributes are being used in the ClearPass policies so that only changes to those attributes would trigger an update to the endpoint. This is done by listing out the specific attributes under endpointAttributes in extension configuration.
Sample for JAMF extension:
"endpointAttributes": "Group names, MDM Enabled, Managed, Remote Managed, Supervised, Serial Number", -
Setup extension to restart unless it was intentionally stopped. A restart policy can be defined in extension configuration to ensure that the extension starts up automatically after server reboots and such. Restart policy of “unless-stopped” would ensure the extension always starts up unless it was manually stopped.
“restartPolicy”: “no” — The extension will not be automatically restarted after the server is restarted.
“restartPolicy”: “always” — The extension will always be restarted after the server is restarted.
“restartPolicy”: “unless-stopped” — The extension will be restarted unless it was stopped prior to the server restart, in which case it will maintain that state.
“restartPolicy”: “on-failure:N” — If the extension fails to restart, the value for “N” specifies the number of times the extension should try to restart. If you do not provide a value for “N”, the default value will be “0”.
The “restartPolicy” parameter is not present by default in extension configurations. When it is not present, if the system is restarted a default policy is applied to the extension to maintain the state it was in before the restart. If the “restartPolicy” parameter is added to the configuration but later removed, the extension will then revert to the default restart policy.
Appendix E – Using the Jamf Extension Information in a ClearPass Service
In this appendix, we’ll provide more detail on how to incorporate information from the Jamf Extension in an existing ClearPass service. We’ll add the Endpoint Database to an existing basic Wired 802.1X service that processes authentications from HPE ArubaOS switches. This service checks Active Directory to set roles, then uses those roles in an enforcement policy to send different RADIUS attributes to the switch. The configuration of your existing policies will likely differ, so please use this appendix as a general guide.
Service Authorization
The first step is to add Authorization to our service by checking the Authorization box on the Service tab. Checking this box makes the Authorization tab visible in the service definition.
Note: your existing services may already have this box checked.

Proceed to the Authorization tab and add the Endpoint Database.
We also added the [Time Source] [Local SQL DB] for evaluating dates and times.

Role Mapping Policy
Our Role Mapping Policy originally only contained the first two lines seen below.
We first created the role names in ClearPass by navigating to Configuration > Identity > Roles. We then added the subsequent lines to the role mapping policy to set roles based on the returned values from Jamf. Note this is an evaluate-all Role Mapping Policy, so all matching roles will be applied.
Appendix F – Using Webhooks for real-time event updates from Jamf to ClearPass
Jamf supports triggering Webhooks based on certain events which include changes in device groups and newly added devices in the inventory. This eliminates the dependency on endpoint sync schedule interval to get the correct state of managed endpoints with the use of real-time updates for any state changes in existing endpoints and updates for newly added endpoints in Jamf. These events can be leveraged by ClearPass when Jamf is configuted to send these events to Skyhook and update the endpoint attributes based on the attributes received from the Skyhook events.
Configuring Webhooks in Jamf
Under All Settings > Global Management click on Webhooks:

Click “+ New” button to configure a new Webhook:

Set the Display Name for the Webhook and enable it. The Webhook URL sample is provided below. The Skyhook tenant ID is suffixed in the URL to send the webhook events to the right skyhook tenant. The procedure to get a skyhook tenant registered for Jamf is discussed in the following steps. Set all other configuration settings as shown below in the example (make sure Content Type is set to JSON) and click on Save.

Register for a Skyhook Tenant ID
Skyhook Tenant ID’s can be registered in the skyhook self-service portal by accessing the following link https://clearpass.arubanetworks.com/webhooks/skyhook and instructions on using the skyhook self-service portal is available here: https://arubanetworking.hpe.com/techdocs/NAC/clearpass/integrations/clearpass-extension/skyhook-self-service-portal/
Kindly copy the skyhookTenant, dbAccessToken and the Webhook URL in a text file. This will be used for configuration of the extension in ClearPass Policy Manager as well as configuring the tenant details in Jamf.

Example: New Device Enrollment
Here is a sample configuration for New Device Enrollment on Jamf:

Here is a sample log from the Jamf Extension based on a new mobile device enrolled:

The newly enrolled device is then entered in the Endpoint DB and can be looked up based on the MAC address shown in the extension log.
Example: Smart Group Mobile Device Membership Change
Here is a sample configuration for Mobile Device Membership Change on Jamf:

Here is a sample log from the Jamf Extension based on a mobile device membership change:

5.2 - Jamf School
Introduction and Overview
Jamf School is a powerful, cost effective Mobile Device Management system for today’s modern digital classroom. With Jamf School all your Apple devices can be managed. Jamf School has easy to use tools for the IT Department, teachers and parents.
In combination with Apple’s iOS, Jamf School is the very best MDM choice for education. Inventory, deploy and secure every Mac, iPad and iPhone in your schools – and integrate them into existing IT with an ease that has never been possible until now.
This integration guide covers the deployment and configuration of ClearPass Policy Manager to interface with Jamf School. The integration leverages Jamf School APIs to obtain attributes associated with an endpoint. It provides an ability to pull all device details from a customer tenant into ClearPass endpoints database. The contextual data inserted into ClearPass can then be leveraged to drive granular access policy.
Pictorial View of the Integration
The diagram below shows a pictorial overview of the components and how
they interact with each other.
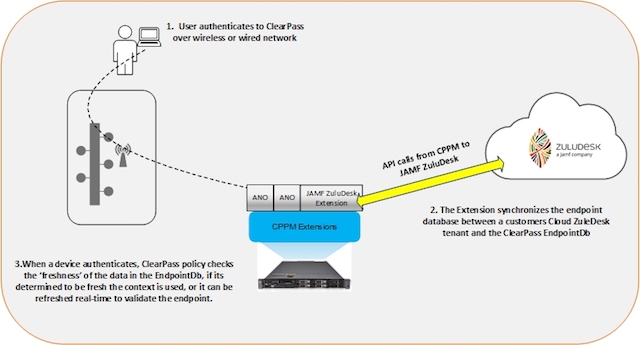
Software Requirements
The minimum software version required for CPPM is 6.11.0 . At the time of writing, version 6.11.10 is available as the long supported release and 6.12.4 is available as the short supported release. CPPM runs on hardware appliances with pre-installed software or as a Virtual Machine under the following hypervisors. Hypervisors that run on a client computer such as VMware Player are not supported.
-
VMware vSphere Hypervisor (ESXi) 7.0 U3c and 8.0
-
Windows Server 2019 with Hyper‑V and Windows Server 2022 with Hyper‑V.
-
KVM on CentOS Stream 8, CentOS Stream 9, Ubuntu 20.04 LTS, and Ubuntu 22.04 LTS.
ClearPass Installation and Deployment Guide
This document assumes your ClearPass environment is already configured and operational. If you require assistance with basic deployment, refer to the following deployment guide:
https://arubanetworking.hpe.com/techdocs/ClearPass/6.11/Installation-Guide/Default.htm
ClearPass Extensions
The integration between ClearPass Policy Manager and external systems is driven through a ClearPass capability known as Extensions, a sub-component of the ClearPass Exchange Integration framework. ClearPass Extensions are micro-services running on top of the base ClearPass platform. These micro-services enable HPE Aruba Networking to deliver new features outside of the main software release cycle and facilitate a faster time to market for specific features and integrations. Configuration and control of ClearPass Extensions is accomplished through the ClearPass Guest GUI, as covered later in this document.
Installing Extension
ClearPass Extensions are easy to install from the ClearPass Extensions Store. In a cluster, ClearPass Extensions can be installed on a subscriber independently of the publisher. Multiple copies of the same extension can be installed if needed as well.
INFO
Internet access is required for ClearPass Policy Manager to install the ClearPass Extensions from the Extension Store. Starting with ClearPass 6.12, extensions can be can be installed offline as well. Offline ClearPass Extension images are available on HPE networking support portal.
Access to the extension store
Access the Extension Store to download and install ClearPass extensions. The Extension store utilizes the same HPE Passport account credentials used to validate support entitlement in the Software Updates Por- tal. This is configured under Administration > Agents and Software Updates > Software Updates as shown below. Ensure that valid HPE Passport credentials have been entered in these fields to enable Ex- tension download capabilities.
Installing the Extension from Store
Extensions are installed from the extension page in ClearPass Guest, as shown below. Access it from Guest > Administration > Extensions
From here, click on ‘Install Extension’, and the search box below appears.
Enter “Intune” and click on ‘Search’, see the example below.
INFO
Here we are using Intune as an example. The installation steps are the same for all the extensions. For your deployment, please search for the appropriate extension like Jamf, Mosyle, Crowdstrike, etc.
All currently available extensions are listed in the page: https://www.arubanetworks.com/techdocs/NAC/clearpass/integrations/clearpass-extension/extensions-list/
Click on the extension name and then click “Install.”
In the “Install Extension” dialog box, set the IP address if necessary, as described in section “Extensions and IP address configuration support” below. Do not check the box to start the extension at this time. Click the “Install” button.
In this example, we’ve not entered an IP address for the extension to use, if there is intent to use the extension as an authorization source set this value and ensure its set the same on all nodes where the Extension is deployed.
The extension will download and appear in a “Stopped” state. Notice the options to Start, Delete, Reinstall, Show Logs, and view Configuration. Click on “Configuration” to view settings.
After the extension has been installed, proceed to configure the extension
A copy of the default Extension configuration is shown above, this will need to be modified for your deployment.
INFO
Password and sensitive configuration items are obfuscated when presented in both the Extension GUI or in the Explorer configuration.
WARNING
The configuration attributes are case sensitive. It is recommended to refer the default configuration sample while editing your configuration.
Extensions and web proxy support
Extensions support communications with 3rd parties via a web proxy. This adds incremental proxy functionality. If a proxy is defined in ClearPass Policy Manager, then an extension will inherit that configuration. See later in the document on how to disable the proxy inherited configuration.
INFO
Note that the Policy Manger web proxy configuration is ONLY read by the extension at installation time. If the web proxy configuration is changed in Policy Manager, then the extension must be re-installed so the new settings are re-read and bonded to the extension.
Extensions and IP address configuration support
ClearPass uses a non-externally routed IP address range to communicate with the Extension. The default is 172.17.0.0/16. You may configure a different range, if desired. This is especially useful when deploying extensions across nodes within a cluster where there is the requirement for a fixed consistent IP address for the extension across the cluster.
Changing the “Extensions Network Address” range is only necessary if either the ClearPass MGMT or DATA interface are using an IP address in the extension default range of 172.17.x.x/12, or if ClearPass needs to communicate with some external device in that range.
To Configure the base Extension IP subnet within Policy Manager navigate to Administration > Server Manager > Server Configuration [chose your node] Service Parameters [ClearPass system service].
INFO
The subnet defined here for the extension framework must fall within the following subnet range 10.0.0.0/8, 172.16.0.0/12, 192.168.0.0/16 as defined by RFC1918. For best results, set the network address range to a subnet that does not exist in your enterprise, and restart the extension service for this change to take effect.
Never set the DATA or MGMT IP address to use an address that matches the Extension Network
INFO
Note that changing the extension base IP address will require the extension service to be restarted.
ClearPass Jamf School Extension Configuration
After installing the Extension, the default configuration will need to be updated. The configuration parameters are divided into two tables, one for Jamf Extension-specific configuration parameters and the other for Extension framework configuration parameters that are common across multiple vendor Extensions.
Table 1: Jamf School Extension-specific configuration parameters
Jamf School Configuration
| Attribute | Description | Values/Examples |
|---|---|---|
| JamfSchoolHost | This will be the URL used by ClearPass to communicate with Jamf School API endpoints. | account.jamfcloud.com |
| JamfSchoolNetworkId | The network ID for your Jamf School Instance. See, https://developer.jamf.com/developer-guide/docs/jamf-school for more details. | 30174556 |
| JamfSchoolApiV2Key | The ApiV2key is mandatory and used to access the Jamf School API for periodic sync with JamfSchool. See, https://developer.jamf.com/developer-guide/docs/jamf-school for more details. | secret-Value | JamfSchoolApiV1Key | The ApiV1key is optional if only periodic sync is configured. However to support Real-time AuthZ against JamfSchool this API key is needed. | secret-Value |
| ignoreEndpointDifferences | List of endpoint fields that should be ignored during comparison/syncing. | lastCheckin, lastCheckin.date, modified, etc |
| removeEndpointAttributes | List of attributes that should be removed from endpoints during sync. | availableCapacity, batteryLevel, etc |
Common extension attributes
Extension framework configuration parameters (common configuration)
| Attribute | Description | Default Values |
|---|---|---|
| logLevel | Logging level for troubleshooting | “INFO” |
| verifySSLCerts | Should SSL certificates be validated when communicating with external context sources | true |
| enableEndpointCache | Cache endpoint attributes to optimize authorization queries, avoid repeated DB queries and reduce API calls to external context sources | true |
| endpointCacheTimeSeconds | The duration in seconds to cache the endpoint attributes | 300 |
| syncUpdatedOnly | If this option is set to true, only the endpoints updated after the previous sync would be fetched from the context source. Note that this option only works for the third-party context sources that have APIs to support this functionality. If this option is set to false, all endpoints are fetched at every sync interval. |
true |
| syncAllOnStart | If this option is set to true, when the extension starts, the system will attempt to sync all endpoints in the external context source to ClearPass. Note that if you have a large number device context to be fetched, it would take a long time for the initial sync to complete. When used along with syncUpdatedOnly, the subsequent syncs should be faster. |
true |
| enableSyncAll | Enable periodic sync of all endpoints | true |
| syncAllSchedule | The schedule for when the Sync All Endpoints process should run. Note: This uses CRON type scheduling. |
0 2 * * 6 |
| enableStats | Enable display of extension statistics | false |
| statsUsername | Create a username to access the extension statistics page | Give any username you want to use |
| statsPassword | Create a password to access the extension statistics page | Give any password you want to use |
| bypassProxy | Bypass the web proxy configured on ClearPass Policy Manager | false |
Periodic Polling to Sync Endpoints
When leveraging the pull capabilities of the Extension to get the device attributes from Jamf School, use the attribute enableSyncAll and specify syncAllSchedule. These 2 attributes are leveraged for periodic poll of endpoints from Jamf School. The syncAllOnStart attribute can be leveraged as well to sync everything upon the start of the extension.
The JamfSchoolNetworkId,JamfSchoolApiKeys are collected from inside the Jamf School system. For the username, you will have to use the Network ID for your account, which can be found at Devices > Enroll Device(s). For the password, you will have to use the API Key.
A copy of the Jamf School Extension with the desired configuration is shown below, this has to be modified for your deployment. Include the JamfSchoolHost, JamfSchoolNetworkId and JamfSchoolApiKeys that will be specific to your environment.
Change or include any other values based on the description of each in the above table. Select Restart and click on Save Changes to restart the extension.
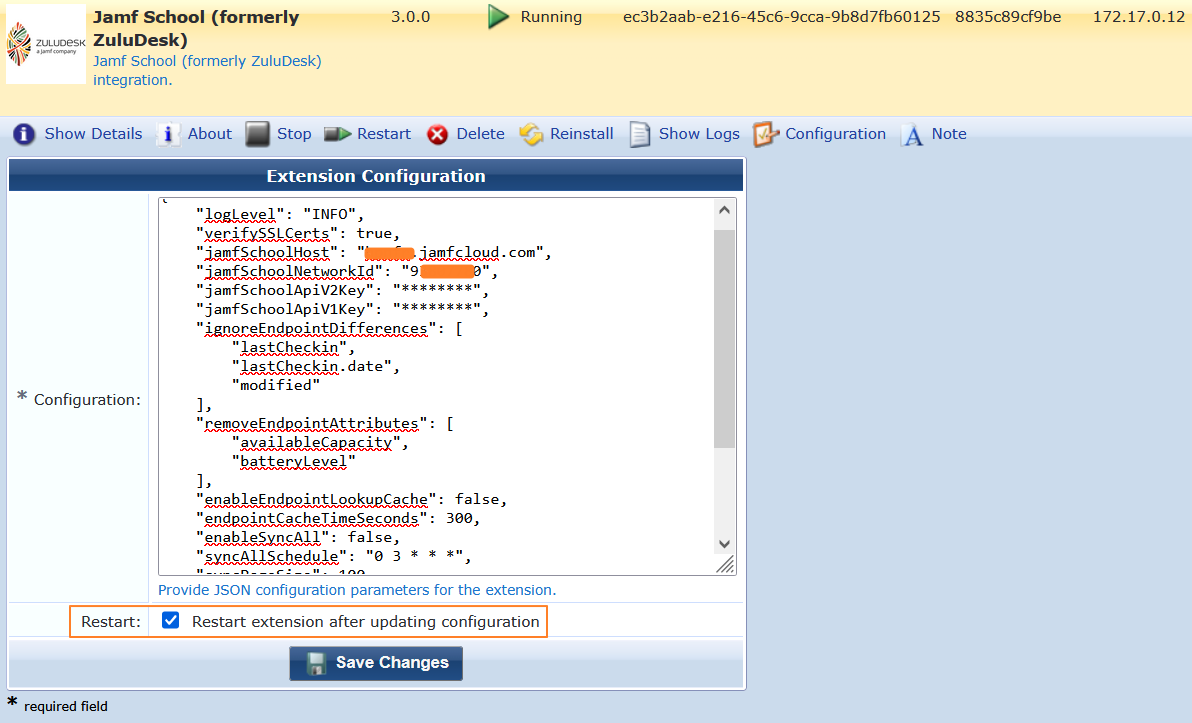
After the configuration and the restart of the extension, click on
Show Logs.
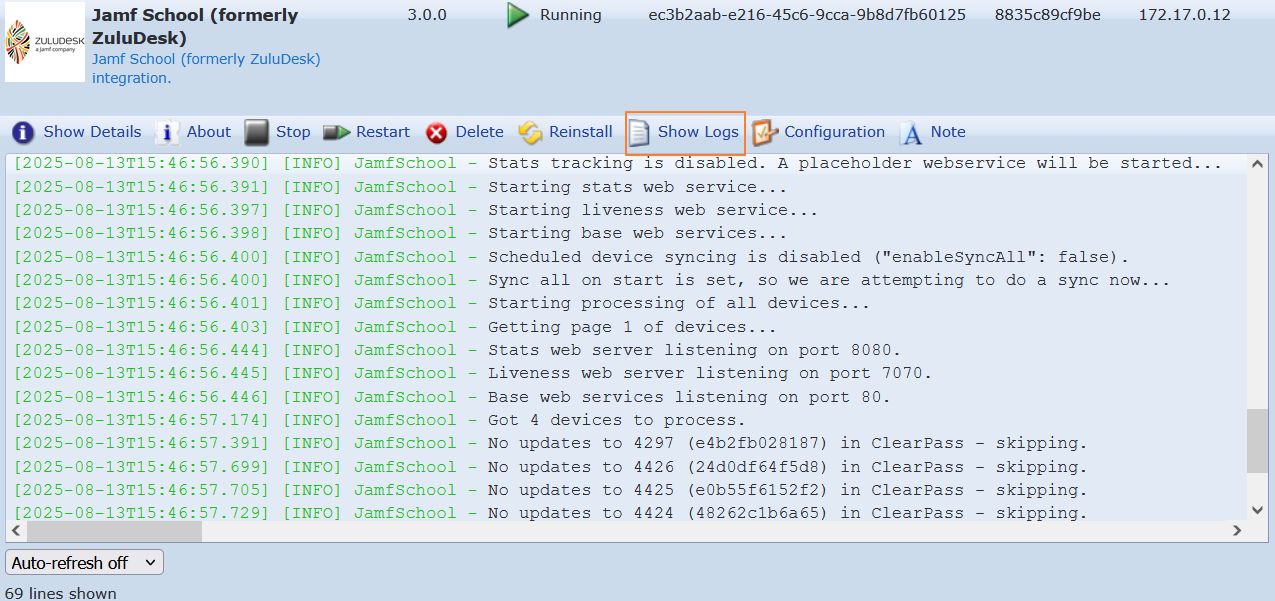
The above log shows that the Extension has pulled the endpoint data from
Jamf School. The above steps pull endpoint details at the time of starting
the Extension and then regular updates are fetched at the interval
specified by SyncAllSchedule. Please note the IP address of the
Extension. This will be used in the next section where we leverage the
Jamf School attributes during real-time AuthZ. A sample of endpoint attributes
fetched are shown below.
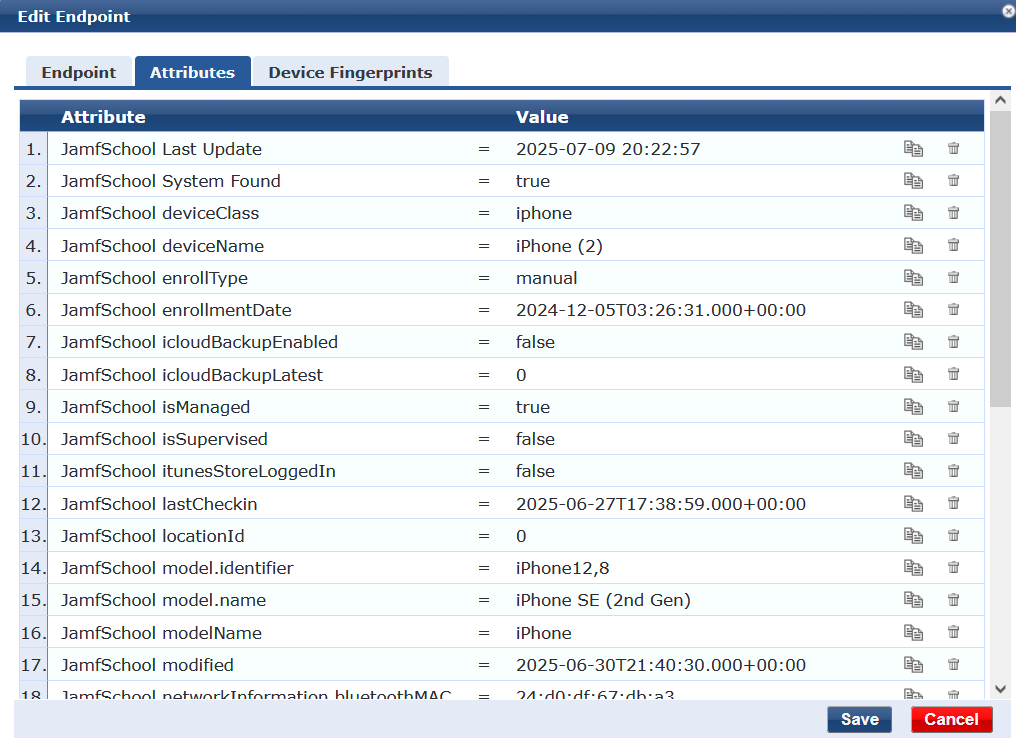
Multiple use-cases exist for how the data that is returned from Jamf School can be used in the Policy enforcement. In the example below, we are performing multiple checks:
-
Check if the device is managed by Jamf School. If it is not, redirect it to the captive Portal. Create a helpdesk ticket for remediation.
-
If the iCloud Backup is not enabled, create a helpdesk ticket.
-
If the device is not supervised by Jamf School, put it in the Quarantine VLAN.
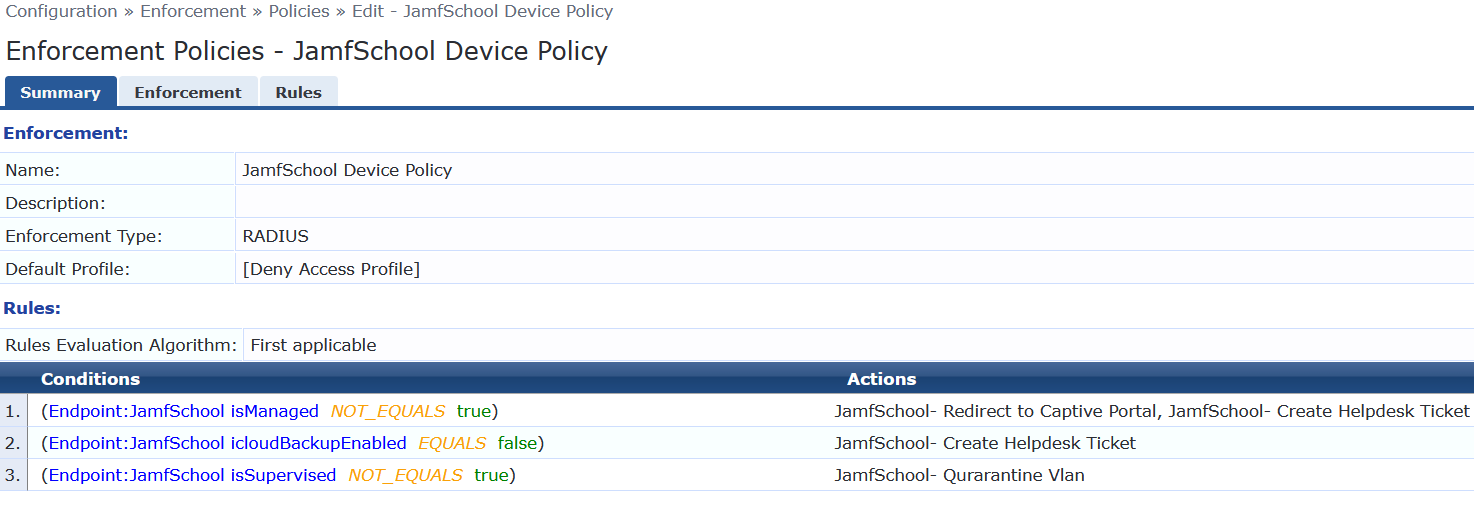
Different companies will have different enforcement profiles and policies. The key takeaway here is to leverage the attributes received from Jamf School to drive the policy engine into making different enforcement actions for the device as they authenticate on the network.
Using JamfSchool extension as HTTP AuthZ source for Real-time attribute lookups for Endpoints.
INFO
When using the JamfSchool extension as an HTTP AuthZ source for real-time attribute lookups of endpoints, you must configure the JamfSchoolApiV1Key. This key enables real-time queries to Jamf School during authorization. If real-time lookups are not required, the JamfSchoolApiV1Key can be omitted. In such cases, configuring only the JamfSchoolApiV2Key is sufficient for periodic polling and endpoint synchronization.
To add JamfSchool as a real-time AuthZ source:
Navigate to Configuration > Authentication > Sources and click Add.
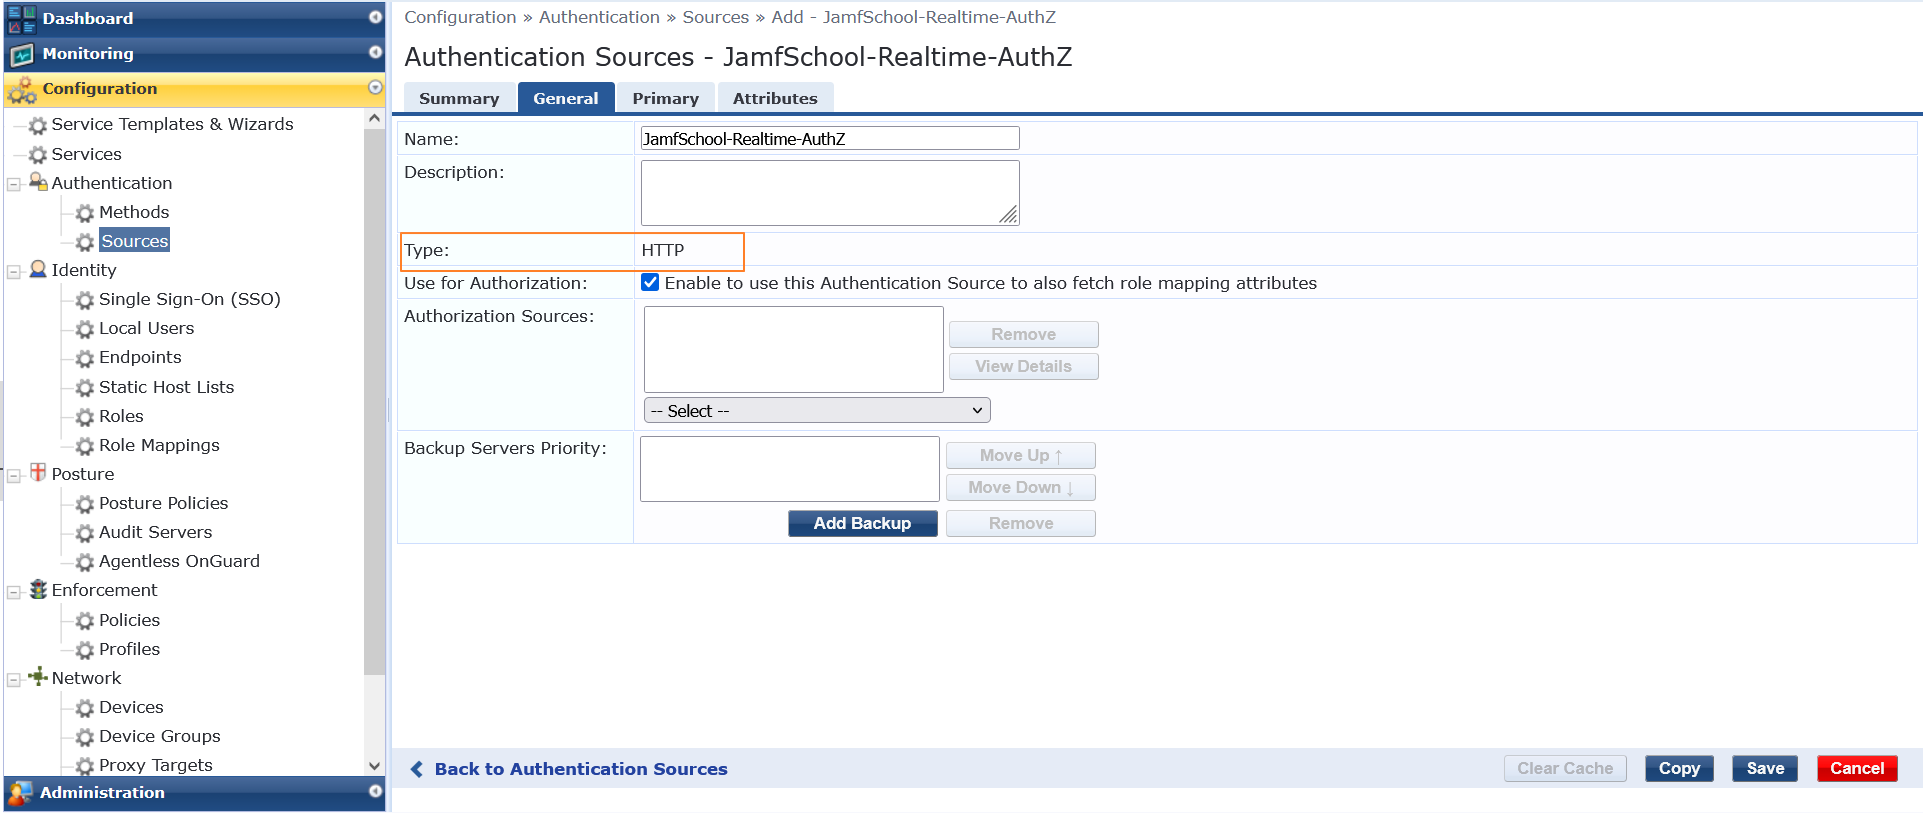
Select Type = HTTP, then go to the Primary tab. Enter the JamfSchool extension IP as the HTTP address and click Next.

Configure the Filter Query, specifying the attributes you want to retrieve from JamfSchool.
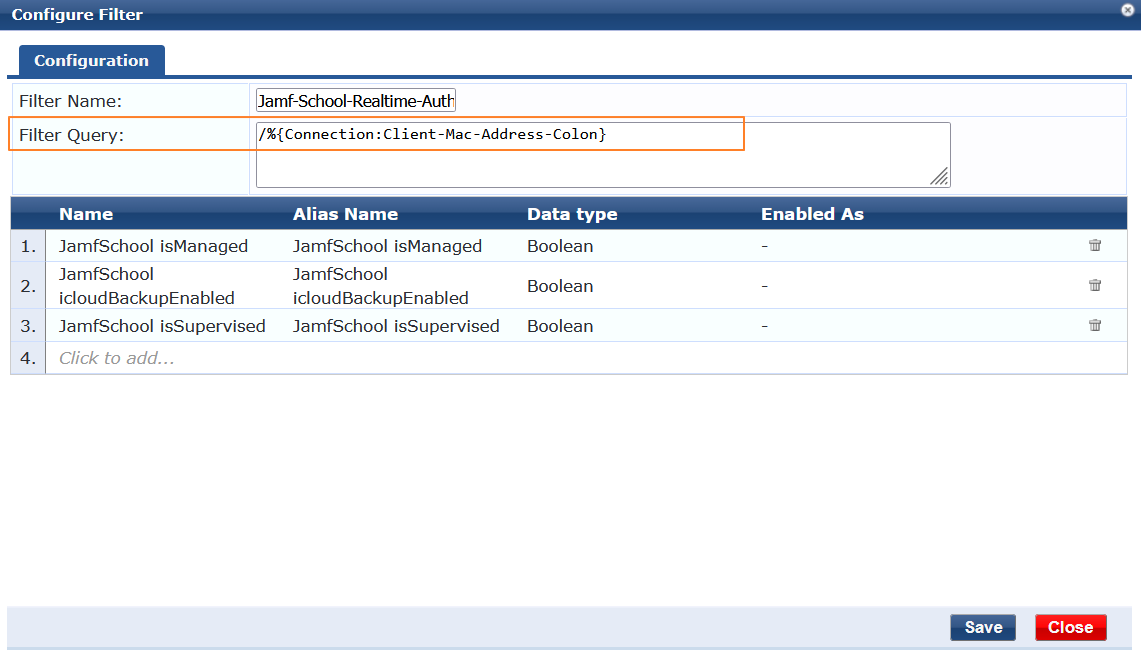
These attributes can then be leveraged in your policies.
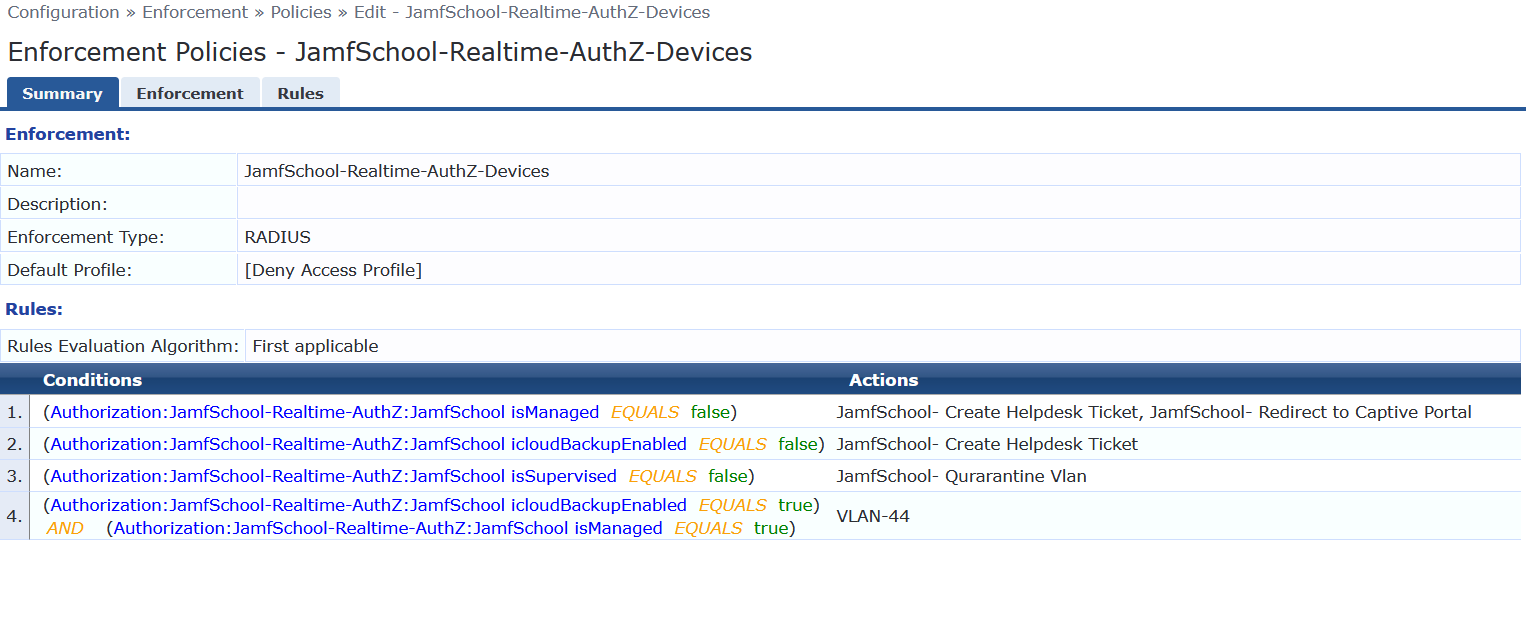
Appendix A – Troubleshooting and Support
Here we list some basic troubleshooting steps. If you need any help beyond this, please reach out to HPE Aruba Networking Support.
Check API Access Application Control restrictions
If you’ve previously hardened your ClearPass deployment with Application Access Controls, it’s possible that the Extension will not work. Reviewing the Extension Log might show something like the following after immediately starting the Extension. This likely indicates the ClearPass Application API’s are in place.
Example of Extension authorization failure due to Policy Manager Application Control:
[2020-03-16T15:42:21.083] [INFO] Intune - Server listening on port 80.
[2020-03-16T15:42:21.243] [DEBUG] Intune - Request “GET ‘https://172.17.0.1/api/server/version’” took 51.91ms.
[2020-03-16T15:42:21.245] [DEBUG] Intune - <!DOCTYPE html><html>
<head>
<title>
Error 403 (Forbidden)
</title>
<script language=“javascript”>
function reloadPage() {
var locHref = window.location.protocol + “//” + window.location.hostname;
window.location.href = locHref;
}
</script>
To resolve this issue, add the IP address of the Extension to the list of nodes permitted to access the API by navigating to Administration > Server Manager > Server Configuration {choose your node} > Network
INFO
For this reason its good practice to fix the IP address of the extension at installation time such that it doesn’t change over time and break the application controls.
Checking on the Extension Service
The ClearPass Extensions are supported by a system service which must be running.
Restarting this service will affect all deployed and running extensions.
To check on the state of the Extension Service, or to restart the service, go to Administration > Server Manager > Server Configuration > [SERVER] > Service Control. By default this service is automatically started.
Extensions and web proxy / firewall whitelisting
If ClearPass Policy Manager has been configured with a proxy, it’s still possible that domain whitelists are required, the same for some datacenter firewall to allow the installation of Extensions. Some enterprise customers maintain a whitelist of domain that are allowed to transit the proxy/firewall. The underlying docker configuration process uses standard docker registry access to pull images (hosted in docker hub). In general, the following hosts are used:
INFO
-
extensions.clearpassbeta.com
-
registry-1.docker.io
-
index.docker.io
-
auth.docker.io
-
production.cloudflare.docker.com
This is all also geo dependent to some degree and based on various AWS services, so AWS redirects and geo location services will vary. Finally, this all runs via standard HTTPS (port 443).
Extension Logs/Enable Debugging
If you have a requirement to access and view the logs from the Extension, you can turn on different logging levels from the Extension GUI. Adjust the logLevel to ‘DEBUG’ and restart the extension as shown below.
Logs can then be viewed from the ‘Show Logs’.
Remember after changing the logging level, as with any extension configuration change the extension will need to be restarted for this change to take effect.
Accessing the extension logs using ‘Collect Logs’ system function
In addition to viewing the logs as shown above, logs can also be collected and examined via the Policy Manager Collect Logs system function (Administration > Server Manager > Server Configuration > [Select SERVER] > Collect Logs). This is extremely useful should you have a need to call for technical assistance.
If the support team needs to investigate a system issue, one of the items they regularly ask for is the system logs to aid with their diagnostic investigation. By default the “logLevel” is set to INFO, but TRACE, DEBUG, INFO, WARN, ERROR, FATAL can also be set as required. Any of the levels will display the information for the selected state and lower; if INFO is selected, it will show messages for INFO, WARN, ERROR, FATAL.
After the logs have been collected, downloaded and expanded, you can locate the extension logs in the following location in the folder structure PolicyManagerLogs > extension > your-extension-id as shown below. Note the file-name is the same as the running instance ID of the extension.
Monitoring extension statistics
There is a way to monitor extension’s critical resource statistics with the configurable parameter added as part of the extension’s configuration. To enable extension statistics set the “enableStats” parameter to true. Remember a restart of the extension is need to activate the change anytime the config is modified.
To navigate to statistics page, click Show Details.
This will show statistics similar to the following:
Monitoring authorization performance
Since we are authorizing against an external system, it could be relevant to monitor the performance of these transactions as you setup and deploy. If you suspect there is a performance issue, ClearPass provides a way to monitor the authorization processing time. The graph below shows an example of this data, navigate to Monitoring > Live Monitor > System Monitor [click on ClearPass Tab, then select [Authorization]….
Appendix B – Considerations for Installing in a Cluster
Extensions are not synced between ClearPass cluster members, and thus must be installed on each member separately.
Some Extensions can run in two modes: Periodic Sync Mode and Authorization Source Mode.
Periodic Sync Mode
If you are configuring the extension to poll external system periodically and utilize the resulting ClearPass Endpoint database during endpoint Authorization, then you only need to install the extension on one cluster member, often the publisher.
You may wish to install the extension on a second cluster member as a backup, but remember that both extensions will individually be updating the endpoint database. You may want to stagger the updates between the two extensions, for example, Subscriber1 updates at the top of the hour and Subscriber2 updates at 30 minutes after the hour.
Also, in this mode there is no need to explicitly enter an IP address during installation. The defaults will suffice and ClearPass will select an IP in the range specified in the server configuration.
HTTP Authorization Source Mode
In this mode we configure an HTTP Auth source that results in a HTTPS call to external system during endpoint authorization. In this deployment model the extension must be installed on every cluster node that process authentications. Also in this scenario every cluster member’s extension must be set to the exact same IP address during installation time, as the HTTP Auth source configuration is propagated globally across all cluster members.
For example, if the extension IP range is 172.17.0.0/16, we would set the extension to 172.17.0.5 on every cluster member during installation of the extension.
While we normally want to avoid duplicate IP addresses in a network, this is not a concern with ClearPass extensions. Each ClearPass node communicates internally only with its own extension, and this traffic is not routed outside of ClearPass.
Subscriber nodes support the same ability as publishers to install an Extension from the Extension store.
Appendix C – endpoint sync schedule settings
The syncSchedule and similar scheduling parameters sets how often ClearPass executes certain actions like syncing or pushing endpoints. This setting is based on a slightly modified version of the CRON job scheduler found in Unix-like operating systems. It can be used to schedule jobs to run periodically at fixed times, dates or intervals.
A ‘cron’ is a job scheduler. Any scheduled task is called a ‘cron job’. The syntax for a cron job schedule is as follows:
In our use of the cron scheduler, we’ve dropped the use of the last instruction ≤command to execute> and use only the time/date functions, see below for a number of examples of scheduling a sync process.
-
Schedule a sync to run at 2am daily:- 0 2 * * *
-
Schedule a sync to run twice a day at 5am and 5pm:- 0 5,17 * * *
-
Schedule a sync to run on every Sunday at 5pm:- 0 17 * * sun
-
Schedule a sync to run every 30 minutes:- */30 * * * *
-
Schedule a sync to run at 5pm on selected days:- 0 17 * * sun,fri
You can see from the above that the scheduling process is extremely flexible, alternatively https://crontab.guru/ is a great page for learning more about CRON scheduling.
Appendix D – Extension performance optimizations
Extensions are a critical part of ClearPass deployments today and with the increased dependency on extension interactions that involve periodic polling or real-time lookups, here are some of the best practice recommendations around optimizing overall performance when using extensions:
-
If the extension is used to periodically poll external systems and populate endpoint repository, ensure that it is not installed in all the nodes in the cluster. Ideally these type of extensions should only be installed on the publisher node since only publisher node can add endpoint entries to the database. For redundancy, it can be installed on another additional node but it is recommended to stagger the polling interval so that both do not attempt to poll and update endpoint database at the same time.
Example: 0 * * * *, This cron job runs at minute 0 of every hour (e.g., 00:00, 01:00, 02:00, etc.).
30 * * * *, This cron job runs at minute 30 of every hour (e.g., 00:30, 01:30, 02:30, etc.). -
If the extension is used for looking up attributes from external systems in real time during authentication, it should be installed in all the nodes handling authentication. Note that the context server config is replicated from the publisher. When using extension for real time lookup, ensure that the extension has the same IP address in all the cluster nodes.
-
If the extension is expected to do both real-time lookup and periodic polling, ensure that polling is enabled only on the publisher while the extension in subscribers can have the polling disabled by setting the “enableSyncAll” attribute to false.
"enableSyncAll": false,
WARNING
Having the extension installed on all the cluster nodes with enableSyncAll set to true would cause each cluster node to independently poll the external system and update endpoint repository. This could impact the performance of ClearPass. Hence it is strongly recommended to enable endpoint sync only on the extension installed on the publisher and on another cluster node for redundancy.
-
Some 3rd party systems support fetching delta updates vs fetching all of the device information every polling cycle. The extensions that support fetching delta updates are: Workspace ONE Crowdstrike Falcon Microsoft Intune Mosyle SentinelOne Service Now
For these extensions, the syncUpdatedOnly attribute should be set to true in extension config so that the number of DB updates in ClearPass is minimized
"syncUpdatedOnly": true,For extensions that do not support syncUpdatedOnly, ensure that the sync interval is not aggressive. We recommend syncing at most twice a day and that too during off peak hours whenever a full sync is performed.
-
Some 3rd party systems can be very noisy in terms of attribute updates. There could be certain attributes that keep changing every sync interval like “Free Memory in Bytes”, “Last Check in Time” etc. There is no value in updating endpoints when such trivial attributes change for the device. Hence it is recommended to use “ignoreEndpointDifferences” attribute in extension configuration to ignore change in attributes that you do not care about in terms of ClearPass policies.
You can review the Audit Viewer in ClearPass under Monitoring > Audit Viewer to see what attributes are being updated for endpoints to check if there are unnecessary updates.
Sample for JAMF extension:
"ignoreEndpointDifferences": "Last Update, Report Date UTC, Last Contact Time UTC, Last Inventory Update UTC, Last Reported IP, IP Address",Default for Microsoft Intune extension:
"ignoreEndpointDifferences": "Last Sync Date Time, Free Storage Space in Bytes", -
To further optimize the number of endpoints being updated in ClearPass, you can specify which attributes are being used in the ClearPass policies so that only changes to those attributes would trigger an update to the endpoint. This is done by listing out the specific attributes under endpointAttributes in extension configuration.
Sample for JAMF extension:
"endpointAttributes": "Group names, MDM Enabled, Managed, Remote Managed, Supervised, Serial Number", -
Setup extension to restart unless it was intentionally stopped. A restart policy can be defined in extension configuration to ensure that the extension starts up automatically after server reboots and such. Restart policy of “unless-stopped” would ensure the extension always starts up unless it was manually stopped.
“restartPolicy”: “no” — The extension will not be automatically restarted after the server is restarted.
“restartPolicy”: “always” — The extension will always be restarted after the server is restarted.
“restartPolicy”: “unless-stopped” — The extension will be restarted unless it was stopped prior to the server restart, in which case it will maintain that state.
“restartPolicy”: “on-failure:N” — If the extension fails to restart, the value for “N” specifies the number of times the extension should try to restart. If you do not provide a value for “N”, the default value will be “0”.
The “restartPolicy” parameter is not present by default in extension configurations. When it is not present, if the system is restarted a default policy is applied to the extension to maintain the state it was in before the restart. If the “restartPolicy” parameter is added to the configuration but later removed, the extension will then revert to the default restart policy.
5.3 - Meraki System Manager
Introduction
This TechNote covers how to deploy and configure the ClearPass Extension to interface with Meraki System Manager. In this TechNote we will cover the complete installation, configuration and integration between the Extension and ClearPass Policy Manager. The Extension effectively becomes an authorization source to service policies.
With Meraki System Manager hosted in the cloud and ClearPass sitting primarily on-prem, there are challenges in making these two applications communicate in real time on device posture status. Traditionally the apps would communicate using APIs where an application would request information which is usually followed by a response. Hence in order to get real-time information you must poll or request as often as possible which is not scalable. The answer or the solution is a webhook which does not wait for a request to send information but sends the data as soon as it is available.
Before we proceed with the flow, we need to understand the concept of webhooks and skyhook.
What is a webhook?
A webhook (also called a web callback or HTTP push API) is a way for an app to provide other applications with real-time information. A webhook delivers data to other applications as it happens, meaning you get data immediately.
What is skyhook?
Skyhook was developed to overcome the inability for Cloud based applications to send events [webhooks] directly into a ClearPass that was typically deployed on the Trust side of a corporate firewall. In short, it is a service that runs in the Cloud, deployed, developed and managed by Aruba. ClearPass nodes running onprem, use extensions to open a persistent connection into Skyhook to receive the events originally sent from a 3rd party cloud application specific for that customer/tenant. As an overview, Meraki System Manager running in the cloud will send a webhook upon an alert notification. This will communicate with Skyhook. The ClearPass extension configured and installed will maintain a persistent connection with Skyhook awaiting an event.
Software Requirements
The minimum software version required for CPPM is 6.11.0 . At the time of writing, version 6.11.10 is available as the long supported release and 6.12.4 is available as the short supported release. CPPM runs on hardware appliances with pre-installed software or as a Virtual Machine under the following hypervisors. Hypervisors that run on a client computer such as VMware Player are not supported.
-
VMware vSphere Hypervisor (ESXi) 7.0 U3c and 8.0
-
Windows Server 2019 with Hyper‑V and Windows Server 2022 with Hyper‑V.
-
KVM on CentOS Stream 8, CentOS Stream 9, Ubuntu 20.04 LTS, and Ubuntu 22.04 LTS.
ClearPass Installation and Deployment Guide
This document assumes your ClearPass environment is already configured and operational. If you require assistance with basic deployment, refer to the following deployment guide:
https://arubanetworking.hpe.com/techdocs/ClearPass/6.11/Installation-Guide/Default.htm
ClearPass Extensions
The integration between ClearPass Policy Manager and external systems is driven through a ClearPass capability known as Extensions, a sub-component of the ClearPass Exchange Integration framework. ClearPass Extensions are micro-services running on top of the base ClearPass platform. These micro-services enable HPE Aruba Networking to deliver new features outside of the main software release cycle and facilitate a faster time to market for specific features and integrations. Configuration and control of ClearPass Extensions is accomplished through the ClearPass Guest GUI, as covered later in this document.
Installing Extension
ClearPass Extensions are easy to install from the ClearPass Extensions Store. In a cluster, ClearPass Extensions can be installed on a subscriber independently of the publisher. Multiple copies of the same extension can be installed if needed as well.
INFO
Internet access is required for ClearPass Policy Manager to install the ClearPass Extensions from the Extension Store. Starting with ClearPass 6.12, extensions can be can be installed offline as well. Offline ClearPass Extension images are available on HPE networking support portal.
Access to the extension store
Access the Extension Store to download and install ClearPass extensions. The Extension store utilizes the same HPE Passport account credentials used to validate support entitlement in the Software Updates Por- tal. This is configured under Administration > Agents and Software Updates > Software Updates as shown below. Ensure that valid HPE Passport credentials have been entered in these fields to enable Ex- tension download capabilities.
Installing the Extension from Store
Extensions are installed from the extension page in ClearPass Guest, as shown below. Access it from Guest > Administration > Extensions
From here, click on ‘Install Extension’, and the search box below appears.
Enter “Intune” and click on ‘Search’, see the example below.
INFO
Here we are using Intune as an example. The installation steps are the same for all the extensions. For your deployment, please search for the appropriate extension like Jamf, Mosyle, Crowdstrike, etc.
All currently available extensions are listed in the page: https://www.arubanetworks.com/techdocs/NAC/clearpass/integrations/clearpass-extension/extensions-list/
Click on the extension name and then click “Install.”
In the “Install Extension” dialog box, set the IP address if necessary, as described in section “Extensions and IP address configuration support” below. Do not check the box to start the extension at this time. Click the “Install” button.
In this example, we’ve not entered an IP address for the extension to use, if there is intent to use the extension as an authorization source set this value and ensure its set the same on all nodes where the Extension is deployed.
The extension will download and appear in a “Stopped” state. Notice the options to Start, Delete, Reinstall, Show Logs, and view Configuration. Click on “Configuration” to view settings.
After the extension has been installed, proceed to configure the extension
A copy of the default Extension configuration is shown above, this will need to be modified for your deployment.
INFO
Password and sensitive configuration items are obfuscated when presented in both the Extension GUI or in the Explorer configuration.
WARNING
The configuration attributes are case sensitive. It is recommended to refer the default configuration sample while editing your configuration.
Extensions and web proxy support
Extensions support communications with 3rd parties via a web proxy. This adds incremental proxy functionality. If a proxy is defined in ClearPass Policy Manager, then an extension will inherit that configuration. See later in the document on how to disable the proxy inherited configuration.
INFO
Note that the Policy Manger web proxy configuration is ONLY read by the extension at installation time. If the web proxy configuration is changed in Policy Manager, then the extension must be re-installed so the new settings are re-read and bonded to the extension.
Extensions and IP address configuration support
ClearPass uses a non-externally routed IP address range to communicate with the Extension. The default is 172.17.0.0/16. You may configure a different range, if desired. This is especially useful when deploying extensions across nodes within a cluster where there is the requirement for a fixed consistent IP address for the extension across the cluster.
Changing the “Extensions Network Address” range is only necessary if either the ClearPass MGMT or DATA interface are using an IP address in the extension default range of 172.17.x.x/12, or if ClearPass needs to communicate with some external device in that range.
To Configure the base Extension IP subnet within Policy Manager navigate to Administration > Server Manager > Server Configuration [chose your node] Service Parameters [ClearPass system service].
INFO
The subnet defined here for the extension framework must fall within the following subnet range 10.0.0.0/8, 172.16.0.0/12, 192.168.0.0/16 as defined by RFC1918. For best results, set the network address range to a subnet that does not exist in your enterprise, and restart the extension service for this change to take effect.
Never set the DATA or MGMT IP address to use an address that matches the Extension Network
INFO
Note that changing the extension base IP address will require the extension service to be restarted.
Pictorial View of the Integration
The extension can be configured for two different ways of operation.
Periodic Sync Mode
In this mode ClearPass polls Meraki System Manager periodically and
updates the ClearPass Endpoint database with attributes obtained from
Meraki System Manager. These attributes can be utilized in ClearPass during endpoint Authorization. This mode has a simpler
configuration demand, however, the data provided may not be completely
up to date at authentication time.

Ingress Event Processing (IEE):
In this mode we configure an IEE source that results in real time alert
notifications from Meraki System Manager. Information in this case is
more up to date, but there is the higher overhead of an API call during
endpoint authorization. A view of this process is below.

Register and Request for a Skyhook Tenant ID
Skyhook Tenant ID’s can be registered in the skyhook self-service portal by accessing the following link https://clearpass.arubanetworks.com/webhooks/skyhook and instructions on using the skyhook self-service portal is available here: https://arubanetworking.hpe.com/techdocs/NAC/clearpass/integrations/clearpass-extension/skyhook-self-service-portal/
Meraki System Manager Configuration
The ClearPass Meraki System Manager extension communicates with your Meraki System Manager tenant via REST API calls. By default, your Meraki System Manager tenant is not enabled to receive and respond to API calls, so you will need to create a Meraki System Manager API Key to enable API access. In this process an API key should be collected as it will be required to configure the ClearPass Meraki System Manager Extension.
Meraki System Manager API Tenant Configuration
Follow the below steps to configure and collect the data from your Meraki System Manager tenant.
After login, go to Your login name > My profile on the upper right
nav-bar as shown below.

Then from under My profile options, scroll down to API Access and click
“Generate new API key”.

At this time you will be shown the API key and you will need to copy it
for later user in ClearPass, click “I have stored my new API Key” and
then “Done”, as shown below.

Meraki System Manager Alert Webhook Configuration
Follow the below steps to configure and collect the data from your Meraki System Manager tenant.
After login, go to System Manager -> Alerts on the left nav-bar as
shown below.

Then scroll down to Webhooks and click “Add an HTTP server”. Fill in
the “Name” field to anything you prefer. The “URL” field will be
“https://skyhook.clearpassbeta.com/api/skyhook/meraki-sm/put-yourskyhook-tenant-id-here”
where “put-your-skyhook-tenant-id-here” will be replace with the
skyhook tenant ID you received after enrollment. “Shared secret” is a
password you specify that is optionally used within the extension to
validate the authenticity of the webhook, this needs to be referenced
later in the extension configuration. Then click “Save”.

In “Default recipients” add the Webhook alias you created earlier
and then create/modify a “Security Alert” that you want to be
notified on.

Meraki System Manager Extension Configuration
After installing the Extension, the default configuration will need to be updated.
Edit the three configuration value pairs from the previous steps with your saved values.
Below is an explanation of all of the configuration value pairs. The logLevel, verifySSLCerts and merakiHost should be left as their default settings unless advised by ClearPass TAC or your Aruba SE/Partner. Once you configure these parameters, you can start your extension. Any subsequent reconfiguration requires a restart of the extension.
Extension Configuration options
| Configuration attribute | Description | Example/Values |
|---|---|---|
| logLevel | Logging level for troubleshooting | "DEBUG", "INFO", "WARN", "ERROR" |
| verifySSLCerts | Specifies whether SSL certificates should be validated when making requests | true or false |
| merakiHost | URL for API calls to Meraki | api.meraki.com |
| merakiApiKey | The API Key from Meraki System Manager configuration | — |
| endpointSyncSchedule | The CRON schedule used for the sync process | 10 3 * * * |
| endpointSyncOnStart | Specifies whether to run the endpoint sync immediately when the extension starts | true or false |
| enableSyslogEvents | Enables the processing of syslog events from Meraki System Manager alerts | true or false |
| syslogServers | Host: IP of the extension gateway; Port: syslog port (usually 514); useTCP: true or false | — |
| enableSkyhook | Enables or disables the endpoint sync scheduler | true or false |
| skyhookTenant | The Tenant ID for Skyhook from registration | 965abd48-zzzz-aaaa-8164-xxxxxxxxxx |
| dbAccessToken | The access token for Skyhook (sent from Skyhook registration) | — |
| sharedSecret | The Meraki System Manager Webhook Secret from alert settings | — |
| cppmUserName | A ClearPass username used for device profiling | — |
| cppmPassword | Password for the above ClearPass user | — |
| bypassProxy | Enable extension to bypass web proxy | true or false |
Additional Configuration Notes
If you only want the extension to sync device information to the endpoint database, set the endpointSyncSchedule attributes, and optionally the endpointSyncOnStart attribute.
At a minimum, you’ll need to set these attributes:
-
merakiApiKey
-
cppmUserName
-
cppmPassword
The cppmUserName and cppmPassword attributes are set, the
extension can configure endpoint profiling based on data from Meraki
System Manager. Create this user in ClearPass, navigate to
Administration > Users and Privileges > Admin Users. Click on
Add. Set the Privilege Level to Network Administrator.

Configure ClearPass Policy Manager
Multiple methods exist for how ClearPass can utilize the returned data from Meraki System Manager, such as:
-
Ensure that the endpoint is managed by Meraki System Manager. If not, perhaps restrict access for the device on the Corporate Network with a role that only allows the user to remediate and enroll the device to Meraki System Manager. This provides a controlled environment where all endpoints are managed.
-
Check if the endpoint is meeting compliance requirements set by your company (i.e. Firewall enable, Anti-virus installed, etc)
-
Take automated actions on notifications sent from Meraki System Manager.
As mentioned previously, the extension can be run in two modes.
Periodic Sync Mode: Using stored attributes
The Extension can sync data from Meraki System Manager periodically, write this data into the ClearPass EndpointDB, then use the EndpointDB as an authorization source. Also, as part of this sync configuration notifications can be processed for devices that are not meeting company compliance. Why this is useful is that if a device were to fall out of compliance an event can be triggered, and a new enforcement can be processed to handle the violation.
Be aware that this data will not be completely ‘real-time,’ but may be
adequate for many use cases.
Here’s an example of a ClearPass Role Mapping Policy that utilizes these
Meraki System Manager Endpoint Attributes.

Ingress Event Processing: A Real-Time Notification
In this scenario we configure ClearPass Policy Manager to process event notifications. For a complete and more detailed overview of Ingress Event Processing please review the technote “CPPM_TechNote__Ingress_Event_Engine_V1.0.pdf”
Ingress Event Processing uses the Ingress Event Engine [IEE] that is built-in ClearPass Policy Manager. The IEE delivers an extra dimension to the capabilities on how ClearPass Policy Manager can interoperate with Devices and Users. IEE is where an inbound syslog can be the trigger for CPPM to take action on authenticated networks devices & users.
Configuring Ingress Event Processing
Let’s check the basics first….. we need to enable the Ingress Events
processing engine. Enable this under Administration-> Server Manager
> Server Configuration > [Your CPPM Node] > System as below.

INFO
Note when enabling this feature, a warning message is displayed as shown below which highlights and warns of the potential consequences. Be aware that is can generate a significant CPU load on the node. Careful consideration needs to be used and we specifically do not want CPPM to be receiving a constant stream of syslog messages that it has to then process. CPPM should only be receiving syslog messages by exception that it has to process and take action on, if you send a constant stream of syslog then the overhead will likely cause the node to become CPU bound and the potential failure/timeout of the primary function, the Authentication of Users/Computers.
Check if Ingress Daemons are Running
As a part of the Ingress framework, we have added two new daemons, check
they are running, if they are ‘Stopped’, then start them using the
controls as shown below.

Check on the Configured Inbound Ingress Listening Port
As shown above there are a couple of daemons, one of these, the logger
service is responsible for listening on the TCP/UDP port defined below
[default 514] and ingesting the syslog records on that port, configure
the TCP/UDP port from the following location **Administration > Server
Manager > Server Configuration > [Your CPPM Node] > Service
Parameters [select Ingress logger]… set the TCP/UDP port number
required.

Configure Ingress Events Dictionary
This is the actual file which takes the structured/unstructured syslog
and turns it into fields/attributes that we can reference within a
Namespace. This section of the configuration requires some knowledge of
Groks, especially when adding a new Vendor. We supply multiple IEE
dictionaries by default and will add more over time. We have provided
dictionaries for Juniper, Palo-Alto, CheckPoint and InfoBlox. As you can
see below the supplied dictionaries are disabled. Only enable the
required dictionaries.

Here you will want to import two new IEE dictionary for Meraki System
Manager. One dictionary is used for the polling notifications that
provides rich device detail to where we can trigger action on an
authenticated device. The other dictionary is used for real-time Alert
notification via the Meraki Webhook. Currently the Alert notifications
contain very limited information.

Add an Event Source
Next we need to define the event source, go to Configuration >
Network > Events Sources > [Add your node].

Add an Enforcement Profile
We need to create a policy under Configuration > Enforcement > Policies that we will use to trigger an action for notification.
Example for Notification Profile
This example is created for email notification, but different
notification types can be configured. This is to handle the minimal
information provided in Alerts, in some circumstances admins may want
some type of notification for device policy change state.

Add an Event Enforcement Policy
Next create an Event Enforcement Policy. Create this under
Configuration -> Enforcement -> Policies [add] be sure to select
as highlighted below of the Enforcement Type as Event.

Based upon the Meraki System Manager Event Dictionary you enabled, it
will determine what is available here in the rules definition. Then
expanding the namespace ‘Name’, we see all the fields that are
configured in this Ingres Event Dictionary.

In this case we do a check to demonstrate the configuration for a device
policy violation notification from the Extension polling. We set the
policy to trigger a session re-auth if we see the words “security_policy_violating” in the violatingPolicy field. The other
one is for a real-time Alert notification generated by the Webhook. We
set the policy to trigger an email if we see the words “Clients are
violating” in the alertType field.

Add an Event Service
Now that all of the parsing/enforcement is completed, add the Event
Service. Create this under Configuration -> Services -> [add
‘Event-based Enforcement’].

Then set the Service Rule conditions that will trigger the service.

CPPM Access Tracker Logs Examples
Below is an example of the logs that get posted in the CPPM Access
Tracker when an ‘Event’ occurs. The below is filtering just on
‘Events’ in Access Tracker.


Appendix A – Troubleshooting and Support
Here we list some basic troubleshooting steps. If you need any help beyond this, please reach out to HPE Aruba Networking Support.
Check API Access Application Control restrictions
If you’ve previously hardened your ClearPass deployment with Application Access Controls, it’s possible that the Extension will not work. Reviewing the Extension Log might show something like the following after immediately starting the Extension. This likely indicates the ClearPass Application API’s are in place.
Example of Extension authorization failure due to Policy Manager Application Control:
[2020-03-16T15:42:21.083] [INFO] Intune - Server listening on port 80.
[2020-03-16T15:42:21.243] [DEBUG] Intune - Request “GET ‘https://172.17.0.1/api/server/version’” took 51.91ms.
[2020-03-16T15:42:21.245] [DEBUG] Intune - <!DOCTYPE html><html>
<head>
<title>
Error 403 (Forbidden)
</title>
<script language=“javascript”>
function reloadPage() {
var locHref = window.location.protocol + “//” + window.location.hostname;
window.location.href = locHref;
}
</script>
To resolve this issue, add the IP address of the Extension to the list of nodes permitted to access the API by navigating to Administration > Server Manager > Server Configuration {choose your node} > Network
INFO
For this reason its good practice to fix the IP address of the extension at installation time such that it doesn’t change over time and break the application controls.
Checking on the Extension Service
The ClearPass Extensions are supported by a system service which must be running.
Restarting this service will affect all deployed and running extensions.
To check on the state of the Extension Service, or to restart the service, go to Administration > Server Manager > Server Configuration > [SERVER] > Service Control. By default this service is automatically started.
Extensions and web proxy / firewall whitelisting
If ClearPass Policy Manager has been configured with a proxy, it’s still possible that domain whitelists are required, the same for some datacenter firewall to allow the installation of Extensions. Some enterprise customers maintain a whitelist of domain that are allowed to transit the proxy/firewall. The underlying docker configuration process uses standard docker registry access to pull images (hosted in docker hub). In general, the following hosts are used:
INFO
-
extensions.clearpassbeta.com
-
registry-1.docker.io
-
index.docker.io
-
auth.docker.io
-
production.cloudflare.docker.com
This is all also geo dependent to some degree and based on various AWS services, so AWS redirects and geo location services will vary. Finally, this all runs via standard HTTPS (port 443).
Extension Logs/Enable Debugging
If you have a requirement to access and view the logs from the Extension, you can turn on different logging levels from the Extension GUI. Adjust the logLevel to ‘DEBUG’ and restart the extension as shown below.
Logs can then be viewed from the ‘Show Logs’.
Remember after changing the logging level, as with any extension configuration change the extension will need to be restarted for this change to take effect.
Accessing the extension logs using ‘Collect Logs’ system function
In addition to viewing the logs as shown above, logs can also be collected and examined via the Policy Manager Collect Logs system function (Administration > Server Manager > Server Configuration > [Select SERVER] > Collect Logs). This is extremely useful should you have a need to call for technical assistance.
If the support team needs to investigate a system issue, one of the items they regularly ask for is the system logs to aid with their diagnostic investigation. By default the “logLevel” is set to INFO, but TRACE, DEBUG, INFO, WARN, ERROR, FATAL can also be set as required. Any of the levels will display the information for the selected state and lower; if INFO is selected, it will show messages for INFO, WARN, ERROR, FATAL.
After the logs have been collected, downloaded and expanded, you can locate the extension logs in the following location in the folder structure PolicyManagerLogs > extension > your-extension-id as shown below. Note the file-name is the same as the running instance ID of the extension.
Monitoring extension statistics
There is a way to monitor extension’s critical resource statistics with the configurable parameter added as part of the extension’s configuration. To enable extension statistics set the “enableStats” parameter to true. Remember a restart of the extension is need to activate the change anytime the config is modified.
To navigate to statistics page, click Show Details.
This will show statistics similar to the following:
Monitoring authorization performance
Since we are authorizing against an external system, it could be relevant to monitor the performance of these transactions as you setup and deploy. If you suspect there is a performance issue, ClearPass provides a way to monitor the authorization processing time. The graph below shows an example of this data, navigate to Monitoring > Live Monitor > System Monitor [click on ClearPass Tab, then select [Authorization]….
Appendix B – Considerations for Installing in a Cluster
Extensions are not synced between ClearPass cluster members, and thus must be installed on each member separately.
Some Extensions can run in two modes: Periodic Sync Mode and Authorization Source Mode.
Periodic Sync Mode
If you are configuring the extension to poll external system periodically and utilize the resulting ClearPass Endpoint database during endpoint Authorization, then you only need to install the extension on one cluster member, often the publisher.
You may wish to install the extension on a second cluster member as a backup, but remember that both extensions will individually be updating the endpoint database. You may want to stagger the updates between the two extensions, for example, Subscriber1 updates at the top of the hour and Subscriber2 updates at 30 minutes after the hour.
Also, in this mode there is no need to explicitly enter an IP address during installation. The defaults will suffice and ClearPass will select an IP in the range specified in the server configuration.
HTTP Authorization Source Mode
In this mode we configure an HTTP Auth source that results in a HTTPS call to external system during endpoint authorization. In this deployment model the extension must be installed on every cluster node that process authentications. Also in this scenario every cluster member’s extension must be set to the exact same IP address during installation time, as the HTTP Auth source configuration is propagated globally across all cluster members.
For example, if the extension IP range is 172.17.0.0/16, we would set the extension to 172.17.0.5 on every cluster member during installation of the extension.
While we normally want to avoid duplicate IP addresses in a network, this is not a concern with ClearPass extensions. Each ClearPass node communicates internally only with its own extension, and this traffic is not routed outside of ClearPass.
Subscriber nodes support the same ability as publishers to install an Extension from the Extension store.
Appendix C – endpoint sync schedule settings
The syncSchedule and similar scheduling parameters sets how often ClearPass executes certain actions like syncing or pushing endpoints. This setting is based on a slightly modified version of the CRON job scheduler found in Unix-like operating systems. It can be used to schedule jobs to run periodically at fixed times, dates or intervals.
A ‘cron’ is a job scheduler. Any scheduled task is called a ‘cron job’. The syntax for a cron job schedule is as follows:
In our use of the cron scheduler, we’ve dropped the use of the last instruction ≤command to execute> and use only the time/date functions, see below for a number of examples of scheduling a sync process.
-
Schedule a sync to run at 2am daily:- 0 2 * * *
-
Schedule a sync to run twice a day at 5am and 5pm:- 0 5,17 * * *
-
Schedule a sync to run on every Sunday at 5pm:- 0 17 * * sun
-
Schedule a sync to run every 30 minutes:- */30 * * * *
-
Schedule a sync to run at 5pm on selected days:- 0 17 * * sun,fri
You can see from the above that the scheduling process is extremely flexible, alternatively https://crontab.guru/ is a great page for learning more about CRON scheduling.
Appendix D – Extension performance optimizations
Extensions are a critical part of ClearPass deployments today and with the increased dependency on extension interactions that involve periodic polling or real-time lookups, here are some of the best practice recommendations around optimizing overall performance when using extensions:
-
If the extension is used to periodically poll external systems and populate endpoint repository, ensure that it is not installed in all the nodes in the cluster. Ideally these type of extensions should only be installed on the publisher node since only publisher node can add endpoint entries to the database. For redundancy, it can be installed on another additional node but it is recommended to stagger the polling interval so that both do not attempt to poll and update endpoint database at the same time.
Example: 0 * * * *, This cron job runs at minute 0 of every hour (e.g., 00:00, 01:00, 02:00, etc.).
30 * * * *, This cron job runs at minute 30 of every hour (e.g., 00:30, 01:30, 02:30, etc.). -
If the extension is used for looking up attributes from external systems in real time during authentication, it should be installed in all the nodes handling authentication. Note that the context server config is replicated from the publisher. When using extension for real time lookup, ensure that the extension has the same IP address in all the cluster nodes.
-
If the extension is expected to do both real-time lookup and periodic polling, ensure that polling is enabled only on the publisher while the extension in subscribers can have the polling disabled by setting the “enableSyncAll” attribute to false.
"enableSyncAll": false,
WARNING
Having the extension installed on all the cluster nodes with enableSyncAll set to true would cause each cluster node to independently poll the external system and update endpoint repository. This could impact the performance of ClearPass. Hence it is strongly recommended to enable endpoint sync only on the extension installed on the publisher and on another cluster node for redundancy.
-
Some 3rd party systems support fetching delta updates vs fetching all of the device information every polling cycle. The extensions that support fetching delta updates are: Workspace ONE Crowdstrike Falcon Microsoft Intune Mosyle SentinelOne Service Now
For these extensions, the syncUpdatedOnly attribute should be set to true in extension config so that the number of DB updates in ClearPass is minimized
"syncUpdatedOnly": true,For extensions that do not support syncUpdatedOnly, ensure that the sync interval is not aggressive. We recommend syncing at most twice a day and that too during off peak hours whenever a full sync is performed.
-
Some 3rd party systems can be very noisy in terms of attribute updates. There could be certain attributes that keep changing every sync interval like “Free Memory in Bytes”, “Last Check in Time” etc. There is no value in updating endpoints when such trivial attributes change for the device. Hence it is recommended to use “ignoreEndpointDifferences” attribute in extension configuration to ignore change in attributes that you do not care about in terms of ClearPass policies.
You can review the Audit Viewer in ClearPass under Monitoring > Audit Viewer to see what attributes are being updated for endpoints to check if there are unnecessary updates.
Sample for JAMF extension:
"ignoreEndpointDifferences": "Last Update, Report Date UTC, Last Contact Time UTC, Last Inventory Update UTC, Last Reported IP, IP Address",Default for Microsoft Intune extension:
"ignoreEndpointDifferences": "Last Sync Date Time, Free Storage Space in Bytes", -
To further optimize the number of endpoints being updated in ClearPass, you can specify which attributes are being used in the ClearPass policies so that only changes to those attributes would trigger an update to the endpoint. This is done by listing out the specific attributes under endpointAttributes in extension configuration.
Sample for JAMF extension:
"endpointAttributes": "Group names, MDM Enabled, Managed, Remote Managed, Supervised, Serial Number", -
Setup extension to restart unless it was intentionally stopped. A restart policy can be defined in extension configuration to ensure that the extension starts up automatically after server reboots and such. Restart policy of “unless-stopped” would ensure the extension always starts up unless it was manually stopped.
“restartPolicy”: “no” — The extension will not be automatically restarted after the server is restarted.
“restartPolicy”: “always” — The extension will always be restarted after the server is restarted.
“restartPolicy”: “unless-stopped” — The extension will be restarted unless it was stopped prior to the server restart, in which case it will maintain that state.
“restartPolicy”: “on-failure:N” — If the extension fails to restart, the value for “N” specifies the number of times the extension should try to restart. If you do not provide a value for “N”, the default value will be “0”.
The “restartPolicy” parameter is not present by default in extension configurations. When it is not present, if the system is restarted a default policy is applied to the extension to maintain the state it was in before the restart. If the “restartPolicy” parameter is added to the configuration but later removed, the extension will then revert to the default restart policy.
Periodic Sync Mode
If you are configuring the extension to poll Meraki System Manager periodically and utilize the resulting ClearPass Endpoint database during endpoint Authorization, then you only need to install the extension on one cluster member, often the publisher.
You may wish to install the extension on a second cluster member as a backup, but remember that both extensions will individually be updating the endpoint database. You may want to stagger the updates between the two extensions, for example, Subscriber1 updates at the top of the hour and Subscriber2 updates at 30 minutes after the hour.
Also, in this mode there is no need to explicitly enter an IP address during installation. The defaults will suffice and ClearPass will select an IP in the range specified in the server configuration.
Ingress Event Processing
In this scenario we configure ClearPass Policy Manager to process event notifications. For a complete and more detailed overview of Ingress Event Processing and cluster consideration please review the technote “CPPM_TechNote_-_Ingress_Event_Engine_V1.0.pdf”
5.4 - Microsoft Intune
Version History
This integration is implemented through ClearPass Extensions which run independent of the ClearPass platform version. Hence extensions can be updated and released outside of ClearPass release cycles.
What’s new in ClearPass Intune Extension v6.4 ?
Support for HTTP caching for User and Device Group queries
In this release, support for HTTP caching is added for User and Device group queries to the Intune extension. ClearPass policies that use Intune extension as the authorization source for real time User and Device group queries can now be cached with a configurable TTL cache timeout. This avoids frequent HTTP real-time calls from the Intune extension to the Entra ID tenant for User and Device group queries improving the performace of the overall integration components.
The following configuration knobs are added to the extension which are hidden by default. Adding these knobs with the below settings on the extension configuration will enable the HTTP caching for User and Device group real time queries.
“httpCacheTtlInSeconds”: 30, - HTTP Cache TLL in seconds defines the cache timeout. E.g 30 seconds
“httpCacheMaxEntries”: 100, - HTTP Cache Max Entries should not exceed 100 for optimal performance.
Sample Configuration:
{
“logLevel”: “INFO”,
“verifySSLCerts”: true,
“httpCacheTtlInSeconds”: 30,
“httpCacheMaxEntries”: 100,
“azureADEndpoint”: “login.microsoftonline.com”,
“graphEndpoint”: “graph.microsoft.com”,
“tenantId”: “xxxxxxxx”,
“clientId”: “xxxxxxxx”,
“clientSecret”: “xxxxxxxx”,
“syncPageSize”: 50,
“enableSyncAll”: true,
“syncAllSchedule”: “*/30 * * * *”,
“syncUpdatedOnly”: false,
“syncOnStart”: true,
“enableEndpointCache”: true,
“endpointCacheTimeSeconds”: 900,
“intuneAttributes”: null,
“enableUserGroups”: false,
“userGroupUpdateSchedule”: “*/5 * * * *”,
“bypassProxy”: false,
“enableStats”: true,
“statsUsername”: “whoever”,
“statsPassword”: “********”,
}
What’s new in ClearPass Intune Extension v6.3 ?
Support for Strong Mapping
With Intune extension version 6.3.3, we have made changes to align with Microsoft’s Strong Mapping requirements detailed below.
With the introduction of Strong Mapping feature the SAN URI field is now also used by Microsoft to insert a security identifier (SID) value for Microsoft Entra hybrid joined users/devices. This means that Intune managed clients in a Microsoft Entra hybrid joined environment when provisioned with a certificate using the Intune SCEP certificate profile will have SID tag in the SAN URI field of the certificate. This means that the Intune attribute used for real time lookups now comes in the SAN URI field of the certificate along with the Strong Mapping SID attribute as comma seperated strings in ClearPass. It is therfore important for us to be able to extract only the Intune Device ID attribute from this field to make API calls for real time lookups.
This release supports parsing of the Intune Device ID attribute from the comma seperated string that comes in the SAN URI field to make API calls for real time lookups on Intune. Therfore, all customers adopting the Strong Mapping feature are required to upgrade to this release of the Intune extension. Starting Jan 2025 the Strong Mapping adoption is expected to be enforced on the overall windows ecosystem after which the key distribution system (KDC) will check if certificates have the security identifier during certificate-based authentications.Upgrading to this extension release will therefore not be optional once Microsoft enforces Strong Mapping for Microsoft Entra hybrid joined users/devices.

The URI attribute “{{OnPremisesSecurityIdentifier}}” is required on the Intune SCEP certificate profile to add the Strong Mapping SID value in the SAN URI field once Strong Mapping is enabled for the Intune tenant by Microsoft.

New Recommendation around using alternate Intune ID to support Device / User Group Lookups
INFO
The following are only recommendations and not mandatory settings. They also only apply to environments that need device or user group lookups using Intune extension. With ClearPass release 6.12 Device group lookups against Entra ID is also supported natively along with User group lookups.
For customers using Intune extension as real-time AuthZ source to do user and device group lookups, we use the Intune Device ID from the SAN URI field of the certificate to fetch the Intune attributes and parse the User ID / AAD_Device_ID to then make another call to fetch either the user or device group information. This adds an additional API call for getting the User ID / AAD_Device_ID as part of Intune attributes (Using Intune Device ID) first and then using that information to do the user or device group lookup. However, if the AAD_Device_ID and the UserPrincipalName if already present in the SAN / CN field of certificate we can save an API call for better performance in high client density environments to directly parse them from the certificate and make the API call to fetch the user or device group lookup directly without having to make that extra API call to first fetch those attributes as Intune attributes (Using Intune Device ID) first then make the second call.
To address this we have added support for KEY:VALUE pair when more than one ID is included in the SAN URI field or when using AAD_Device_ID. AAD_Device_ID can fetch both Intune attributes and device group information. UserPrincipalName fetches the user group information and Intune Device ID only fetches the Intune attributes. Given below are the examples to setup Intune SCEP certificate profile to use KEY:VALUE pairs for different ID’s. Note that making changes in the below fields would require the configured Certificate Authority to re-sign / issue new certificates for the clients.
Supported KEY:VALUE pairs are as follows. The KEY names used are same as the variable names that Intune supports in the SCEP profile. Please refer the below link from Micrsoft for details.
https://learn.microsoft.com/en-us/mem/intune/protect/certificates-profile-scep
- DeviceId:{{DeviceId}} - Used for Intune attributes lookup.
- AAD_Device_ID:{{AAD_Device_ID}} - Used for both Intune attributes and Device group membership lookup.
- UserPrincipalName:{{UserPrincipalName}} - Used for User group lookup only when user group lookup using extension is enabled.
The order of priority for querying Intune using these attributes during real-time AuthZ is DeviceId, AAD_Device_ID and finally the standalone value. Any attribute value in the SAN URI that does not have any one of the above KEYs before them is considered as a standalone value and is considered as DeviceId by default to maintain backward compatibility for environments that are already setup with DeviceId in the SAN URI field of the client certificates for real-time lookpus against Intune or environments that have Strong Mapping enabled. These recommendations as noted above are optional and environments that use only the DeviceId value (wthout the KEY:VALUE pair) in the SAN URI field is still supported for both Microsoft Entra hybrid joined users/devices and Microsoft Entra only joined users/devices.


INFO
Supported special characters in the KEY variable names are “_” and “-”. KEYS can be set in any case as required but it is strongly recommended to use the same variable names that Intune supports in the SCEP profile. Supported variables can be found in the following Microsoft Intune documentation https://learn.microsoft.com/en-us/intune/intune-service/protect/certificates-profile-scep#create-a-scep-certificate-profile
For more information on how to use the extension in HTTP Authorization Mode please refer to the Configuring ClearPass Policy Manager as an HTTP authZ source section of this document.
What’s new in ClearPass Intune Extension v6 ?
Microsoft released the Compliance Retrieval service with the Intune June 2021 service release. This new service is intended to replace the Intune NAC service, and includes changes to improve the security, reliability, and privacy of the NAC service. For example, it uses lookup by Intune device ID only, which removes the dependency on internal identifiers, such as serial numbers, which are not consistently accessible. It also eliminates MAC address identifiers, which are problematic because devices can have multiple or randomized MAC addresses. The new service is also streamlined to return only enrollment and compliance data from Intune. Any other device data not related to access control is eliminated from this service.
Intune Extension v6 adheres to the main requirement to use certificate-based authentication (e.g. EAP-TLS) with the new service. In conjunction with this, it is required to include the Intune device ID in the subject alternative name (SAN) of your certificate profiles. Please refer to Appendix E for more details on SCEP certificate profile configuration.
As noted below, Intune Extension v5 made a major move to use Microsoft GraphAPI. However, we encountered an issue with GraphAPI when syncing with Intune to retrieve device attributes as it did not support pulling the Ethernet MAC address attribute (wired interface). We addressed this with a workaround that utilizes real-time lookup by Intune device ID to pull the Ethernet MAC address attribute and have it stored in the endpoint DB. Please refer to the section “Utilizing HTTP Authorization Mode to Retrieve Specific Device Attributes” for more details.
INFO
The following are recent changes done by Google that impact Android devices in Intune: (1) Removal of serial number, IMEI, and MEID on personally-owned work profile devices [running Android 12] and (2) Removal of Wi-Fi MAC address on newly-enrolled device administrator and personally-owned work profile devices [running Android 9 and above]. For more information, see the Android Day Zero Support with Microsoft Endpoint Manager blog post.
What’s new in ClearPass Intune Extension v5 ?
In this MAJOR update the integration changes fundamentally how it works. You MUST read the ‘change in behaviors’ below to understand how this might affect how you use this Extension. We feel this change is for the better, we’ve constantly had customers telling us that the authN event-driven approach was not how they liked or wanted this integration to work. Previously we had been restricted to using the “Intune NAC-API”, however this version uses the Microsoft GraphAPI, this open up a list of new features and some changes.
-
Batch Ingest all Tenant endpoints like other UEM vendors
-
Only sync updated endpoint context after previous sync
-
Send CMD’s to Intune to ‘run’ against endpoints
-
Lock Screen
-
Wipe Device
-
Shutdown Device
v5 - Change in Behavior
It is important to note that this Extension works in a different way to the previous Intune extensions, it does not query Intune on each and every authN {or reference cached data as in previous versions} thus it’s not an authZ source like before, though an authZ use-case exists it works differently from the previous version.
This integration works by ingesting all of the endpoint with a customer’s tenant, this is inline with how every other UEM integration fundamentally works. However, because of the API changes we can’t query based upon the authenticating mac-address, more on this later. With the v5 we have to use the EndpointDb as the authZ source, so depending on the sync schedule, this will determine the fresh ‘v’ stale view of the data.
There is an option to query real-time Intune, however there is an assumption that the endpoint is already managed by Intune and you’re only querying for current data. You could have an authZ rule such as Endpoint Source=Intune trigger a CSA profile for an update, and if Source != Intune trigger a different CSA profile. The reason behind this is that the query exposed in GraphAPI is based on the Azure DeviceID {AZID}, so for ClearPass to query for an endpoint update it needs the AZID, which it has from data already synced, the Extension uses the mac-address of the authenticating device, looks up the AZID in the ClearPass endpointDb before it can query Intune.
For this reason the previous process of using a real-time query based upon mac-address for found/not-found devices in Intune needs to be adjusted, perhaps validating an endpoint has an AZID attribute value.
INFO
As/If you move to this v5 you must carefully consider the adjustments that may be need in your work flow and configuration and how you use the Intune data ingested into the endpointDb repo.
What’s new in ClearPass Intune Extension v4
In v4, we added the capability to cache Intune attributes for a configurable time. This allows device attributes from Intune to be written to the Endpoint Repository of ClearPass. If a device authenticates within the cache period, ClearPass would not send requests to Intune Authorization source, rather use the attributes cached in the Endpoint Repository. This helps reduce the number of API calls to Intune.
What’s new in ClearPass Intune Extension v3
Enabling Intune NAC API to ingest endpoint ownership such as it can be used in Policy within ClearPass
INFO
Intune v2 was never released publicly
What’s new in ClearPass Intune Extension v1
The first Intune extension for ingesting endpoint data, based upon a 1:1 API call due to limited ability in Intune to ingest ALL endpoint in a tenant.
Software Requirements
The minimum software version required for CPPM is 6.11.0 . At the time of writing, version 6.11.10 is available as the long supported release and 6.12.4 is available as the short supported release. CPPM runs on hardware appliances with pre-installed software or as a Virtual Machine under the following hypervisors. Hypervisors that run on a client computer such as VMware Player are not supported.
-
VMware vSphere Hypervisor (ESXi) 7.0 U3c and 8.0
-
Windows Server 2019 with Hyper‑V and Windows Server 2022 with Hyper‑V.
-
KVM on CentOS Stream 8, CentOS Stream 9, Ubuntu 20.04 LTS, and Ubuntu 22.04 LTS.
ClearPass Installation and Deployment Guide
This document assumes your ClearPass environment is already configured and operational. If you require assistance with basic deployment, refer to the following deployment guide:
https://arubanetworking.hpe.com/techdocs/ClearPass/6.11/Installation-Guide/Default.htm
ClearPass Extensions
The integration between ClearPass Policy Manager and external systems is driven through a ClearPass capability known as Extensions, a sub-component of the ClearPass Exchange Integration framework. ClearPass Extensions are micro-services running on top of the base ClearPass platform. These micro-services enable HPE Aruba Networking to deliver new features outside of the main software release cycle and facilitate a faster time to market for specific features and integrations. Configuration and control of ClearPass Extensions is accomplished through the ClearPass Guest GUI, as covered later in this document.
Installing Extension
ClearPass Extensions are easy to install from the ClearPass Extensions Store. In a cluster, ClearPass Extensions can be installed on a subscriber independently of the publisher. Multiple copies of the same extension can be installed if needed as well.
INFO
Internet access is required for ClearPass Policy Manager to install the ClearPass Extensions from the Extension Store. Starting with ClearPass 6.12, extensions can be can be installed offline as well. Offline ClearPass Extension images are available on HPE networking support portal.
Access to the extension store
Access the Extension Store to download and install ClearPass extensions. The Extension store utilizes the same HPE Passport account credentials used to validate support entitlement in the Software Updates Por- tal. This is configured under Administration > Agents and Software Updates > Software Updates as shown below. Ensure that valid HPE Passport credentials have been entered in these fields to enable Ex- tension download capabilities.
Installing the Extension from Store
Extensions are installed from the extension page in ClearPass Guest, as shown below. Access it from Guest > Administration > Extensions
From here, click on ‘Install Extension’, and the search box below appears.
Enter “Intune” and click on ‘Search’, see the example below.
INFO
Here we are using Intune as an example. The installation steps are the same for all the extensions. For your deployment, please search for the appropriate extension like Jamf, Mosyle, Crowdstrike, etc.
All currently available extensions are listed in the page: https://www.arubanetworks.com/techdocs/NAC/clearpass/integrations/clearpass-extension/extensions-list/
Click on the extension name and then click “Install.”
In the “Install Extension” dialog box, set the IP address if necessary, as described in section “Extensions and IP address configuration support” below. Do not check the box to start the extension at this time. Click the “Install” button.
In this example, we’ve not entered an IP address for the extension to use, if there is intent to use the extension as an authorization source set this value and ensure its set the same on all nodes where the Extension is deployed.
The extension will download and appear in a “Stopped” state. Notice the options to Start, Delete, Reinstall, Show Logs, and view Configuration. Click on “Configuration” to view settings.
After the extension has been installed, proceed to configure the extension
A copy of the default Extension configuration is shown above, this will need to be modified for your deployment.
INFO
Password and sensitive configuration items are obfuscated when presented in both the Extension GUI or in the Explorer configuration.
WARNING
The configuration attributes are case sensitive. It is recommended to refer the default configuration sample while editing your configuration.
Extensions and web proxy support
Extensions support communications with 3rd parties via a web proxy. This adds incremental proxy functionality. If a proxy is defined in ClearPass Policy Manager, then an extension will inherit that configuration. See later in the document on how to disable the proxy inherited configuration.
INFO
Note that the Policy Manger web proxy configuration is ONLY read by the extension at installation time. If the web proxy configuration is changed in Policy Manager, then the extension must be re-installed so the new settings are re-read and bonded to the extension.
Extensions and IP address configuration support
ClearPass uses a non-externally routed IP address range to communicate with the Extension. The default is 172.17.0.0/16. You may configure a different range, if desired. This is especially useful when deploying extensions across nodes within a cluster where there is the requirement for a fixed consistent IP address for the extension across the cluster.
Changing the “Extensions Network Address” range is only necessary if either the ClearPass MGMT or DATA interface are using an IP address in the extension default range of 172.17.x.x/12, or if ClearPass needs to communicate with some external device in that range.
To Configure the base Extension IP subnet within Policy Manager navigate to Administration > Server Manager > Server Configuration [chose your node] Service Parameters [ClearPass system service].
INFO
The subnet defined here for the extension framework must fall within the following subnet range 10.0.0.0/8, 172.16.0.0/12, 192.168.0.0/16 as defined by RFC1918. For best results, set the network address range to a subnet that does not exist in your enterprise, and restart the extension service for this change to take effect.
Never set the DATA or MGMT IP address to use an address that matches the Extension Network
INFO
Note that changing the extension base IP address will require the extension service to be restarted.
Pictorial View of the Integration
The extension can be configured for two different modes of operation.
Periodic Sync Mode:
In this mode ClearPass polls Intune periodically and updates the ClearPass Endpoint database with attributes obtained from Intune. These attributes can be utilized in ClearPass during endpoint Authorization. This mode has a simpler configuration demand, however, the data provided may not be completely up to date at authentication time.
HTTP Authorization Source Mode:
In this mode we configure an HTTP Auth source that results in a real time API call to Intune during endpoint authorization. Information in this case is more up to date, but there is a higher overhead of an API call during endpoint authorization, remember we only query for already known/ingested endpoint context. A view of this process is below.

Configurations Steps
There are primarily 4 steps involved in getting this Integration configured.
-
Configuring and Collecting Information from Microsoft to Configure Intune extension
-
Installation and Configuration of the Intune Extension
-
Configuring ClearPass Intune Extension to sync endpoint data from Intune to the EndpointDb
-
Configuring ClearPass Policy Manager to use already ingest endpoint context from Intune or configure an Authorization source for real-time updates.
Collecting Information to Configure Intune extension
INFO
Below we cover the process of adding a ‘ClearPass App’ into Azure as an application and enabling the necessary application level permissions. Think of this as the gateway between ClearPass and Microsoft Intune.
It is assumed you have Intune/Azure environment already setup and configured. The setup of these environments is beyond the scope of this TechNote.
In order to complete the integration, you need to collect multiple pieces of information from Intune and the Azure platform when configuring the ‘ClearPass App’ that are required to complete the extension configuration. The goal is to collect information to complete the highlighted attributes below in red:
{
“logLevel”: “INFO”,
“verifySSLCerts”: true,
“azureADEndpoint”: “login.microsoftonline.com”,
“graphEndpoint”: “graph.microsoft.com”,
"tenantId": "xxxxxxxx",
"clientId": "xxxxxxxx",
"clientSecret": "********",
“syncPageSize”: 50,
“enableSyncAll”: true,
“syncAllSchedule”: “*/30 * * * *”,
“syncUpdatedOnly”: false,
“syncOnStart”: true,
“enableEndpointCache”: true,
“endpointCacheTimeSeconds”: 900,
“intuneAttributes”: null,
“enableUserGroups”: false,
“userGroupUpdateSchedule”: “*/5 * * * *”,
“bypassProxy”: false,
“enableStats”: true,
“statsUsername”: “whoever”,
“statsPassword”: “********”,
}
Login to https://portal.azure.com. Log in using your Intune Tenant Admin account. We assume here you have already identified and configured at least one of your Intune accounts with Administrator rights.
Once logged in, open “Azure Active Directory” and select “App Registrations”. In “App Registrations”, click on “New registration” menu. Provide a name to identify this application, something like “ClearPass Intune Integration”. Use all the default values when defining the new application, click on ‘Register’.

After clicking on Register, in the next screen for the application previously created, record the clientId and the tenantdID as highlighted below. Collect these string as they will be required later to complete the Extension configuration.

Next the permissions must be configured for the new application. To the left on the navigation tree, click on ‘API permissions’ followed by ‘Add a Permission’

Next, click on ‘Microsoft Graph > Application permission’, add the permissions listed below. Next click on ‘Intune > Application permission’ add the permissions listed below.
 TIP
TIP
Check Appendix F for details about permissions required for the application. We have a detailed breakdown of permissions needed for each use case. Only enable the appropriate permissions as required by your setup.

At this stage all of the permission should be added, but show as ‘Not granted for…..’ Click on ‘Grant admin consent for XXX’

Confirm on the request for granting consent for the requested permissions.

Ensure you see a successful confirmation of this process, as the below two screen images indicate.


One final step in this section, create a secret. From the navigation pane on the left side, click on ‘Certificates & secrets’, then under ‘Client secret’ add a ‘New client secret’, provide a descriptive description, choose the expiration and be sure to make a note of the expiration date. Depending on your sensitivity to password rotation and corporate policy, this is ultimately your decision. You can configure a new password at any time, change its duration accordingly as long as you match this to the secret configured in the Extension.

Before you leave this screen record the client-secret shown below as this is also required to complete the configuration of the Intune extension.

Configuring ClearPass Intune Extension to sync endpoint data
It’s important to set the configuration within the Extension to meet your needs. The extension can be configured to sync data in multiple ways as well as be used as a “real-time” authZ to Intune. Not all configuration settings need to be set but some are mandatory. We have divided the parameters into two tables, one for Intune Extension-specific configuration parameters and the other for extension framework configuration parameters that are common across multiple vendor Extensions.
Table 1: Intune Extension-specific configuration parameters
| Attribute | Description | Values/Examples | |
|---|---|---|---|
| tenantId | Azure Tenant ID for the instance, as previously recorded. | XXXXXXXXX-b3e5-12ab-34cd-ZZZZZZZZZZZ | |
| clientId | The API Client ID configured for the Intune instance, as previously recorded. | 123abcde-45fg-67hi-jk89-1234567890a | |
| clientSecret | The Client Secret that corresponds to the clientId, as previously recorded. | XyzYZ123456-aabbccddeeff123-abcfgh12= | |
| syncPageSize | The page size used when puling data from Graph. | 50 | |
intuneAttributes {See below for a more detailed explanation of this field} |
This setting allows the user to restrict the requested attributes from Intune. The setting requires an array of strings, each string being an attribute to include. |
Example:
|
Common extension attributes
Extension framework configuration parameters (common configuration)
| Attribute | Description | Default Values |
|---|---|---|
| logLevel | Logging level for troubleshooting | “INFO” |
| verifySSLCerts | Should SSL certificates be validated when communicating with external context sources | true |
| enableEndpointCache | Cache endpoint attributes to optimize authorization queries, avoid repeated DB queries and reduce API calls to external context sources | true |
| endpointCacheTimeSeconds | The duration in seconds to cache the endpoint attributes | 300 |
| syncUpdatedOnly | If this option is set to true, only the endpoints updated after the previous sync would be fetched from the context source. Note that this option only works for the third-party context sources that have APIs to support this functionality. If this option is set to false, all endpoints are fetched at every sync interval. |
true |
| syncAllOnStart | If this option is set to true, when the extension starts, the system will attempt to sync all endpoints in the external context source to ClearPass. Note that if you have a large number device context to be fetched, it would take a long time for the initial sync to complete. When used along with syncUpdatedOnly, the subsequent syncs should be faster. |
true |
| enableSyncAll | Enable periodic sync of all endpoints | true |
| syncAllSchedule | The schedule for when the Sync All Endpoints process should run. Note: This uses CRON type scheduling. |
0 2 * * 6 |
| enableStats | Enable display of extension statistics | false |
| statsUsername | Create a username to access the extension statistics page | Give any username you want to use |
| statsPassword | Create a password to access the extension statistics page | Give any password you want to use |
| bypassProxy | Bypass the web proxy configured on ClearPass Policy Manager | false |
Mandatory fields are; tenantId, clientId, clientSecret obtained earlier.
Configuration of syncSchedule is covered in more detail in Appendix D at the end of this documentation, this is used to control the frequency of when the sync process runs. syncUpdatedOnly when set to true, will only ingest changes for managed endpoints. syncOnStart determines if when the extension is started or restarted should it immediately run the sync process, or wait until the syncSchedule job is run.
The two values of enableEndpointCache and cacheTimeInSeconds are specifically used in conjunction with the extension is used as an Authorization source to retrieve real-time data for a known endpoint. If using the Extension in combination as discussed later with a HTTP authZ source which needs to do lookup based on Intune Device ID as following:
- GET /device/info/id/:intuneId
Then these switches will ensure that if the extension is asked to refresh data, it will check the cacheTimeInSeconds to decide if the data current held is fresh or stale.
intuneAttributes is used to filter the returned data back from Intune, this can be used if there are large amounts of tenants or you just want to reduce the number of attributes returned and updated. This setting allows the user to restrict the requested attributes from Intune.
The setting requires an array of strings, each string being an attribute to include.
Example:
| ["complianceState", "deviceEnrollmentType", "jailBroken"] |
|---|
When blank, which is the default value when the extension is initailly installed, it will say null, all attributes from Intune will be returned and added to the endpoint database. If you populate a filter the following fields will always be included, ‘id’, ‘wiFiMacAddress’, ‘deviceName’, ‘model’, ‘osVersion’, ‘operatingSystem’.
The following values are valid optional attributes:
id, userId, deviceName, managedDeviceOwnerType enrolledDateTime, lastSyncDateTime, operatingSystem, complianceState, jailBroken, managementAgent, osVersion, easActivated, easDeviceId, easActivationDateTime, azureADRegistered, deviceEnrollmentType, activationLockBypassCode, emailAddress, azureADDeviceId, deviceRegistrationState, deviceCategoryDisplayName, isSupervised, exchangeLastSuccessfulSyncDateTime, exchangeAccessState, exchangeAccessStateReason, remoteAssistanceSessionUrl, remoteAssistanceSessionErrorDetails, isEncrypted, userPrincipalName, model, manufacturer, imei, complianceGracePeriodExpirationDateTime, serialNumber, phoneNumber, androidSecurityPatchLevel, userDisplayName, configurationManagerClientEnabledFeatures, wiFiMacAddress, deviceHealthAttestationState, subscriberCarrier, meid, totalStorageSpaceInBytes, freeStorageSpaceInBytes, managedDeviceName, partnerReportedThreatState
INFO
Note: If something is incorrect or a field that Intune doesn’t like to limit, it will cause errors. If this happens check or remove the configured values. A sample of this error is, “Parsing OData Select and Expand failed: Could not find a property named ‘XXXXX’ on type ‘microsoft.graph.managedDevice’.”
Leave dataPageSize, verifySSLCerts and logLevel at their default else otherwise advised.
An example of an Intune extension configuration is below. Include appropriate values for your environment based on the information gathered before, select Restart and click on Save Changes to start the extension.

Following the restart, click on “Show Logs”. If contact is made, and access is granted based upon the configuration above with your Intune tenant, you should see something similar to the below.

INFO
IP address assigned to the extension is “172.17.0.4”. This will be used when configuring Intune as an HTTP Authorization source within ClearPass Policy Manager. It’s likely the IP address of your Extension will differ.
Configuring ClearPass Policy Manager as an HTTP authZ source
Endpoint Sync Mode
After configuring the syncSchedule and starting the Extension, data should immediately start to appear in the EndpointDb, especially if syncOnStart is set as true, you can see this by filtering data as shown below.
Filter=Attribute equals Source contains Intune

After the initial sync is complete, it’s a simple process of utilizing the data in the EndpointDb inside Role-Mapping/Enforcement-Policy.
HTTP Authorization Mode
To complete the configuration to use the Extension as a ‘real-time’ authorization source, configure an HTTP authorization source within ClearPass. With Intune as an authorization source to the extension, ClearPass can receive the latest data from the Intune platform for previously ingested endpoints, presented under the authZ source. This is more real-time but consideration needs to be made relative to the number of API calls that would be made.

Click on Next. This will advance to the Primary Tab provide the connection details.
The Base URL IP address is what can be seen in figures above.

Set the Base URL as HTTP://IP_of_the_Extension/device/info/id/ and pay special attention to HTTP not HTTPS, and also the addition of “id/” in the path which is required in v6 of Extension.
It’s mandated that a Login Username/Password is entered, but it’s not used, so this can be set to anything.
Click on “Next”. This will advance you to the Attributes Tab where you need to provide the authorization attributes.
Click on “Add More Filters”. Provide a Name for the filter and then a filter query. It’s extremely important that the filter query is defined correctly. This is the query string that is sent to the Intune extension asking for context about the endpoint. The query is indexed off the Intune Device ID in the certificate of the authenticating endpoint. The Device ID can be referenced in the subject alternative name in the certificate (see Appendix E for more details).For completeness, the Filter Query is provided here, copy one of the options carefully corresponding to how the certificate is configured.
%{Certificate:Subject-AltName-URI}
Next build out the definitions of the attributes that will be returned from the Filter Query. These attributes will subsequently be used within our policy-evaluation and ultimately the enforcement policy applied. You can choose whatever attributes you want to be exposed under authZ based upon what you list here. A complete list is available in Appendix A, the first fields in BOLD listed in Appendix A translate to the fields you can enter when configuring the query results, a short example is below.

Once the HTTP authorization source is defined you can use the returned attributes in your policy processing. As an example lets view the returned attributes from the above from an authentication request in access-tracker.
Below can be see the result of a real-time query from Intune based upon the attributes configured in the above authZ source, this data has been returned and is available to the policy at authentication time.

Similarly, For fetching User group information as AuthZ attributes using the Intune extension the Base URL of the authentication source should be set as HTTP://IP_of_the_Extension//realtimeUserGroup/ and the filter query is indexed of the UserPrincipalName from the SAN field of the certificate. For the Device group information the Base URL of the authentication source should be set as HTTP://IP_of_the_Extension/realtimeDeviceGroup/ and the filter is indexed of the AAD_Device_ID from the SAN field of the certificate.
Fetching user group membership:


Fetching device group membership:


Utilizing HTTP Authorization Mode to Retrieve Specific Attributes
The HTTP authorization mode can be leveraged as a general method for retrieving specific attributes from Intune. This comes in handy when we need to overcome a limitation with GraphAPI when syncing with Intune to retrieve device attributes. One such limitation of GraphAPI is it does not support retrieving the Ethernet MAC address attribute (wired interface). In order to address this, we can add Ethernet MAC Address to the HTTP authorization source query and returned attribute as shown below:

INFO
It is important that “enableEndpointCache” is set to true in the Extension configuration.
This method utilizes real-time lookup by Intune device ID to pull the Ethernet MAC attribute and have it stored in the endpoint DB as shown below:

In the next section we cover options on how to use the results of the returned attributes from Intune in Role-Mapping or in an Enforcement-Policy.
Using data from Intune in a ClearPass Enforcement Policy
Multiple use-cases exist for how the data that is returned from Intune can be used in your policy enforcement. In the example below, we are performing multiple checks:
-
Check the device is a Corporately issued and managed device. If true then update the Palo Alto and Checkpoint corporate firewall with context about this device.
-
Check that the device is managed by Intune and that it’s compliant. In addition to allowing access for these devices, we’re also updating the endpoint with the authentication Date & Time so we can track the device’s access to the network.
-
If the device is not in compliance then we will apply a Quarantine role.
-
If the device is running an OS that is not 13.6 [assume iOS] then we flag it as an old-OS.
-
If the device is running an OS that begins with 13.6 [assume iOS] then we flag it as an approved-OS.
-
If the device is running Android OS then we attach a label of Android.
-
If the device is running Android OS then we attach a label of Apple.

The policy used in the screenshot above is just a reference. Different companies will have different enforcement profiles and policies. The key take away here is that it showcases the use of authorization attributes received from Intune to drive the policy engine into taking different enforcement actions for the device as they authenticate on the network. It is recommended to use these policies within Role-Mapping. Enforcement policies usually will not use an “Evaluate all” rules evaluation algorithm.
Sending updates and triggering actions on Azure enrolled Devices
Starting with the v5 Extension we’ve enabled some new capabilities in respect of how we can interact with the Intune managed devices. The framework adopted for v5 allows ClearPass Policy Manager to update endpoint attributes in Intune and trigger actions against managed devices.
Review this link to see a list of the possible actions; https://docs.microsoft.com/en-us/graph/api/resources/intune-devices-manageddevice?view=graph-rest-1.0
This list shows all of the supported actions that can be envoked against an Intune managed device, at this stage based upon request from customer’s we’ve implmented a small subnet of actions to gauge the need from our customers, if there are other actions required, please contact us.
-
Trigger a device-sync
-
Trigger a device endpoint update {very limited capabilities}
-
Trigger a device shutdown
-
Trigger a device wipe
-
Trigger a device remote lock
From the list of commands above in the link it can be seen that via a Context Server Actions {CSA}, any actions in theory can be sent via the Extension to Intune. Below are some examples of building out the CSA’s for the action’s supported.
Before configuring the CSA, you must configure a basic Context-Server pointing to the Extension IP-Address, pay specific attention to theServer Base URl of http://Extension_IP_address . Note that it is not https, after this configure the individual CSA’s shown below. in our working example 172.17.0.4 is the IP-address of the Intune extension, your IP will likely differ.

Next create the Context-Server-Actions.
Creating the remoteLock Action CSA
Depending on the action, there are several steps to check/configure.
Firstly, ensure the required permission in Azure have been configured. The permission to run the actions is additional to the base permission required to ingest the endpoint data. For example; reviewing the remoteLock actions from the link supplied above shows that a specific GraphAPI permissions is required.
TIP
Check Appendix F for details about permissions required for the application. We have a detailed breakdown of permissions needed for each use case. Only enable the appropriate permissions as required by your setup.

So be sure to add the permissions as necessary as per the above;

It likely after adding the new permission you’ll see a warning messages like below;

Ensure that you “Grant admin consent for XXXXX”, for the permission that was just added.

Once this above step is complete, you’ll see a message indicating success and the permission grant will change as shown below.

Following the configuration of the Context-Server and the configuration in Azure, configure the CSA in ClearPass.

Configure the CSA, chose the Context-Server previously configured {172.17.0.4 in our example}, configure as a POST, set Authentication Method equal to None and set the URL as /device/remoteLock/%{Connection:Client-Mac-Address-Hyphen}
Then the CSA needs to be added to a Enforcement Profile, configure it as the below as a post_authentication session-notification, then this can be added to an existing enforcment-policy rule.

When this is run succesfully in the Extension the following logs can be seen;
[2020-09-01T21:06:36.809] [INFO] Intune - [/device/remoteLock/:mac] request received from ::ffff:172.17.0.1.
[2020-09-01T21:06:37.023] [DEBUG] Intune - Request “GET ‘/endpoint’” took 213 ms.
[2020-09-01T21:06:38.091] [DEBUG] Intune - Request “POST ‘/deviceManagement/managedDevices/94ee89b5-55b0-4635-9f74-1f732dac8497/remoteLock’” took 1.067 Seconds.
[2020-09-01T21:06:38.091] [INFO] Intune - The action “remoteLock” was sent to Intune for device 94ee89b5-55b0-4635-9f74-1f732dac8497.
INFO
Based on customer feedback, if the NAD device deployed is not sending the framed IP address in the accounting packets, the “Post_Authentication Type” based enforcement profile does not get triggered/applied for the endpoint. A workaround for this to remove the dependency on the framed IP address in accounting is to use “HTTP Type” based enforcement profile instead to trigger the post authentication.
Creating the deviceShutdown Action {requires Supervised Mode on endpoint}

Configure the CSA as a POST, set Authentication Method equal to None and set the URL as /device/shutDown/%{Connection:Client-Mac-Address-Hyphen}, this CSA can then be attached to a enforcement-profile, which can then ultimatly be added to a service-policy to be triggered under certain matching conditions.
Appendix A – Troubleshooting and Support
Here we list some basic troubleshooting steps. If you need any help beyond this, please reach out to HPE Aruba Networking Support.
Check API Access Application Control restrictions
If you’ve previously hardened your ClearPass deployment with Application Access Controls, it’s possible that the Extension will not work. Reviewing the Extension Log might show something like the following after immediately starting the Extension. This likely indicates the ClearPass Application API’s are in place.
Example of Extension authorization failure due to Policy Manager Application Control:
[2020-03-16T15:42:21.083] [INFO] Intune - Server listening on port 80.
[2020-03-16T15:42:21.243] [DEBUG] Intune - Request “GET ‘https://172.17.0.1/api/server/version’” took 51.91ms.
[2020-03-16T15:42:21.245] [DEBUG] Intune - <!DOCTYPE html><html>
<head>
<title>
Error 403 (Forbidden)
</title>
<script language=“javascript”>
function reloadPage() {
var locHref = window.location.protocol + “//” + window.location.hostname;
window.location.href = locHref;
}
</script>
To resolve this issue, add the IP address of the Extension to the list of nodes permitted to access the API by navigating to Administration > Server Manager > Server Configuration {choose your node} > Network
INFO
For this reason its good practice to fix the IP address of the extension at installation time such that it doesn’t change over time and break the application controls.
Checking on the Extension Service
The ClearPass Extensions are supported by a system service which must be running.
Restarting this service will affect all deployed and running extensions.
To check on the state of the Extension Service, or to restart the service, go to Administration > Server Manager > Server Configuration > [SERVER] > Service Control. By default this service is automatically started.
Extensions and web proxy / firewall whitelisting
If ClearPass Policy Manager has been configured with a proxy, it’s still possible that domain whitelists are required, the same for some datacenter firewall to allow the installation of Extensions. Some enterprise customers maintain a whitelist of domain that are allowed to transit the proxy/firewall. The underlying docker configuration process uses standard docker registry access to pull images (hosted in docker hub). In general, the following hosts are used:
INFO
-
extensions.clearpassbeta.com
-
registry-1.docker.io
-
index.docker.io
-
auth.docker.io
-
production.cloudflare.docker.com
This is all also geo dependent to some degree and based on various AWS services, so AWS redirects and geo location services will vary. Finally, this all runs via standard HTTPS (port 443).
Extension Logs/Enable Debugging
If you have a requirement to access and view the logs from the Extension, you can turn on different logging levels from the Extension GUI. Adjust the logLevel to ‘DEBUG’ and restart the extension as shown below.
Logs can then be viewed from the ‘Show Logs’.
Remember after changing the logging level, as with any extension configuration change the extension will need to be restarted for this change to take effect.
Accessing the extension logs using ‘Collect Logs’ system function
In addition to viewing the logs as shown above, logs can also be collected and examined via the Policy Manager Collect Logs system function (Administration > Server Manager > Server Configuration > [Select SERVER] > Collect Logs). This is extremely useful should you have a need to call for technical assistance.
If the support team needs to investigate a system issue, one of the items they regularly ask for is the system logs to aid with their diagnostic investigation. By default the “logLevel” is set to INFO, but TRACE, DEBUG, INFO, WARN, ERROR, FATAL can also be set as required. Any of the levels will display the information for the selected state and lower; if INFO is selected, it will show messages for INFO, WARN, ERROR, FATAL.
After the logs have been collected, downloaded and expanded, you can locate the extension logs in the following location in the folder structure PolicyManagerLogs > extension > your-extension-id as shown below. Note the file-name is the same as the running instance ID of the extension.
Monitoring extension statistics
There is a way to monitor extension’s critical resource statistics with the configurable parameter added as part of the extension’s configuration. To enable extension statistics set the “enableStats” parameter to true. Remember a restart of the extension is need to activate the change anytime the config is modified.
To navigate to statistics page, click Show Details.
This will show statistics similar to the following:
Monitoring authorization performance
Since we are authorizing against an external system, it could be relevant to monitor the performance of these transactions as you setup and deploy. If you suspect there is a performance issue, ClearPass provides a way to monitor the authorization processing time. The graph below shows an example of this data, navigate to Monitoring > Live Monitor > System Monitor [click on ClearPass Tab, then select [Authorization]….
Appendix B – Considerations for Installing in a Cluster
Extensions are not synced between ClearPass cluster members, and thus must be installed on each member separately.
Some Extensions can run in two modes: Periodic Sync Mode and Authorization Source Mode.
Periodic Sync Mode
If you are configuring the extension to poll external system periodically and utilize the resulting ClearPass Endpoint database during endpoint Authorization, then you only need to install the extension on one cluster member, often the publisher.
You may wish to install the extension on a second cluster member as a backup, but remember that both extensions will individually be updating the endpoint database. You may want to stagger the updates between the two extensions, for example, Subscriber1 updates at the top of the hour and Subscriber2 updates at 30 minutes after the hour.
Also, in this mode there is no need to explicitly enter an IP address during installation. The defaults will suffice and ClearPass will select an IP in the range specified in the server configuration.
HTTP Authorization Source Mode
In this mode we configure an HTTP Auth source that results in a HTTPS call to external system during endpoint authorization. In this deployment model the extension must be installed on every cluster node that process authentications. Also in this scenario every cluster member’s extension must be set to the exact same IP address during installation time, as the HTTP Auth source configuration is propagated globally across all cluster members.
For example, if the extension IP range is 172.17.0.0/16, we would set the extension to 172.17.0.5 on every cluster member during installation of the extension.
While we normally want to avoid duplicate IP addresses in a network, this is not a concern with ClearPass extensions. Each ClearPass node communicates internally only with its own extension, and this traffic is not routed outside of ClearPass.
Subscriber nodes support the same ability as publishers to install an Extension from the Extension store.
Appendix C – endpoint sync schedule settings
The syncSchedule and similar scheduling parameters sets how often ClearPass executes certain actions like syncing or pushing endpoints. This setting is based on a slightly modified version of the CRON job scheduler found in Unix-like operating systems. It can be used to schedule jobs to run periodically at fixed times, dates or intervals.
A ‘cron’ is a job scheduler. Any scheduled task is called a ‘cron job’. The syntax for a cron job schedule is as follows:
In our use of the cron scheduler, we’ve dropped the use of the last instruction ≤command to execute> and use only the time/date functions, see below for a number of examples of scheduling a sync process.
-
Schedule a sync to run at 2am daily:- 0 2 * * *
-
Schedule a sync to run twice a day at 5am and 5pm:- 0 5,17 * * *
-
Schedule a sync to run on every Sunday at 5pm:- 0 17 * * sun
-
Schedule a sync to run every 30 minutes:- */30 * * * *
-
Schedule a sync to run at 5pm on selected days:- 0 17 * * sun,fri
You can see from the above that the scheduling process is extremely flexible, alternatively https://crontab.guru/ is a great page for learning more about CRON scheduling.
Appendix D – Extension performance optimizations
Extensions are a critical part of ClearPass deployments today and with the increased dependency on extension interactions that involve periodic polling or real-time lookups, here are some of the best practice recommendations around optimizing overall performance when using extensions:
-
If the extension is used to periodically poll external systems and populate endpoint repository, ensure that it is not installed in all the nodes in the cluster. Ideally these type of extensions should only be installed on the publisher node since only publisher node can add endpoint entries to the database. For redundancy, it can be installed on another additional node but it is recommended to stagger the polling interval so that both do not attempt to poll and update endpoint database at the same time.
Example: 0 * * * *, This cron job runs at minute 0 of every hour (e.g., 00:00, 01:00, 02:00, etc.).
30 * * * *, This cron job runs at minute 30 of every hour (e.g., 00:30, 01:30, 02:30, etc.). -
If the extension is used for looking up attributes from external systems in real time during authentication, it should be installed in all the nodes handling authentication. Note that the context server config is replicated from the publisher. When using extension for real time lookup, ensure that the extension has the same IP address in all the cluster nodes.
-
If the extension is expected to do both real-time lookup and periodic polling, ensure that polling is enabled only on the publisher while the extension in subscribers can have the polling disabled by setting the “enableSyncAll” attribute to false.
"enableSyncAll": false,
WARNING
Having the extension installed on all the cluster nodes with enableSyncAll set to true would cause each cluster node to independently poll the external system and update endpoint repository. This could impact the performance of ClearPass. Hence it is strongly recommended to enable endpoint sync only on the extension installed on the publisher and on another cluster node for redundancy.
-
Some 3rd party systems support fetching delta updates vs fetching all of the device information every polling cycle. The extensions that support fetching delta updates are: Workspace ONE Crowdstrike Falcon Microsoft Intune Mosyle SentinelOne Service Now
For these extensions, the syncUpdatedOnly attribute should be set to true in extension config so that the number of DB updates in ClearPass is minimized
"syncUpdatedOnly": true,For extensions that do not support syncUpdatedOnly, ensure that the sync interval is not aggressive. We recommend syncing at most twice a day and that too during off peak hours whenever a full sync is performed.
-
Some 3rd party systems can be very noisy in terms of attribute updates. There could be certain attributes that keep changing every sync interval like “Free Memory in Bytes”, “Last Check in Time” etc. There is no value in updating endpoints when such trivial attributes change for the device. Hence it is recommended to use “ignoreEndpointDifferences” attribute in extension configuration to ignore change in attributes that you do not care about in terms of ClearPass policies.
You can review the Audit Viewer in ClearPass under Monitoring > Audit Viewer to see what attributes are being updated for endpoints to check if there are unnecessary updates.
Sample for JAMF extension:
"ignoreEndpointDifferences": "Last Update, Report Date UTC, Last Contact Time UTC, Last Inventory Update UTC, Last Reported IP, IP Address",Default for Microsoft Intune extension:
"ignoreEndpointDifferences": "Last Sync Date Time, Free Storage Space in Bytes", -
To further optimize the number of endpoints being updated in ClearPass, you can specify which attributes are being used in the ClearPass policies so that only changes to those attributes would trigger an update to the endpoint. This is done by listing out the specific attributes under endpointAttributes in extension configuration.
Sample for JAMF extension:
"endpointAttributes": "Group names, MDM Enabled, Managed, Remote Managed, Supervised, Serial Number", -
Setup extension to restart unless it was intentionally stopped. A restart policy can be defined in extension configuration to ensure that the extension starts up automatically after server reboots and such. Restart policy of “unless-stopped” would ensure the extension always starts up unless it was manually stopped.
“restartPolicy”: “no” — The extension will not be automatically restarted after the server is restarted.
“restartPolicy”: “always” — The extension will always be restarted after the server is restarted.
“restartPolicy”: “unless-stopped” — The extension will be restarted unless it was stopped prior to the server restart, in which case it will maintain that state.
“restartPolicy”: “on-failure:N” — If the extension fails to restart, the value for “N” specifies the number of times the extension should try to restart. If you do not provide a value for “N”, the default value will be “0”.
The “restartPolicy” parameter is not present by default in extension configurations. When it is not present, if the system is restarted a default policy is applied to the extension to maintain the state it was in before the restart. If the “restartPolicy” parameter is added to the configuration but later removed, the extension will then revert to the default restart policy.
Appendix E – List of all available Intune Attributes
“Source”:“Intune”,
“Intune Last Updated”:“2020-08-24 22:51:00”,
“Intune ID”:“04bbcce0-07bb-4c88-a3bb-c88a123abcb0c”,
“Intune User ID”:“abaf94ff-b6b3-1a2b-5e6f-19581de12345”,
“Intune Device Name”:“Danny’s iPhone”,
“Intune Managed Device Owner Type”:“personal”,
“Intune Enrolled Date Time”:“2019-02-06T21:33:29.6217769Z”,
“Intune Last Sync Date Time”:“2019-07-20T21:38:23.0716346Z”,
“Intune Operating System”:“iOS”,
“Intune Compliance State”:“noncompliant”,
“Intune Jail Broken”:“False”,
“Intune Management Agent”:“mdm”,
“Intune OS Version”:“12.3.1”,
“Intune Eas Activated”:true,
“Intune Eas Device ID”:“12345445XXX0B396FFF642NOG3C”,
“Intune Eas Activation Date Time”:“2019-02-06T21:34:08.5872874Z”,
“Intune Azure AD Registered”:true,
“Intune Device Enrollment Type”:“userEnrollment”,
“Intune Azure AD Device Id”:“7a80afd3-aabb-1234-9acf-83f987654321”,
“Intune Device Registration State”:“registered”,
“Intune Device Category Display Name”:"",
“Intune Is Supervised”:false,
“Intune Exchange Last Successful Sync Date Time”:“0001-01-01T00:00:00Z”,
“Intune Exchange Access State”:“none”,
“Intune Exchange Access State Reason”:“none”,
“Intune Remote Assistance Session Url”:"",
“Intune Remote Assistance Session Error Details”:"",
“Intune Is Encrypted":true,
“Intune User Principal Name”:“dannyjump@clearpassyeahbaby.onmicrosoft.com”,
“Intune Model”:“iPhone X”,
“Intune Manufacturer”:“Apple”,
“Intune IMEI”:“351234567890154321”,
“Intune Compliance Grace Period Expiration Date Time”:“2020-05-10T11:15:10.1451Z”,
“Intune Serial Number”:“G6TWXXYXYZXYZXYZ”,
“Intune Phone Number”:"+*******9748”,
“Intune User Display Name”:“Danny Jump”,
“Intune Wi Fi MAC Address”:“a056f38cc6be”,
“Intune Subscriber Carrier”:“AT&T”,
“Intune MEID”:"",
“Intune Total Storage Space in Bytes":251419164672,
“Intune Free Storage Space in Bytes":211984318464,
“Intune Managed Device Name”:“dannyjump_IPhone_2/6/2019_9:33 PM”,
“Intune Partner Reported Threat State”:“unknown”
Appendix F – SCEP Certificate Configuration Profile
This appendix provides an example of how to create a SCEP certificate configuration profile for a specific device type, such as Windows, in Intune. Configuration profiles for other device types are done in a similar fashion. For reference, Microsoft provides the following useful guides:
Create and assign SCEP certificate profiles in Intune
https://docs.microsoft.com/en-us/mem/intune/protect/certificates-profile-scep
Configure and use PKCS certificates with Intune
https://docs.microsoft.com/en-us/mem/intune/protect/certificates-pfx-configure
Windows Device Configuration Profile
The first step is to create a “Trusted certificate” configuration profile for Windows devices with the following properties:

Upload certificate file from your own implemented CA (e.g. AD CS).
The next step is to create a “SCEP certificate” configuration profile for Windows devices with the following properties:

The configurations settings for this profile are as follows:


It is important to reference the Device ID in the Subject alternative name.
The Root certificate refers back to the “Trusted certificate” profile done in the first step.
When the endpoint authenticates with ClearPass, the Access Tracker details can be inspected to ensure that the Device ID is present in the SAN URI attribute of the certificate as shown below:

If a real-time query is being implemented via HTTP authorization source, make sure to reference the Subject alternative name URI attribute in the filter query as shown in Figure 27.
Appendix G – Permissions needed for the Entra ID Application
The complete list of permissions required by the Entra Application for Intune integration is listed below:
GroupMember.Read.All
Directory.Read.All
User.Read.All
Device.Read.All
DeviceManagementManagedDevices.ReadWrite.All (Post Auth)
DeviceManagementManagedDevices.PrivilegedOperations.All (Post Auth)
DeviceManagementManagedDevices.Read.All
INFO
Note that depending upon your use case and workflows, you might only need a subset of these permissions. The table listed below breaks down the permissions required by different use cases. Please enable only the ones required in your setup.
| Use Case | Usage | Permission | URL |
|---|---|---|---|
| Fetch Intune user group membership | config.enableUserGroups GET '/groupsByMac/:mac' GET '/groupsByUserId/:userId' |
GroupMember.Read.All | https://learn.microsoft.com/en-us/graph/api/group-list?view=graph-rest-1.0&tabs=http |
| Real time call to fetch Intune user group membership | GET '/realtimeGroupsByUserId/:userId' GET '/realtimeGroupsByMac/:mac' GET '/realtimeUserGroup/:macOrSanUri' |
Directory.Read.All | https://learn.microsoft.com/en-us/graph/api/user-list-memberof?view=graph-rest-1.0&tabs=http |
| Real time call to fetch Intune user transitive group membership | GET '/realtimeTransitiveGroupsByUserId/:userIdOrSanUri' | User.Read.All | https://learn.microsoft.com/en-us/graph/api/user-list-transitivememberof?view=graph-rest-1.0&tabs=http |
| Real time call to fetch Intune user group membership | GET /realtimeGroupsById/:id | Device.Read.All | https://learn.microsoft.com/en-us/graph/api/device-list-memberof?view=graph-rest-1.0&tabs=http |
| Real time call to fetch Intune device group membership | GET '/realtimeDeviceGroup/:sanUri' GET '/realtimeGroupsByDeviceId/:deviceId' |
Device.Read.All | https://learn.microsoft.com/en-us/graph/api/device-list-memberof?view=graph-rest-1.0&tabs=http |
| Real time call to fetch Intune device transitive group membership | GET '/realtimeTransitiveGroupsById/:id' | Device.Read.All | https://learn.microsoft.com/en-us/graph/api/device-list-transitivememberof?view=graph-rest-1.0&tabs=http |
| Real time call to fetch Intune device transitive group membership | GET '/realtimeTransitiveGroupsByDeviceId/:deviceId' GET '/realtimeTransitiveDeviceGroup/:sanUri' |
Device.Read.All | https://learn.microsoft.com/en-us/graph/api/device-list-transitivememberof?view=graph-rest-1.0&tabs=http |
| Trigger action from ClearPass to Intune | POST '/device/sync/:macOrSanUri' POST '/device/shutDown/:macOrSanUri' POST '/device/wipe/:macOrSanUri' POST '/device/remoteLock/:macOrSanUri' |
DeviceManagementManagedDevices.ReadWrite.All DeviceManagementManagedDevices.PrivilegedOperations.All |
https://learn.microsoft.com/en-us/graph/api/intune-devices-manageddevice-get?view=graph-rest-1.0&tabs=http |
| Trigger action from ClearPass to Intune | POST '/device/update/:macOrSanUri' | DeviceManagementManagedDevices.ReadWrite.All | https://learn.microsoft.com/en-us/graph/api/intune-devices-manageddevice-update?view=graph-rest-1.0&tabs=http |
| Fetch information about a specific device from Intune | GET '/realtimeTransitiveDeviceGroup/:sanUri' GET '/realtimeDeviceGroup/:sanUri' GET '/device/info/:mac' GET '/device/info/id/:managedDeviceIdOrSanUri' |
DeviceManagementManagedDevices.Read.All | https://learn.microsoft.com/en-us/graph/api/intune-devices-manageddevice-get?view=graph-rest-1.0&tabs=http |
| Fetch information about a specific device from Intune using Entra Device ID | GET '/device/info/:mac' GET '/device/info/id/:managedDeviceIdOrSanUri' |
DeviceManagementManagedDevices.Read.All | https://learn.microsoft.com/en-us/graph/api/intune-devices-manageddevice-list?view=graph-rest-1.0 |
| Fetch list of devices periodically | config.enableSyncAll GET '/realtimeManagedDevices' |
DeviceManagementManagedDevices.Read.All | https://learn.microsoft.com/en-us/graph/api/intune-devices-manageddevice-list?view=graph-rest-1.0 |
| Fetch list of devices periodically | GET '/realtimeDevices' | Device.Read.All | https://learn.microsoft.com/en-us/graph/api/device-list?view=graph-rest-1.0&tabs=http |
5.5 - VMware Workspace ONE (Airwatch)
Introduction and Overview
With the extension-based integration we receive information associated with the endpoints in real time rather than relying on a poll interval like how we used to integrate with Vmware Workspace ONE earlier using Endpoint Context Servers. Hence, upon device enrollment/unenrollment, Workspace ONE triggers a webhook which will be consumed by a ClearPass service running in the cloud. The extension installed within ClearPass for this integration maintains a persistent connection with this service and immediately writes the updated information in the ClearPass endpoint repository. This integration is an enhancement that leverages an extension. The events for which the real time updates can be sent via webhook are configurable in Workspace ONE. Following are a list of the events we support today.
-
Device enrollment
-
Device unenrolled/ Enterprise wipe
-
Device compromised/ Status changed
-
Device Delete
To summarize, the endpoint repository continues to be used as an Authorization source, but the information is updated in real time hence allowing an administrator to create more accurate policies. Without integration with the extension, ClearPass would only get the latest information based on the polling interval. The default value of this polling interval is 60 minutes. It could be set to a lower value {under guidance from HPE Aruba Networking} depending on the number of endpoints to be fetched and varies based on the environments.
Version History
This integration is implemented through ClearPass Extensions which run independent of the ClearPass platform version. Hence extensions can be updated and released outside of ClearPass release cycles. Updates are done with backwards compatibility in mind and any breaking changes would be called out in this tech note. Extensions are validated against the latest instance of Workspace ONE and unless explicitly noted here, should be compatible with all supported Workspace ONE releases.
What’s new in Workspace ONE v6.6 Extension? – Important Changes
Workspace ONE release v6.6.0 adds support for OAuth 2.0 in addition to the previous API key based approach. Workspace ONE extension now supports using OAuth 2.0 client credentials for API authentication.
Three additional extension configuration attributes have been added to support OAuth: clientId, clientSecret and tokenEndpoint. Details about configuring OAuth credentials both on Workspace ONE and ClearPass extension is documented under the respective configuration sections below.
INFO
Note that the airWatchApiKey and OAuth credentials are both supported. If both user credentials (airWatchUser and Password) and OAuth credentials are given, OAuth credentials would be used.
What’s new in Workspace ONE v6 Extension? – Important Changes
-
Workspace ONE release v6.2.0 supports an additional knob in the extension configuration called “airWatchExtensiveSearch” which if set to true makes use of the /extensivesearch API replacing the default /search API call during the periodic polls. When set to false the default /search API is used for the periodic polls.
Some environments require both wired and wireless mac addresses in the ClearPass endpoint repository for endpoints which use both the NICs and tend to switch from wireless to wired and vice-versa. The expectation is that both the interfaces are authenticated before allowing access to the network. In such cases it is necessary that both the interface mac addresses are available in the ClearPass endpoint repository to be able to check for the attributes when evaluating policies for the endpoint to allow the right access.
Addition of this configuration knob solves this problem however one should be mindful that setting “airWatchExtensiveSearch” to true fetches limited number of attributes to work from for an endpoint and can be a limitation for few environments though the attributes which are missed by enabling this configuration knob are not very widely used. This is currently a limitation on Workspace ONE API’s and once /search is worked upon or any new API is introduced to add both the mac addresses with the most complete information returned as attributes then we will implement it on our side which will eliminate the need to choose from enabling or disabling airWatchExtensiveSearch.
A copy of attributes fetched when “airWatchExtensiveSearch” is set to true and a copy of attributes fetched when “airWatchExtensiveSearch” is set to false is given in Appendix D.
INFO
Extension upgrade from the ClearPass Guest UI retains the configuration for minor version upgrades. However, it does not incorporate any new configuration fields added to the new version. Therefore, new fields like “airWatchExtensiveSearch”: true, will need to be added manually in the config.
-
With the release of Workspace ONE v6.1.0 we now support authenticated webhooks hitting ClearPass from a customer’s tenant. This eliminates the risk of any unauthorized webhook event being processed by ClearPass. Workspace ONE now supports sending authenticated webhook events by introducing a username and password field in the event notification section. This means that every webhook event sent by Workspace ONE is hashed using these configured credentials and ClearPass would be able to decrypt the webhook events when it has the same credentials configured in the extension as shown below.
Any webhook event which does not include the authentication header from Workspace ONE will not be processed by ClearPass if the extension is configured with a username and password. ClearPass would also not process any events from Workspace One when there is a mismatch in the configured username and password on Workspace ONE and ClearPass extension.
The following are the two config knobs that needs to be added in the extension (not available in the default config setting) to support authenticated webhook events from Workspace ONE.
“skyhookAuthorizationUsername”:
“skyhookAuthorizationPassword”:
Sample extension configuration with the new skyhook credential attributes:
{
“logLevel”: “INFO”,
“verifySSLCerts”: true,
“skyhookTenant”: “”,
“skyhookAuthorizationUsername”: “”,
“skyhookAuthorizationPassword”: “********”,
“dbAccessToken”: “********”,
“airWatchHost”: “”,
“airWatchUser”: “”,
“airWatchPassword”: “********”,
“airWatchApiKey”: “********”,
“clientId”: “abacxxxxxxxxxxxxxxxxxxxxx”,
“clientSecret”: “********”,
“tokenEndpoint”: “https://na.uemauth.workspaceone.com/connect/token",
“airWatchExtensiveSearch”: false,
“enrollmentRetries”: 3,
“enrollmentWaitTimer”: 5,
“toggleEndpointStatus”: false,
“enableOutOfComplianceDisconnect”: false,
“enableOutOfComplianceReconnect”: false,
“enableCompromisedDisconnect”: false,
“enableCompromisedReconnect”: false,
“enableEndpointCache”: false,
“endpointCacheTimeSeconds”: 300,
“syncAllOnStart”: false,
“enableSyncAll”: false,
“syncAllSchedule”: “*/15 * * * *”,
“syncUpdatedOnly”: true,
“syncPageSize”: 50,
“includeSecurityInfo”: false,
“attributePrefix”: “”,
“bypassProxy”: false,
“enableStats”: false,
“statsUsername”: “”,
“statsPassword”: “********”
“skyhookAuthorizationUsername”: “testuser”,
“skyhookAuthorizationPassword”: “********"
}

-
To address “Android 12 Day Zero Support with Microsoft Endpoint Manager“ like hurdles and be prepared for client vendors restricting MDMs from reading the MAC address from the clients and any upcoming compliance requirements to use certificate-based authentication and expose endpoint information only based on some MDM specific attributes unlike MAC address and serial numbers, we have also added the support to able to query endpoint information from Workspace ONE using the Device UDID attribute.
This is achieved by adding a real time HTTP AuthZ source which reads the Device UDID attribute from the certificate passed during the EAP-TLS authentication and fetches the endpoint attributes from Workspace ONE in real time. For endpoints which don’t reveal their MAC addresses the extension would not be able to sync those endpoints as they wouldn’t have a valid MAC address to add in the endpoint repository. Hence, using certificate-based authentication with Device UDID as the certificate CN name is the workaround for devices which does reveal their MAC addresses.
With the real time HTTP AuthZ source added to the ClearPass service addresses this caveat and we can fetch the attributes from Workspace ONE to be able to evaluate them in the ClearPass enforcement policies and Role Mappings. We will see some more details and sample configuration later in this document.
Pictorial View of the Integration
The diagram below shows a pictorial overview of the components and how they interact with each other.

Software Requirements
The minimum software version required for CPPM is 6.11.0 . At the time of writing, version 6.11.10 is available as the long supported release and 6.12.4 is available as the short supported release. CPPM runs on hardware appliances with pre-installed software or as a Virtual Machine under the following hypervisors. Hypervisors that run on a client computer such as VMware Player are not supported.
-
VMware vSphere Hypervisor (ESXi) 7.0 U3c and 8.0
-
Windows Server 2019 with Hyper‑V and Windows Server 2022 with Hyper‑V.
-
KVM on CentOS Stream 8, CentOS Stream 9, Ubuntu 20.04 LTS, and Ubuntu 22.04 LTS.
ClearPass Installation and Deployment Guide
This document assumes your ClearPass environment is already configured and operational. If you require assistance with basic deployment, refer to the following deployment guide:
https://arubanetworking.hpe.com/techdocs/ClearPass/6.11/Installation-Guide/Default.htm
ClearPass Extensions
The integration between ClearPass Policy Manager and external systems is driven through a ClearPass capability known as Extensions, a sub-component of the ClearPass Exchange Integration framework. ClearPass Extensions are micro-services running on top of the base ClearPass platform. These micro-services enable HPE Aruba Networking to deliver new features outside of the main software release cycle and facilitate a faster time to market for specific features and integrations. Configuration and control of ClearPass Extensions is accomplished through the ClearPass Guest GUI, as covered later in this document.
Installing Extension
ClearPass Extensions are easy to install from the ClearPass Extensions Store. In a cluster, ClearPass Extensions can be installed on a subscriber independently of the publisher. Multiple copies of the same extension can be installed if needed as well.
INFO
Internet access is required for ClearPass Policy Manager to install the ClearPass Extensions from the Extension Store. Starting with ClearPass 6.12, extensions can be can be installed offline as well. Offline ClearPass Extension images are available on HPE networking support portal.
Access to the extension store
Access the Extension Store to download and install ClearPass extensions. The Extension store utilizes the same HPE Passport account credentials used to validate support entitlement in the Software Updates Por- tal. This is configured under Administration > Agents and Software Updates > Software Updates as shown below. Ensure that valid HPE Passport credentials have been entered in these fields to enable Ex- tension download capabilities.
Installing the Extension from Store
Extensions are installed from the extension page in ClearPass Guest, as shown below. Access it from Guest > Administration > Extensions
From here, click on ‘Install Extension’, and the search box below appears.
Enter “Intune” and click on ‘Search’, see the example below.
INFO
Here we are using Intune as an example. The installation steps are the same for all the extensions. For your deployment, please search for the appropriate extension like Jamf, Mosyle, Crowdstrike, etc.
All currently available extensions are listed in the page: https://www.arubanetworks.com/techdocs/NAC/clearpass/integrations/clearpass-extension/extensions-list/
Click on the extension name and then click “Install.”
In the “Install Extension” dialog box, set the IP address if necessary, as described in section “Extensions and IP address configuration support” below. Do not check the box to start the extension at this time. Click the “Install” button.
In this example, we’ve not entered an IP address for the extension to use, if there is intent to use the extension as an authorization source set this value and ensure its set the same on all nodes where the Extension is deployed.
The extension will download and appear in a “Stopped” state. Notice the options to Start, Delete, Reinstall, Show Logs, and view Configuration. Click on “Configuration” to view settings.
After the extension has been installed, proceed to configure the extension
A copy of the default Extension configuration is shown above, this will need to be modified for your deployment.
INFO
Password and sensitive configuration items are obfuscated when presented in both the Extension GUI or in the Explorer configuration.
WARNING
The configuration attributes are case sensitive. It is recommended to refer the default configuration sample while editing your configuration.
Extensions and web proxy support
Extensions support communications with 3rd parties via a web proxy. This adds incremental proxy functionality. If a proxy is defined in ClearPass Policy Manager, then an extension will inherit that configuration. See later in the document on how to disable the proxy inherited configuration.
INFO
Note that the Policy Manger web proxy configuration is ONLY read by the extension at installation time. If the web proxy configuration is changed in Policy Manager, then the extension must be re-installed so the new settings are re-read and bonded to the extension.
Extensions and IP address configuration support
ClearPass uses a non-externally routed IP address range to communicate with the Extension. The default is 172.17.0.0/16. You may configure a different range, if desired. This is especially useful when deploying extensions across nodes within a cluster where there is the requirement for a fixed consistent IP address for the extension across the cluster.
Changing the “Extensions Network Address” range is only necessary if either the ClearPass MGMT or DATA interface are using an IP address in the extension default range of 172.17.x.x/12, or if ClearPass needs to communicate with some external device in that range.
To Configure the base Extension IP subnet within Policy Manager navigate to Administration > Server Manager > Server Configuration [chose your node] Service Parameters [ClearPass system service].
INFO
The subnet defined here for the extension framework must fall within the following subnet range 10.0.0.0/8, 172.16.0.0/12, 192.168.0.0/16 as defined by RFC1918. For best results, set the network address range to a subnet that does not exist in your enterprise, and restart the extension service for this change to take effect.
Never set the DATA or MGMT IP address to use an address that matches the Extension Network
INFO
Note that changing the extension base IP address will require the extension service to be restarted.
Configuration Steps
There are primarily 3 steps involved in getting this integration configured.
-
Register and request for a Skyhook tenant
-
Configuration of VMware Workspace ONE for Integration
-
Installation and Configuration of the Workspace ONE extension using the GUI in ClearPass.
Register for a Skyhook Tenant ID
Skyhook Tenant ID’s can be registered in the skyhook self-service portal by accessing the following link https://clearpass.arubanetworks.com/webhooks/skyhook and instructions on using the skyhook self-service portal is available here: https://arubanetworking.hpe.com/techdocs/NAC/clearpass/integrations/clearpass-extension/skyhook-self-service-portal/
Kindly copy the skyhookTenant, dbAccessToken and the Target URL in a text file. This will be used for configuration of the extension in ClearPass Policy Manager as well as configuring the tenant details on Workspace ONE UEM.
Configuring Workspace ONE for ClearPass Integration
INFO
Setup and configuration of Workspace ONE UEM is beyond the scope of this guide. Here we specify the steps necessary to configure the integration.
Below are the configuration steps to follow.
Getting API Credentials
Login to the Workspace ONE UEM tenant, using your administrator credentials.
Create a new administrator account for this integration.
Navigate to Accounts > Administrator > List View > Add > Add Admin.

Specify the mandatory fields below and create a user. It is not recommended to use the default admin account for this integration for security reasons.

When creating this user, one can specify the role associated with the user. Use “Device Manager” role or any custom role that gives device information access via the REST API.

The credentials of the account created can be used as “airwatchUser” and “airwatchPassword” in the ClearPass extension configuration.
Getting REST API key
Go to “Groups & Settings” > All Settings.
Navigate to System > Advanced > API > REST API.
To add a new API service.
-
Select “Override” as the Current Setting.
-
Set “Enable API Access” to “Enabled**”**.
-
Click on +ADD box to add a new service account. This should generate the API Key.
-
Set the Service name to something that can be identified later like “ClearPass Extension**”**.
-
Set the Account Type to “Admin**”**.
-
Copy the API Key. This will be used as “airwatchApiKey” for the ClearPass extension configuration.
-
-
Ensure you Save your changes.

Configuring OAuth 2.0
Extension version 6.6.0 introduces support for OAuth 2.0 for API authentication. First we need to create an admin role that provides read access to the API client.
On Workspace ONE, navigate to Accounts > Administrators > Admin Roles > Add Role
Enable “read” access to the following:
API > REST Device Management > Compliance Device Management > Device Details Device Management > Devices List View Groups

Next, to create OAuth 2.0 credentials, navigate to Groups&Settings > Configurations > OAuth Client Management > Add and register a new OAuth client referencing the Role that was created previously

Upon saving the this, the OAuth Client ID and secret would be displayed. Store them somewhere safe since the credentials cannot be viewed again later.

These credentials now can be used within the extension configuration as described in the extension configuration section.
Also make a note of the base URL for UEM token service for each environment as shown below. This is also required in the extension configuration.

Configuring Event Notifications
Go to “Groups & Settings” > All Settings.
Navigate to System > Advanced > API > Event Notifications.
Click on + ADD RULE to add the events that the ClearPass skyhook needs to be notified for.

The Event Notification window helps to specify the Target Name and the Target URL. The Target URL contains the skyhook tenant that was granted to you at the time of the request in “Step I: Register and Request for a Skyhook Tenant ID**”**. The email received should consist of the Target URL to be used.
The Username and Password field could be left blank. However, for secure and authenticated webhook events from Workspace ONE to ClearPass a username and password should be configured at both ends (ClearPass and Workspace ONE). Username and password at both sides should be same so that events hashed using the username and password on Workspace ONE can be decrypted by the ClearPass extension.
Select the Format as JSON.

INFO
The attempt to “TEST CONNECTION” will be unsuccessful in this scenario.
Finally, scroll down under the “Events” section and specify the events for which we require a real time update from Workspace ONE.
Currently ClearPass has added support for the following events.
-
Device Enrollment
-
Device Unenrolled Enterprise Wipe
-
Device Wipe
-
Device Compromised Status Change
-
Device Compliance Status Change
-
Device Delete
-
Device Attribute Change - Ownership
These are essentially the events which are leveraged within ClearPass Policy Manager to define policies and hence requires a real time update for accurate policy enforcement.

Once the required events are Enabled, Save the changes.
Workspace ONE Extension Configuration
The default configuration used for the extension is below
{
“logLevel”: “INFO”,
“verifySSLCerts”: true,
“skyhookTenant”: “”,
“skyhookAuthorizationUsername”: “”,
“skyhookAuthorizationPassword”: “********”,
“dbAccessToken”: “********”,
“airWatchHost”: “”,
“airWatchUser”: “”,
“airWatchPassword”: “********”,
“airWatchApiKey”: “********”,
“clientId”: “abacxxxxxxxxxxxxxxxxxxxxx”,
“clientSecret”: “********”,
“tokenEndpoint”: “https://na.uemauth.workspaceone.com/connect/token",
“airWatchExtensiveSearch”: false,
“enrollmentRetries”: 3,
“enrollmentWaitTimer”: 5,
“toggleEndpointStatus”: false,
“enableOutOfComplianceDisconnect”: false,
“enableOutOfComplianceReconnect”: false,
“enableCompromisedDisconnect”: false,
“enableCompromisedReconnect”: false,
“enableEndpointCache”: false,
“endpointCacheTimeSeconds”: 300,
“syncAllOnStart”: false,
“enableSyncAll”: false,
“syncAllSchedule”: “*/15 * * * *”,
“syncUpdatedOnly”: true,
“syncPageSize”: 50,
“includeSecurityInfo”: false,
“attributePrefix”: “”,
“bypassProxy”: false,
“enableStats”: false,
“statsUsername”: “”,
“statsPassword”: “********”
Each of the attributes are explained in the table below in detail.
Workspace ONE specific extension configuration attributes
| Configuration attribute | Description | Default Values |
|---|---|---|
| includeSecurityInfo | Not supported as of 6.0.2. Planned for later releases. | NA |
| skyhookTenant | The Skyhook tenant ID received in the registration email. | Null |
| dbAccessToken | The access token for Skyhook received in the registration email. | Null |
| airWatchHost | The URL/FQDN for Workspace ONE instance | Null |
| airWatchUser | The Workspace ONE account username who has access to the device information using the APIs. | Null |
airWatchPassword
|
The Workspace ONE account password for the user who has access to the device information using the APIs. | Null |
| airWatchApiKey | Allows access to Workspace ONE REST APIs. | Null |
| clientId | OAuth Client ID | Null |
| clientSecret | OAuth Client Secret | Null |
| tokenEndpoint | Value of this field is derived from the UEM token service base URL as {base-url}/connect/token | Null |
| airWatchExtensiveSearch | Fetches both wired and wireless mac address of an endpoint if set to true | false |
enrollmentRetries
|
During the enrollment process, if there is no MAC Address found, retry X number of times to wait for a MAC Address. | 3 |
| enrollmentWaitTimer | The delay between retries when attempting to get a MAC Address. | 5 |
| toggleEndpointStatus | When a device is unenrolled, if set to true, the endpoints status will be set to "Unknown". | false |
| enableOutOfComplianceDisconnect | When true and “Compliance Status Changed” event is received with state “non-compliant” active session disconnect is issued to the endpoint if exists in ClearPass | false |
| enableOutOfComplianceReconnect | When true and “Compliance Status Changed” event is received with state “Complaint” active session disconnect is issued to the endpoint if exists in ClearPass | false |
| attributePrefix | Add prefix to endpoint attributes to be able to identify attributes synced from two parallel extension instances. | Null |
| enableCompromisedDisconnect | When true and “Compromised Status Changed” event is received with state “false” active session disconnect is issued to the endpoint if exists in ClearPass | false |
| enableCompromisedReconnect | When true and “Compromised Status Changed” event is received with state “true” active session disconnect is issued to the endpoint if exists in ClearPass | false |
Common extension attributes
Extension framework configuration parameters (common configuration)
| Attribute | Description | Default Values |
|---|---|---|
| logLevel | Logging level for troubleshooting | “INFO” |
| verifySSLCerts | Should SSL certificates be validated when communicating with external context sources | true |
| enableEndpointCache | Cache endpoint attributes to optimize authorization queries, avoid repeated DB queries and reduce API calls to external context sources | true |
| endpointCacheTimeSeconds | The duration in seconds to cache the endpoint attributes | 300 |
| syncUpdatedOnly | If this option is set to true, only the endpoints updated after the previous sync would be fetched from the context source. Note that this option only works for the third-party context sources that have APIs to support this functionality. If this option is set to false, all endpoints are fetched at every sync interval. |
true |
| syncAllOnStart | If this option is set to true, when the extension starts, the system will attempt to sync all endpoints in the external context source to ClearPass. Note that if you have a large number device context to be fetched, it would take a long time for the initial sync to complete. When used along with syncUpdatedOnly, the subsequent syncs should be faster. |
true |
| enableSyncAll | Enable periodic sync of all endpoints | true |
| syncAllSchedule | The schedule for when the Sync All Endpoints process should run. Note: This uses CRON type scheduling. |
0 2 * * 6 |
| enableStats | Enable display of extension statistics | false |
| statsUsername | Create a username to access the extension statistics page | Give any username you want to use |
| statsPassword | Create a password to access the extension statistics page | Give any password you want to use |
| bypassProxy | Bypass the web proxy configured on ClearPass Policy Manager | false |
A copy of the VMware Workspace ONE Extension with the desired configuration is shown below, this has to be modified for your deployment. Include the skyhookTenant, dbAccessToken, airwatchHost, airwatchApiKey, airwatchUser, airwatchPassword that will be specific to your environment.
Change or include any other values based on the description of each in the above table
Select Restart and click on Save Changes to restart the extension.

After the configuration and the restart of the extension, click on Show Logs

The above log states that the extension has established a successful connection to skyhook and ready to ingest events from Workspace ONE in real time.
Sample Events
In this section we look at some sample events. The logs have been enabled in DEBUG mode for details.
Device Registration
As soon as a device enrolls with Workspace ONE, it triggers a webhook which is consumed by ClearPass using extensions. In this scenario the Event Type triggered is ‘Enrollment Complete’.
Once the extension gets the device ID using webhook, it will trigger an API call into Workspace ONE to get all details associated with the device since the webhook triggered does not send all the details. These details are then copied into the endpoint database in ClearPass.
[2022-08-08T10:10:39.355] [INFO] WorkspaceONE - New event received -N8ww1-fB5v8oNlvVKKP.
[2022-08-08T10:10:39.381] [DEBUG] WorkspaceONE - Event Details: {“body”:{“EventId”:170,"EventType”:“Enrollment Complete”,“DeviceId”:37971,“DeviceFriendlyName”:“Android_BND-AL10_866676030046304”,“EnrollmentEmailAddress”:“bikki.gupta@nacsecurity.com”,“EnrollmentUserName”:“bikki”,“EventTime”:“2022-08-08T10:11:22.7859476Z”,“EnrollmentStatus”:“Enrolled”,“CompromisedStatus”:””,“CompromisedTimeStamp”:“2022-08-08T10:11:24.5384903Z”,“ComplianceStatus”:“PendingComplianceCheck”,“PhoneNumber”:"",“Udid”:“6780aead7ae0df2c298c6dd8da3a9dc3796894d59f”,“SerialNumber”:“P2L4C17B14003317”,“MACAddress”:“1044008DB104”,“DeviceIMEI”:“866676030046304”,“EnrollmentUserId”:84707,“AssetNumber”:“6780aead7ae0df2c298c6dd8da3a9dc3796894d59f”,“Platform”:“Android”,“OperatingSystem”:“9.0.0”,“Ownership”:“EmployeeOwned”,“SIMMCC”:"",“CurrentMCC”:"",“OrganizationGroupName”:“HPE Aruba Networking”,“DeviceUUID”:“90b60c2b-5e1b-4646-b5fc-6c27a8d03469”,“EnrollmentUserUUID”:“7d9222d6-0fa1-44e6-b205-8d9415f111a6”}
Compliance Status Change
This event is triggered immediately after a device is enrolled and performs its first compliance check. It is also triggered if Workspace One detects a change in the compliance status of the device. Again, the webhook sends us the Device ID which is used by the extension to trigger an API call on Workspace ONE and get more information about the device. Once the device lookup is completed, the extension writes the attributes into the ClearPass endpoint repository.
[2022-08-08T10:16:23.912] [INFO] WorkspaceONE - New event received -N8wxL7kBfy8abbqcy0F.
[2022-08-08T10:16:23.940] [DEBUG] WorkspaceONE - Event Details: {“body”:{“EventId”:184,“EventType”:“Compliance Status Changed”,“DeviceId”:37971,“DeviceFriendlyName”:“Android_BND-AL10_866676030046304”,“EnrollmentEmailAddress”:“bikki.gupta@nacsecurity.com”,“EnrollmentUserName”:“bikki”,“EventTime”:“2022-08-08T10:17:08.4541214Z”,“EnrollmentStatus”:“Enrolled”,“CompromisedStatus”:"",“CompromisedTimeStamp”:“2022-08-08T10:17:08.9987884Z”,“ComplianceStatus”:“NonCompliant”,“PhoneNumber”:"",“Udid”:“6780aead7ae0df2c298c6dd8da3a9dc3796894d59f”,“SerialNumber”:“P2L4C17B14003317”,“MACAddress”:“1044008DB104”,“DeviceIMEI”:“866676030046304”,“EnrollmentUserId”:84707,“AssetNumber”:“6780aead7ae0df2c298c6dd8da3a9dc3796894d59f”,“Platform”:“Android”,“OperatingSystem”:“9.0.0”,“Ownership”:“EmployeeOwned”,“SIMMCC”:"",“CurrentMCC”:"",“OrganizationGroupName”:“HPE Aruba Networking”,“DeviceUUID”:“90b60c2b-5e1b-4646-b5fc-6c27a8d03469”,“EnrollmentUserUUID”:“7d9222d6-0fa1-44e6-b205-8d9415f111a6”}
Once the compliance check on the device is finished, the endpoint table on ClearPass gets updated with the device information as shown below

MDM Unenroll
Once the Device Management profile is deleted from the managed endpoint, it would trigger a webhook for the event type captured below.
[2022-08-08T10:46:19.457] [INFO] WorkspaceONE - New event received -N8x3BW3pJCnSFA2VfAV.
[2022-08-08T10:46:19.483] [DEBUG] WorkspaceONE - Event Details: {“body”:{“EventId”:39,"EventType":“Break MDM Confirmed”,“DeviceId”:37971,“DeviceFriendlyName”:“Android_BND-AL10_866676030046304”,“EnrollmentEmailAddress”:"",“EnrollmentUserName”:"",“EventTime”:“2022-08-08T10:47:05.8870115Z”,“EnrollmentStatus”:“Unenrolled”,“CompromisedStatus”:"",“CompromisedTimeStamp”:“2022-08-08T10:47:06.7020299Z”,“ComplianceStatus”:“NotAvailable”,“PhoneNumber”:"",“Udid”:“6780aead7ae0df2c298c6dd8da3a9dc3796894d59f”,“SerialNumber”:“P2L4C17B14003317”,“MACAddress”:“1044008DB104”,“DeviceIMEI”:“866676030046304”,“EnrollmentUserId”:0,“AssetNumber”:“6780aead7ae0df2c298c6dd8da3a9dc3796894d59f”,“Platform”:“Android”,“OperatingSystem”:“9.0.0”,“Ownership”:“EmployeeOwned”,“SIMMCC”:"",“CurrentMCC”:"",“OrganizationGroupName”:“HPE Aruba Networking”,“DeviceUUID”:“90b60c2b-5e1b-4646-b5fc-6c27a8d03469”,“EnrollmentUserUUID”:""}
This results in change of the attribute ‘MDM Enabled’ to ‘false’. ‘Let’s look at the attributes changed for the endpoint in the endpoint database.

The above attributes can be used in the ClearPass Policy Manager to ensure devices with “MDM Enabled = false” are either quarantined, or forced into a captive portal role or denied access.
Device Deletion
In this scenario, a device that was added previously by polling was deleted from Workspace ONE. This triggered a “Delete Device Requested” event.
[2022-08-08T10:39:54.674] [INFO] WorkspaceONE - New event received -N8x1iZIl4iM6fukq4PM.
[2022-08-08T10:39:54.702] [DEBUG] WorkspaceONE - Event Details: {“body”:{“EventId”:662,“EventType”:“Delete Device Requested”,“DeviceId”:37899,“DeviceFriendlyName”:“BGHOME”,“EnrollmentEmailAddress”:“bikki.gupta@nacsecurity.com”,“EnrollmentUserName”:“bikki”,“EventTime”:“2022-08-08T10:40:39.2698451Z”,“EnrollmentStatus”:“Unknown”,“CompromisedStatus”:null,“CompromisedTimeStamp”:“0001-01-01T00:00:00”,“ComplianceStatus”:null,“PhoneNumber”:null,“Udid”:“8D667CAA15ACCD48B785A104031DE3A0”,“SerialNumber”:“M4N0CX12R927169”,“MACAddress”:null,“DeviceIMEI”:null,“EnrollmentUserId”:0,“AssetNumber”:"",“Platform”:null,“OperatingSystem”:null,“Ownership”:null,“SIMMCC”:null,“CurrentMCC”:null,“OrganizationGroupName”:null,“DeviceUUID”:"",“EnrollmentUserUUID”:""},“headers”:{“x-aw-event-version”:“1”,“X-Clearpass-SourceIp”:“44.231.1.105”}}
This again results in change of the attribute “MDM Enabled” to false. Starting with V2 of the WorskspaceOne Extension a device deletion will also toggle the Known/Unknown status of the endpoint, the allows for ClearPass housekeeping to remove devices from the EndpointDb. This is an optional configuration switch.

A sample Enforcement Policy that can be used is shown here for reference. This may completely vary based upon the requirements of the customer.

Real Time Authorization Lookup
As discussed in the “What’s new in Workspace ONE v6 Extension” section of the document we can leverage the HTTP AuthZ source to fetch endpoint attributes from Workspace ONE using the extension in real time. Due to restrictions on the client side where the MAC address is not exposed to the MDM and the extension is not able to sync these endpoints to the endpoint repository, this is an alternate way to fetch the endpoint attributes which are used in the enforcement policy to assign the right roles as per the MDM assigned attributes to the endpoints.
However, this method is not just limited to one use case. As discussed earlier if there are any compliance requirements from MDM in the future to use certificate-based authentication and expose endpoint information only based on some MDM specific attributes (unlike MAC address and serial numbers) then we can also use this method to fetch attributes from Workspace ONE using the Device UDID attribute. This attribute can be injected in the CN field of the certificate using the certificate request templates in Workspace ONE. The extension supports querying endpoints to Workspace ONE using either MAC address or the Device UDID attribute.
Step I: Certificate template configuration
Configuring the Workspace ONE certificate template to use Device UDID in CN name field of the certificate when requesting certificate to the SCEP server.
Go to Group & Settings > All Settings > Enterprise Integration > Certificate Authorities and click Add.

Choose the applicable Authority type and fill in rest of all the mandatory fields and click Save. In this example we have used ClearPass Onboard CA as the SCEP server so the selection for Authority Type in this case is “Generic SCEP. For details on Certificate Authorities and Request templates refer ‘Certificate Authority Integrations’ in VMware Workspace ONE UEM Product Documentation.

Next, go to Group & Settings > All Settings > Enterprise Integration > Certificate Authorities> Request Templates and click Add.

Set the Certificate Authority from the drop down created in the last step. Set the Subject Name to be CN={DeviceUid} as shown below and fill in the rest of the mandatory fields and click on Save.

Step II: Enabling SCEP server in ClearPass Onboard CA.
INFO
This step is optional and is required only if ClearPass is used as a SCEP server for enrolling clients
For enabling SCEP server on the Onboard CA Login to the Onboard module from ClearPass Login Page. Go to Onboard > Certificate Authority > Create a new certificate Authority or edit an existing one if you would like to use an existing Certificate Authority.
Under the SCEP Server select the “Enable access to the SCEP server” check box. Type a SCEP Secret and click on Save Changes.

The shown SCEP URL will need to be entered in the ‘SCEP URL’ field and SCEP Secret in the ‘Static Challenge’ field with challenge type set to Static while adding the Certificate Authority in Workspace ONE if ClearPass Onboard CA is used as the SCEP server.
For more details on Onboard CA Authorities and enabling SCEP refer the ClearPass documentation.
Step III: Adding HTTP AuthZ source in ClearPass
Go to Configuration > Authentication > Sources and Click Add.

Give a name to the Auth source, Select ‘HTTP’ from Type dropdown and click Next.

This will advance to the Primary Tab which requires connection details. Here an internal POST is made to the extension. The extension then calls Workspace ONE APIs to fetch the attributes associated with the endpoint.

The Base URL is http://<Extension IP>/. The extension IP can be seen by going to the Guest module under Administration > Aruba Integrations > Extensions.

Enter the Workspace ONE extension IP address in the Base URL field and click Next.
Under the attributes tab, Click on Add more Filters.

Enter the Filter Name and Filter Query as shown in the below figure. We had earlier configured the Workspace ONE certificate request template to use Device UDID in the CN field of the certificate. This query will read the Device UDID attribute from CN field whenever a client presents the EAP-TLS certificate during authentication.
You can choose to add the attributes to be used for AuthZ as needed. Here we have used the WorkspaceONE Compliance, Enrollment Status and Compromised attributes to be fetched as our AuthZ attributes.

Save and Click Next. You will now see a summary page of the configured AuthZ source, Click on Save.

Add this AuthZ source in the service where Workspace ONE managed endpoints authenticate using EAP-TLS method.

INFO
This will make real time API queries for every endpoint authenticating on this service. It is not necessary to use the same service for endpoints which the extension has synced to the endpoint repository and for endpoints which could not be synced due limitations discussed around endpoints not exposing mac address e.g android devices. The way to segregate which clients need a real time lookup for AuthZ and which do not will vary for different deployments.
Appendix A – Troubleshooting and Support
Here we list some basic troubleshooting steps. If you need any help beyond this, please reach out to HPE Aruba Networking Support.
Check API Access Application Control restrictions
If you’ve previously hardened your ClearPass deployment with Application Access Controls, it’s possible that the Extension will not work. Reviewing the Extension Log might show something like the following after immediately starting the Extension. This likely indicates the ClearPass Application API’s are in place.
Example of Extension authorization failure due to Policy Manager Application Control:
[2020-03-16T15:42:21.083] [INFO] Intune - Server listening on port 80.
[2020-03-16T15:42:21.243] [DEBUG] Intune - Request “GET ‘https://172.17.0.1/api/server/version’” took 51.91ms.
[2020-03-16T15:42:21.245] [DEBUG] Intune - <!DOCTYPE html><html>
<head>
<title>
Error 403 (Forbidden)
</title>
<script language=“javascript”>
function reloadPage() {
var locHref = window.location.protocol + “//” + window.location.hostname;
window.location.href = locHref;
}
</script>
To resolve this issue, add the IP address of the Extension to the list of nodes permitted to access the API by navigating to Administration > Server Manager > Server Configuration {choose your node} > Network
INFO
For this reason its good practice to fix the IP address of the extension at installation time such that it doesn’t change over time and break the application controls.
Checking on the Extension Service
The ClearPass Extensions are supported by a system service which must be running.
Restarting this service will affect all deployed and running extensions.
To check on the state of the Extension Service, or to restart the service, go to Administration > Server Manager > Server Configuration > [SERVER] > Service Control. By default this service is automatically started.
Extensions and web proxy / firewall whitelisting
If ClearPass Policy Manager has been configured with a proxy, it’s still possible that domain whitelists are required, the same for some datacenter firewall to allow the installation of Extensions. Some enterprise customers maintain a whitelist of domain that are allowed to transit the proxy/firewall. The underlying docker configuration process uses standard docker registry access to pull images (hosted in docker hub). In general, the following hosts are used:
INFO
-
extensions.clearpassbeta.com
-
registry-1.docker.io
-
index.docker.io
-
auth.docker.io
-
production.cloudflare.docker.com
This is all also geo dependent to some degree and based on various AWS services, so AWS redirects and geo location services will vary. Finally, this all runs via standard HTTPS (port 443).
Extension Logs/Enable Debugging
If you have a requirement to access and view the logs from the Extension, you can turn on different logging levels from the Extension GUI. Adjust the logLevel to ‘DEBUG’ and restart the extension as shown below.
Logs can then be viewed from the ‘Show Logs’.
Remember after changing the logging level, as with any extension configuration change the extension will need to be restarted for this change to take effect.
Accessing the extension logs using ‘Collect Logs’ system function
In addition to viewing the logs as shown above, logs can also be collected and examined via the Policy Manager Collect Logs system function (Administration > Server Manager > Server Configuration > [Select SERVER] > Collect Logs). This is extremely useful should you have a need to call for technical assistance.
If the support team needs to investigate a system issue, one of the items they regularly ask for is the system logs to aid with their diagnostic investigation. By default the “logLevel” is set to INFO, but TRACE, DEBUG, INFO, WARN, ERROR, FATAL can also be set as required. Any of the levels will display the information for the selected state and lower; if INFO is selected, it will show messages for INFO, WARN, ERROR, FATAL.
After the logs have been collected, downloaded and expanded, you can locate the extension logs in the following location in the folder structure PolicyManagerLogs > extension > your-extension-id as shown below. Note the file-name is the same as the running instance ID of the extension.
Monitoring extension statistics
There is a way to monitor extension’s critical resource statistics with the configurable parameter added as part of the extension’s configuration. To enable extension statistics set the “enableStats” parameter to true. Remember a restart of the extension is need to activate the change anytime the config is modified.
To navigate to statistics page, click Show Details.
This will show statistics similar to the following:
Monitoring authorization performance
Since we are authorizing against an external system, it could be relevant to monitor the performance of these transactions as you setup and deploy. If you suspect there is a performance issue, ClearPass provides a way to monitor the authorization processing time. The graph below shows an example of this data, navigate to Monitoring > Live Monitor > System Monitor [click on ClearPass Tab, then select [Authorization]….
Appendix B – Considerations for Installing in a Cluster
Extensions are not synced between ClearPass cluster members, and thus must be installed on each member separately.
Some Extensions can run in two modes: Periodic Sync Mode and Authorization Source Mode.
Periodic Sync Mode
If you are configuring the extension to poll external system periodically and utilize the resulting ClearPass Endpoint database during endpoint Authorization, then you only need to install the extension on one cluster member, often the publisher.
You may wish to install the extension on a second cluster member as a backup, but remember that both extensions will individually be updating the endpoint database. You may want to stagger the updates between the two extensions, for example, Subscriber1 updates at the top of the hour and Subscriber2 updates at 30 minutes after the hour.
Also, in this mode there is no need to explicitly enter an IP address during installation. The defaults will suffice and ClearPass will select an IP in the range specified in the server configuration.
HTTP Authorization Source Mode
In this mode we configure an HTTP Auth source that results in a HTTPS call to external system during endpoint authorization. In this deployment model the extension must be installed on every cluster node that process authentications. Also in this scenario every cluster member’s extension must be set to the exact same IP address during installation time, as the HTTP Auth source configuration is propagated globally across all cluster members.
For example, if the extension IP range is 172.17.0.0/16, we would set the extension to 172.17.0.5 on every cluster member during installation of the extension.
While we normally want to avoid duplicate IP addresses in a network, this is not a concern with ClearPass extensions. Each ClearPass node communicates internally only with its own extension, and this traffic is not routed outside of ClearPass.
Subscriber nodes support the same ability as publishers to install an Extension from the Extension store.
Appendix C – endpoint sync schedule settings
The syncSchedule and similar scheduling parameters sets how often ClearPass executes certain actions like syncing or pushing endpoints. This setting is based on a slightly modified version of the CRON job scheduler found in Unix-like operating systems. It can be used to schedule jobs to run periodically at fixed times, dates or intervals.
A ‘cron’ is a job scheduler. Any scheduled task is called a ‘cron job’. The syntax for a cron job schedule is as follows:
In our use of the cron scheduler, we’ve dropped the use of the last instruction ≤command to execute> and use only the time/date functions, see below for a number of examples of scheduling a sync process.
-
Schedule a sync to run at 2am daily:- 0 2 * * *
-
Schedule a sync to run twice a day at 5am and 5pm:- 0 5,17 * * *
-
Schedule a sync to run on every Sunday at 5pm:- 0 17 * * sun
-
Schedule a sync to run every 30 minutes:- */30 * * * *
-
Schedule a sync to run at 5pm on selected days:- 0 17 * * sun,fri
You can see from the above that the scheduling process is extremely flexible, alternatively https://crontab.guru/ is a great page for learning more about CRON scheduling.
Appendix D – Extension performance optimizations
Extensions are a critical part of ClearPass deployments today and with the increased dependency on extension interactions that involve periodic polling or real-time lookups, here are some of the best practice recommendations around optimizing overall performance when using extensions:
-
If the extension is used to periodically poll external systems and populate endpoint repository, ensure that it is not installed in all the nodes in the cluster. Ideally these type of extensions should only be installed on the publisher node since only publisher node can add endpoint entries to the database. For redundancy, it can be installed on another additional node but it is recommended to stagger the polling interval so that both do not attempt to poll and update endpoint database at the same time.
Example: 0 * * * *, This cron job runs at minute 0 of every hour (e.g., 00:00, 01:00, 02:00, etc.).
30 * * * *, This cron job runs at minute 30 of every hour (e.g., 00:30, 01:30, 02:30, etc.). -
If the extension is used for looking up attributes from external systems in real time during authentication, it should be installed in all the nodes handling authentication. Note that the context server config is replicated from the publisher. When using extension for real time lookup, ensure that the extension has the same IP address in all the cluster nodes.
-
If the extension is expected to do both real-time lookup and periodic polling, ensure that polling is enabled only on the publisher while the extension in subscribers can have the polling disabled by setting the “enableSyncAll” attribute to false.
"enableSyncAll": false,
WARNING
Having the extension installed on all the cluster nodes with enableSyncAll set to true would cause each cluster node to independently poll the external system and update endpoint repository. This could impact the performance of ClearPass. Hence it is strongly recommended to enable endpoint sync only on the extension installed on the publisher and on another cluster node for redundancy.
-
Some 3rd party systems support fetching delta updates vs fetching all of the device information every polling cycle. The extensions that support fetching delta updates are: Workspace ONE Crowdstrike Falcon Microsoft Intune Mosyle SentinelOne Service Now
For these extensions, the syncUpdatedOnly attribute should be set to true in extension config so that the number of DB updates in ClearPass is minimized
"syncUpdatedOnly": true,For extensions that do not support syncUpdatedOnly, ensure that the sync interval is not aggressive. We recommend syncing at most twice a day and that too during off peak hours whenever a full sync is performed.
-
Some 3rd party systems can be very noisy in terms of attribute updates. There could be certain attributes that keep changing every sync interval like “Free Memory in Bytes”, “Last Check in Time” etc. There is no value in updating endpoints when such trivial attributes change for the device. Hence it is recommended to use “ignoreEndpointDifferences” attribute in extension configuration to ignore change in attributes that you do not care about in terms of ClearPass policies.
You can review the Audit Viewer in ClearPass under Monitoring > Audit Viewer to see what attributes are being updated for endpoints to check if there are unnecessary updates.
Sample for JAMF extension:
"ignoreEndpointDifferences": "Last Update, Report Date UTC, Last Contact Time UTC, Last Inventory Update UTC, Last Reported IP, IP Address",Default for Microsoft Intune extension:
"ignoreEndpointDifferences": "Last Sync Date Time, Free Storage Space in Bytes", -
To further optimize the number of endpoints being updated in ClearPass, you can specify which attributes are being used in the ClearPass policies so that only changes to those attributes would trigger an update to the endpoint. This is done by listing out the specific attributes under endpointAttributes in extension configuration.
Sample for JAMF extension:
"endpointAttributes": "Group names, MDM Enabled, Managed, Remote Managed, Supervised, Serial Number", -
Setup extension to restart unless it was intentionally stopped. A restart policy can be defined in extension configuration to ensure that the extension starts up automatically after server reboots and such. Restart policy of “unless-stopped” would ensure the extension always starts up unless it was manually stopped.
“restartPolicy”: “no” — The extension will not be automatically restarted after the server is restarted.
“restartPolicy”: “always” — The extension will always be restarted after the server is restarted.
“restartPolicy”: “unless-stopped” — The extension will be restarted unless it was stopped prior to the server restart, in which case it will maintain that state.
“restartPolicy”: “on-failure:N” — If the extension fails to restart, the value for “N” specifies the number of times the extension should try to restart. If you do not provide a value for “N”, the default value will be “0”.
The “restartPolicy” parameter is not present by default in extension configurations. When it is not present, if the system is restarted a default policy is applied to the extension to maintain the state it was in before the restart. If the “restartPolicy” parameter is added to the configuration but later removed, the extension will then revert to the default restart policy.
Appendix E – Sample attributes from VMware Worskspace One
When airWatchExtensiveSearch is set to true:
| "Source" | "WorkspaceONE", |
|---|---|
| "WorkspaceONE UDID" | "8D667CAA15ACCD48B785A104031DE3A0", |
| "WorkspaceONE UUID" | "ea6019a9-f592-41f9-8340-24c796fd02a6", |
| "WorkspaceONE Owner" | "bikki", |
| "WorkspaceONE Device ID" | "40848", |
| "WorkspaceONE Compliance" | "NotAvailable", |
| "WorkspaceONE Compromised" | "false", |
| "WorkspaceONE Last Update" | "2023-04-27 14 |
| "WorkspaceONE MDM Enabled" | "true", |
| "WorkspaceONE Last Check In" | "2023-04-27 14 |
| "WorkspaceONE Serial Number" | "M4N0CX12R927169", |
| "WorkspaceONE MDM Identifier" | "8D667CAA15ACCD48B785A104031DE3A0", |
| "WorkspaceONE Enrollment Status" | "Enrolled", |
| "WorkspaceONE Device Friendly Name" | "B07D64852C5D-BG", |
| "WorkspaceONE Enrollment User Name" | "bikki" |
When airWatchExtensiveSearch is set to false:
| "Source" | "WorkspaceONE", |
|---|---|
| "WorkspaceONE UDID" | "8D667CAA15ACCD48B785A104031DE3A0", |
| "WorkspaceONE UUID" | "ea6019a9-f592-41f9-8340-24c796fd02a6", |
| "WorkspaceONE Model" | "VivoBook_ASUSLaptop X571GT_F571GT", |
| "WorkspaceONE Owner" | "bikki", |
| "WorkspaceONE Group ID" | "9835", |
| "WorkspaceONE Platform" | "WinRT", |
| "WorkspaceONE Device ID" | "40848", |
| "WorkspaceONE Ownership" | "Undefined", |
| "WorkspaceONE Compliance" | "Compliant", |
| "WorkspaceONE Group Name" | "HPE Aruba Networking", |
| "WorkspaceONE Is Roaming" | "false", |
| "WorkspaceONE Compromised" | "true", |
| "WorkspaceONE Last Update" | "2023-04-27 14 |
| "WorkspaceONE MAC Address" | "Bxxxxx5D", |
| "WorkspaceONE MDM Enabled" | "true", |
| "WorkspaceONE Last Check In" | "2023-04-27 14 |
| "WorkspaceONE Serial Number" | "M4N0CX12R927169", |
| "WorkspaceONE MDM Identifier" | "8D667CAA15ACCD48B785A104031DE3A0", |
| "WorkspaceONE Operating System" | "10.0.22621", |
| "WorkspaceONE Enrollment Status" | "Enrolled", |
| "WorkspaceONE Is Network Tethered" | "false", |
| "WorkspaceONE Device Friendly Name" | "B07D64852C5D-BG", |
| "WorkspaceONE Enrollment User Name" | "bikki", |
| "WorkspaceONE Is Device DND Enabled" | "false", |
| "WorkspaceONE Is Cloud Backup Enabled" | "false", |
| "WorkspaceONE Enrollment Email Address" | bikki.gupta@hpe.com, |
| "WorkspaceONE Is Device Locator Enabled" | "false", |
| "WorkspaceONE Is Activation Lock Enabled" | "false", |
| "WorkspaceONE System Integrity Protection Enabled" | "false" |
5.6 - Ivanti MDM (formerly MobileIron)
Introduction
MobileIron Cloud is now branded as Ivanti Neurons for MDM and MobileIron Core is branded as Ivanti Endpoint Manager Mobile. ClearPass uses a single extension for both cloud and core platforms and hence the extension is named Ivanti MDM (formerly MobileIron On-Prem & Cloud).
Version History
This integration is implemented through ClearPass Extensions which run independent of the ClearPass platform version. Hence extensions can be updated and released outside of ClearPass release cycles.
What’s new in v4 Extension? – Important Changes
Version 4.0 is the new publicly available version, and it will have the following additional functionality:
-
Ivanti MDM extension v4 supports lookup based on Device Identifier or Device GUID, which removes the dependency on internal identifiers, such as serial numbers, which are not consistently accessible. It also eliminates MAC address identifiers, which are problematic because devices can have multiple or randomized MAC addresses.
-
Ivanti MDM extension v4 adheres to the main requirement to use certificate-based authentication (e.g., EAP-TLS) with the new service. In conjunction with this, it is required to include the Device Identifier or Device GUID in the subject alternative name (SAN) of your certificate profiles. Please refer to Onboard Certificate Enrollment for more details on SCEP certificate profile configuration.
-
Ivanti MDM extension v4 is built on a revamped underlying Extension framework which aims to standardize common configuration parameters across multiple extensions.
-
Extension v4 also has updates to branding from MobileIron to IvantiMDM. The default endpoint attribute prefix will also be “IvantiMDM” starting with extension v4. Existing deployments moving from v1 to v4, please follow the guidance given under attributePrefix extension configuration if you wish to continue using MobileIron as attribute prefix.
What’s new in v1 Extension? – Important Changes
Version 1.0 of the extension provides two key features.
-
Added support for MobileIron Cloud. MobileIron Cloud has not been previously supported, this extension adds support for Cloud version R50 and above.
-
Support for Common Platform Services Event Notifications. This provides for a near-real-time notification feed as discussed below, to allow ClearPass to maintain an up-to-date view of the managed devices, without the need to constantly poll. This is supported in MobileIron Cloud starting in R50 and in MobileIron Core starting in 9.5.
Note that ClearPass has supported MobileIron Core for several years, our support for this does not change. This Extension however can complement an existing MobileIron Core deployment or it can possibly replace it if the version of Core in 9.5 or greater and thus supports the Common Platform Services.
API Product |
MI API’s supported | Native ClearPass Polling | Native ClearPass Polling + Extension CPS API [Hybrid deployment] | MobileIron Extension CPS API |
|---|---|---|---|---|
| Pre-Core 9.5 | V1 | Yes | Yes* | No |
| Core 9.5 + | V1 + CPS | Yes | Yes | Yes |
| Cloud R50 + | CPS | No | No | Yes |
INFO
For the Pre-Core 9.5 in Hybrid mode, only the Native ClearPass Polling API V1 are supported, the CPS API’s are not available in the pre 9.5 Core so adding the Extension to add real-time updates is not supported.
As discussed, the Extension has the ability to ingest endpoint attributes (Core 9.5+ & Cloud R50+) and to receive a near real-time [typically circ. 5 seconds] feed of changes within the customer’s MobileIron tenant. There are five use-cases where ClearPass receives a real-time event notification.
-
A New Device Added
-
A Device Retired/Deleted
-
A Device changes state to “out of Compliance”
-
A Device changes state to “in Compliance”
-
A Device is Wiped
When one of the above events occurs, MobileIron places an event notification in a messages queue, all ClearPass nodes that are subscribed for that event, would then receive that message, afterwards, that message is purged from the system.
If no active ClearPass nodes are available to consume the message, the message is published to the messaging server, the message would be retained in the system for a maximum duration of 3 hours before it either gets consumed by a re-connecting ClearPass node or gets deleted out of the system.
In comparison, the legacy approach [still available] is to poll the tenant every hour and ingest all of the endpoint data, then update the delta changes into the EndpointDB. The obvious issue with the legacy approach is that if a device goes out of compliance, ClearPass won’t know of the state change until the next poll. Similarly, if a new device is added, typically the access-policy is that when a SmartDevice accesses the network, ClearPass checks to ensure it’s a known managed device. In the legacy approach access would be denied until the next poll had completed. Utilizing the full polling capabilities in conjunction with the event notifications allows a near real-time local view of all of the managed Endpoints.
Below, we cover installation and configuration of the extension, configuration within MobileIron, and finally ClearPass configuration. Additionally, we document a solution which allows a device to be ‘tagged’ as in or out of compliance. This creates an event notification and allows for testing of the end-to-end workflow.
Software Requirements
The minimum software version required for CPPM is 6.11.0 . At the time of writing, version 6.11.10 is available as the long supported release and 6.12.4 is available as the short supported release. CPPM runs on hardware appliances with pre-installed software or as a Virtual Machine under the following hypervisors. Hypervisors that run on a client computer such as VMware Player are not supported.
-
VMware vSphere Hypervisor (ESXi) 7.0 U3c and 8.0
-
Windows Server 2019 with Hyper‑V and Windows Server 2022 with Hyper‑V.
-
KVM on CentOS Stream 8, CentOS Stream 9, Ubuntu 20.04 LTS, and Ubuntu 22.04 LTS.
ClearPass Installation and Deployment Guide
This document assumes your ClearPass environment is already configured and operational. If you require assistance with basic deployment, refer to the following deployment guide:
https://arubanetworking.hpe.com/techdocs/ClearPass/6.11/Installation-Guide/Default.htm
ClearPass Extensions
The integration between ClearPass Policy Manager and external systems is driven through a ClearPass capability known as Extensions, a sub-component of the ClearPass Exchange Integration framework. ClearPass Extensions are micro-services running on top of the base ClearPass platform. These micro-services enable HPE Aruba Networking to deliver new features outside of the main software release cycle and facilitate a faster time to market for specific features and integrations. Configuration and control of ClearPass Extensions is accomplished through the ClearPass Guest GUI, as covered later in this document.
Installing Extension
ClearPass Extensions are easy to install from the ClearPass Extensions Store. In a cluster, ClearPass Extensions can be installed on a subscriber independently of the publisher. Multiple copies of the same extension can be installed if needed as well.
INFO
Internet access is required for ClearPass Policy Manager to install the ClearPass Extensions from the Extension Store. Starting with ClearPass 6.12, extensions can be can be installed offline as well. Offline ClearPass Extension images are available on HPE networking support portal.
Access to the extension store
Access the Extension Store to download and install ClearPass extensions. The Extension store utilizes the same HPE Passport account credentials used to validate support entitlement in the Software Updates Por- tal. This is configured under Administration > Agents and Software Updates > Software Updates as shown below. Ensure that valid HPE Passport credentials have been entered in these fields to enable Ex- tension download capabilities.
Installing the Extension from Store
Extensions are installed from the extension page in ClearPass Guest, as shown below. Access it from Guest > Administration > Extensions
From here, click on ‘Install Extension’, and the search box below appears.
Enter “Intune” and click on ‘Search’, see the example below.
INFO
Here we are using Intune as an example. The installation steps are the same for all the extensions. For your deployment, please search for the appropriate extension like Jamf, Mosyle, Crowdstrike, etc.
All currently available extensions are listed in the page: https://www.arubanetworks.com/techdocs/NAC/clearpass/integrations/clearpass-extension/extensions-list/
Click on the extension name and then click “Install.”
In the “Install Extension” dialog box, set the IP address if necessary, as described in section “Extensions and IP address configuration support” below. Do not check the box to start the extension at this time. Click the “Install” button.
In this example, we’ve not entered an IP address for the extension to use, if there is intent to use the extension as an authorization source set this value and ensure its set the same on all nodes where the Extension is deployed.
The extension will download and appear in a “Stopped” state. Notice the options to Start, Delete, Reinstall, Show Logs, and view Configuration. Click on “Configuration” to view settings.
After the extension has been installed, proceed to configure the extension
A copy of the default Extension configuration is shown above, this will need to be modified for your deployment.
INFO
Password and sensitive configuration items are obfuscated when presented in both the Extension GUI or in the Explorer configuration.
WARNING
The configuration attributes are case sensitive. It is recommended to refer the default configuration sample while editing your configuration.
Extensions and web proxy support
Extensions support communications with 3rd parties via a web proxy. This adds incremental proxy functionality. If a proxy is defined in ClearPass Policy Manager, then an extension will inherit that configuration. See later in the document on how to disable the proxy inherited configuration.
INFO
Note that the Policy Manger web proxy configuration is ONLY read by the extension at installation time. If the web proxy configuration is changed in Policy Manager, then the extension must be re-installed so the new settings are re-read and bonded to the extension.
Extensions and IP address configuration support
ClearPass uses a non-externally routed IP address range to communicate with the Extension. The default is 172.17.0.0/16. You may configure a different range, if desired. This is especially useful when deploying extensions across nodes within a cluster where there is the requirement for a fixed consistent IP address for the extension across the cluster.
Changing the “Extensions Network Address” range is only necessary if either the ClearPass MGMT or DATA interface are using an IP address in the extension default range of 172.17.x.x/12, or if ClearPass needs to communicate with some external device in that range.
To Configure the base Extension IP subnet within Policy Manager navigate to Administration > Server Manager > Server Configuration [chose your node] Service Parameters [ClearPass system service].
INFO
The subnet defined here for the extension framework must fall within the following subnet range 10.0.0.0/8, 172.16.0.0/12, 192.168.0.0/16 as defined by RFC1918. For best results, set the network address range to a subnet that does not exist in your enterprise, and restart the extension service for this change to take effect.
Never set the DATA or MGMT IP address to use an address that matches the Extension Network
INFO
Note that changing the extension base IP address will require the extension service to be restarted.
After the extension has been installed, proceed to configure Ivanti MDM and ClearPass.


A copy of the default Ivanti MDM Extension is shown above, this will need to be modified for your deployment.
Configuring the Ivanti MDM Extension
It is important to set the configuration within the Extension to meet your needs. The extension can be configured to sync data in multiple ways as well as be used as a “real-time” authorization to Ivanti MDM. As shown on the previous page there are several parameters required to configure this version. Not all switch settings need to be set but some are mandatory. We have divided the parameters into two tables, one for Ivanti MDM Extension-specific configuration parameters and the other for Extension framework configuration parameters that are common across multiple vendor Extensions.
Ivanti MDM specific extension configuration attributes
| Attribute | Description | Values/Examples |
|---|---|---|
| ivantiMDMUrl | URL to access the cloud / core Ivanti MDM instance | https://XXXXX.mobileiron.com |
| ivantiMDMUserName | Username used to make API calls against Ivanti MDM | cppm-api@XXXX.com |
| ivantiMDMPassword | Password corresponding to the API username | XXXXXXXXXXX |
| syncPageSize | The page size used when puling data from Ivanti MDM | 50 |
| enableMqtt | This setting enables processing of MQTT messages from Ivanti MDM | true |
| mqttUrl | URL from which Ivanti MDM would send MQTT updates (Common Platform Services Notification) | ssl://queue-XXXXX.mobileiron.com:8883 |
| mqttUserName | Username which has Common Platform Services Notification enabled | cppm-api@XXXX.com |
| mqttPassword | Password corresponding to mqttUserName | XXXXXXXXXXX |
| toggleEndpointStatus | If a device is Wiped or Retired, toggle the endpoint status from "Known" to "Unknown" | true |
Mandatory fields are: ivantiMDMUrl, ivantiMDMUserName, ivantiMDMPassword
Common extension attributes
Extension framework configuration parameters (common configuration)
| Attribute | Description | Default Values |
|---|---|---|
| logLevel | Logging level for troubleshooting | “INFO” |
| verifySSLCerts | Should SSL certificates be validated when communicating with external context sources | true |
| enableEndpointCache | Cache endpoint attributes to optimize authorization queries, avoid repeated DB queries and reduce API calls to external context sources | true |
| endpointCacheTimeSeconds | The duration in seconds to cache the endpoint attributes | 300 |
| syncUpdatedOnly | If this option is set to true, only the endpoints updated after the previous sync would be fetched from the context source. Note that this option only works for the third-party context sources that have APIs to support this functionality. If this option is set to false, all endpoints are fetched at every sync interval. |
true |
| syncAllOnStart | If this option is set to true, when the extension starts, the system will attempt to sync all endpoints in the external context source to ClearPass. Note that if you have a large number device context to be fetched, it would take a long time for the initial sync to complete. When used along with syncUpdatedOnly, the subsequent syncs should be faster. |
true |
| enableSyncAll | Enable periodic sync of all endpoints | true |
| syncAllSchedule | The schedule for when the Sync All Endpoints process should run. Note: This uses CRON type scheduling. |
0 2 * * 6 |
| enableStats | Enable display of extension statistics | false |
| statsUsername | Create a username to access the extension statistics page | Give any username you want to use |
| statsPassword | Create a password to access the extension statistics page | Give any password you want to use |
| bypassProxy | Bypass the web proxy configured on ClearPass Policy Manager | false |
INFO
There are changes in syntax for the sync parameters in Ivanti MDM Extension v4 due to updates in the underlying extension framework.
Configuration of syncAllSchedule is covered in more detail in Appendix C at the end of this documentation, this is used to control the frequency of when the sync process runs. syncUpdatedOnly when set to true, will only ingest changes for managed endpoints. syncAllOnStart determines if when the extension is started or restarted should it immediately run the sync process or wait until the syncAllSchedule job is run.
The two values of enableEndpointCache and endpointCacheTimeSeconds are specifically used in conjunction with the extension is used as an Authorization source to retrieve real-time data for a known endpoint. If using the Extension in combination as discussed later with a HTTP authorization source which needs to do lookup based on Ivanti MDM Device ID / GUID as following:
-
GET /?identifier=:identifier
-
GET /?identifier=:deviceGuid&identifierType=GUID
Then these switches will ensure that if the extension is asked to refresh data, it will check the endpointCacheTimeSeconds to decide if the data current held is fresh or stale.
Leave syncPageSize, verifySSLCerts and logLevel at their default else otherwise advised.
An example of an Ivanti MDM extension configuration is below. Include appropriate values for your environment based on the information gathered before, select Restart and click on Save Changes to start the extension.
The configuration item “attributePrefix” controls the prefix that is added to the endpoint attributes fetched from Ivanti MDM and subsequently used in policy conditions. If you already have MobileIron v1 and is looking to update to latest version of the extension, you can configure attributePrefix as “MobileIron” so that extension will continue to use the same prefix as before. If this is a new deployment or if you wish to switch to new attribute prefix, you can leave the attributePrefix empty as shown below so that ClearPass will use “Ivanti MDM” as prefix for endpoint attribute names.

Following the restart, click on “Show Logs”. If contact is made, and access is granted based upon the configuration above with your Ivanti MDM credentials, you should see something similar to shown below:

Ivanti MDM Configuration – Common Platform Services [CPS]
Below we cover the configuration required in the Ivanti MDM environment. To aid the configuration of the extension it helps to collect several items from the Ivanti MDM tenant. Within the configuration, there are two username/password combinations required. They are covered below.
Account Creation
Ivanti MDM-Tenant-Credentials: The first pair
[ivantiMDMUserName/ivantiMDMPassword] is used by the extension to
communicate with the Ivanti MDM instance for calling API’s that allow
the extension to retrieve all the endpoint data that is then populated
into the ClearPass EndpointDB. For the Ivanti MDM-
Tenant-Credentials, it is suggested that an account be created in
Ivanti MDM dedicated for this function. These credentials can be an
Administrator account, but it’s recommended that a new account with the
“Device Registration” role be used. To create the account. Users ->
+Add

Then select the API User and enter username and password to create the user.


Once the user account has been created, select it to view details and ensure the user has ‘Device Registration’ role assigned.

Ivanti MDM-MQTT-Credentials: The second pair [mqttUserName/mqttPassword] is used by the extension to communicate with the Ivanti MDM Common Platform Services. This service sends the real-time-notifications. It is possible to use the same account as above or a separate account. If using the same account, ensure that the Common Platform Services role has been added to the user account. In the Roles tab, click on Actions -> Assign Roles
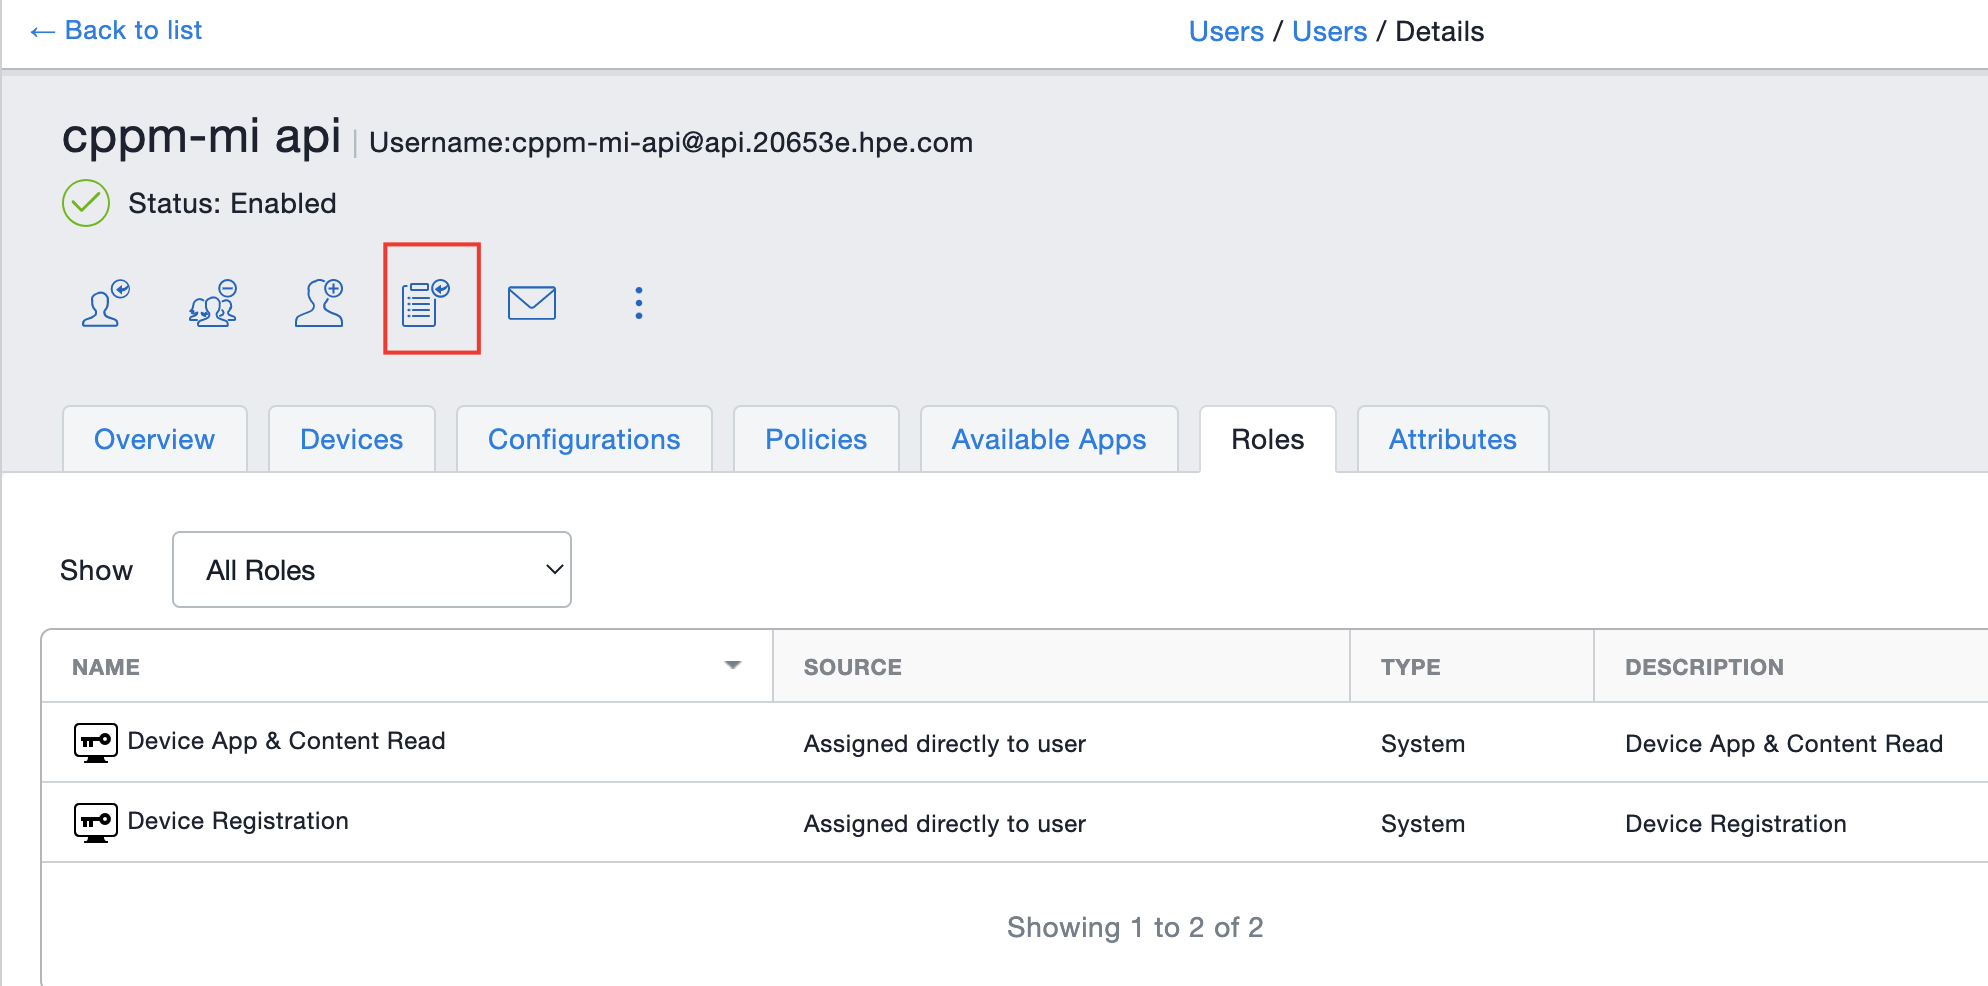
Next add the role to the user. Note, to add the role Common Platform Services scroll down as highlighted below to locate the role. Select the role, and Next.

Click Done to complete adding the role

Enabling CPS framework
Following the creation of the accounts If the near-real-time event notification is to be used, then there are additional configuration steps required. To configure and enable the CPS Event Notifications follow the below steps. Navigate to the Admin > System > Common Platform Services Notification. Click on Common Platform Services Notification toggle button and enable the service.

If the CPS role has not been added to an existing user, then create a new CPS user and assign CPS role to this new user.
Manually triggering an event
Here are specific instructions showing an example of how use custom attributes and compliance policy to force devices in and out of non-compliant state: This section allows for the creation of an event to test the end-to-end workflow of the system.
A good use case would be to toggle a value of a custom attribute (say, nacCompliant) for devices which have moved out of compliance from true to false and then, use the attribute to take actions on the device. There are multiple ways to force compliance actions on the device to render it non-compliant. Please refer the below steps:
1: Create a compliance action policy: Navigate to Policies on the admin portal menu bar and click on Add

2: Add policy rule/definition to determine the criteria for a device going non-compliant: Click on “Custom Policy” option to create a custom compliance action policy.

Choose a custom policy rule: Enter a policy name and create a criteria query to specify policy rule, E.g. If the device ownership is ‘User Owned’ or the device OS is type ‘Android’ mark it as non-compliant and click Next.

3: Distribute the policy to all devices and click Done

4: Perform state changes on the device to match the criteria, this would mark the device non-compliant, in which case, device_not_compliant events would be triggered e.g., Changing device ownership to ‘User Owned’ and initiate force check-in and device sync.
Change an endpoint attribute to trigger an event notification – part1

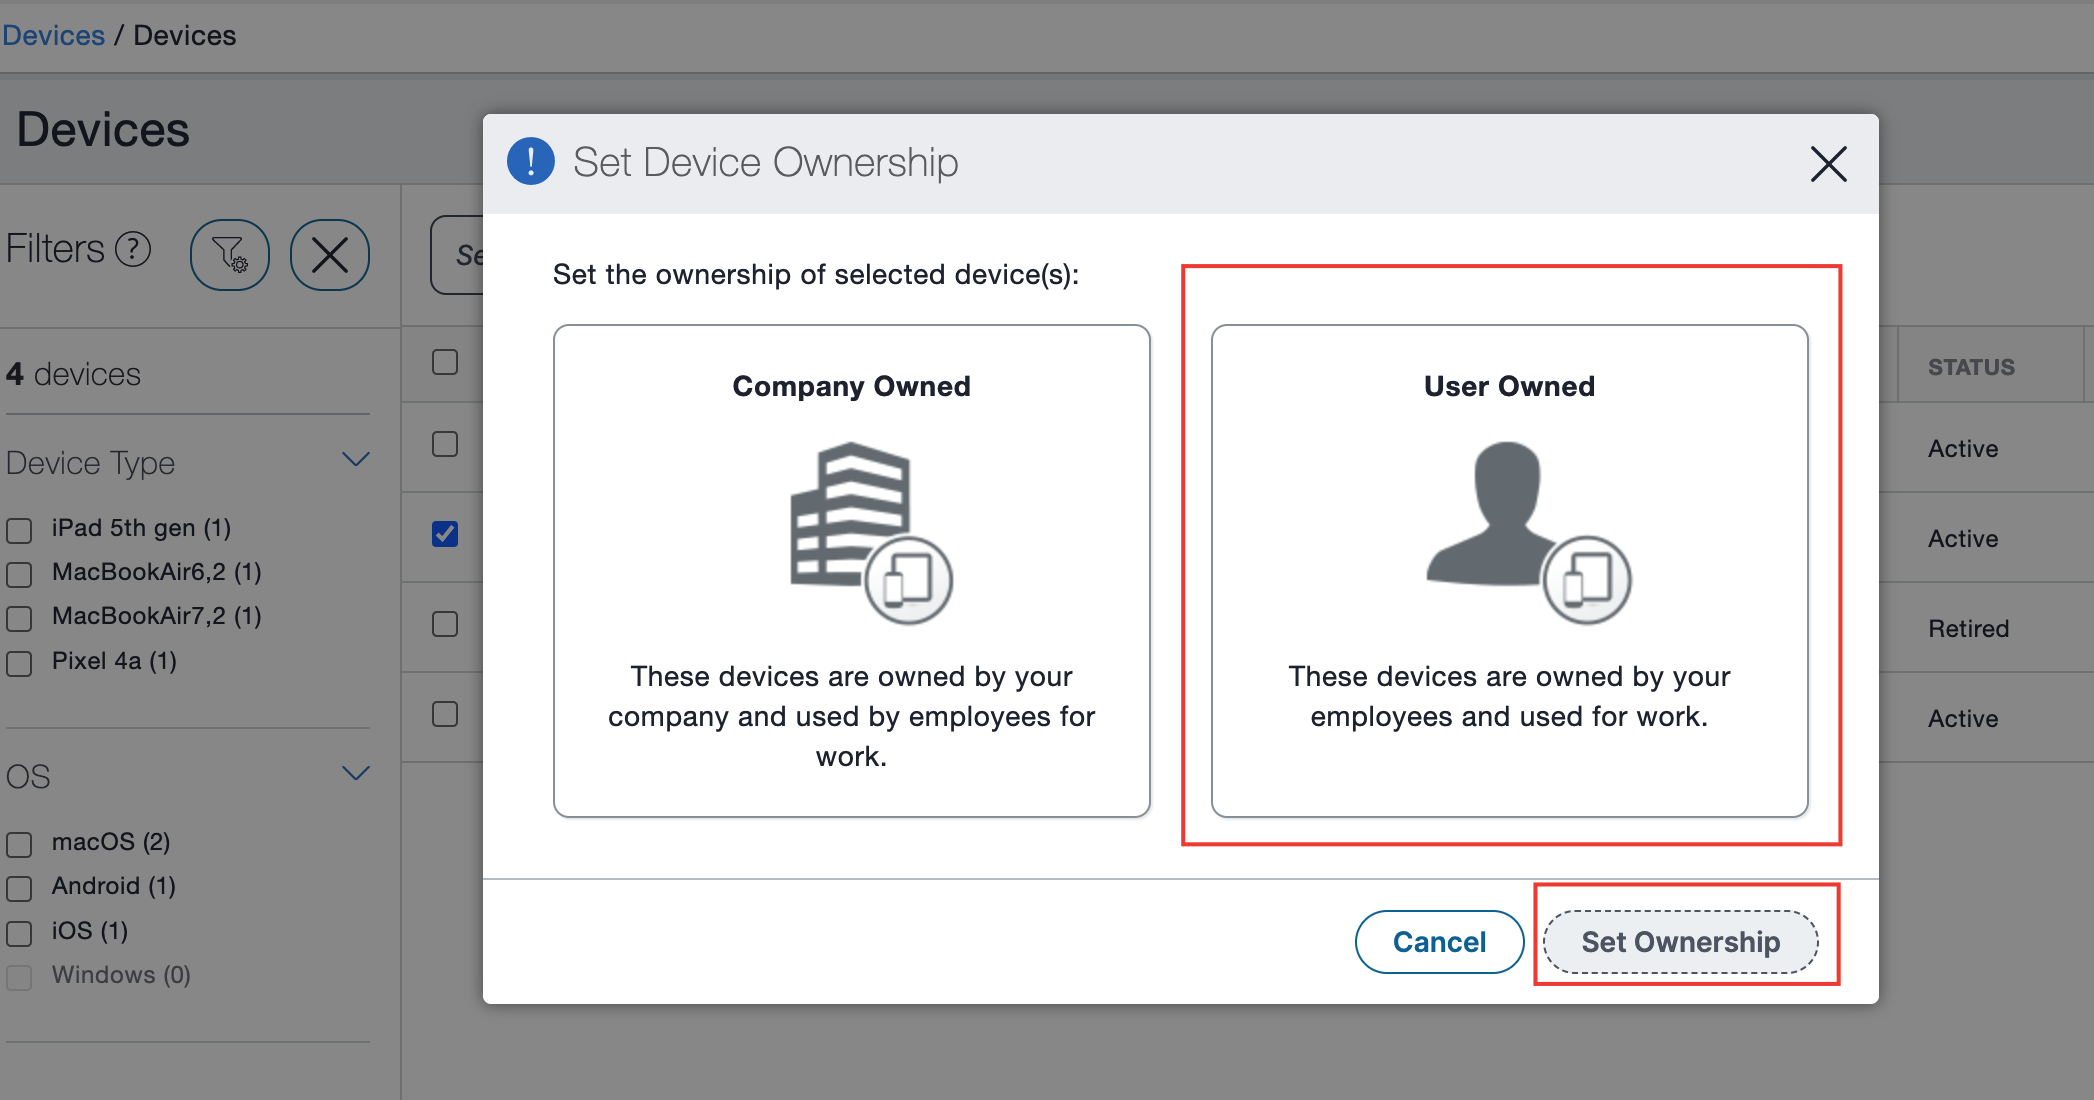
Some sample policy rules affecting large enclosure of devices at once might not be recommended.
-
OS is iOS
-
Last check-in is 10 hrs. ago
-
Ownership Type is ‘User Owned’
5: To bring the device back to compliance, either perform reverse device state changes or delete the compliance action policy and initiate force-sync on devices.
ClearPass Policy Manager Configuration
The final part is the configuration on ClearPass Policy Manager. Depending on how you use the integration will ultimately define how you configure the interaction between Ivanti MDM and the ClearPass Extension and Policy Manager.
If you plan on using the extension to interface with Ivanti MDM, then configure the extension and its associated polling. Following this, configuring ClearPass Policy Manager configuration is no different in how you would authenticate and authorize any other device, it’s really about how you use the endpoint database attributes in your authorization policy checks.
If you plan on using the extension to complement the existing Ivanti MDM Endpoint Context Server polling, then overall this is a hybrid deployment. Using the built-in polling to ingest the endpoint details once per day in addition to using the extension to ‘trickle-feed’ changes into the endpoint-database as they happen. This hybrid deployment can remove the need for the lengthy polling; however, we still recommend a poll be run once per day.
When mac randomization is enabled, MAC address based lookups cannot be done against endpoint database. Android OS also stopped sharing MAC Address with MDM solutions like Ivanti MDM. Hence there is a need to fetch device attributes based on a unique identifier other than MAC Address. Ivanti MDM extension v4 has the ability to lookup device information based on either Device Identifier or Device GUID. This is a real time lookup by using the unique device identifier embedded within device certificate. Within the certificate, the identifier can be embedded either as CN or as one of the Subject Alt Name fields like Subject-AltName-URI.
Regardless of which deployment you configure, as noted above the power of the integration is how you use the endpoint data base attributes. Here are a few simple examples.

To add, a little more clarity, if a device is retired from within Ivanti MDM then the endpoint status flag is set accordingly. Within your enforcement policy you need to add a rule {#1} as shown above, where, when the status of the endpoint is set as RETIRED, the enforcement action would be to Deny Access. This can be adjusted to fit your own needs, as an example if you detected a device trying to access the network which has been deleted/retired from the system, you may want to have a workflow that drops the device into a captive portal role which directs the user to contact the helpdesk for assistance.

HTTP Authorization Mode
To complete the configuration to use the Extension as a ‘real-time’ authorization source, configure an HTTP authorization source within ClearPass. With Ivanti MDM as an authorization source to the extension, ClearPass can receive the latest data from the Ivanti MDM platform for devices based on Device Identifier or Device GUID. This is more real-time but consideration needs to be made relative to the number of API calls that would be made.

Click on Next. This will advance to the Primary Tab provide the connection details.
INFO
The Base URL IP address is the IP address of Ivanti MDM extension.

Set the Base URL as http://ip_of_the_extension/ and pay special attention to HTTP not HTTPS, and also the addition of “/” in the path. It is mandated that a Login Username/Password is entered, but it is not used, so this can be set to anything.
Click on “Next”. This will advance you to the Attributes Tab where you need to provide the authorization attributes. Click on “Add More Filters”. Provide a Name for the filter and then a Filter Query. It’s extremely important that the Filter Query is defined correctly. This is the query string that is sent to the Ivanti MDM extension asking for context about the endpoint. The query is indexed off either the Device Identifier or the GUID in the certificate of the authenticating endpoint. For completeness, the Filter Queries are provided here. Depending upon the type of lookup you want to do, select the appropriate filter and copy it carefully.
| Device Identifier lookup | %{Certificate:Subject-CN} |
|---|---|
| Device GUID lookup | %{Certificate:Subject-CN}?identifierType=GUID |
Next build out the definitions of the attributes that will be returned from the Filter Query. These attributes will subsequently be used within our policy-evaluation and ultimately the enforcement policy applied. You can choose whatever attributes you want to be exposed under authorization based upon what you list here. A complete list is available in Appendix A, the first fields in BOLD listed in Appendix A translate to the fields you can enter when configuring the query results, a short example is below.

INFO
If you have configured a custom value for “attributePrefix” in extension configuration, replace “Ivanti MDM” with the custom string in the Name and Alias Name fields shown above.
Once the HTTP authorization source is defined you can use the returned attributes in your policy processing. As an example, lets view the returned attributes from the above from an authentication request in access-tracker.
Below can be see the result of a real-time query from Ivanti MDM based upon the attributes configured in the authorization source above, this data has been returned and is available to the policy at authentication time.

Onboard Certificate Enrollment
Managed devices should also be configured to authenticate securely to the network. EAP-TLS is considered the most secure authentication method available due to mutual authentication using digital certificates. Ivanti MDM configuration profiles help setup fully automated enrollment workflows. ClearPass Onboard CA can be used as certificate issuing authority with provisioning done using Simple Certificate Enrollment Protocol (SCEP). The steps below show how to setup SCEP enrollment against Onboard CA. Note that Onboard CA can be setup either as root or intermediate.
First, we need to enable SCEP enrollment for ClearPass Onboard CA. Navigate to ClearPass Onboard > Certificate Authorities > Click on the CA you want to enable SCEP for > Edit > Check the box to enable SCEP server as shown below.
Select SCEP secret as validation method and add a SCEP shared secret.

After saving the changes, click on the CA again > Trust Chain > Download Bundle to download as a .pem file. We will be uploading this certificate to the SCEP profile in Ivanti MDM later.

On Ivanti MDM, navigate to Configurations and add a new profile:

Search for certificate and select “Identity Certificate” profile:

Configure SCEP profile as shown below:


Once the SCEP profile is setup, you can create a WiFi profile to use the client certificate for EAP-TLS authentication


Appendix A – Troubleshooting and Support
Here we list some basic troubleshooting steps. If you need any help beyond this, please reach out to HPE Aruba Networking Support.
Check API Access Application Control restrictions
If you’ve previously hardened your ClearPass deployment with Application Access Controls, it’s possible that the Extension will not work. Reviewing the Extension Log might show something like the following after immediately starting the Extension. This likely indicates the ClearPass Application API’s are in place.
Example of Extension authorization failure due to Policy Manager Application Control:
[2020-03-16T15:42:21.083] [INFO] Intune - Server listening on port 80.
[2020-03-16T15:42:21.243] [DEBUG] Intune - Request “GET ‘https://172.17.0.1/api/server/version’” took 51.91ms.
[2020-03-16T15:42:21.245] [DEBUG] Intune - <!DOCTYPE html><html>
<head>
<title>
Error 403 (Forbidden)
</title>
<script language=“javascript”>
function reloadPage() {
var locHref = window.location.protocol + “//” + window.location.hostname;
window.location.href = locHref;
}
</script>
To resolve this issue, add the IP address of the Extension to the list of nodes permitted to access the API by navigating to Administration > Server Manager > Server Configuration {choose your node} > Network
INFO
For this reason its good practice to fix the IP address of the extension at installation time such that it doesn’t change over time and break the application controls.
Checking on the Extension Service
The ClearPass Extensions are supported by a system service which must be running.
Restarting this service will affect all deployed and running extensions.
To check on the state of the Extension Service, or to restart the service, go to Administration > Server Manager > Server Configuration > [SERVER] > Service Control. By default this service is automatically started.
Extensions and web proxy / firewall whitelisting
If ClearPass Policy Manager has been configured with a proxy, it’s still possible that domain whitelists are required, the same for some datacenter firewall to allow the installation of Extensions. Some enterprise customers maintain a whitelist of domain that are allowed to transit the proxy/firewall. The underlying docker configuration process uses standard docker registry access to pull images (hosted in docker hub). In general, the following hosts are used:
INFO
-
extensions.clearpassbeta.com
-
registry-1.docker.io
-
index.docker.io
-
auth.docker.io
-
production.cloudflare.docker.com
This is all also geo dependent to some degree and based on various AWS services, so AWS redirects and geo location services will vary. Finally, this all runs via standard HTTPS (port 443).
Extension Logs/Enable Debugging
If you have a requirement to access and view the logs from the Extension, you can turn on different logging levels from the Extension GUI. Adjust the logLevel to ‘DEBUG’ and restart the extension as shown below.
Logs can then be viewed from the ‘Show Logs’.
Remember after changing the logging level, as with any extension configuration change the extension will need to be restarted for this change to take effect.
Accessing the extension logs using ‘Collect Logs’ system function
In addition to viewing the logs as shown above, logs can also be collected and examined via the Policy Manager Collect Logs system function (Administration > Server Manager > Server Configuration > [Select SERVER] > Collect Logs). This is extremely useful should you have a need to call for technical assistance.
If the support team needs to investigate a system issue, one of the items they regularly ask for is the system logs to aid with their diagnostic investigation. By default the “logLevel” is set to INFO, but TRACE, DEBUG, INFO, WARN, ERROR, FATAL can also be set as required. Any of the levels will display the information for the selected state and lower; if INFO is selected, it will show messages for INFO, WARN, ERROR, FATAL.
After the logs have been collected, downloaded and expanded, you can locate the extension logs in the following location in the folder structure PolicyManagerLogs > extension > your-extension-id as shown below. Note the file-name is the same as the running instance ID of the extension.
Monitoring extension statistics
There is a way to monitor extension’s critical resource statistics with the configurable parameter added as part of the extension’s configuration. To enable extension statistics set the “enableStats” parameter to true. Remember a restart of the extension is need to activate the change anytime the config is modified.
To navigate to statistics page, click Show Details.
This will show statistics similar to the following:
Monitoring authorization performance
Since we are authorizing against an external system, it could be relevant to monitor the performance of these transactions as you setup and deploy. If you suspect there is a performance issue, ClearPass provides a way to monitor the authorization processing time. The graph below shows an example of this data, navigate to Monitoring > Live Monitor > System Monitor [click on ClearPass Tab, then select [Authorization]….
Appendix B – Considerations for Installing in a Cluster
Extensions are not synced between ClearPass cluster members, and thus must be installed on each member separately.
Some Extensions can run in two modes: Periodic Sync Mode and Authorization Source Mode.
Periodic Sync Mode
If you are configuring the extension to poll external system periodically and utilize the resulting ClearPass Endpoint database during endpoint Authorization, then you only need to install the extension on one cluster member, often the publisher.
You may wish to install the extension on a second cluster member as a backup, but remember that both extensions will individually be updating the endpoint database. You may want to stagger the updates between the two extensions, for example, Subscriber1 updates at the top of the hour and Subscriber2 updates at 30 minutes after the hour.
Also, in this mode there is no need to explicitly enter an IP address during installation. The defaults will suffice and ClearPass will select an IP in the range specified in the server configuration.
HTTP Authorization Source Mode
In this mode we configure an HTTP Auth source that results in a HTTPS call to external system during endpoint authorization. In this deployment model the extension must be installed on every cluster node that process authentications. Also in this scenario every cluster member’s extension must be set to the exact same IP address during installation time, as the HTTP Auth source configuration is propagated globally across all cluster members.
For example, if the extension IP range is 172.17.0.0/16, we would set the extension to 172.17.0.5 on every cluster member during installation of the extension.
While we normally want to avoid duplicate IP addresses in a network, this is not a concern with ClearPass extensions. Each ClearPass node communicates internally only with its own extension, and this traffic is not routed outside of ClearPass.
Subscriber nodes support the same ability as publishers to install an Extension from the Extension store.
Appendix C – endpoint sync schedule settings
The syncSchedule and similar scheduling parameters sets how often ClearPass executes certain actions like syncing or pushing endpoints. This setting is based on a slightly modified version of the CRON job scheduler found in Unix-like operating systems. It can be used to schedule jobs to run periodically at fixed times, dates or intervals.
A ‘cron’ is a job scheduler. Any scheduled task is called a ‘cron job’. The syntax for a cron job schedule is as follows:
In our use of the cron scheduler, we’ve dropped the use of the last instruction ≤command to execute> and use only the time/date functions, see below for a number of examples of scheduling a sync process.
-
Schedule a sync to run at 2am daily:- 0 2 * * *
-
Schedule a sync to run twice a day at 5am and 5pm:- 0 5,17 * * *
-
Schedule a sync to run on every Sunday at 5pm:- 0 17 * * sun
-
Schedule a sync to run every 30 minutes:- */30 * * * *
-
Schedule a sync to run at 5pm on selected days:- 0 17 * * sun,fri
You can see from the above that the scheduling process is extremely flexible, alternatively https://crontab.guru/ is a great page for learning more about CRON scheduling.
Appendix D – Extension performance optimizations
Extensions are a critical part of ClearPass deployments today and with the increased dependency on extension interactions that involve periodic polling or real-time lookups, here are some of the best practice recommendations around optimizing overall performance when using extensions:
-
If the extension is used to periodically poll external systems and populate endpoint repository, ensure that it is not installed in all the nodes in the cluster. Ideally these type of extensions should only be installed on the publisher node since only publisher node can add endpoint entries to the database. For redundancy, it can be installed on another additional node but it is recommended to stagger the polling interval so that both do not attempt to poll and update endpoint database at the same time.
Example: 0 * * * *, This cron job runs at minute 0 of every hour (e.g., 00:00, 01:00, 02:00, etc.).
30 * * * *, This cron job runs at minute 30 of every hour (e.g., 00:30, 01:30, 02:30, etc.). -
If the extension is used for looking up attributes from external systems in real time during authentication, it should be installed in all the nodes handling authentication. Note that the context server config is replicated from the publisher. When using extension for real time lookup, ensure that the extension has the same IP address in all the cluster nodes.
-
If the extension is expected to do both real-time lookup and periodic polling, ensure that polling is enabled only on the publisher while the extension in subscribers can have the polling disabled by setting the “enableSyncAll” attribute to false.
"enableSyncAll": false,
WARNING
Having the extension installed on all the cluster nodes with enableSyncAll set to true would cause each cluster node to independently poll the external system and update endpoint repository. This could impact the performance of ClearPass. Hence it is strongly recommended to enable endpoint sync only on the extension installed on the publisher and on another cluster node for redundancy.
-
Some 3rd party systems support fetching delta updates vs fetching all of the device information every polling cycle. The extensions that support fetching delta updates are: Workspace ONE Crowdstrike Falcon Microsoft Intune Mosyle SentinelOne Service Now
For these extensions, the syncUpdatedOnly attribute should be set to true in extension config so that the number of DB updates in ClearPass is minimized
"syncUpdatedOnly": true,For extensions that do not support syncUpdatedOnly, ensure that the sync interval is not aggressive. We recommend syncing at most twice a day and that too during off peak hours whenever a full sync is performed.
-
Some 3rd party systems can be very noisy in terms of attribute updates. There could be certain attributes that keep changing every sync interval like “Free Memory in Bytes”, “Last Check in Time” etc. There is no value in updating endpoints when such trivial attributes change for the device. Hence it is recommended to use “ignoreEndpointDifferences” attribute in extension configuration to ignore change in attributes that you do not care about in terms of ClearPass policies.
You can review the Audit Viewer in ClearPass under Monitoring > Audit Viewer to see what attributes are being updated for endpoints to check if there are unnecessary updates.
Sample for JAMF extension:
"ignoreEndpointDifferences": "Last Update, Report Date UTC, Last Contact Time UTC, Last Inventory Update UTC, Last Reported IP, IP Address",Default for Microsoft Intune extension:
"ignoreEndpointDifferences": "Last Sync Date Time, Free Storage Space in Bytes", -
To further optimize the number of endpoints being updated in ClearPass, you can specify which attributes are being used in the ClearPass policies so that only changes to those attributes would trigger an update to the endpoint. This is done by listing out the specific attributes under endpointAttributes in extension configuration.
Sample for JAMF extension:
"endpointAttributes": "Group names, MDM Enabled, Managed, Remote Managed, Supervised, Serial Number", -
Setup extension to restart unless it was intentionally stopped. A restart policy can be defined in extension configuration to ensure that the extension starts up automatically after server reboots and such. Restart policy of “unless-stopped” would ensure the extension always starts up unless it was manually stopped.
“restartPolicy”: “no” — The extension will not be automatically restarted after the server is restarted.
“restartPolicy”: “always” — The extension will always be restarted after the server is restarted.
“restartPolicy”: “unless-stopped” — The extension will be restarted unless it was stopped prior to the server restart, in which case it will maintain that state.
“restartPolicy”: “on-failure:N” — If the extension fails to restart, the value for “N” specifies the number of times the extension should try to restart. If you do not provide a value for “N”, the default value will be “0”.
The “restartPolicy” parameter is not present by default in extension configurations. When it is not present, if the system is restarted a default policy is applied to the extension to maintain the state it was in before the restart. If the “restartPolicy” parameter is added to the configuration but later removed, the extension will then revert to the default restart policy.
Appendix E – List of all available Ivanti MDM Attributes
Ivanti MDM OS: OSX
Ivanti MDM UDID: DD1A8DDE-DDD2-5041-AC94-6655A6459D98
Ivanti MDM Model: MacBookAir6,2
Ivanti MDM Status: ACTIVE
Ivanti MDM Blocked: true
Ivanti MDM User ID: matt@bbqlabs.net
Ivanti MDM Compliant: false
Ivanti MDM Ownership: Unknown
Ivanti MDM User UUID: 8d1f27a2-6341-48be-97fc-8ff85fa5ef21
Ivanti MDM OS Version: 10.13.5
Ivanti MDM Compromised: false
Ivanti MDM Device GUID: cb806490-360f-4b1b-abc6-13a07aa3c1b2
Ivanti MDM Last Update: 2022-11-02 09:47:58
Ivanti MDM MAC Address: 5c:f9:38:98:7d:2c
Ivanti MDM MDM Enabled: true
Ivanti MDM Quarantined: true
Ivanti MDM Manufacturer: Apple Inc.
Ivanti MDM Last Check In: 2022-10-14 14:59:26
Ivanti MDM Serial Number: C02LM1HMF6T6
Ivanti MDM MDM Identifier: DD1A8DDE-DDD2-5041-AC94-6655A6459D98
Ivanti MDM Registration Date: 2022-10-13 21:39:22
5.7 - Mosyle
Introduction and Overview
Mosyle provides two different solutions: Manager and Business. Starting from v2 of the Extension, we’ve added support for Mosyle Business which complements our initial support for Mosyle Manager.
Mosyle Manager was designed exclusively for K-12 schools and districts to incorporate education-focused features and hierarchy, with areas for students, class periods and course information. It also integrates directly with Apple School Manager. In addition, Mosyle Manager will offer Classroom Management capabilities, so teachers can manage student-device interactions within the classroom.
Mosyle Business, on the other hand, was built for enterprise and higher education institutions, and it will have a different hierarchy, as well as integrate with both Apple Business Manager and Apple School Manager. It allows companies to experience the most secure and compliant experience when automating and managing Apple devices to their end-users to be more productive at work.
This integration guide covers the deployment and configuration of ClearPass Policy Manager to interface with Mosyle.
It provides the ability to pull all device details from a customer tenant into ClearPass endpoints database. The contextual data inserted into Policy Manager can then be leveraged to drive granular access policy.
Pictorial View of the Integration
The diagrams below show pictorial overview of the components and how they interact with each other.
The primary workflow in the integration has ClearPass periodically syncing devices from Mosyle to its endpoint database.

There is also an advanced use case where a context server based dynamic lookup can be used to fetch the updated attributes for a device from Mosyle if the entry in endpoint repository is not up to date.

Software Requirements
The minimum software version required for CPPM is 6.11.0 . At the time of writing, version 6.11.10 is available as the long supported release and 6.12.4 is available as the short supported release. CPPM runs on hardware appliances with pre-installed software or as a Virtual Machine under the following hypervisors. Hypervisors that run on a client computer such as VMware Player are not supported.
-
VMware vSphere Hypervisor (ESXi) 7.0 U3c and 8.0
-
Windows Server 2019 with Hyper‑V and Windows Server 2022 with Hyper‑V.
-
KVM on CentOS Stream 8, CentOS Stream 9, Ubuntu 20.04 LTS, and Ubuntu 22.04 LTS.
ClearPass Installation and Deployment Guide
This document assumes your ClearPass environment is already configured and operational. If you require assistance with basic deployment, refer to the following deployment guide:
https://arubanetworking.hpe.com/techdocs/ClearPass/6.11/Installation-Guide/Default.htm
ClearPass Extensions
The integration between ClearPass Policy Manager and external systems is driven through a ClearPass capability known as Extensions, a sub-component of the ClearPass Exchange Integration framework. ClearPass Extensions are micro-services running on top of the base ClearPass platform. These micro-services enable HPE Aruba Networking to deliver new features outside of the main software release cycle and facilitate a faster time to market for specific features and integrations. Configuration and control of ClearPass Extensions is accomplished through the ClearPass Guest GUI, as covered later in this document.
Installing Extension
ClearPass Extensions are easy to install from the ClearPass Extensions Store. In a cluster, ClearPass Extensions can be installed on a subscriber independently of the publisher. Multiple copies of the same extension can be installed if needed as well.
INFO
Internet access is required for ClearPass Policy Manager to install the ClearPass Extensions from the Extension Store. Starting with ClearPass 6.12, extensions can be can be installed offline as well. Offline ClearPass Extension images are available on HPE networking support portal.
Access to the extension store
Access the Extension Store to download and install ClearPass extensions. The Extension store utilizes the same HPE Passport account credentials used to validate support entitlement in the Software Updates Por- tal. This is configured under Administration > Agents and Software Updates > Software Updates as shown below. Ensure that valid HPE Passport credentials have been entered in these fields to enable Ex- tension download capabilities.
Installing the Extension from Store
Extensions are installed from the extension page in ClearPass Guest, as shown below. Access it from Guest > Administration > Extensions
From here, click on ‘Install Extension’, and the search box below appears.
Enter “Intune” and click on ‘Search’, see the example below.
INFO
Here we are using Intune as an example. The installation steps are the same for all the extensions. For your deployment, please search for the appropriate extension like Jamf, Mosyle, Crowdstrike, etc.
All currently available extensions are listed in the page: https://www.arubanetworks.com/techdocs/NAC/clearpass/integrations/clearpass-extension/extensions-list/
Click on the extension name and then click “Install.”
In the “Install Extension” dialog box, set the IP address if necessary, as described in section “Extensions and IP address configuration support” below. Do not check the box to start the extension at this time. Click the “Install” button.
In this example, we’ve not entered an IP address for the extension to use, if there is intent to use the extension as an authorization source set this value and ensure its set the same on all nodes where the Extension is deployed.
The extension will download and appear in a “Stopped” state. Notice the options to Start, Delete, Reinstall, Show Logs, and view Configuration. Click on “Configuration” to view settings.
After the extension has been installed, proceed to configure the extension
A copy of the default Extension configuration is shown above, this will need to be modified for your deployment.
INFO
Password and sensitive configuration items are obfuscated when presented in both the Extension GUI or in the Explorer configuration.
WARNING
The configuration attributes are case sensitive. It is recommended to refer the default configuration sample while editing your configuration.
Extensions and web proxy support
Extensions support communications with 3rd parties via a web proxy. This adds incremental proxy functionality. If a proxy is defined in ClearPass Policy Manager, then an extension will inherit that configuration. See later in the document on how to disable the proxy inherited configuration.
INFO
Note that the Policy Manger web proxy configuration is ONLY read by the extension at installation time. If the web proxy configuration is changed in Policy Manager, then the extension must be re-installed so the new settings are re-read and bonded to the extension.
Extensions and IP address configuration support
ClearPass uses a non-externally routed IP address range to communicate with the Extension. The default is 172.17.0.0/16. You may configure a different range, if desired. This is especially useful when deploying extensions across nodes within a cluster where there is the requirement for a fixed consistent IP address for the extension across the cluster.
Changing the “Extensions Network Address” range is only necessary if either the ClearPass MGMT or DATA interface are using an IP address in the extension default range of 172.17.x.x/12, or if ClearPass needs to communicate with some external device in that range.
To Configure the base Extension IP subnet within Policy Manager navigate to Administration > Server Manager > Server Configuration [chose your node] Service Parameters [ClearPass system service].
INFO
The subnet defined here for the extension framework must fall within the following subnet range 10.0.0.0/8, 172.16.0.0/12, 192.168.0.0/16 as defined by RFC1918. For best results, set the network address range to a subnet that does not exist in your enterprise, and restart the extension service for this change to take effect.
Never set the DATA or MGMT IP address to use an address that matches the Extension Network
INFO
Note that changing the extension base IP address will require the extension service to be restarted.
Mosyle Extension Configuration
The default configuration used for Extension is below
{
“logLevel”: “INFO”,
“verifySSLCerts”: true,
“mosyleHost”: “”,
“mosyleEmail”: “”,
“mosylePassword”: “********”,
“accessToken”: “********”,
“isMosyleBusiness”: false,
“osTypes”: [
“ios”,
“mac”,
“tvos”
],
“dataColumns”: [
“deviceudid”,
“wifi_mac_address”,
“ethernet_mac_address”,
“os”,
“device_name”,
“device_model”,
“device_type”,
“model_name”,
“osversion”,
“status”,
“is_supervised”,
“is_deleted”,
“date_checkin”,
“date_info”
],
“enableEndpointCache”: true,
“endpointCacheTimeSeconds”: 300,
“syncUpdatedOnly”: true,
“syncAllOnStart”: true,
“enableSyncAll”: true,
“syncAllSchedule”: “0 2 * * 6”,
“enableStats”: true,
“statsUsername”: “”,
“statsPassword”: ""
}
Each of the attributes are explained in the table below in detail.
Mosyle specific extension configuration attributes
| Configuration | Description | Example/Values |
|---|---|---|
| mosyleHost | Mosyle Host URL. ClearPass automatically chooses between Mosyle Manager and Business URLs depending upon the value of “ isMosyleBusiness” attribute. This field is now optional and can be used to override the default URLs used by ClearPass. |
managerapi.mosyle.com businessapi.mosyle.com |
| mosyleEmail | Email of administrative user in Mosyle Business | Administrator username {added in V3 of the extension} |
| mosylePassword | Password associated with Mosyle email account | Administrator password {added in V3 of the extension} |
| accessToken | Token to access Mosyle API | 000000 |
| isMosyleBusiness | Determines if the Extension is communicating with Mosyle Manager or Mosyle Business and uses the appropriate host URL | true or false {added in V2 of the extension} |
| dataColumns | Specify what information to be synced from Mosyle system. For all, enter “*” | device_name, device_model |
| osTypes | Specify OS types to be fetched from Mosyle system. | ios, mac, tvos |
Common extension attributes
Extension framework configuration parameters (common configuration)
| Attribute | Description | Default Values |
|---|---|---|
| logLevel | Logging level for troubleshooting | “INFO” |
| verifySSLCerts | Should SSL certificates be validated when communicating with external context sources | true |
| enableEndpointCache | Cache endpoint attributes to optimize authorization queries, avoid repeated DB queries and reduce API calls to external context sources | true |
| endpointCacheTimeSeconds | The duration in seconds to cache the endpoint attributes | 300 |
| syncUpdatedOnly | If this option is set to true, only the endpoints updated after the previous sync would be fetched from the context source. Note that this option only works for the third-party context sources that have APIs to support this functionality. If this option is set to false, all endpoints are fetched at every sync interval. |
true |
| syncAllOnStart | If this option is set to true, when the extension starts, the system will attempt to sync all endpoints in the external context source to ClearPass. Note that if you have a large number device context to be fetched, it would take a long time for the initial sync to complete. When used along with syncUpdatedOnly, the subsequent syncs should be faster. |
true |
| enableSyncAll | Enable periodic sync of all endpoints | true |
| syncAllSchedule | The schedule for when the Sync All Endpoints process should run. Note: This uses CRON type scheduling. |
0 2 * * 6 |
| enableStats | Enable display of extension statistics | false |
| statsUsername | Create a username to access the extension statistics page | Give any username you want to use |
| statsPassword | Create a password to access the extension statistics page | Give any password you want to use |
| bypassProxy | Bypass the web proxy configured on ClearPass Policy Manager | false |
INFO
Starting in V2 of the Extension, support for Mosyle Business was added. This additional support added one new switch in the Extension configuration, isMosyleBusiness, which is a boolean true or false option and very self-explanatory, finally one other very important configuration option, see below.
The selection of whether you are using the Extension to communicate with Mosyle Manager or Mosyle Business will also automatically set the value for attribute mosyleHost. You can also override this value if the URL has changed.
| Configuration Deployment Mode | Value for mosyleHost |
|---|---|
| Mosyle Manager | managerapi.mosyle.com |
| Mosyle Business | businessapi.mosyle.com |
INFO
The V3 extension added additional configuration attributes like syncUpdatedOnly and enableEndpointCache. With syncUpdatedOnly, only the endpoints updated since the last sync are fetched from Mosyle. With enableEndpointCache, authorization queries use the cached endpoint attributes, thus reducing database / API queries and optimizing policy evaluation performance.
V3 extension also added two configuration attributes mosyleEmail and mosylePassword which are used with Mosyle Business for API authentication in addition to the accessToken.
When leveraging the sync capabilities of the Extension to get the device attributes from Mosyle, enable syncAllSchedule. This attribute is leveraged for periodic sync of endpoints from Mosyle.
INFO
When used in conjunction with “syncUpdatedOnly”, you can now configure the sync interval to be more aggressive than the default of once a week. For example, to have the “updated” endpoints sync every 30 minutes, you can use the following cron syntax.
“syncAllSchedule”: “0/30 * * * *”,
The syncAllOnStart attribute can be leveraged as well to sync all devices upon the start or re-start of the extension. Note that first time sync of all the devices could take a long time to complete and can be resource intensive.
A copy of the Mosyle Extension with the desired configuration is shown below, this has to be modified for your deployment. Include accessToken, dataColumns, osTypes, mosyleEmail and mosylePassword that will be specific to your environment.
Change or include any other values based on the description of each in the above table. Select Restart and click on Save Changes to restart the extension.

After the configuration and the restart of the extension, click on Show Logs.

The above log shows that the Extension has synced the endpoint data from Mosyle. The above steps sync endpoint details at the time of starting the Extension and then regular updates are fetched at the interval specified by syncAllSchedule. Please note the IP address of the Extension. This will be used in the next section where we leverage the Mosyle attributes during enforcement. A sample of endpoint attributes fetched are shown below.

Multiple use-cases exist for how the data that is returned from Mosyle can be used in the Policy enforcement. In the example below, we are performing multiple checks:
-
Check if the device’s status is valid. If it is not, redirect it to the captive Portal. Create a helpdesk ticket for remediation.
-
If the device is deleted in Mosyle, create a helpdesk ticket.
-
If the device is not supervised by Mosyle, put it in the Quarantine VLAN.
-
Check when the device last checked-in with Mosyle. If the device has not checked in for certain number of days, flag it and redirect it to the Captive Portal.

Different companies will have different enforcement profiles and policies. The key takeaway here is to leverage the attributes received from Mosyle to drive the policy engine into making different enforcement actions for the device as they authenticate on the network.
Mosyle Real Time Authorization
We can also add the Mosyle extension as an Endpoint Context Server to fetch latest device information if it is not already present in endpoint repository. This is useful when the context has changed in Mosyle and we want to ensure that ClearPass fetches the latest state for authorization.
If using EAP-TLS authentication where client certificates contain the DeviceUDID attribute, we can use a device ID based context server action. The old method of pulling context information from Mosyle using the client MAC Address is still available. EAP-TLS with device ID is the preferred way to fetch device information dynamically. However, for organization that have not yet completed the process of deploying EAP-TLS, client MAC Address based workflow can still be used.
First step is to add Mosyle extension as an Endpoint Context Server as shown below.

Depending upon whether we want to use device ID or calling station ID based lookup, we can define the required Context Server Action under Administration > Dictionaries > Context Server Actions.

Set the HTTP Method to GET. There is no additional configuration required in Header, Content and Attributes tab.

Set the HTTP Method to GET. There is no additional configuration required in Header, Content and Attributes tab.
Mosyle configuration
It is assumed that a working Mosyle environment is leveraged for this extension. The configuration of Mosyle is beyond the scope of this guide.
Available Data Fields
There is a wide range of available information from the Mosyle system. By default, we only pull a subset of the fields, but you can add or change them using the dataColumns configuration value. If you wish to include all fields simply add an asterisk ("*") to the dataColumns list.
If the “is_deleted” field is true we will set the ClearPass Endpoint status to “Unknown”. For all other endpoints the status will be “Known”.
All fields added to endpoints are prefixed with “Mosyle “, for example, “Mosyle is_deleted”.
Below are the available data fields:
deviceudid, total_disk, os, serial_number, device_name, device_model, battery, osversion, date_info, carrier, roaming_enabled, isroaming, imei, meid, available_disk, wifi_mac_address, bluetooth_mac_address, is_supervised, date_app_info, date_last_beat, date_last_push, status, isActivationLockEnabled, isDeviceLocatorServiceEnabled, isDoNotDisturbInEffect, isCloudBackupEnabled, IsNetworkTethered, needosupdate, productkeyupdate, device_type, lostmode_status, is_muted, date_muted, activation_bypass, date_media_info, tags, is_deleted, iTunesStoreAccountHash, iTunesStoreAccountIsActive, date_profiles_info, ethernet_mac_address, model_name, LastCloudBackupDate, SystemIntegrityProtectionEnabled, BuildVersion, LocalHostName, HostName, OSUpdateSettings, ActiveManagedUsers, CurrentConsoleManagedUser, date_printers, AutoSetupAdminAccounts, appleTVid, asset_tag, ManagementStatus, OSUpdateStatus, AvailableOSUpdates, appleTVid, enrollment_type, userid, date_checkin
Bold fields are required and are always returned.
API Token Creation
To obtain the accessToken, if you are using Mosyle Manager, the API Integration is available for only Mosyle Manager Premium accounts. You can access the API Integration by going to My School > API Integration.
API requests require Admin User Credentials for authorization. You can create an Admin user specifically for the API integration under My School > Administrators and limit the user’s permissions to only API access.
If you are using Mosyle Business, there is a self-service option within the UI. Navigate from the GUI to ‘Organization’, then click on ‘API Integration’ as shown below.

then ‘Add new token’ on the top right-hand-side. Input an appropriate name, perhaps ‘clearpass’.

The token will be created {example below}, record this as it will be shown only once and will be need in the extension configuration under accessToken.

INFO
With the latest update to Mosyle Business, an admin username and password is required along with the Access Token to make API calls. “Require User Credentials” is enabled by default for all new API integrations and cannot be disabled.
There is a wide range of available information from the Mosyle system. By default, we only ingest a subset of the fields, but you can add or change them using the dataColumns configuration value. If you wish to include all fields simply add an asterisk (”*”) to the dataColumns list.
Appendix A – Troubleshooting and Support
Here we list some basic troubleshooting steps. If you need any help beyond this, please reach out to HPE Aruba Networking Support.
Check API Access Application Control restrictions
If you’ve previously hardened your ClearPass deployment with Application Access Controls, it’s possible that the Extension will not work. Reviewing the Extension Log might show something like the following after immediately starting the Extension. This likely indicates the ClearPass Application API’s are in place.
Example of Extension authorization failure due to Policy Manager Application Control:
[2020-03-16T15:42:21.083] [INFO] Intune - Server listening on port 80.
[2020-03-16T15:42:21.243] [DEBUG] Intune - Request “GET ‘https://172.17.0.1/api/server/version’” took 51.91ms.
[2020-03-16T15:42:21.245] [DEBUG] Intune - <!DOCTYPE html><html>
<head>
<title>
Error 403 (Forbidden)
</title>
<script language=“javascript”>
function reloadPage() {
var locHref = window.location.protocol + “//” + window.location.hostname;
window.location.href = locHref;
}
</script>
To resolve this issue, add the IP address of the Extension to the list of nodes permitted to access the API by navigating to Administration > Server Manager > Server Configuration {choose your node} > Network
INFO
For this reason its good practice to fix the IP address of the extension at installation time such that it doesn’t change over time and break the application controls.
Checking on the Extension Service
The ClearPass Extensions are supported by a system service which must be running.
Restarting this service will affect all deployed and running extensions.
To check on the state of the Extension Service, or to restart the service, go to Administration > Server Manager > Server Configuration > [SERVER] > Service Control. By default this service is automatically started.
Extensions and web proxy / firewall whitelisting
If ClearPass Policy Manager has been configured with a proxy, it’s still possible that domain whitelists are required, the same for some datacenter firewall to allow the installation of Extensions. Some enterprise customers maintain a whitelist of domain that are allowed to transit the proxy/firewall. The underlying docker configuration process uses standard docker registry access to pull images (hosted in docker hub). In general, the following hosts are used:
INFO
-
extensions.clearpassbeta.com
-
registry-1.docker.io
-
index.docker.io
-
auth.docker.io
-
production.cloudflare.docker.com
This is all also geo dependent to some degree and based on various AWS services, so AWS redirects and geo location services will vary. Finally, this all runs via standard HTTPS (port 443).
Extension Logs/Enable Debugging
If you have a requirement to access and view the logs from the Extension, you can turn on different logging levels from the Extension GUI. Adjust the logLevel to ‘DEBUG’ and restart the extension as shown below.
Logs can then be viewed from the ‘Show Logs’.
Remember after changing the logging level, as with any extension configuration change the extension will need to be restarted for this change to take effect.
Accessing the extension logs using ‘Collect Logs’ system function
In addition to viewing the logs as shown above, logs can also be collected and examined via the Policy Manager Collect Logs system function (Administration > Server Manager > Server Configuration > [Select SERVER] > Collect Logs). This is extremely useful should you have a need to call for technical assistance.
If the support team needs to investigate a system issue, one of the items they regularly ask for is the system logs to aid with their diagnostic investigation. By default the “logLevel” is set to INFO, but TRACE, DEBUG, INFO, WARN, ERROR, FATAL can also be set as required. Any of the levels will display the information for the selected state and lower; if INFO is selected, it will show messages for INFO, WARN, ERROR, FATAL.
After the logs have been collected, downloaded and expanded, you can locate the extension logs in the following location in the folder structure PolicyManagerLogs > extension > your-extension-id as shown below. Note the file-name is the same as the running instance ID of the extension.
Monitoring extension statistics
There is a way to monitor extension’s critical resource statistics with the configurable parameter added as part of the extension’s configuration. To enable extension statistics set the “enableStats” parameter to true. Remember a restart of the extension is need to activate the change anytime the config is modified.
To navigate to statistics page, click Show Details.
This will show statistics similar to the following:
Monitoring authorization performance
Since we are authorizing against an external system, it could be relevant to monitor the performance of these transactions as you setup and deploy. If you suspect there is a performance issue, ClearPass provides a way to monitor the authorization processing time. The graph below shows an example of this data, navigate to Monitoring > Live Monitor > System Monitor [click on ClearPass Tab, then select [Authorization]….
Appendix B – Considerations for Installing in a Cluster
Extensions are not synced between ClearPass cluster members, and thus must be installed on each member separately.
Some Extensions can run in two modes: Periodic Sync Mode and Authorization Source Mode.
Periodic Sync Mode
If you are configuring the extension to poll external system periodically and utilize the resulting ClearPass Endpoint database during endpoint Authorization, then you only need to install the extension on one cluster member, often the publisher.
You may wish to install the extension on a second cluster member as a backup, but remember that both extensions will individually be updating the endpoint database. You may want to stagger the updates between the two extensions, for example, Subscriber1 updates at the top of the hour and Subscriber2 updates at 30 minutes after the hour.
Also, in this mode there is no need to explicitly enter an IP address during installation. The defaults will suffice and ClearPass will select an IP in the range specified in the server configuration.
HTTP Authorization Source Mode
In this mode we configure an HTTP Auth source that results in a HTTPS call to external system during endpoint authorization. In this deployment model the extension must be installed on every cluster node that process authentications. Also in this scenario every cluster member’s extension must be set to the exact same IP address during installation time, as the HTTP Auth source configuration is propagated globally across all cluster members.
For example, if the extension IP range is 172.17.0.0/16, we would set the extension to 172.17.0.5 on every cluster member during installation of the extension.
While we normally want to avoid duplicate IP addresses in a network, this is not a concern with ClearPass extensions. Each ClearPass node communicates internally only with its own extension, and this traffic is not routed outside of ClearPass.
Subscriber nodes support the same ability as publishers to install an Extension from the Extension store.
Appendix C – endpoint sync schedule settings
The syncSchedule and similar scheduling parameters sets how often ClearPass executes certain actions like syncing or pushing endpoints. This setting is based on a slightly modified version of the CRON job scheduler found in Unix-like operating systems. It can be used to schedule jobs to run periodically at fixed times, dates or intervals.
A ‘cron’ is a job scheduler. Any scheduled task is called a ‘cron job’. The syntax for a cron job schedule is as follows:
In our use of the cron scheduler, we’ve dropped the use of the last instruction ≤command to execute> and use only the time/date functions, see below for a number of examples of scheduling a sync process.
-
Schedule a sync to run at 2am daily:- 0 2 * * *
-
Schedule a sync to run twice a day at 5am and 5pm:- 0 5,17 * * *
-
Schedule a sync to run on every Sunday at 5pm:- 0 17 * * sun
-
Schedule a sync to run every 30 minutes:- */30 * * * *
-
Schedule a sync to run at 5pm on selected days:- 0 17 * * sun,fri
You can see from the above that the scheduling process is extremely flexible, alternatively https://crontab.guru/ is a great page for learning more about CRON scheduling.
Appendix D – Extension performance optimizations
Extensions are a critical part of ClearPass deployments today and with the increased dependency on extension interactions that involve periodic polling or real-time lookups, here are some of the best practice recommendations around optimizing overall performance when using extensions:
-
If the extension is used to periodically poll external systems and populate endpoint repository, ensure that it is not installed in all the nodes in the cluster. Ideally these type of extensions should only be installed on the publisher node since only publisher node can add endpoint entries to the database. For redundancy, it can be installed on another additional node but it is recommended to stagger the polling interval so that both do not attempt to poll and update endpoint database at the same time.
Example: 0 * * * *, This cron job runs at minute 0 of every hour (e.g., 00:00, 01:00, 02:00, etc.).
30 * * * *, This cron job runs at minute 30 of every hour (e.g., 00:30, 01:30, 02:30, etc.). -
If the extension is used for looking up attributes from external systems in real time during authentication, it should be installed in all the nodes handling authentication. Note that the context server config is replicated from the publisher. When using extension for real time lookup, ensure that the extension has the same IP address in all the cluster nodes.
-
If the extension is expected to do both real-time lookup and periodic polling, ensure that polling is enabled only on the publisher while the extension in subscribers can have the polling disabled by setting the “enableSyncAll” attribute to false.
"enableSyncAll": false,
WARNING
Having the extension installed on all the cluster nodes with enableSyncAll set to true would cause each cluster node to independently poll the external system and update endpoint repository. This could impact the performance of ClearPass. Hence it is strongly recommended to enable endpoint sync only on the extension installed on the publisher and on another cluster node for redundancy.
-
Some 3rd party systems support fetching delta updates vs fetching all of the device information every polling cycle. The extensions that support fetching delta updates are: Workspace ONE Crowdstrike Falcon Microsoft Intune Mosyle SentinelOne Service Now
For these extensions, the syncUpdatedOnly attribute should be set to true in extension config so that the number of DB updates in ClearPass is minimized
"syncUpdatedOnly": true,For extensions that do not support syncUpdatedOnly, ensure that the sync interval is not aggressive. We recommend syncing at most twice a day and that too during off peak hours whenever a full sync is performed.
-
Some 3rd party systems can be very noisy in terms of attribute updates. There could be certain attributes that keep changing every sync interval like “Free Memory in Bytes”, “Last Check in Time” etc. There is no value in updating endpoints when such trivial attributes change for the device. Hence it is recommended to use “ignoreEndpointDifferences” attribute in extension configuration to ignore change in attributes that you do not care about in terms of ClearPass policies.
You can review the Audit Viewer in ClearPass under Monitoring > Audit Viewer to see what attributes are being updated for endpoints to check if there are unnecessary updates.
Sample for JAMF extension:
"ignoreEndpointDifferences": "Last Update, Report Date UTC, Last Contact Time UTC, Last Inventory Update UTC, Last Reported IP, IP Address",Default for Microsoft Intune extension:
"ignoreEndpointDifferences": "Last Sync Date Time, Free Storage Space in Bytes", -
To further optimize the number of endpoints being updated in ClearPass, you can specify which attributes are being used in the ClearPass policies so that only changes to those attributes would trigger an update to the endpoint. This is done by listing out the specific attributes under endpointAttributes in extension configuration.
Sample for JAMF extension:
"endpointAttributes": "Group names, MDM Enabled, Managed, Remote Managed, Supervised, Serial Number", -
Setup extension to restart unless it was intentionally stopped. A restart policy can be defined in extension configuration to ensure that the extension starts up automatically after server reboots and such. Restart policy of “unless-stopped” would ensure the extension always starts up unless it was manually stopped.
“restartPolicy”: “no” — The extension will not be automatically restarted after the server is restarted.
“restartPolicy”: “always” — The extension will always be restarted after the server is restarted.
“restartPolicy”: “unless-stopped” — The extension will be restarted unless it was stopped prior to the server restart, in which case it will maintain that state.
“restartPolicy”: “on-failure:N” — If the extension fails to restart, the value for “N” specifies the number of times the extension should try to restart. If you do not provide a value for “N”, the default value will be “0”.
The “restartPolicy” parameter is not present by default in extension configurations. When it is not present, if the system is restarted a default policy is applied to the extension to maintain the state it was in before the restart. If the “restartPolicy” parameter is added to the configuration but later removed, the extension will then revert to the default restart policy.
5.8 - SOTI MobiControl
SOTI MobiControl is the Enterprise Mobility Management (EMM) solution that gives you visibility and control over where your business-critical mobile devices are, what they’re doing, how they’re performing and what security or compliance risks they’re facing.
Deploy apps to smartphones. Enroll and provision new tablets in the field. Track the location of rugged devices. Identify and neutralize security risks to the IoT endpoints. Protect critical data stored on mobile devices. Minimize device downtime so field workers stay productive.
This technote covers how to deploy and configure the ClearPass Extension to interface with SOTI MobiControl MDM.
In this technote we will cover the installation and configuration of the extension for integration between MobiControl and ClearPass Policy Manager. The Extension effectively becomes an authorization source to service policies by utilizing the endpoint context synchronized from SOTI MobiControl.
This extension provides the ability to capture all of the mac-address’s on an endpoint and create corresponding entries in the ClearPass endpoint ensuing that if the devices uses a wires/wireless/dongle to authenticate, ClearPass will have the mac-address of the endpoint such that it can validate it.
Finally, in the extension we expose the ability to add any SOTI MobiControl endpoint attribute required to make your policy complete, add the endpoint attribute and the ClearPass Extension will capture that context and add it automatically to the ClearPass Policy Manager Endpoint DB so it can be used in role-mapping or in an Enforcement Policy.
Pictorial View of the Integration
The extension can be configured in to periodically sync device information from SOTI MobiControl.

In this mode ClearPass polls SOTI MobiControl periodically and updates the ClearPass Endpoint database with attributes obtained from SOTI MobiControl. These attributes can be utilized in ClearPass during endpoint Authorization. This mode has a simpler configuration demand, however, the data provided may not be completely up to date at authentication time.
Software Requirements
The minimum software version required for CPPM is 6.11.0 . At the time of writing, version 6.11.10 is available as the long supported release and 6.12.4 is available as the short supported release. CPPM runs on hardware appliances with pre-installed software or as a Virtual Machine under the following hypervisors. Hypervisors that run on a client computer such as VMware Player are not supported.
-
VMware vSphere Hypervisor (ESXi) 7.0 U3c and 8.0
-
Windows Server 2019 with Hyper‑V and Windows Server 2022 with Hyper‑V.
-
KVM on CentOS Stream 8, CentOS Stream 9, Ubuntu 20.04 LTS, and Ubuntu 22.04 LTS.
ClearPass Installation and Deployment Guide
This document assumes your ClearPass environment is already configured and operational. If you require assistance with basic deployment, refer to the following deployment guide:
https://arubanetworking.hpe.com/techdocs/ClearPass/6.11/Installation-Guide/Default.htm
ClearPass Extensions
The integration between ClearPass Policy Manager and external systems is driven through a ClearPass capability known as Extensions, a sub-component of the ClearPass Exchange Integration framework. ClearPass Extensions are micro-services running on top of the base ClearPass platform. These micro-services enable HPE Aruba Networking to deliver new features outside of the main software release cycle and facilitate a faster time to market for specific features and integrations. Configuration and control of ClearPass Extensions is accomplished through the ClearPass Guest GUI, as covered later in this document.
Installing Extension
ClearPass Extensions are easy to install from the ClearPass Extensions Store. In a cluster, ClearPass Extensions can be installed on a subscriber independently of the publisher. Multiple copies of the same extension can be installed if needed as well.
INFO
Internet access is required for ClearPass Policy Manager to install the ClearPass Extensions from the Extension Store. Starting with ClearPass 6.12, extensions can be can be installed offline as well. Offline ClearPass Extension images are available on HPE networking support portal.
Access to the extension store
Access the Extension Store to download and install ClearPass extensions. The Extension store utilizes the same HPE Passport account credentials used to validate support entitlement in the Software Updates Por- tal. This is configured under Administration > Agents and Software Updates > Software Updates as shown below. Ensure that valid HPE Passport credentials have been entered in these fields to enable Ex- tension download capabilities.
Installing the Extension from Store
Extensions are installed from the extension page in ClearPass Guest, as shown below. Access it from Guest > Administration > Extensions
From here, click on ‘Install Extension’, and the search box below appears.
Enter “Intune” and click on ‘Search’, see the example below.
INFO
Here we are using Intune as an example. The installation steps are the same for all the extensions. For your deployment, please search for the appropriate extension like Jamf, Mosyle, Crowdstrike, etc.
All currently available extensions are listed in the page: https://www.arubanetworks.com/techdocs/NAC/clearpass/integrations/clearpass-extension/extensions-list/
Click on the extension name and then click “Install.”
In the “Install Extension” dialog box, set the IP address if necessary, as described in section “Extensions and IP address configuration support” below. Do not check the box to start the extension at this time. Click the “Install” button.
In this example, we’ve not entered an IP address for the extension to use, if there is intent to use the extension as an authorization source set this value and ensure its set the same on all nodes where the Extension is deployed.
The extension will download and appear in a “Stopped” state. Notice the options to Start, Delete, Reinstall, Show Logs, and view Configuration. Click on “Configuration” to view settings.
After the extension has been installed, proceed to configure the extension
A copy of the default Extension configuration is shown above, this will need to be modified for your deployment.
INFO
Password and sensitive configuration items are obfuscated when presented in both the Extension GUI or in the Explorer configuration.
WARNING
The configuration attributes are case sensitive. It is recommended to refer the default configuration sample while editing your configuration.
Extensions and web proxy support
Extensions support communications with 3rd parties via a web proxy. This adds incremental proxy functionality. If a proxy is defined in ClearPass Policy Manager, then an extension will inherit that configuration. See later in the document on how to disable the proxy inherited configuration.
INFO
Note that the Policy Manger web proxy configuration is ONLY read by the extension at installation time. If the web proxy configuration is changed in Policy Manager, then the extension must be re-installed so the new settings are re-read and bonded to the extension.
Extensions and IP address configuration support
ClearPass uses a non-externally routed IP address range to communicate with the Extension. The default is 172.17.0.0/16. You may configure a different range, if desired. This is especially useful when deploying extensions across nodes within a cluster where there is the requirement for a fixed consistent IP address for the extension across the cluster.
Changing the “Extensions Network Address” range is only necessary if either the ClearPass MGMT or DATA interface are using an IP address in the extension default range of 172.17.x.x/12, or if ClearPass needs to communicate with some external device in that range.
To Configure the base Extension IP subnet within Policy Manager navigate to Administration > Server Manager > Server Configuration [chose your node] Service Parameters [ClearPass system service].
INFO
The subnet defined here for the extension framework must fall within the following subnet range 10.0.0.0/8, 172.16.0.0/12, 192.168.0.0/16 as defined by RFC1918. For best results, set the network address range to a subnet that does not exist in your enterprise, and restart the extension service for this change to take effect.
Never set the DATA or MGMT IP address to use an address that matches the Extension Network
INFO
Note that changing the extension base IP address will require the extension service to be restarted.
ClearPass SOTI MobiControl Integration Extension Configuration
After installing the Extension, the default configuration will need to be updated.
Common extension attributes
Extension framework configuration parameters (common configuration)
| Attribute | Description | Default Values |
|---|---|---|
| logLevel | Logging level for troubleshooting | “INFO” |
| verifySSLCerts | Should SSL certificates be validated when communicating with external context sources | true |
| enableEndpointCache | Cache endpoint attributes to optimize authorization queries, avoid repeated DB queries and reduce API calls to external context sources | true |
| endpointCacheTimeSeconds | The duration in seconds to cache the endpoint attributes | 300 |
| syncUpdatedOnly | If this option is set to true, only the endpoints updated after the previous sync would be fetched from the context source. Note that this option only works for the third-party context sources that have APIs to support this functionality. If this option is set to false, all endpoints are fetched at every sync interval. |
true |
| syncAllOnStart | If this option is set to true, when the extension starts, the system will attempt to sync all endpoints in the external context source to ClearPass. Note that if you have a large number device context to be fetched, it would take a long time for the initial sync to complete. When used along with syncUpdatedOnly, the subsequent syncs should be faster. |
true |
| enableSyncAll | Enable periodic sync of all endpoints | true |
| syncAllSchedule | The schedule for when the Sync All Endpoints process should run. Note: This uses CRON type scheduling. |
0 2 * * 6 |
| enableStats | Enable display of extension statistics | false |
| statsUsername | Create a username to access the extension statistics page | Give any username you want to use |
| statsPassword | Create a password to access the extension statistics page | Give any password you want to use |
| bypassProxy | Bypass the web proxy configured on ClearPass Policy Manager | false |
SOTI MobiControl specific extension attributes
| Configuration attribute | Description | Example/Values |
|---|---|---|
| sotiHostName | This hostname of the SOTI MobiControl. This will be the URL used by ClearPass to communicate with SOTI MobiControl | |
| sotiClientId | The API Client ID from SOTI MobiControl | |
| sotiClientSecret | The API Client Secret from SOTI MobiControl | |
| sotiUserName | The username of the SOTI MobiControl admin account | |
| sotiPassword | The password for the SOTI MobiControl admin account |
SOTI MobiControl Configuration
This extension communicates with your SOTI MobiControl tenant via publicly exposed and documented API’s. The only configuration needed on SOTI MobiControl is to create an API client.
Adding an API Client
To add an API client, you must have administrative access to the Windows server where MobiControl is hosted. If you are a MobiControl cloud customer, please contact SOTI MobiControl support to add an API client. Please refer to https://www.soti.net/mc/help/v15.5/en/adminutility/tools/restapi.html for additional information.
Configure ClearPass Policy Manager
As mentioned previously, the extension supports only a single mode of use, “Sync endpoint data from SOTI MobiControl into the ClearPass EndpointDb.
Periodic Sync Mode: Using stored attributes
The Extension will sync data from SOTI MobiControl based upon a configurable schedule, write this data into the ClearPass EndpointDB, this data is then used in policy as an authorization source.
INFO
Be aware that this data is not ‘real-time’ and the update frequency would depend on the sync schedule configured in the extension
Here’s an example of a ClearPass Role Mapping Policy that utilizes these SOTI MobiControl Endpoint attributes.

Using the SOTI MobiControl Integration Extension information in a ClearPass Service
Here we will provide more detail on how to incorporate information from the SOTI MobiControl Integration Extension in an existing ClearPass service. We’ll add the Endpoint Database to an existing basic Wired 802.1X service that processes authentications from ArubaOS switches. This service checks Active Directory to set roles, then uses those roles in an enforcement policy to send different RADIUS attributes to the switch. The configuration of your existing policies will likely differ, so please use this appendix as a general guide.
Service Authorization
The first step is to add Authorization to our service by checking the Authorization box on the Service tab. Checking this box makes the Authorization tab visible in the service definition.
Note: your existing services may already have this box checked.

Proceed to the Authorization tab and add the Endpoint Database.
We also added the [Time Source] [Local SQL DB] for evaluating dates and times.

Role Mapping Policy
Our Role Mapping Policy originally only contained the first two lines seen below.
We first created the role names in ClearPass by navigating to Configuration > Identity > Roles. We then added the subsequent lines to the role mapping policy to set roles based on the returned values from SOTI MobiControl. Note this is an evaluate-all Role Mapping Policy, so all matching roles will be applied.

Appendix A – Troubleshooting and Support
Here we list some basic troubleshooting steps. If you need any help beyond this, please reach out to HPE Aruba Networking Support.
Check API Access Application Control restrictions
If you’ve previously hardened your ClearPass deployment with Application Access Controls, it’s possible that the Extension will not work. Reviewing the Extension Log might show something like the following after immediately starting the Extension. This likely indicates the ClearPass Application API’s are in place.
Example of Extension authorization failure due to Policy Manager Application Control:
[2020-03-16T15:42:21.083] [INFO] Intune - Server listening on port 80.
[2020-03-16T15:42:21.243] [DEBUG] Intune - Request “GET ‘https://172.17.0.1/api/server/version’” took 51.91ms.
[2020-03-16T15:42:21.245] [DEBUG] Intune - <!DOCTYPE html><html>
<head>
<title>
Error 403 (Forbidden)
</title>
<script language=“javascript”>
function reloadPage() {
var locHref = window.location.protocol + “//” + window.location.hostname;
window.location.href = locHref;
}
</script>
To resolve this issue, add the IP address of the Extension to the list of nodes permitted to access the API by navigating to Administration > Server Manager > Server Configuration {choose your node} > Network
INFO
For this reason its good practice to fix the IP address of the extension at installation time such that it doesn’t change over time and break the application controls.
Checking on the Extension Service
The ClearPass Extensions are supported by a system service which must be running.
Restarting this service will affect all deployed and running extensions.
To check on the state of the Extension Service, or to restart the service, go to Administration > Server Manager > Server Configuration > [SERVER] > Service Control. By default this service is automatically started.
Extensions and web proxy / firewall whitelisting
If ClearPass Policy Manager has been configured with a proxy, it’s still possible that domain whitelists are required, the same for some datacenter firewall to allow the installation of Extensions. Some enterprise customers maintain a whitelist of domain that are allowed to transit the proxy/firewall. The underlying docker configuration process uses standard docker registry access to pull images (hosted in docker hub). In general, the following hosts are used:
INFO
-
extensions.clearpassbeta.com
-
registry-1.docker.io
-
index.docker.io
-
auth.docker.io
-
production.cloudflare.docker.com
This is all also geo dependent to some degree and based on various AWS services, so AWS redirects and geo location services will vary. Finally, this all runs via standard HTTPS (port 443).
Extension Logs/Enable Debugging
If you have a requirement to access and view the logs from the Extension, you can turn on different logging levels from the Extension GUI. Adjust the logLevel to ‘DEBUG’ and restart the extension as shown below.
Logs can then be viewed from the ‘Show Logs’.
Remember after changing the logging level, as with any extension configuration change the extension will need to be restarted for this change to take effect.
Accessing the extension logs using ‘Collect Logs’ system function
In addition to viewing the logs as shown above, logs can also be collected and examined via the Policy Manager Collect Logs system function (Administration > Server Manager > Server Configuration > [Select SERVER] > Collect Logs). This is extremely useful should you have a need to call for technical assistance.
If the support team needs to investigate a system issue, one of the items they regularly ask for is the system logs to aid with their diagnostic investigation. By default the “logLevel” is set to INFO, but TRACE, DEBUG, INFO, WARN, ERROR, FATAL can also be set as required. Any of the levels will display the information for the selected state and lower; if INFO is selected, it will show messages for INFO, WARN, ERROR, FATAL.
After the logs have been collected, downloaded and expanded, you can locate the extension logs in the following location in the folder structure PolicyManagerLogs > extension > your-extension-id as shown below. Note the file-name is the same as the running instance ID of the extension.
Monitoring extension statistics
There is a way to monitor extension’s critical resource statistics with the configurable parameter added as part of the extension’s configuration. To enable extension statistics set the “enableStats” parameter to true. Remember a restart of the extension is need to activate the change anytime the config is modified.
To navigate to statistics page, click Show Details.
This will show statistics similar to the following:
Monitoring authorization performance
Since we are authorizing against an external system, it could be relevant to monitor the performance of these transactions as you setup and deploy. If you suspect there is a performance issue, ClearPass provides a way to monitor the authorization processing time. The graph below shows an example of this data, navigate to Monitoring > Live Monitor > System Monitor [click on ClearPass Tab, then select [Authorization]….
Appendix B – Considerations for Installing in a Cluster
Extensions are not synced between ClearPass cluster members, and thus must be installed on each member separately.
Some Extensions can run in two modes: Periodic Sync Mode and Authorization Source Mode.
Periodic Sync Mode
If you are configuring the extension to poll external system periodically and utilize the resulting ClearPass Endpoint database during endpoint Authorization, then you only need to install the extension on one cluster member, often the publisher.
You may wish to install the extension on a second cluster member as a backup, but remember that both extensions will individually be updating the endpoint database. You may want to stagger the updates between the two extensions, for example, Subscriber1 updates at the top of the hour and Subscriber2 updates at 30 minutes after the hour.
Also, in this mode there is no need to explicitly enter an IP address during installation. The defaults will suffice and ClearPass will select an IP in the range specified in the server configuration.
HTTP Authorization Source Mode
In this mode we configure an HTTP Auth source that results in a HTTPS call to external system during endpoint authorization. In this deployment model the extension must be installed on every cluster node that process authentications. Also in this scenario every cluster member’s extension must be set to the exact same IP address during installation time, as the HTTP Auth source configuration is propagated globally across all cluster members.
For example, if the extension IP range is 172.17.0.0/16, we would set the extension to 172.17.0.5 on every cluster member during installation of the extension.
While we normally want to avoid duplicate IP addresses in a network, this is not a concern with ClearPass extensions. Each ClearPass node communicates internally only with its own extension, and this traffic is not routed outside of ClearPass.
Subscriber nodes support the same ability as publishers to install an Extension from the Extension store.
Appendix C – endpoint sync schedule settings
The syncSchedule and similar scheduling parameters sets how often ClearPass executes certain actions like syncing or pushing endpoints. This setting is based on a slightly modified version of the CRON job scheduler found in Unix-like operating systems. It can be used to schedule jobs to run periodically at fixed times, dates or intervals.
A ‘cron’ is a job scheduler. Any scheduled task is called a ‘cron job’. The syntax for a cron job schedule is as follows:
In our use of the cron scheduler, we’ve dropped the use of the last instruction ≤command to execute> and use only the time/date functions, see below for a number of examples of scheduling a sync process.
-
Schedule a sync to run at 2am daily:- 0 2 * * *
-
Schedule a sync to run twice a day at 5am and 5pm:- 0 5,17 * * *
-
Schedule a sync to run on every Sunday at 5pm:- 0 17 * * sun
-
Schedule a sync to run every 30 minutes:- */30 * * * *
-
Schedule a sync to run at 5pm on selected days:- 0 17 * * sun,fri
You can see from the above that the scheduling process is extremely flexible, alternatively https://crontab.guru/ is a great page for learning more about CRON scheduling.
Appendix D – Extension performance optimizations
Extensions are a critical part of ClearPass deployments today and with the increased dependency on extension interactions that involve periodic polling or real-time lookups, here are some of the best practice recommendations around optimizing overall performance when using extensions:
-
If the extension is used to periodically poll external systems and populate endpoint repository, ensure that it is not installed in all the nodes in the cluster. Ideally these type of extensions should only be installed on the publisher node since only publisher node can add endpoint entries to the database. For redundancy, it can be installed on another additional node but it is recommended to stagger the polling interval so that both do not attempt to poll and update endpoint database at the same time.
Example: 0 * * * *, This cron job runs at minute 0 of every hour (e.g., 00:00, 01:00, 02:00, etc.).
30 * * * *, This cron job runs at minute 30 of every hour (e.g., 00:30, 01:30, 02:30, etc.). -
If the extension is used for looking up attributes from external systems in real time during authentication, it should be installed in all the nodes handling authentication. Note that the context server config is replicated from the publisher. When using extension for real time lookup, ensure that the extension has the same IP address in all the cluster nodes.
-
If the extension is expected to do both real-time lookup and periodic polling, ensure that polling is enabled only on the publisher while the extension in subscribers can have the polling disabled by setting the “enableSyncAll” attribute to false.
"enableSyncAll": false,
WARNING
Having the extension installed on all the cluster nodes with enableSyncAll set to true would cause each cluster node to independently poll the external system and update endpoint repository. This could impact the performance of ClearPass. Hence it is strongly recommended to enable endpoint sync only on the extension installed on the publisher and on another cluster node for redundancy.
-
Some 3rd party systems support fetching delta updates vs fetching all of the device information every polling cycle. The extensions that support fetching delta updates are: Workspace ONE Crowdstrike Falcon Microsoft Intune Mosyle SentinelOne Service Now
For these extensions, the syncUpdatedOnly attribute should be set to true in extension config so that the number of DB updates in ClearPass is minimized
"syncUpdatedOnly": true,For extensions that do not support syncUpdatedOnly, ensure that the sync interval is not aggressive. We recommend syncing at most twice a day and that too during off peak hours whenever a full sync is performed.
-
Some 3rd party systems can be very noisy in terms of attribute updates. There could be certain attributes that keep changing every sync interval like “Free Memory in Bytes”, “Last Check in Time” etc. There is no value in updating endpoints when such trivial attributes change for the device. Hence it is recommended to use “ignoreEndpointDifferences” attribute in extension configuration to ignore change in attributes that you do not care about in terms of ClearPass policies.
You can review the Audit Viewer in ClearPass under Monitoring > Audit Viewer to see what attributes are being updated for endpoints to check if there are unnecessary updates.
Sample for JAMF extension:
"ignoreEndpointDifferences": "Last Update, Report Date UTC, Last Contact Time UTC, Last Inventory Update UTC, Last Reported IP, IP Address",Default for Microsoft Intune extension:
"ignoreEndpointDifferences": "Last Sync Date Time, Free Storage Space in Bytes", -
To further optimize the number of endpoints being updated in ClearPass, you can specify which attributes are being used in the ClearPass policies so that only changes to those attributes would trigger an update to the endpoint. This is done by listing out the specific attributes under endpointAttributes in extension configuration.
Sample for JAMF extension:
"endpointAttributes": "Group names, MDM Enabled, Managed, Remote Managed, Supervised, Serial Number", -
Setup extension to restart unless it was intentionally stopped. A restart policy can be defined in extension configuration to ensure that the extension starts up automatically after server reboots and such. Restart policy of “unless-stopped” would ensure the extension always starts up unless it was manually stopped.
“restartPolicy”: “no” — The extension will not be automatically restarted after the server is restarted.
“restartPolicy”: “always” — The extension will always be restarted after the server is restarted.
“restartPolicy”: “unless-stopped” — The extension will be restarted unless it was stopped prior to the server restart, in which case it will maintain that state.
“restartPolicy”: “on-failure:N” — If the extension fails to restart, the value for “N” specifies the number of times the extension should try to restart. If you do not provide a value for “N”, the default value will be “0”.
The “restartPolicy” parameter is not present by default in extension configurations. When it is not present, if the system is restarted a default policy is applied to the extension to maintain the state it was in before the restart. If the “restartPolicy” parameter is added to the configuration but later removed, the extension will then revert to the default restart policy.
Appendix E – List of returned SOTI MobiControl endpoint attributes
{
“$type”: “DeviceIos”,
“ActivationLockBypassCode”: null,
“ActivationLockBypassStatus”: “NotApplicable”,
“AgentVersion”: null,
“Memory”: {
“$type”: “Memory”,
“AvailableExternalStorage”: null,
“AvailableMemory”: null,
“AvailableSDCardStorage”: null,
“AvailableStorage”: null,
“TotalExternalStorage”: null,
“TotalMemory”: null,
“TotalSDCardStorage”: null,
“TotalStorage”: null
},
“BatteryStatus”: null,
“BluetoothMACAddress”: null,
“BuildVersion”: null,
“CarrierSettingsVersion”: null,
“CellularCarrier”: null,
“CellularTechnology”: “None”,
“CurrentMCC”: null,
“CurrentMNC”: null,
“DataRoamingEnabled”: false,
“DeviceTerms”: {
“$type”: “DeviceTerms”,
“Status”: 3,
“StatusTime”: “2020-07-27T08:22:20.09Z”,
“StatusVersion”: “1”,
“RuleId”: 9,
“RuleName”: “sample”,
“StatusEnum”: “Accepted”
},
“DeviceUserInfo”: null,
“MultiUserDeviceInfo”: null,
“ExchangeBlocked”: false,
“ExchangeStatus”: “Accepted”,
“FirmwareVersion”: null,
“HardwareEncryptionCaps”: 0,
“HardwareEncryption”: “None”,
“ICCID”: null,
“IMEI_MEID_ESN”: null,
“InRoaming”: null,
“Ipv6”: null,
“IsActivationLockEnabled”: null,
“IsAgentCompatible”: true,
“IsAgentless”: true,
“IsDeviceLocatorServiceEnabled”: null,
“IsDoNotDisturbInEffect”: null,
“IsEncrypted”: false,
“IsEnrolled”: true,
“IsITunesStoreAccountActive”: null,
“IsMDMLostModeEnabled”: null,
“IsOSSecure”: true,
“IsPersonalHotspotEnabled”: null,
“IsSupervised”: null,
“ItunesIdHash”: null,
“LastCheckInTime”: null,
“LastAgentConnectTime”: null,
“LastAgentDisconnectTime”: null,
“LastLoggedOnUser”: null,
“LastStatusUpdate”: “2020-07-27T08:22:43.967Z”,
“ManufacturerSerialNumber”: null,
“ModelNumber”: null,
“ModemFirmwareVersion”: null,
“NetworkConnectionType”: “Unknown”,
“PasscodeEnabled”: false,
“PasscodeStatus”: “Unknown”,
“PersonalizedName”: null,
“PhoneNumber”: null,
“ProductName”: null,
“SIMCarrierNetwork”: null,
“SubscriberMCC”: null,
“SubscriberMNC”: null,
“SubscriberNumber”: null,
“UserIdHash”: null,
“VoiceRoamingEnabled”: false,
“ManagementProfileUpdateTime”: “2020-07-27T08:22:26.06Z”,
“ManagementProfileSigningCertificateExpiry”: “2039-07-15T00:00:00Z”,
“MDMClientCertificateHash”: “BB4D692033D2E33BC7FFE72D9370693B3B98CC51”,
“Kind”: “Ios”,
“ComplianceStatus”: true,
“ComplianceItems”: [
{
“$type”: “ComplianceItem”,
“ComplianceType”: “IsSecured”,
“ComplianceValue”: true
},
{
“$type”: “ComplianceItem”,
“ComplianceType”: “IsDeviceAdmin”,
“ComplianceValue”: null
},
{
“$type”: “ComplianceItem”,
“ComplianceType”: “NotWiped”,
“ComplianceValue”: true
},
{
“$type”: “ComplianceItem”,
“ComplianceType”: “IsEnabled”,
“ComplianceValue”: true
},
{
“$type”: “ComplianceItem”,
“ComplianceType”: “IsEnrolled”,
“ComplianceValue”: true
}
],
“DeviceId”: “00008030-001449C23CA3802E”,
“DeviceName”: “00008030-001449C23CA3802E”,
“EnrollmentTime”: “2020-07-27T08:22:20.073Z”,
“Family”: “Apple”,
“HostName”: null,
“IsAgentOnline”: false,
“CustomAttributes”: [],
“MACAddress”: null,
“WifiMAC”: null,
“Manufacturer”: null,
“Mode”: “Active”,
“Model”: null,
“OSVersion”: null,
“Path”: “\\Theja”,
“Platform”: “iOS”,
“ServerName”: null
}
6 - Visitor Management / Webhook Processing
ClearPass integrates with a wide range of Visitor Management solutions for automated guest workflows. Combining ClearPass Guest Management along with these solutions can enhance the user experience by providing seamless visitor solution that automates visitor’s Wi-Fi requirements.
A detailed list of third party interoperability can be found here: https://www.arubanetworks.com/support-services/clearpass-interoperability/
6.1 - Envoy
Envoy
This guide covers the setup, configuration, and monitoring of the ClearPass extension for Envoy and the configuration of webhook in Envoy for the Integration with HPE Aruba Networking ClearPass. This guide walks through the v2 of this integration. We will also cover the migration steps from v1 to v2.
INFO
The Envoy v2 integration requires Envoy Enterprise edition.
Envoy Visitors is a visitor management platform for a modern front desk which helps streamline visitor Sign-in. When visitors arrive, Envoy makes it easy for them to Sign-in, presents them with relevant forms where they can provide their information, sign documents (NDAs) and optionally notifies the person they are visiting of their arrival using an Email or SMS.
ClearPass is an industry leading Guest Management solution that delivers secure, automated guest access workflows. It’s very useful for an enterprise to combine these two applications to get a seamless visitor management system that automates visitor’s Wi-Fi requirements.
This Extension serves two primary use-cases
-
Creates a guest account upon Visitor Sign In
-
Disables a guest account upon Visitor Sign Out
With Envoy hosted in the cloud and ClearPass sitting primarily on-prem, there are challenges in making these two applications communicate in real time so that a visitor receives guest Wi-Fi credentials from ClearPass as soon as he registers using Envoy Visitors application. Traditionally the apps would communicate using APIs where an application would request information which is usually followed by a response. Hence in order to get real-time information you have to poll or request as often as possible which is not scalable. The answer or the solution is a webhook which does not wait for a request to send information but sends the data as soon as it’s available.
Before we proceed with the flow, we need to understand the concept of webhooks and skyhook.
What is a webhook?
A webhook (also called a web callback or HTTP push API) is a way for an app to provide other applications with real-time information. A webhook delivers data to other applications as it happens, meaning you get data immediately.
What is skyhook?
Skyhook was developed to overcome the inability for cloud-based applications to send events [webhooks] directly into a ClearPass that was typically deployed on the trust side of a corporate firewall. In short, it is a service that runs in AWS. ClearPass nodes running on-prem, use extensions to open a persistent connection into Skyhook to receive the events originally sent from a 3rd party cloud application specific for that customer/tenant.
As an overview, Envoy running in the cloud will send a webhook upon a Visitor Sign in or a Sign out event. This will communicate with skyhook. The ClearPass extension configured and installed will maintain a persistent connection with skyhook awaiting an event (Sign in/ Sign out).
Software Requirements
The minimum software version required for CPPM is 6.11.0 . At the time of writing, version 6.11.10 is available as the long supported release and 6.12.4 is available as the short supported release. CPPM runs on hardware appliances with pre-installed software or as a Virtual Machine under the following hypervisors. Hypervisors that run on a client computer such as VMware Player are not supported.
-
VMware vSphere Hypervisor (ESXi) 7.0 U3c and 8.0
-
Windows Server 2019 with Hyper‑V and Windows Server 2022 with Hyper‑V.
-
KVM on CentOS Stream 8, CentOS Stream 9, Ubuntu 20.04 LTS, and Ubuntu 22.04 LTS.
ClearPass Installation and Deployment Guide
This document assumes your ClearPass environment is already configured and operational. If you require assistance with basic deployment, refer to the following deployment guide:
https://arubanetworking.hpe.com/techdocs/ClearPass/6.11/Installation-Guide/Default.htm
ClearPass Extensions
The integration between ClearPass Policy Manager and external systems is driven through a ClearPass capability known as Extensions, a sub-component of the ClearPass Exchange Integration framework. ClearPass Extensions are micro-services running on top of the base ClearPass platform. These micro-services enable HPE Aruba Networking to deliver new features outside of the main software release cycle and facilitate a faster time to market for specific features and integrations. Configuration and control of ClearPass Extensions is accomplished through the ClearPass Guest GUI, as covered later in this document.
Installing Extension
ClearPass Extensions are easy to install from the ClearPass Extensions Store. In a cluster, ClearPass Extensions can be installed on a subscriber independently of the publisher. Multiple copies of the same extension can be installed if needed as well.
INFO
Internet access is required for ClearPass Policy Manager to install the ClearPass Extensions from the Extension Store. Starting with ClearPass 6.12, extensions can be can be installed offline as well. Offline ClearPass Extension images are available on HPE networking support portal.
Access to the extension store
Access the Extension Store to download and install ClearPass extensions. The Extension store utilizes the same HPE Passport account credentials used to validate support entitlement in the Software Updates Por- tal. This is configured under Administration > Agents and Software Updates > Software Updates as shown below. Ensure that valid HPE Passport credentials have been entered in these fields to enable Ex- tension download capabilities.
Installing the Extension from Store
Extensions are installed from the extension page in ClearPass Guest, as shown below. Access it from Guest > Administration > Extensions
From here, click on ‘Install Extension’, and the search box below appears.
Enter “Intune” and click on ‘Search’, see the example below.
INFO
Here we are using Intune as an example. The installation steps are the same for all the extensions. For your deployment, please search for the appropriate extension like Jamf, Mosyle, Crowdstrike, etc.
All currently available extensions are listed in the page: https://www.arubanetworks.com/techdocs/NAC/clearpass/integrations/clearpass-extension/extensions-list/
Click on the extension name and then click “Install.”
In the “Install Extension” dialog box, set the IP address if necessary, as described in section “Extensions and IP address configuration support” below. Do not check the box to start the extension at this time. Click the “Install” button.
In this example, we’ve not entered an IP address for the extension to use, if there is intent to use the extension as an authorization source set this value and ensure its set the same on all nodes where the Extension is deployed.
The extension will download and appear in a “Stopped” state. Notice the options to Start, Delete, Reinstall, Show Logs, and view Configuration. Click on “Configuration” to view settings.
After the extension has been installed, proceed to configure the extension
A copy of the default Extension configuration is shown above, this will need to be modified for your deployment.
INFO
Password and sensitive configuration items are obfuscated when presented in both the Extension GUI or in the Explorer configuration.
WARNING
The configuration attributes are case sensitive. It is recommended to refer the default configuration sample while editing your configuration.
Extensions and web proxy support
Extensions support communications with 3rd parties via a web proxy. This adds incremental proxy functionality. If a proxy is defined in ClearPass Policy Manager, then an extension will inherit that configuration. See later in the document on how to disable the proxy inherited configuration.
INFO
Note that the Policy Manger web proxy configuration is ONLY read by the extension at installation time. If the web proxy configuration is changed in Policy Manager, then the extension must be re-installed so the new settings are re-read and bonded to the extension.
Extensions and IP address configuration support
ClearPass uses a non-externally routed IP address range to communicate with the Extension. The default is 172.17.0.0/16. You may configure a different range, if desired. This is especially useful when deploying extensions across nodes within a cluster where there is the requirement for a fixed consistent IP address for the extension across the cluster.
Changing the “Extensions Network Address” range is only necessary if either the ClearPass MGMT or DATA interface are using an IP address in the extension default range of 172.17.x.x/12, or if ClearPass needs to communicate with some external device in that range.
To Configure the base Extension IP subnet within Policy Manager navigate to Administration > Server Manager > Server Configuration [chose your node] Service Parameters [ClearPass system service].
INFO
The subnet defined here for the extension framework must fall within the following subnet range 10.0.0.0/8, 172.16.0.0/12, 192.168.0.0/16 as defined by RFC1918. For best results, set the network address range to a subnet that does not exist in your enterprise, and restart the extension service for this change to take effect.
Never set the DATA or MGMT IP address to use an address that matches the Extension Network
INFO
Note that changing the extension base IP address will require the extension service to be restarted.
Configuration Steps
There are primarily 3 steps involved in getting this integration configured.
-
Register and request for a Skyhook tenant
-
Configuration of Envoy for Integration
-
Installation and Configuration of the Envoy Extension using GUI in ClearPass 6.7.X
It is assumed you have SMTP and SMS configured to allow ClearPass Guest to send visitor account details to the Visitor/Guest.
Step I: Register and Request for a Skyhook Tenant ID
Skyhook Tenant ID’s can be registered in the skyhook self-service portal by accessing the following link https://clearpass.arubanetworks.com/webhooks/skyhook and instructions on using the skyhook self-service portal is available here: https://arubanetworking.hpe.com/techdocs/NAC/clearpass/integrations/clearpass-extension/skyhook-self-service-portal/
Kindly copy the skyhookTenant and the dbAccessToken in a text file. This will be used for configuration of the extension in ClearPass as well as configuring the tenant details on the Envoy plugin.
Step II: Configuring Envoy for ClearPass Integration
INFO
Setup and configuration of Envoy is beyond the scope of this guide. Here we specify the steps necessary to configure the integration.
Below are the configuration steps to follow.
- Login to Envoy using your credentials on https://dashboard.envoy.com
Select the Location you wish to integrate with ClearPass as highlighted below**.** Navigate to Integrations and “Install” the ClearPass plugin.

- Once the plugin is installed, click on Configure and follow the steps.
For the first step, copy the Envoy Plugin Install Token. This will be used for the extension configuration in ClearPass to perform health checks.

- For the next step, we need to use the skyhookTenant obtained in Step I from the email in Figure 8. Copy this value in the CLEARPASS TENANTNAME section as shown below.
Ensure that the default URL in the section SKYHOOK API HOST matches with https://skyhook.clearpassbeta.com/api/skyhook/envoy. Do not edit the field if it does or unless instructed by TAC.

- Select the SMS Gateway that will be used to send the credentials to a visitor. We should use ClearPass SMS Gateway as an option here.
INFO
Configuration of ClearPass SMS Gateway and it’s template is beyond the scope of this guide.
The other option is to use the Envoy SMS gateway (using Twilio). The SMS gateway used here uses the SMS template shown in the screenshot. This can be modified as per requirements. For this setup, we are going to use the ClearPass SMS Gateway.

- The last step shows the Status Report of the health checks performed by ClearPass extension.
ClearPass extension sends a health check every 5 minutes using the Envoy Plugin Install token for the given tenant. The statistics associated with this health check are shown here. This will only happen after the installation of the Envoy extension which is covered under the section Step III: Envoy Extension Installation and Configuration. Click on Complete Setup

Step III: Envoy Extension Installation and Configuration
After the extension has been installed, review the extension configuration as necessary and adjust as needed. Notice the options to Start, Delete, Reinstall or Show Logs and the option to review and set the extension configuration.
The default configuration used for extension is below
{
“skyhookTenant”: “0f4cxxxx-xxxx-xxxx-xxxx-2e04897691a8”,
“dbAccessToken”: “********”,
“envoyInstallToken”: “********”,
“countryIsoCode”: “US”,
“phoneNumberField”: “Your Phone Number”,
“cppmDefaultExpiryHrs”: 8,
“cppmGuestRoleName”: “[Guest]”,
“cppmGuestRoleId”: 2,
“cppmGuestSmsReceipt”: true,
“cppmGuestEmailReceipt”: true,
“cppmGuestAccessCode”: false,
“dbLogging”: false,
“logLevel”: “INFO”
}
A copy of the Envoy Extension with the desired configuration is shown below, this will need to be modified for your deployment. Include the skyhookTenant, dbAccessToken and envoyInstallToken that will be specific to your environment. Change any other default values if necessary. Select ‘Restart’ and click on Save Changes to restart the extension.

The table below explains each option with the values and examples required for configuration.
Extension configuration options
| Configuration attribute | Description | Example/Values |
|---|---|---|
| skyhookTenant | The Skyhook tenant ID received in the registration email. | c7xxxxx8-b2b6-4125-9741-cxxxxxxxx38a6 |
| dbAccessToken | The access token for Skyhook received in the registration email. | Long Random string like 7INXYr1YUixxxxxv... |
| envoyInstallToken | The install token from Envoy used for Health Checks to ensure a valid communication channel exists. | f2343xxx-xxxx-xxxx-xxxx-2abd3e415a12 |
| CountryIsoCode | The country code to use for phone number formatitting when the number is not specified in the international format. | US, IN |
| phoneNumberField | The sign-in field from Envoy to use for the visitor phone number. | “Your Phone Number” |
| cppmDefaultExpiryHrs | The default number of hours for an account to be active. | 8 |
| cppmGuestRoleName | The role name to be used in ClearPass Guest when creating the account. This value should match with the cppmGuestRoleId | [Contractor], [Guest], [Employee], Custom Role |
| cppmGuestRoleId | This value sets the role id to use when creating guest accounts | 1 - [Contractor], 2 - [Guest], 3 - [Employee], 4 - Custom Role |
| cppmGuestSmsReceipt | Sets the value of auto_send_sms for ClearPass to send the Guest credentials receipt via SMS | true/false |
| cppmGuestEmailReceipt | Sets the value of auto_send_smtp for ClearPass to send the Guest credentials receipt via SMTP | true/false |
| cppmGuestAccessCode | Enables creation of random codes as Guest Username. If not used the defaul email field is used as username. | true/false |
| dbLogging | Enables advanced logging of skyhook db connection | true/false |
| logLevel | Logging level for troubleshooting | "DEBUG", "INFO", "WARN", "ERROR" |
INFO
Set cppmGuestSmsReceipt value to false if leveraging the Envoy SMS Gateway. This would trigger an SMS using Envoy’s SMS Gateway which leverages Twilio in the backend.
After the configuration and the restart of the extension, click on Show Logs. You should see the following.

The above log states that the extension is now ready to process the events for Envoy.
You can change the logLevel to DEBUG under configuration for detailed logs. These are very useful for troubleshooting and should be included before raising a support case if necessary.
Envoy Sign-in flow
The configuration of Envoy Sign-in form is beyond the scope of this guide however there are a couple of interesting features introduced in Envoy v2 extension which requires us to go through this in brief. These features are not available in v1.
An Envoy Sign-in flow can be configured by selecting the location of your choice and then navigating to Visitors > Settings > Sign-in flow. Click on Sign-in fields.

The v2 extension now allows you to use any custom field as a Phone number field. This gives you the flexibility to change the name of the field displayed on the form. It can now be changed for example to “Mobile Number” or “Cellphone Number” or any other custom label. In v1 this was hardcoded and cannot be changed.
This field is then mapped to visitor_phone field in ClearPass Guest using the extension configuration parameter phoneNumberField as described in the “Extension configuration options” in Figure 19. It allows an administrator to effectively rename this field in Envoy and map the value to visitor_phone field in ClearPass Guest which is then used by ClearPass to SMS the credentials.
Envoy v2 extension can also consume information from other custom fields defined in the form. One can also add a custom field in the Sign-in form the input to which will be captured under the Guest account details within ClearPass. For instance, the custom field “Favourite Drink” is added to this form as shown in the figure. This can be added by clicking “Add a New Field” which is highlighted.

This is captured under Guest account details within ClearPass. Go to Guest > Manage Accounts, select a registered account and click on Show Details.

To add further, you can also use this field for the reports within Insight.
Migration Steps from Envoy v1 to Envoy v2
Envoy v1 was available as a ClearPass extension prior to writing this guide. Customers who already have v1 installed are recommended to move to v2 for performance enhancements. The v2 version of the Extension also provides an additional flexibility in defining custom fields as shown in Figure 22.
Following are the migration steps.
-
Request for a new SkyHook Tenant ID for Envoy v2 integration. The steps for the same are specified in the section “Step I: Register and Request for a Skyhook Tenant ID”.
-
Stop the Envoy v1 extension installed on your ClearPass server. Navigate to ClearPass Guest and go to Administration > Extensions. Click on the Envoy Extension to Stop it as shown below.

-
Install the new Envoy plugin for ClearPass Integration. Use the steps in the section “Step II: Configuring Envoy for ClearPass Integration”.
-
Follow the section “Step III: Envoy Extension Installation and Configuration” to install the new Envoy v2 extension.
-
Test the functionality for few days to ensure it works. If yes, the old extension can be deleted. If no, it can be restarted to ensure no service interruption. Contact support for any further assistance with troubleshooting.
Testing/Demo
Now that the components are all configured and ready to use, let’s walk through the experience from the visitor and administrator perspective. In order to do so, the first step for a visitor is to sign in using the Envoy Visitors app running on an iPad at a reception in the customer setup.
Configuring an iPad to assist customers with registration at front desk is beyond the scope of this document. Essentially, one needs to download the Envoy Visitors app from the appstore and register the device to your Envoy account.
Detailed steps are available here https://dashboard.envoy.com/devices/ipads/new
- Visitor walks up to a tablet used for registration. Every company can personalize the branding by using their logos for the registration pages and email. A simple registration Sign-in page configured for our demo is shown below.
Visitor taps to sign in.

- A first-time visitor is asked to fill the form completely with his details as shown below. The visitor is also asked to select the Sponsor, the person he is visiting. The sponsor is notified via an email/SMS of the visitor’s arrival. We have used basic forms here for demo. These forms are customizable and can be created as per customer requirements.

-
The next steps will ask the visitor to click a picture if configured and then make them digitally sign the required forms like NDA etc. There are several options available for the Sign-in flow on Envoy.
-
Once done, you will see a welcome message. This could be a message, image or a video based on the configuration on Envoy. The customization options are a part of the Sign-in flow. This finishes the registration from a visitor perspective.
-
Visitor should receive an email as well as an SMS with his credentials to login to guest Wi-Fi. Following is the snapshot of the email. Notice the account expiry time is set to 8 hours by default.

You can change the Receipt Template (Guest Manager Receipt) under Configuration > Receipts > Templates.
- After the visit, user can Sign out at the registration desk using the same tablet. Type the first 3 letter of the name used during Sign in and select the user.

Now let’s see what happens in the backend from an administrator perspective.
- Login to ClearPass Guest and go to Manage Accounts under Guest.

The new account has been created upon registration. Note the Expiration time, this should match with the Envoy extension configuration setting for cppmDefaultExpiryHrs. By default, it is set to 8 hours. Another thing to note is the Role which is set to [Guest]. This depends on the extension configuration settings for cppmGuestRoleName and cppmGuestRoleId. This could also be set to a custom Role value if required. The configuration for the same is beyond the scope of this guide.
- If you enable DEBUG and Click on Show Logs under Extension, you should see the following details as a part of the Sign in event.
[2018-10-24T08:10:46.907] [INFO] envoy - [Sign In] The following guest signed in: clearpass.test@gmail.com
[2018-10-24T08:10:46.908] [DEBUG] envoy - Sending health check to https://app.envoy.com/platform/clearpass-staging/sign-in-callback?_juuid=8d089232-c25c-4b57-9aa3-xxxxxxxxxxx
[2018-10-24T08:10:46.908] [DEBUG] envoy - {“status”:“sign-in”,“visitor”:“Test User”,“username”:“clearpass.test@gmail.com”,“password”:30922,“tenant”:“3d72456d-fbd1-49cd-aa08- xxxxxxxxxxx “,“extId”:“313deebb-3807-45ee-ace8-f4e908fc83cb”}
[2018-10-24T08:10:47.373] [DEBUG] envoy - handleEnvoyHealthCheck Response: [202] payload: “ACCEPTED”
[2018-10-24T08:10:47.373] [INFO] envoy - Successfully called Envoy healthcheck
[2018-10-24T08:10:47.373] [DEBUG] envoy - Successfully sent healthcheck update to Envoy.
[2018-10-24T08:10:47.649] [DEBUG] envoy - Successfully deleted transaciton from realtime db.
- Upon Sign out, the visitor account will be disabled. This can be validated under Manage Accounts in ClearPass Guest

-
The user’s Wi-Fi session should also get disconnected automatically upon Sign out. This depends on the policy configured for the Guest SSID. This configuration is beyond the scope of this document.
-
You would see a similar Sign out event in the DEBUG logs.
Appendix A – Troubleshooting and Support
Here we list some basic troubleshooting steps. If you need any help beyond this, please reach out to HPE Aruba Networking Support.
Check API Access Application Control restrictions
If you’ve previously hardened your ClearPass deployment with Application Access Controls, it’s possible that the Extension will not work. Reviewing the Extension Log might show something like the following after immediately starting the Extension. This likely indicates the ClearPass Application API’s are in place.
Example of Extension authorization failure due to Policy Manager Application Control:
[2020-03-16T15:42:21.083] [INFO] Intune - Server listening on port 80.
[2020-03-16T15:42:21.243] [DEBUG] Intune - Request “GET ‘https://172.17.0.1/api/server/version’” took 51.91ms.
[2020-03-16T15:42:21.245] [DEBUG] Intune - <!DOCTYPE html><html>
<head>
<title>
Error 403 (Forbidden)
</title>
<script language=“javascript”>
function reloadPage() {
var locHref = window.location.protocol + “//” + window.location.hostname;
window.location.href = locHref;
}
</script>
To resolve this issue, add the IP address of the Extension to the list of nodes permitted to access the API by navigating to Administration > Server Manager > Server Configuration {choose your node} > Network
INFO
For this reason its good practice to fix the IP address of the extension at installation time such that it doesn’t change over time and break the application controls.
Checking on the Extension Service
The ClearPass Extensions are supported by a system service which must be running.
Restarting this service will affect all deployed and running extensions.
To check on the state of the Extension Service, or to restart the service, go to Administration > Server Manager > Server Configuration > [SERVER] > Service Control. By default this service is automatically started.
Extensions and web proxy / firewall whitelisting
If ClearPass Policy Manager has been configured with a proxy, it’s still possible that domain whitelists are required, the same for some datacenter firewall to allow the installation of Extensions. Some enterprise customers maintain a whitelist of domain that are allowed to transit the proxy/firewall. The underlying docker configuration process uses standard docker registry access to pull images (hosted in docker hub). In general, the following hosts are used:
INFO
-
extensions.clearpassbeta.com
-
registry-1.docker.io
-
index.docker.io
-
auth.docker.io
-
production.cloudflare.docker.com
This is all also geo dependent to some degree and based on various AWS services, so AWS redirects and geo location services will vary. Finally, this all runs via standard HTTPS (port 443).
Extension Logs/Enable Debugging
If you have a requirement to access and view the logs from the Extension, you can turn on different logging levels from the Extension GUI. Adjust the logLevel to ‘DEBUG’ and restart the extension as shown below.
Logs can then be viewed from the ‘Show Logs’.
Remember after changing the logging level, as with any extension configuration change the extension will need to be restarted for this change to take effect.
Accessing the extension logs using ‘Collect Logs’ system function
In addition to viewing the logs as shown above, logs can also be collected and examined via the Policy Manager Collect Logs system function (Administration > Server Manager > Server Configuration > [Select SERVER] > Collect Logs). This is extremely useful should you have a need to call for technical assistance.
If the support team needs to investigate a system issue, one of the items they regularly ask for is the system logs to aid with their diagnostic investigation. By default the “logLevel” is set to INFO, but TRACE, DEBUG, INFO, WARN, ERROR, FATAL can also be set as required. Any of the levels will display the information for the selected state and lower; if INFO is selected, it will show messages for INFO, WARN, ERROR, FATAL.
After the logs have been collected, downloaded and expanded, you can locate the extension logs in the following location in the folder structure PolicyManagerLogs > extension > your-extension-id as shown below. Note the file-name is the same as the running instance ID of the extension.
Monitoring extension statistics
There is a way to monitor extension’s critical resource statistics with the configurable parameter added as part of the extension’s configuration. To enable extension statistics set the “enableStats” parameter to true. Remember a restart of the extension is need to activate the change anytime the config is modified.
To navigate to statistics page, click Show Details.
This will show statistics similar to the following:
Monitoring authorization performance
Since we are authorizing against an external system, it could be relevant to monitor the performance of these transactions as you setup and deploy. If you suspect there is a performance issue, ClearPass provides a way to monitor the authorization processing time. The graph below shows an example of this data, navigate to Monitoring > Live Monitor > System Monitor [click on ClearPass Tab, then select [Authorization]….
Appendix B – Considerations for Installing in a Cluster
Extensions are not synced between ClearPass cluster members, and thus must be installed on each member separately.
Some Extensions can run in two modes: Periodic Sync Mode and Authorization Source Mode.
Periodic Sync Mode
If you are configuring the extension to poll external system periodically and utilize the resulting ClearPass Endpoint database during endpoint Authorization, then you only need to install the extension on one cluster member, often the publisher.
You may wish to install the extension on a second cluster member as a backup, but remember that both extensions will individually be updating the endpoint database. You may want to stagger the updates between the two extensions, for example, Subscriber1 updates at the top of the hour and Subscriber2 updates at 30 minutes after the hour.
Also, in this mode there is no need to explicitly enter an IP address during installation. The defaults will suffice and ClearPass will select an IP in the range specified in the server configuration.
HTTP Authorization Source Mode
In this mode we configure an HTTP Auth source that results in a HTTPS call to external system during endpoint authorization. In this deployment model the extension must be installed on every cluster node that process authentications. Also in this scenario every cluster member’s extension must be set to the exact same IP address during installation time, as the HTTP Auth source configuration is propagated globally across all cluster members.
For example, if the extension IP range is 172.17.0.0/16, we would set the extension to 172.17.0.5 on every cluster member during installation of the extension.
While we normally want to avoid duplicate IP addresses in a network, this is not a concern with ClearPass extensions. Each ClearPass node communicates internally only with its own extension, and this traffic is not routed outside of ClearPass.
Subscriber nodes support the same ability as publishers to install an Extension from the Extension store.
Appendix C – endpoint sync schedule settings
The syncSchedule and similar scheduling parameters sets how often ClearPass executes certain actions like syncing or pushing endpoints. This setting is based on a slightly modified version of the CRON job scheduler found in Unix-like operating systems. It can be used to schedule jobs to run periodically at fixed times, dates or intervals.
A ‘cron’ is a job scheduler. Any scheduled task is called a ‘cron job’. The syntax for a cron job schedule is as follows:
In our use of the cron scheduler, we’ve dropped the use of the last instruction ≤command to execute> and use only the time/date functions, see below for a number of examples of scheduling a sync process.
-
Schedule a sync to run at 2am daily:- 0 2 * * *
-
Schedule a sync to run twice a day at 5am and 5pm:- 0 5,17 * * *
-
Schedule a sync to run on every Sunday at 5pm:- 0 17 * * sun
-
Schedule a sync to run every 30 minutes:- */30 * * * *
-
Schedule a sync to run at 5pm on selected days:- 0 17 * * sun,fri
You can see from the above that the scheduling process is extremely flexible, alternatively https://crontab.guru/ is a great page for learning more about CRON scheduling.
Appendix D – Extension performance optimizations
Extensions are a critical part of ClearPass deployments today and with the increased dependency on extension interactions that involve periodic polling or real-time lookups, here are some of the best practice recommendations around optimizing overall performance when using extensions:
-
If the extension is used to periodically poll external systems and populate endpoint repository, ensure that it is not installed in all the nodes in the cluster. Ideally these type of extensions should only be installed on the publisher node since only publisher node can add endpoint entries to the database. For redundancy, it can be installed on another additional node but it is recommended to stagger the polling interval so that both do not attempt to poll and update endpoint database at the same time.
Example: 0 * * * *, This cron job runs at minute 0 of every hour (e.g., 00:00, 01:00, 02:00, etc.).
30 * * * *, This cron job runs at minute 30 of every hour (e.g., 00:30, 01:30, 02:30, etc.). -
If the extension is used for looking up attributes from external systems in real time during authentication, it should be installed in all the nodes handling authentication. Note that the context server config is replicated from the publisher. When using extension for real time lookup, ensure that the extension has the same IP address in all the cluster nodes.
-
If the extension is expected to do both real-time lookup and periodic polling, ensure that polling is enabled only on the publisher while the extension in subscribers can have the polling disabled by setting the “enableSyncAll” attribute to false.
"enableSyncAll": false,
WARNING
Having the extension installed on all the cluster nodes with enableSyncAll set to true would cause each cluster node to independently poll the external system and update endpoint repository. This could impact the performance of ClearPass. Hence it is strongly recommended to enable endpoint sync only on the extension installed on the publisher and on another cluster node for redundancy.
-
Some 3rd party systems support fetching delta updates vs fetching all of the device information every polling cycle. The extensions that support fetching delta updates are: Workspace ONE Crowdstrike Falcon Microsoft Intune Mosyle SentinelOne Service Now
For these extensions, the syncUpdatedOnly attribute should be set to true in extension config so that the number of DB updates in ClearPass is minimized
"syncUpdatedOnly": true,For extensions that do not support syncUpdatedOnly, ensure that the sync interval is not aggressive. We recommend syncing at most twice a day and that too during off peak hours whenever a full sync is performed.
-
Some 3rd party systems can be very noisy in terms of attribute updates. There could be certain attributes that keep changing every sync interval like “Free Memory in Bytes”, “Last Check in Time” etc. There is no value in updating endpoints when such trivial attributes change for the device. Hence it is recommended to use “ignoreEndpointDifferences” attribute in extension configuration to ignore change in attributes that you do not care about in terms of ClearPass policies.
You can review the Audit Viewer in ClearPass under Monitoring > Audit Viewer to see what attributes are being updated for endpoints to check if there are unnecessary updates.
Sample for JAMF extension:
"ignoreEndpointDifferences": "Last Update, Report Date UTC, Last Contact Time UTC, Last Inventory Update UTC, Last Reported IP, IP Address",Default for Microsoft Intune extension:
"ignoreEndpointDifferences": "Last Sync Date Time, Free Storage Space in Bytes", -
To further optimize the number of endpoints being updated in ClearPass, you can specify which attributes are being used in the ClearPass policies so that only changes to those attributes would trigger an update to the endpoint. This is done by listing out the specific attributes under endpointAttributes in extension configuration.
Sample for JAMF extension:
"endpointAttributes": "Group names, MDM Enabled, Managed, Remote Managed, Supervised, Serial Number", -
Setup extension to restart unless it was intentionally stopped. A restart policy can be defined in extension configuration to ensure that the extension starts up automatically after server reboots and such. Restart policy of “unless-stopped” would ensure the extension always starts up unless it was manually stopped.
“restartPolicy”: “no” — The extension will not be automatically restarted after the server is restarted.
“restartPolicy”: “always” — The extension will always be restarted after the server is restarted.
“restartPolicy”: “unless-stopped” — The extension will be restarted unless it was stopped prior to the server restart, in which case it will maintain that state.
“restartPolicy”: “on-failure:N” — If the extension fails to restart, the value for “N” specifies the number of times the extension should try to restart. If you do not provide a value for “N”, the default value will be “0”.
The “restartPolicy” parameter is not present by default in extension configurations. When it is not present, if the system is restarted a default policy is applied to the extension to maintain the state it was in before the restart. If the “restartPolicy” parameter is added to the configuration but later removed, the extension will then revert to the default restart policy.
6.2 - SinePro
Introduction
This guide covers the setup, configuration, and monitoring of the ClearPass extension for Sine Pro and the configuration of a webhook in Sine Pro for the Integration.
Sine Pro is an easy to use cloud-based visitor management platform. When visitors arrive, Sine makes it easy for them to Check-In and Check-Out, presents them with relevant forms where they can provide their information, sign documents (NDAs) and it optionally notifies the person they are visiting of their arrival.
ClearPass is an industry leading Guest Management solution that delivers secure, automated guest access workflows. It’s very useful for an enterprise to combine these two applications to get a seamless visitor management system that automates visitor’s Wi-Fi requirements.
This Extension serves two primary use-cases
-
Guest account creation upon Visitor Check In
-
Guest account deletion upon Visitor Check Out
With Sine hosted in the cloud and ClearPass sitting primarily on-prem, there are challenges in making these two applications communicate in real time so that a visitor gets guest WiFi credentials from ClearPass as soon as he registers using Sine application. Traditionally the apps would communicate using APIs where an application would request information which is usually followed by a response. Hence in order to get real-time information you have to poll or request as often as possible which is not scalable. The answer or the solution is a webhook which does not wait for a request to send information but sends the data as soon as it’s available.
Before we proceed with the flow, we need to understand the concept of webhooks and skyhook.
What is a webhook?
A webhook (also called a web callback or HTTP push API) is a way for an app to provide other applications with real-time information. A webhook delivers data to other applications as it happens, meaning you get data immediately.
What is skyhook?
Skyhook was developed to overcome the inability for Cloud based applications to send events [webhooks] directly into a ClearPass that was typically deployed on the Trust side of a corporate firewall. In short, it is a service that runs in AWS. ClearPass nodes running on-prem, use extensions to open a persistent connection into Skyhook to receive the events originally sent from a 3rd party cloud application specific for that customer/tenant.
As an overview, Sine Pro running in the cloud will send a webhook upon a Visitor check-in (signin_after) or a check-out (signout_after) event. This will communicate with Skyhook. The ClearPass extension configured and installed will maintain a persistent connection with Skyhook awaiting an event (Check In/ Check Out).
Software Requirements
The minimum software version required for CPPM is 6.11.0 . At the time of writing, version 6.11.10 is available as the long supported release and 6.12.4 is available as the short supported release. CPPM runs on hardware appliances with pre-installed software or as a Virtual Machine under the following hypervisors. Hypervisors that run on a client computer such as VMware Player are not supported.
-
VMware vSphere Hypervisor (ESXi) 7.0 U3c and 8.0
-
Windows Server 2019 with Hyper‑V and Windows Server 2022 with Hyper‑V.
-
KVM on CentOS Stream 8, CentOS Stream 9, Ubuntu 20.04 LTS, and Ubuntu 22.04 LTS.
ClearPass Installation and Deployment Guide
This document assumes your ClearPass environment is already configured and operational. If you require assistance with basic deployment, refer to the following deployment guide:
https://arubanetworking.hpe.com/techdocs/ClearPass/6.11/Installation-Guide/Default.htm
ClearPass Extensions
The integration between ClearPass Policy Manager and external systems is driven through a ClearPass capability known as Extensions, a sub-component of the ClearPass Exchange Integration framework. ClearPass Extensions are micro-services running on top of the base ClearPass platform. These micro-services enable HPE Aruba Networking to deliver new features outside of the main software release cycle and facilitate a faster time to market for specific features and integrations. Configuration and control of ClearPass Extensions is accomplished through the ClearPass Guest GUI, as covered later in this document.
Installing Extension
ClearPass Extensions are easy to install from the ClearPass Extensions Store. In a cluster, ClearPass Extensions can be installed on a subscriber independently of the publisher. Multiple copies of the same extension can be installed if needed as well.
INFO
Internet access is required for ClearPass Policy Manager to install the ClearPass Extensions from the Extension Store. Starting with ClearPass 6.12, extensions can be can be installed offline as well. Offline ClearPass Extension images are available on HPE networking support portal.
Access to the extension store
Access the Extension Store to download and install ClearPass extensions. The Extension store utilizes the same HPE Passport account credentials used to validate support entitlement in the Software Updates Por- tal. This is configured under Administration > Agents and Software Updates > Software Updates as shown below. Ensure that valid HPE Passport credentials have been entered in these fields to enable Ex- tension download capabilities.
Installing the Extension from Store
Extensions are installed from the extension page in ClearPass Guest, as shown below. Access it from Guest > Administration > Extensions
From here, click on ‘Install Extension’, and the search box below appears.
Enter “Intune” and click on ‘Search’, see the example below.
INFO
Here we are using Intune as an example. The installation steps are the same for all the extensions. For your deployment, please search for the appropriate extension like Jamf, Mosyle, Crowdstrike, etc.
All currently available extensions are listed in the page: https://www.arubanetworks.com/techdocs/NAC/clearpass/integrations/clearpass-extension/extensions-list/
Click on the extension name and then click “Install.”
In the “Install Extension” dialog box, set the IP address if necessary, as described in section “Extensions and IP address configuration support” below. Do not check the box to start the extension at this time. Click the “Install” button.
In this example, we’ve not entered an IP address for the extension to use, if there is intent to use the extension as an authorization source set this value and ensure its set the same on all nodes where the Extension is deployed.
The extension will download and appear in a “Stopped” state. Notice the options to Start, Delete, Reinstall, Show Logs, and view Configuration. Click on “Configuration” to view settings.
After the extension has been installed, proceed to configure the extension
A copy of the default Extension configuration is shown above, this will need to be modified for your deployment.
INFO
Password and sensitive configuration items are obfuscated when presented in both the Extension GUI or in the Explorer configuration.
WARNING
The configuration attributes are case sensitive. It is recommended to refer the default configuration sample while editing your configuration.
Extensions and web proxy support
Extensions support communications with 3rd parties via a web proxy. This adds incremental proxy functionality. If a proxy is defined in ClearPass Policy Manager, then an extension will inherit that configuration. See later in the document on how to disable the proxy inherited configuration.
INFO
Note that the Policy Manger web proxy configuration is ONLY read by the extension at installation time. If the web proxy configuration is changed in Policy Manager, then the extension must be re-installed so the new settings are re-read and bonded to the extension.
Extensions and IP address configuration support
ClearPass uses a non-externally routed IP address range to communicate with the Extension. The default is 172.17.0.0/16. You may configure a different range, if desired. This is especially useful when deploying extensions across nodes within a cluster where there is the requirement for a fixed consistent IP address for the extension across the cluster.
Changing the “Extensions Network Address” range is only necessary if either the ClearPass MGMT or DATA interface are using an IP address in the extension default range of 172.17.x.x/12, or if ClearPass needs to communicate with some external device in that range.
To Configure the base Extension IP subnet within Policy Manager navigate to Administration > Server Manager > Server Configuration [chose your node] Service Parameters [ClearPass system service].
INFO
The subnet defined here for the extension framework must fall within the following subnet range 10.0.0.0/8, 172.16.0.0/12, 192.168.0.0/16 as defined by RFC1918. For best results, set the network address range to a subnet that does not exist in your enterprise, and restart the extension service for this change to take effect.
Never set the DATA or MGMT IP address to use an address that matches the Extension Network
INFO
Note that changing the extension base IP address will require the extension service to be restarted.
Pictorial View of the Integration
The diagram below shows a pictorial overview of the components and how they interact with each other.

Configuration Steps
There are primarily 3 steps involved in getting this integration configured.
-
Register and request for a Skyhook tenant
-
Configuration of Sine Pro for Integration
-
Installation and Configuration of the Sine Pro extension using GUI in ClearPass 6.7.X
It is assumed you have SMTP and SMS configured to allow ClearPass Guest to send visitor account details to the Visitor/Guest.
Step I: Register and Request for a Skyhook Tenant ID
Skyhook Tenant ID’s can be registered in the skyhook self-service portal by accessing the following link https://clearpass.arubanetworks.com/webhooks/skyhook and instructions on using the skyhook self-service portal is available here: https://arubanetworking.hpe.com/techdocs/NAC/clearpass/integrations/clearpass-extension/skyhook-self-service-portal/
Step II: Configuring Sine Pro for ClearPass Integration
INFO
Setup and Configuration of Sine Pro is beyond the scope of this guide. Here we specify the steps necessary to configure the integration.
The “Email Required” field must be enabled in Sine Pro. This can be accessed from Passes > Check-In Requirements under Settings for individual sites. This email field is mapped to the Guest account username created in ClearPass.
Below are the configuration steps to follow:
- Login to Sine Pro using your credentials on https://dashboard.sine.co
Click on Sites. Select a Site and go to Settings. Navigate to Integrations and add (+) a WebHook.

The screen capture above covers the configuration required in the Sine Pro environment. Following are the values required for the configuration.
- URL: This is the Skyhook Posting URL. The SkyHook Tenant is obtained from the sample email as shown in previous step. Replace the <SKYHOOK TENANT> below to create the URL.
https://skyhook.clearpassbeta.com/api/skyhook/sine**/<SKYHOOK TENANT>**
- API Key: This is a shared key for communication between ClearPass and Sine.
INFO
We recommend using a GUID value or a large random value as the key. You can generate a GUID value here: https://www.guidgenerator.com/ OR a random value here: https://www.random.org/bytes/
-
External ID: This can be left blank as it is not used currently. It will automatically pick the default value.
-
Visitor Types: You could choose these based on your requirement however, in current versions of ClearPass all Visitor Types will be mapped to a Guest role on ClearPass by default.
-
Events: “signin_after” is a mandatory event that has to be selected. It is strongly recommended to select both the events “signin_after” and “signout_after” to complete the guest sign in workflow.
-
Status: Ensure the status is enabled.
Step III: Sine Pro Extension Installation and Configuration
The default configuration used for extension is below
{
“skyhookTenant”: “27f80f8aaaea8974d9c7ca43e69xxxxb5xxxx85910”,
“dbAccessToken”: “********”,
“sineApiKey”: “********”,
“cppmDefaultExpiryHrs”: 8,
“cppmGuestRoleName”: “[Guest]”,
“cppmGuestRoleId”: 2,
“cppmGuestSmsReceipt”: true,
“cppmGuestEmailReceipt”: true,
“dbLogging”: false,
“logLevel”: “INFO”
}
A copy of the Sine Pro Extension with the desired configuration is shown below, this will need to be modified for your deployment. Include the skyhookTenant, dbAccessToken and sineApiKey that will be specific to your environment. Change any other default values if necessary. Select ‘Restart’ and click on Save Changes to restart the extension.

The table on the next page explains each option with the values and examples required for configuration.
Extension Configuration options
| Configuration attribute | Description | Example/Values |
|---|---|---|
| skyhookTenant | The Skyhook tenant ID received in the registration email. | 27f80f8aaaea8974d9c7ca43e69xxxxb5xxxx85910 |
| dbAccessToken | The access token for Skyhook received in the registration email. | Long Random string like 7INXYr1YUixxxxxv... |
| sineApiKey | The API key configured in the sine integrations configuration. | 4a348197-cc57-4cf7-a339-5a4c3f76b2b0 |
| cppmDefaultExpiryHrs | The default number of hours for an account to be active. | 8 |
| cppmGuestRoleName | The role name to be used in ClearPass Guest when creating the account. This value should match with the cppmGuestRoleId | [Guest], [Contractor], [Employee], Custom Role |
| cppmGuestRoleId | This value sets the role id to use when creating guest accounts | 1 - [Guest], 2 - [Contractor], 3 - [Employee], 4 - Custom Role |
| cppmGuestSmsReceipt | Sets the value of auto_send_sms for ClearPass to send the Guest credentials receipt via SMS | true/false |
| cppmGuestEmailReceipt | Sets the value of auto_send_smtp for ClearPass to send the Guest credentials receipt via SMTP | true/false |
| dbLogging | Enables advanced logging of skyhook db connection | true/false |
| logLevel | Logging level for troubleshooting | "DEBUG", "INFO", "WARN", "ERROR" |
After the configuration and the restart of the extension, click on Show Logs. You should see the following.

The above log shows the License Agreement and also states that the extension is now ready to process events for Sine Pro.
You can change the logLevel to DEBUG under configuration for detailed logs. These are very useful for troubleshooting and should be included before raising a support case if necessary.
Migration Steps from Sine Pro v1 to Sine Pro v2
Sine Pro v1 was available as a ClearPass extension prior to writing this guide. Customers who already have v1 installed are recommended to move to v2 for performance enhancements.
INFO
Note the Sine Pro v1 is denoted as version 0.3 in ClearPass Extension UI.
Following are the migration steps.
-
Request for a new SkyHook Tenant ID for Sine Pro v2 integration. The steps for the same are specified in the section “Step I: Register and Request for a Skyhook Tenant ID”.
-
Disable the WebHook created for v1 Integration. Do not delete this. The idea is to keep the v1 integration in a disabled state so that we can move back to v1, if the v2 migration fails.
You can also rename this to WebHook-v1 or WebHook-OLD to avoid confusion.

-
The next step is to create another WebHook for v2 integration. Follow the steps in the section “Step II: Configuring Sine Pro for ClearPass Integration”.
-
Stop the Sine Pro v0.3 extension installed on your ClearPass server. Navigate to ClearPass Guest and go to Administration > Extensions. Click on the Sine Extension to Stop it as shown below.

-
Follow the section “Step III: Sine Pro Extension Installation and Configuration” to install the new Sine Pro v2 extension.
-
Test the functionality for few days to ensure it works. If yes, the old extension and the WebHook can be deleted. If no, they can be re-enabled to ensure no service interruption. Contact HPE Aruba Networking support for any further assistance with troubleshooting.
Testing/Demo
Now that the components are all configured and ready to use, let’s walk through the experience from the user and administrator perspective. In order to do so, the first step for a visitor is to register using the Sine Pro app running on an iPad at a reception in the customer setup.
Configuring an iPad or any other device to assist customers with registration at front desk is beyond the scope of this document. Essentially, you download the SinePoint Pro app from the appstore and use the registered account to login with this device to your Sine Pro tenant. Detailed steps are available on Sine’s website here
https://www.sine.co/sinepointsetup/
- Visitor walks up to a tablet used for Registration. Every company can have a different skin for the Registration page. A simple Registration Check-In page configured for our demo is shown below.
Visitor clicks Check-In.

- A first-time visitor is asked to fill all the forms with his details as shown below. A site location in Sine is recognized using the Google Maps. This will default the country code to that region. For example, 0414 will automatically be converted to +61414 for sites in Australia. Visitors from outside the region can manually enter the country code when checking-in.
We have used basic forms here for demo. These forms are customizable and can be created as per customer requirements. As you can see below, the email field should be available in the Check-In form. This field is mapped to the username of the Guest account created in ClearPass.

-
The next steps will ask the visitor to click a picture if configured and then make them digitally sign the required forms like NDA etc.
-
As a final step, the application asks the visitor to select the host. A notification about the visitor’s arrival will be sent to this host via SMS, email and/or push notification, as configured within Sine Pro.
-
Once done, you will see a successful check-In. This finishes the registration from the user perspective.

- User should receive an email as well as an SMS with his credentials. Following is the snapshot of the email. Notice the account expiry time is set to 8 hours by default.

You can change the Receipt Template (Guest Manager Receipt) under Configuration > Receipts > Templates.
- After the visit, user can Check Out at the registration desk using the same Tablet. Type you email, mobile or you can also scan the QR code to check-out. Click Next.

Now let’s see what happens in the backend from an administrator perspective.
- Login to ClearPass Guest and go to Manage Accounts under Guest.

The new account has been created upon registration. Note the Expiration time, this should match with the Sine Pro extension configuration setting for cppmDefaultExpiryHrs. By default, it is set to 8 hours. Another thing to note is the Role which is set to [Guest]. This depends on the extension configuration settings for cppmGuestRoleName and cppmGuestRoleId. This could also be set to a custom Role value if required. The configuration for the same is beyond the scope of this guide.
- If you enable DEBUG and Click on Show Logs under Extension, you should see the following details as a part of the Check In event.
[2018-08-14T15:08:18.168] [DEBUG] sine - New event received (43ef9b54-e4b1-4f56-b8c0-690db430e96a).
[2018-08-14T15:08:18.178] [DEBUG] sine - The Sine API Key is a match. Processing message…
[2018-08-14T15:08:18.178] [DEBUG] sine - [Sign In] Looking up guest “peter@webworks.com” in CPPM.
Attmepting to call https://172.17.0.1/api/guest/username/peter@webworks.com with token of Bearer aabbcc13d3a5bfab48e3890d3937046f1aaabbcc
[2018-08-14T15:08:18.482] [DEBUG] sine - [Sign In] Creating guest “peter@webworks.com” in CPPM.
Attmepting to call https://172.17.0.1/api/guest with token of Bearer 0df7cf13d3a5bfab48e3890d3937046f1a35659d
[2018-08-14T15:08:19.136] [INFO] sine - [Sign In] The following guest signed in: Peter Parker (peter@webworks.com)
[2018-08-14T15:08:19.136] [DEBUG] sine - Removing event from skyhook (43ef9b54-e4b1-4f56-b8c0-690db430e96a)…
[2018-08-14T15:08:19.405] [DEBUG] sine - Event removed (43ef9b54-e4b1-4f56-b8c0-690db430e96a).
- Upon Check Out, the User account will be disabled, see this under Manage Accounts in ClearPass Guest

-
The user’s WiFi session should also get disconnected automatically upon Check Out. This depends on the Policy configured for the Guest SSID. This configuration is beyond the scope of this document.
-
You would see a similar Check Out event in the DEBUG logs.
Appendix A – Troubleshooting and Support
Here we list some basic troubleshooting steps. If you need any help beyond this, please reach out to HPE Aruba Networking Support.
Check API Access Application Control restrictions
If you’ve previously hardened your ClearPass deployment with Application Access Controls, it’s possible that the Extension will not work. Reviewing the Extension Log might show something like the following after immediately starting the Extension. This likely indicates the ClearPass Application API’s are in place.
Example of Extension authorization failure due to Policy Manager Application Control:
[2020-03-16T15:42:21.083] [INFO] Intune - Server listening on port 80.
[2020-03-16T15:42:21.243] [DEBUG] Intune - Request “GET ‘https://172.17.0.1/api/server/version’” took 51.91ms.
[2020-03-16T15:42:21.245] [DEBUG] Intune - <!DOCTYPE html><html>
<head>
<title>
Error 403 (Forbidden)
</title>
<script language=“javascript”>
function reloadPage() {
var locHref = window.location.protocol + “//” + window.location.hostname;
window.location.href = locHref;
}
</script>
To resolve this issue, add the IP address of the Extension to the list of nodes permitted to access the API by navigating to Administration > Server Manager > Server Configuration {choose your node} > Network
INFO
For this reason its good practice to fix the IP address of the extension at installation time such that it doesn’t change over time and break the application controls.
Checking on the Extension Service
The ClearPass Extensions are supported by a system service which must be running.
Restarting this service will affect all deployed and running extensions.
To check on the state of the Extension Service, or to restart the service, go to Administration > Server Manager > Server Configuration > [SERVER] > Service Control. By default this service is automatically started.
Extensions and web proxy / firewall whitelisting
If ClearPass Policy Manager has been configured with a proxy, it’s still possible that domain whitelists are required, the same for some datacenter firewall to allow the installation of Extensions. Some enterprise customers maintain a whitelist of domain that are allowed to transit the proxy/firewall. The underlying docker configuration process uses standard docker registry access to pull images (hosted in docker hub). In general, the following hosts are used:
INFO
-
extensions.clearpassbeta.com
-
registry-1.docker.io
-
index.docker.io
-
auth.docker.io
-
production.cloudflare.docker.com
This is all also geo dependent to some degree and based on various AWS services, so AWS redirects and geo location services will vary. Finally, this all runs via standard HTTPS (port 443).
Extension Logs/Enable Debugging
If you have a requirement to access and view the logs from the Extension, you can turn on different logging levels from the Extension GUI. Adjust the logLevel to ‘DEBUG’ and restart the extension as shown below.
Logs can then be viewed from the ‘Show Logs’.
Remember after changing the logging level, as with any extension configuration change the extension will need to be restarted for this change to take effect.
Accessing the extension logs using ‘Collect Logs’ system function
In addition to viewing the logs as shown above, logs can also be collected and examined via the Policy Manager Collect Logs system function (Administration > Server Manager > Server Configuration > [Select SERVER] > Collect Logs). This is extremely useful should you have a need to call for technical assistance.
If the support team needs to investigate a system issue, one of the items they regularly ask for is the system logs to aid with their diagnostic investigation. By default the “logLevel” is set to INFO, but TRACE, DEBUG, INFO, WARN, ERROR, FATAL can also be set as required. Any of the levels will display the information for the selected state and lower; if INFO is selected, it will show messages for INFO, WARN, ERROR, FATAL.
After the logs have been collected, downloaded and expanded, you can locate the extension logs in the following location in the folder structure PolicyManagerLogs > extension > your-extension-id as shown below. Note the file-name is the same as the running instance ID of the extension.
Monitoring extension statistics
There is a way to monitor extension’s critical resource statistics with the configurable parameter added as part of the extension’s configuration. To enable extension statistics set the “enableStats” parameter to true. Remember a restart of the extension is need to activate the change anytime the config is modified.
To navigate to statistics page, click Show Details.
This will show statistics similar to the following:
Monitoring authorization performance
Since we are authorizing against an external system, it could be relevant to monitor the performance of these transactions as you setup and deploy. If you suspect there is a performance issue, ClearPass provides a way to monitor the authorization processing time. The graph below shows an example of this data, navigate to Monitoring > Live Monitor > System Monitor [click on ClearPass Tab, then select [Authorization]….
Appendix B – Considerations for Installing in a Cluster
Extensions are not synced between ClearPass cluster members, and thus must be installed on each member separately.
Some Extensions can run in two modes: Periodic Sync Mode and Authorization Source Mode.
Periodic Sync Mode
If you are configuring the extension to poll external system periodically and utilize the resulting ClearPass Endpoint database during endpoint Authorization, then you only need to install the extension on one cluster member, often the publisher.
You may wish to install the extension on a second cluster member as a backup, but remember that both extensions will individually be updating the endpoint database. You may want to stagger the updates between the two extensions, for example, Subscriber1 updates at the top of the hour and Subscriber2 updates at 30 minutes after the hour.
Also, in this mode there is no need to explicitly enter an IP address during installation. The defaults will suffice and ClearPass will select an IP in the range specified in the server configuration.
HTTP Authorization Source Mode
In this mode we configure an HTTP Auth source that results in a HTTPS call to external system during endpoint authorization. In this deployment model the extension must be installed on every cluster node that process authentications. Also in this scenario every cluster member’s extension must be set to the exact same IP address during installation time, as the HTTP Auth source configuration is propagated globally across all cluster members.
For example, if the extension IP range is 172.17.0.0/16, we would set the extension to 172.17.0.5 on every cluster member during installation of the extension.
While we normally want to avoid duplicate IP addresses in a network, this is not a concern with ClearPass extensions. Each ClearPass node communicates internally only with its own extension, and this traffic is not routed outside of ClearPass.
Subscriber nodes support the same ability as publishers to install an Extension from the Extension store.
Appendix C – endpoint sync schedule settings
The syncSchedule and similar scheduling parameters sets how often ClearPass executes certain actions like syncing or pushing endpoints. This setting is based on a slightly modified version of the CRON job scheduler found in Unix-like operating systems. It can be used to schedule jobs to run periodically at fixed times, dates or intervals.
A ‘cron’ is a job scheduler. Any scheduled task is called a ‘cron job’. The syntax for a cron job schedule is as follows:
In our use of the cron scheduler, we’ve dropped the use of the last instruction ≤command to execute> and use only the time/date functions, see below for a number of examples of scheduling a sync process.
-
Schedule a sync to run at 2am daily:- 0 2 * * *
-
Schedule a sync to run twice a day at 5am and 5pm:- 0 5,17 * * *
-
Schedule a sync to run on every Sunday at 5pm:- 0 17 * * sun
-
Schedule a sync to run every 30 minutes:- */30 * * * *
-
Schedule a sync to run at 5pm on selected days:- 0 17 * * sun,fri
You can see from the above that the scheduling process is extremely flexible, alternatively https://crontab.guru/ is a great page for learning more about CRON scheduling.
Appendix D – Extension performance optimizations
Extensions are a critical part of ClearPass deployments today and with the increased dependency on extension interactions that involve periodic polling or real-time lookups, here are some of the best practice recommendations around optimizing overall performance when using extensions:
-
If the extension is used to periodically poll external systems and populate endpoint repository, ensure that it is not installed in all the nodes in the cluster. Ideally these type of extensions should only be installed on the publisher node since only publisher node can add endpoint entries to the database. For redundancy, it can be installed on another additional node but it is recommended to stagger the polling interval so that both do not attempt to poll and update endpoint database at the same time.
Example: 0 * * * *, This cron job runs at minute 0 of every hour (e.g., 00:00, 01:00, 02:00, etc.).
30 * * * *, This cron job runs at minute 30 of every hour (e.g., 00:30, 01:30, 02:30, etc.). -
If the extension is used for looking up attributes from external systems in real time during authentication, it should be installed in all the nodes handling authentication. Note that the context server config is replicated from the publisher. When using extension for real time lookup, ensure that the extension has the same IP address in all the cluster nodes.
-
If the extension is expected to do both real-time lookup and periodic polling, ensure that polling is enabled only on the publisher while the extension in subscribers can have the polling disabled by setting the “enableSyncAll” attribute to false.
"enableSyncAll": false,
WARNING
Having the extension installed on all the cluster nodes with enableSyncAll set to true would cause each cluster node to independently poll the external system and update endpoint repository. This could impact the performance of ClearPass. Hence it is strongly recommended to enable endpoint sync only on the extension installed on the publisher and on another cluster node for redundancy.
-
Some 3rd party systems support fetching delta updates vs fetching all of the device information every polling cycle. The extensions that support fetching delta updates are: Workspace ONE Crowdstrike Falcon Microsoft Intune Mosyle SentinelOne Service Now
For these extensions, the syncUpdatedOnly attribute should be set to true in extension config so that the number of DB updates in ClearPass is minimized
"syncUpdatedOnly": true,For extensions that do not support syncUpdatedOnly, ensure that the sync interval is not aggressive. We recommend syncing at most twice a day and that too during off peak hours whenever a full sync is performed.
-
Some 3rd party systems can be very noisy in terms of attribute updates. There could be certain attributes that keep changing every sync interval like “Free Memory in Bytes”, “Last Check in Time” etc. There is no value in updating endpoints when such trivial attributes change for the device. Hence it is recommended to use “ignoreEndpointDifferences” attribute in extension configuration to ignore change in attributes that you do not care about in terms of ClearPass policies.
You can review the Audit Viewer in ClearPass under Monitoring > Audit Viewer to see what attributes are being updated for endpoints to check if there are unnecessary updates.
Sample for JAMF extension:
"ignoreEndpointDifferences": "Last Update, Report Date UTC, Last Contact Time UTC, Last Inventory Update UTC, Last Reported IP, IP Address",Default for Microsoft Intune extension:
"ignoreEndpointDifferences": "Last Sync Date Time, Free Storage Space in Bytes", -
To further optimize the number of endpoints being updated in ClearPass, you can specify which attributes are being used in the ClearPass policies so that only changes to those attributes would trigger an update to the endpoint. This is done by listing out the specific attributes under endpointAttributes in extension configuration.
Sample for JAMF extension:
"endpointAttributes": "Group names, MDM Enabled, Managed, Remote Managed, Supervised, Serial Number", -
Setup extension to restart unless it was intentionally stopped. A restart policy can be defined in extension configuration to ensure that the extension starts up automatically after server reboots and such. Restart policy of “unless-stopped” would ensure the extension always starts up unless it was manually stopped.
“restartPolicy”: “no” — The extension will not be automatically restarted after the server is restarted.
“restartPolicy”: “always” — The extension will always be restarted after the server is restarted.
“restartPolicy”: “unless-stopped” — The extension will be restarted unless it was stopped prior to the server restart, in which case it will maintain that state.
“restartPolicy”: “on-failure:N” — If the extension fails to restart, the value for “N” specifies the number of times the extension should try to restart. If you do not provide a value for “N”, the default value will be “0”.
The “restartPolicy” parameter is not present by default in extension configurations. When it is not present, if the system is restarted a default policy is applied to the extension to maintain the state it was in before the restart. If the “restartPolicy” parameter is added to the configuration but later removed, the extension will then revert to the default restart policy.
6.3 - Teem LobbyConnect
Introduction
This TechNote covers the setup, configuration, and monitoring of the ClearPass extension for Teem LobbyConnect and the configuration of the ClearPass plugin in Teem.
This Extension serves two primary use-cases
-
Guest account creation upon Visitor Check In
-
Guest account deletion upon Visitor Check Out
LobbyConnect(LCx) is a visitor management module of Teem’s cloud-based platform. When visitors arrive, LCx presents them with relevant forms where they can provide their information, sign documents (NDAs) and it optionally notifies the person they are visiting of their arrival.
ClearPass is an industry leading Guest Management solution that delivers secure, automated guest access workflows. It’s very useful for an enterprise to combine these two applications to get a seamless visitor management system that automates visitor’s Wifi requirements.
With LCx hosted in the cloud and ClearPass sitting primarily on-prem, there are challenges in making these two applications communicate in real time so that a visitor gets guest WiFi credentials from ClearPass as soon as he registers on Teem’s LCx application. Traditionally the apps would communicate using APIs where an application would request information which is usually followed by a response. Hence in order to get real-time information you have to poll or request as often as possible which is not scalable. The answer or the solution is a webhook which does not wait for a request to send information but sends the data as soon as it’s available.
Before we proceed with the flow, we need to understand the concept of webhooks and skyhook.
What is a webhook?
A webhook (also called a web callback or HTTP push API) is a way for an app to provide other applications with real-time information. A webhook delivers data to other applications as it happens, meaning you get data immediately.
What is skyhook?
Skyhook was developed to overcome the inability for Cloud based applications to send events [webhooks] directly into a ClearPass that was typically deployed on the Trust side of a corporate firewall. In short, it is a service that runs in AWS. ClearPass nodes running on-prem, use extensions to open a persistent connection into Skyhook to receive the events originally sent from a 3rd party cloud application specific for that customer/tenant.
As an overview, Teem LCx running in the cloud will send a webhook upon a Visitor CheckIn or a CheckOut event. This will communicate with Skyhook. The ClearPass extension configured and installed will maintain a persistent connection with Skyhook awaiting an event (Check In/ Check Out).
Software Requirements
The minimum software version required for CPPM is 6.11.0 . At the time of writing, version 6.11.10 is available as the long supported release and 6.12.4 is available as the short supported release. CPPM runs on hardware appliances with pre-installed software or as a Virtual Machine under the following hypervisors. Hypervisors that run on a client computer such as VMware Player are not supported.
-
VMware vSphere Hypervisor (ESXi) 7.0 U3c and 8.0
-
Windows Server 2019 with Hyper‑V and Windows Server 2022 with Hyper‑V.
-
KVM on CentOS Stream 8, CentOS Stream 9, Ubuntu 20.04 LTS, and Ubuntu 22.04 LTS.
ClearPass Installation and Deployment Guide
This document assumes your ClearPass environment is already configured and operational. If you require assistance with basic deployment, refer to the following deployment guide:
https://arubanetworking.hpe.com/techdocs/ClearPass/6.11/Installation-Guide/Default.htm
ClearPass Extensions
The integration between ClearPass Policy Manager and external systems is driven through a ClearPass capability known as Extensions, a sub-component of the ClearPass Exchange Integration framework. ClearPass Extensions are micro-services running on top of the base ClearPass platform. These micro-services enable HPE Aruba Networking to deliver new features outside of the main software release cycle and facilitate a faster time to market for specific features and integrations. Configuration and control of ClearPass Extensions is accomplished through the ClearPass Guest GUI, as covered later in this document.
Installing Extension
ClearPass Extensions are easy to install from the ClearPass Extensions Store. In a cluster, ClearPass Extensions can be installed on a subscriber independently of the publisher. Multiple copies of the same extension can be installed if needed as well.
INFO
Internet access is required for ClearPass Policy Manager to install the ClearPass Extensions from the Extension Store. Starting with ClearPass 6.12, extensions can be can be installed offline as well. Offline ClearPass Extension images are available on HPE networking support portal.
Access to the extension store
Access the Extension Store to download and install ClearPass extensions. The Extension store utilizes the same HPE Passport account credentials used to validate support entitlement in the Software Updates Por- tal. This is configured under Administration > Agents and Software Updates > Software Updates as shown below. Ensure that valid HPE Passport credentials have been entered in these fields to enable Ex- tension download capabilities.
Installing the Extension from Store
Extensions are installed from the extension page in ClearPass Guest, as shown below. Access it from Guest > Administration > Extensions
From here, click on ‘Install Extension’, and the search box below appears.
Enter “Intune” and click on ‘Search’, see the example below.
INFO
Here we are using Intune as an example. The installation steps are the same for all the extensions. For your deployment, please search for the appropriate extension like Jamf, Mosyle, Crowdstrike, etc.
All currently available extensions are listed in the page: https://www.arubanetworks.com/techdocs/NAC/clearpass/integrations/clearpass-extension/extensions-list/
Click on the extension name and then click “Install.”
In the “Install Extension” dialog box, set the IP address if necessary, as described in section “Extensions and IP address configuration support” below. Do not check the box to start the extension at this time. Click the “Install” button.
In this example, we’ve not entered an IP address for the extension to use, if there is intent to use the extension as an authorization source set this value and ensure its set the same on all nodes where the Extension is deployed.
The extension will download and appear in a “Stopped” state. Notice the options to Start, Delete, Reinstall, Show Logs, and view Configuration. Click on “Configuration” to view settings.
After the extension has been installed, proceed to configure the extension
A copy of the default Extension configuration is shown above, this will need to be modified for your deployment.
INFO
Password and sensitive configuration items are obfuscated when presented in both the Extension GUI or in the Explorer configuration.
WARNING
The configuration attributes are case sensitive. It is recommended to refer the default configuration sample while editing your configuration.
Extensions and web proxy support
Extensions support communications with 3rd parties via a web proxy. This adds incremental proxy functionality. If a proxy is defined in ClearPass Policy Manager, then an extension will inherit that configuration. See later in the document on how to disable the proxy inherited configuration.
INFO
Note that the Policy Manger web proxy configuration is ONLY read by the extension at installation time. If the web proxy configuration is changed in Policy Manager, then the extension must be re-installed so the new settings are re-read and bonded to the extension.
Extensions and IP address configuration support
ClearPass uses a non-externally routed IP address range to communicate with the Extension. The default is 172.17.0.0/16. You may configure a different range, if desired. This is especially useful when deploying extensions across nodes within a cluster where there is the requirement for a fixed consistent IP address for the extension across the cluster.
Changing the “Extensions Network Address” range is only necessary if either the ClearPass MGMT or DATA interface are using an IP address in the extension default range of 172.17.x.x/12, or if ClearPass needs to communicate with some external device in that range.
To Configure the base Extension IP subnet within Policy Manager navigate to Administration > Server Manager > Server Configuration [chose your node] Service Parameters [ClearPass system service].
INFO
The subnet defined here for the extension framework must fall within the following subnet range 10.0.0.0/8, 172.16.0.0/12, 192.168.0.0/16 as defined by RFC1918. For best results, set the network address range to a subnet that does not exist in your enterprise, and restart the extension service for this change to take effect.
Never set the DATA or MGMT IP address to use an address that matches the Extension Network
INFO
Note that changing the extension base IP address will require the extension service to be restarted.
Pictorial View of the Integration
The diagram below shows a pictorial overview of the components and how
they interact with each other.

Configuration Steps
There are primarily 3 steps involved in getting this Integration configured.
Step I: Register and request for a Skyhook tenant.
Step II: Configuration of Teem LobbyConnect for Integration.
Step III: Configuration of the Teem Extension.
Its assumed you have SMTP and SMS configured to allow ClearPass Guest to send account data to the Visitor/Guest.
Step I: Register and Request for a Skyhook Tenant ID
Skyhook Tenant ID’s can be registered in the skyhook self-service portal by accessing the following link https://clearpass.arubanetworks.com/webhooks/skyhook and instructions on using the skyhook self-service portal is available here: https://arubanetworking.hpe.com/techdocs/NAC/clearpass/integrations/clearpass-extension/skyhook-self-service-portal/
Step II: Configuring Teem LobbyConnect for ClearPass Integration
INFO
For the ClearPass Plugin to be available under 3rd Party Apps on Teem, please contact your Teem Account Manager. This is currently enabled upon request.
Below we cover the configuration required in the Teem environment. To aid the configuration of the extension it helps to collect a number of items from the email received above.
INFO
Setup and Configuration of Teem LobbyConnect is beyond the scope of this guide. Here we specify the steps necessary to configure ClearPass Plugin within the Teem LobbyConnect application.
You would require the following details on Teem for the config
-
Skyhook Webhook Posting URL
-
Teem Secret
-
ClearPass Expiration Time: Account expiration time for the guest checked in
-
SMS Gateway configured on ClearPass (optional)
-
SMTP server configured on ClearPass (optional)
Below are the configuration steps to follow:
-
Login to Teem using your credentials on www.teem.com
-
Click on Manage > Apps & Integration > 3rd Party Apps. Search for ClearPass by Aruba and click on Activate. You should see the following.
ClearPass Plugin within the Teem App 
INFO
Ensure you select the correct Aruba plugin. Teem already integrates with Aruba Beacons and Sensors. Ensure you activate the ClearPass Plugin under User Management.
- Once activated Click on Settings and use the details collected above
ClearPass Plugin Configuration Settings 
ClearPass URL: The format of this URL would be similar to https://skyhook.clearpassbeta.com/api/skyhook/teem/<skyhook tenant>
Example: https://skyhook.clearpassbeta.com/api/skyhook/teem/3f5913f5-b4b0-4e38-8d53-b7425baabbcc
Secret: A shared secret that needs to be configured later in the ClearPass extension and must match what is configured here.
ClearPass Expiration Time: Directly controls the period of time the Visitor account can remain active in ClearPass Guest based upon the account creation time.
Send ClearPass SMS: Setting it to yes invokes ClearPass to send credentials for Guest login via SMS with the SMS Gateway configured on ClearPass.
Send ClearPass Email: Setting it to yes invokes ClearPass to send credentials for Guest login via Email with the SMTP Server configured on ClearPass.
Step III: Teem Extension Configuration
The default configuration used for extension is below
{
"logLevel": "INFO",
"verifySSLCerts": true,
"teemSecret": "",
"randomPasswordLength": 6,
"skyhookTenant": "",
"dbAccessToken": ""
}
Extension Configuration options
| Configuration attribute | Description | Example/Values |
|---|---|---|
| logLevel | The logging level the extensions should use. | "DEBUG", "INFO", "WARN", "ERROR" |
| verifySSLCerts | Should the extension validate SSL certificates. | true/false |
| teemSecret | The secret configured previously in LCx ClearPass plugin. | SecretValueHere |
| randomPasswordLength | The length of the random password to generate for new Guest/Visitor accounts. | 6 |
| skyhookTenant | The Skyhook tenant ID. | 965abd48-zzzz-aaaa-8164-xxxxxxxxxx |
| dbAccessToken | The access token for Skyhook. | LongRandomAccessTokenString |
Configure the teemSecret, skyhookTenant and dbAccessToken
and restart the extension.

A copy of the default Teem LobbyConnect Extension is shown above, this
will need to be modified for your deployment. Include the
teemSecret, skyhookTenant and dbAccessToken that will be
specific to your environment. This needs to be requested per customer
which is explained later in the document.
Select ‘Restart’ and click on Save Changes to restart the
extension. Following the restart, click on Show Logs. You should see
the following:

You can change the logLevel to DEBUG for detailed logs and
troubleshooting or include the same before raising a TAC case if
necessary.
Testing/Demo
Now that the components are all configured and ready to use, let’s walk through the experience from the user and administrator perspective. In order to do so, the first step for a visitor is to register using the LobbyConnect app running on an iPad or other smartdevice in the customer setup.
Configuring an iPad or any other device to assist customers with registration at front desk is beyond the scope of this document. Essentially, you download the LobbyConnect app from the appstore and use the activation code to register this device with your TEEM LobbyConnect tenant. Add a device for the Location in Teem using the Activation Code. Detailed steps are available here:
I. Visitor walks up to a tablet used for Registration

II. Visitor enters his details as shown below. It is important to enter
the cell phone number with the country code, e.g. in the US prefix a
‘+1’ before your cell number, for India it is ‘+91’ and so on.

III. The next screen will ask for the details of the host or sponsor. A
notification about the visitor’s arrival will be sent to this host
via an email or SMS as configured within LobbyConnect.

IV. You may or may not be asked to take a picture. This depends on the setup used in Teem. This finishes the registration from the user perspective.
V. User should receive an email as well as an SMS with his credentials.
Following is the snapshot of the email.

INFO
You can change the Receipt Template (Guest Manager Receipt) under Configuration > Receipts > Templates.
VI. After the visit, user can Check Out at the registration desk using
the same Tablet. Type and Select your name. Click Next.

Now let’s see what happens in the backend from an administrator perspective.
I. Login to ClearPass Guest and go to Manage Accounts under Guest.

The new account has been created upon registration. Note the Expiration
time, this should match with the setting configured in the ClearPass
Plugin in Teem. In this example, it is set to 4 hours.
II. If you enable DEBUG and Click on Show Logs under Extension, you should see the following details as a part of the Check In event.
[2018-03-07T11:54:55.651] [DEBUG] teem - Event Details:
[2018-03-07T11:54:55.651] [DEBUG] teem - {
"auto_send_sms": true,
"last_name": "Bhatt",
"enabled": true,
"sponsor_name": null,
"first_name": "Arpit",
"sponsor_email": null,
"visitor_company": "Aruba",
"create_time": "2018-03-07T06:24:54.770198+00:00",
"dynamic_expire_time": 240,
"visitor_phone": "1911911911",
"auto_send_email": true,
"role_name": null,
"email": "arpit.bhatt@hpe.com",
"expire_timezone": "Asia/Kolkata"
}
[2018-03-07T11:54:55.651] [DEBUG] teem - {
"X-EventBoard-Event": "lobbyconnect-checkin-clearpass",
"X-EventBoard-ID": "afd0f9f9-db49-5f8a-8b91-71b4b4498faa",
"X-EventBoard-Signature": "9395711f8fe96319c36372093f80206f"
}
III. A similar log entry cab seen in the Teem app as well. Go to
Manage > Apps & Integrations > 3rd Party Apps. Click on
Settings and then select the Logs tab as shown below

IV. Upon Check Out, the User account will have been disabled, see this
under Manage Accounts in ClearPass Guest.

V. The user’s WiFi session should also get disconnected automatically upon Check Out. This depends on the Policy configured for the Guest SSID. This configuration is beyond the scope of this document.
VI. You would see a Check Out event in the DEBUG logs.
Appendix A – Additional Diagnostics & Support
Extension logs and debugging
If there is a need to access the logs from inside the extension, turn on
log collection from the API Explorer. Referencing the configuration
previously used, adjust the "logLevel" to "DEBUG". In the
new 6.7 GUI change the config and restart the extension as shown below.
Logs can then be viewed from the ‘Show Logs’.

Alternatively, the config can be changed from the API Explorer. Remember after changing the logging level, the extension will need to be restarted for this change to take effect.
Here are a few examples of ’normal’ logs under DEBUG
[2018-03-07T12:46:05.538] [DEBUG] teem - Using CPPM API Url: https://172.17.0.1/api
[2018-03-07T12:46:05.538] [INFO] teem - Connecting to skyhook database...
[2018-03-07T12:46:05.538] [DEBUG] teem - Enabling skyhook advanced logging.
[2018-03-07T12:46:05.542] [DEBUG] teem - p:0: Browser went online.
[2018-03-07T12:46:05.547] [DEBUG] teem - p:0: Authenticating using credential: YYYYYYYYYYYYYYYYYYYYYYYYYYYY.eyJleHAiOjE1NTAwODAwMzEsInYiOjAsImQiOnsidWlkIjoiYzUwN2U2NGQtZjBhMS00NjQ3LWI0YjMtYWNlODQwNjA1YTM0IiwiZW1haWwiOiJ3aWxsLnNXXXXXXXXXXXXXXXXXXXXXXXXXXXXXXXXXXXXXXXXXXXXXXXXXXXX-FudCI6ImEwYjdkZjQ2LTcxZWEtNDE1O11111111111111111111111111111111111-iOjE1MTg1NDQwMzF9.ZZZZZZZZZZZZZZZZZZZZZZZZZZZZZZZZZZZZZZZZZZZZZZZZZ
[2018-03-07T12:46:05.551] [DEBUG] teem - p:0: Listen called for /teem/XXXXXXXX-71ea-YYYY-YYYY-ZZZZZZZZZZZZZ default
[2018-03-07T12:46:05.554] [DEBUG] teem - p:0: Making a connection attempt
[2018-03-07T12:46:05.554] [DEBUG] teem - c:0:0: Connection created
[2018-03-07T12:46:05.556] [DEBUG] teem - c:0:0:0 Websocket connecting to wss://aruba-skyhook.firebaseio.com/.ws?v=5
[2018-03-07T12:46:06.684] [DEBUG] teem - c:0:0:0 Websocket connected.
[2018-03-07T12:46:06.692] [DEBUG] teem - c:0:0: Realtime connection established.
[2018-03-07T12:46:06.692] [DEBUG] teem - p:0: connection ready
[2018-03-07T12:46:06.693] [DEBUG] teem - p:0: reportStats {"c":{"sdk.js.2-4-2":1}}
[2018-03-07T12:46:06.693] [DEBUG] teem - p:0: {"r":1,"a":"s","b":{"c":{"sdk.js.2-4-2":1}}}
[2018-03-07T12:46:06.695] [DEBUG] teem - p:0: {"r":2,"a":"auth","b":{"cred":"YYYYYYYYYYYYYYYYYYYYYYYYYYYY.eyJleHAiOjE1NTAwODAwMzEsInYiOjAsImQiOnsidWlkIjoiYzUwN2U2NGQtZjBhMS00NjQ3LWI0YjMtYWNlODQwNjA1YTM0IiwiZW1haWwiOiJ3aWxsLnNXXXXXXXXXXXXXXXXXXXXXXXXXXXXXXXXXXXXXXXXXXXXXXXXXXXX-FudCI6ImEwYjdkZjQ2LTcxZWEtNDE1O11111111111111111111111111111111111-iOjE1MTg1NDQwMzF9.ZZZZZZZZZZZZZZZZZZZZZZZZZZZZZZZZZZZZZZZZZZZZZZZZZ"}}
[2018-03-07T12:46:06.696] [DEBUG] teem - p:0: Listen on /teem/a0b7df46-71ea-4159-afd5-231001ab5922 for default
[2018-03-07T12:46:06.696] [DEBUG] teem - p:0: {"r":3,"a":"q","b":{"p":"/teem/ XXXXXXXX-71ea-YYYY-YYYY-ZZZZZZZZZZZZZ ","h":""}}
[2018-03-07T12:46:06.959] [DEBUG] teem - p:0: from server: {"r":1,"b":{"s":"ok","d":""}}
[2018-03-07T12:46:06.960] [DEBUG] teem - c:0:0: Primary connection is healthy.
[2018-03-07T12:46:06.960] [DEBUG] teem - p:0: from server: {"r":2,"b":{"s":"ok","d":{"auth":{"email":"will.smith@teem.com","tenant":" XXXXXXXX-71ea-YYYY-YYYY-ZZZZZZZZZZZZZ ","token":{"email":"w.s@t.com","tenant":" XXXXXXXX-71ea-YYYY-YYYY-ZZZZZZZZZZZZZ ","exp":1550080031,"app":"teem","iat":1518544031,"sub":"c507e64d-f0a1-4647-b4b3-ace840605a34","aud":"aruba-skyhook","auth_time":1518544031,"iss":"https://securetoken.google.com/aruba-skyhook"},"uid":"abc123abc123-XxXx-YyYy-ZzZz-abc123abc123","app":"teem"},"expires":1550080031}}}
[2018-03-07T12:46:06.962] [INFO] teem - Logged in to skyhook. Waiting for events...
[2018-03-07T12:46:06.962] [DEBUG] teem - p:0: from server: {"r":3,"b":{"s":"ok","d":{}}}
[2018-03-07T12:46:06.962] [DEBUG] teem - p:0: listen response {"s":"ok","d":{}}
Errors observed during configuration
- Configuration error
[2018-03-07T11:41:29.940] [ERROR] teem - Error: Received message that failed hash validation, Skipping.
at processEvent (/src/app.js:292:38)
at /src/app.js:364:9
at /src/node_modules/firebase/lib/firebase-node.js:203:375
at ec (/src/node_modules/firebase/lib/firebase-node.js:52:165)
at ac (/src/node_modules/firebase/lib/firebase-node.js:31:216)
at bc (/src/node_modules/firebase/lib/firebase-node.js:30:1259)
at Ji.h.Ib (/src/node_modules/firebase/lib/firebase-node.js:220:287)
at Rh.h.Jd (/src/node_modules/firebase/lib/firebase-node.js:186:251)
at Fh.Jd (/src/node_modules/firebase/lib/firebase-node.js:176:364)
at wh.Jg (/src/node_modules/firebase/lib/firebase-node.js:174:280)
Issue: Unable to process the message as it fails hash validation. The configuration template used for extensions is sensitive. Ensure there are no human errors. Leading space in the Shared Secret used was the issue.\
Resolution: Have a coffee and avoid human errors
Accessing extension logs within ClearPass ‘Collect Logs’
In addition to the logging of messages that be examined in the extension as shown above, it’s possible to configure the extension to log messages so that they can be collected and examined via the Policy Manager ‘Collect Logs’ system function. This is extremely useful for Aruba TAC.
If there is a requirement for HPE Networking Aruba TAC to investigate a system issue, one of the items they regularly ask for is the system logs to aid with their diagnostic investigation. The ClearPass extension can write its logs such that they are available and can be collected with all other system diagnostics information when the ‘Collect Logs’ function is run. Remember that by default, the logLevel is set to INFO but TRACE, DEBUG, INFO, WARN, ERROR, FATAL can also be set. Any of the levels will display the information for the selected state and lower. For example, if INFO is selected, it will show messages for INFO, WARN, ERROR, FATAL.
After the Logs have been collected and exported from the system, expand
the GZ file and locate the extension logs in the following location
‘PolicyManagerLogs->extension’ as shown below.

6.4 - Skyhook Generic Processor
Introduction and Overview
This TechNote covers how to deploy and configure the ClearPass ‘Skyhook Generic Processor’ Extension that provides a simple method for customers to push data from a cloud app to an on-prem ClearPass using a webhook style interface. For example, a use-case workflow may require a cloud enabled app to create Guest accounts, Devices or Endpoints within the ClearPass Guest framework.
You may think of it as optimizing several existing manual actions within an existing Help/Service Desk workflow that authorizes Guest accounts, Devices or Endpoints and then the operator has to access the ClearPass Guest Portal to manually create the Guest account, Device or Endpoint. Using this Extension, the workflow can now be simplified by automatically triggering the creation of a Guest account, Device or Endpoint by sending data in a webhook directly from the cloud app. This eliminates the requirement to login to the ClearPass Guest Portal to manually create the account, device or endpoint.
A real world example for this may be taking the input from a Cloud-based Ticketing system workflow and automatically creating the Guest account right from the cloud app, eliminating the second manual step for the Help/Service Desk to login and create the account within ClearPass – for example, ServiceNow or any other cloud app that can send data in a webhook.
The idea here is that this Integration opens up the possibilities of creativity to link cloud-apps with ClearPass as any attributes that are part of the (Guest, Device and Endpoint) REST API can be leveraged.
With apps hosted in the cloud and ClearPass sitting primarily on-prem, there are challenges in making these two applications communicate in real time so the desired output from the cloud app triggers an action and response within ClearPass. Traditionally the apps would communicate using APIs where an application would request information which is usually followed by a response. In order to get real-time information, the app would have to continuously poll or request the data, however that would not be a scalable solution. The solution for this is to use a webhook as it does not wait for a request to send information but rather sends the data as soon as it’s available.
Before we proceed with the flow, we need to understand the concepts of webhooks and Skyhook.
What is a webhook?
A webhook (also called a web callback or HTTP push API) is a way for an app to provide other applications with real-time information. A webhook delivers data to other applications as it happens, meaning you get data immediately.
What is Skyhook?
Skyhook was developed to overcome the inability for cloud-based applications to send events [webhooks] directly into a ClearPass system that is typically deployed on the trust side of a corporate firewall. In short, it is a service that runs in the Cloud, developed and managed by HPE Aruba Networking. ClearPass nodes running on-prem, use Extensions to open a persistent connection into Skyhook to receive the events originally sent from a 3rd party cloud application specific for that customer/tenant.
The cloud-based app will send a webhook to trigger a Guest, Device or Endpoint event and it will be consumed by Skyhook. The installed ClearPass ‘Skyhook Generic Processor’ Extension will maintain a persistent connection with Skyhook and process the cloud apps events in real-time.
Software Requirements
The minimum software version required for CPPM is 6.11.0 . At the time of writing, version 6.11.10 is available as the long supported release and 6.12.4 is available as the short supported release. CPPM runs on hardware appliances with pre-installed software or as a Virtual Machine under the following hypervisors. Hypervisors that run on a client computer such as VMware Player are not supported.
-
VMware vSphere Hypervisor (ESXi) 7.0 U3c and 8.0
-
Windows Server 2019 with Hyper‑V and Windows Server 2022 with Hyper‑V.
-
KVM on CentOS Stream 8, CentOS Stream 9, Ubuntu 20.04 LTS, and Ubuntu 22.04 LTS.
ClearPass Installation and Deployment Guide
This document assumes your ClearPass environment is already configured and operational. If you require assistance with basic deployment, refer to the following deployment guide:
https://arubanetworking.hpe.com/techdocs/ClearPass/6.11/Installation-Guide/Default.htm
ClearPass Extensions
The integration between ClearPass Policy Manager and external systems is driven through a ClearPass capability known as Extensions, a sub-component of the ClearPass Exchange Integration framework. ClearPass Extensions are micro-services running on top of the base ClearPass platform. These micro-services enable HPE Aruba Networking to deliver new features outside of the main software release cycle and facilitate a faster time to market for specific features and integrations. Configuration and control of ClearPass Extensions is accomplished through the ClearPass Guest GUI, as covered later in this document.
Installing Extension
ClearPass Extensions are easy to install from the ClearPass Extensions Store. In a cluster, ClearPass Extensions can be installed on a subscriber independently of the publisher. Multiple copies of the same extension can be installed if needed as well.
INFO
Internet access is required for ClearPass Policy Manager to install the ClearPass Extensions from the Extension Store. Starting with ClearPass 6.12, extensions can be can be installed offline as well. Offline ClearPass Extension images are available on HPE networking support portal.
Access to the extension store
Access the Extension Store to download and install ClearPass extensions. The Extension store utilizes the same HPE Passport account credentials used to validate support entitlement in the Software Updates Por- tal. This is configured under Administration > Agents and Software Updates > Software Updates as shown below. Ensure that valid HPE Passport credentials have been entered in these fields to enable Ex- tension download capabilities.
Installing the Extension from Store
Extensions are installed from the extension page in ClearPass Guest, as shown below. Access it from Guest > Administration > Extensions
From here, click on ‘Install Extension’, and the search box below appears.
Enter “Intune” and click on ‘Search’, see the example below.
INFO
Here we are using Intune as an example. The installation steps are the same for all the extensions. For your deployment, please search for the appropriate extension like Jamf, Mosyle, Crowdstrike, etc.
All currently available extensions are listed in the page: https://www.arubanetworks.com/techdocs/NAC/clearpass/integrations/clearpass-extension/extensions-list/
Click on the extension name and then click “Install.”
In the “Install Extension” dialog box, set the IP address if necessary, as described in section “Extensions and IP address configuration support” below. Do not check the box to start the extension at this time. Click the “Install” button.
In this example, we’ve not entered an IP address for the extension to use, if there is intent to use the extension as an authorization source set this value and ensure its set the same on all nodes where the Extension is deployed.
The extension will download and appear in a “Stopped” state. Notice the options to Start, Delete, Reinstall, Show Logs, and view Configuration. Click on “Configuration” to view settings.
After the extension has been installed, proceed to configure the extension
A copy of the default Extension configuration is shown above, this will need to be modified for your deployment.
INFO
Password and sensitive configuration items are obfuscated when presented in both the Extension GUI or in the Explorer configuration.
WARNING
The configuration attributes are case sensitive. It is recommended to refer the default configuration sample while editing your configuration.
Extensions and web proxy support
Extensions support communications with 3rd parties via a web proxy. This adds incremental proxy functionality. If a proxy is defined in ClearPass Policy Manager, then an extension will inherit that configuration. See later in the document on how to disable the proxy inherited configuration.
INFO
Note that the Policy Manger web proxy configuration is ONLY read by the extension at installation time. If the web proxy configuration is changed in Policy Manager, then the extension must be re-installed so the new settings are re-read and bonded to the extension.
Extensions and IP address configuration support
ClearPass uses a non-externally routed IP address range to communicate with the Extension. The default is 172.17.0.0/16. You may configure a different range, if desired. This is especially useful when deploying extensions across nodes within a cluster where there is the requirement for a fixed consistent IP address for the extension across the cluster.
Changing the “Extensions Network Address” range is only necessary if either the ClearPass MGMT or DATA interface are using an IP address in the extension default range of 172.17.x.x/12, or if ClearPass needs to communicate with some external device in that range.
To Configure the base Extension IP subnet within Policy Manager navigate to Administration > Server Manager > Server Configuration [chose your node] Service Parameters [ClearPass system service].
INFO
The subnet defined here for the extension framework must fall within the following subnet range 10.0.0.0/8, 172.16.0.0/12, 192.168.0.0/16 as defined by RFC1918. For best results, set the network address range to a subnet that does not exist in your enterprise, and restart the extension service for this change to take effect.
Never set the DATA or MGMT IP address to use an address that matches the Extension Network
INFO
Note that changing the extension base IP address will require the extension service to be restarted.
Pictorial View of the Integration
The diagram below shows a pictorial overview of the components and how
they interact with each other.

Configuration Steps
The following steps are required to get this integration working:
-
Register and request a Skyhook Tenant ID
-
Install and configure the Skyhook Generic Processor Extension
INFO
Ensure you have SMTP and SMS configured to allow ClearPass Guest to send visitor account details to the Visitor/Guest.
Step 1: Register and Request for a Skyhook Tenant ID
Skyhook Tenant ID’s can be registered in the skyhook self-service portal by accessing the following link https://clearpass.arubanetworks.com/webhooks/skyhook and instructions on using the skyhook self-service portal is available here: https://arubanetworking.hpe.com/techdocs/NAC/clearpass/integrations/clearpass-extension/skyhook-self-service-portal/
- Copy the skyhookTenant and the dbAccessToken to a text file. This will be used for configuration of the extension in ClearPass.
Skyhook Generic Processor Extension Configuration
The ClearPass Skyhook Generic Processor Extension communicates with your Skyhook tenant via REST API calls. The extension establishes and maintains a persistent connection to Skyhook where it continuously ingests data received into Skyhook from your cloud-enabled application. The extension configuration and supported data types are shown below.
For your convenience, a copy of the default Extension configuration.
Default Configuration
{
"logLevel": "INFO",
"verifySSLCerts": true,
"dbAccessToken": "********",
"skyhookTenant": "",
"useHeaderPreSharedKey": false,
"headerPreSharedKeyName": "X-Skyhook-PSK",
"headerPreSharedKeyValue": "",
"guestRandomPasswordLength": 5,
"guestDefaultRoleId": 2,
"guestSendRegistrationSms": false,
"guestSendRegistrationEmail": false,
"guestDefaultAccountExpireHrs": 2,
"deviceDefaultRoleId": 2,
"deviceDefaultAccountExpireHrs": 2,
"enableStats": false
}
ClearPass Skyhook Generic Processor Extension Configuration
After installing the Extension, the default configuration will need to be updated.
At a minimum, the “dbAccessToken” and “skyhookTenant” need to be changed with values received in your registration email.
Below is an explanation of all of the configuration value pairs. The logLevel and verifySSLCerts should be left as their default settings unless advised by ClearPass TAC or your SE/Partner. Once you configure these parameters, you can start your extension. Any subsequent reconfiguration requires a restart of the extension.
Table 1: Skyhook Processor Extension-specific configuration parameters
| Attribute | Description | Values/Examples |
|---|---|---|
| dbAccessToken | The Skyhook access token. | Null |
| skyhookTenant | The Skyhook tenant id. | Null |
| useHeaderPreSharedKey | When processing events, should a header pre-shared key be required and validated. When true, the headerPreSharedKeyName and headerPreSharedKeyValue must be populated or all requests will fail validation. | true/false |
| headerPreSharedKeyName | The header pre-shared key name. This is the name of an HTTP header sent with the request that contains the pre-shared key value. Default value is "X-Skyhook-PSK". | "X-Skyhook-PSK" |
| headerPreSharedKeyValue | The pre-shared validation key. | ****************** |
| guestRandomPasswordLength | When no password is sent with a new guest account, what should the default password length be? | 5 |
| guestDefaultRoleId | The Role ID to be used for new guest accounts. | 2 (Guest) |
| guestSendRegistrationSms | Should SMS messages be sent for new guest registrations? | true/false |
| guestSendRegistrationEmail | Should email messages be sent for new guest registrations? | true/false |
| guestDefaultAccountExpireHrs | The default expire duration of new guest accounts. This can be overridden by including an expire_time value. | 2 hours |
| deviceDefaultRoleId | The Role ID to be used for new device accounts. | 2 (Guest) |
| deviceDefaultAccountExpireHrs | The default expire duration of new device accounts. This can be overridden by including an expire_time value. | 2 hours |
Supported Skyhook Datatypes
For each data type there are 3 possible actions, "update", "replace", or "delete".
INFO
For all actions guests require a username field, devices require a mac field and endpoints require a specific structure including mac_address and status.
Action Details
| Action | Description |
|---|---|
| update | Creates the object if it doesn’t exist, otherwise updates the existing object information. |
| replace | Creates the object if it doesn’t exist, otherwise replaces the existing object. |
| delete | Deletes the specified matching item. |
Data Types
Guests
| Type | Sample Data | Details |
|---|---|---|
| Guests |
{
  "action": "update",
  "guest": {
    "username": "Guest.User@hpe.com",
    "email": "Guest.User@hpe.com",
    "expire_time": 1596240000,
    "enabled": true,
    "visitor_company": "",
    "visitor_name": "",
    "visitor_phone": ""
  }
}
|
curl --location --request POST 'https://skyhook.clearpassbeta.com/api/skyhook/processor/{tenantId}' \
--header 'Accept: application/json' \
--header 'Content-Type: application/json' \
--header 'X-Skyhook-PSK: {PSK Value}' \
--data-raw '{
  "action": "update",
  "guest": {
    "username": "Guest.User@hpe.com",
    "email": "Guest.User@hpe.com",
    "expire_time": 1596240000,
    "enabled": true,
    "visitor_company": "",
    "visitor_name": "",
    "visitor_phone": ""
  }
}'
|
INFO
Any attributes that are part of the Guest REST API can be included in the “guest” object detail..
Devices
| Type | Sample Data | Details |
|---|---|---|
| Devices |
{
  "action": "update",
  "device": {
    "mac": "01-02-03-04-05-06",
    "email": "Guest.User@hpe.com",
    "expire_time": 158708348,
    "enabled": true,
    "visitor_company": "",
    "visitor_name": "",
    "visitor_phone": ""
  }
}
|
curl --location --request POST 'https://skyhook.clearpassbeta.com/api/skyhook/processor/{tenantId}' \
--header 'Accept: application/json' \
--header 'Content-Type: application/json' \
--header 'X-Skyhook-PSK: {PSK Value}' \
--data-raw '{
  "action": "update",
  "device": {
    "mac": "01-02-03-04-05-06",
    "email": "Guest.User@hpe.com",
    "expire_time": 158708348,
    "enabled": true,
    "visitor_company": "",
    "visitor_name": "",
    "visitor_phone": ""
  }
}'
|
INFO
Any attributes that are part of the Device REST API can be included in the “device” object detail.
Endpoints
| Type | Sample Data | Details |
|---|---|---|
| Endpoints |
{
  "action": "update",
  "endpoint": {
    "mac_address": "01-02-03-04-05-06",
    "status": "Known or Unknown",
    "attributes": {
      "Source": "",
      "My Custom Attribute": "Attribute Value"
    }
  }
}
|
curl --location --request POST 'https://skyhook.clearpassbeta.com/api/skyhook/processor/{tenantId}' \
--header 'Accept: application/json' \
--header 'Content-Type: application/json' \
--header 'X-Skyhook-PSK: {PSK Value}' \
--data-raw '{
  "action": "update",
  "endpoint": {
    "mac_address": "01-02-03-04-05-06",
    "status": "Known or Unknown",
    "attributes": {
      "Source": "",
      "My Custom Attribute": "Attribute Value"
    }
  }
}'
|
INFO
Any attributes that are part of the Endpoint REST API can be included in the “endpoint” and “attribute” object details.
How to test the Integration using cURL
This Tech Note was written to illustrate how a Generic cloud-based application could create or manipulate Guest accounts, Devices or Endpoints. Most apps would provide the capability to send or POST data in a webhook json payload and within this guide we use cURL to send the data.
The following example uses a widely deployed command line tool found in many operating systems call cURL. More details on the cURL client can be found on the following website http://curl.haxx.se/
The following three use-cases will demonstrate how you can update, replace or delete Guest accounts, Devices and Endpoints.
Creating a Guest Account

For your convenience, copy the following text to paste into your terminal or into Git Bash terminal in Windows.
curl --location --request POST 'https://skyhook.clearpassbeta.com/api/skyhook/processor/{Insert-your-tenantId}' \ --header 'Accept: application/json' \
--header 'Content-Type: application/json' \
--header 'X-Skyhook-PSK: {PSK Value}' \
--data-raw '{
"action": "update",
"guest": {
"username": "guest.user@hpe.com",
"email": "guest.user@hpe.com",
"expire_time": 1596240000,
"enabled": true,
"visitor_company": "HPE Aruba Networking",
"visitor_name": "Guest User",
"visitor_phone": "5556789"
}
}'
INFO
Try changing the “action” value pair from “update” to either “replace” or “delete” and verify the results in ClearPass
Verifying the Cloud-based Applications creation of Guest Accounts
To examine the result of the webhook sent by your cloud-app, go to ClearPass Guest and navigate to ‘Guest’ ** ‘Manage Accounts’ and you will see the account was created. Verify by clicking on “Show Details” as shown below.

Creating a MAC Device

For your convenience, copy the following text to paste into your terminal or into Git Bash terminal in Windows.
curl --location --request POST 'https://skyhook.clearpassbeta.com/api/skyhook/processor/{Insert-your-tenantId}' \ --header 'Accept: application/json' \
--header 'Content-Type: application/json' \
--header 'X-Skyhook-PSK: {}' \
--data-raw '{
"action": "update",
"device": {
"mac": "F4-2E-7F-C6-56-0C",
"sponsor_name": "admin",
"expire_time": 0,
"enabled": true,
"visitor_company": "HPE Aruba Networking",
"visitor_name": "AP515 - CSE Lab"
}
}'
INFO
Try changing the “action” value pair from “update” to either “replace” or “delete” and verify the results in ClearPass
Verifying the Cloud-based Applications creation of a MAC Device
To examine the result of the webhook sent by your cloud-app, go to ClearPass Guest and navigate to ‘Devices’ ** ‘Manage Devices’ and you will see that it was created. Verify by clicking on “Show Details” as shown below.

Creating an Endpoint

For your convenience, copy the following text to paste into your terminal or into Git Bash terminal in Windows.
curl --location --request POST 'https://skyhook.clearpassbeta.com/api/skyhook/processor/{Insert-your-tenantId}' \ --header 'Accept: application/json' \
--header 'Content-Type: application/json' \
--header 'X-Skyhook-PSK: {}' \
--data-raw '{
"action": "update",
"endpoint": {
"mac_address": "01-02-03-04-05-06",
"status": "Known",
"attributes": {
"Source": "Scotts-Cloud-App-Testing",
"My Custom Attribute":"MyCustomAttributeValue"
}
}
}'
INFO
Try changing the “action” value pair from “update” to either “replace” or “delete” and verify the results in ClearPass
Verifying the Cloud-based Applications creation of an Endpoint
To examine the result of the webhook sent by your cloud-app, go to ClearPass Policy Manager and navigate to ‘Configuration’ ** ‘Identity’ ** ‘Endpoints’ and you will see that it was created – you can find it quickly with the MAC Address Filter. Verify by clicking on the “MAC Address” to see the general Endpoint status and ‘Attributes’ as shown below.

Appendix A – Troubleshooting and Support
Here we list some basic troubleshooting steps. If you need any help beyond this, please reach out to HPE Aruba Networking Support.
Check API Access Application Control restrictions
If you’ve previously hardened your ClearPass deployment with Application Access Controls, it’s possible that the Extension will not work. Reviewing the Extension Log might show something like the following after immediately starting the Extension. This likely indicates the ClearPass Application API’s are in place.
Example of Extension authorization failure due to Policy Manager Application Control:
[2020-03-16T15:42:21.083] [INFO] Intune - Server listening on port 80.
[2020-03-16T15:42:21.243] [DEBUG] Intune - Request “GET ‘https://172.17.0.1/api/server/version’” took 51.91ms.
[2020-03-16T15:42:21.245] [DEBUG] Intune - <!DOCTYPE html><html>
<head>
<title>
Error 403 (Forbidden)
</title>
<script language=“javascript”>
function reloadPage() {
var locHref = window.location.protocol + “//” + window.location.hostname;
window.location.href = locHref;
}
</script>
To resolve this issue, add the IP address of the Extension to the list of nodes permitted to access the API by navigating to Administration > Server Manager > Server Configuration {choose your node} > Network
INFO
For this reason its good practice to fix the IP address of the extension at installation time such that it doesn’t change over time and break the application controls.
Checking on the Extension Service
The ClearPass Extensions are supported by a system service which must be running.
Restarting this service will affect all deployed and running extensions.
To check on the state of the Extension Service, or to restart the service, go to Administration > Server Manager > Server Configuration > [SERVER] > Service Control. By default this service is automatically started.
Extensions and web proxy / firewall whitelisting
If ClearPass Policy Manager has been configured with a proxy, it’s still possible that domain whitelists are required, the same for some datacenter firewall to allow the installation of Extensions. Some enterprise customers maintain a whitelist of domain that are allowed to transit the proxy/firewall. The underlying docker configuration process uses standard docker registry access to pull images (hosted in docker hub). In general, the following hosts are used:
INFO
-
extensions.clearpassbeta.com
-
registry-1.docker.io
-
index.docker.io
-
auth.docker.io
-
production.cloudflare.docker.com
This is all also geo dependent to some degree and based on various AWS services, so AWS redirects and geo location services will vary. Finally, this all runs via standard HTTPS (port 443).
Extension Logs/Enable Debugging
If you have a requirement to access and view the logs from the Extension, you can turn on different logging levels from the Extension GUI. Adjust the logLevel to ‘DEBUG’ and restart the extension as shown below.
Logs can then be viewed from the ‘Show Logs’.
Remember after changing the logging level, as with any extension configuration change the extension will need to be restarted for this change to take effect.
Accessing the extension logs using ‘Collect Logs’ system function
In addition to viewing the logs as shown above, logs can also be collected and examined via the Policy Manager Collect Logs system function (Administration > Server Manager > Server Configuration > [Select SERVER] > Collect Logs). This is extremely useful should you have a need to call for technical assistance.
If the support team needs to investigate a system issue, one of the items they regularly ask for is the system logs to aid with their diagnostic investigation. By default the “logLevel” is set to INFO, but TRACE, DEBUG, INFO, WARN, ERROR, FATAL can also be set as required. Any of the levels will display the information for the selected state and lower; if INFO is selected, it will show messages for INFO, WARN, ERROR, FATAL.
After the logs have been collected, downloaded and expanded, you can locate the extension logs in the following location in the folder structure PolicyManagerLogs > extension > your-extension-id as shown below. Note the file-name is the same as the running instance ID of the extension.
Monitoring extension statistics
There is a way to monitor extension’s critical resource statistics with the configurable parameter added as part of the extension’s configuration. To enable extension statistics set the “enableStats” parameter to true. Remember a restart of the extension is need to activate the change anytime the config is modified.
To navigate to statistics page, click Show Details.
This will show statistics similar to the following:
Monitoring authorization performance
Since we are authorizing against an external system, it could be relevant to monitor the performance of these transactions as you setup and deploy. If you suspect there is a performance issue, ClearPass provides a way to monitor the authorization processing time. The graph below shows an example of this data, navigate to Monitoring > Live Monitor > System Monitor [click on ClearPass Tab, then select [Authorization]….
Appendix B – Considerations for Installing in a Cluster
Extensions are not synced between ClearPass cluster members, and thus must be installed on each member separately.
Some Extensions can run in two modes: Periodic Sync Mode and Authorization Source Mode.
Periodic Sync Mode
If you are configuring the extension to poll external system periodically and utilize the resulting ClearPass Endpoint database during endpoint Authorization, then you only need to install the extension on one cluster member, often the publisher.
You may wish to install the extension on a second cluster member as a backup, but remember that both extensions will individually be updating the endpoint database. You may want to stagger the updates between the two extensions, for example, Subscriber1 updates at the top of the hour and Subscriber2 updates at 30 minutes after the hour.
Also, in this mode there is no need to explicitly enter an IP address during installation. The defaults will suffice and ClearPass will select an IP in the range specified in the server configuration.
HTTP Authorization Source Mode
In this mode we configure an HTTP Auth source that results in a HTTPS call to external system during endpoint authorization. In this deployment model the extension must be installed on every cluster node that process authentications. Also in this scenario every cluster member’s extension must be set to the exact same IP address during installation time, as the HTTP Auth source configuration is propagated globally across all cluster members.
For example, if the extension IP range is 172.17.0.0/16, we would set the extension to 172.17.0.5 on every cluster member during installation of the extension.
While we normally want to avoid duplicate IP addresses in a network, this is not a concern with ClearPass extensions. Each ClearPass node communicates internally only with its own extension, and this traffic is not routed outside of ClearPass.
Subscriber nodes support the same ability as publishers to install an Extension from the Extension store.
Appendix C – endpoint sync schedule settings
The syncSchedule and similar scheduling parameters sets how often ClearPass executes certain actions like syncing or pushing endpoints. This setting is based on a slightly modified version of the CRON job scheduler found in Unix-like operating systems. It can be used to schedule jobs to run periodically at fixed times, dates or intervals.
A ‘cron’ is a job scheduler. Any scheduled task is called a ‘cron job’. The syntax for a cron job schedule is as follows:
In our use of the cron scheduler, we’ve dropped the use of the last instruction ≤command to execute> and use only the time/date functions, see below for a number of examples of scheduling a sync process.
-
Schedule a sync to run at 2am daily:- 0 2 * * *
-
Schedule a sync to run twice a day at 5am and 5pm:- 0 5,17 * * *
-
Schedule a sync to run on every Sunday at 5pm:- 0 17 * * sun
-
Schedule a sync to run every 30 minutes:- */30 * * * *
-
Schedule a sync to run at 5pm on selected days:- 0 17 * * sun,fri
You can see from the above that the scheduling process is extremely flexible, alternatively https://crontab.guru/ is a great page for learning more about CRON scheduling.
Appendix D – Extension performance optimizations
Extensions are a critical part of ClearPass deployments today and with the increased dependency on extension interactions that involve periodic polling or real-time lookups, here are some of the best practice recommendations around optimizing overall performance when using extensions:
-
If the extension is used to periodically poll external systems and populate endpoint repository, ensure that it is not installed in all the nodes in the cluster. Ideally these type of extensions should only be installed on the publisher node since only publisher node can add endpoint entries to the database. For redundancy, it can be installed on another additional node but it is recommended to stagger the polling interval so that both do not attempt to poll and update endpoint database at the same time.
Example: 0 * * * *, This cron job runs at minute 0 of every hour (e.g., 00:00, 01:00, 02:00, etc.).
30 * * * *, This cron job runs at minute 30 of every hour (e.g., 00:30, 01:30, 02:30, etc.). -
If the extension is used for looking up attributes from external systems in real time during authentication, it should be installed in all the nodes handling authentication. Note that the context server config is replicated from the publisher. When using extension for real time lookup, ensure that the extension has the same IP address in all the cluster nodes.
-
If the extension is expected to do both real-time lookup and periodic polling, ensure that polling is enabled only on the publisher while the extension in subscribers can have the polling disabled by setting the “enableSyncAll” attribute to false.
"enableSyncAll": false,
WARNING
Having the extension installed on all the cluster nodes with enableSyncAll set to true would cause each cluster node to independently poll the external system and update endpoint repository. This could impact the performance of ClearPass. Hence it is strongly recommended to enable endpoint sync only on the extension installed on the publisher and on another cluster node for redundancy.
-
Some 3rd party systems support fetching delta updates vs fetching all of the device information every polling cycle. The extensions that support fetching delta updates are: Workspace ONE Crowdstrike Falcon Microsoft Intune Mosyle SentinelOne Service Now
For these extensions, the syncUpdatedOnly attribute should be set to true in extension config so that the number of DB updates in ClearPass is minimized
"syncUpdatedOnly": true,For extensions that do not support syncUpdatedOnly, ensure that the sync interval is not aggressive. We recommend syncing at most twice a day and that too during off peak hours whenever a full sync is performed.
-
Some 3rd party systems can be very noisy in terms of attribute updates. There could be certain attributes that keep changing every sync interval like “Free Memory in Bytes”, “Last Check in Time” etc. There is no value in updating endpoints when such trivial attributes change for the device. Hence it is recommended to use “ignoreEndpointDifferences” attribute in extension configuration to ignore change in attributes that you do not care about in terms of ClearPass policies.
You can review the Audit Viewer in ClearPass under Monitoring > Audit Viewer to see what attributes are being updated for endpoints to check if there are unnecessary updates.
Sample for JAMF extension:
"ignoreEndpointDifferences": "Last Update, Report Date UTC, Last Contact Time UTC, Last Inventory Update UTC, Last Reported IP, IP Address",Default for Microsoft Intune extension:
"ignoreEndpointDifferences": "Last Sync Date Time, Free Storage Space in Bytes", -
To further optimize the number of endpoints being updated in ClearPass, you can specify which attributes are being used in the ClearPass policies so that only changes to those attributes would trigger an update to the endpoint. This is done by listing out the specific attributes under endpointAttributes in extension configuration.
Sample for JAMF extension:
"endpointAttributes": "Group names, MDM Enabled, Managed, Remote Managed, Supervised, Serial Number", -
Setup extension to restart unless it was intentionally stopped. A restart policy can be defined in extension configuration to ensure that the extension starts up automatically after server reboots and such. Restart policy of “unless-stopped” would ensure the extension always starts up unless it was manually stopped.
“restartPolicy”: “no” — The extension will not be automatically restarted after the server is restarted.
“restartPolicy”: “always” — The extension will always be restarted after the server is restarted.
“restartPolicy”: “unless-stopped” — The extension will be restarted unless it was stopped prior to the server restart, in which case it will maintain that state.
“restartPolicy”: “on-failure:N” — If the extension fails to restart, the value for “N” specifies the number of times the extension should try to restart. If you do not provide a value for “N”, the default value will be “0”.
The “restartPolicy” parameter is not present by default in extension configurations. When it is not present, if the system is restarted a default policy is applied to the extension to maintain the state it was in before the restart. If the “restartPolicy” parameter is added to the configuration but later removed, the extension will then revert to the default restart policy.
7 - Multi Factor Authentication
Integration with Identity Management solutions allow ClearPass to use multiple factors as part of authentication workflow thus increasing the security profile of the solution.
A detailed list of third party interoperability can be found here: https://www.arubanetworks.com/support-services/clearpass-interoperability/
7.1 - PingID MFA
This technote covers the setup, configuration, and monitoring of the ClearPass extension for multi factor authentication with Ping Identity. Without the extension, MFA workflow required ClearPass to proxy the request to Ping Federate which would then validate the source using a RADIUS authentication request before sending request to Ping Identity to trigger push notification. This integration aims to simplify the workflow with the extension making an API call directly to Ping Identity. Thus, removing the dependence on Ping Federate. This integration can be used to enable MFA for TACACS device logins and captive portal workflows.
Pictorial view of the Integration
The diagram below shows a pictorial overview of the components and how they interact with each other. There are mainly two way the integration works:
The first use case is to trigger a push notification for the user assuming that there is a push enabled device enrolled by the user
The second use case is to trigger a push notification to a specific device. Here the extension first uses API calls to fetch details of all devices enrolled by the user and then checks if there is a device which is either marked as primary or at least enabled with push notification and selects the best device to send push notification to.

Software Requirements
The minimum software version required for CPPM is 6.11.0 . At the time of writing, version 6.11.10 is available as the long supported release and 6.12.4 is available as the short supported release. CPPM runs on hardware appliances with pre-installed software or as a Virtual Machine under the following hypervisors. Hypervisors that run on a client computer such as VMware Player are not supported.
-
VMware vSphere Hypervisor (ESXi) 7.0 U3c and 8.0
-
Windows Server 2019 with Hyper‑V and Windows Server 2022 with Hyper‑V.
-
KVM on CentOS Stream 8, CentOS Stream 9, Ubuntu 20.04 LTS, and Ubuntu 22.04 LTS.
ClearPass Installation and Deployment Guide
This document assumes your ClearPass environment is already configured and operational. If you require assistance with basic deployment, refer to the following deployment guide:
https://arubanetworking.hpe.com/techdocs/ClearPass/6.11/Installation-Guide/Default.htm
ClearPass Extensions
The integration between ClearPass Policy Manager and external systems is driven through a ClearPass capability known as Extensions, a sub-component of the ClearPass Exchange Integration framework. ClearPass Extensions are micro-services running on top of the base ClearPass platform. These micro-services enable HPE Aruba Networking to deliver new features outside of the main software release cycle and facilitate a faster time to market for specific features and integrations. Configuration and control of ClearPass Extensions is accomplished through the ClearPass Guest GUI, as covered later in this document.
Installing Extension
ClearPass Extensions are easy to install from the ClearPass Extensions Store. In a cluster, ClearPass Extensions can be installed on a subscriber independently of the publisher. Multiple copies of the same extension can be installed if needed as well.
INFO
Internet access is required for ClearPass Policy Manager to install the ClearPass Extensions from the Extension Store. Starting with ClearPass 6.12, extensions can be can be installed offline as well. Offline ClearPass Extension images are available on HPE networking support portal.
Access to the extension store
Access the Extension Store to download and install ClearPass extensions. The Extension store utilizes the same HPE Passport account credentials used to validate support entitlement in the Software Updates Por- tal. This is configured under Administration > Agents and Software Updates > Software Updates as shown below. Ensure that valid HPE Passport credentials have been entered in these fields to enable Ex- tension download capabilities.
Installing the Extension from Store
Extensions are installed from the extension page in ClearPass Guest, as shown below. Access it from Guest > Administration > Extensions
From here, click on ‘Install Extension’, and the search box below appears.
Enter “Intune” and click on ‘Search’, see the example below.
INFO
Here we are using Intune as an example. The installation steps are the same for all the extensions. For your deployment, please search for the appropriate extension like Jamf, Mosyle, Crowdstrike, etc.
All currently available extensions are listed in the page: https://www.arubanetworks.com/techdocs/NAC/clearpass/integrations/clearpass-extension/extensions-list/
Click on the extension name and then click “Install.”
In the “Install Extension” dialog box, set the IP address if necessary, as described in section “Extensions and IP address configuration support” below. Do not check the box to start the extension at this time. Click the “Install” button.
In this example, we’ve not entered an IP address for the extension to use, if there is intent to use the extension as an authorization source set this value and ensure its set the same on all nodes where the Extension is deployed.
The extension will download and appear in a “Stopped” state. Notice the options to Start, Delete, Reinstall, Show Logs, and view Configuration. Click on “Configuration” to view settings.
After the extension has been installed, proceed to configure the extension
A copy of the default Extension configuration is shown above, this will need to be modified for your deployment.
INFO
Password and sensitive configuration items are obfuscated when presented in both the Extension GUI or in the Explorer configuration.
WARNING
The configuration attributes are case sensitive. It is recommended to refer the default configuration sample while editing your configuration.
Extensions and web proxy support
Extensions support communications with 3rd parties via a web proxy. This adds incremental proxy functionality. If a proxy is defined in ClearPass Policy Manager, then an extension will inherit that configuration. See later in the document on how to disable the proxy inherited configuration.
INFO
Note that the Policy Manger web proxy configuration is ONLY read by the extension at installation time. If the web proxy configuration is changed in Policy Manager, then the extension must be re-installed so the new settings are re-read and bonded to the extension.
Extensions and IP address configuration support
ClearPass uses a non-externally routed IP address range to communicate with the Extension. The default is 172.17.0.0/16. You may configure a different range, if desired. This is especially useful when deploying extensions across nodes within a cluster where there is the requirement for a fixed consistent IP address for the extension across the cluster.
Changing the “Extensions Network Address” range is only necessary if either the ClearPass MGMT or DATA interface are using an IP address in the extension default range of 172.17.x.x/12, or if ClearPass needs to communicate with some external device in that range.
To Configure the base Extension IP subnet within Policy Manager navigate to Administration > Server Manager > Server Configuration [chose your node] Service Parameters [ClearPass system service].
INFO
The subnet defined here for the extension framework must fall within the following subnet range 10.0.0.0/8, 172.16.0.0/12, 192.168.0.0/16 as defined by RFC1918. For best results, set the network address range to a subnet that does not exist in your enterprise, and restart the extension service for this change to take effect.
Never set the DATA or MGMT IP address to use an address that matches the Extension Network
INFO
Note that changing the extension base IP address will require the extension service to be restarted.
Importing PingID Properties File
First step in the integration is to download pingid.properties file from PingOne Admin portal. The properties file contains the encryption key, token, authenticator URL and idp URL. Depending upon the use case, properties file should be generated with appropriate permissions.
For customers who are looking for the first use case which is to trigger push notification assuming that a push enabled device has been enrolled, only a limited subset of permissions to perform authentication is required. This is preferred in cases where organizations do not want to provide full administrator privileges to the extension.
For customers who are looking for the second use case where push notification is triggered to a specific device, full administrator permissions are needed to fetch user and device details.
Generate a properties file with the appropriate permissions (either authenticate only or administrator) from PingOne admin portal from Setup > Ping ID > Client Integration as described in the following knowledge article:
Once the pingid.properties file has been downloaded, upload the same to ClearPass Guest > Configuration > Content Manager > Private Files > Upload New Content as shown below:

Extension Configuration Parameters
| Attribute | Description | Default Values |
|---|---|---|
| enableStats | Enable display of extension statistics | false |
| statsUsername | Create a username to access the extension statistics page | Give any username you want to use |
| statsPassword | Create a password to access the extension statistics page | Give any password you want to use |
| bypassProxy | Bypass the web proxy configured on ClearPass Policy Manager | false |
| skipLookup | Skip lookup to send push notification to any enrolled device or enable lookup to send push notification to a specific push enabled device | true |
After the extension has been installed, proceed to configure ClearPass.
ClearPass Policy Manager Configuration
The final part is the configuration on ClearPass Policy Manager. We need to configure an HTTP authorization source within ClearPass to use the Extension as a ‘real-time’ authorization source.

Click on Next. This will advance to the Primary Tab to provide the connection details.
INFO
The Base URL IP address is the IP address of PingID MFA extension

Set the Base URL as http://ip_of_the_extension/ and pay special attention to HTTP not HTTPS, and the addition of “/” in the path. It is mandated that a Login Username/Password is entered, but it is not used, so this can be set to anything.
Click on “Next”. This will advance you to the Attributes Tab where you need to provide the authorization attributes. Click on “Add More Filters”. Provide a Name for the filter and then a Filter Query. It’s extremely important that the Filter Query is defined correctly. This is the query string that is sent to the Ping ID MFA extension to trigger the push notification. The query is indexed off the username in authentication request. Query also contains the app name attribute which is displayed on the client device while push notification is triggered. Customize the app name in the URL to something that is relevant for your organization. The query also includes authentication status so that push notification is only triggered for successful authentications.
?username=%{Authentication:Username}&app=CPPM%20Admin%20Login&auth_status=%{Authentication:Status}
Next, build out the definitions of the attributes that will be returned from the Filter Query. These attributes can subsequently be used within our policy-evaluation and ultimately the enforcement policy applied. “success” evaluates to true in case of a successful MFA and is used as key to allow/deny/restrict access.

Once the HTTP authorization source is defined, you can use the returned attributes in your policy rules as shown below:

Below we can see the result of a push authorization from Ping Identity and the attributes returned. This data is available to be used in the policy as part of authorization.

Appendix A – Troubleshooting and Support
Here we list some basic troubleshooting steps. If you need any help beyond this, please reach out to HPE Aruba Networking Support.
Check API Access Application Control restrictions
If you’ve previously hardened your ClearPass deployment with Application Access Controls, it’s possible that the Extension will not work. Reviewing the Extension Log might show something like the following after immediately starting the Extension. This likely indicates the ClearPass Application API’s are in place.
Example of Extension authorization failure due to Policy Manager Application Control:
[2020-03-16T15:42:21.083] [INFO] Intune - Server listening on port 80.
[2020-03-16T15:42:21.243] [DEBUG] Intune - Request “GET ‘https://172.17.0.1/api/server/version’” took 51.91ms.
[2020-03-16T15:42:21.245] [DEBUG] Intune - <!DOCTYPE html><html>
<head>
<title>
Error 403 (Forbidden)
</title>
<script language=“javascript”>
function reloadPage() {
var locHref = window.location.protocol + “//” + window.location.hostname;
window.location.href = locHref;
}
</script>
To resolve this issue, add the IP address of the Extension to the list of nodes permitted to access the API by navigating to Administration > Server Manager > Server Configuration {choose your node} > Network
INFO
For this reason its good practice to fix the IP address of the extension at installation time such that it doesn’t change over time and break the application controls.
Checking on the Extension Service
The ClearPass Extensions are supported by a system service which must be running.
Restarting this service will affect all deployed and running extensions.
To check on the state of the Extension Service, or to restart the service, go to Administration > Server Manager > Server Configuration > [SERVER] > Service Control. By default this service is automatically started.
Extensions and web proxy / firewall whitelisting
If ClearPass Policy Manager has been configured with a proxy, it’s still possible that domain whitelists are required, the same for some datacenter firewall to allow the installation of Extensions. Some enterprise customers maintain a whitelist of domain that are allowed to transit the proxy/firewall. The underlying docker configuration process uses standard docker registry access to pull images (hosted in docker hub). In general, the following hosts are used:
INFO
-
extensions.clearpassbeta.com
-
registry-1.docker.io
-
index.docker.io
-
auth.docker.io
-
production.cloudflare.docker.com
This is all also geo dependent to some degree and based on various AWS services, so AWS redirects and geo location services will vary. Finally, this all runs via standard HTTPS (port 443).
Extension Logs/Enable Debugging
If you have a requirement to access and view the logs from the Extension, you can turn on different logging levels from the Extension GUI. Adjust the logLevel to ‘DEBUG’ and restart the extension as shown below.
Logs can then be viewed from the ‘Show Logs’.
Remember after changing the logging level, as with any extension configuration change the extension will need to be restarted for this change to take effect.
Accessing the extension logs using ‘Collect Logs’ system function
In addition to viewing the logs as shown above, logs can also be collected and examined via the Policy Manager Collect Logs system function (Administration > Server Manager > Server Configuration > [Select SERVER] > Collect Logs). This is extremely useful should you have a need to call for technical assistance.
If the support team needs to investigate a system issue, one of the items they regularly ask for is the system logs to aid with their diagnostic investigation. By default the “logLevel” is set to INFO, but TRACE, DEBUG, INFO, WARN, ERROR, FATAL can also be set as required. Any of the levels will display the information for the selected state and lower; if INFO is selected, it will show messages for INFO, WARN, ERROR, FATAL.
After the logs have been collected, downloaded and expanded, you can locate the extension logs in the following location in the folder structure PolicyManagerLogs > extension > your-extension-id as shown below. Note the file-name is the same as the running instance ID of the extension.
Monitoring extension statistics
There is a way to monitor extension’s critical resource statistics with the configurable parameter added as part of the extension’s configuration. To enable extension statistics set the “enableStats” parameter to true. Remember a restart of the extension is need to activate the change anytime the config is modified.
To navigate to statistics page, click Show Details.
This will show statistics similar to the following:
Monitoring authorization performance
Since we are authorizing against an external system, it could be relevant to monitor the performance of these transactions as you setup and deploy. If you suspect there is a performance issue, ClearPass provides a way to monitor the authorization processing time. The graph below shows an example of this data, navigate to Monitoring > Live Monitor > System Monitor [click on ClearPass Tab, then select [Authorization]….
Appendix B – Considerations for Installing in a Cluster
Extensions are not synced between ClearPass cluster members, and thus must be installed on each member separately.
Some Extensions can run in two modes: Periodic Sync Mode and Authorization Source Mode.
Periodic Sync Mode
If you are configuring the extension to poll external system periodically and utilize the resulting ClearPass Endpoint database during endpoint Authorization, then you only need to install the extension on one cluster member, often the publisher.
You may wish to install the extension on a second cluster member as a backup, but remember that both extensions will individually be updating the endpoint database. You may want to stagger the updates between the two extensions, for example, Subscriber1 updates at the top of the hour and Subscriber2 updates at 30 minutes after the hour.
Also, in this mode there is no need to explicitly enter an IP address during installation. The defaults will suffice and ClearPass will select an IP in the range specified in the server configuration.
HTTP Authorization Source Mode
In this mode we configure an HTTP Auth source that results in a HTTPS call to external system during endpoint authorization. In this deployment model the extension must be installed on every cluster node that process authentications. Also in this scenario every cluster member’s extension must be set to the exact same IP address during installation time, as the HTTP Auth source configuration is propagated globally across all cluster members.
For example, if the extension IP range is 172.17.0.0/16, we would set the extension to 172.17.0.5 on every cluster member during installation of the extension.
While we normally want to avoid duplicate IP addresses in a network, this is not a concern with ClearPass extensions. Each ClearPass node communicates internally only with its own extension, and this traffic is not routed outside of ClearPass.
Subscriber nodes support the same ability as publishers to install an Extension from the Extension store.
Appendix C – endpoint sync schedule settings
The syncSchedule and similar scheduling parameters sets how often ClearPass executes certain actions like syncing or pushing endpoints. This setting is based on a slightly modified version of the CRON job scheduler found in Unix-like operating systems. It can be used to schedule jobs to run periodically at fixed times, dates or intervals.
A ‘cron’ is a job scheduler. Any scheduled task is called a ‘cron job’. The syntax for a cron job schedule is as follows:
In our use of the cron scheduler, we’ve dropped the use of the last instruction ≤command to execute> and use only the time/date functions, see below for a number of examples of scheduling a sync process.
-
Schedule a sync to run at 2am daily:- 0 2 * * *
-
Schedule a sync to run twice a day at 5am and 5pm:- 0 5,17 * * *
-
Schedule a sync to run on every Sunday at 5pm:- 0 17 * * sun
-
Schedule a sync to run every 30 minutes:- */30 * * * *
-
Schedule a sync to run at 5pm on selected days:- 0 17 * * sun,fri
You can see from the above that the scheduling process is extremely flexible, alternatively https://crontab.guru/ is a great page for learning more about CRON scheduling.
Appendix D – Extension performance optimizations
Extensions are a critical part of ClearPass deployments today and with the increased dependency on extension interactions that involve periodic polling or real-time lookups, here are some of the best practice recommendations around optimizing overall performance when using extensions:
-
If the extension is used to periodically poll external systems and populate endpoint repository, ensure that it is not installed in all the nodes in the cluster. Ideally these type of extensions should only be installed on the publisher node since only publisher node can add endpoint entries to the database. For redundancy, it can be installed on another additional node but it is recommended to stagger the polling interval so that both do not attempt to poll and update endpoint database at the same time.
Example: 0 * * * *, This cron job runs at minute 0 of every hour (e.g., 00:00, 01:00, 02:00, etc.).
30 * * * *, This cron job runs at minute 30 of every hour (e.g., 00:30, 01:30, 02:30, etc.). -
If the extension is used for looking up attributes from external systems in real time during authentication, it should be installed in all the nodes handling authentication. Note that the context server config is replicated from the publisher. When using extension for real time lookup, ensure that the extension has the same IP address in all the cluster nodes.
-
If the extension is expected to do both real-time lookup and periodic polling, ensure that polling is enabled only on the publisher while the extension in subscribers can have the polling disabled by setting the “enableSyncAll” attribute to false.
"enableSyncAll": false,
WARNING
Having the extension installed on all the cluster nodes with enableSyncAll set to true would cause each cluster node to independently poll the external system and update endpoint repository. This could impact the performance of ClearPass. Hence it is strongly recommended to enable endpoint sync only on the extension installed on the publisher and on another cluster node for redundancy.
-
Some 3rd party systems support fetching delta updates vs fetching all of the device information every polling cycle. The extensions that support fetching delta updates are: Workspace ONE Crowdstrike Falcon Microsoft Intune Mosyle SentinelOne Service Now
For these extensions, the syncUpdatedOnly attribute should be set to true in extension config so that the number of DB updates in ClearPass is minimized
"syncUpdatedOnly": true,For extensions that do not support syncUpdatedOnly, ensure that the sync interval is not aggressive. We recommend syncing at most twice a day and that too during off peak hours whenever a full sync is performed.
-
Some 3rd party systems can be very noisy in terms of attribute updates. There could be certain attributes that keep changing every sync interval like “Free Memory in Bytes”, “Last Check in Time” etc. There is no value in updating endpoints when such trivial attributes change for the device. Hence it is recommended to use “ignoreEndpointDifferences” attribute in extension configuration to ignore change in attributes that you do not care about in terms of ClearPass policies.
You can review the Audit Viewer in ClearPass under Monitoring > Audit Viewer to see what attributes are being updated for endpoints to check if there are unnecessary updates.
Sample for JAMF extension:
"ignoreEndpointDifferences": "Last Update, Report Date UTC, Last Contact Time UTC, Last Inventory Update UTC, Last Reported IP, IP Address",Default for Microsoft Intune extension:
"ignoreEndpointDifferences": "Last Sync Date Time, Free Storage Space in Bytes", -
To further optimize the number of endpoints being updated in ClearPass, you can specify which attributes are being used in the ClearPass policies so that only changes to those attributes would trigger an update to the endpoint. This is done by listing out the specific attributes under endpointAttributes in extension configuration.
Sample for JAMF extension:
"endpointAttributes": "Group names, MDM Enabled, Managed, Remote Managed, Supervised, Serial Number", -
Setup extension to restart unless it was intentionally stopped. A restart policy can be defined in extension configuration to ensure that the extension starts up automatically after server reboots and such. Restart policy of “unless-stopped” would ensure the extension always starts up unless it was manually stopped.
“restartPolicy”: “no” — The extension will not be automatically restarted after the server is restarted.
“restartPolicy”: “always” — The extension will always be restarted after the server is restarted.
“restartPolicy”: “unless-stopped” — The extension will be restarted unless it was stopped prior to the server restart, in which case it will maintain that state.
“restartPolicy”: “on-failure:N” — If the extension fails to restart, the value for “N” specifies the number of times the extension should try to restart. If you do not provide a value for “N”, the default value will be “0”.
The “restartPolicy” parameter is not present by default in extension configurations. When it is not present, if the system is restarted a default policy is applied to the extension to maintain the state it was in before the restart. If the “restartPolicy” parameter is added to the configuration but later removed, the extension will then revert to the default restart policy.
8 - Asset Management
8.1 - Service Now CMDB
Introduction and Overview
The ServiceNow v3 extension is a full featured extension enabling the pushing of ClearPass endpoints to ServiceNow CMDB as well as the pulling of devices from ServiceNow into ClearPass. This extension requires a ServiceNow application to be installed for custom APIs and data mapping. This Integration guide covers how to deploy and configure the ClearPass extension to interface with ServiceNow Configuration Management Database. In this guide we will cover the complete installation, configuration and integration between the extension and ClearPass Policy Manager.
Extension Version Updates
| ServiceNow Extension Version | ClearPass App on ServiceNow Store Version | ServiceNow Release Certification | Date | Notes |
|---|---|---|---|---|
| 2.1.1 | 2.0.1 | Tokyo | May 2023 | Updated Endpoint Sync Filtering Mechanisms (refer to details in subsection under Configuration) |
| 3.1.3 | 2.2.0 | Tokyo Utah Vancouver | Oct 2023 | New Endpoint Sync Filtering Mechanisms (refer to details in subsection under Configuration) |
| 3.2.9 | 2.2.1 | Tokyo Utah Vancouver Washington Xanadu Yokohama Zurich Australia | Sep 2025 | Updated to push additional attributes from insight DB to Service Now |
INFO
The ServiceNow Extension works in conjunction with the ClearPass app on ServiceNow Store. The version numbers listed in the table correspond to how they need to be paired up.
What’s new in Service Now Extension v3.2.9
Until now the extension could push 3 attributes CPPM-Device-Category, CPPM-Device-Family, and CPPM-Device-Name from ClearPass insight database to Service Now CMDB. With v3.2.9, the extension is now able to push additional attributes from insight db to CMDB. Care has been taken to ensure backwards compatibility with existing deployments using endpoint push workflow.
INFO
ServiceNow ClearPass App store version 2.2.1 is recommended with extension version 3.2.9 since it has all the latest updates and fixes.
Sample of insight attributes made available in v3.2.9:
| mac | 11ab33ae55d6 |
| ip | 192.168.0.10 |
| ipv6 | null |
| user | bruce |
| domain | tmelab |
| roles | {"Domain Computers",Faculty,"Front Desk","Intune Compliant",[Employee],"[User Authenticated]"} |
| spt | QUARANTINE |
| aruba_user_role | quarantine |
| aruba_user_vlan | 100 |
| device_category | SmartDevice |
| device_family | Apple |
| device_name | Apple iPhone |
| is_conflict | false |
| other_category | Unknown |
| other_family | Unknown |
| other_name | Unknown |
| is_online | false |
| updated_at | 2024-10-09T14:07:13+05:30 |
What’s new in Service Now Extension v3.2.2
Starting with ServiceNow extension version 3.2.2, communication with Service Now is able to use OAuth. Version 3.1.3 and earlier only supported basic auth. Adding support for OAuth gives us additional security with the integration in terms of password exposure.
INFO
This release does not change the ServiceNow release certification and the ServiceNow ClearPass App store version. Therefore, the recommended ServiceNow ClearPass App version remains 2.2.0 with extension version 3.2.2.
With OAuth support, there are two additional fields in the extension configuration namely ClientId and ClientSecret.
“serviceNowUser”: “”,
“serviceNowPassword”: “********”,
“clientId”: “********”,
“clientSecret”: “********”,
The ClientId and ClientSecret fields are set to work in conjunction with the existing serviceNowUser and serviceNowPassword fields. ServiceNow does not support only clientID and clientSecret based authentication, the username and password fields are still mandatory while the clientID and clientSecret fields to support OAuth are optional. However, it is recommended to enable OAuth by configuring the clientID and clientSecret fields from ServiceNow > System OAuth > Application Registries
Note: It is recommended to first update the ClearPass App on ServiceNow Store to version 2.2.0 and then update the ServiceNow Extension on ClearPass to version 3.2.2.
Pictorial View of the Integration

Use Cases
ClearPass Policy Manager integrates with ServiceNow in multiple ways:
-
Use Case 1: Bulk import of all devices information from ServiceNow CMDB to ClearPass Policy Manager leveraging flexible polling definition based on cron based scheduling.
-
Use Case 2: Push individual endpoint attributes and insight attributes from ClearPass Policy Manager and map them in ServiceNow as and when they authenticate
-
Use Case 3: Push individual endpoint attributes and insight attributes from ClearPass Policy Manager and map them in ServiceNow based on a queueing mechanism. This is similar to the previous use case but adds batching to help with performance.
-
Use Case 4: Bulk export of all endpoints (including endpoint attributes and insight attributes) from ClearPass Policy Manager to ServiceNow.
-
Use Case 5: Perform a real-time lookup of the device attributes which can be leveraged for Authorization.
The above use cases are covered as part of this integration and are documented in this integration guide.
Software Requirements
The minimum software version required for CPPM is 6.11.0 . At the time of writing, version 6.11.10 is available as the long supported release and 6.12.4 is available as the short supported release. CPPM runs on hardware appliances with pre-installed software or as a Virtual Machine under the following hypervisors. Hypervisors that run on a client computer such as VMware Player are not supported.
-
VMware vSphere Hypervisor (ESXi) 7.0 U3c and 8.0
-
Windows Server 2019 with Hyper‑V and Windows Server 2022 with Hyper‑V.
-
KVM on CentOS Stream 8, CentOS Stream 9, Ubuntu 20.04 LTS, and Ubuntu 22.04 LTS.
ClearPass Installation and Deployment Guide
This document assumes your ClearPass environment is already configured and operational. If you require assistance with basic deployment, refer to the following deployment guide:
https://arubanetworking.hpe.com/techdocs/ClearPass/6.11/Installation-Guide/Default.htm
ClearPass Extensions
The integration between ClearPass Policy Manager and external systems is driven through a ClearPass capability known as Extensions, a sub-component of the ClearPass Exchange Integration framework. ClearPass Extensions are micro-services running on top of the base ClearPass platform. These micro-services enable HPE Aruba Networking to deliver new features outside of the main software release cycle and facilitate a faster time to market for specific features and integrations. Configuration and control of ClearPass Extensions is accomplished through the ClearPass Guest GUI, as covered later in this document.
Installing Extension
ClearPass Extensions are easy to install from the ClearPass Extensions Store. In a cluster, ClearPass Extensions can be installed on a subscriber independently of the publisher. Multiple copies of the same extension can be installed if needed as well.
INFO
Internet access is required for ClearPass Policy Manager to install the ClearPass Extensions from the Extension Store. Starting with ClearPass 6.12, extensions can be can be installed offline as well. Offline ClearPass Extension images are available on HPE networking support portal.
Access to the extension store
Access the Extension Store to download and install ClearPass extensions. The Extension store utilizes the same HPE Passport account credentials used to validate support entitlement in the Software Updates Por- tal. This is configured under Administration > Agents and Software Updates > Software Updates as shown below. Ensure that valid HPE Passport credentials have been entered in these fields to enable Ex- tension download capabilities.
Installing the Extension from Store
Extensions are installed from the extension page in ClearPass Guest, as shown below. Access it from Guest > Administration > Extensions
From here, click on ‘Install Extension’, and the search box below appears.
Enter “Intune” and click on ‘Search’, see the example below.
INFO
Here we are using Intune as an example. The installation steps are the same for all the extensions. For your deployment, please search for the appropriate extension like Jamf, Mosyle, Crowdstrike, etc.
All currently available extensions are listed in the page: https://www.arubanetworks.com/techdocs/NAC/clearpass/integrations/clearpass-extension/extensions-list/
Click on the extension name and then click “Install.”
In the “Install Extension” dialog box, set the IP address if necessary, as described in section “Extensions and IP address configuration support” below. Do not check the box to start the extension at this time. Click the “Install” button.
In this example, we’ve not entered an IP address for the extension to use, if there is intent to use the extension as an authorization source set this value and ensure its set the same on all nodes where the Extension is deployed.
The extension will download and appear in a “Stopped” state. Notice the options to Start, Delete, Reinstall, Show Logs, and view Configuration. Click on “Configuration” to view settings.
After the extension has been installed, proceed to configure the extension
A copy of the default Extension configuration is shown above, this will need to be modified for your deployment.
INFO
Password and sensitive configuration items are obfuscated when presented in both the Extension GUI or in the Explorer configuration.
WARNING
The configuration attributes are case sensitive. It is recommended to refer the default configuration sample while editing your configuration.
Extensions and web proxy support
Extensions support communications with 3rd parties via a web proxy. This adds incremental proxy functionality. If a proxy is defined in ClearPass Policy Manager, then an extension will inherit that configuration. See later in the document on how to disable the proxy inherited configuration.
INFO
Note that the Policy Manger web proxy configuration is ONLY read by the extension at installation time. If the web proxy configuration is changed in Policy Manager, then the extension must be re-installed so the new settings are re-read and bonded to the extension.
Extensions and IP address configuration support
ClearPass uses a non-externally routed IP address range to communicate with the Extension. The default is 172.17.0.0/16. You may configure a different range, if desired. This is especially useful when deploying extensions across nodes within a cluster where there is the requirement for a fixed consistent IP address for the extension across the cluster.
Changing the “Extensions Network Address” range is only necessary if either the ClearPass MGMT or DATA interface are using an IP address in the extension default range of 172.17.x.x/12, or if ClearPass needs to communicate with some external device in that range.
To Configure the base Extension IP subnet within Policy Manager navigate to Administration > Server Manager > Server Configuration [chose your node] Service Parameters [ClearPass system service].
INFO
The subnet defined here for the extension framework must fall within the following subnet range 10.0.0.0/8, 172.16.0.0/12, 192.168.0.0/16 as defined by RFC1918. For best results, set the network address range to a subnet that does not exist in your enterprise, and restart the extension service for this change to take effect.
Never set the DATA or MGMT IP address to use an address that matches the Extension Network
INFO
Note that changing the extension base IP address will require the extension service to be restarted.
ServiceNow Configuration Requirements
Before the ClearPass application can be installed in ServiceNow, the following configuration changes are required.
-
The plugin “Configuration Management For Scoped Apps (CMDB)” (com.snc.cmdb.scoped) must be enabled.
-
The CI Identifier rule for MAC Address only lookups must be enabled. CI Identifiers > Hardware Rule > Network Adapter [cmdb_ci_network_adapter] (mac_address) and enable the mac_address only rule.
-
You must add “ClearPass” to the discovery source choice list. Navigate to Choice Lists and add a “ClearPass” record.

INFO
The ClearPass ServiceNow extension configuration necessitates that you set and/or collect a number of items based upon the configuration of your CMDB. Deployment and Configuration of ServiceNow CMDB is beyond the scope of this document, we only cover the necessary components required to enable the basic integration.
Configuring ClearPass Extension and ClearPass Policy Manager
Depending upon the use case and the workflows being implemented, there are different configuration items that must be setup. Here we are going to list out each possilbe workflow and the configuration needed for each both on the extension and on Policy Manager.
ServiceNow Extension Configuration Parameter
These are the SNOW Configuration Parameters within the extension
| Configuration Parameter | Description | Example/Values |
|---|---|---|
| logLevel | Logging level for troubleshooting | "INFO" |
| verifySSLCerts | Should SSL certificates be validated when communicating with Service Now. | true or false |
| serviceNowUri | The host and port (if other than 443) of your ServiceNow instance. | ven00000.service-now.com |
| serviceNowUser | The user name you would like the extension to use for accessing ServiceNow. | |
| serviceNowPassword | The password of the user for accessing ServiceNow. | |
| clientId | ClientID from OAuth Client in ServiceNow System OAuth > Application registries. | |
| clientSecret | ClientSecret from OAuth Client in ServiceNow System OAuth > Application registries. | |
| serviceNowOperationalStatus | Ability to filter endpoints based on Operational Status | Refer to Endpoint Sync Filtering Mechanisms section after table |
| serviceNowInstallStatus | Ability to filter endpoints based on Install Status | Refer to Endpoint Sync Filtering Mechanisms section after table |
| serviceNowSysClassAllow | Ability to filter endpoints based on Allowlist of cmdb_ci tables | Refer to Endpoint Sync Filtering Mechanisms section after table |
| serviceNowSysClassDeny | Ability to filter endpoints based on Denylist of cmdb_ci tables | Refer to Endpoint Sync Filtering Mechanisms section after table |
| macAddressSeparator | The MAC Address separator used in ServiceNow. The default value is a hyphen "-". ClearPass stores MAC Addresses with no separator, so if no seperator is specified MAC Addresses will be sent to ServiceNow as they are seen in ClearPass, something that could result in duplicates. | - |
| enableEndpointCache | Enable or disable the endpoint caching process. When enabled endpoints when looked up using the MAC Address lookup APIs will cache the ServiceNow results in the endpoint database. Information will only be refreshed by this process after the Cache Time is elapsed. | true or false |
| endpointCacheTimeSeconds | The time in seconds for endpoint lookup API to use cached endpoint data from ServiceNow. | 300 |
| enableQueue | Enable or disable the endpoint processing queue for pushing endpoints to ServiceNow. When enabled, you can add MAC Addresses to the processing queue using the queue related API endpoints. | true or false |
| queueSchedule | The schedule used for the queue processor. This is a CRON based schedule. | */30 * * * * * |
| queueRequireIdentity | Should identity information be required to send data to ServiceNow. If set to true, a mac address processed by the queue processor will only be sent to ServiceNow if the mac address is found in the identity endpoint database. | true or false |
| queueRequireInsight | Should insights information be required to send data to ServiceNow. If set to true, a mac address processed by the queue processor will only be sent to ServiceNow if the mac address is found in the insight endpoint database. | true or false |
| queueRetryCount | The queue retry count is the number of times a mac address will be looked up to attempt to get information to send to ServiceNow. This queue will take effect if there is not information in ClearPass for the MAC Address or if one of the queues require rules comes into play. | 3 |
| cmdbDiscoverySourceName | The CMDB Discovery source that is used when sending data to the CMDB. This must be added to Service Now. Add a choice list option for cmdb_ci -> discovery_source named "ClearPass" | “ClearPass” |
| cmdbDefaultTarget | The default table target mapping if no mappings can be found in the cmdbTargetMap configuration. | cmdb_ci_netgear |
| cmdbTargetMap | This map describes how CMDB table mappings are identified. For example, a CPPM endpoint, profiled as a "Computer", will map to the CMDB cmdb_ci_computer table. This base matching is done using the device category, optional device family mappings can also be used to further refine the mapping. A default set of mappings is provided. |
[ { "deviceCategory": "Computer", "target": "cmdb_ci_computer" }, { "deviceCategory": "Server", "target": "cmdb_ci_server", "deviceFamilies": [{ "deviceFamily": "win", "target": "cmdb_ci_win_server" }, { "deviceFamily": "unix", "target": "cmdb_ci_unix_server" }, { "deviceFamily": "vmware", "target": "cmdb_ci_vm_vmware" }] }, { "deviceCategory": ["SmartDevice", "Network Camera", "Access Points"], "target": "cmdb_ci_netgear" }, { "deviceCategory": "Printer", "target": "cmdb_ci_printer" }, { "deviceCategory": "Switch", "target": "cmdb_ci_switch" } ] |
| cmdbAttributeMap | This is a list of endpoint or insight attributes to send to ServiceNow and what
fields they should be mapped to in the CMDB. Each entry is a key/value
pair. The key is the CPPM attribute name, the value is the ServiceNow
CMDB table column name. Only unreferenced columns from ServiceNow can be used here. The names in the list should match up to
endpoint attributes. When a matching attribute is found it will be
pushed to ServiceNow. When available, the insights information of Device
Category, Device Family and Device Name are available using the names
CPPM-Device-Category, CPPM-Device-Family, and CPPM-Device-Name or by using the actual attribute name in insight database (starting with v3.2.9).
Only unreferenced fields in cmdb tables can be used to push raw values. |
{ "Description": "short_description" } |
| enableSyncAll | Enable or disable pulling all endpoints from ServiceNow. | true or false |
| syncAllSchedule | The ServiceNow pull schedule. This is a CRON based schedule. | 0 3 * * * |
| syncPageSize | The number of ServiceNow cmdb items to pull with each request. You can adjust this based on the number of cmdb items you have, the performance of your ClearPass system, and the performance of your network. | 100 |
| syncUpdatedOnly | True or false to only pull cmdb_ci records that have been updated since the last update. | true or false |
| syncAllOnStart | Sync all endpoints from ServiceNow when the extension starts or restarts | true or false |
| enableEndpointPush | Enable or disable pushing all identity endpoints from ClearPass to ServiceNow. | true or false |
| endpointPushSchedule | The endpoint push schedule. This is a CRON based schedule. | 0 3 * * * |
| endpointPushPageSize | The number of ClearPass endpoints to pull with each request. You may want to adjust this based on the number of endpoint attributes your endpoints contain. | 100 |
| endpointPushRequireInsight | Should insight information be required to send an endpoint to ServiceNow. | true or false |
| asyncOperationLimit | The number of asynchronous operations to run at one time. This controls how many individual internal workers are running at any given time for any one process. For example, if this is set to 10, and the queue processor and pull processors are running at the same time, this setting will limit each process to processing at most 10 items at a time, so in the mentions situation there would be 20 works pushing and pulling information. You can adjust this value based on your ClearPass load. The lower the value the longer it will take for items to be processed. |
3 |
| bypassProxy | Bypasses the configured system proxy | true or false |
| enableStats | Option to enable extension statistics | true or false |
| statsUsername | Create a username to access the extension statistics page | Give any username you want to use |
| statsPassword | Create a password to access the extension statistics page | Give any password you want to use |
TIP
Pay special attention to the values in the extension configuration. Where a configuration attribute is a Boolean value {true/false}, it must not be enclosed with literals.
Enter the ServiceNow tenant details such as serviceNowUri, serviceNowUser, serviceNowPassword into the extension configuration. Depending upon the use case, adjust the other configuration switches as necessary, pay attention to attributes related to push/pull queues and schedules.
INFO
Sample ServiceNow CMDB Extension is shown below, this will need to be modified based on the use cases being implemented.


In the next section we discuss the configuration values and how to use them and where to collect the configuration items that are required.
Use Case 1: Bulk Endpoint Sync from CMDB to ClearPass
The custom API built in the ClearPass Integration App is designed to work in conjunction with the ServiceNow Extension to pull a set of attributes from devices in ServiceNow CMDB and map them into the ClearPass Endpoints DB.
These are the extension configuration parameters that impact endpoint sync from Service Now CMDB:
| Configuration Parameter | Description | Example/Values |
|---|---|---|
| enableSyncAll | Enable or disable pulling all endpoints from ServiceNow. | true or false |
| syncAllSchedule | The ServiceNow pull schedule. This is a CRON based schedule. | 0 3 * * * |
| syncPageSize | The number of ServiceNow cmdb items to pull with each request. You can adjust this based on the number of cmdb items you have, the performance of your ClearPass system, and the performance of your network. | 100 |
| syncUpdatedOnly | True or false to only pull cmdb_ci records that have been updated since the last update. | true or false |
| syncAllOnStart | Sync all endpoints from ServiceNow when the extension starts or restarts | true or false |
| serviceNowOperationalStatus | Ability to filter endpoints based on Operational Status | Refer to Endpoint Sync Filtering Mechanisms section after table |
| serviceNowInstallStatus | Ability to filter endpoints based on Install Status | Refer to Endpoint Sync Filtering Mechanisms section after table |
| serviceNowSysClassAllow | Ability to filter endpoints based on Allowlist of cmdb_ci tables | Refer to Endpoint Sync Filtering Mechanisms section after table |
| serviceNowSysClassDeny | Ability to filter endpoints based on Denylist of cmdb_ci tables | Refer to Endpoint Sync Filtering Mechanisms section after table |
Utilize enableSyncAll, enabling this will turn on the ingest polling, ensure that in conjunction with syncAllSchedule (cron based scheduling) ingest works, all data is written to endpoint, if the endpoint does not previously exist, its created and the endpoint attributes are added. Ensure the scheduling engine works, test to ensure it can be scheduled as expected, E.g. one-hour repeat runs, daily repeat etc. also to be tested in this use case.
Utilize the syncPageSize to ensure we adjust the size of the returned body, start with 100 records and try perhaps 20.
Utilize the syncUpdatedOnly to only have the ingest process pull updated delta changes, for this you’ll need to make changes to endpoints in the CMDB tenant and check only those records with changed records/attributes are retrieved, (based upon the last update).
When pulling a MAC address (or multiple MAC addresses) for an endpoint, it is based on network adapter configuration item “cmdb_ci_network_adapter”. A default filter based on Operational Status is applied in which only MAC addresses with “Operational Status = Operational” are pulled in. This continues to be the default mode of operation.
The ServiceNow Extension v2.1.1 expanded to two filters that can be applied, and there is also more flexibility in how these filters are applied. The two filters that can be applied are based on Operational Status and Install Status as seen in the default configuration:
“serviceNowOperationalStatus”: “1”,
“serviceNowInstallStatus”: “”,
A value of “1” for Operational Status is equivalent to Operational. An empty value for Install Status means this filter is not applied.
Another option is to apply filter based on Install Status only rather than Operational Status. In this case, the configuration is changed to the following:
“serviceNowOperationalStatus”: “”,
“serviceNowInstallStatus”: “1”,
Here a value of “1” for Install Status is equivalent to Installed. An empty value for Operational Status means this filter is not applied.
For reference, the following tables list the possible values for Operational Status and Install Status.
Operational Status
| Selection | Value |
|---|---|
| Operational | 1 |
| Non-Operational | 2 |
| Repair in Progress | 3 |
| DR Standby | 4 |
| Ready | 5 |
| Retired | 6 |
Install Status
| Selection | Value |
|---|---|
| Installed | 1 |
| On Order | 2 |
| In Maintenance | 3 |
| Pending Install | 4 |
| Pending Repair | 5 |
| In Stock | 6 |
| Retired | 7 |
| Stolen | 8 |
| Absent | 100 |
For the case where no filter needs to be applied and all MAC addresses are to be pulled in, the configuration is changed to the following with empty values:
“serviceNowOperationalStatus”: “”,
“serviceNowInstallStatus”: “”,
The ServiceNow Extension v3.1.3 expands even further with two new filters that can be applied. In order to optimize the syncing of large databases, now either an Allowlist or Denylist can be configured to filter which “cmdb_ci” tables will be included or excluded during the endpoint sync process.
INFO
Only one of these filters (either Allowlist or Denylist) can be applied. Do not apply both filters simultaneously.
By default, the configuration starts with empty values for both the Allowlist and Denylist:
“serviceNowSysClassAllow”: “”,
“serviceNowSysClassDeny”: “”,
Here is an example of an Allowlist that can be applied to only include “cmdb_ci” tables that contain MAC addresses (the end customer to determine the “cmdb_ci” tables to be included pertaining to their environment):
“serviceNowSysClassAllow”: “cmdb_ci_computer_list,cmdb_ci_printer_list,cmdb_ci_ip_phone_list,cmdb_ci_ups_list”,
Here is an example of a Denylist that can be applied to exclude “cmdb_ci” tables that do not contain MAC addresses (the end customer to determine the “cmdb_ci” tables to be excluded pertaining to their environment):
“serviceNowSysClassDeny”: “dscy_route_next_hop,cmdb_ci_ups_alarm”,
Use Case 2: Push endpoint to CMDB after authentication
This triggers a MAC Address’s information to be pushed to ServiceNow using the Identity and Insights information in ClearPass.
Only the identity attributes mapped in the cmdbAttributeMap configuration are sent to ServiceNow. If available, the insights data of device_category, device_family, and device_name are internally mapped to the properties CPPM-Device-Category, CPPM-Device-Family, and CPPM-Device-Name and sent to ServiceNow. Starting with extension v3.2.9, there are other insight attributes also available as listed in the section “What’s new in Service Now Extension v3.2.9”
INFO
cmdbAttributeMap is a list of endpoint or insight attributes to send to ServiceNow and what fields they should be mapped to in the CMDB. Each entry is a key/value pair. The key is the CPPM attribute name, the value is the ServiceNow CMDB table column name. Only unreferenced columns from ServiceNow can be used here. The names in the list should match up to the attributes listed under Configuration > Identity > Endpoints > Click on an endpoint > Attributes tab. When a matching attribute is found it will be pushed to ServiceNow. When available, the insights information of Device Category, Device Family and Device Name are available using the names CPPM-Device-Category, CPPM-Device-Family, and CPPM-Device-Name or by using the actual attribute name in insight database (starting with v3.2.9).
A context server action can be used to push an endpoint from ClearPass to ServiceNow CMDB database. To trigger the push, enable the attribute “enableEndpointPush”: true in extension configuration. Any attribute from endpoint repository and a set of attributes from insight db can be pushed to cmdb. cmdbTargetMap and cmdbAttributeMap defines to which tables and fields the attributes are pushed to and should be configured appropriately.
“endpointPushRequireInsight”: true should be enabled if you wish to push insight attributes for the endpoint to CMDB.
Steps to configure this context server based endpoint push:
-
Define Endpoint Context Server
-
Add Context Server Action
-
Create an Enforcement Profile to trigger the action
So first configure a basic Context-Server pointing to the Extension IP-Address, pay specific attention to the Server Base URl of http://Extension_IP_address .

Note that it is not https, after this configure the individual context server action as shown below. in our working example 172.17.0.7 is the IP-address of the Service Now extension, your IP will likely differ.

The next step involves using the Context Server Action in the Enforcement Profile as below. The Enforcement Profile to push an endpoint to ServiceNow is shown below:

Use Case 3: Push endpoints from ClearPass to ServiceNow via push-queue
Using push queue helps to batch the pushes from ClearPass to ServiceNow. Enable cmdbAttributeMap to add additional endpoint context to be sent to SNOW. When available, extension sends Device Category, Device Family and Device Name, but cmdbAttributeMap allows you to send additional endpoint attributes. Perhaps you want to send MDM or some EDR attributes. List them in the array like this [ “Owner Email”, “OS Version” ], ensure they are mapped however via the SNOW Identification and Reconciliation engine (I&R) and that the proper mappings are made in the Aruba SNOW Application.
INFO
cmdbAttributeMap is a list of endpoint or insight attributes to send to ServiceNow and what fields they should be mapped to in the CMDB. Each entry is a key/value pair. The key is the CPPM attribute name, the value is the ServiceNow CMDB table column name. Only unreferenced columns from ServiceNow can be used here. The names in the list should match up to the attributes listed under Configuration > Identity > Endpoints > Click on an endpoint > Attributes tab. When a matching attribute is found it will be pushed to ServiceNow. When available, the insights information of Device Category, Device Family and Device Name are available using the names CPPM-Device-Category, CPPM-Device-Family, and CPPM-Device-Name or by using the actual attribute name in insight database (starting with v3.2.9).
Enable enableQueue to start using the queuing mechanism, then utilize the queueSchedule to validate scheduling and repetitive scheduling functions. When queueRequireIdentity is enabled, only mac addresses present in Endpoint DB are sent to CMDB. Enable queueRequireInsight to ensure endpoint exists in InsightDb and to send attributes from InsightDB.
Steps to configure this context server based endpoint push using queuing mechanism:
-
Define Endpoint Context Server
-
Add Context Server Action
-
Create an Enforcement Profile to trigger the action
So first configure a basic Context-Server pointing to the Extension IP-Address, pay specific attention to the Server Base URl of http://Extension_IP_address .
Note that it is not https, after this configure the individual context server action as shown below. in our working example 172.17.0.7 is the IP-address of the Service Now extension, your IP will likely differ.
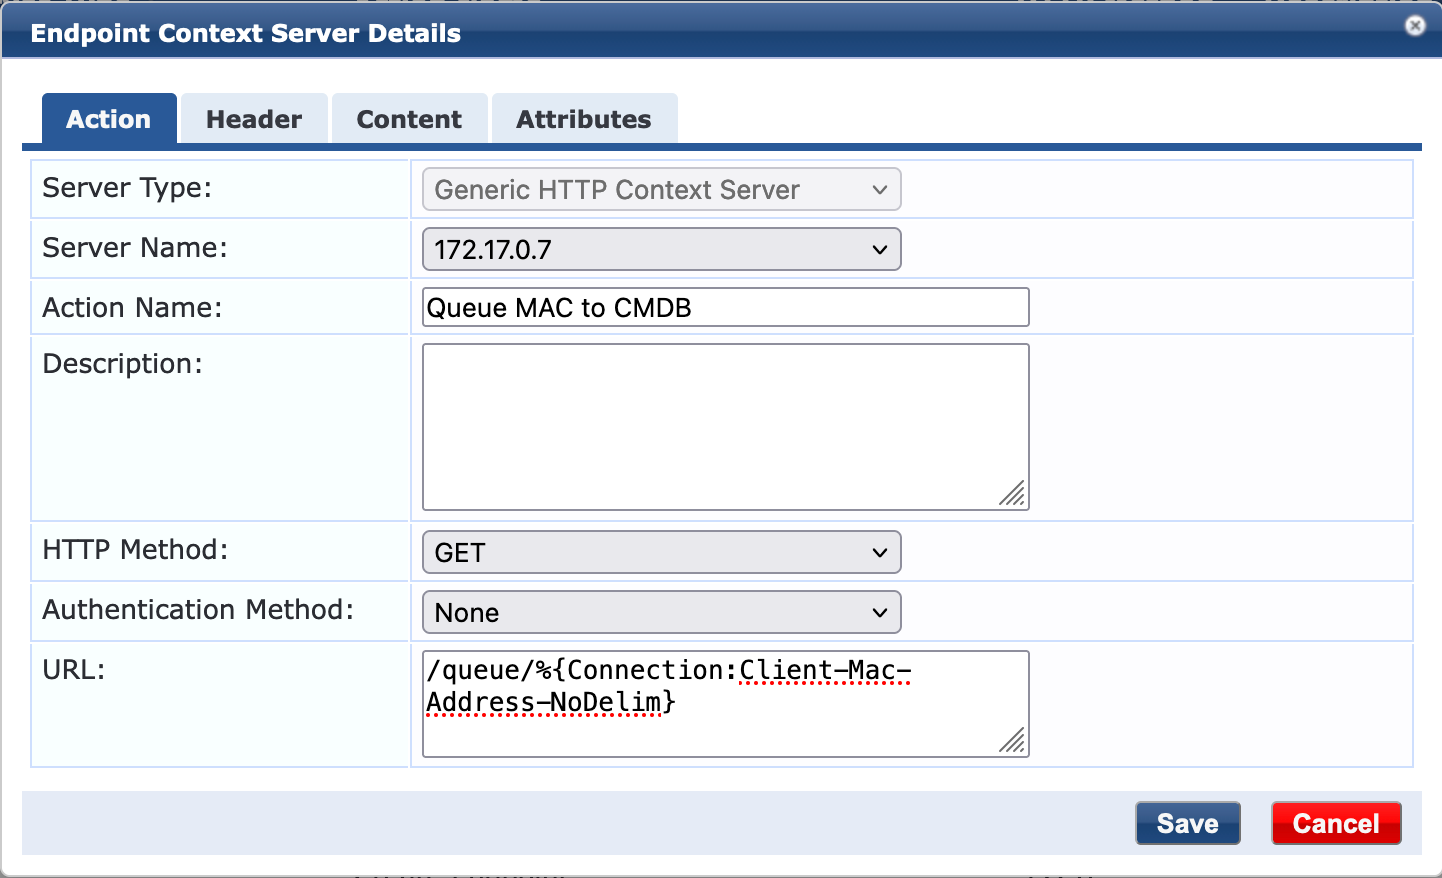
The next step involves using the Context Server Action in the Enforcement Profile as below. The Enforcement Profile to push an endpoint to ServiceNow is shown below:
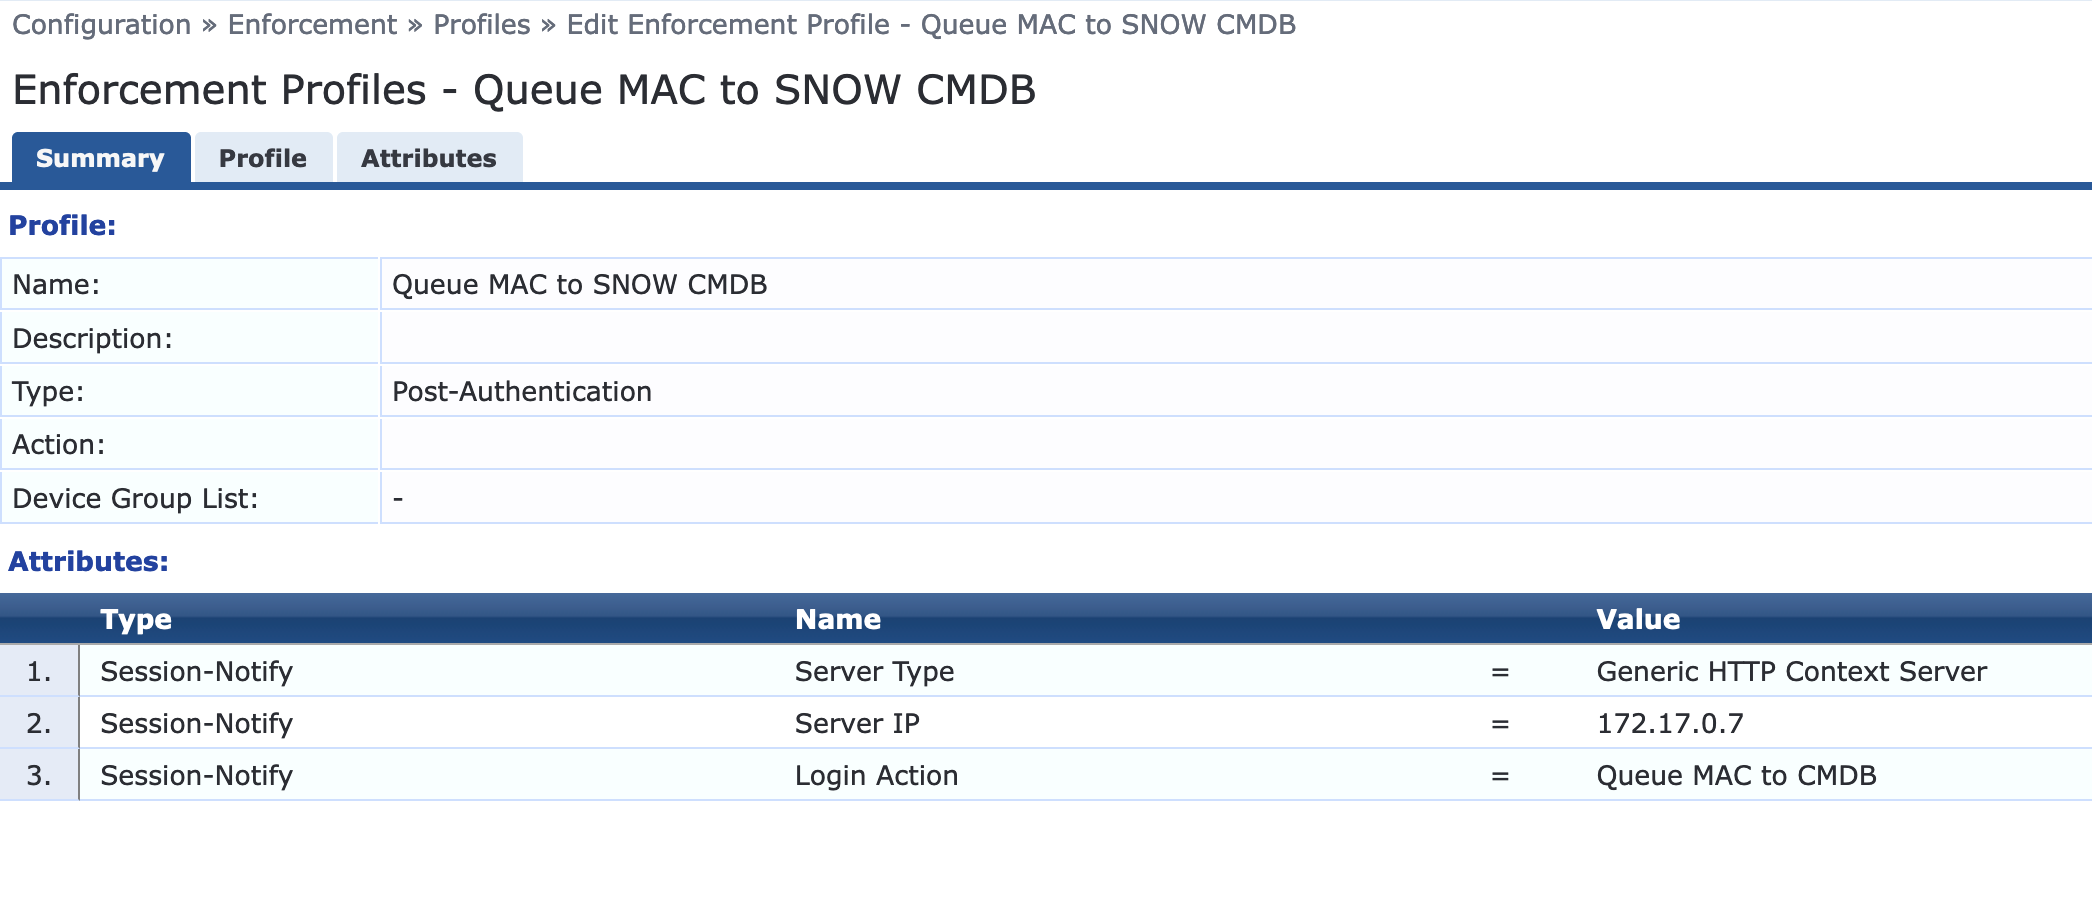
Use Case 4: Sync endpoint database from ClearPass into ServiceNow
Utilize enableEndpointPush to sync all of the CPPM endpoints into ServiceNow CMDB with the frequency of the sync based on endpointPushSchedule. Optionally, configure endpointPushPageSize for endpoint being pushed into ServiceNow.
In our example below we’ve set the schedule to run every 2-hours, sync all endpoint when the extension starts/restarts and cache the results for 30 minutes. Adjust these config items as necessary for your environment.
“enableEndpointPush”: true,
**“enableEndpointPushSchedule”: * /2 * * ,
“endpointPushPageSize”: 100,
“endpointPushRequireInsight”: false
INFO
cmdbAttributeMap is a list of endpoint or insight attributes to send to ServiceNow and what fields they should be mapped to in the CMDB. Each entry is a key/value pair. The key is the CPPM attribute name, the value is the ServiceNow CMDB table column name. Only unreferenced columns from ServiceNow can be used here. The names in the list should match up to the attributes listed under Configuration > Identity > Endpoints > Click on an endpoint > Attributes tab. When a matching attribute is found it will be pushed to ServiceNow. When available, the insights information of Device Category, Device Family and Device Name are available using the names CPPM-Device-Category, CPPM-Device-Family, and CPPM-Device-Name or by using the actual attribute name in insight database (starting with v3.2.9).
Refer to Appendix C for more details about configuring the cron based scheduling for enableEndpointPushSchedule
Use Case 5: Perform real time authorization lookup against Service Now CMDB
Service Now CMDB can be added as an auth source in ClearPass to perform a real time authorization call. The attributes fetched as part of this real time lookup can be used within the service policies. Making a get request to the extension with a MAC Address in the URL will return the details for the CMDB device in ServiceNow. If enableEndpointCache is true, the data may be cached for the duration of endpointCacheTimeMinutes.
The attribute “Found In SNOW” should always be returned by the API and will be true or false.
From ServiceNow, the cmdb_ci parent table as well as the asset, location, owned_by, cpu_manufacturer, assigned_to, company and department information will be returned and prefixed with the cmdb_ci reference field name followed by the column name (e.g. asset.display_name is the data from joined cmdb_ci.asset).
Steps to add CMDB as authorization source:
Navigate to Configuration > Authentication > Sources to create a new auth source of the type HTTP

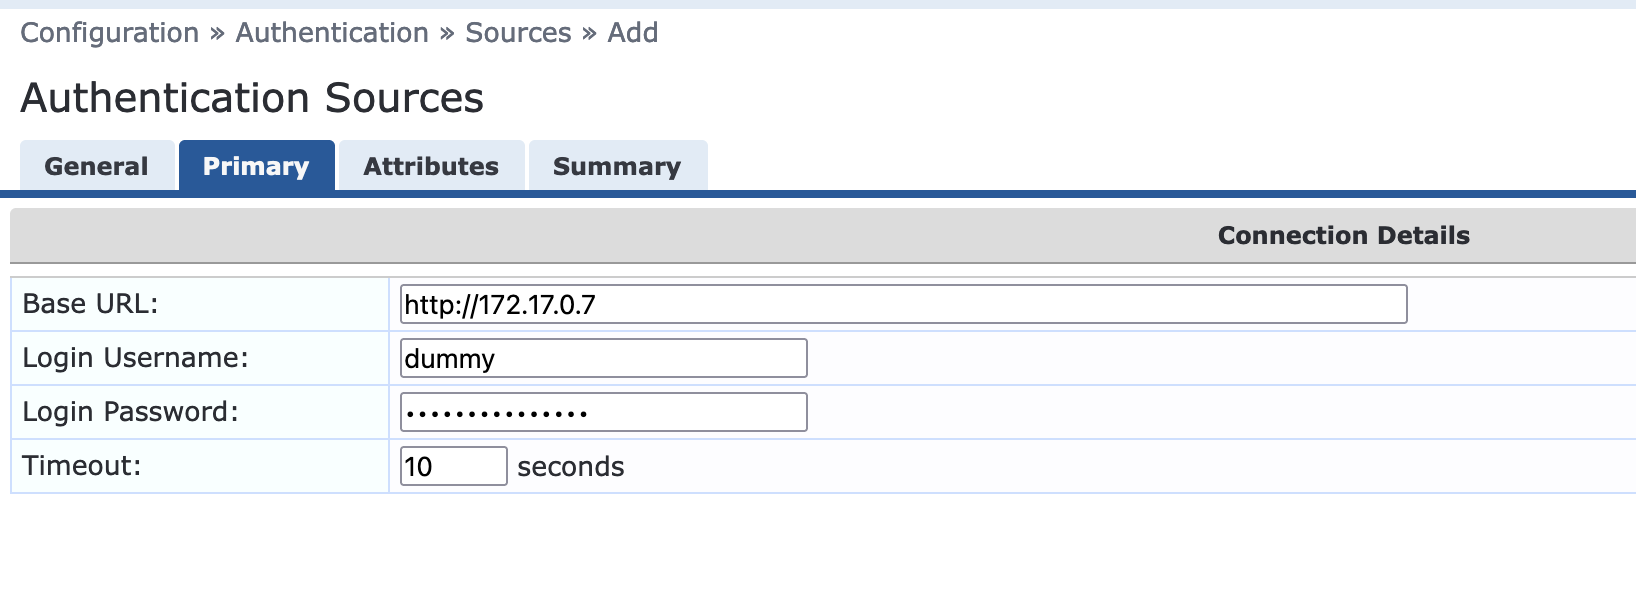

Once the auth source has been created, it can be added to the service and referenced in policy conditions.


WARNING
Do not add this auth source under the “Authentication” tab in service configuration. This source is meant for authZ only. Incorrect mapping can cause the RADIUS service to stop in some versions of ClearPass.
Additional context server action options
Service Now extension supports these additional context server action options to trigger raw API calls to Service Now. The payload must be specified as part of context server action in json format. There is no validation for these context server actions and data is sent as is. These can be useful if you want to push some attributes that are not part of endpoint db or insight db but is part of the computed attributes of the authentication request.
| URL | Description | Example Data |
|---|---|---|
| POST /push | This process triggers a device send to ServiceNow using the data specified in the request body. The request body should be a JSON object containing at least a MAC Address. This process does not use internal endpoint lookup information and only sends the information supplied. The properties mac, ip, device_category, device_family, device_name are internally mapped to the properties CPPM-Device-Category, CPPM-Device-Family, and CPPM-Device-Name when being sent to ServiceNow. The other properties included in the object should match to the attributeMAP configuration. |
{ "mac": "000f7c0d5cd0", " ip": "", "device_category": "Network Camera", " device_family": "", "device_name": "", "Owner": "user@hpe.com", "OS Version": "Unknown", ... } |
| POST /identifyreconcile | This endpoint will send the body to the ServiceNow identifyreconcile API. This simply relays the information posted to it, giving the user full control over what the I&R engine does. More information can be found here, https://docs.servicenow.com/bundle/paris-application-development/page/integrate/inbound-rest/concept/c_IdentifyReconcileAPI.html |
{ "items": [ { "className": "cmdb_ci_computer", "internal_id":"comp", "values": { "mac_address": "01-01-01-01-01-01", "name": "Computer 2", "os": "Windows", "os_version": "10", "short_description": "Test Device" }, "lookup": [ { "className": "cmdb_ci_network_adapter", "values": { "mac_address": "01-01-01-01-01-01", "install_status": 1 } } ] } ] } |
| POST /queue | Adds the specified MAC Address to the processing queue to be sent to ServiceNow. This queue process runs based on the queueSchedule and will look up the endpoint’s identity and insight information. Only the identity attributes mapped in the attributesToSend configuration are sent to ServiceNow. If available, the insights data of device_category, device_family, and device_name are internally mapped to the properties CPPM-Device-Category, CPPM-Device-Family, and CPPM-Device-Name and sent to ServiceNow. This setting uses the queueRequireIdentity and queueRequireInsight options to determine if certain sets of information are required for sending to ServiceNow. If either of these options is set to true, the corresponding set of data must be available in ClearPass for the data to be sent to ServiceNow. |
{ "mac": "000f7c0d5cd0" } |
| GET /resetPullLastUpdate | Resets the last updated date saved by the ServiceNow pull process when the serviceNowPullUpdatedOnly configuration option is true. |
Appendix A – Troubleshooting and Support
Here we list some basic troubleshooting steps. If you need any help beyond this, please reach out to HPE Aruba Networking Support.
Check API Access Application Control restrictions
If you’ve previously hardened your ClearPass deployment with Application Access Controls, it’s possible that the Extension will not work. Reviewing the Extension Log might show something like the following after immediately starting the Extension. This likely indicates the ClearPass Application API’s are in place.
Example of Extension authorization failure due to Policy Manager Application Control:
[2020-03-16T15:42:21.083] [INFO] Intune - Server listening on port 80.
[2020-03-16T15:42:21.243] [DEBUG] Intune - Request “GET ‘https://172.17.0.1/api/server/version’” took 51.91ms.
[2020-03-16T15:42:21.245] [DEBUG] Intune - <!DOCTYPE html><html>
<head>
<title>
Error 403 (Forbidden)
</title>
<script language=“javascript”>
function reloadPage() {
var locHref = window.location.protocol + “//” + window.location.hostname;
window.location.href = locHref;
}
</script>
To resolve this issue, add the IP address of the Extension to the list of nodes permitted to access the API by navigating to Administration > Server Manager > Server Configuration {choose your node} > Network
INFO
For this reason its good practice to fix the IP address of the extension at installation time such that it doesn’t change over time and break the application controls.
Checking on the Extension Service
The ClearPass Extensions are supported by a system service which must be running.
Restarting this service will affect all deployed and running extensions.
To check on the state of the Extension Service, or to restart the service, go to Administration > Server Manager > Server Configuration > [SERVER] > Service Control. By default this service is automatically started.
Extensions and web proxy / firewall whitelisting
If ClearPass Policy Manager has been configured with a proxy, it’s still possible that domain whitelists are required, the same for some datacenter firewall to allow the installation of Extensions. Some enterprise customers maintain a whitelist of domain that are allowed to transit the proxy/firewall. The underlying docker configuration process uses standard docker registry access to pull images (hosted in docker hub). In general, the following hosts are used:
INFO
-
extensions.clearpassbeta.com
-
registry-1.docker.io
-
index.docker.io
-
auth.docker.io
-
production.cloudflare.docker.com
This is all also geo dependent to some degree and based on various AWS services, so AWS redirects and geo location services will vary. Finally, this all runs via standard HTTPS (port 443).
Extension Logs/Enable Debugging
If you have a requirement to access and view the logs from the Extension, you can turn on different logging levels from the Extension GUI. Adjust the logLevel to ‘DEBUG’ and restart the extension as shown below.
Logs can then be viewed from the ‘Show Logs’.
Remember after changing the logging level, as with any extension configuration change the extension will need to be restarted for this change to take effect.
Accessing the extension logs using ‘Collect Logs’ system function
In addition to viewing the logs as shown above, logs can also be collected and examined via the Policy Manager Collect Logs system function (Administration > Server Manager > Server Configuration > [Select SERVER] > Collect Logs). This is extremely useful should you have a need to call for technical assistance.
If the support team needs to investigate a system issue, one of the items they regularly ask for is the system logs to aid with their diagnostic investigation. By default the “logLevel” is set to INFO, but TRACE, DEBUG, INFO, WARN, ERROR, FATAL can also be set as required. Any of the levels will display the information for the selected state and lower; if INFO is selected, it will show messages for INFO, WARN, ERROR, FATAL.
After the logs have been collected, downloaded and expanded, you can locate the extension logs in the following location in the folder structure PolicyManagerLogs > extension > your-extension-id as shown below. Note the file-name is the same as the running instance ID of the extension.
Monitoring extension statistics
There is a way to monitor extension’s critical resource statistics with the configurable parameter added as part of the extension’s configuration. To enable extension statistics set the “enableStats” parameter to true. Remember a restart of the extension is need to activate the change anytime the config is modified.
To navigate to statistics page, click Show Details.
This will show statistics similar to the following:
Monitoring authorization performance
Since we are authorizing against an external system, it could be relevant to monitor the performance of these transactions as you setup and deploy. If you suspect there is a performance issue, ClearPass provides a way to monitor the authorization processing time. The graph below shows an example of this data, navigate to Monitoring > Live Monitor > System Monitor [click on ClearPass Tab, then select [Authorization]….
Appendix B – Considerations for Installing in a Cluster
Extensions are not synced between ClearPass cluster members, and thus must be installed on each member separately.
Some Extensions can run in two modes: Periodic Sync Mode and Authorization Source Mode.
Periodic Sync Mode
If you are configuring the extension to poll external system periodically and utilize the resulting ClearPass Endpoint database during endpoint Authorization, then you only need to install the extension on one cluster member, often the publisher.
You may wish to install the extension on a second cluster member as a backup, but remember that both extensions will individually be updating the endpoint database. You may want to stagger the updates between the two extensions, for example, Subscriber1 updates at the top of the hour and Subscriber2 updates at 30 minutes after the hour.
Also, in this mode there is no need to explicitly enter an IP address during installation. The defaults will suffice and ClearPass will select an IP in the range specified in the server configuration.
HTTP Authorization Source Mode
In this mode we configure an HTTP Auth source that results in a HTTPS call to external system during endpoint authorization. In this deployment model the extension must be installed on every cluster node that process authentications. Also in this scenario every cluster member’s extension must be set to the exact same IP address during installation time, as the HTTP Auth source configuration is propagated globally across all cluster members.
For example, if the extension IP range is 172.17.0.0/16, we would set the extension to 172.17.0.5 on every cluster member during installation of the extension.
While we normally want to avoid duplicate IP addresses in a network, this is not a concern with ClearPass extensions. Each ClearPass node communicates internally only with its own extension, and this traffic is not routed outside of ClearPass.
Subscriber nodes support the same ability as publishers to install an Extension from the Extension store.
Appendix C – endpoint sync schedule settings
The syncSchedule and similar scheduling parameters sets how often ClearPass executes certain actions like syncing or pushing endpoints. This setting is based on a slightly modified version of the CRON job scheduler found in Unix-like operating systems. It can be used to schedule jobs to run periodically at fixed times, dates or intervals.
A ‘cron’ is a job scheduler. Any scheduled task is called a ‘cron job’. The syntax for a cron job schedule is as follows:
In our use of the cron scheduler, we’ve dropped the use of the last instruction ≤command to execute> and use only the time/date functions, see below for a number of examples of scheduling a sync process.
-
Schedule a sync to run at 2am daily:- 0 2 * * *
-
Schedule a sync to run twice a day at 5am and 5pm:- 0 5,17 * * *
-
Schedule a sync to run on every Sunday at 5pm:- 0 17 * * sun
-
Schedule a sync to run every 30 minutes:- */30 * * * *
-
Schedule a sync to run at 5pm on selected days:- 0 17 * * sun,fri
You can see from the above that the scheduling process is extremely flexible, alternatively https://crontab.guru/ is a great page for learning more about CRON scheduling.
Appendix D – Extension performance optimizations
Extensions are a critical part of ClearPass deployments today and with the increased dependency on extension interactions that involve periodic polling or real-time lookups, here are some of the best practice recommendations around optimizing overall performance when using extensions:
-
If the extension is used to periodically poll external systems and populate endpoint repository, ensure that it is not installed in all the nodes in the cluster. Ideally these type of extensions should only be installed on the publisher node since only publisher node can add endpoint entries to the database. For redundancy, it can be installed on another additional node but it is recommended to stagger the polling interval so that both do not attempt to poll and update endpoint database at the same time.
Example: 0 * * * *, This cron job runs at minute 0 of every hour (e.g., 00:00, 01:00, 02:00, etc.).
30 * * * *, This cron job runs at minute 30 of every hour (e.g., 00:30, 01:30, 02:30, etc.). -
If the extension is used for looking up attributes from external systems in real time during authentication, it should be installed in all the nodes handling authentication. Note that the context server config is replicated from the publisher. When using extension for real time lookup, ensure that the extension has the same IP address in all the cluster nodes.
-
If the extension is expected to do both real-time lookup and periodic polling, ensure that polling is enabled only on the publisher while the extension in subscribers can have the polling disabled by setting the “enableSyncAll” attribute to false.
"enableSyncAll": false,
WARNING
Having the extension installed on all the cluster nodes with enableSyncAll set to true would cause each cluster node to independently poll the external system and update endpoint repository. This could impact the performance of ClearPass. Hence it is strongly recommended to enable endpoint sync only on the extension installed on the publisher and on another cluster node for redundancy.
-
Some 3rd party systems support fetching delta updates vs fetching all of the device information every polling cycle. The extensions that support fetching delta updates are: Workspace ONE Crowdstrike Falcon Microsoft Intune Mosyle SentinelOne Service Now
For these extensions, the syncUpdatedOnly attribute should be set to true in extension config so that the number of DB updates in ClearPass is minimized
"syncUpdatedOnly": true,For extensions that do not support syncUpdatedOnly, ensure that the sync interval is not aggressive. We recommend syncing at most twice a day and that too during off peak hours whenever a full sync is performed.
-
Some 3rd party systems can be very noisy in terms of attribute updates. There could be certain attributes that keep changing every sync interval like “Free Memory in Bytes”, “Last Check in Time” etc. There is no value in updating endpoints when such trivial attributes change for the device. Hence it is recommended to use “ignoreEndpointDifferences” attribute in extension configuration to ignore change in attributes that you do not care about in terms of ClearPass policies.
You can review the Audit Viewer in ClearPass under Monitoring > Audit Viewer to see what attributes are being updated for endpoints to check if there are unnecessary updates.
Sample for JAMF extension:
"ignoreEndpointDifferences": "Last Update, Report Date UTC, Last Contact Time UTC, Last Inventory Update UTC, Last Reported IP, IP Address",Default for Microsoft Intune extension:
"ignoreEndpointDifferences": "Last Sync Date Time, Free Storage Space in Bytes", -
To further optimize the number of endpoints being updated in ClearPass, you can specify which attributes are being used in the ClearPass policies so that only changes to those attributes would trigger an update to the endpoint. This is done by listing out the specific attributes under endpointAttributes in extension configuration.
Sample for JAMF extension:
"endpointAttributes": "Group names, MDM Enabled, Managed, Remote Managed, Supervised, Serial Number", -
Setup extension to restart unless it was intentionally stopped. A restart policy can be defined in extension configuration to ensure that the extension starts up automatically after server reboots and such. Restart policy of “unless-stopped” would ensure the extension always starts up unless it was manually stopped.
“restartPolicy”: “no” — The extension will not be automatically restarted after the server is restarted.
“restartPolicy”: “always” — The extension will always be restarted after the server is restarted.
“restartPolicy”: “unless-stopped” — The extension will be restarted unless it was stopped prior to the server restart, in which case it will maintain that state.
“restartPolicy”: “on-failure:N” — If the extension fails to restart, the value for “N” specifies the number of times the extension should try to restart. If you do not provide a value for “N”, the default value will be “0”.
The “restartPolicy” parameter is not present by default in extension configurations. When it is not present, if the system is restarted a default policy is applied to the extension to maintain the state it was in before the restart. If the “restartPolicy” parameter is added to the configuration but later removed, the extension will then revert to the default restart policy.
Appendix E – Sample data from ServiceNow
Following is the sample list of the default attributes fetched from ServiceNow using the default policy.
{ "source": "SNOW", "network.skip_sync": "0", "network.operational_status": "1", "network.sys_updated_on": "2019-04-06 00:17:51", "network.first_discovered": "2019-04-03 23:45:17", "network.sys_created_on": "2019-04-03 23:45:17", "network.dhcp_enabled": "0", "network.install_status": "1", "network.name": "NetworkAdapter@10.2.100.218", "network.subcategory": "Network", "network.virtual": "0", "network.last_discovered": "2019-04-06 00:17:51", "network.can_print": "0", "network.sys_class_name": "cmdb_ci_network_adapter", "network.sys_id": "b00ea29adb207f4061840bb6f496194a", "network.netmask": "255.255.255.0", "network.mac_address": "00-0f-7c-0d-5c-d0", "network.monitor": "0", "network.ip_address": "10.2.100.218", "network.cost_cc": "USD", "network.unverified": "0", "network.category": "Hardware", "network.fault_count": "0", "cmdb_ci.can_switch": "0", "cmdb_ci.skip_sync": "0", "cmdb_ci.operational_status": "1", "cmdb_ci.device_type": "Network Camera", "cmdb_ci.sys_updated_on": "2019-04-06 00:17:51", "cmdb_ci.discovery_source": "ClearPass", "cmdb_ci.first_discovered": "2019-04-03 23:45:17", "cmdb_ci.sys_created_on": "2019-04-03 23:45:17", "cmdb_ci.can_partitionvlans": "0", "cmdb_ci.hardware_status": "installed", "cmdb_ci.install_status": "1", "cmdb_ci.subcategory": "Network", "cmdb_ci.last_discovered": "2019-04-06 00:17:51", "cmdb_ci.can_print": "0", "cmdb_ci.sys_class_name": "cmdb_ci_netgear", "cmdb_ci.can_hub": "0", "cmdb_ci.cpu_count": "1", "cmdb_ci.sys_id": "fc0ea25adb207f4061840bb6f4961923", "cmdb_ci.mac_address": "00-0f-7c-0d-5c-d0", "cmdb_ci.can_route": "0", "cmdb_ci.monitor": "0", "cmdb_ci.ip_address": "10.2.100.218", "cmdb_ci.cost_cc": "USD", "cmdb_ci.unverified": "0", "asset.skip_sync": "0", "asset.residual": "0", "asset.sys_updated_on": "2019-04-03 23:45:17", "asset.sys_created_on": "2019-04-03 23:45:17", "asset.depreciated_amount": "0", "asset.pre_allocated": "0", "asset.display_name": "Unknown", "asset.install_status": "1", "asset.sys_class_name": "alm_hardware", "asset.sys_id": "f40ea25adb207f4061840bb6f4961924", "asset.resale_price": "0", "asset.cost": "0", "asset.quantity": "1", "asset.active_to": "0", "asset.salvage_value": "0", "cmdb_ci.category": "Hardware", "cmdb_ci.fault_count": "0", "SNOW Last Update": "2019-04-06T00:18:57.201Z", "Found In SNOW": true } |
|---|
9 - ClearPass Extension
9.1 - Common Appendices for Extensions
Appendix A – Troubleshooting and Support
Here we list some basic troubleshooting steps. If you need any help beyond this, please reach out to HPE Aruba Networking Support.
Check API Access Application Control restrictions
If you’ve previously hardened your ClearPass deployment with Application Access Controls, it’s possible that the Extension will not work. Reviewing the Extension Log might show something like the following after immediately starting the Extension. This likely indicates the ClearPass Application API’s are in place.
Example of Extension authorization failure due to Policy Manager Application Control:
[2020-03-16T15:42:21.083] [INFO] Intune - Server listening on port 80.
[2020-03-16T15:42:21.243] [DEBUG] Intune - Request “GET ‘https://172.17.0.1/api/server/version’” took 51.91ms.
[2020-03-16T15:42:21.245] [DEBUG] Intune - <!DOCTYPE html><html>
<head>
<title>
Error 403 (Forbidden)
</title>
<script language=“javascript”>
function reloadPage() {
var locHref = window.location.protocol + “//” + window.location.hostname;
window.location.href = locHref;
}
</script>
To resolve this issue, add the IP address of the Extension to the list of nodes permitted to access the API by navigating to Administration > Server Manager > Server Configuration {choose your node} > Network
INFO
For this reason its good practice to fix the IP address of the extension at installation time such that it doesn’t change over time and break the application controls.
Checking on the Extension Service
The ClearPass Extensions are supported by a system service which must be running.
Restarting this service will affect all deployed and running extensions.
To check on the state of the Extension Service, or to restart the service, go to Administration > Server Manager > Server Configuration > [SERVER] > Service Control. By default this service is automatically started.
Extensions and web proxy / firewall whitelisting
If ClearPass Policy Manager has been configured with a proxy, it’s still possible that domain whitelists are required, the same for some datacenter firewall to allow the installation of Extensions. Some enterprise customers maintain a whitelist of domain that are allowed to transit the proxy/firewall. The underlying docker configuration process uses standard docker registry access to pull images (hosted in docker hub). In general, the following hosts are used:
INFO
-
extensions.clearpassbeta.com
-
registry-1.docker.io
-
index.docker.io
-
auth.docker.io
-
production.cloudflare.docker.com
This is all also geo dependent to some degree and based on various AWS services, so AWS redirects and geo location services will vary. Finally, this all runs via standard HTTPS (port 443).
Extension Logs/Enable Debugging
If you have a requirement to access and view the logs from the Extension, you can turn on different logging levels from the Extension GUI. Adjust the logLevel to ‘DEBUG’ and restart the extension as shown below.
Logs can then be viewed from the ‘Show Logs’.
Remember after changing the logging level, as with any extension configuration change the extension will need to be restarted for this change to take effect.
Accessing the extension logs using ‘Collect Logs’ system function
In addition to viewing the logs as shown above, logs can also be collected and examined via the Policy Manager Collect Logs system function (Administration > Server Manager > Server Configuration > [Select SERVER] > Collect Logs). This is extremely useful should you have a need to call for technical assistance.
If the support team needs to investigate a system issue, one of the items they regularly ask for is the system logs to aid with their diagnostic investigation. By default the “logLevel” is set to INFO, but TRACE, DEBUG, INFO, WARN, ERROR, FATAL can also be set as required. Any of the levels will display the information for the selected state and lower; if INFO is selected, it will show messages for INFO, WARN, ERROR, FATAL.
After the logs have been collected, downloaded and expanded, you can locate the extension logs in the following location in the folder structure PolicyManagerLogs > extension > your-extension-id as shown below. Note the file-name is the same as the running instance ID of the extension.
Monitoring extension statistics
There is a way to monitor extension’s critical resource statistics with the configurable parameter added as part of the extension’s configuration. To enable extension statistics set the “enableStats” parameter to true. Remember a restart of the extension is need to activate the change anytime the config is modified.
To navigate to statistics page, click Show Details.
This will show statistics similar to the following:
Monitoring authorization performance
Since we are authorizing against an external system, it could be relevant to monitor the performance of these transactions as you setup and deploy. If you suspect there is a performance issue, ClearPass provides a way to monitor the authorization processing time. The graph below shows an example of this data, navigate to Monitoring > Live Monitor > System Monitor [click on ClearPass Tab, then select [Authorization]….
Appendix B – Considerations for Installing in a Cluster
Extensions are not synced between ClearPass cluster members, and thus must be installed on each member separately.
Some Extensions can run in two modes: Periodic Sync Mode and Authorization Source Mode.
Periodic Sync Mode
If you are configuring the extension to poll external system periodically and utilize the resulting ClearPass Endpoint database during endpoint Authorization, then you only need to install the extension on one cluster member, often the publisher.
You may wish to install the extension on a second cluster member as a backup, but remember that both extensions will individually be updating the endpoint database. You may want to stagger the updates between the two extensions, for example, Subscriber1 updates at the top of the hour and Subscriber2 updates at 30 minutes after the hour.
Also, in this mode there is no need to explicitly enter an IP address during installation. The defaults will suffice and ClearPass will select an IP in the range specified in the server configuration.
HTTP Authorization Source Mode
In this mode we configure an HTTP Auth source that results in a HTTPS call to external system during endpoint authorization. In this deployment model the extension must be installed on every cluster node that process authentications. Also in this scenario every cluster member’s extension must be set to the exact same IP address during installation time, as the HTTP Auth source configuration is propagated globally across all cluster members.
For example, if the extension IP range is 172.17.0.0/16, we would set the extension to 172.17.0.5 on every cluster member during installation of the extension.
While we normally want to avoid duplicate IP addresses in a network, this is not a concern with ClearPass extensions. Each ClearPass node communicates internally only with its own extension, and this traffic is not routed outside of ClearPass.
Subscriber nodes support the same ability as publishers to install an Extension from the Extension store.
Appendix C – endpoint sync schedule settings
The syncSchedule and similar scheduling parameters sets how often ClearPass executes certain actions like syncing or pushing endpoints. This setting is based on a slightly modified version of the CRON job scheduler found in Unix-like operating systems. It can be used to schedule jobs to run periodically at fixed times, dates or intervals.
A ‘cron’ is a job scheduler. Any scheduled task is called a ‘cron job’. The syntax for a cron job schedule is as follows:
In our use of the cron scheduler, we’ve dropped the use of the last instruction ≤command to execute> and use only the time/date functions, see below for a number of examples of scheduling a sync process.
-
Schedule a sync to run at 2am daily:- 0 2 * * *
-
Schedule a sync to run twice a day at 5am and 5pm:- 0 5,17 * * *
-
Schedule a sync to run on every Sunday at 5pm:- 0 17 * * sun
-
Schedule a sync to run every 30 minutes:- */30 * * * *
-
Schedule a sync to run at 5pm on selected days:- 0 17 * * sun,fri
You can see from the above that the scheduling process is extremely flexible, alternatively https://crontab.guru/ is a great page for learning more about CRON scheduling.
Appendix D – Extension performance optimizations
Extensions are a critical part of ClearPass deployments today and with the increased dependency on extension interactions that involve periodic polling or real-time lookups, here are some of the best practice recommendations around optimizing overall performance when using extensions:
-
If the extension is used to periodically poll external systems and populate endpoint repository, ensure that it is not installed in all the nodes in the cluster. Ideally these type of extensions should only be installed on the publisher node since only publisher node can add endpoint entries to the database. For redundancy, it can be installed on another additional node but it is recommended to stagger the polling interval so that both do not attempt to poll and update endpoint database at the same time.
Example: 0 * * * *, This cron job runs at minute 0 of every hour (e.g., 00:00, 01:00, 02:00, etc.).
30 * * * *, This cron job runs at minute 30 of every hour (e.g., 00:30, 01:30, 02:30, etc.). -
If the extension is used for looking up attributes from external systems in real time during authentication, it should be installed in all the nodes handling authentication. Note that the context server config is replicated from the publisher. When using extension for real time lookup, ensure that the extension has the same IP address in all the cluster nodes.
-
If the extension is expected to do both real-time lookup and periodic polling, ensure that polling is enabled only on the publisher while the extension in subscribers can have the polling disabled by setting the “enableSyncAll” attribute to false.
"enableSyncAll": false,
WARNING
Having the extension installed on all the cluster nodes with enableSyncAll set to true would cause each cluster node to independently poll the external system and update endpoint repository. This could impact the performance of ClearPass. Hence it is strongly recommended to enable endpoint sync only on the extension installed on the publisher and on another cluster node for redundancy.
-
Some 3rd party systems support fetching delta updates vs fetching all of the device information every polling cycle. The extensions that support fetching delta updates are: Workspace ONE Crowdstrike Falcon Microsoft Intune Mosyle SentinelOne Service Now
For these extensions, the syncUpdatedOnly attribute should be set to true in extension config so that the number of DB updates in ClearPass is minimized
"syncUpdatedOnly": true,For extensions that do not support syncUpdatedOnly, ensure that the sync interval is not aggressive. We recommend syncing at most twice a day and that too during off peak hours whenever a full sync is performed.
-
Some 3rd party systems can be very noisy in terms of attribute updates. There could be certain attributes that keep changing every sync interval like “Free Memory in Bytes”, “Last Check in Time” etc. There is no value in updating endpoints when such trivial attributes change for the device. Hence it is recommended to use “ignoreEndpointDifferences” attribute in extension configuration to ignore change in attributes that you do not care about in terms of ClearPass policies.
You can review the Audit Viewer in ClearPass under Monitoring > Audit Viewer to see what attributes are being updated for endpoints to check if there are unnecessary updates.
Sample for JAMF extension:
"ignoreEndpointDifferences": "Last Update, Report Date UTC, Last Contact Time UTC, Last Inventory Update UTC, Last Reported IP, IP Address",Default for Microsoft Intune extension:
"ignoreEndpointDifferences": "Last Sync Date Time, Free Storage Space in Bytes", -
To further optimize the number of endpoints being updated in ClearPass, you can specify which attributes are being used in the ClearPass policies so that only changes to those attributes would trigger an update to the endpoint. This is done by listing out the specific attributes under endpointAttributes in extension configuration.
Sample for JAMF extension:
"endpointAttributes": "Group names, MDM Enabled, Managed, Remote Managed, Supervised, Serial Number", -
Setup extension to restart unless it was intentionally stopped. A restart policy can be defined in extension configuration to ensure that the extension starts up automatically after server reboots and such. Restart policy of “unless-stopped” would ensure the extension always starts up unless it was manually stopped.
“restartPolicy”: “no” — The extension will not be automatically restarted after the server is restarted.
“restartPolicy”: “always” — The extension will always be restarted after the server is restarted.
“restartPolicy”: “unless-stopped” — The extension will be restarted unless it was stopped prior to the server restart, in which case it will maintain that state.
“restartPolicy”: “on-failure:N” — If the extension fails to restart, the value for “N” specifies the number of times the extension should try to restart. If you do not provide a value for “N”, the default value will be “0”.
The “restartPolicy” parameter is not present by default in extension configurations. When it is not present, if the system is restarted a default policy is applied to the extension to maintain the state it was in before the restart. If the “restartPolicy” parameter is added to the configuration but later removed, the extension will then revert to the default restart policy.
9.2 - Common Extension Attributes
Common extension attributes
Extension framework configuration parameters (common configuration)
| Attribute | Description | Default Values |
|---|---|---|
| logLevel | Logging level for troubleshooting | “INFO” |
| verifySSLCerts | Should SSL certificates be validated when communicating with external context sources | true |
| enableEndpointCache | Cache endpoint attributes to optimize authorization queries, avoid repeated DB queries and reduce API calls to external context sources | true |
| endpointCacheTimeSeconds | The duration in seconds to cache the endpoint attributes | 300 |
| syncUpdatedOnly | If this option is set to true, only the endpoints updated after the previous sync would be fetched from the context source. Note that this option only works for the third-party context sources that have APIs to support this functionality. If this option is set to false, all endpoints are fetched at every sync interval. |
true |
| syncAllOnStart | If this option is set to true, when the extension starts, the system will attempt to sync all endpoints in the external context source to ClearPass. Note that if you have a large number device context to be fetched, it would take a long time for the initial sync to complete. When used along with syncUpdatedOnly, the subsequent syncs should be faster. |
true |
| enableSyncAll | Enable periodic sync of all endpoints | true |
| syncAllSchedule | The schedule for when the Sync All Endpoints process should run. Note: This uses CRON type scheduling. |
0 2 * * 6 |
| enableStats | Enable display of extension statistics | false |
| statsUsername | Create a username to access the extension statistics page | Give any username you want to use |
| statsPassword | Create a password to access the extension statistics page | Give any password you want to use |
| bypassProxy | Bypass the web proxy configured on ClearPass Policy Manager | false |
9.3 - Installing Extensions
Software Requirements
The minimum software version required for CPPM is 6.11.0 . At the time of writing, version 6.11.10 is available as the long supported release and 6.12.4 is available as the short supported release. CPPM runs on hardware appliances with pre-installed software or as a Virtual Machine under the following hypervisors. Hypervisors that run on a client computer such as VMware Player are not supported.
-
VMware vSphere Hypervisor (ESXi) 7.0 U3c and 8.0
-
Windows Server 2019 with Hyper‑V and Windows Server 2022 with Hyper‑V.
-
KVM on CentOS Stream 8, CentOS Stream 9, Ubuntu 20.04 LTS, and Ubuntu 22.04 LTS.
ClearPass Installation and Deployment Guide
This document assumes your ClearPass environment is already configured and operational. If you require assistance with basic deployment, refer to the following deployment guide:
https://arubanetworking.hpe.com/techdocs/ClearPass/6.11/Installation-Guide/Default.htm
ClearPass Extensions
The integration between ClearPass Policy Manager and external systems is driven through a ClearPass capability known as Extensions, a sub-component of the ClearPass Exchange Integration framework. ClearPass Extensions are micro-services running on top of the base ClearPass platform. These micro-services enable HPE Aruba Networking to deliver new features outside of the main software release cycle and facilitate a faster time to market for specific features and integrations. Configuration and control of ClearPass Extensions is accomplished through the ClearPass Guest GUI, as covered later in this document.
Installing Extension
ClearPass Extensions are easy to install from the ClearPass Extensions Store. In a cluster, ClearPass Extensions can be installed on a subscriber independently of the publisher. Multiple copies of the same extension can be installed if needed as well.
INFO
Internet access is required for ClearPass Policy Manager to install the ClearPass Extensions from the Extension Store. Starting with ClearPass 6.12, extensions can be can be installed offline as well. Offline ClearPass Extension images are available on HPE networking support portal.
Access to the extension store
Access the Extension Store to download and install ClearPass extensions. The Extension store utilizes the same HPE Passport account credentials used to validate support entitlement in the Software Updates Por- tal. This is configured under Administration > Agents and Software Updates > Software Updates as shown below. Ensure that valid HPE Passport credentials have been entered in these fields to enable Ex- tension download capabilities.
Installing the Extension from Store
Extensions are installed from the extension page in ClearPass Guest, as shown below. Access it from Guest > Administration > Extensions
From here, click on ‘Install Extension’, and the search box below appears.
Enter “Intune” and click on ‘Search’, see the example below.
INFO
Here we are using Intune as an example. The installation steps are the same for all the extensions. For your deployment, please search for the appropriate extension like Jamf, Mosyle, Crowdstrike, etc.
All currently available extensions are listed in the page: https://www.arubanetworks.com/techdocs/NAC/clearpass/integrations/clearpass-extension/extensions-list/
Click on the extension name and then click “Install.”
In the “Install Extension” dialog box, set the IP address if necessary, as described in section “Extensions and IP address configuration support” below. Do not check the box to start the extension at this time. Click the “Install” button.
In this example, we’ve not entered an IP address for the extension to use, if there is intent to use the extension as an authorization source set this value and ensure its set the same on all nodes where the Extension is deployed.
The extension will download and appear in a “Stopped” state. Notice the options to Start, Delete, Reinstall, Show Logs, and view Configuration. Click on “Configuration” to view settings.
After the extension has been installed, proceed to configure the extension
A copy of the default Extension configuration is shown above, this will need to be modified for your deployment.
INFO
Password and sensitive configuration items are obfuscated when presented in both the Extension GUI or in the Explorer configuration.
WARNING
The configuration attributes are case sensitive. It is recommended to refer the default configuration sample while editing your configuration.
Extensions and web proxy support
Extensions support communications with 3rd parties via a web proxy. This adds incremental proxy functionality. If a proxy is defined in ClearPass Policy Manager, then an extension will inherit that configuration. See later in the document on how to disable the proxy inherited configuration.
INFO
Note that the Policy Manger web proxy configuration is ONLY read by the extension at installation time. If the web proxy configuration is changed in Policy Manager, then the extension must be re-installed so the new settings are re-read and bonded to the extension.
Extensions and IP address configuration support
ClearPass uses a non-externally routed IP address range to communicate with the Extension. The default is 172.17.0.0/16. You may configure a different range, if desired. This is especially useful when deploying extensions across nodes within a cluster where there is the requirement for a fixed consistent IP address for the extension across the cluster.
Changing the “Extensions Network Address” range is only necessary if either the ClearPass MGMT or DATA interface are using an IP address in the extension default range of 172.17.x.x/12, or if ClearPass needs to communicate with some external device in that range.
To Configure the base Extension IP subnet within Policy Manager navigate to Administration > Server Manager > Server Configuration [chose your node] Service Parameters [ClearPass system service].
INFO
The subnet defined here for the extension framework must fall within the following subnet range 10.0.0.0/8, 172.16.0.0/12, 192.168.0.0/16 as defined by RFC1918. For best results, set the network address range to a subnet that does not exist in your enterprise, and restart the extension service for this change to take effect.
Never set the DATA or MGMT IP address to use an address that matches the Extension Network
INFO
Note that changing the extension base IP address will require the extension service to be restarted.
9.4 - List of active ClearPass Extensions
List of Active ClearPass Extensions
| Aruba ClearPass Universal Authentication Proxy |
| BlackBerry UEM |
| Carbon Black EDR |
| Certificate Enrollment Manager CEM |
| CrowdStrike Falcon |
| Cylance Authorization Source |
| Envoy |
| Google Secure LDAP Connector |
| goreception-cppm |
| HTTP AuthZ Proxy |
| BigFix |
| Intune SCEP |
| Jamf Pro Jamf School (formerly ZuluDesk) |
| Lightspeed Systems Relay |
| McAfee ePO |
| Meraki Integration |
| Microsoft Intune |
| MobileIron UEM |
| Mosyle |
| Microsoft Defender ATP |
| OPSWAT MetaAccess Authorization Source |
| Palo Alto Networks GlobalProtect |
| PingID MFA |
| privacyIDEA Authentication |
| rapid7-nexpose |
| Rapid7 InsightVM |
| SentinelOne |
| ServiceNow |
| Sine ClearPass Integration |
| Skyhook Processor |
| Sophos Central |
| SOTI MobiControl |
| Splunk HEC Connector |
| Symantec Endpoint Protection Manager |
| Tanium |
| Teem LobbyConnect |
| Tenable.sc |
| Trend Micro Apex Central |
| VMware Workspace ONE |
9.5 - Skyhook Introduction
Skyhook Framework
Skyhooks was developed to overcome the inability for Cloud based applications to send events [webhooks] directly into a ClearPass that was typically deployed on the Trust side of a corporate firewall. In short the service runs in AWS, ClearPass nodes running on-prem use extensions to open a persistent connection into Skyhooks to receive the events originally sent from a 3rd party cloud application specific for that customer/tenant, we’ll go into greater depth of the components. Recently the Skyhooks framework has been re-developed to ensure that security is at the heart of the framework and any concern around PII/GDPR are addressed. At this time we have over 100+ active customers utilizing this service. The new service we are moving to is internally referred to Skyhookv2, as part of the move from the original Skyhook service, the extensions currently in use will need to be re-factored to incorporate changes in the framework supporting data encryption for data-in-motion and data-at-rest.
So, what exactly is a webhook? A webhook (also called a web callback or HTTP push API) is a way for an app to provide other applications with real-time information. A webhook delivers data to other applications as it happens, meaning you get data immediately. Unlike typical APIs where you would need to poll for data very frequently in order to get it real-time. A number of the integrations we have can benefit greatly from a real-time view of other systems or certain workflows mean that without a real-time framework the integration is basically broken.
Here are two popular use-cases we have been developing recently.
-
Cloud based Guest/Visitor Integrations such as Envoy/SINE and soon TEEM Lobby-Connect rely on a real0-time iteration such that as events are created on the 3rd Party Guest, a webhook event is triggered to ensure the Cloud guest account is reciprocally created inside ClearPass Guest to allow the Guest to signing to the local guest WiFi.
-
Another workflow that benefits greatly from a webhook framework is MDM integrations. Historically CPPM has polled hourly by default, [some customer poll longer due to the size of their tenant DB], and retrieves endpoint data, ingests this data, parses it and ultimately writes this to the EndpointDb in CPPM. A number of the attributes we have are extremely relevant to the device and how the device should be treated when it access or is on the corporate network. i.e. If a user deploys a blacklisted application or they jailbreak/root the device, its appropriate to quarantine this device on the network. However if we allow a device on the network then the user installs the blacklisted application, CPPM does not know this device is now our of Corporate Security Policy, the MDM vendor know but historically has no way to let CPPM know. Having the MDM system send us a CPPM webhook notification allows us to have a real-time view on the current posture of a device and appropriate respond. The other huge benefits to this process allows a customer to effectively not POLL, as mentioned above the polling can take hours to complete for some of our largest MDM customers, utilizing webhooks to ’trickle-feed’ events through, m such as new-davie or device-retired again allows CPPM to maintain a real-time view of the tenants managed devices.
Also thats the overview and a couple of common use-cases, but what makes Skyhooks tick? So the starting point for this is the service which the 3rd party cloud applications send their webhooks to, this is a service in AWS called a lambda serverless compute, I think of it as a “service as a function”.
From AWS website:
“AWS Lambda lets you run code without provisioning or managing servers. You pay only for the compute time you consume - there is no charge when your code is not running.*
With Lambda, you can run code for virtually any type of application or backend service - all with zero administration. Just upload your code and Lambda takes care of everything required to run and scale your code with high availability. You can set up your code to automatically trigger from other AWS services or call it directly from any web or mobile app.”
So, thats Part1, your webhook message hits this service, then this data is written into a DB called Firebase, a product built by Google. at this stage data is stored & encrypted per application/customer. Part2 The extension that site on-prem running on ClearPass has a persistent connection to this DataBase and effectively retrieves the data per application/customer. There are per application/customer db keys that are used to encrypt the data in FireBase, these keys must be configured in the extension to allow it access, retrieve and decode the data.
9.6 - Skyhook Self Service Portal
Skyhook Self Service Portal
The skyhook self service portal can be used to create new skyhook tenants and renew expiring dbAccessTokens for extensions that use our skyhook service. Customers can access the portal on this link https://clearpass.arubanetworks.com/webhooks/skyhook and can login using their HPE passport credentials.
This portal allows administrators to create skyhook tenants for various integrations that support webhook notifications. Upon registering for a skyhook tenant you are provided with a ‘Tenant ID’ that can be used in the “skyhookTenant” field and a DB token that goes in the “dbAccessToken” field of the extension configuration. Once a tenant is registered, the dbAccessToken for the tenant is valid for a year. For an uninterrupted service, customers are required to renew their DB token by logging in to the portal and following the renewal steps. All registered skyhook tenants are mapped under the HPE Passport used to login to the self service portal.
The portal gives a list of all registered tenants including the App name (Integration e.g Jamf, Envoy etc), the expiration date and time until expiration to let administrators choose when they want to renew the DB token as per their convenience.
Using the Skyhook Self Service Portal
Creating a new Skyhook Tenant
-
Go to https://clearpass.arubanetworks.com/webhooks/skyhook and click on ‘Login with HPE SSO’ option.

-
Enter your HPE passport credentials to login.
INFO
The HPE passport credentials used to login to the skyhook self service portal should be associated with a tenant that has a valid support license on their HPE Aruba Networking ClearPass Policy Manager. If there are no ClearPass Policy Manager appliances with valid support licenses registered under the HPE passport credentials used to login then the below error is displayed despite the credentials are valid

- The landing page displays the skyhook tenants registered with the HPE Passport credentials under the ‘Your Tenants’ page.
INFO
Note that the old tenants created using the legacy manual method will not show up in the self service portal. As an initial onboarding step, a new tenant has to be created. This creates a new new tenant ID and DB Access Token. The tenant ID needs to be updated both within the extension configuration and also in the 3rd party application sending notifications to skyhook. The DB Access Token needs to be updated within the extension configuration.

- To create a new tenant Click on ‘Register Tenant’.

INFO
Note that the portal reaches out to the domain “skyhook.clearpassbeta.com” for creating new tenant. The domain and the URL should be allow listed through any endpoint security or SSE solutions installed on the device you are accessing the portal from and also through firewalls that the traffic is traversing through.
https://skyhook.clearpassbeta.com/api/register/<name-of-extension>

-
Choose the integration name as needed from the ‘App’ dropdown, Enter a suitable label and click on ‘Register’.

-
The tenant and the DB token is displayed. Ensure to copy / download the details as the token is displayed only once. Once done, click ‘OK’ to return to the ‘Your Tenants’ page.

-
Once you have the SkyhookTenant and the dbAccessToken, You can continue with the further ClearPass Extension configuration as per the steps decribed in the integration guide for the extension you are installing. Existing integrations which were using legacy manually provisioned tenant ID, would have to ensure that the tenant ID is updated on the third-party application with the new one from self-service portal.
INFO
When configuring Webhook HTTP Servers in the third-party application, please use the following Target URL:
https://skyhook.arubasecurity.net/api/skyhook/{{extension-id}}/{{skyhook-tenant-id}}
Where:
{{extension-id}} can be any of the following depending upon which application you are sending webhooks from
jamf / envoy / sine / processor (for Generic Skyhook Processor) / meraki / teem / airwatch (for VMware Workspace ONE)
{{skyhook-tenant-id}} would be the new tenant ID created from the self-service portal
Example: https://skyhook.arubasecurity.net/api/skyhook/jamf/ab45xxxx-bcd4-cd45-ef34-abcde11xxxxx
TIP
For Envoy integration, ensure that the tenant ID is updated separately for each location to ensure each location is using the new tenant ID to send the notifications
Renewing the DB token
-
Select the Tenant that needs DB token renewal. You can use the Search box to search for Tenants based on their Tenant name or Label on the upper left corner of the page.

-
Click on the ‘Renew’ option under the ‘Actions’ column to proceed with the renewal of the DB token.

-
The tenant and the DB token is displayed. Ensure to copy / download the details as the token is displayed only once. Once done click ‘OK’ to return to the ‘Your Tenants’ page.
INFO
Once the dbAccessToken is renewed, Ensure that you update the dbAccessToken field in the extension configuration immediately to avoid longer service outages as renewing the dbAccessToken disables the existing token.
9.7 - Skyhook Token Refresh
Updating Skyhook Token
Navigate to ClearPass Guest > Administration > Extensions > Click on the extension for which you want to update the skyhook token > Configuration

Replace the dbAccessToken value, ensure to check the box “Restart extension after updating configuration” and click “Save Changes”
Once the extension is running, check the extension logs to confirm that connection to skyhook is working fine.
INFO
The dbAccessToken only needs to be updated on the extension configuration. You do not have to update the dbAccessToken on the third party system.