Background
Customers become dependent on solutions and applications to help them run their business. Part of the deployment will typically include planning to ensure that the deployed systems are available and they provide a level of availability in line with the demands of the application and business. For example it’s not as important to plan for the same uptime in an application used to process luncheon-vouchers as that of an enterprise wide identity store providing authentication and authorization for the entire employees of a company, e.g. ClearPass Policy Manager.
Customers plan for availability in multiple ways and generally leverage multiple different hardware and software components. As an example many large enterprise customers will incorporate technology such as multiple Storage Area Networks to consolidate data, for high-availability this may include synchronous or asynchronous replication between them.Typically x86 and x64 environments will have been consolidated onto VMware ESXi. This virtualized technology encompasses multiple features to enable high availability for these virtualized servers. We will discuss the use of vMotion specifically in this Tech Note to assist in providing a layered HA solution.
In the area of availability, CPPM itself utilizes clustering at a software level to provide scale and Availability.
ClearPass High Availability
Multiple CPPM instances can be deployed locally or in a distributed environment to provide scale and to enable High-Availability. We will classify this solution as an active/passive software solution with regard to HA.
In a cluster of CPPM instances a CPPM can be either a Publisher or a Subscriber. Any CPPM instance can process authentications/authorization for clients but a Publisher is required in the cluster as this system is responsible for the configuration of the cluster and for database writes, such as the creation of Guest accounts or the creation of Onboard client certificates. If we lose the Publisher then we can still authenticate users to the network but we are unable to make configuration changes or create new Guest accounts.
In the event of a Publisher failure, CPPM provides for an automatic and a manual solution for this failure, as discussed below.
Manual Solution
A CPPM subscriber instance can be manually promoted to a Publisher via the GUI as shown below. Under Administration > Server Manager > Server Configuration > [select CPPM], then click the Promote to Publisher link, and click Yes to confirm the promotion as shown below.

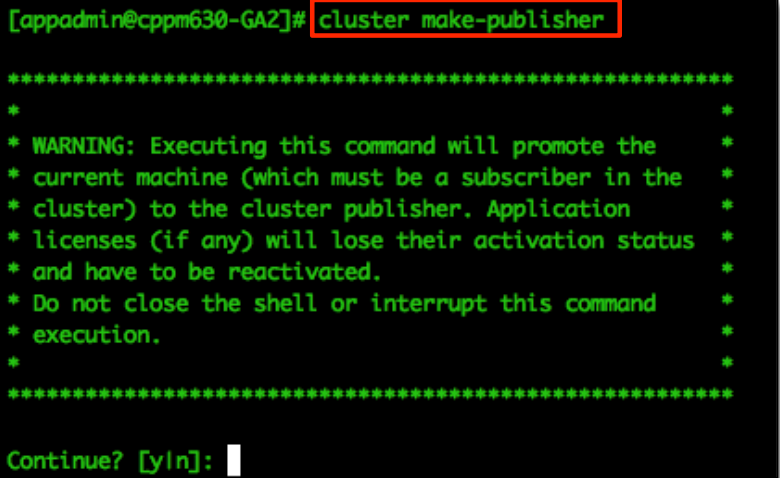
A CPPM Subscriber can also be manually promoted to a Publisher via the CLI, using the command cluster make-publisher an example is shown below.
Automatic Solution
CPPM provides for a Subscriber to not only process authentications/authorizations etc. but it can also function in a role as a ‘Standby Publisher’. This provides for the Subscriber to monitoring the health and availability of the active-Publisher, it monitors for the availability of the Publisher DB every 60 seconds. In the event of a failure, i.e. it is not able to connect to the Publishers DB based upon the ‘Failover Wait Time’ it will begin the process of promoting itself to a Publisher. The default Timeout is 10 minutes, with a minimum value of 5 minutes and a maximum of 60 minutes. During this process all the necessary changes to its configuration and databases to allow it to function as a Publisher will be made. Any other Subscribers in the cluster that need to communicate with the Publisher are informed that this system is now the Active-Publisher and it is now responsible for any configuration changes and that they must now replicate changes from this node.
Configuring the automatic fail-over does depend on the fact that the ClearPass servers have previously been configured in a cluster.
Under Administration > Server Manager > Server Configuration > Cluster-Wide Parameters > Standby Publisher > set Enable Publisher Failover to TRUE, and then select the Designated Standby Publisher.

The option to have a CPPM node self-promoting itself to be the Active-Publisher is extremely useful. However there is a delay that could be deemed as too long by some. The time it takes for a system to effectively become the Active-Publisher from the time the Primary-Publisher fails can be as long as 7-8 minutes.
Applications for vMotion
Having discussed at a high-level that we have in our architecture the necessary features to provide for scale and availability in CPPM why would you want to invest in additional hardware/software to enable a more real-time active-active HA solution?
Some Enterprises who offer for example Guest access for Public Venues need to have the ability to constantly create accounts, a failure of 7-8 minutes may not be acceptable. Remember, when creating Guest accounts for users this must be performed on a Publisher.If this has failed or been taken out of service then no new accounts can be created.
Using a solution such as VMware vMotion allows an enterprise to provide an additional level of application availability. For example, if an ESXi host needs to be taken out of service for maintenance or upgrades then the process today to ensure that the availability of a standalone CPPM or the Publisher within a cluster is maintained is not real-time.
VMware vMotion provides the ability to Live Migrate a CPPM VM under load with little (approximately 2-3 seconds) to zero downtime. Most of the delay is dependent on the processing ability of the ESXi host, the amount of Memory in the VM and the underlying network to transport/replicate the memory pages between systems.
Requirements for vMotion
To successfully use vMotion requires a product like vSphere vCenter Server and multiple VMware vSphere Hypervisor (ESXi) hosts. There are many VMware products that include the functionality required to vMotion a VM. Refer to www.vmware.com/products to decide what is right for your environment.
Ensure that hosts that use vMotion are configured to use shared storage. During a migration with vMotion, the migrating VM must be on storage accessible to both the source and target hosts. Shared storage is typically a storage area network (SAN), but can also be implemented using iSCSI and NAS shared storage.
How vMotion works
To say we are moving a VM from one ESXi server to another with vMotion is a bit of a lie, we don’t actually move the data at all, this stays on the shared storage, it’s only the VM’s memory contents that are moved from one ESXi server to another. The VM on the first ESXi server is duplicated on to the second ESXi server and then the original is deleted, during vMotion the first ESXi server creates an initial pre-copy of memory from the running VM into the second ESXi server, during the copy process, a log file is generated to track all changes during the initial copy phase (it is referred to as a memory bitmap). Once the VM’s are practically at the same state, this memory bitmap is transferred to the second ESXi server, before the transfer of the bitmap file the VM on the first ESXi server is put into a quiescent state. This state reduces the amount of activity occurring inside the VM that is being migrated, it allows the bitmap to become so small that it can be transferred very quickly, it also allows for rollback if a network failure occurs, this means that the migration will have to be successful or unsuccessful. When the bitmap has been transferred the users are then switched to the new ESXi server and the original VM is removed from the first ESXi server.
You need the following to perform a vMotion, the below requirements are for both ESXi servers involved
-
Shared storage visibility between the source and destination ESXi servers
-
A VMkernel port group on a vSwitch configured with 1Gbps or faster (10GB ideally)on the vMotion network, it will require a separate IP address.
-
Access to the same network, preferably not going across L3 switches/routers, etc.
-
Consistently labeled vSwitch port groups
-
Compatible CPUs
vMotion Configuration
To configure vMotion on your ESXi hosts there are a few very basic requirements.

You must ensure that vMotion is enabled on your VMkernel management network. If not messages similar to the below will be shown when you try to run a vMotion on a VM.

If you do experience messages similar to the above then configuration changes will be required to the underlying VMware networking interfaces.
Note: We renamed our port to make it a more sensible name/label. We used ‘Mgmt and vMotion’. Click on ‘Properties’ and ensure as shown below that vMotion is enabled on the port on this vSwitch.

If vMotion is not enabled, click ‘Edit’ on the ‘vMotion and IP Storage Port’ and then enable and save as shown on the following screen.

Beyond the basics of configuring the base ESXi system and configuring a standard CPPM VM and ensuring that the vMotion as shown above is configured that is all you need to do.
Using vSphere Web Client to vMotion an active-CPPM VM
There are multiple methods available from within vCenter’s GUI to initiate a vMotion. Below we have shown one option. We have navigated to and we are displaying all the VM’s that are registered and managed by vCenter. Another option would be to view the individual ESXi host and see the VM’s installed on that host as another method.
By right clicking on the VM we have selected (CPPM – Prod VM (10.2.100.225), under ‘All vCenter Actions’ we can see an option to ‘Migrate’ the VM.
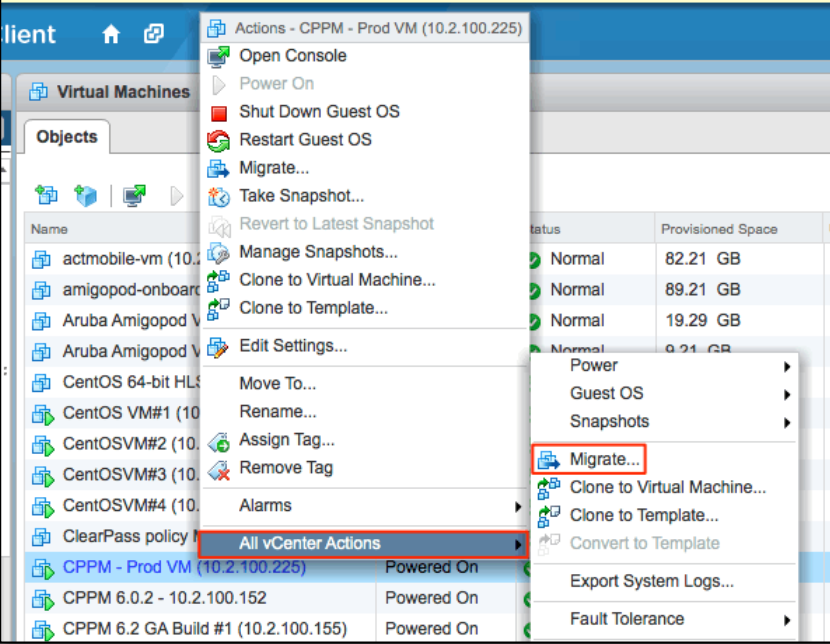
Choose what type of vMotion you want to perform; in our case we will change the hosting ESXi server, the first option.
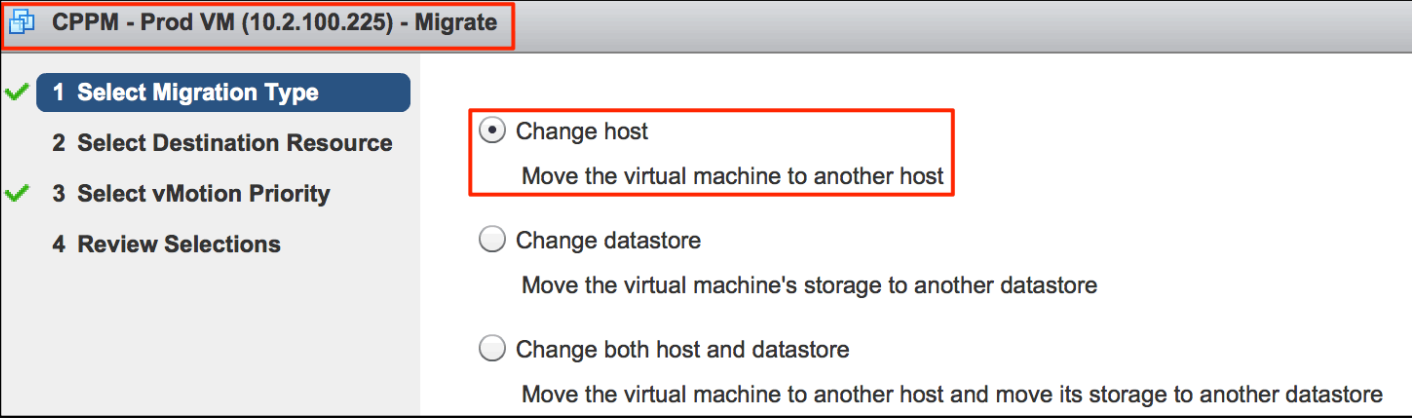
Next select the target ESXi server that will be the destination server for the VM.

Once all your parameters have been selected, confirm and click on the Finish button. vCenter will now move the VM between the source and target ESXi servers.

Monitoring the Move
On the right-hand side of the main vCenter screen you see a visual indication under ‘Recent Tasks’ of the progress of the migration. Once the move is complete a green-tick indicator is displayed as shown below for the previous vMotion we performed. You can see that the current migration is 45% complete and that the previous vMotion completed successfully.

To see additional details about the underlying vMotion process, i.e. the time it took for them to complete you can look under the Monitor then Tasks tab. You can see the start/completion times (2:31:02-2:31:11),to/from ESXi hosts (10.2.100.50-10.2.100.51)
| Related events: | Related events: |
|---|---|
| January 24,2014 at 2:31:11 PM PST January 24,2014 at 2:31:02 PM PST | Migration of virtual machine CPPM-Prod VM (10.2.100.225) from 10.2.100.51, datastore-nas to 10.2,100.50, datastore-nas completed |
| January 24,2014 at 2:31:11 PM PST January 24,2014 at 2:31:02 PM PST | =Migrating CPPM-Prod VM (10.2.100.225) off host 10.2.100.51 in TME-LAB |
| January 24, 2014 at 2:31:02 PM PST | Migrating CPPM -Prod VM (10.2.100.225) from 10.2.100.51, datastore-nas to 10.2.100.50, datastore-nas in TME-LAB |
vMotion Failover Timings
As part of our research we performed multiple timings to understand the expected fail-over performance.
Several factors are directly related to the delay.
• Performance characteristics of the underlying ESXi Server
• Size of the CPPM VM in use
• Workload of the VM – more auth being process = more memory pages changing
• VM-500 (4GB of Memory [default] – minimum recommended size)
• VM-5k (8GB of Memory [default] – minimum recommended size)
• VM-25K (24GB of Memory [default] – minimum recommended size)
• Speed and Utilization of the underlying Network 1GB-Minimum / 10GB-Reccomended
Below is a collection of our timings; we’d expect your performance to be closely inline or better than our findings below. Whilst running the Under-load test we typically did not see any auth failures, we also ran a constant ping to the host with out loss of any packets.
As a rule when ran the vMotion test multiple times. The times below represent what is a $9 5 ^ { t h } +$percentile of the average process time.
| vMotion VM Type (RAM) | 1Gbps Idle | 1Gbps Under load | 10Gbps Idle | 10Gbps Under load |
|---|---|---|---|---|
| VM-500 (4MB) | ~9 seconds | 9 seconds | ||
| VM-5K (8MB) | ~12 seconds | ~14 seconds | ||
| VM-25K (24MB) | ~18 seconds | ~18 seconds |
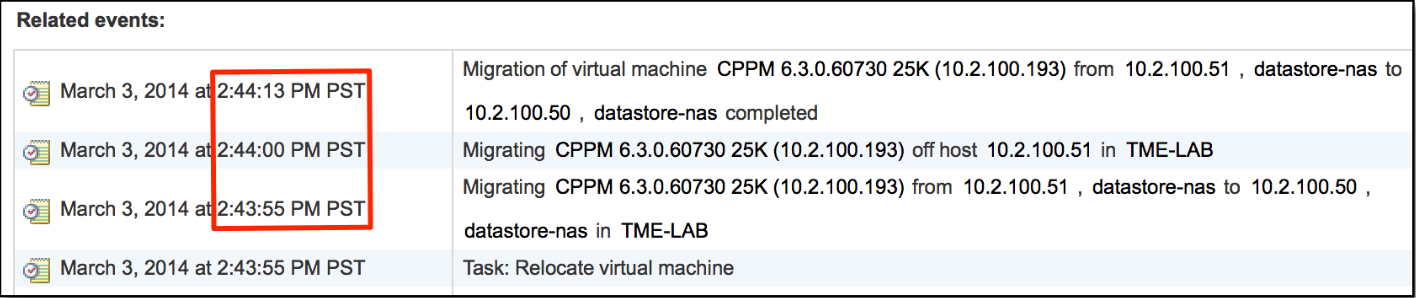
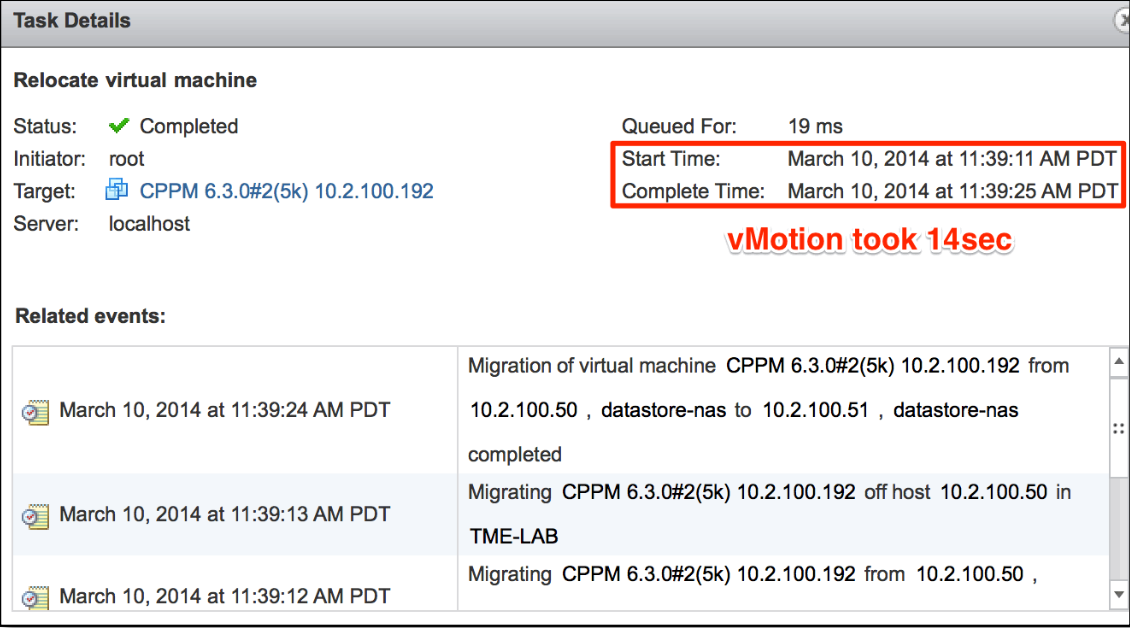
To expand on the testing we performed. We utilized an in-house testing tool which simulates a number of users performing RADIUS authentication and Guest Users registering through an registration portal, we also ran a constant PING to the VM. Whilst the testing automation was running we performed a vMotion’ed on the active VM, we never experienced a missed PING but did at times experience very minor Guest registration failures. In a live network, the expected user experience is that they might have to re-enter the details into the registration portal again to complete their registration.
Following are copies of our vMotion logs showing the failover times under an idle environment.