This is the multi-page printable view of this section. Click here to print.
Central NAC
- 1: Introduction to Central NAC
- 2: Core vs Subscriptions Capabilities
- 3: Identity Providers
- 3.1: Google Workspace
- 3.2: Microsoft Entra ID
- 3.3: Microsoft Intune Extension
- 3.4: Okta Workforce Identity Cloud
- 4: Onboarding devices using Aruba Onboard
- 5: Onboarding with Intune
- 6: Authentication and Authorization
- 7: Bring Your Own Certificate (BYOC)
- 8: Central NAC Onboard - 802.1X Authentication Resilience to Latency
- 9: Multi Pre-Shared Key (MPSK)
- 10: Visitor access workflows
- 11: Air Pass in Central NAC
- 12: Migrating from Cloud Auth to Central NAC
1 - Introduction to Central NAC
Central NAC
Company dynamics have changed in the past few years, welcoming an unprecedented volume of remote workers, as well as those working in hybrid environments. However, unreliable network access and new security concerns can disrupt business and cause help desk calls to soar.
Applying consistent security controls and ensuring users have seamless access to apps and data in the office, at home, and on the go is a critical mandate. HPE Networking Central simplifies this process for IT with Central NAC, a cloud-based Network Access Control (NAC), extending its ability to deliver a single point of visibility and control over all network infrastructure and related security services.
Featuring an easy-to-use interface and dashboard, HPE Networking Central makes it easy to onboard new clients, as well as to monitor and troubleshoot issues that prevent users from connecting to the network. End users are authenticated and provided authorizations for appropriate network access through fine-grained policies as configured by the administrator in HPE Networking Central.
With privacy concerns rising, HPE Aruba Networking Central leverages 802.1X for onboarding corporate devices and MAC-based authentications for non-802.1X devices. These authentication methods coupled with AI-based Client Insights captures and profiles all devices on the network for enhanced visibility and security.
Cloud identity
Central NAC on HPE Networking Central enables end users to connect to wired and wireless networks securely and automatically. The cloud-native security service integrates with a company’s existing cloud identity store such as Google Workspace or Azure Active Directory to authenticate the user’s information and assign them the right level of network access.
Automated security at scale from Edge to Cloud
Central NAC h is an integral part of HPE Aruba Networking Central NetConductor, which streamlines the adoption of identity-based access and simplifies IT operations by delivering advanced, cloud-native configuration, management, and security services, including intent-based policy automation and orchestration, and AI-based discovery and profiling of all connected clients

Central NAC is built to scale and handles billions of authentication request per week.
 INFO
INFO
Here are some of the per tenant scale limits that exist in Central NAC:
Users = 475,000 users in the IdP (Microsoft Entra ID / Okta / Google Workspace)
MAB = 100,000 defined MAC addresses
MPSK = 5,000 per tenant with the foundation license
2 - Core vs Subscriptions Capabilities
This technote provides a detailed comparison between the Central NAC Core and Subscription capabilites of the Central NAC platform. As organizations adopt Central NAC to support their network, security, or identity infrastructure, it becomes essential to understand the capabilities offered between core and subscription to ensure optimal planning and alignment with business needs.
The default Central NAC Core capabilities include a robust set of core features designed to support standard deployments and day-to-day operational requirements. The subscription builds upon this by offering enhanced capabilities aimed at securing complex environments with greater flexibility.
This document outlines the key functional differences between the two tiers, highlights feature availability, and provides guidance on when and why an organization may benefit from upgrading to the subscription tier.
Central NAC Core vs Subscription Capabilities Comparison
| Feature | Core Capabilities | Subscription Capabilities |
|---|---|---|
| In parity with the legacy CloudAuth features | ✔️ | ✔️ |
| Visitor authentication methods (Anonymous, Created user, Self-registration) | ✔️ | ✔️ |
| Basic portal customizations (multiple custom portals) | ✔️ | ✔️ |
| Visitor portal language overrides | ✔️ (override single language) | ✔️ (override multiple languages) |
| EAP-TLS Client Certificates (per-tenant level) | ✔️ | ✔️ |
| MAC address authentication | ✔️ | ✔️ |
| Captive portal authentication | ✔️ | ✔️ |
| EAP-TLS based 802.1X authentication | ✔️ | ✔️ |
| Support for Cloud-based Identity Provider (IdP) | ✔️ (Single External IdP) | ✔️ (Multiple External IdPs) |
| “User” policy | ✔️ | ✔️ |
| “Client” policy | ✔️ | ✔️ |
| “Custom Type” policy | ❌ | ✔️ |
| Additional NAC policy and rule configuration elements | ❌ | ✔️ |
| MPSK support | ✔️ (Limited to 5000) | ✔️ (Unlimited) |
| MPSK expiration policy | ❌ | ✔️ |
| Support for Wi-Fi Easy Connect (DPP) | ✔️ | ✔️ |
| API access (all configuration capabilities) | ✔️ | ✔️ |
| Bring Your Own Certificates (BYOC) or external PKI | ❌ | ✔️ |
| Support for 3rd Party NAD (via RADIUS proxy) | ❌ | ✔️ |
| Client Onboarding using the Onboard App | ✔️ | ✔️ |
| UEM Onboarding using Intune / Jamf | ✔️ | ✔️ |
| Static Tags | ✔️ (Limited to 10 per Tenant and MAC Address) | ✔️ (Limited to 400 per Tenant and 10 per MAC Address) |
| Air Pass SIM | ✔️ | ✔️ |
| Air Pass OpenRoaming | ✔️ | ✔️ |
Core Feature Set Overview
The Central NAC Core vs Subscription Capabilities Comparison table showed earlier covers the capabilities that are availble in the Central NAC Core feature set and are included by default with the Aruba Central foundation or advanced licenses requiring no additional licensing to enable these features.The core capabilities in Central NAC offers a comprehensive set of baseline capabilities designed to support core network access use cases, identity integration, and guest access scenarios. It is ideal for organizations looking for a solid starting point without the need for advanced policies, multi-vendor NAD support, or Bring your own Certificates.
HPE Aruba Networking’s User Role forms the foundation for many of the existing security capabilities available across the portfolio. Every customer should have access to a NAC that makes it simple to unlock and apply these capabilities. In fact, many customers are eager to leverage these features to strengthen their network security posture.
This is precisely why we include the above feature set in the Core capabilities. By making these capabilities universally available, we ensure that every organization—regardless of size or maturity—can implement consistent role-based access control, simplify onboarding, and establish a secure baseline for their network. The Core capabilities serve as the entry point to modern NAC, giving customers immediate value while providing a pathway to adopt more advanced capabilities as their needs evolve.
The following section outlines the key differences in feature between the Core capabilities and Central NAC subscription capabilities. It highlights which capabilities are present in Core and which are exclusive to the subscription tier. This will help users quickly identify what is accessible in their current setup and what additional functionality becomes available with the subscription.
As part of the core capabilities, only a single corporate IdP can be configured.

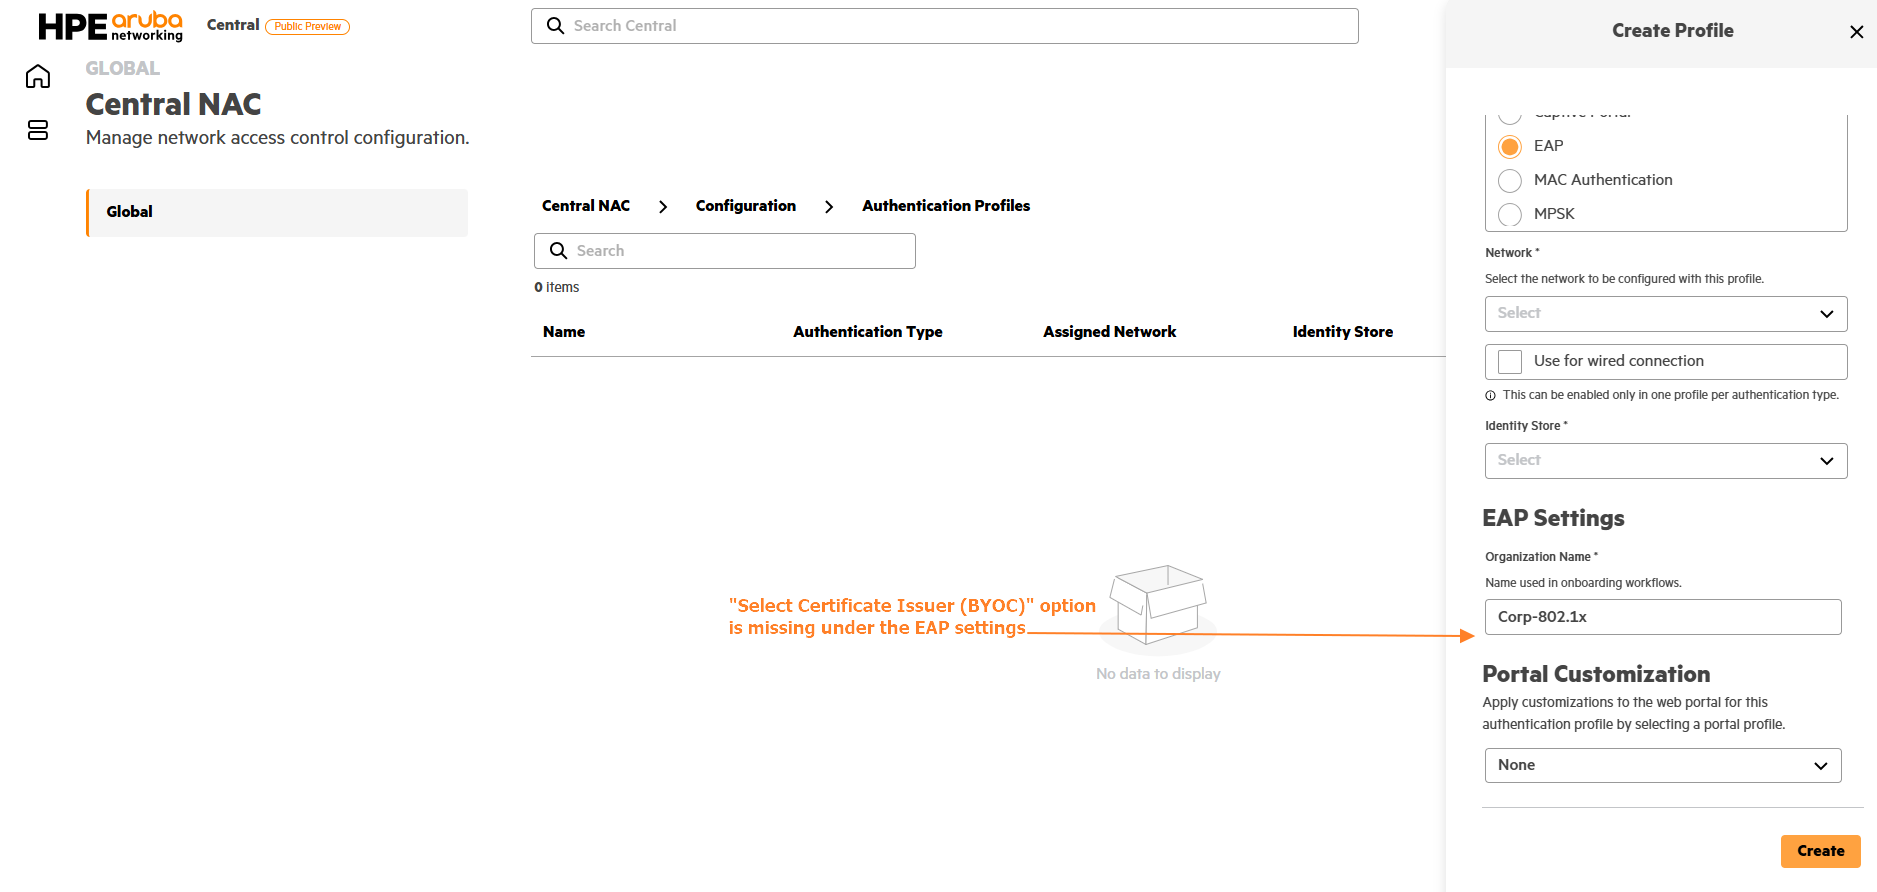
Bring Your Own Certificate (BYOC) capabilities are not available in the Core tier.
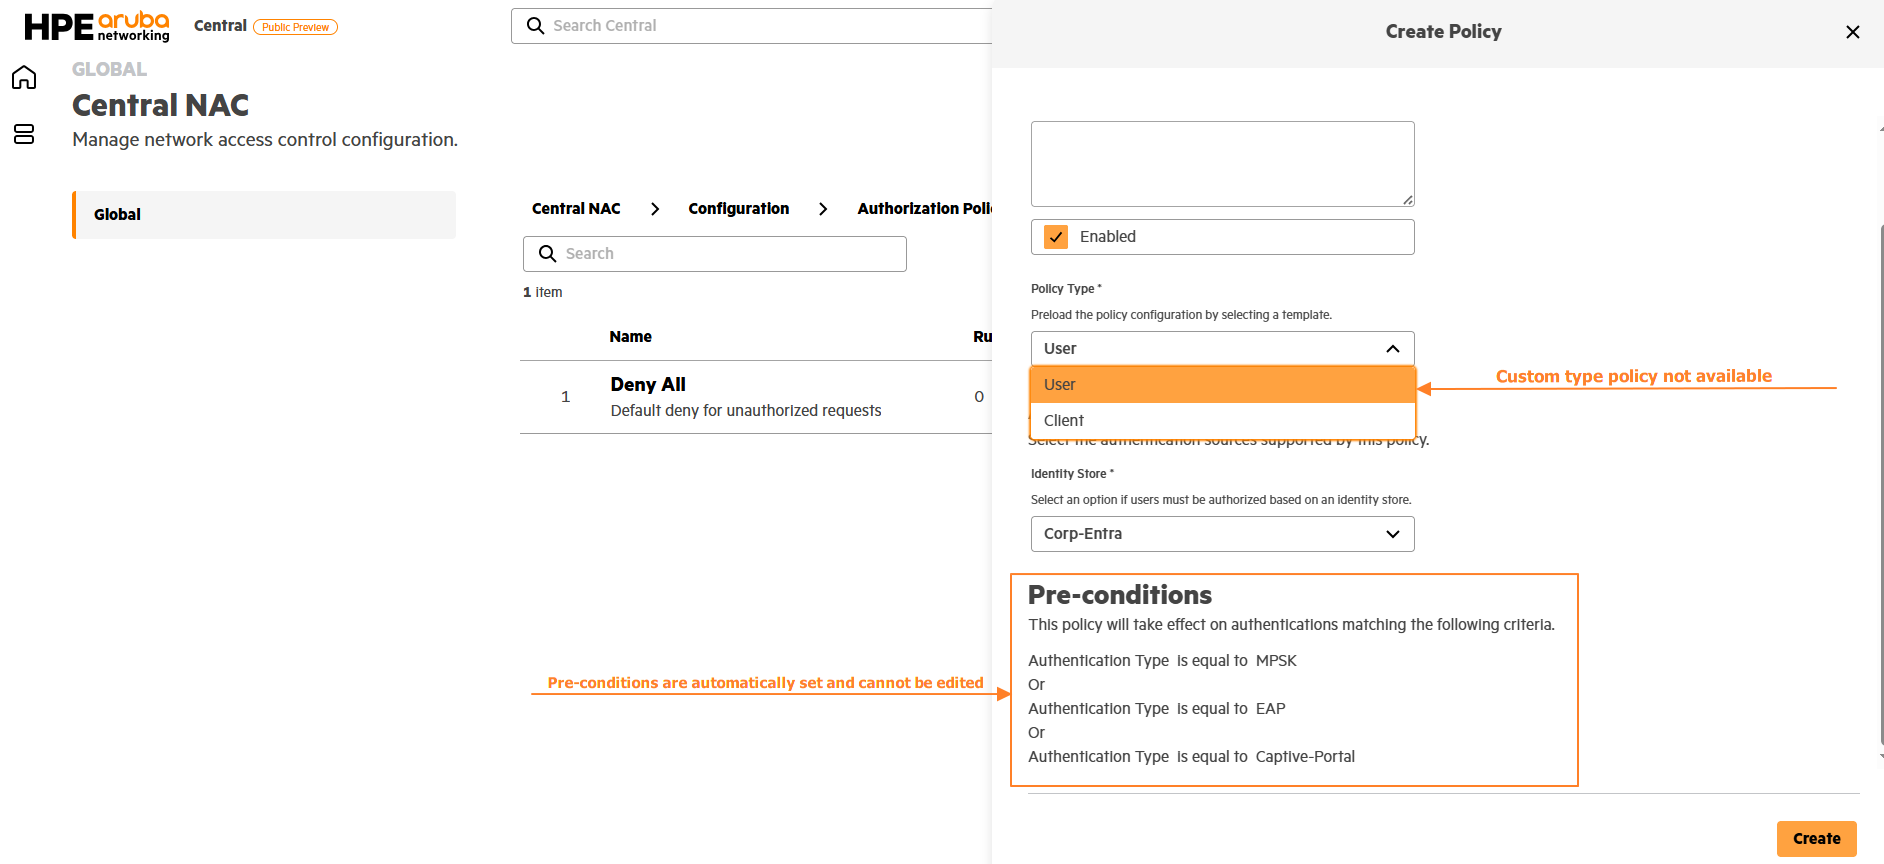
Custom policy type is not available. You can define only one User or Client policy, and its pre-conditions are automatically set based on the selection and cannot be modified..
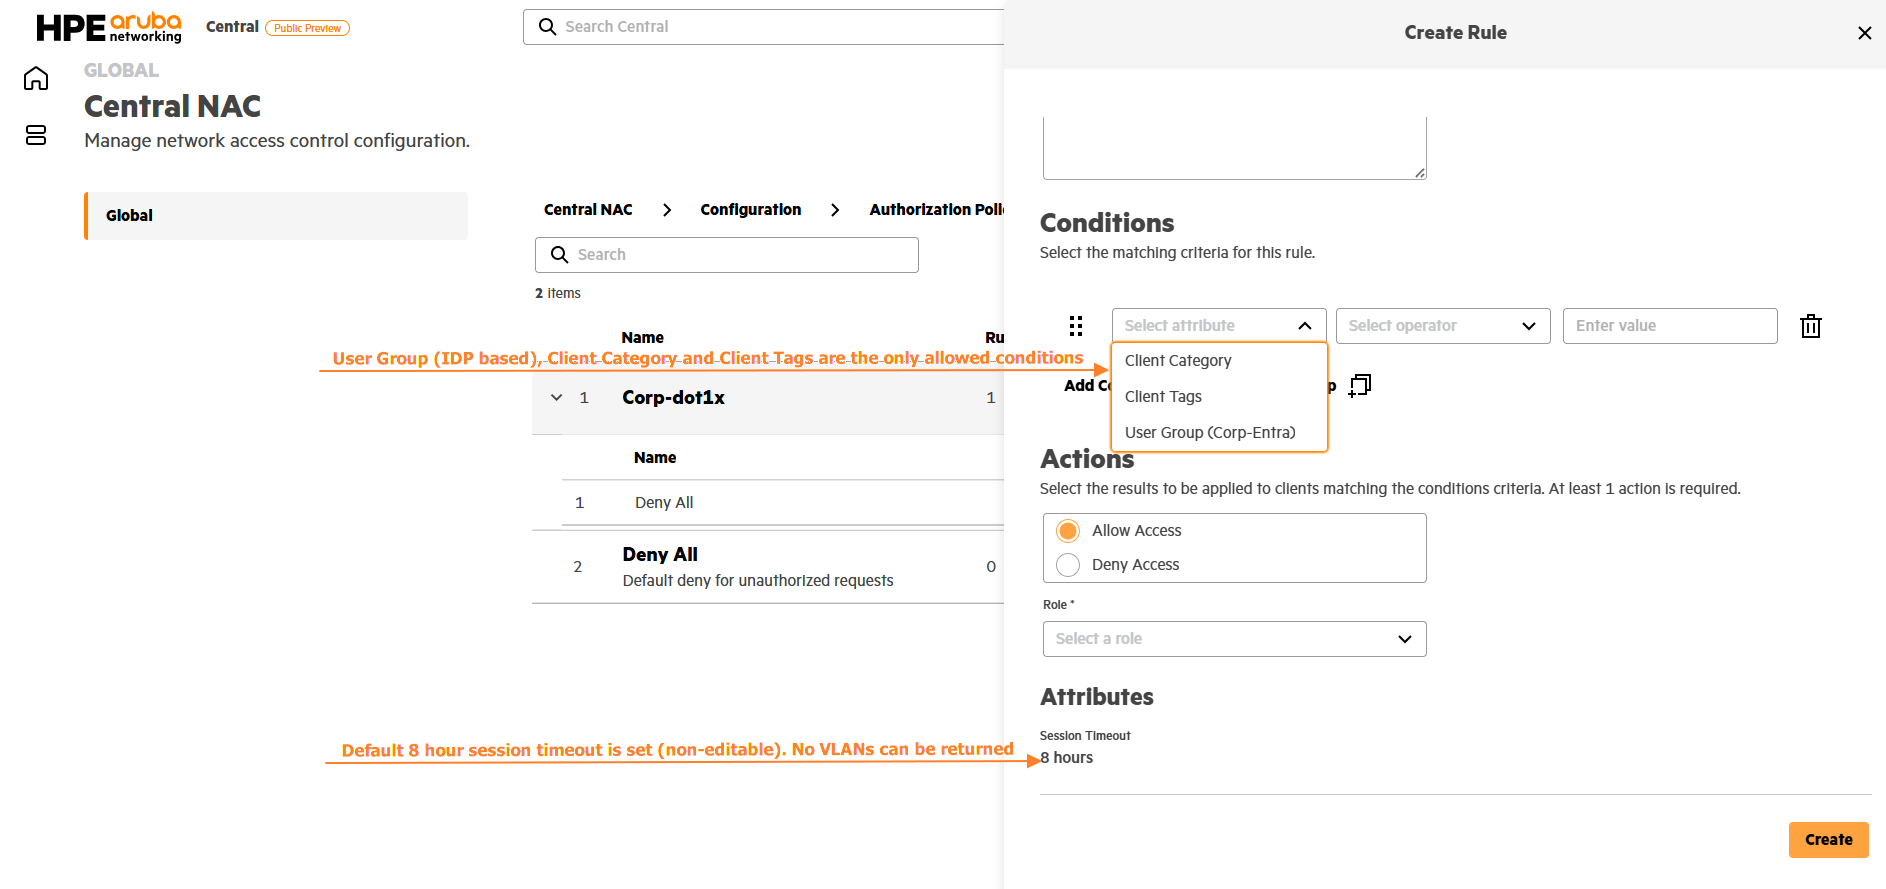
Only User Groups from the IdP, Client Category, and Client Tags are allowed as conditions in AuthZ rules. A default session timeout of 8 hours is enforced (not editable), and VLAN assignment is not supported.
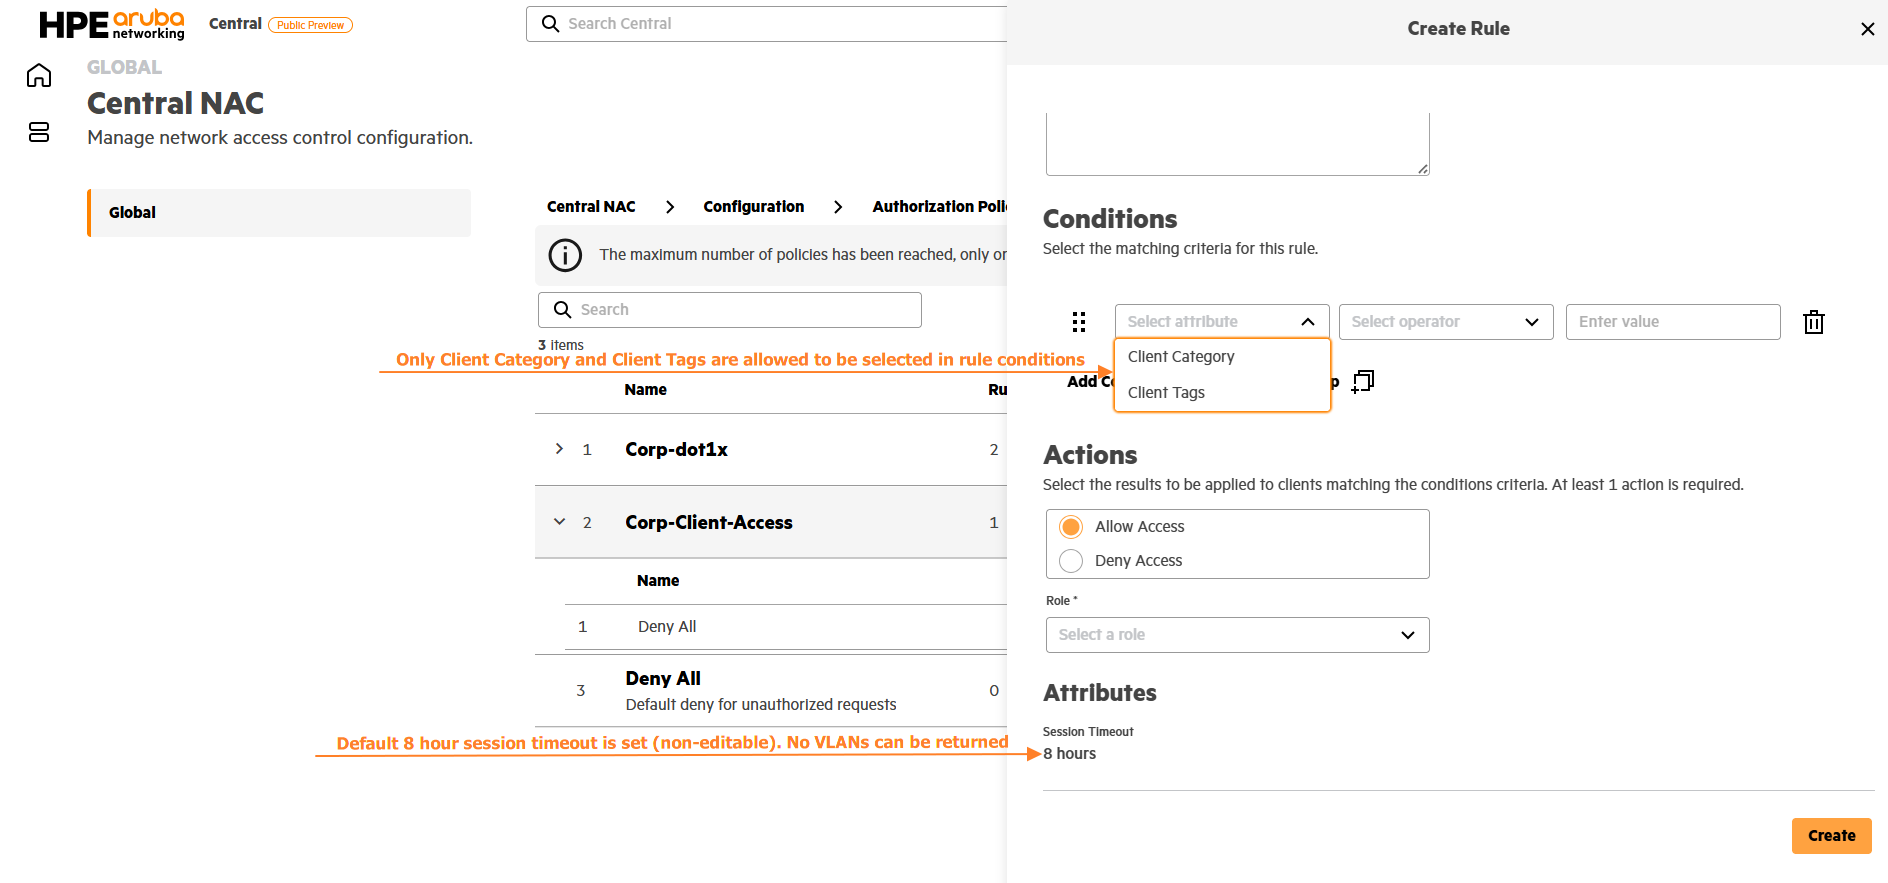
Only Client Category, and Client Tags are allowed as conditions in Client access AuthZ rules. A default session timeout of 8 hours is enforced (not editable), and VLAN assignment is not supported.
Central NAC Subscription Overview
The Subscription capabilities builds on the core capabilities by offering enhanced security and policy capabilities for organizations with more complex requirements. It provides support for multiple identity providers, granular policy control, Bring your own certificate capabilities and much more. With these features, customers can extend their network access control beyond the baseline, enabling stronger compliance and more flexibility in aligning access policies with business needs. The advanced options covered under subscription capabilities would only be visible in the UI once the NAC subscription is applied.
How licenses usage is calculated
A NAC subscription is required if any of the subscription capabilities listed above are to be enabled. Once the NAC subscription is applied, subscription usage is based on number of connected devices or concurrent sessions. Each connected device consume a license at the start of session and once the session ends, the license is released. RADIUS accounting START and STOP messages are used to determine if the device is still connected. In cases where RADIUS Accounting is not enabled, the license would be consumed for 24 hours.
If the license usage threshold is reached, Central NAC will present an alert notifying of the license exhaustion but the authentication would continue to work.
INFO
Once Central NAC subscription is applied, all connected devices will consume a license regardless of whether they are using core capabilities or subscription capabilities
Central NAC Subscription Capabilities
Let us now walk through the additional enhanced capabilities that the Central NAC subscription offers.
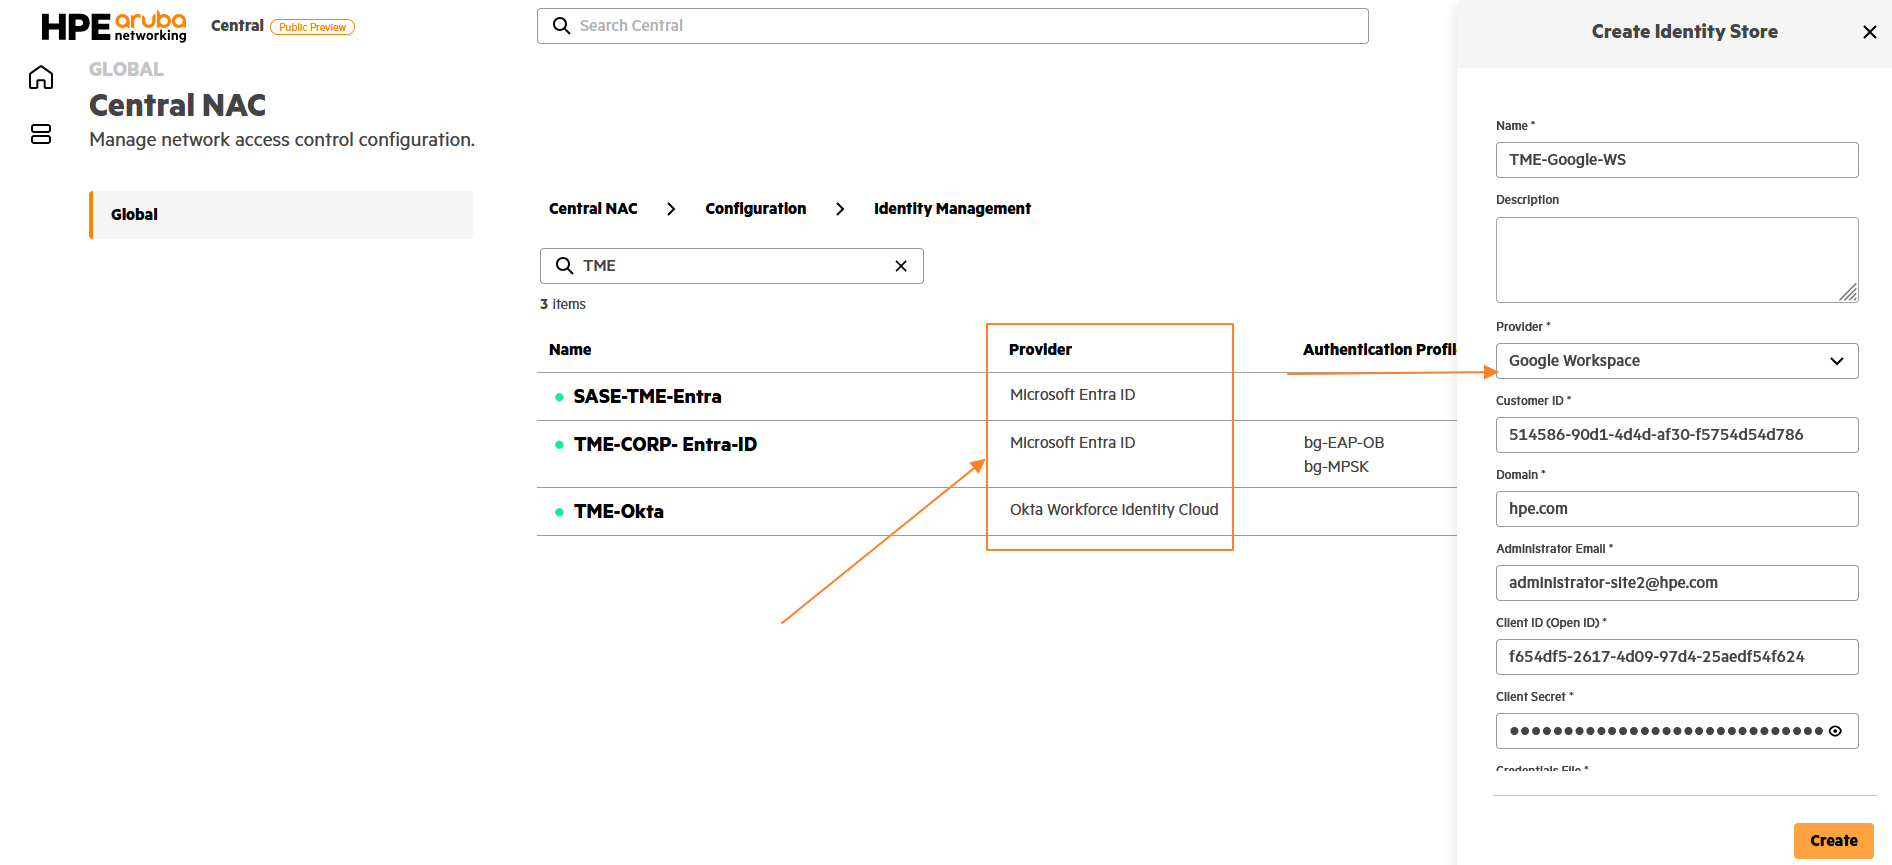
Multiple corporate IdPs are supported, whether of the same type or different providers. For example, you can configure multiple Entra ID identity stores alongside additional identity stores for Google Workspace or Okta..
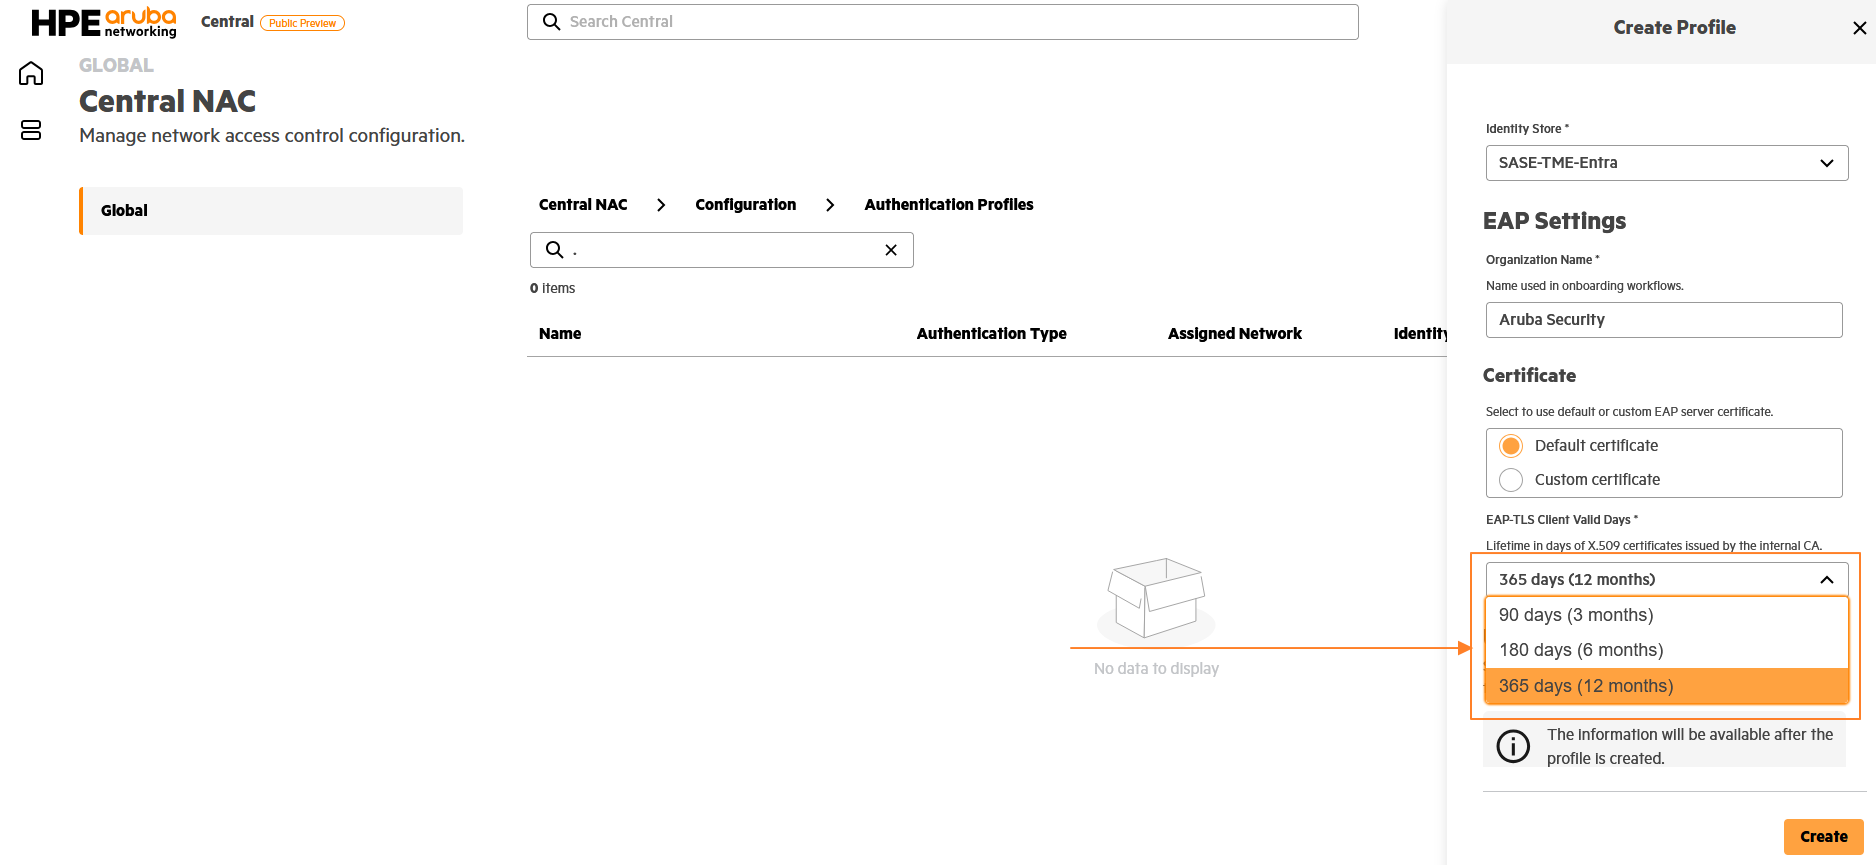
When using the default certificate option for EAP-TLS, client certificates can be issued with validity periods of 90, 180, or 365 days. In the core capabilities tier, customization of client certificate validity is not available, and the default validity period is set to 365 days
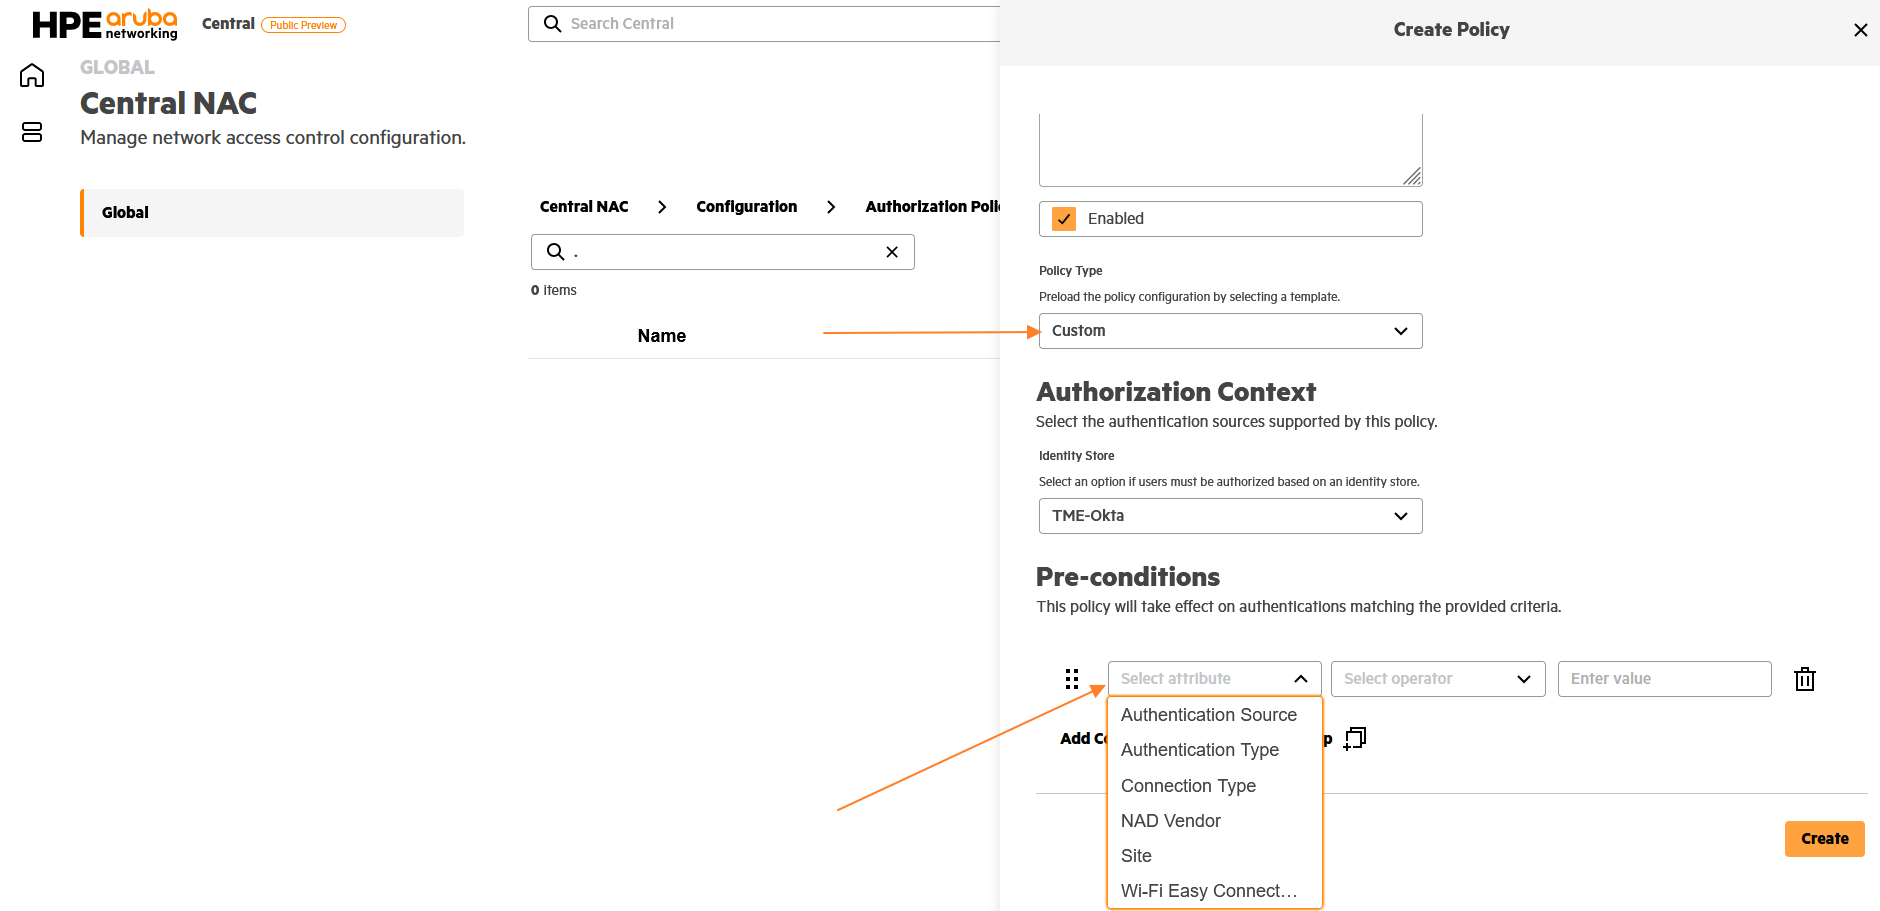
Custom policies and pre-conditions can be defined as needed.
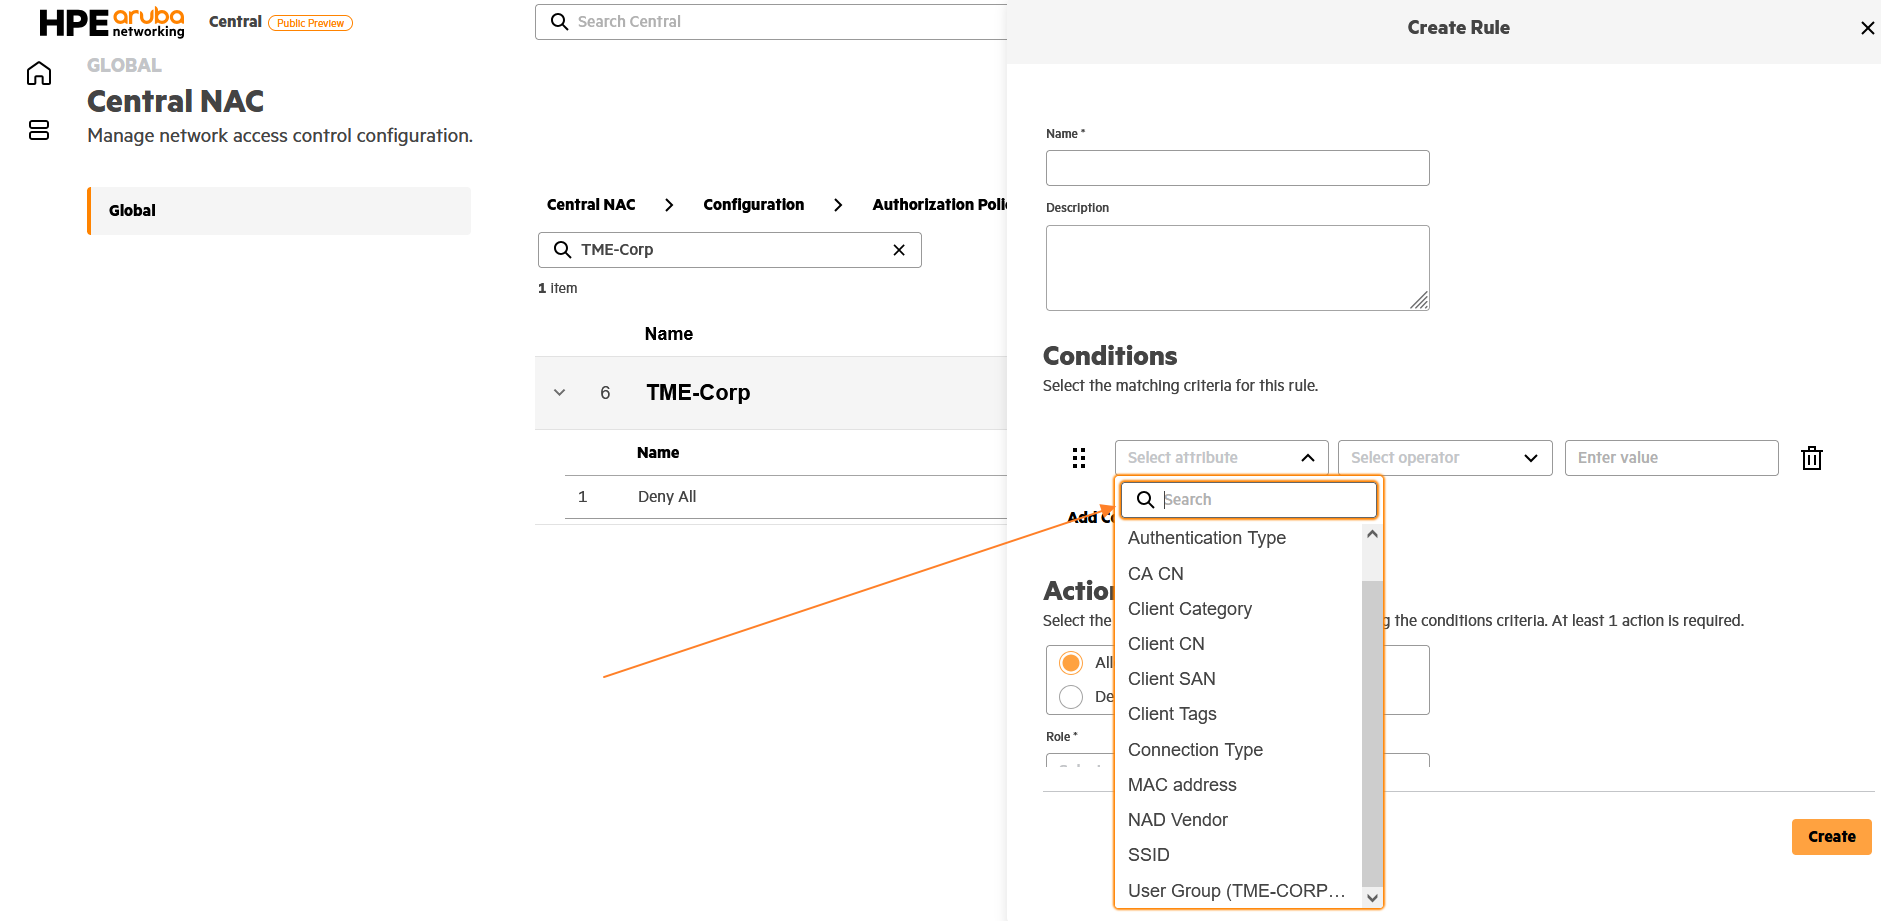
Policy rules support a broader set of matching conditions, including the User Group from the identity store defined in the corresponding authorization policy. With support for multiple IdPs, it is easier to identify which identity store is being referenced when creating authorization rules.
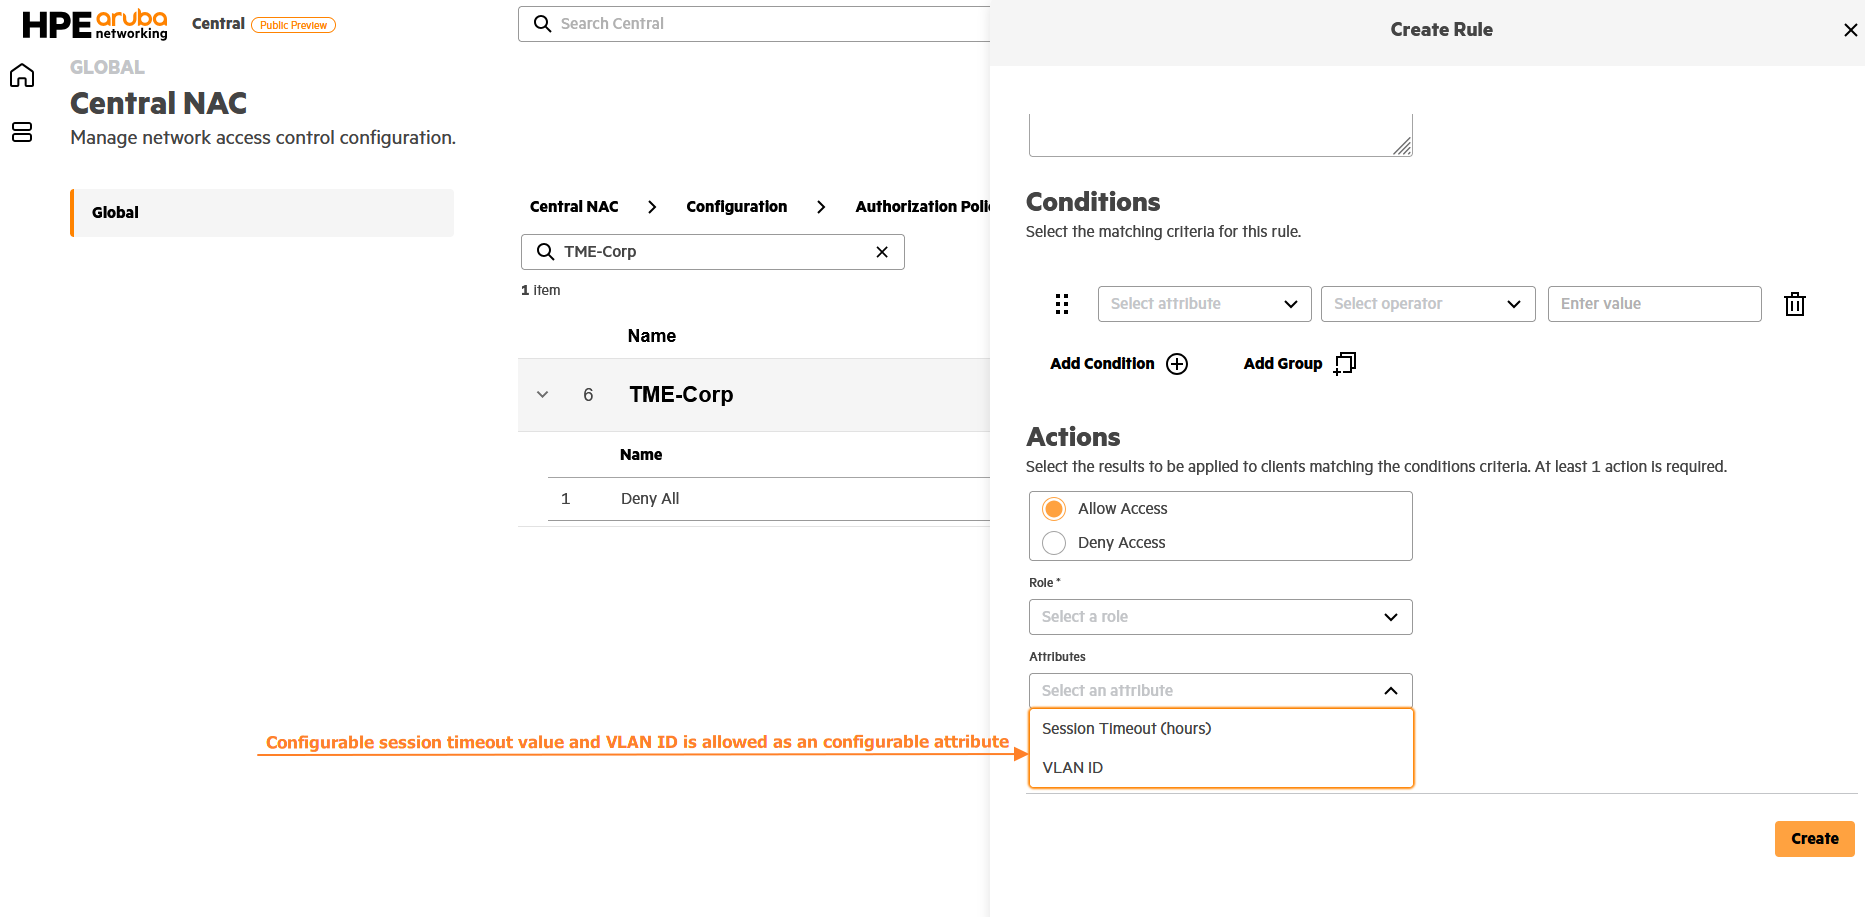
Session timeout is configurable, and the VLAN ID can be sent as an attribute to the NAD. This is especially important for third-party NAD devices, Returning a VLAN ID overrides the value defined in the role configuration
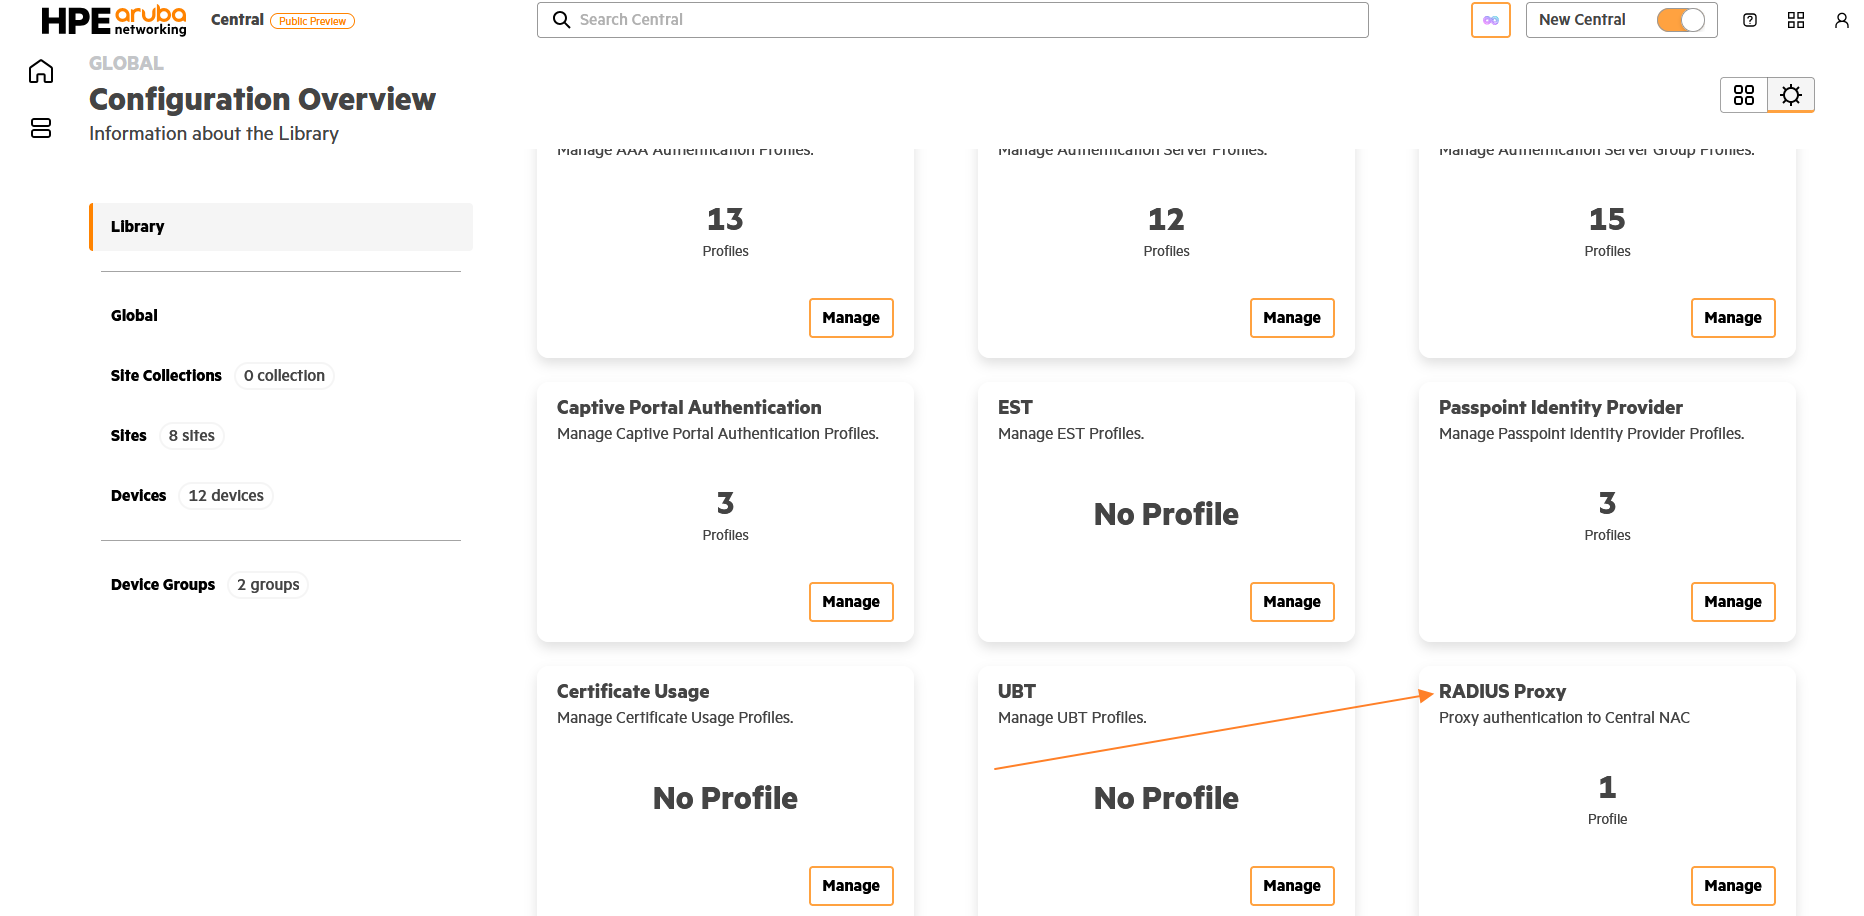
Support for third-party NADs is provided through RADIUS proxy to Central NAC. This requires an AOS 10.7.2 or later Gateway, where the third-party NADs communicate with the AOS Gateway, which in turn proxies the RADIUS requests to Central NAC using the RADIUS proxy profile feature available with the Central NAC subscription.
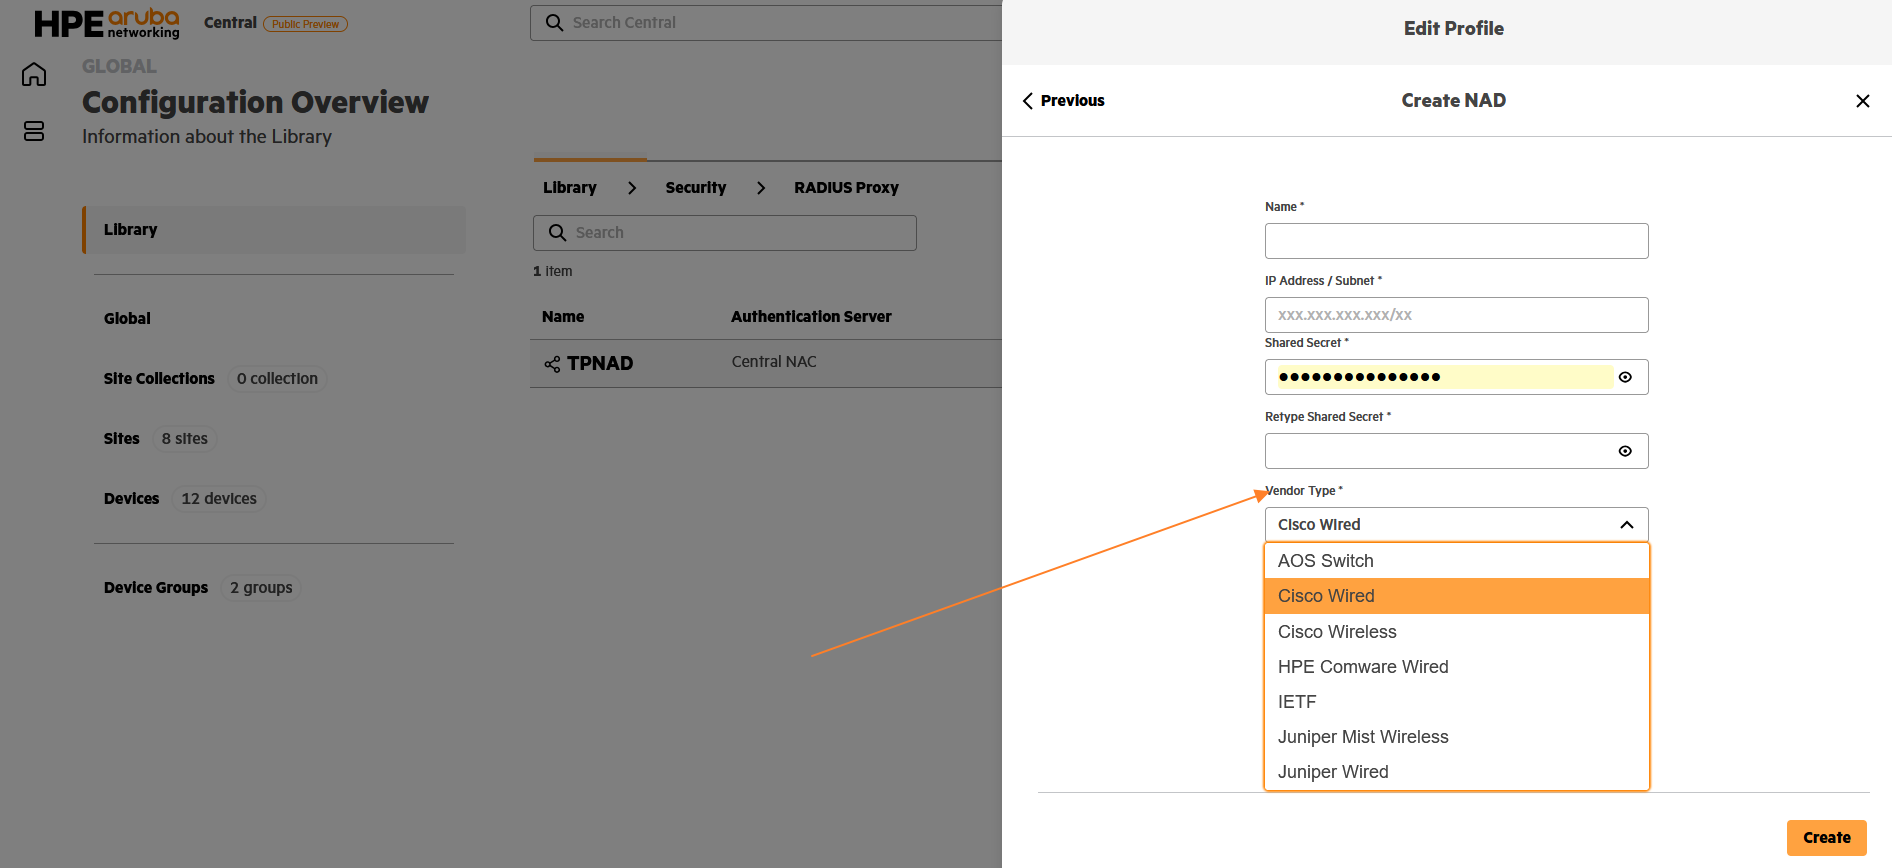
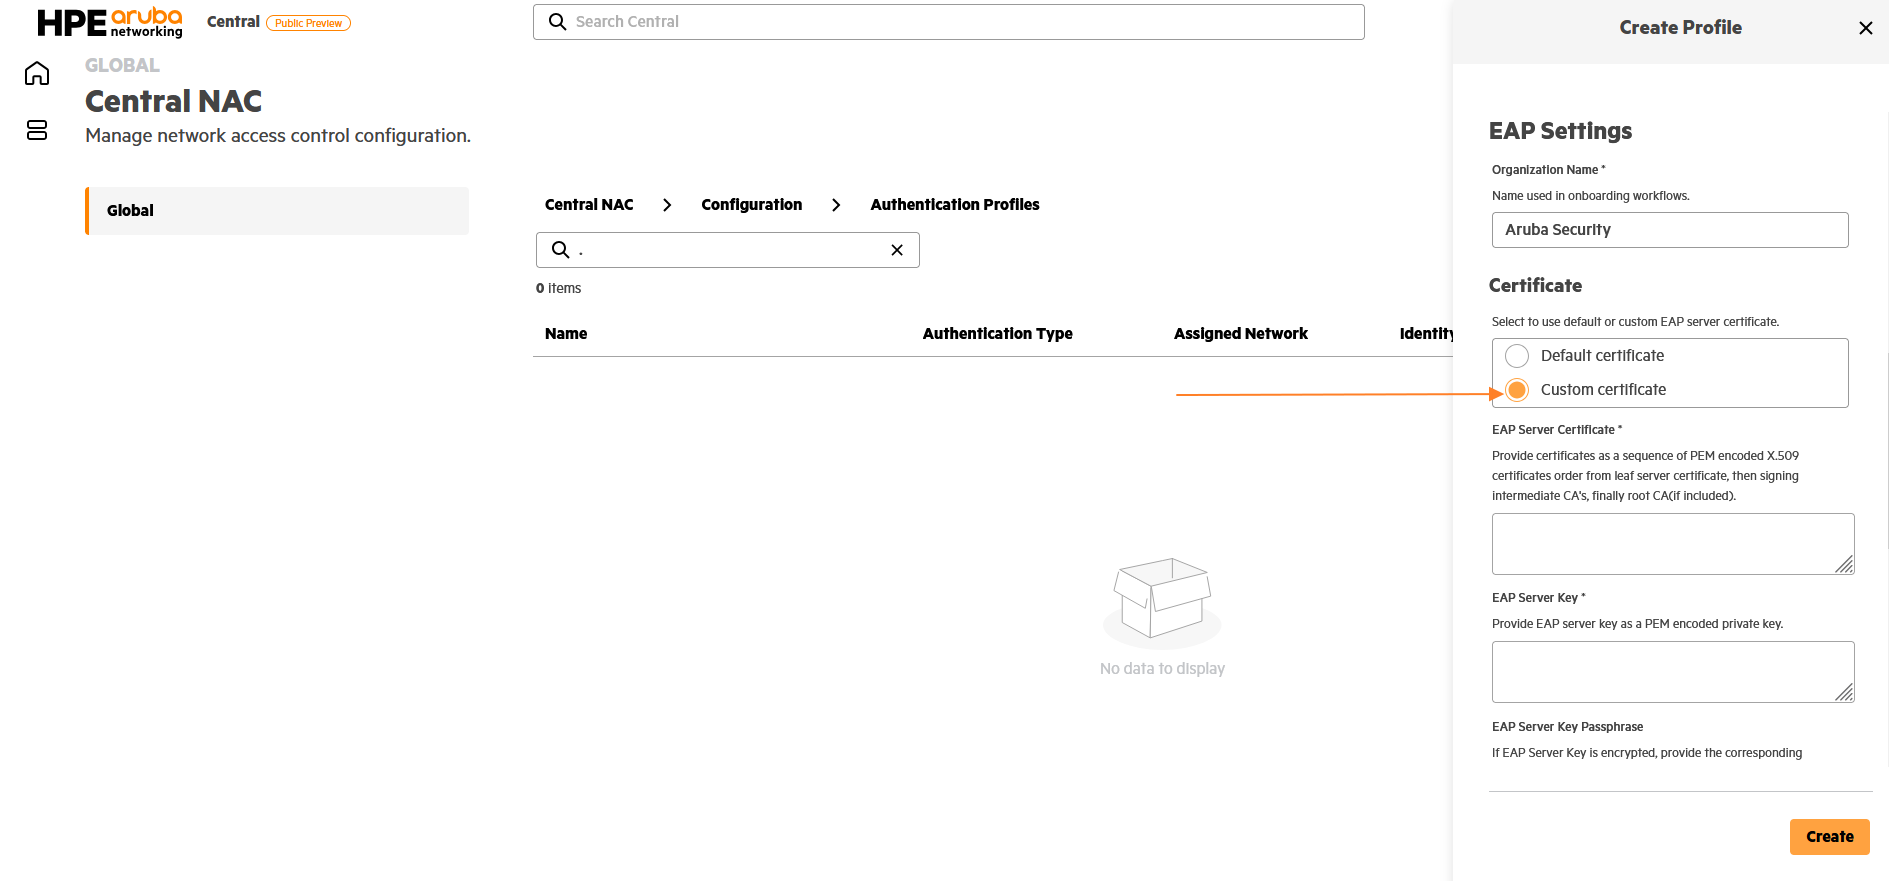
The Central NAC subscription enables Bring Your Own Certificate (BYOC) capabilities in authentication profiles, allowing customers to leverage their own PKI infrastructure for issuing EAP-TLS client certificates. The custom certificate option in the authentication profile supports adding trusted CAs, enabling Central NAC to accept certificates issued by external certificate authorities.
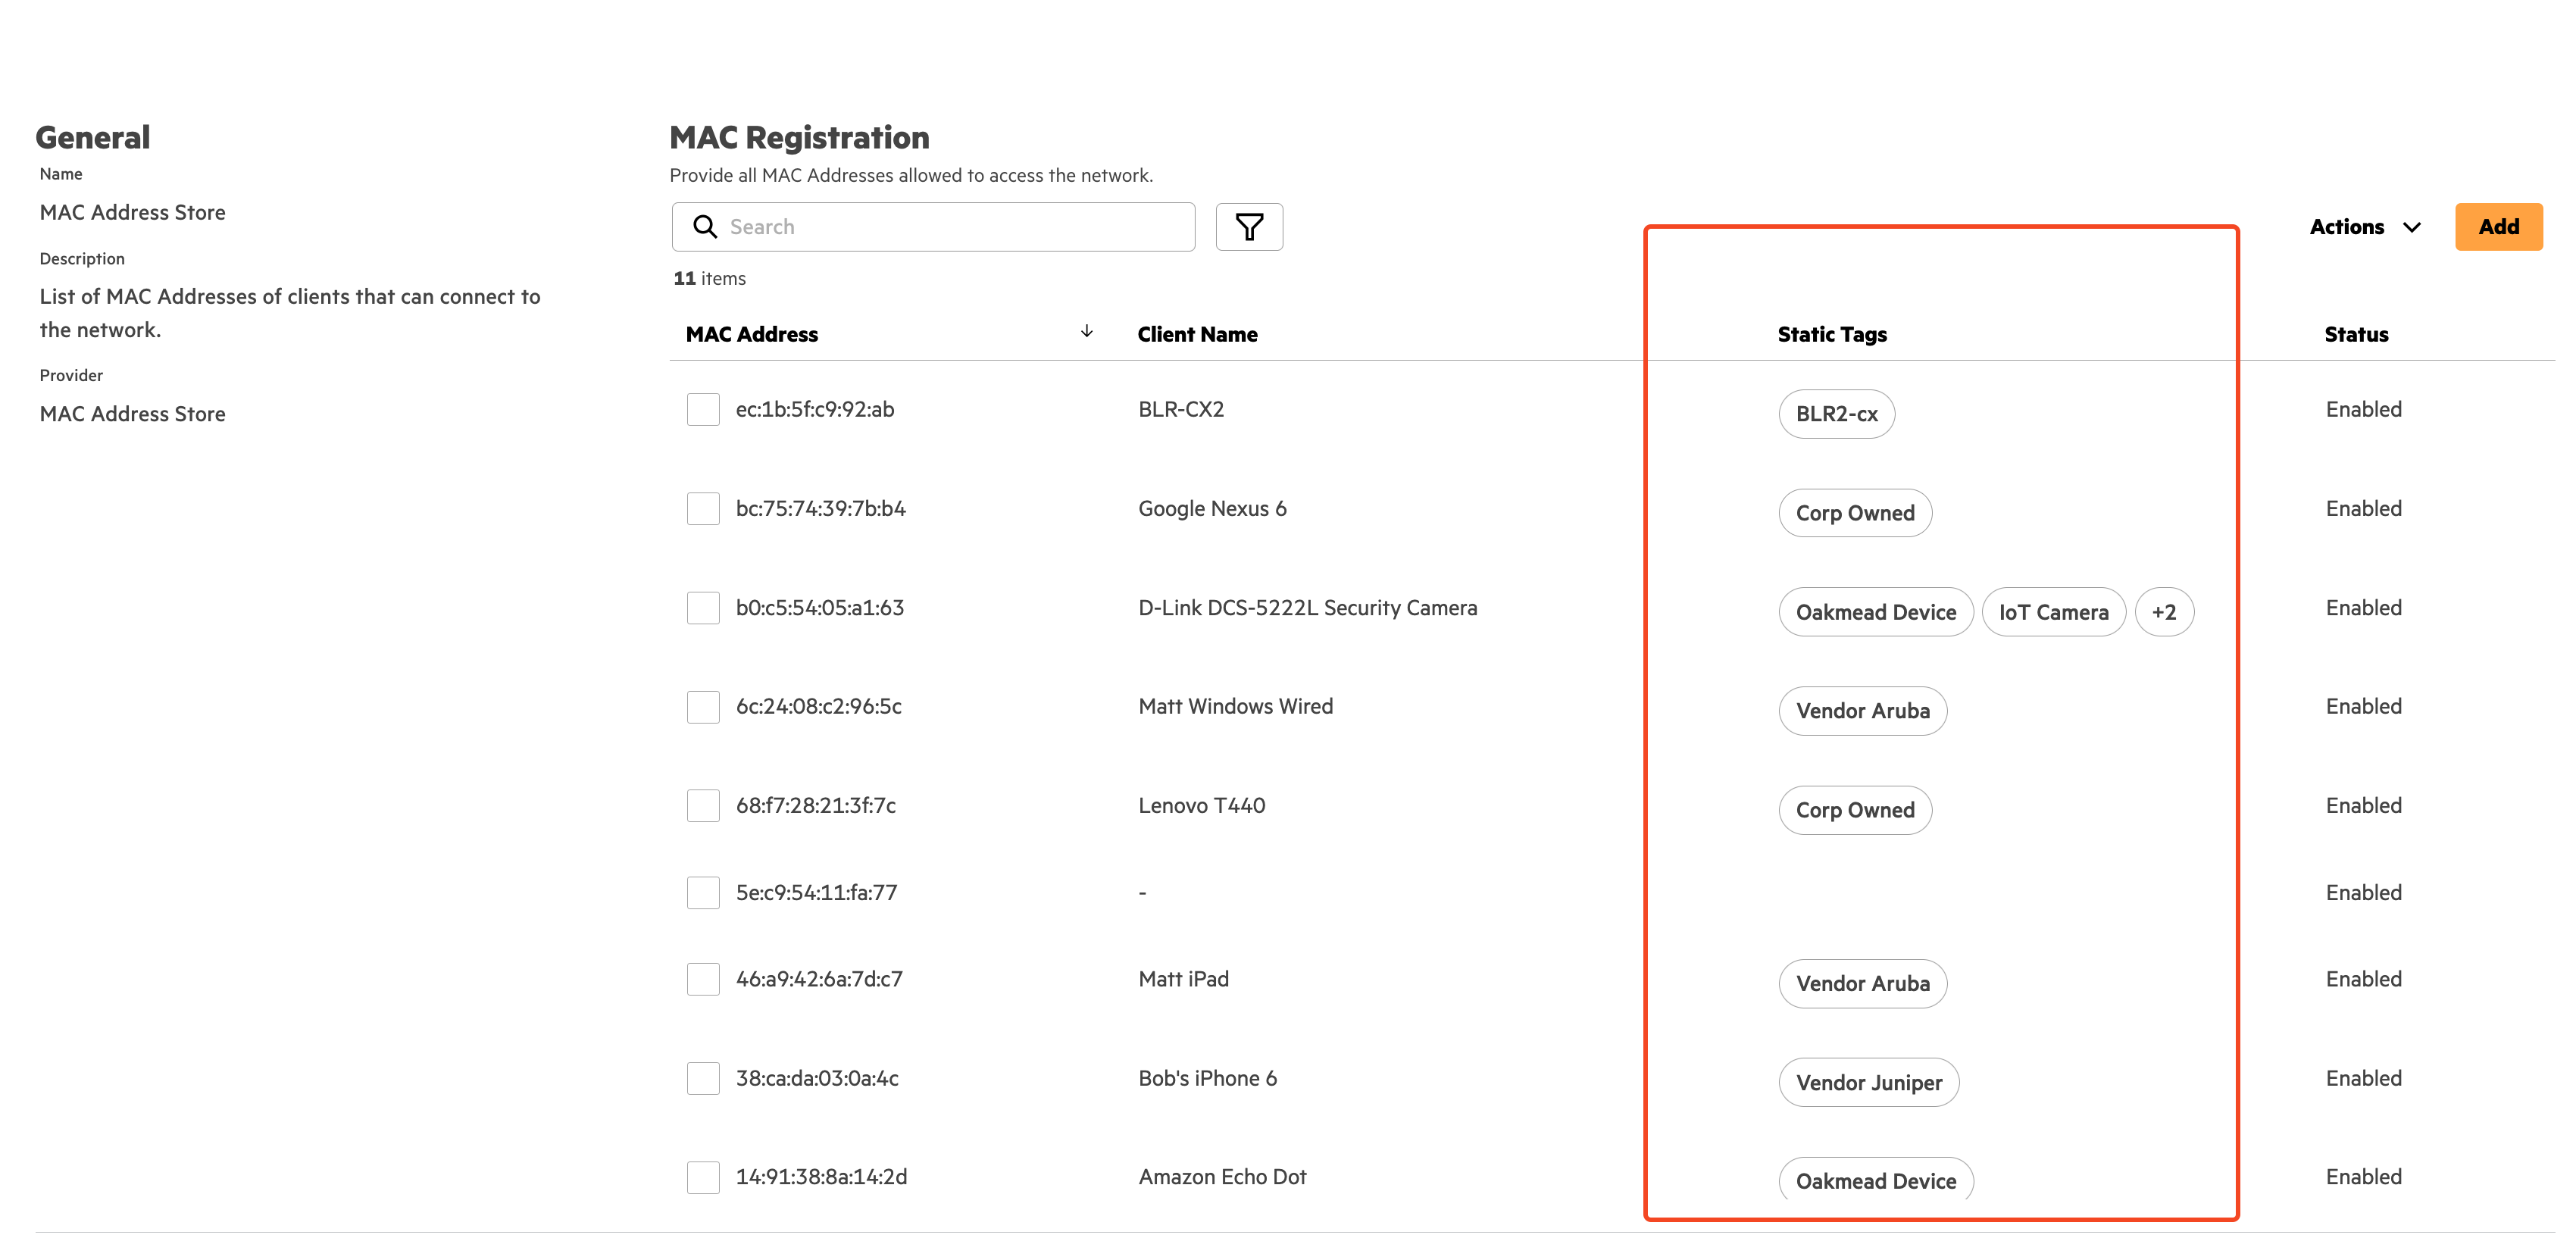
Static tags can be applied to entries in MAC Address store. With core capabilities, up to 10 tags can be assigned per MAC Address while with subscription capabilities, up to 400 can be applied.
The Core and Subscription capabilities of HPE Aruba Networking Central NAC provide organizations with a clear path to strengthen network security and simplify access control. The Core capabilities ensures every customer can establish a secure baseline with essential features such as certificate-based authentication, identity provider integration, and policy enforcement. Central NAC subscription expands these capabilities with greater flexibility, granular policy controls, support for multiple IdPs, and advanced integration options for complex environments.
Together, these tiers empower organizations to adopt NAC at their own pace starting with foundational security and seamlessly scaling to advanced capabilities as their needs evolve.
Licensing FAQs
Q: What happens if the subscription expires? Will services be impacted?
A: If subscription expires, HPE Networking Central would generate alerts notifying the administrators. Warning messages would also be displayed on Central NAC web interface. At present, there is no enforcement which means NAC functionality would not be restricted and there should be no impact to services.
Q: What license do I need for the visibility and profiling provided by HPE Networking Central Client Insights?
A: Client classification, custom tags and extension integrations provided by HPE Networking Central Client Insights is included with the NAC Subscription. If not using NAC Subscription:
- Client classification is included with the device foundation license
- Ability to use custom tags and attributes fetched through extension integrations would require device advanced license
Q: How are licenses applied for MSP tenants
A: Subscriptions owned by the tenant in a MSP workspace are applied and managed at the specific tenant level just like a non MSP tenant. Ability to add MSP owned subscriptions to specific tenants is not yet supported today.
Q: I have a scenario where I need to add multiple external IDPs (Microsoft Entra and Okta) for corporate 802.1X authentication for 1000 devices. I also want to setup visitor self registration workflow for up to 1000 guest devices. Multiple IDPs are a subscription capability while visitor self registration is part of core capabilities. How many NAC subscriptions would I need? Can I use NAC subscription only for the 1000 devices doing 802.1X authentication?
A: NAC subscription is required to enable multiple external IDPs. The subscription is to enable the advanced capabilities within Central NAC and once it is applied, all devices authenticating through Central NAC whether they are using core or subscription capabilities would count against the subscription. Hence in this example, 2000 NAC subscriptions would be required.
3 - Identity Providers
Central NAC supports the following cloud based identity provider for user identity:
- Microsoft Entra ID
- Google Workspace
- Okta Workforce Identity Cloud
The identity stores in Central NAC are used for both authentication and authorization. Onboarding devices and generating user based MPSK requires the user to first authenticate againt an IDP. Authentication against IDP uses OAuth while authorization lookups use REST APIs.
Configuring IDP in Central NAC
Central NAC uses OAuth with grant type as client_credentials to connect to the IDPs. To configure an identity source in Central NAC, first a client ID and secret would have to be configured. The steps to add each identity source is documented at:
https://arubanetworking.hpe.com/techdocs/new-central/content/nac/config-identity-store.htm
INFO
Configuring IDP is optional for BYOC and MPSK workflows. Admin managed MPSK workflow does not require an IDP to be configured. User managed MPSK workflow requires an IDP to be configured.
Central NAC interactions with IDPs
Central NAC uses REST APIs to fetch group membership from IDPs. Central NAC also uses webhook notifications from IDPs to track changes to user accounts like account being deleted, account being disabled or change in group membership. When an account is either deleted or disabled, Central NAC will revoke any client certificates issued to the user and will also delete all the MPSK keys associated with the user. If the user has devices connected to the network, Central NAC will also disconnect the devices from the network as well.
The interaction with IDPs during authorization can be summarized in the following steps:
- Central NAC receives authentication request from a new user
- Lookup IDP to check if user account is enabled and to fetch group membership.
- If the client certificate is issued by the Onboard CA, the certificate’s Common Name (CN) is used for authorization lookup.
- If the client certificate is from an external PKI, the Subject Alternative Name (SAN) attribute (in MSN:UPN format) is used for authorization lookup
- For user managed MPSK workflow,the authentication is done by validating the PSK being used after which the user ID (UPN) associated with the MPSK key is used to fetch group membership for authorization
- Cache the group membership locally for 24 hours
- Evaluate policies and apply the appropriate role
- If user account is disabled or deleted, revoke client certificates, delete MPSK keys and disconnect client from network
- If group membership changes, a re-auth is forced so that the policies are re-evaluated and appropriate role is assigned to the user
Frequently Asked Questions
Q: How often does Central NAC fetch group membership from IDP?
A: Central NAC would fetch group membership in real time for every new authentication request. After that, there is a quiet period of 60 seconds. Any requests coming in during the quiet period would use the local cached information. Any requests coming after the quiet period will again trigger another real-time lookup against IDP
Q: What happens if the IDP is not reachable?
A: Group membership information is cached locally for 24 hours. So if there was a previous authentication request within 24 hours, then authorization is done based on the local cache. If there is no information in local cache, the authorization would fail.
Q: Can Central NAC fetch authorization attributes for client devices from IDP?
A: Central NAC does not do authorization lookups for client devices. Client tags from HPE Aruba Central Client Insights module can be used as part of the authorization policies.
Q: How many IDPs can be added to Central NAC?
A: You can add multiple IDPs, there is no hard limit.
Q: If i delete and re-add the IDP, will users have to go through onboarding again?
A: As long as the IDP belongs to the same domain and contains the same user accounts, provisioned certificates should continue to work fine.
3.1 - Google Workspace
To configure Google Workspace as Idenity Provider in Central NAC, you will need the following information:
- Customer ID
- Google Workspace Domain
- Administrator Email
- OAuth2.0 Client ID
- Client Secret
- Service Account Crentials File
Getting the Customer ID and Domain Information
-
Login to Google Admin Console and navigate to Account > Account settings. Copy the Customer ID from the Profile section.
Copying customer ID 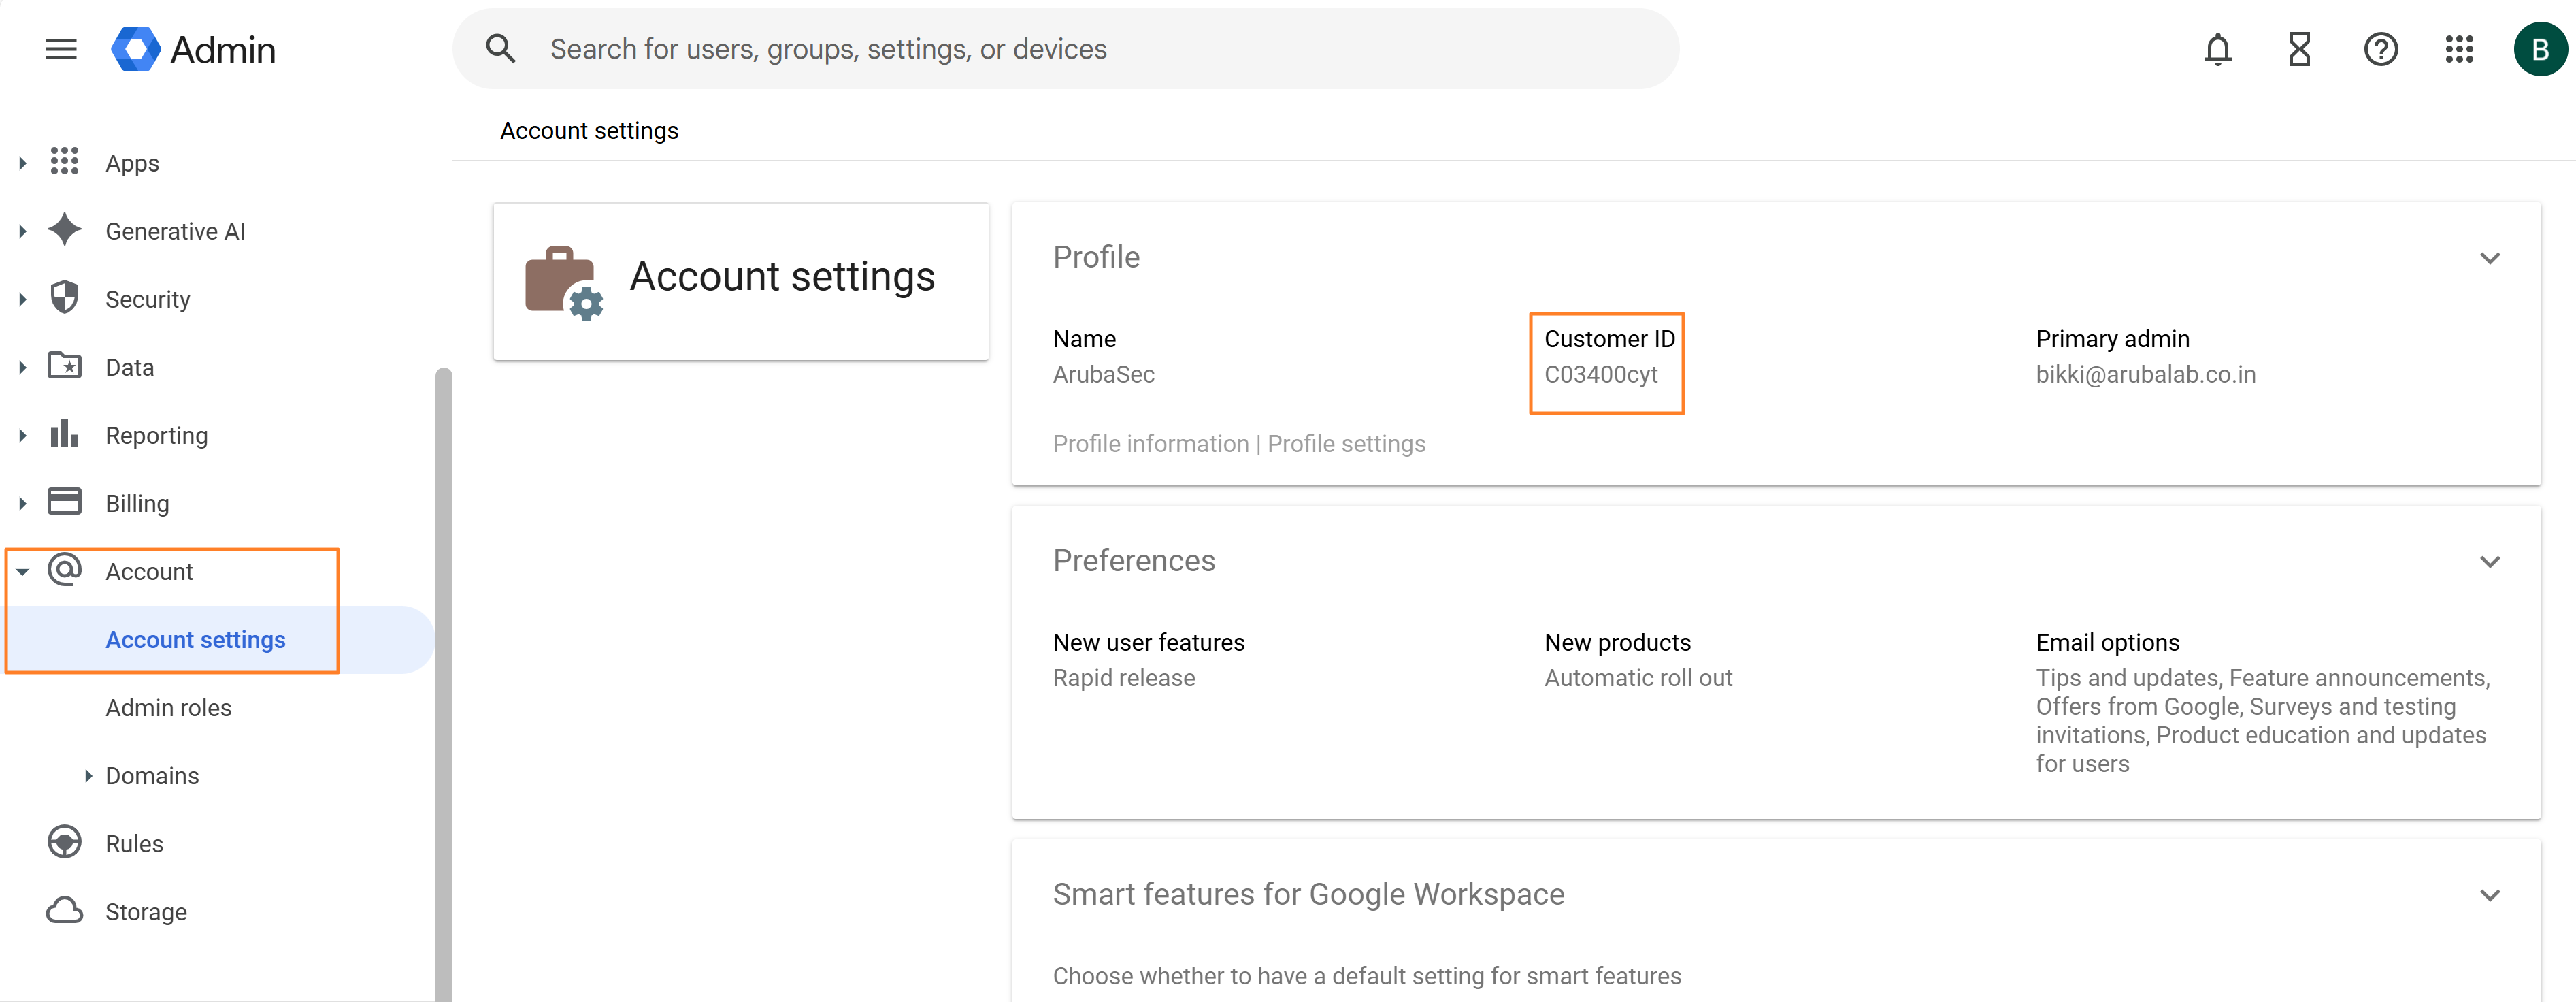
-
Navigate to Account > Domains > Manage domains and copy the domain name.
Copying domain name 
Creating a Project for Central NAC in Google Cloud Console
-
Login to your Google Cloud Console as an administrator and navigate to Project Picker > New Project from the home screen.
Create a new project 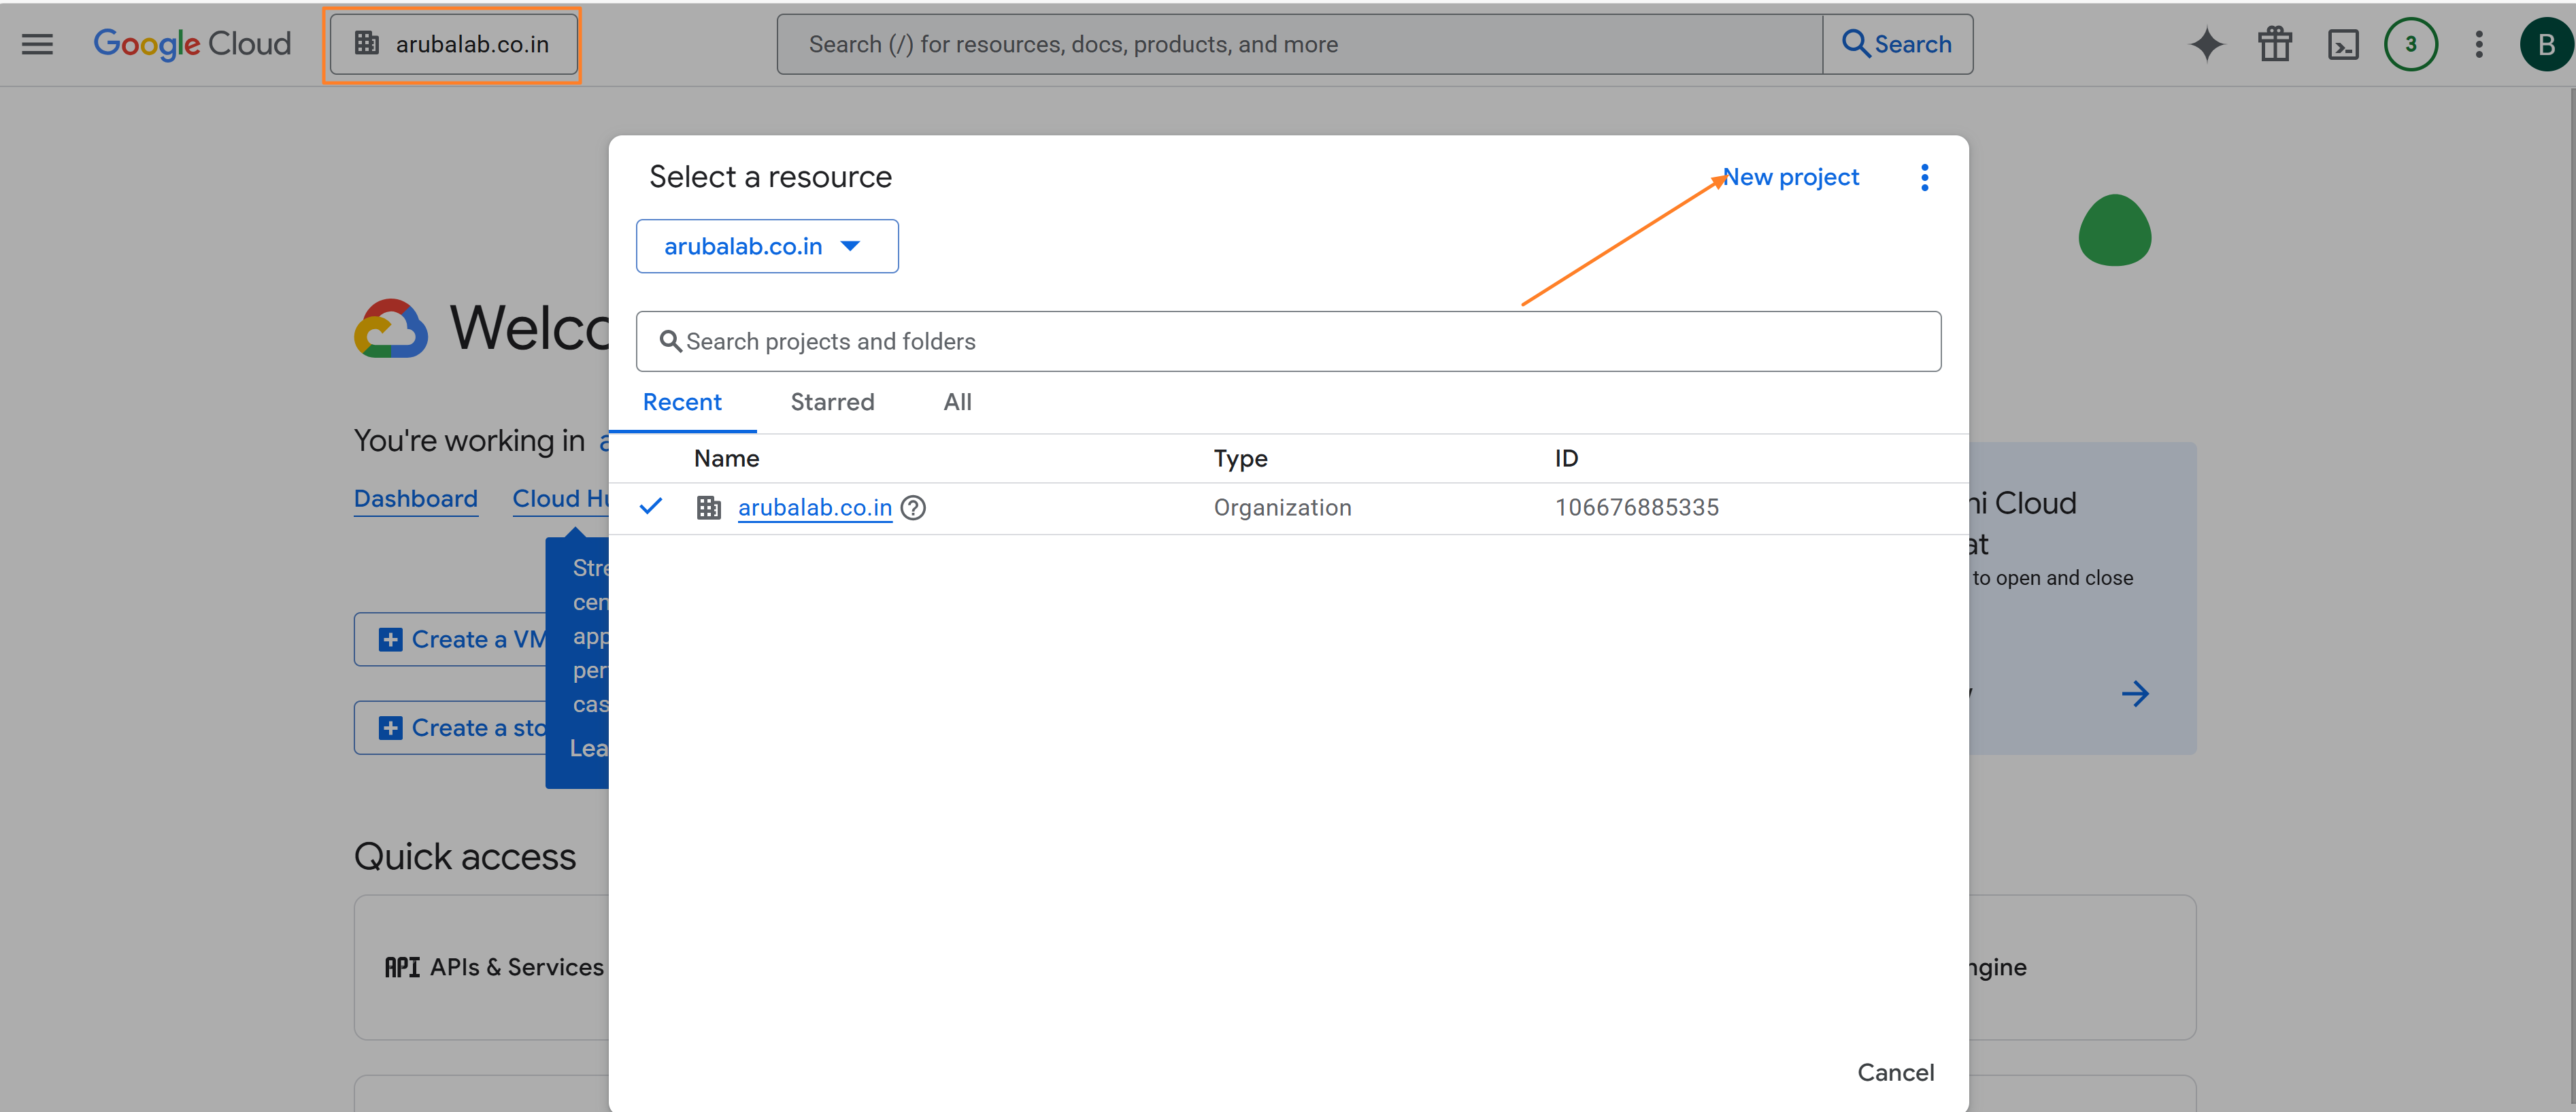
-
Provide a suitable Project Name (for example, Central NAC), select the Organization and Parent Resource, and then click Create.
Create a new project 
-
Now switch to the project that was created from the Project Picker.
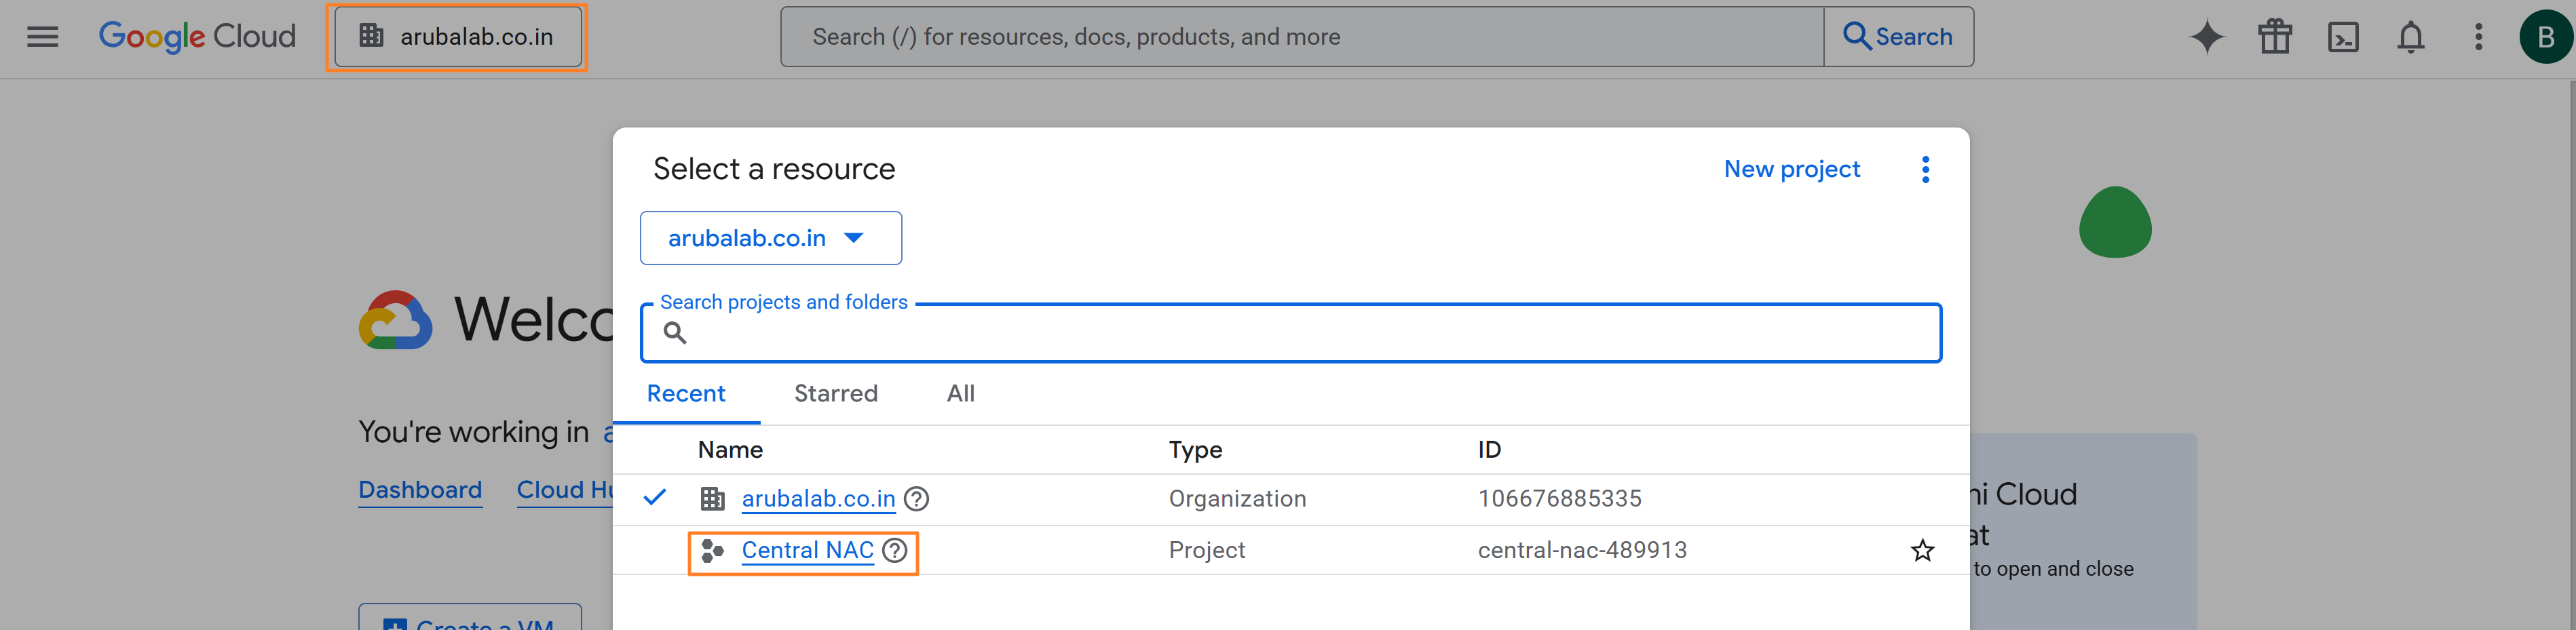
Create OAuth 2.0 Client ID and Client Secret
-
From the hamburger menu in the top-left corner, go to APIs & Services > Credentials.
Creating OAuth 2.0 Client ID and Client Secret 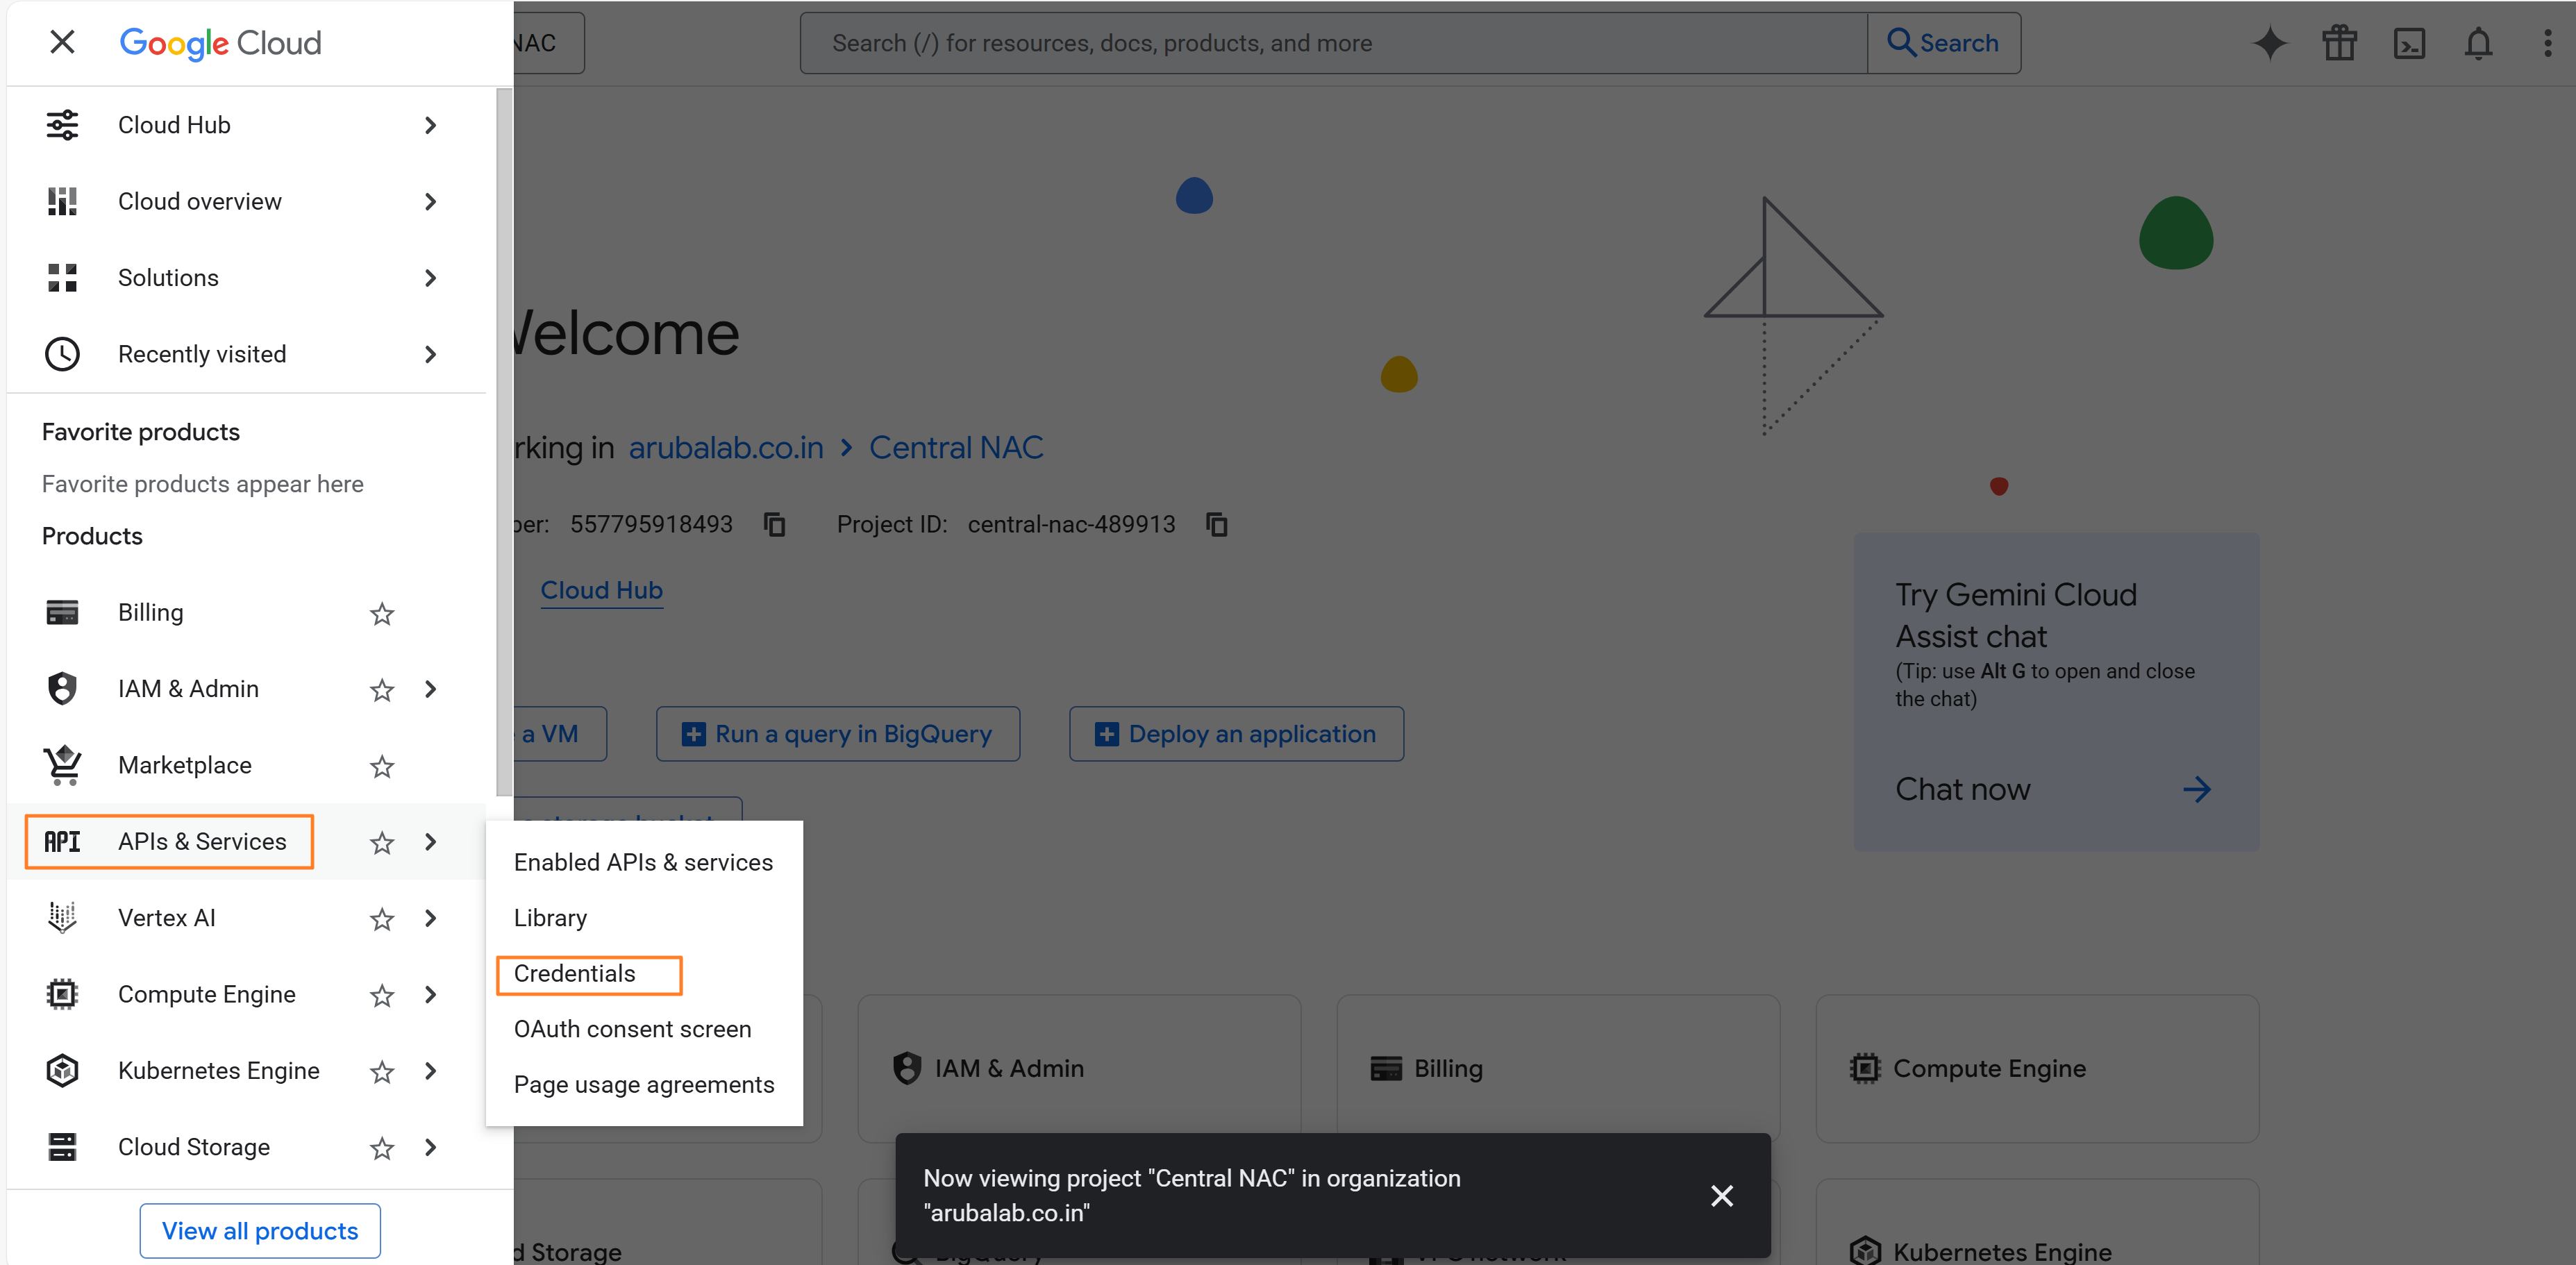
-
The OAuth consent screen must be configured before you can create an OAuth Client ID and Client Secret. To configure the consent screen, either click Configure consent screen from the banner displayed on the page or navigate to the OAuth consent screen menu, as shown below.
Configure consent screen 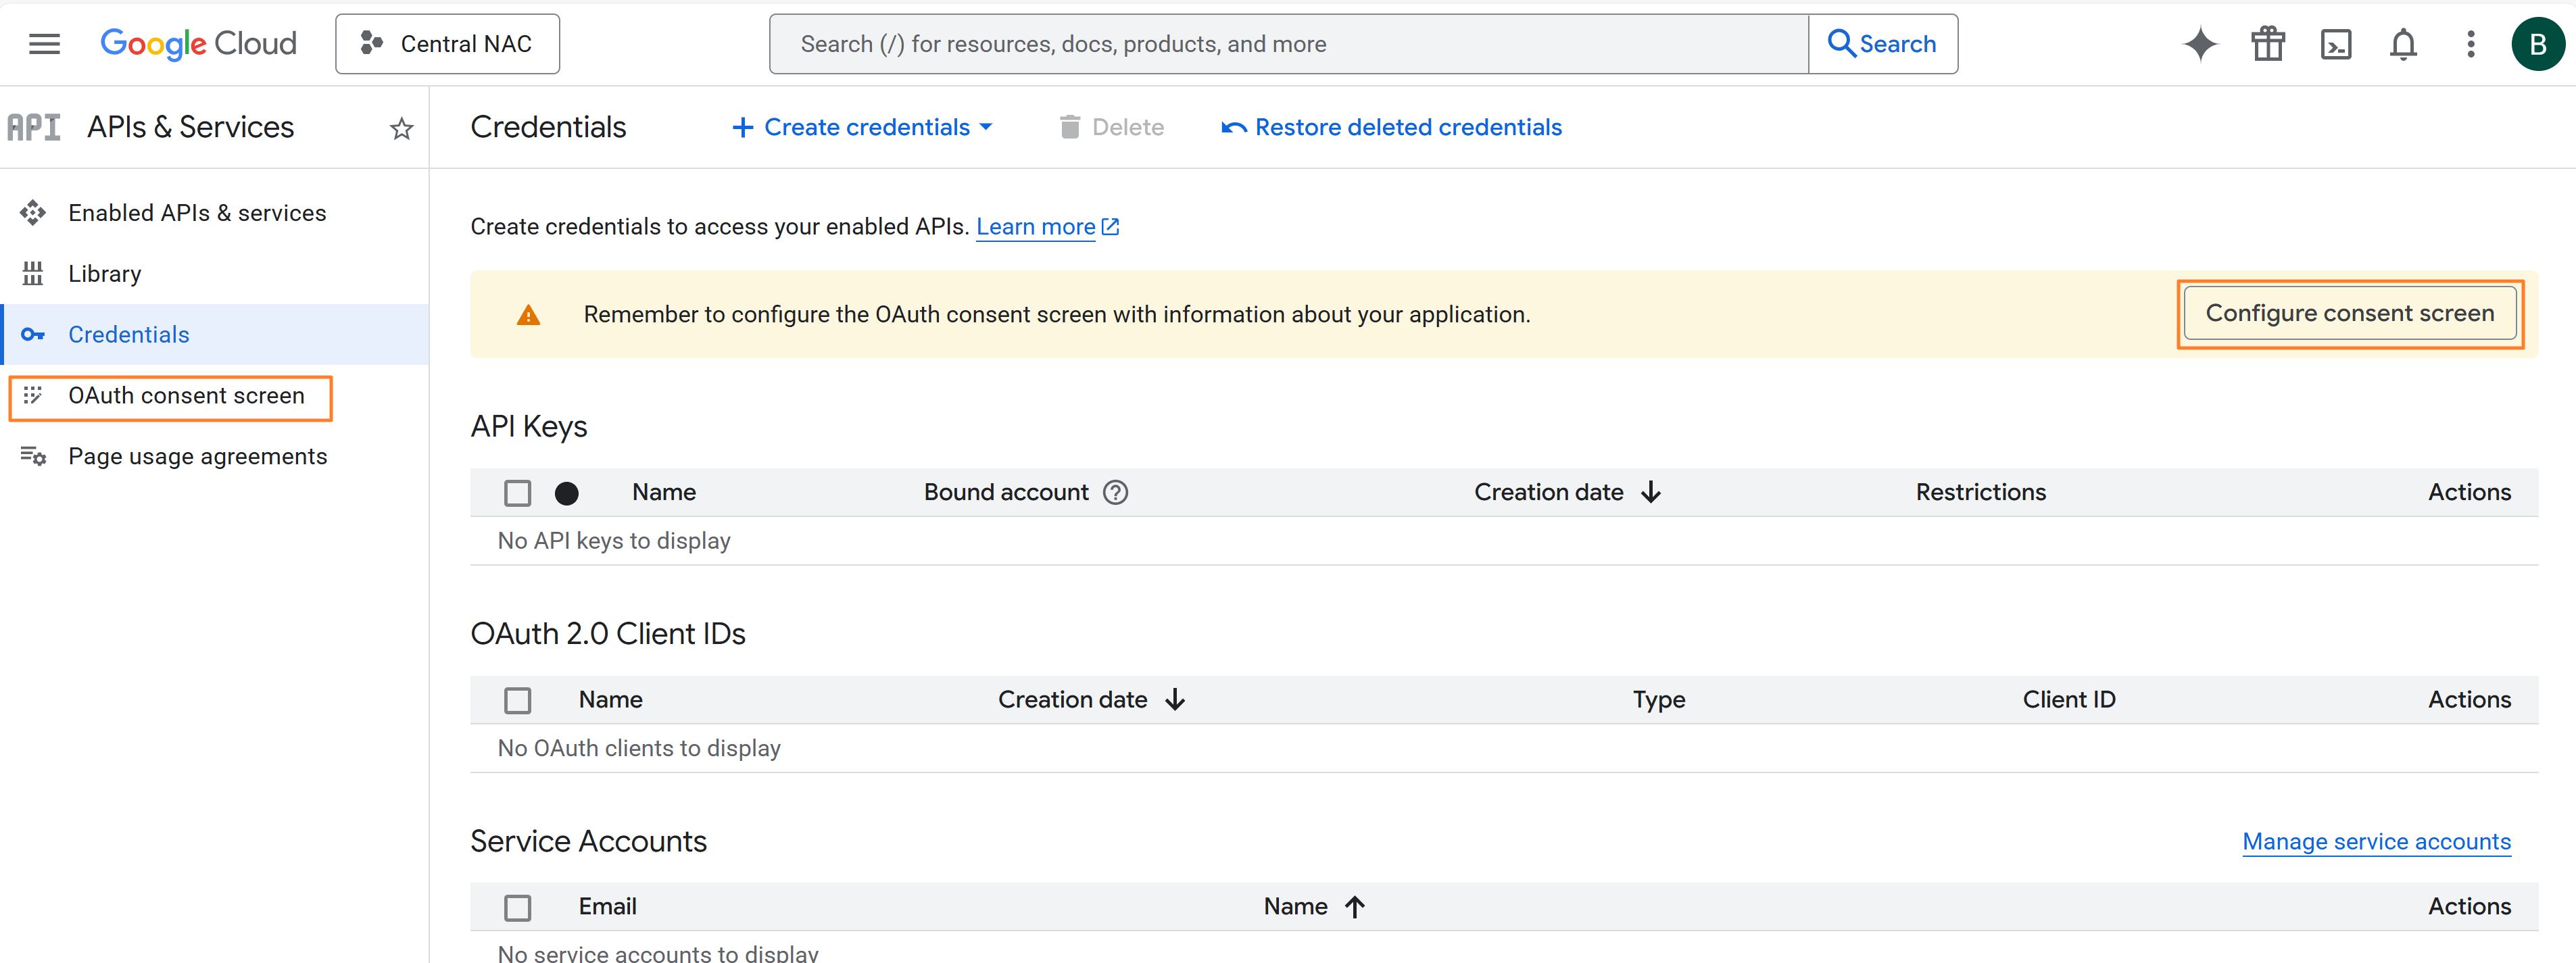
-
Click on Get Started from the Overview Page or follow the onscreen instructions. Enter a suitable App name and a User support email and click Next.

-
Choose Internal as the Audience and click Next.
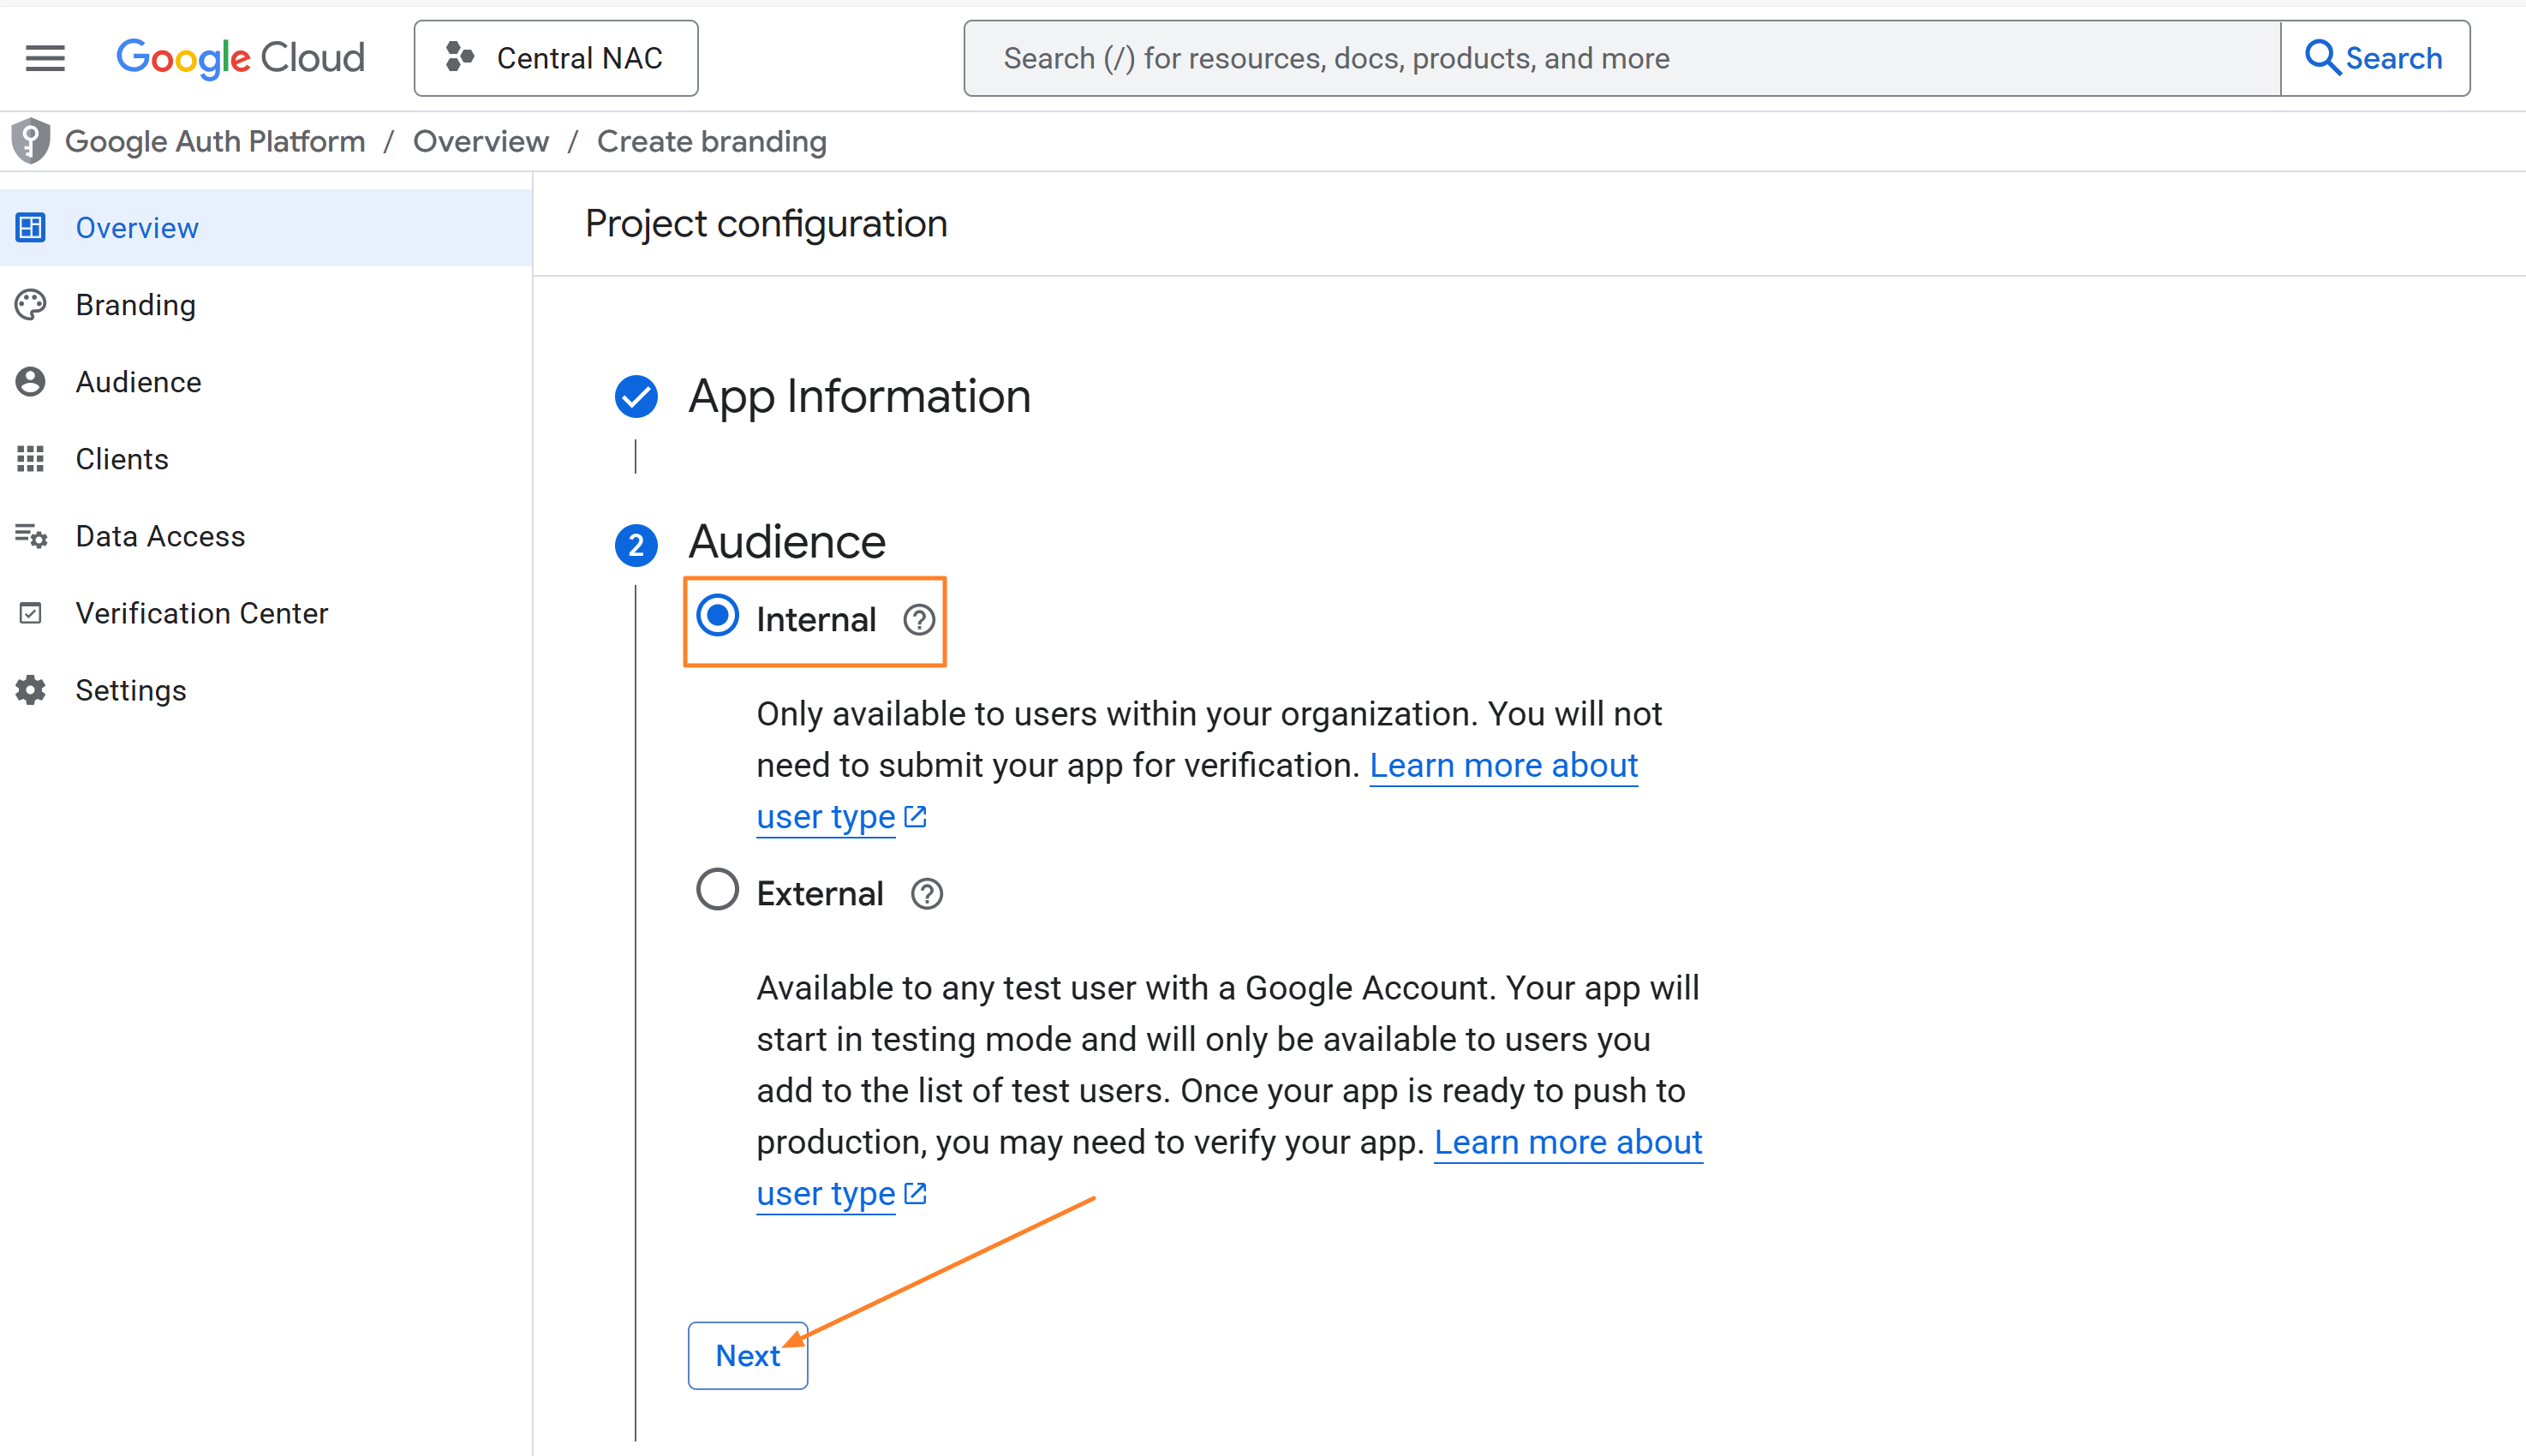
5.Enter the email addresses that should receive notifications from Google for any changes to your project under Contact Information, Agree to the Google API Services:User Data Policy on the Finish page and then click Create.

-
You can now create the OAuth Client Credentials. Click on Create OAuth client from the Overview page or Navigate back to the hamburger menu in the top-left corner, go to APIs & Services > Credentials > Create Credentials > OAuth client ID.
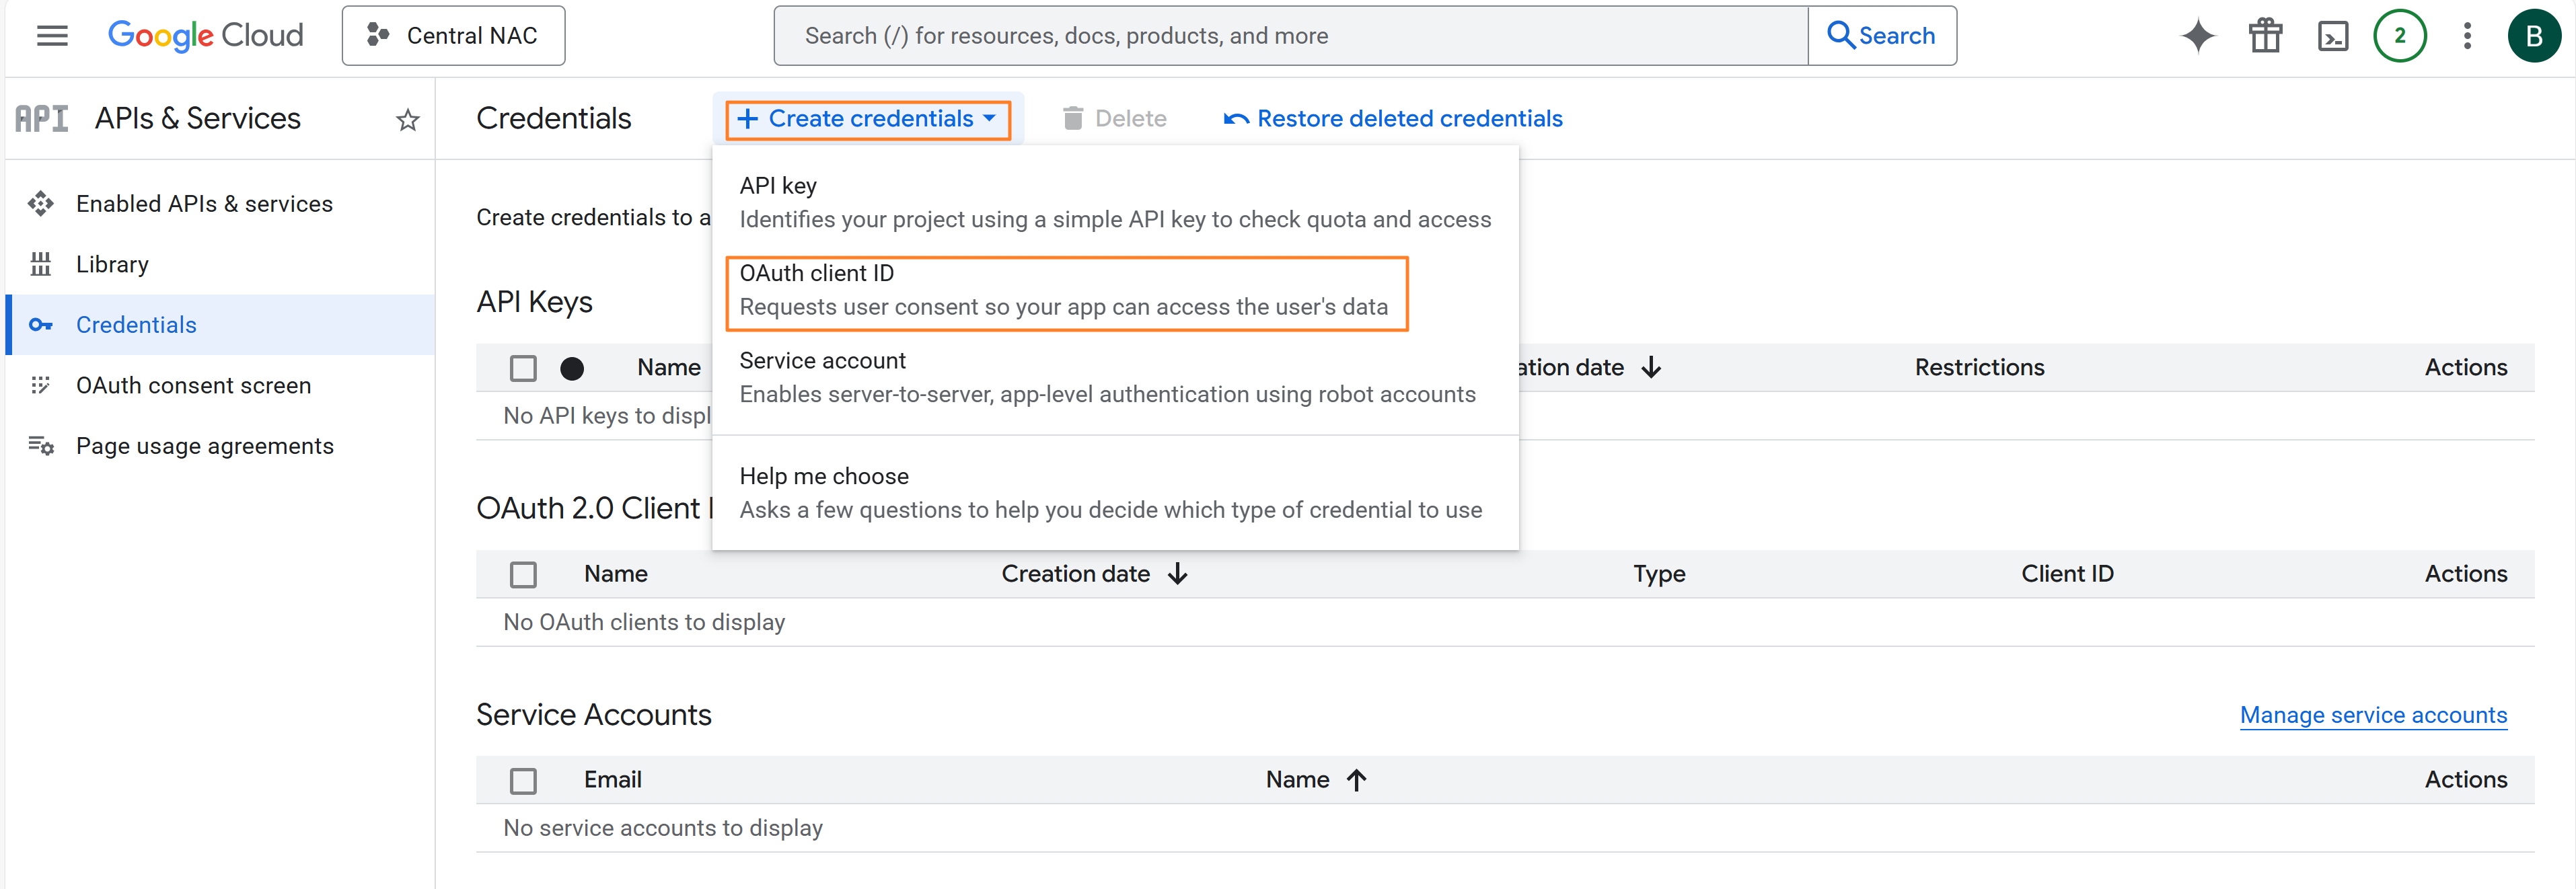
-
Choose Web application as the Application type, Give a Name to your OAuth 2.0 client and scroll down.

-
Click on Add URI under the Authorized redirect URIs, enter the redirect URI and click Create. You can find the redirect URI from Central NAC by navigating to Central NAC > Configuration > Identity Management > Create Identity Store as shown below.

Getting the redirect URI from Central NAC 
-
Copy the Client ID and Client Secret displayed after the OAuth client is created. These will be used later while configuring the IdP in Central NAC.

Creating a Service Account
-
From the hamburger menu in the top-left corner, go to IAM & Admin > Service Accounts.

-
Click Create Service Account to start creating a new service account for the project.

-
Give a name to the Service account, The Service account ID should be auto generated. Click Create and continue to advance to the next steps.

-
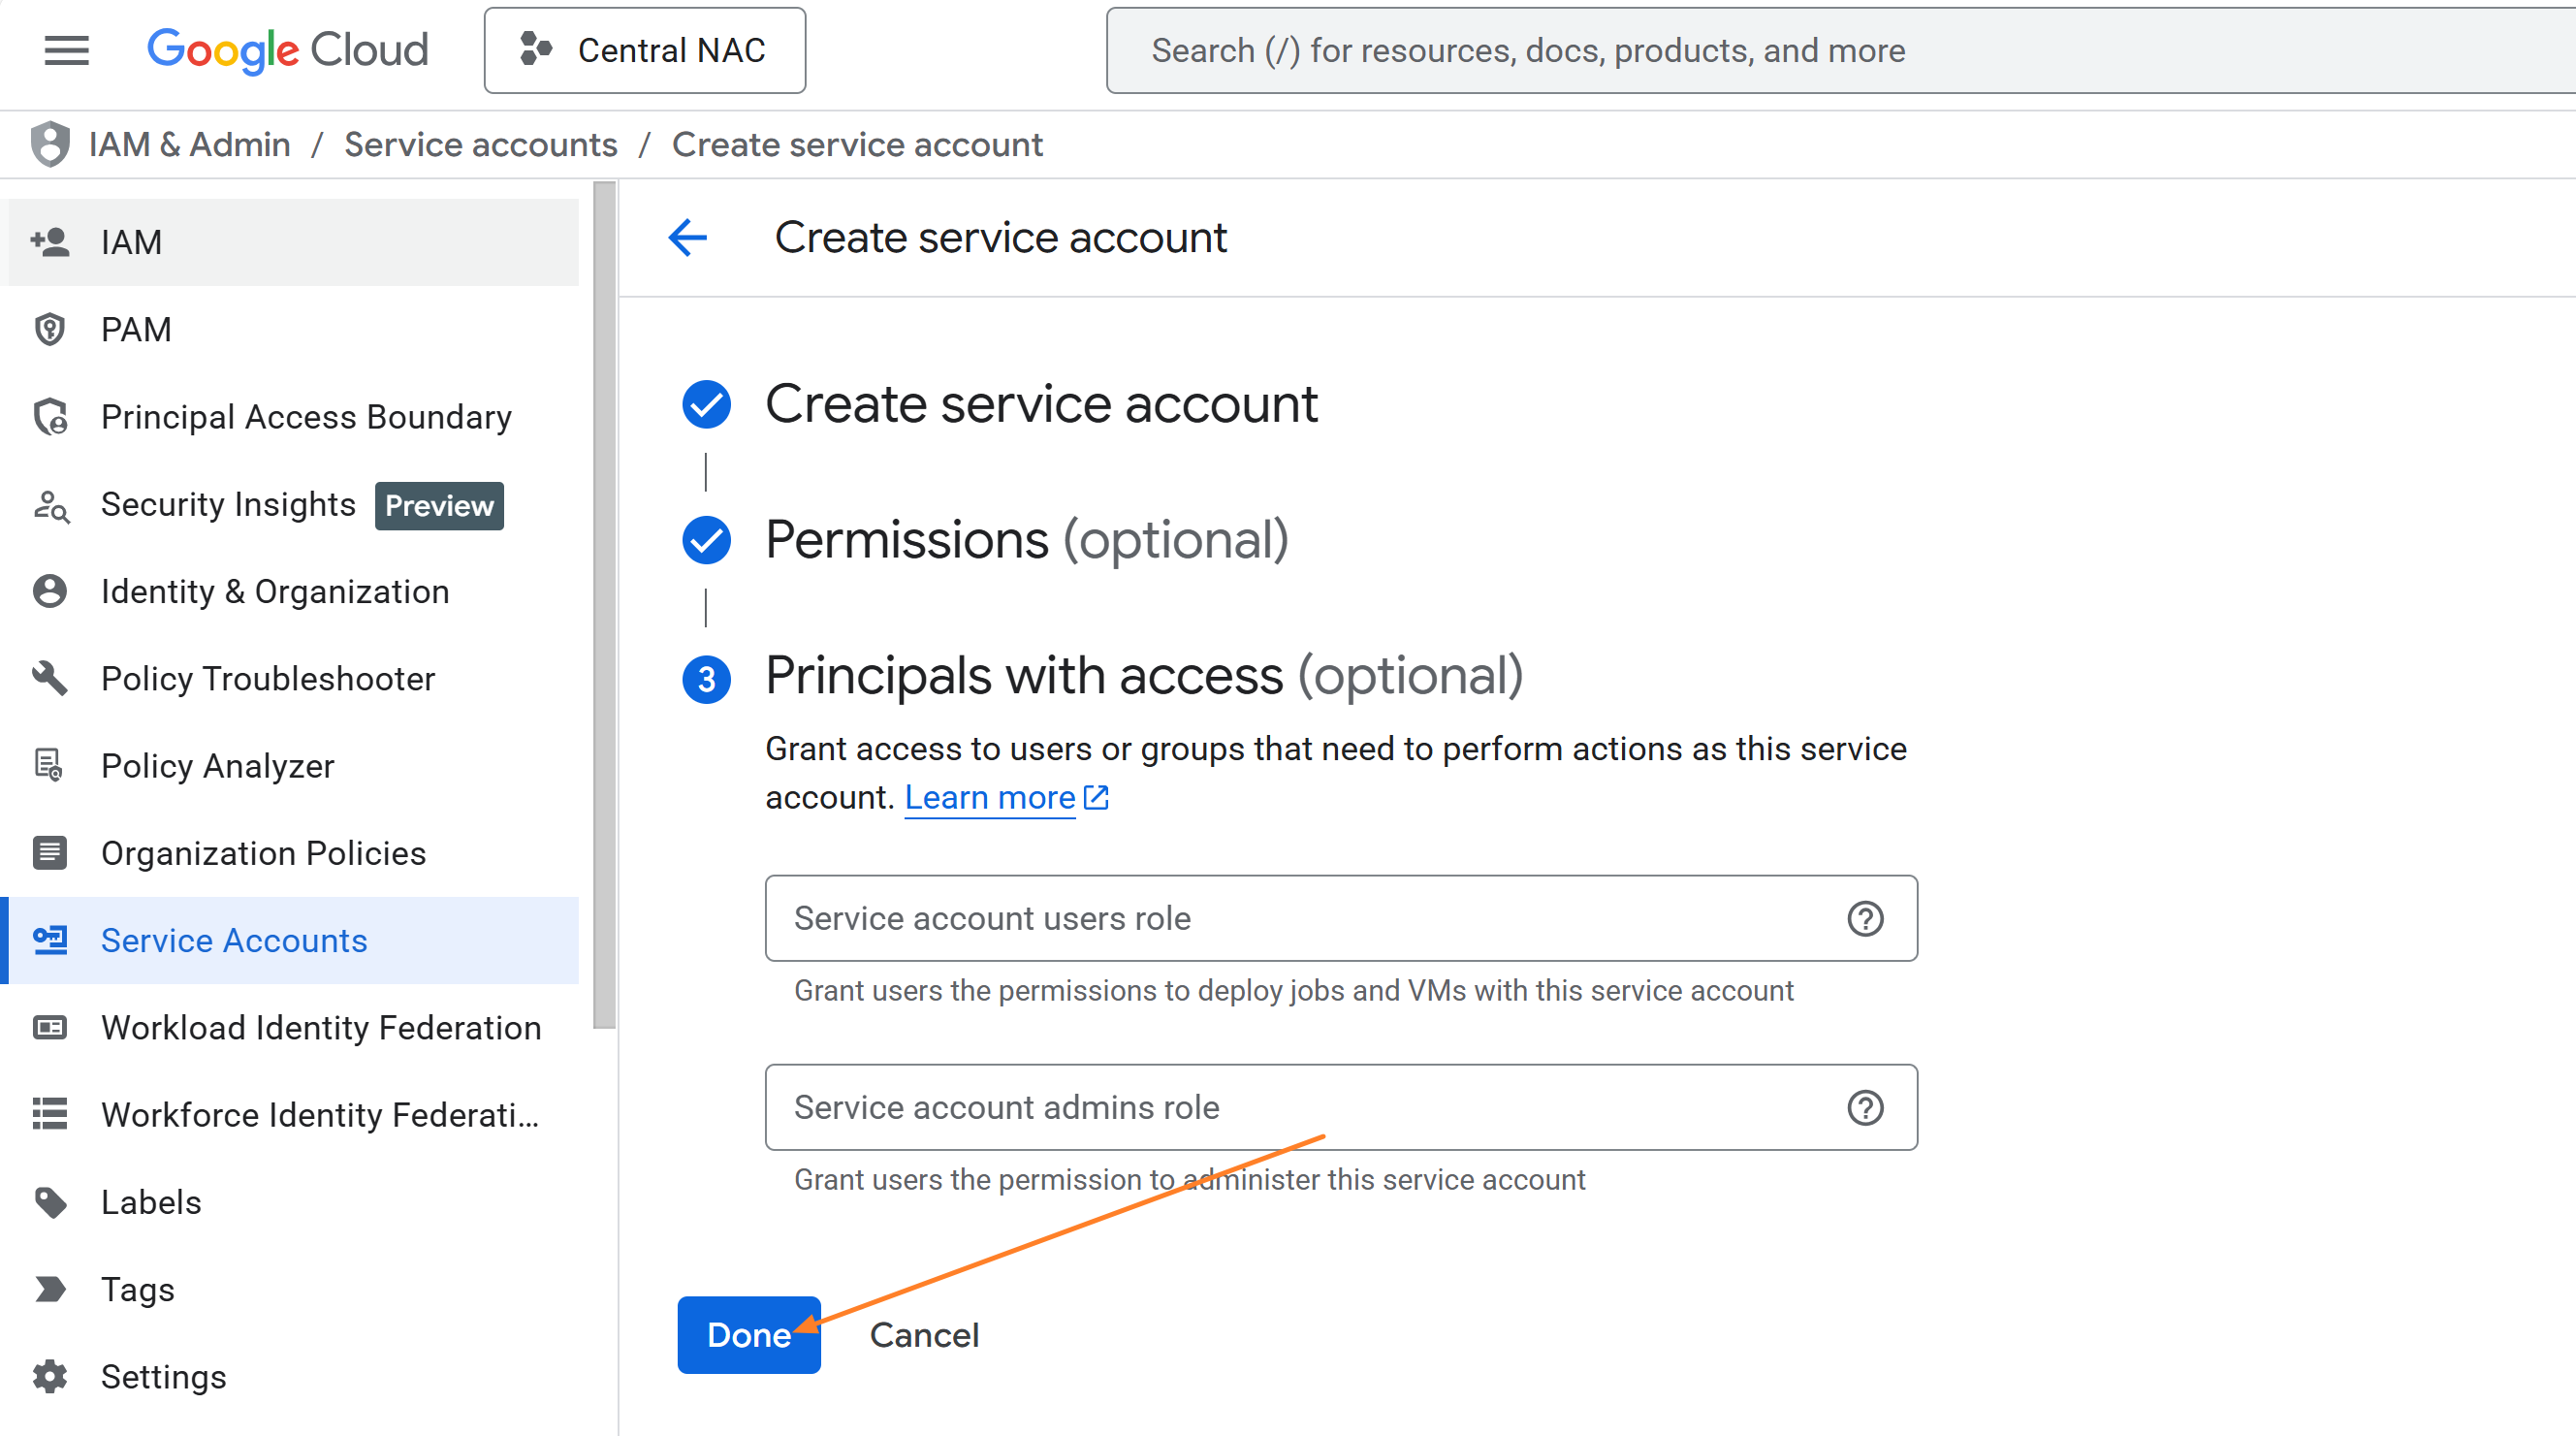
The Permissions and Principals with access section is optional and can be skipped by clicking on Continue. Click Done to complete the service account creation.
-
Once the account is created, it will be listed on the Service Accounts page. For the service account created for Central NAC, click the Actions menu and select Manage keys.

-
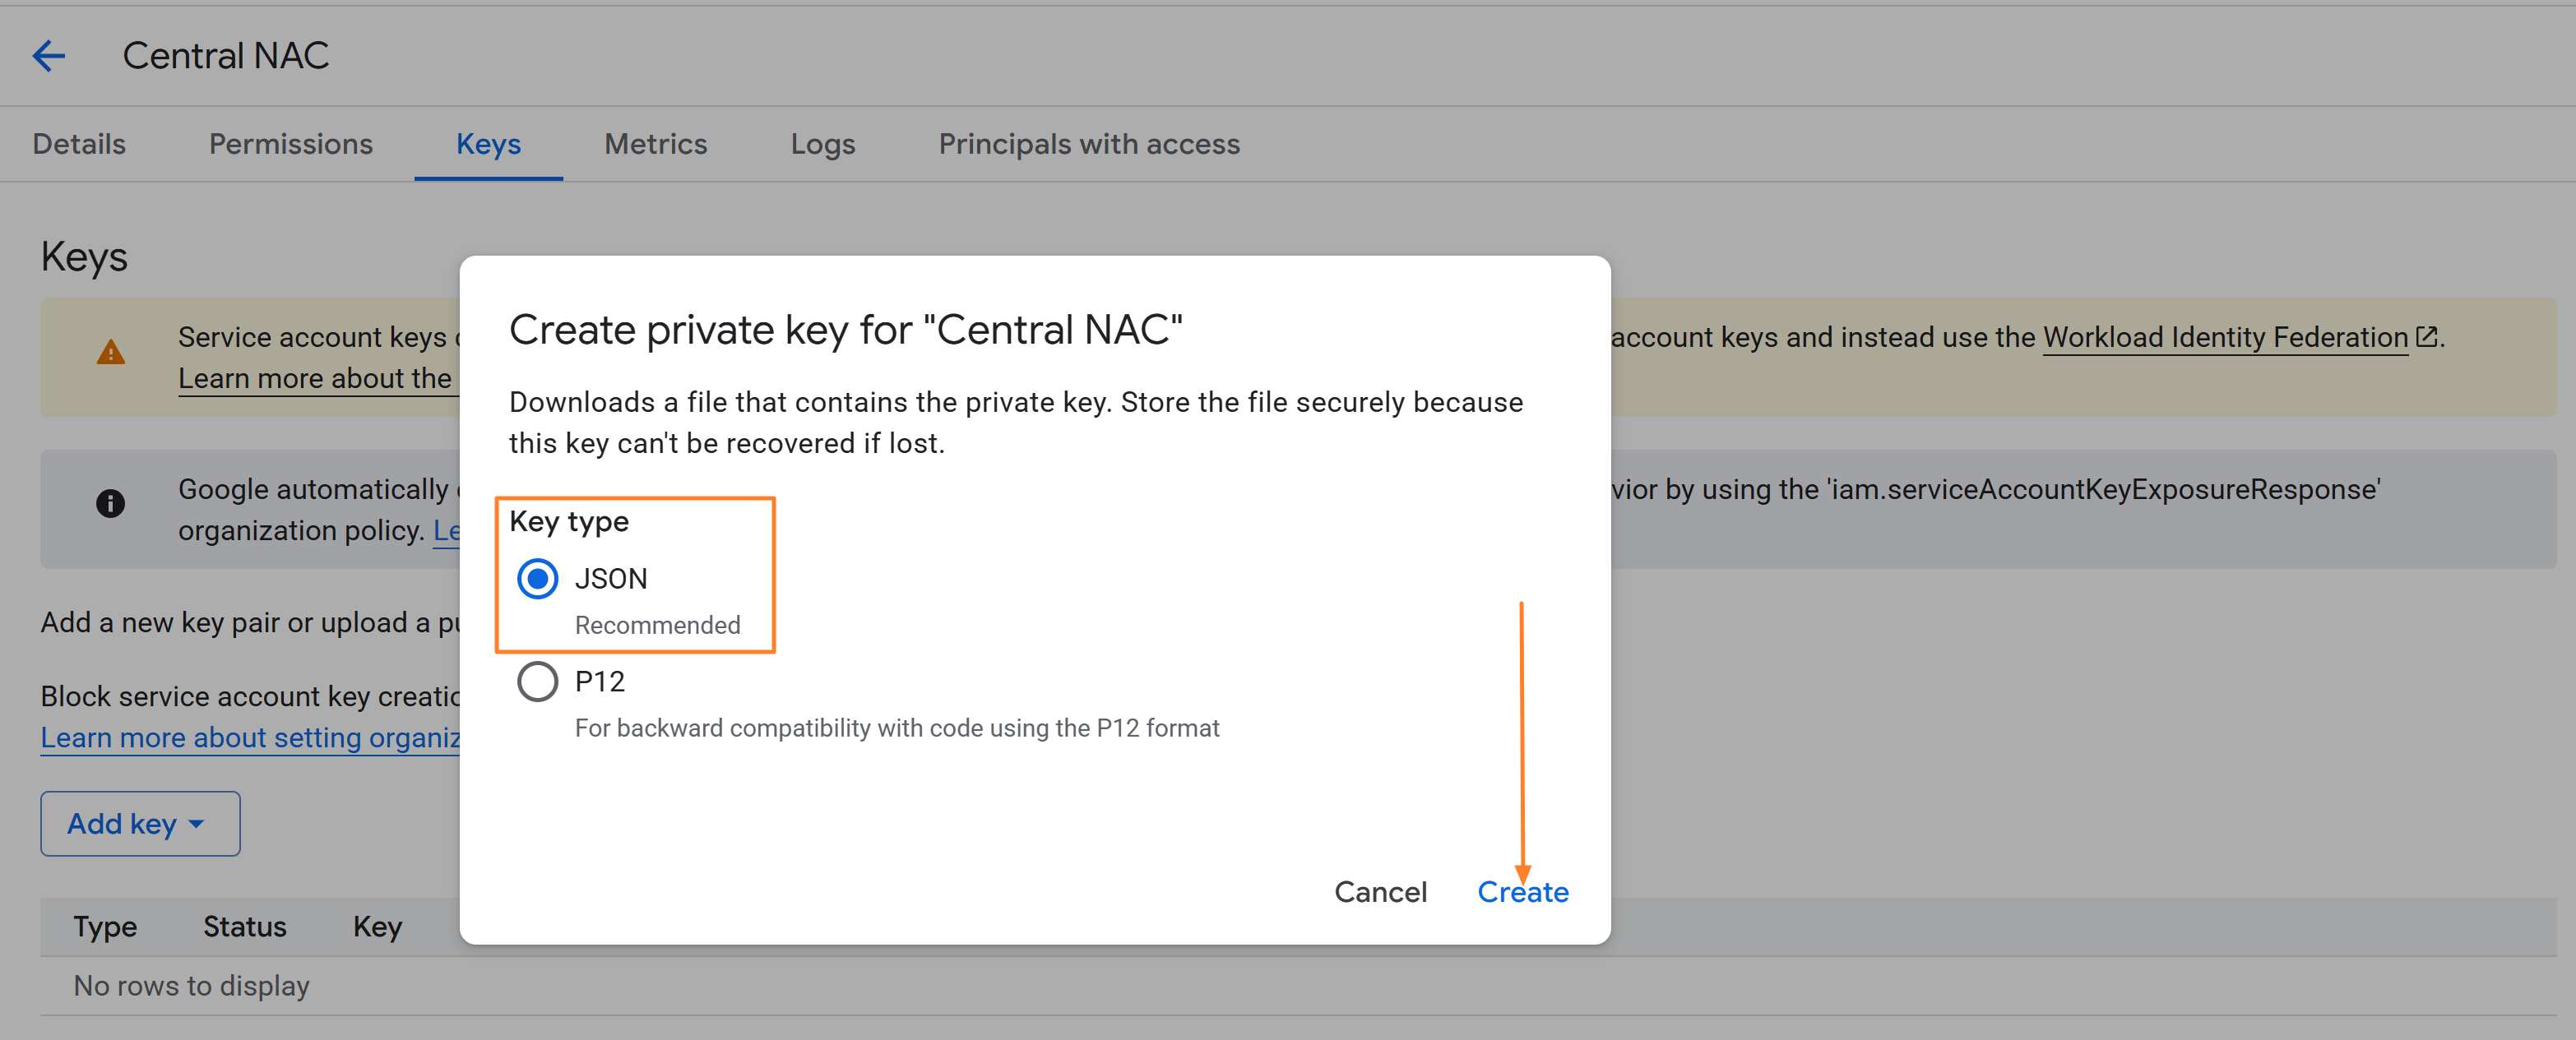
Click on Add Key and select Create new key. Choose Key type as JSON and click on Create. The keys should be downloaded to your computer.

INFO
If the service account or key creation fails due to the iam.managed.disableServiceAccountCreation or iam.managed.disableServiceAccountKeyCreation policies being enforced at the organization level, you may need to temporarily disable these policies. This action must be performed by a user with the Organization Policy Administrator role. Once the policies are set to inactive, retry creating the service account or key.
Configuring Google Workspace as IDP in Central NAC
-
Within Central NAC, Navigate to Configuration > Identity Mangement > Manage as shown below.

-
Click on Create Identity Store to create the IDP

-
Provide a Name, select Google Workspace as the identity provider and fill the form using the Customer ID, Domain, Administator Email, Client ID, Client Secret and Credentials file copied from Google Workspace.

3.2 - Microsoft Entra ID
Microsoft Entra ID App registration
To configure Entra ID as Idenity Provider in Central NAC, you will need the following information:
- Client ID
- Client Secret
- Tenant ID
-
Log into Entra ID and navigate to Entra ID > App registrations > New registration
Create new App Registration 
-
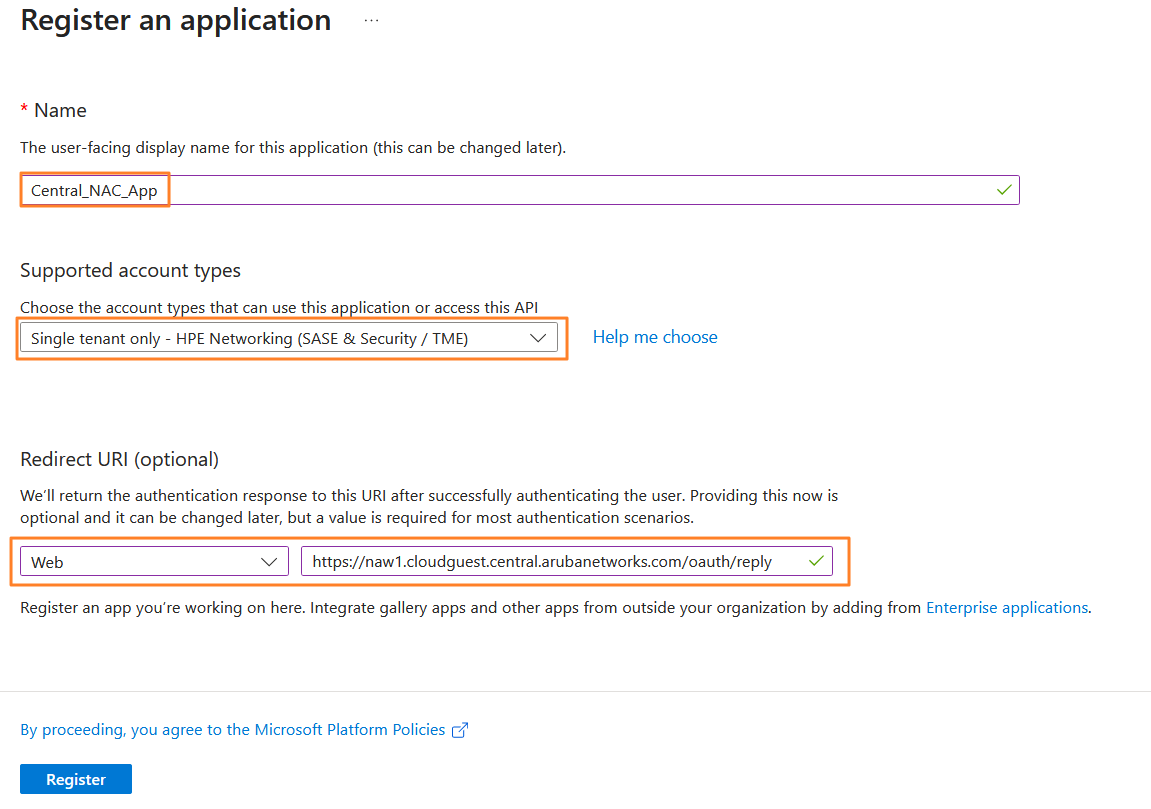
Register a New Application by filling in the form using below details.
Name → Enter your application name
Supported account types → Single tenant only
Redirect URI (Web) → Copy the Redirect URI from the configuration page of Central NAC → Identity Provider Card

-
Click Register
-
Next, Click on Add a certificate or secret to generate the client secret.
Adding client credentials 
Click on New client secret > Add a client secret, define a description and click Add

Copy the Value of client secret to use it later on the Central NAC while adding the Identity Provider.

Configuring API permissions
-
Click on API permissions > Add a permission > Microsoft Graph to start adding permissions required to make API calls to Entra ID from your Central NAC tenant.

-
Select the permissions shown in the table below and click on Add Permissions

Microsoft Graph API permissions:
| Permission | Type | Description |
|---|---|---|
| Directory.Read.All | Application | Read directory data |
| Group.Read.All | Application | Read all groups |
| User.Read | Delegated | Sign in and read user profile |
| User.Read.All | Application | Read all users’full profiles |
- Grant admin consent to the permissions added in the earlier step. Note that you will require administrative privileges to be able to Grant admin consent for the permissions.

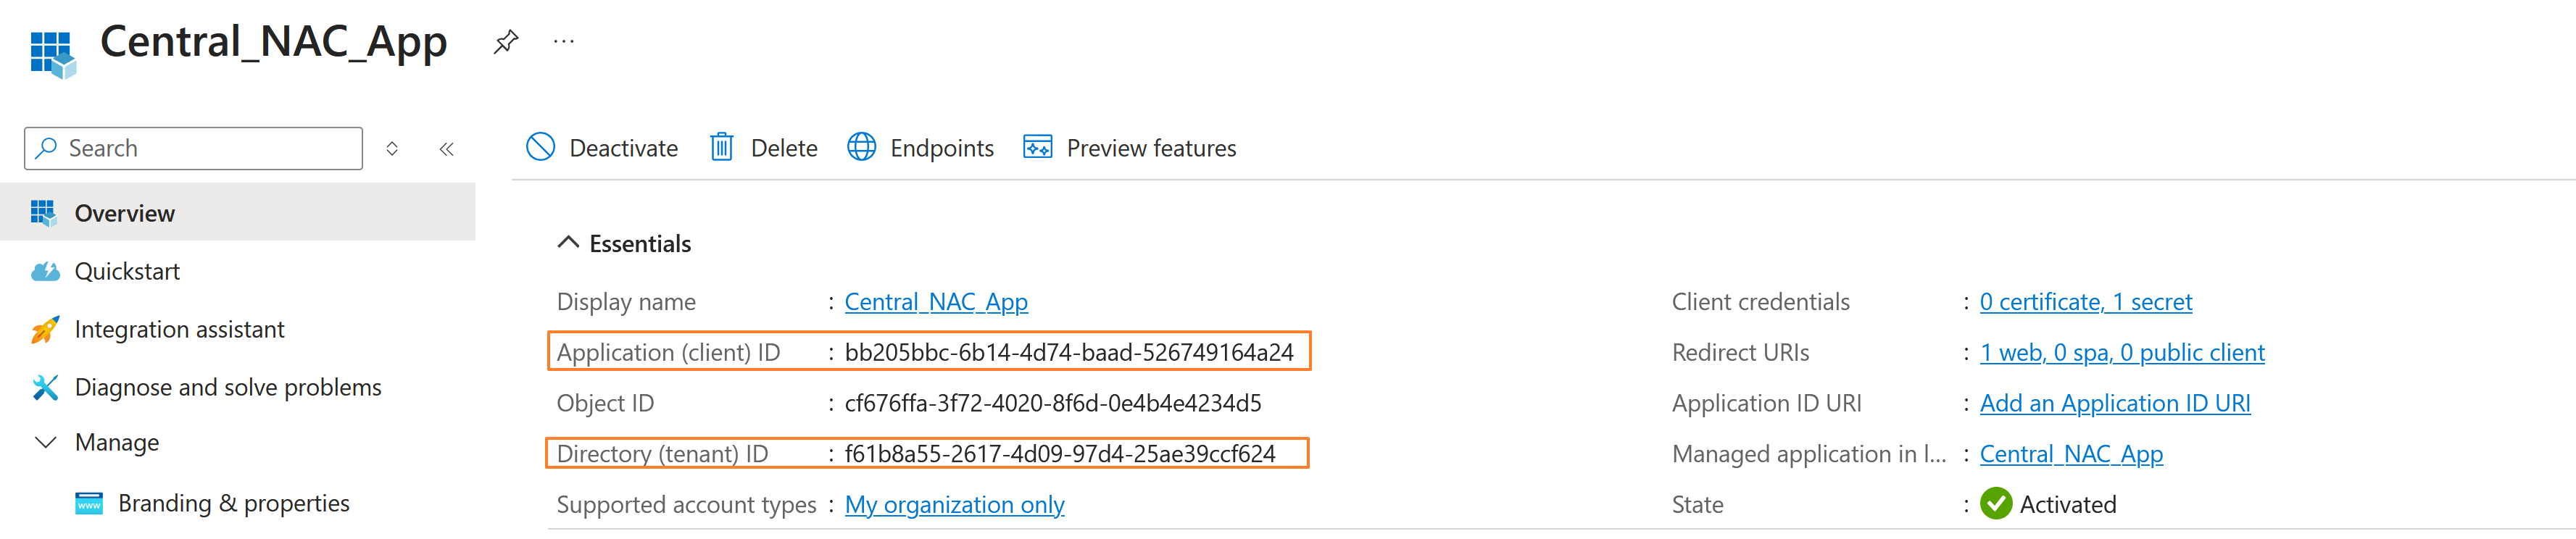
You can now copy the TenantID and ClientID from the overview page of the added application. Use the Client secret copied earlier along with the Tenant ID and Client ID to configure Entra ID as an IDP in Central NAC.
Configuring Entra ID as IDP
Within Central NAC, Navigate to Configuration > Identity Mangement > Manage as shown below.
Click on Create Identity Store to create the IDP
Provide a Name, select Microsoft Entra ID as the identity provider, and enter the Tenant ID along with the Client ID and Client Secret generated for the registered application in your Entra tenant and click on Create.

3.3 - Microsoft Intune Extension
The Microsoft Intune integration with HPE Aruba Networking Central strengthens endpoint visibility, security and compliance by combining cloud-based device management with network-level intelligence. HPE Aruba Networking Central aggregates and analyzes client attributes sourced from Microsoft Intune to enhance device classification across the network. This enriched classification enables more accurate identification of endpoints based on compliance status, device posture, and management attributes. Once classified, endpoints are automatically assigned client tags, which can be leveraged as conditional attributes within Network Access Control (Central NAC) policies to enforce granular, context-aware access decisions.
Microsoft Entra ID App registration
Steps for Microsoft Entra ID App registration is detailed in the Adding Microsoft Entra ID as Identity Provider in Central NAC technote in the following link https://arubanetworking.hpe.com/techdocs/NAC/central-nac/central-nac-idps/microsoft-entra-id/
Configuring API permissions
It is important to note that the application registered for the Microsoft Intune integration requires a distinct set of API permissions compared to the permissions used when configuring Microsoft Entra ID as an Identity Provider (IdP) in Central NAC. The Intune extension leverages specific Microsoft Graph permissions to retrieve device management and compliance attributes necessary for endpoint classification. The following permissions are required when installing and configuring the Intune integration.
Microsoft Graph API permissions:
| Permission | Type | Description |
|---|---|---|
| DeviceManagementManagedDevices.Read.All | Application | Read Microsoft Intune device configuration and policies |
| User.Read | Delegated | Sign in and read user profile |
INFO
If the same app registration in Microsoft Entra ID is used both for configuring Microsoft Entra ID as an Identity Provider (IdP) in Central NAC and for installing the Intune extension, the required API permissions can be consolidated within a single app registration. In this case, the permissions required for the Intune integration can be combined with those needed for the Entra ID IdP configuration, ensuring that all necessary Microsoft Graph access rights are granted under one unified application object..
Installing the Intune Extension on New Central
-
Login to New Central and navigate to Menu > Extensions > Manage
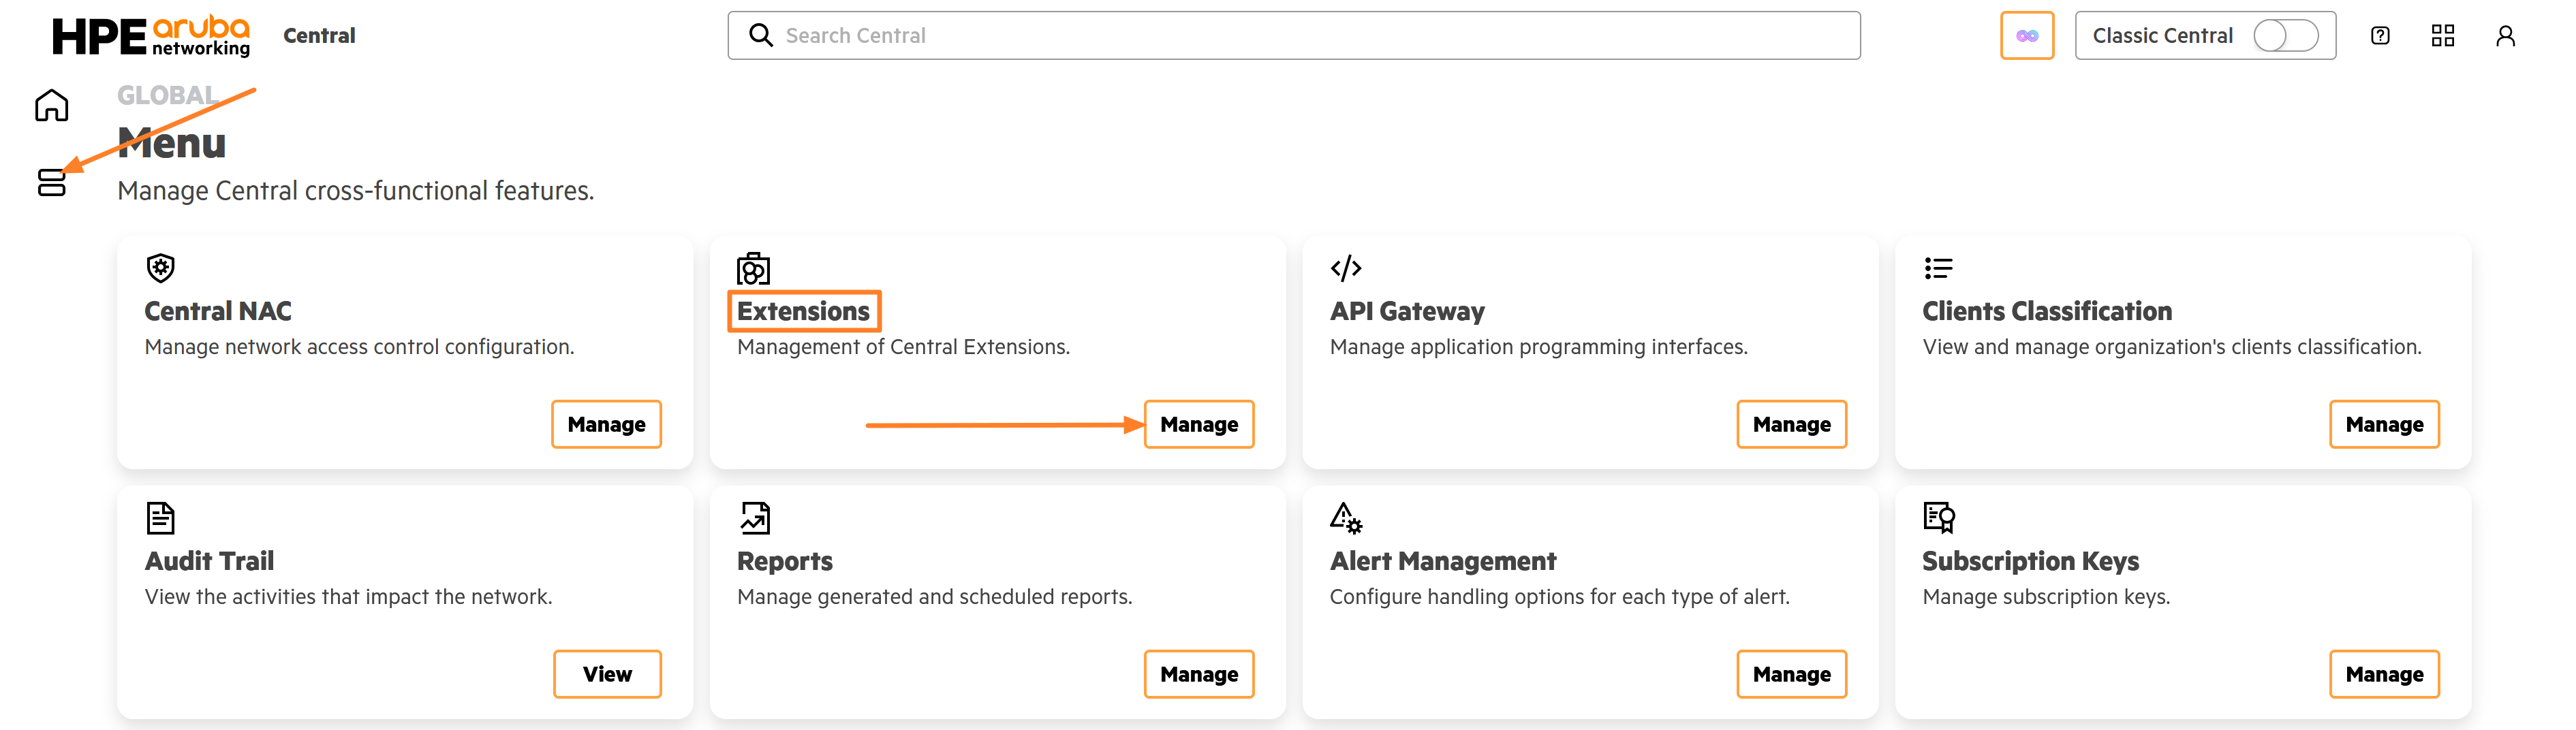
-
Click on Available Extensions > Microsoft Intune > Install
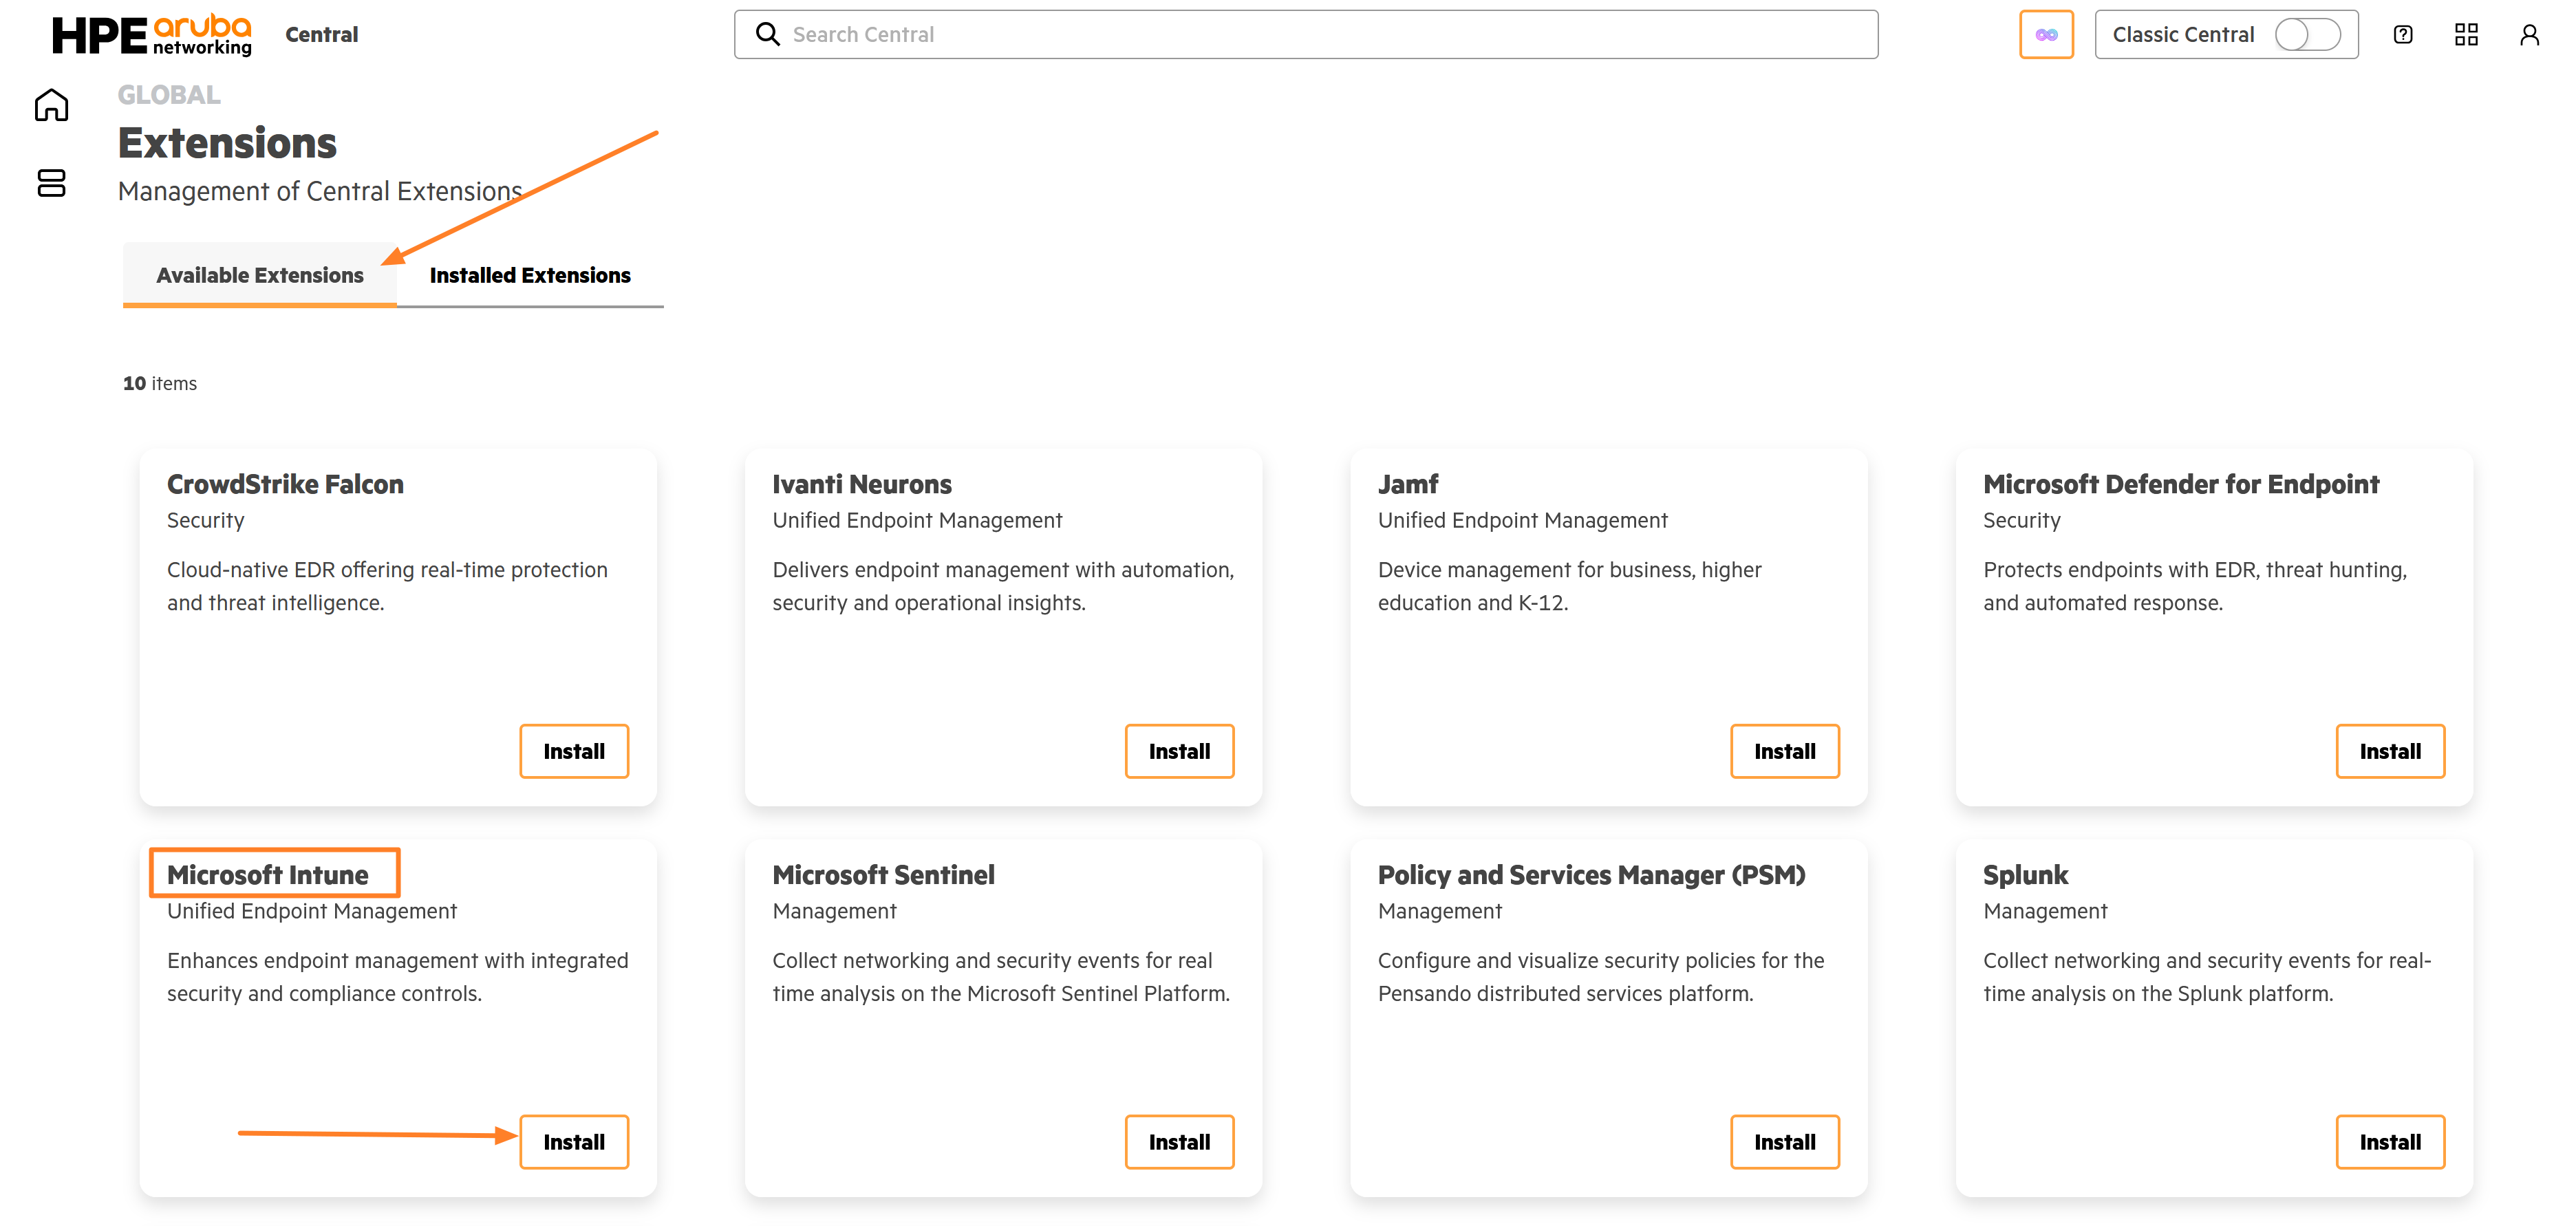
-
Fill the below details in the installation window and click on Install
Name → Give a suitable name for the extension instance
URL → Enter https://graph.microsoft.com as the URL value
Client ID → Use the Client ID generated during the application registration process in Microsoft Entra ID.
Secret → Use the Client Secret generated during the application registration process in Microsoft Entra ID.
Token Server URL → Enter https://login.microsoftonline.com/microsoft-entra-tenant-id/oauth2/v2.0/token
Replace «microsoft-entra-tenant-id» with the actual tenant-id of your Entra ID tenant.
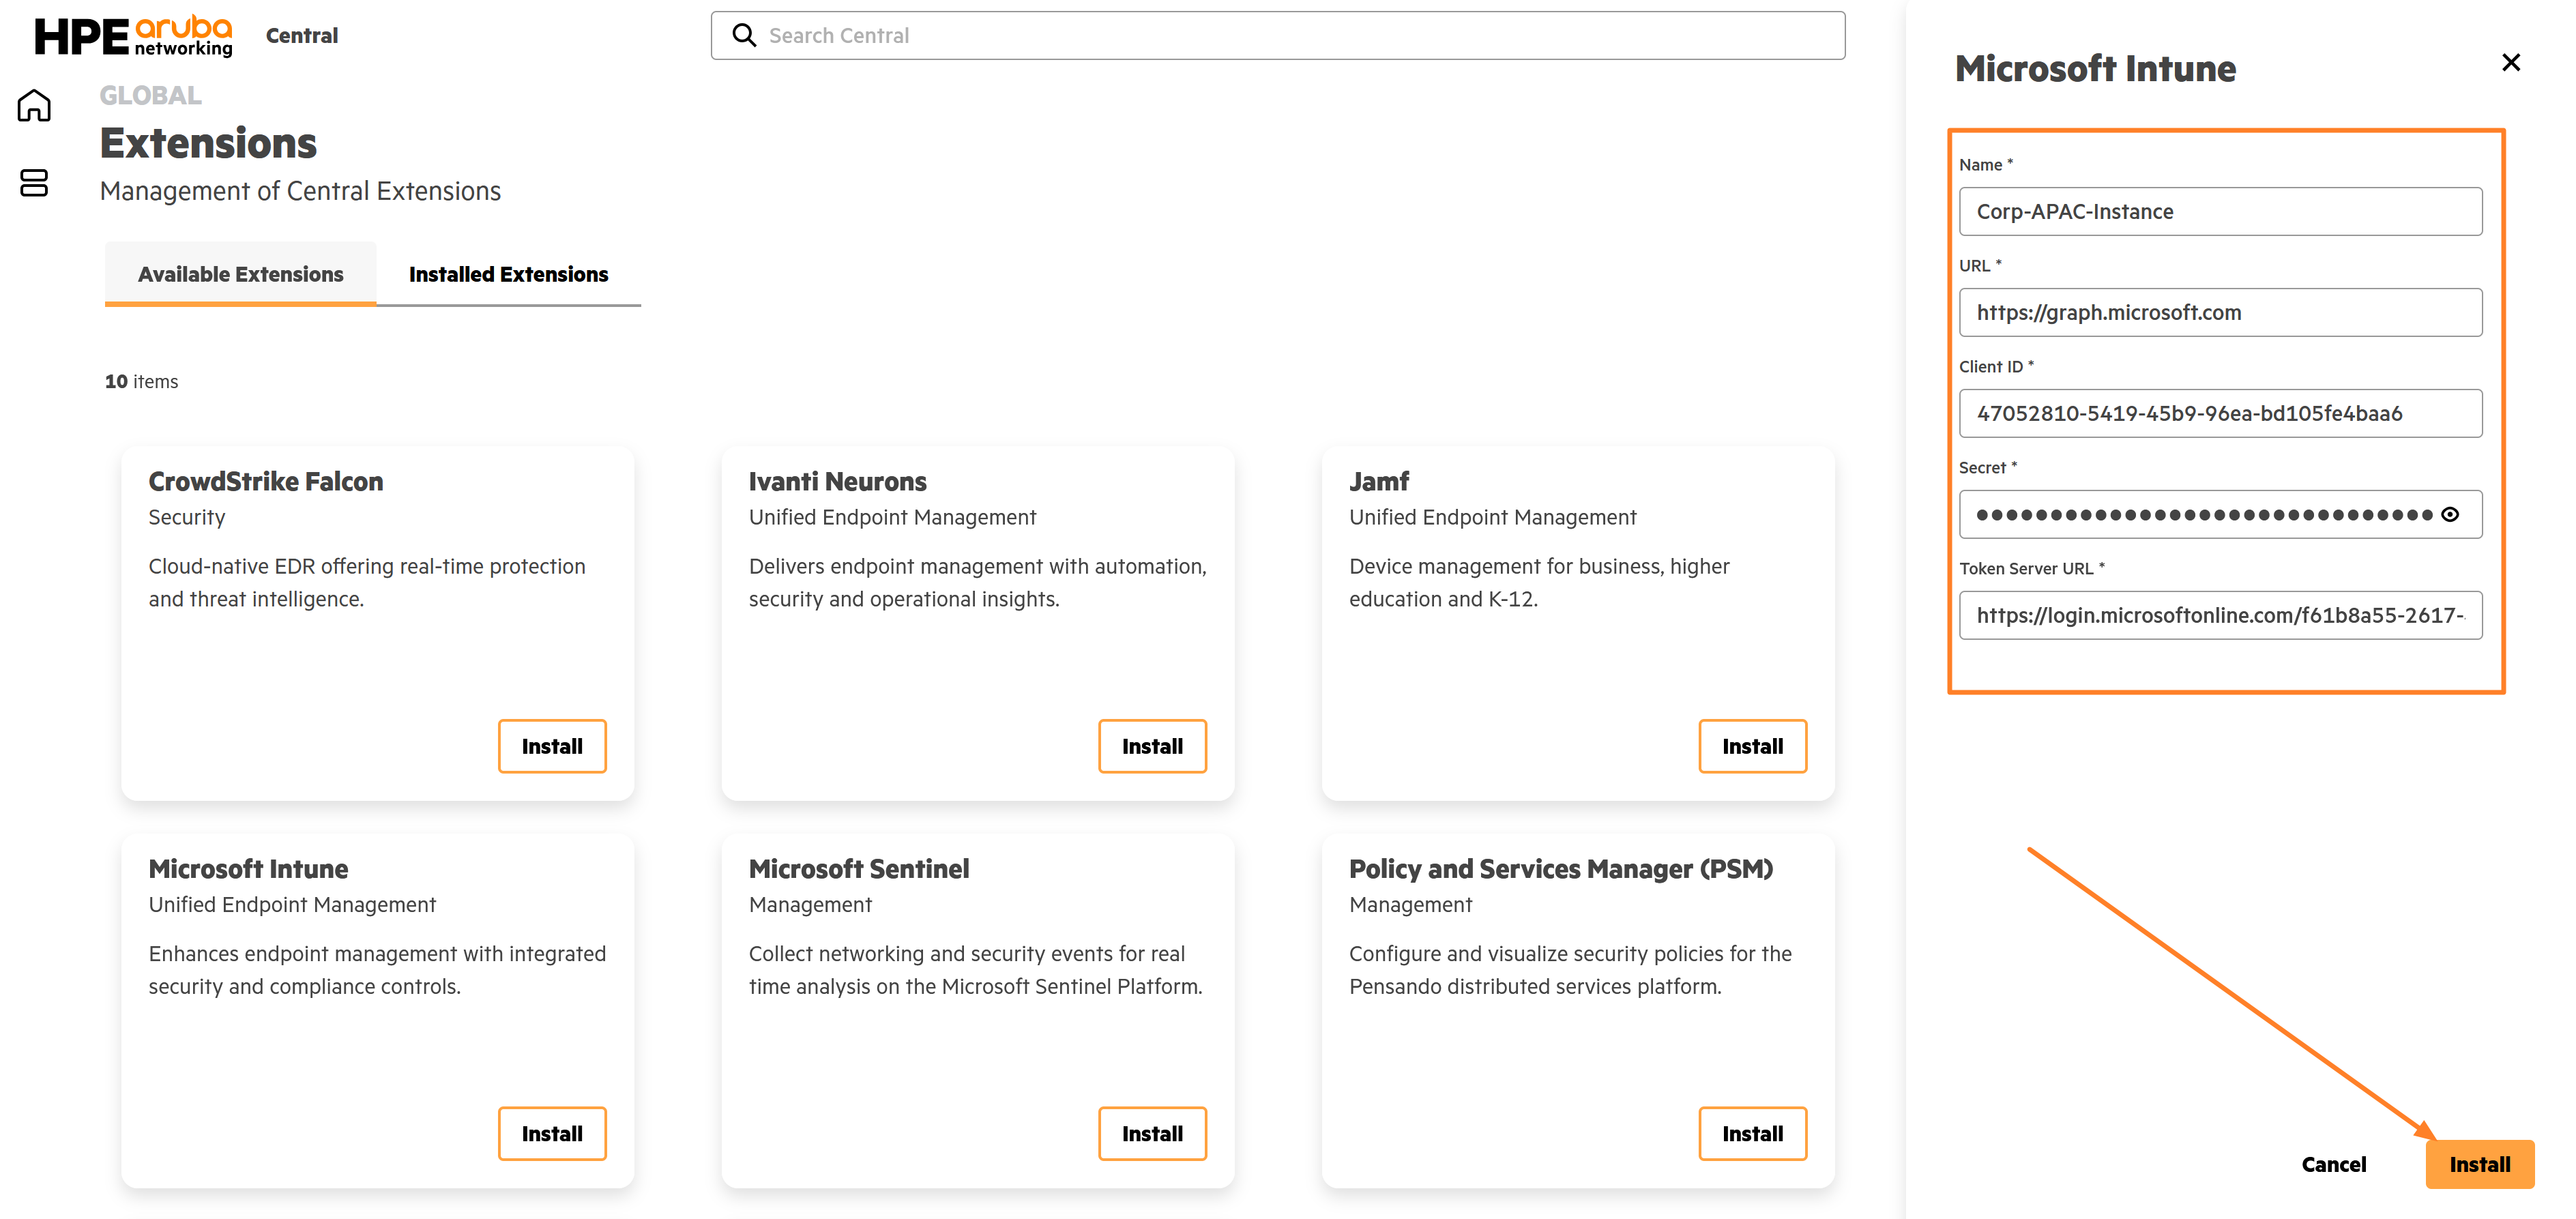
3.4 - Okta Workforce Identity Cloud
Registering Apps on Okta Workforce Identity Cloud
To configure Okta Workforce Identity Cloud as an identity provider, you must install the following applications.
-Cloud Auth OIDC
-Cloud Auth API Service
Adding Cloud Auth OIDC application
-
Log in to the Okta Workforce Identity Cloud administration console.
-
Navigate to the Applications > Browse App Catalog.

-
Select OIDC in the Functionality section.

-
Search for Cloud Auth OIDC and select the Cloud Auth OIDC application.

-
Select Add Integration and click Done.


-
Select Sign On, In the Settings section select Edit.
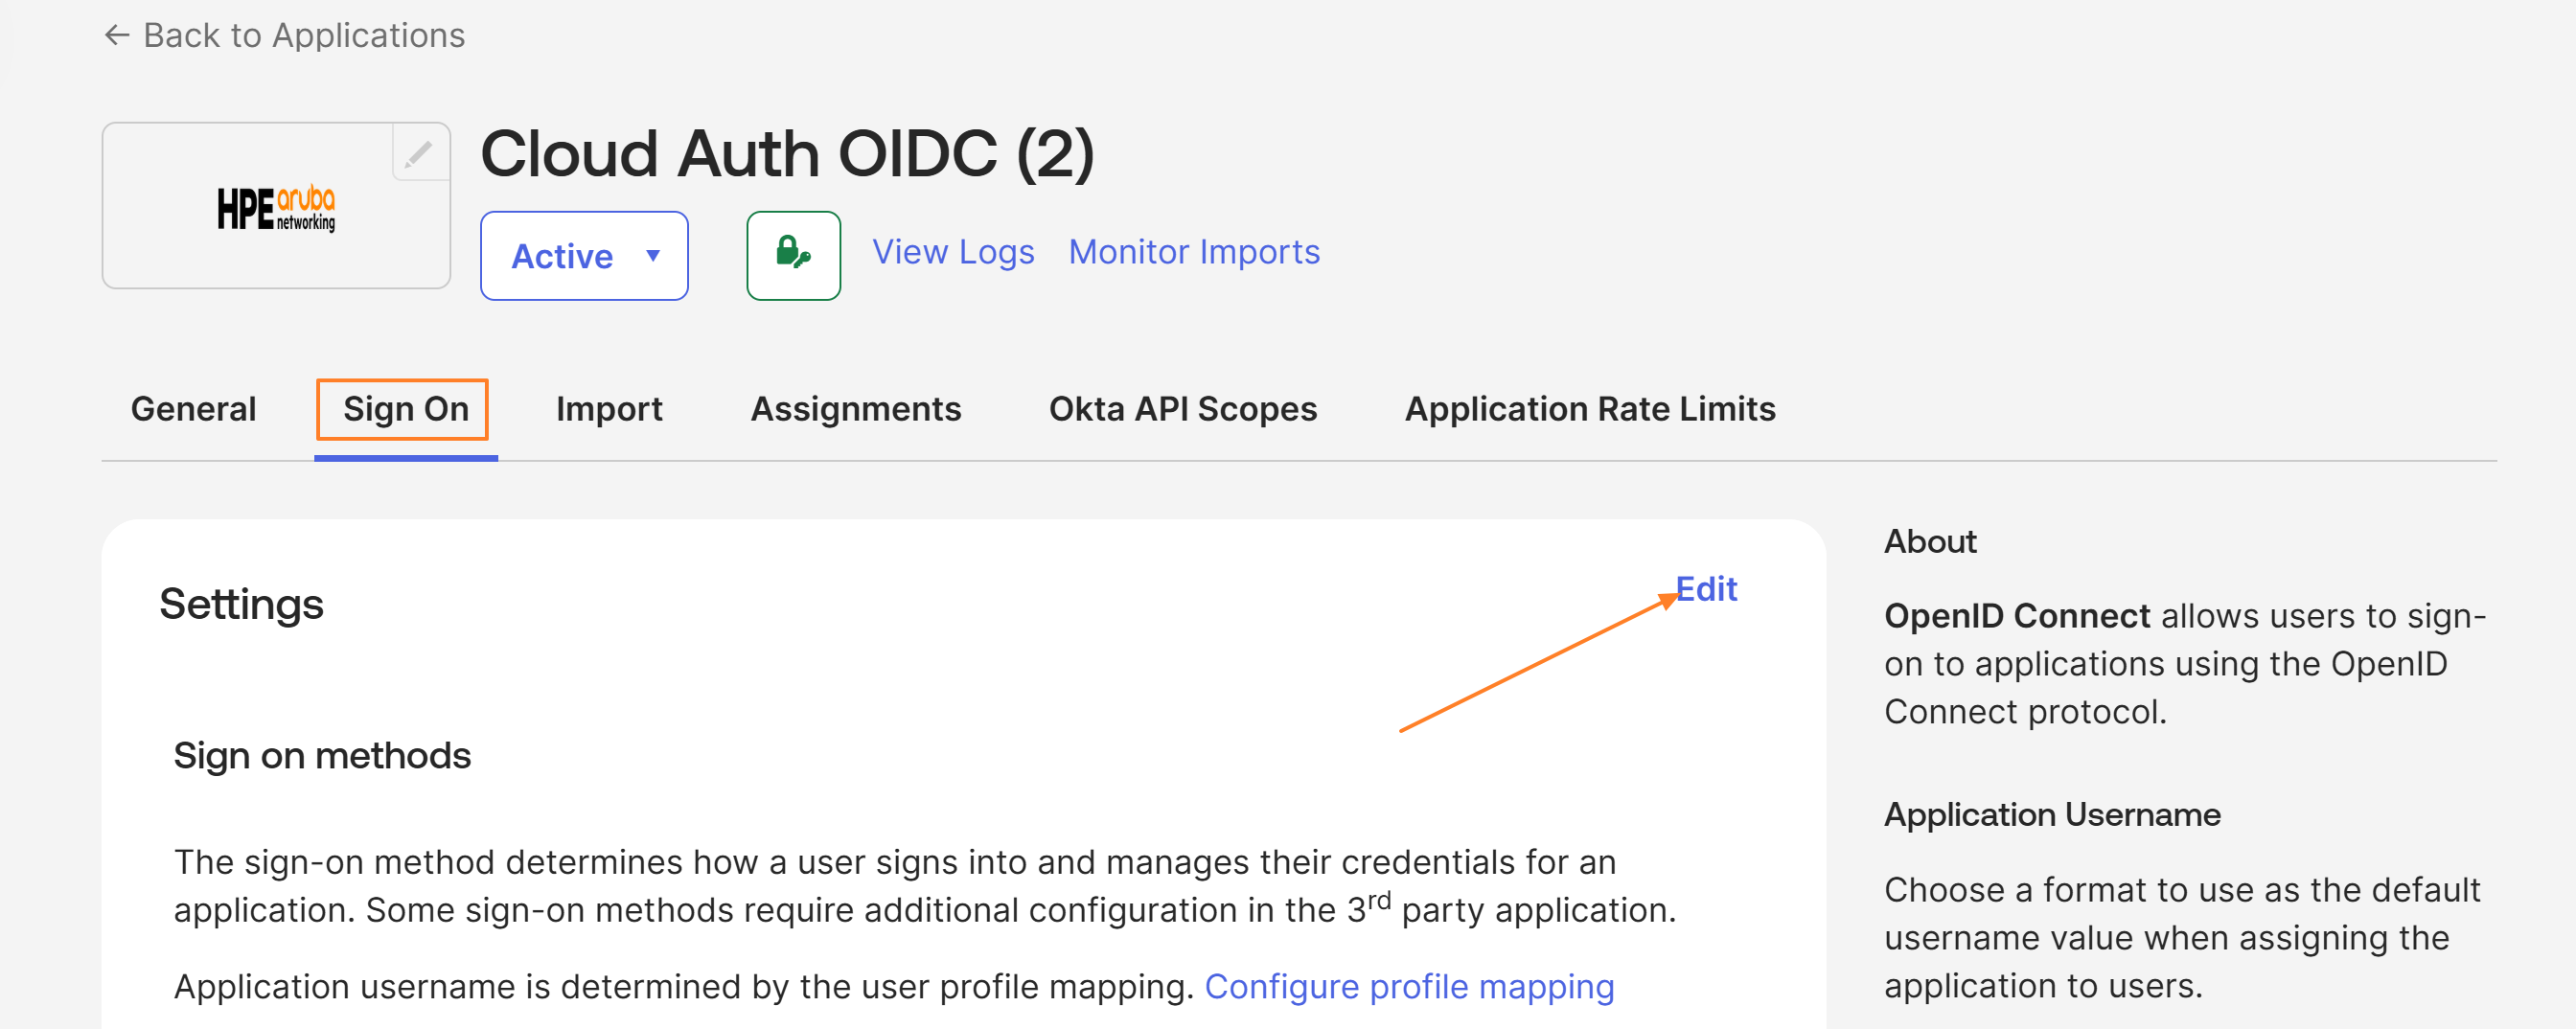
8.Login to New Central and navigate to Central NAC > Configuration > Identity Management > Create Identity Store.

-
Choose Okta Workforce Identity Cloud as the Provider and copy the Redirect URI.

-
In the Okta console, Scroll down to the Advanced Sign-on Settings. Copy the Redirect URI obtained from the Central NAC identity store and paste it in the Redirect URI field and click on Save.

-
Click on the Assignments tab and go to Assign > Assign to People

INFO
For the Cloud Auth OIDC application to authenticate a user, the user must be assigned the application.You may choose to assign the application to Groups for ease of configuration as selecting every individual user may not be feasible in production Okta tenants.
-
Search for the User or Group you want to assign the application to and Click Assign > Done.

-
Click on Sign On and copy the Client ID and Client Secret. This will be used as Client ID and Client Secret when adding Okta Workforce Identity Cloud as an IDP in Central NAC.

Adding Cloud Auth API service
-
Go to the homepage of your Okta Workforce Identity Cloud administration console.
-
Navigate to the Applications > Browse App Catalog.
-
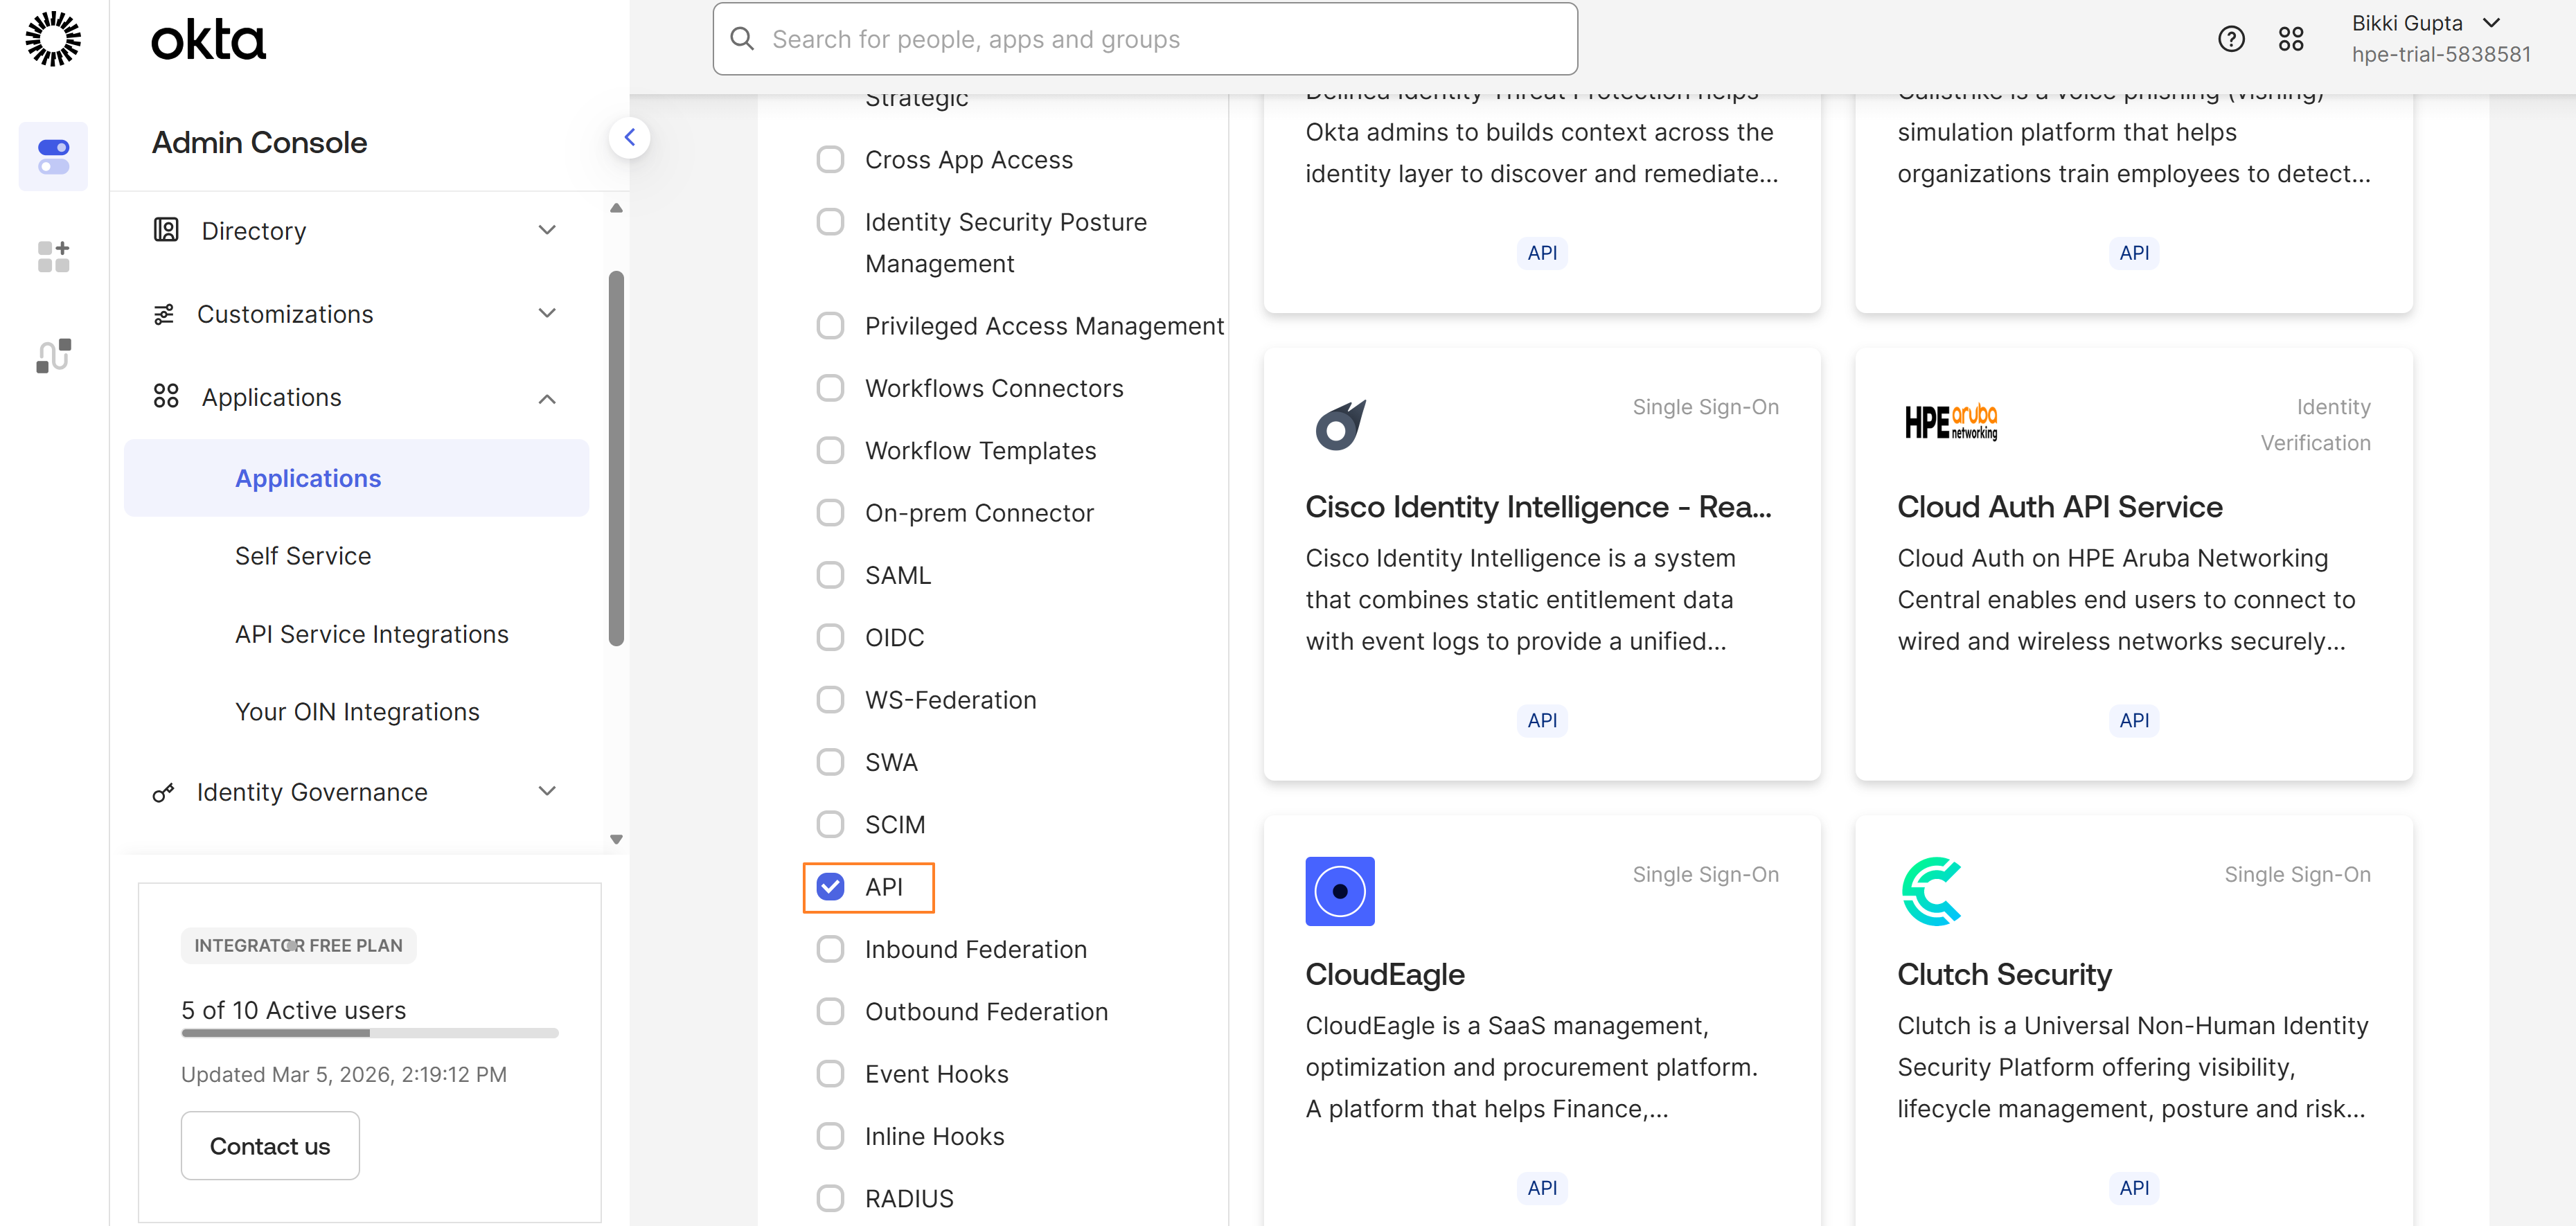
Select API in the Functionality section.
-
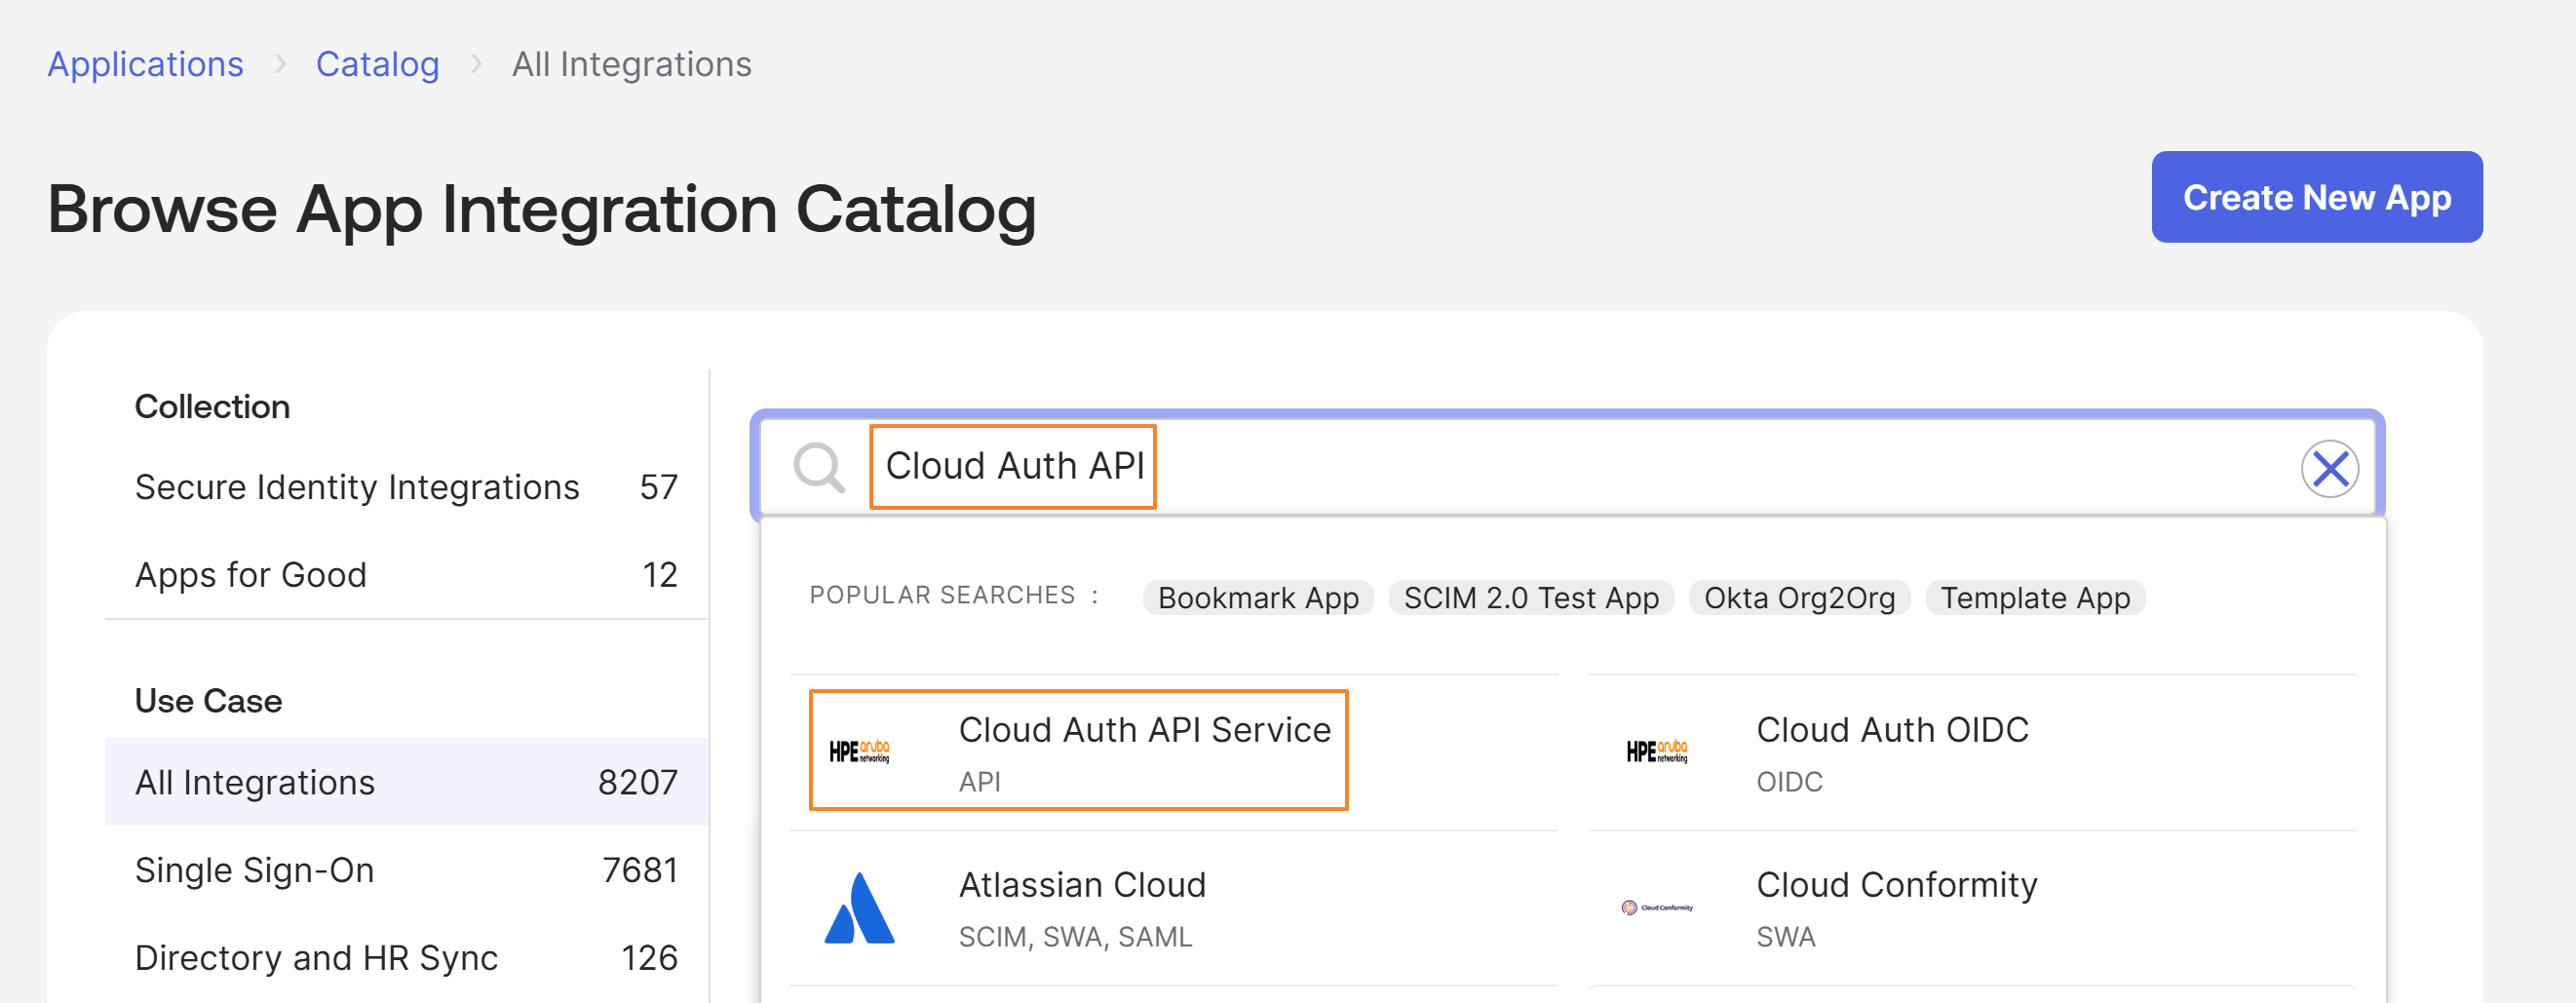
Search for Cloud Auth API Service and select the Cloud Auth API Service application.
-
Click Add Integration to proceed to the next step.

-
Click Install & Authorize, The Client Secret is then displayed. Copy it and store it safely as this will later be used as Service Client Secret while adding Okta Workforce Identity Cloud as an IDP in Central NAC.


-
From the following page, Copy the Okta Domain and Client ID. These will be needed at later steps while while adding Okta Workforce Identity Cloud as an IDP in Central NAC. Client ID copied from here will be used as Service Client ID in Central NAC.

Configuring Okta Workforce Identity Cloud as IDP in Central NAC
-
Within Central NAC, Navigate to Configuration > Identity Mangement > Manage as shown below.
-
Click on Create Identity Store to create the IDP
-
Provide a Name, select Okta Workforce Identity Cloud as the identity provider and fill the form using the Okta Domain, Client IDs and Client Secrets copied earlier from Okta Workforce Identity Cloud.

4 - Onboarding devices using Aruba Onboard
End-user device Onboarding
Employee devices can easily be configured for seamless connection to wired and wireless networks. Managed through HPE Aruba Networking Central, end users are authenticated through cloud identity stores with an enrollment link provided by HPE Aruba Networking Central. The user will be redirected to the identity store for authentication and log in.
Client devices can be configured using HPE Aruba Networking Onboard, a client app that installs wired / wireless network profile on the client device. With the profile installed, anytime the user walks into range of the network, the client device will automatically connect with the appropriate network access rules as configured by the admin through HPE Aruba Networking Central.
HPE Aruba Networking Onboard provides automatic renewals, requiring no additional onboarding steps and upkeep from the end user, while allowing the admin to change and update policies at any time. It is supported on macOS, Windows, iOS, and Android operating systems.

Onboarding workflow
Central NAC policies in Aruba Central define a set of rules and authorize users and devices to access networks. Users can authenticate through cloud identity providers like Microsoft Entra ID, Okta or Google Workspace, and download network profiles to access enterprise wireless network. After downloading the network profiles, your devices can connect automatically to the enterprise wireless network.
The following workflow shows the steps required to connect wireless devices to the network using Central NAC.

Onboarding starts from a provisioning page which takes the end users to a login page associated with the identity source configured in Central NAC. There are several different ways to distribute the onboarding URL depending upon the environment. Using QR codes is one easy and user friendly way if the goal is to onboard smart phone and similar devices that can scan a QR code. If you have a guest network with a captive portal page, the onboarding URL can be embedded in the captive portal page as well. You could also add the onboarding URL to an FAQ page on your organization’s internal portal.
The provisioning page is publicly accessible and hence onboarding can be done outside of corporate network. This, for example enables remote employees receiving new devices to onboard from their home network without having to connect to a VPN or corporate managed network.
INFO
The following operating systems support onboarding using the Aruba Onboard App:
- Windows 10 version 1803 or later versions
- Windows Server 2016 or later versions
- Android 9 or later versions
- macOS 10.13 or later versions
- iOS 12.1 or later versions
 WARNING
The iOS 15.0 and iOS 15.1 versions are not supported because of a bug in iOS. The iOS 15.2 version is supported.
Prerequisites for Onboarding
-
Ensure that you have the onboarding URL shared by the network administrator. The onboarding URL is used to connect your device to wireless network using Central NAC. You should also obtain your Microsoft Entra ID / Google Workspace / Okta credentials from your network administrator to authenticate using the URL.
-
On Windows devices, ensure that the Wi-Fi adapter is enabled to install the network profiles and connect to the network
-
For better UI rendering experience on laptop devices, ensure the screen resolution is 1920x1080 (Full HD/1080p).
Aruba Onboard Sample Videos
iPhone Onboarding
iPad Onboarding
Android Onboarding
Windows 11 Onboarding
Chromebook Onboarding
Onboarding FAQs
Q: What is the lifetime of client certificates generated through the onboarding process?
A: If using Cloud Auth and Policy in HPE Aruba Networking Central classic, the client certificate lifetime is 1 year. With Central NAC in New Central, the lifetime can be configured to be either 90 days / 180 days / 365 days
Q: How does certificate renewal work with Aruba Onboard App?
A: Onboard App notifies the user when a certificate is about to expire and prompts the user to renew the certificate. Expiration notification gets triggered when the certificate is at 80% of its lifetime.
Q: What happens when the client changes their password on the cloud based identity provider after onboarding and installing the network profile? Do the clients have to repeat the onboarding process and install a new network profile?
A: There is no impact to the onboarded device even if the user changes their Entra ID password. Once the profile is installed, the certificate within the profile is used for authentication. The device will still be able to connect to the SSID mentioned in the network profile using the certificate. It can also do a profile refresh successfully. If the user deletes the profile, only then they will need to use the new Entra ID password to login to the onboarding page to be able to download the network profile.
Q: What happens if a customer hits Cloud Identity Provider API limits?
A: Central NAC use API calls to fetch user information from Cloud Identity sources. Care must be taken that API limits are appropriately so that user authentications are not impacted.
Q: How does Aruba Onboard app handle the scenario where a USB ethernet dongle is plugged into wired port of a laptop.
A: Aruba Onboard app would install the network profile on the laptop and it would be able to authenticate successfully and connect to the network. Even if the laptop later uses a different USD ethernet dongle, the device would be still be able to connect to network since the certificate would remain the same.
Q: What certificates does Central NAC use?
A: Every Central NAC account or tenant comes with a unique root and intermediate (signing) certificate authority certificates which are used to issue certificate to onboarded devices. This is a private CA that is managed automatically by Central NAC.
Q: How to renew client certificates. Is the update only possible if the device is not in shutdown or deep sleep mode at the moment of the update?
When client certificates reach 80% of its lifetime, the Onboard app would generate a notification that the ceritficate is about to expire. User has to then open the app to renew the certificate.
Q: Private Root CA expiration - Is the client certificate automatically renewed when the private root CA expires?
A: The private CA would be renewed automatically prior to the expiration. This ensures that the client certificates will continue to work without having to renew.
Q: Central Upgrade. Does Central NAC authentication become unavailable while Central is upgrading?
A: Central NAC would continue to authenticate users even if Aruba Central is down or undergoing maintenance.
Q: If the identity source is out of service, can clients continue to authenticate?
A: Onboarding new devices requires authentication against the identity source and hence would not be possible. Existing devices that already have a profile installed will be able to authenticate successfully. If there was any changes made to the group membership of the user, those changes would only be read by Central NAC once the service is restored. So authorization would use the last known group memberships.
Q: How long does the certificate renewal take
Just as Onboarding takes only few seconds to complete, renewal also completes very quicky.
5 - Onboarding with Intune
Authors: Nicolas Culetto, Mathew George
HPE Aruba Networking Central NAC offers multiple methods for securely onboarding devices to the network.
One approach leverages the HPE Aruba Networking Onboard app, which provisions client certificates and deploys network profiles directly to endpoints. Alternatively, organizations can integrate external Public Key Infrastructure (PKI) and third-party device management platforms such as Microsoft Intune, Jamf, and Omnissa Workspace ONE, or PKI solutions like SCEPman. This integration model is supported through the Bring Your Own Certificate (BYOC) feature, as documented here: https://arubanetworking.hpe.com/techdocs/NAC/central-nac/central-nac-byoc/
However, many organizations consider managing a dedicated PKI environment to be complex, costly, or dependent on on-premises infrastructure. To address this challenge, HPE Aruba Networking Central NAC provides a streamlined alternative.
The UEM Onboard feature enables organizations to use their preferred Unified Endpoint Management (UEM) platform for device provisioning while leveraging the PKI services built into Central NAC. For each tenant, Central NAC automatically generates unique root and intermediate certificates. These certificates integrate with Microsoft Intune using the Simple Certificate Enrollment Protocol (SCEP), enabling secure certificate issuance to Intune-managed devices.
This integration allows organizations to maintain Microsoft Intune as their device management platform while relying on Central NAC’s built-in PKI to issue client certificates. Importantly, this functionality is included within the Central NAC core feature set. It does not require any additional advanced licenses or subscriptions and operates with existing HPE Aruba Networking Central subscriptions.
The high level overview of the integration is shown below with the steps being:
- Push a SCEP Profile and Wi-Fi / Wired network profile to managed devices using Microsoft Intune
- Device reaches out to the SCEP URL which is Central NAC PKI
- Central NAC issues a client certificate from the PKI that is unique to each tenant
- Device connects to network using the provisioned client certificate and network profile

Configuring Microsoft Intune UEM Integration
The different configuration steps required for the integration on Microsoft Entra ID, Microsoft Intune, Central NAC are covered below. The only pre-requisite is that a 802.1X capable WLAN should be created and assigned to the appropriate scopes.
Configuring Entra ID Identity Provider and Intune Extension
With Intune being used for device management, the assumption is that Entra ID is also going to be used as user identity provider. Steps to add Entra ID as IDP is described here: Adding Entra ID as IDP in Central NAC
Intune also needs to be added an extension in New Central. Steps to add Microsoft Intune Extension is described here: Adding Microsoft Intune Extension in New Central
Configuring API permissions
New Central has 3 different integrations with Entra ID and Intune. Intune extension is used to fetch device attributes like management state, compliance state etc. Entra ID can be added as IDP for doing authorization lookups for users and finally there is the UEM Onboard integration which we described in the beginning. There are different API permissions required for each of these and the table below captures each of them in case you want to use a single app registration for all 3 use cases. The use case column in the table captures which use case the permission is used for.
INFO
Note that the table below is a superset that contains the permissions documented in others sections while adding Entra ID as IDP and Intune Extension. If you added those permissions already, only additional ones required are those tagged with Use Case “Central NAC UEM Onboarding”
API permissions > Add a permission

We need to add API permissions for Microsoft Graph and Intune

Microsoft Graph API permissions:
| Permission | Type | Description | Use Case |
|---|---|---|---|
| Application.Read.All | Application | Read all applications | Central NAC UEM Onboarding |
| DeviceManagementManagedDevices.Read.All | Application | Read Microsoft Intune device configuration and policies | Central NAC UEM Onboarding, Central Intune Extension |
| Directory.Read.All | Application | Read directory data | Central NAC IDP |
| Group.Read.All | Application | Read all groups | Central NAC IDP |
| User.Read | Delegated | Sign in and read user profile | Central NAC IDP, Central Intune Extension |
| User.Read.All | Application | Read all users’full profiles | Central NAC IDP |
Microsoft Intune API permissions
| Permission | Type | Description | Use Case |
|---|---|---|---|
| get_device_compliance | Application | Get device state and compliance information from Microsoft Intune | Central Intune Extension |
| scep_challenge_provider | Application | SCEP challenge validation | Central NAC UEM Onboarding |
Finally, grant admin consent to the permissions added

Configuring WLAN
Add a 802.1X enabled WLAN in New Central config library and assign to appropriate scope. Note that the WLAN can be either bridged or tunneled. This integration only requires that the authentication server be selected as Central NAC

Authentication Profiles
An authentication profile is needed to map the auth method and IDP to the network created. An Authorization Profile should also be created to assign appropriate level of access to users. Details about authentication and authorization profiles are described here: https://arubanetworking.hpe.com/techdocs/NAC/central-nac/central-nac-authorization/
If you do not have an authentication profile, create one by following the steps below. If you already have created one, you can skip this section.
Navigate to Menu > Central NAC > Configuration > Authentication Profiles > Create Profile

Under network, select the 802.1X enabled network created in the config library in New Central. In this example, the SSID name is “Luconik”
Under UEM Onboarding, click on “+” to add the Intune extension which was created earlier

Give a display name, select type as Microsoft Intune and select the Intune extension created earlier from the drop down


The user onboarding URL will be available once the profile is created
Click on the authentication profile we just created

Click on the UEM Onboarding profile created (now green)

You should now be able to see the SCEP URL and the button to download the SCEP server certificate

Copy the SCEP URL and download the SCEP server certificate to be used in Intune SCEP profile
Intune Configuration
There are 3 configuration objects that have to be created in Intune:
- Trusted Certificate
- SCEP Profile
- Wi-Fi or Wired network profile
INFO
Note that Intune requires separate profiles be created for each device platform. So if you want to enable UEM Onboarding for Windows, iOS and Android, you need to create separate trusted certificate, SCEP and Wi-Fi / Wired profiles for each platform resulting in a total of 9 profiles
Creating a Trusted Certificate profile
The trusted certificate profile in Intune is used to install root CA certificates that should be used for validating the server certificate presented by SCEP server. The sample Intune configuration shows how to setup the trusted certificate profile for Windows 11 devices.
To create a trusted certificate, navigate to Device > Configuration > Create > Select appropriate platform type > Select “Profile type” as Templates and select the template called “Trusted Certificate”

Input a Name for the trusted certificate > Next

Import Intune SCEP certificate from Central NAC Authentication profile > Next

Add appropriate user and device groups the trusted certificate should be deployed to > Next

Review and create

Creating a SCEP profile
Simple certificate enrollment profile is required to provision client certificates for end user devices. The sample configuration shows how to setup the SCEP certificate profile for Windows 11 devices.
You can create a new SCEP profile from Intune > Devices > Configuration > Policies > Create . As we did before for the trusted certificate, select the appropriate platform and the profile template as “SCEP Certificate”.

Is it recommended to use the subject name as {{UserPrincipalName}}. If the subject name has to be something else, ensure that the {{UserPrincipalName}} is included in Subject Alternate Name (SAN) UPN field since the UPN value is required to do user group membership lookup against Entra ID.

INFO
The preferred SAN URI format is cnac+intune:///?DeviceId={{DeviceId}}
The following formats are also supported for backwards compatibility with existing deployments:
DeviceId:{{DeviceId}}
DeviceId:{{DeviceId}},AAD_Device_ID:{{AzureDeviceId}}
DeviceId:{{DeviceId}},AAD_Device_ID:{{AzureDeviceId}},UserPrincipalName:{{UPN}}
{{DeviceId}}
DeviceId={{DeviceId}}
Enter the SCEP URL copied from Central NAC UEM Onboarding screen earlier

Assign to appropriate groups as needed, review and create

Creating Wi-Fi Profile
Finally we have to create a Wi-Fi profile that uses the client certificate obtained through SCEP enrollment to connect to the network. The sample configuration shows how to setup the Wi-Fi profile for Windows 11 devices.


For “Certificate server names” either leave as blank or enter the name of the 802.1X SSID that was mapped in Central NAC EAP Authentication Profile. Select the SCEP certificate as the trusted root certificate and select the SCEP profile that was created earlier.

INFO
If you want to lock down the “Certificate server names”, it has to be the name of the 802.1X SSID that was mapped in the Authentication profile. Central NAC creates a SSID specific server certificate for each 802.1X enabled SSID. Hence the name of the server cert presented to the supplicant as part of the EAP-TLS exchanges would be that of the SSID itself.


Validation
Log into the PC with Entra ID Account
Check in certmgr.msc if the device has received the Root Certificate and user certificate.


In Network & Internet, check if the SSID provisioned through Intune shows up under “Wi-Fi > Manage Known Networks”

Open Wi-Fi connection, select the provisioned SSID (Luconik) and the device should connect without any additional prompts

Validate the authentication from Aruba Central NAC by navigating to NAC Monitoring in global view

Select Clients to see the active connection

And click on the user to see all the connection information like “Assigned role” in Authorization widget, the device info which includes device profiling data as well as the Client Tags from Intune Extension in the Classification widget

6 - Authentication and Authorization
Central NAC enforces strong authentication methods, ensuring that only authorized users or devices can access the network. This typically involves certificates or unique pre-shared keys to verify the identity of users and devices. Authentication ensures that each individual or device requesting access is properly identified before being granted entry.
Once authentication is successful, Central NAC uses granular authorization policies to determine the level of access granted. These policies are based on various factors, such as the user’s group membership in identity store, location, authentication method, device category, compliance and other context around the device.
Central NAC monitoring dashboard can be used to monitor the authentication status and troubleshoot connectivity issues whether its bad credentials or authorization failure.
Central NAC triggers a re-authentication whenever there is a change in the context of the user or device, prompting a re-evaluation of the access policies. This approach ensures that Zero Trust is enforced dynamically by continuously verifying the user and device context. User context is available in the form of IDP group membership and device context in the form of client tags and category from Aruba Central client insights.
Configuring Authentication and Authorization profiles
Here are the steps to configure authentication and authorization profiles in Central NAC:
- The first step is to create WLAN and wired port profiles and assign to appropriate scope. Note to select Central NAC as the authentication server.
- Configure identity providers needed for authentication and authorization. Steps to configure IDPs are documented at:
https://arubanetworking.hpe.com/techdocs/new-central/content/nac/config-identity-store.htm
- Configure an authentication profile to select the authentication method and IDP to to be used with a particular network.
- Configure authorization policies that provide appropriate level of access based on the user and device context. Authorization policies have pre-conditions that determine which policy would be used. When a policy is first created, it would only have the Deny All rule within it. Additional rules would have to be configured that specify the role / vlan / session timeout to be returned after a successful authentication. Rules can be used to assign different enforcement actions like role, VLAN ID and session timeout.
Frequently Asked Questions
Q: If any change is made to the authorization policy, does it impact connected users?
A: New policies will be applied when the client reauthenticates. Changing policies does not trigger a mass re authorization
7 - Bring Your Own Certificate (BYOC)
Central NAC provides an easy onboarding workflow for devices to connect securely through the Aruba Onboard App. This is a great solution for organizations looking for an easy way to onboard devices without having to deal with the complexities of managing a PKI or device management infrastructure. However, for organizations that already have PKI and device management solutions, the preferred approach would be use existing tools to provision devices. The Bring Your Own Certificate (BYOC) feature in Central NAC now allows the use of external PKI as part of authentication flows.
One example is where organization wants to use Microsoft Cloud PKI to issue certificates and Microsoft Intune to push wired and wireless profiles. In this example, Microsoft Intune would push certificates and network profiles to the devices which then authenticate against Central NAC when they need network connection.
Central NAC now allows uploading server certificate and trusted CA certs that will be used for EAP-TLS authentication. The ability to add trusted CAs enables Central NAC to trust certificates issued by external certificate authorities. Apart from validating trust, Central NAC can also perform OCSP checks to validate the status of the certificate before allowing access.
Configuration steps
The configuration steps to enable the BYOC feature are:
INFO
Steps to create a WLAN and corresponding authentication and authorization profiles are described at : https://arubanetworking.hpe.com/techdocs/NAC/central-nac/central-nac-authorization/
- Create an 802.1X WLAN and assign it to appropriate scope with the authentication server as Central NAC
- Navigate to Central NAC > Authentication Profile and create new profile as described in the following steps
- Set the authentication type as EAP
- Select the 802.1X network created in step #1. Enable wired authentication if needed
- Select appropriate identity store to authorize the users if needed. (optional)

- Under EAP Settings > Certificate select “Custom certificate” to enable BYOC
- Under EAP Server Certificate paste the server certificate. The certificate needs to be in PEM encoded X.509 format in the order leaf server certificate followed by the intermediate certificates and finally the root CA
INFO
The server certificate can either be self signed or signed by a public or private CA
- Provide the PEM encoded private key
- If the private key is encrypted, provide the private key passphrase under EAP Server Key Passphrase. If the private key is unencrypted, leave the EAP Server Key Passphrase blank

- Provide the CA certificates under EAP-TLS Client CA chain. The CA certificates have to be in PEM encoded X.509 format as well
Note that multiple root CA certificates can be concatenated together under the field “EAP-TLS Client CA chain” if there are multiple PKIs involved
Example: Company A has separate PKIs for BYOD devices vs corporate owned devices with the certificate chain being : client certificate -> Intermediate CA Certificate -> Root CA Certificate
The root CAs being used are: “Aruba Security CA-BYOD” and “Aruba Security CA-G1”
Here the EAP-TLS Client CA chain would be root CA certificate “Aruba Security CA-BYOD” in base-64 encoded pem format followed by “Aruba Security CA-G1” in base-64 encoded pem format as shown below:
-----BEGIN CERTIFICATE-----
MIIEnzCCA4egAwIBAgIBFjANBgkqhkiG9w0BAQ0FADCB1jELMAkGA1UEBhMCVVMx
EzARBgNVBAgMCkNhbGlmb3JuaWExETAPBgNVBAcMCFNhbiBKb3NlMRcwFQYDVQQK
................................................................
kffkodpJx/gYfamvUVSpkHSWrnw/WG2eMPYnV+ecwUS6bIC/kWhdxodXb4Ps/DqB
mYmhBQiKT+J7iIbNtfSqXyssIn42Ly9duCcwhhaDMDmFRiLObCnfjuwrYMC64yW3
3G0YY99uBOdzXpiUXTPBpnyk4xIXTfSK0jZ+5NhZjbcjhv4=
-----END CERTIFICATE-----
-----BEGIN CERTIFICATE-----
MIIGUzCCBDugAwIBAgIBGDANBgkqhkiG9w0BAQwFADCBsDELMAkGA1UEBhMCVVMx
EzARBgNVBAgMCkNhbGlmb3JuaWExETAPBgNVBAcMCFNhbiBKb3NlMRcwFQYDVQQK
................................................................
Y/etu7jQ958IZLhwwFsveC9Wj11OzbED1mo5SL0OnkBRxptXSSoU8zp/3zvTgHd9
6j8ZUHcOZ5ZsgWhBqS5irnDgb3kZnMCQfmq6O91fsnfm5rIqEftrvRWB7bfMwm2Q
2mO38EACfNOtx1D7z9rrwM4PFRCZiFTnn3cnkYqdx8Har056gnzq
-----END CERTIFICATE-----
- Online Certificate Status Protocol (OCSP) is a protocol used to determine the revocation status of a certificate. Enable OCSP check if required. When enabled, Central NAC would use the OCSP URL from the client certificate to validate the certificate. If client certificates do not have an OCSP URL or if you wish to override the OCSP URL specified in the certificate, there is option to provide a OCSP URL
- OCSP Check Failure Response allows to either Reject or Allow authentications if the certificate has not yet expired. While normally you would want OCSP checks to be enforced, there could be special scenarios where you want the devices to connect to the network to be able to get a new certificate

BYOC FAQs
Q: Can multiple CA certs be added to the EAP-TLS Client CA chain?
A: Yes, multiple pem formatted x509 root CA certificates can be chained together under the field “EAP-TLS Client CA chain”
Q: Does Central NAC support ECC certificates for BYOC?
A: Yes, both ECC and RSA (up to RSA-2048) certificates are supported for BYOC under server certificate and EAP-TLS Client CA chain
8 - Central NAC Onboard - 802.1X Authentication Resilience to Latency
Evaluating Client-Side Authentication Resilience to Latency
After the Onboarding process to evaluate client-side authentication resilience to latency for 802.1X authentication against Central NAC we will introduce artificial latency in lab environment to deliberately introduce network latency between the Access Point (AP) and the authentication servers. This setup simulates real-world round-trip time (RTT) conditions and allows us to observe client device behaviour under varying latency levels. The goal is to determine how client devices respond as latency increases and to identify the threshold at which authentication begins to fail or exhibit degraded performance.
Control Scenario: No Latency Introduced
This section outlines the behavior of the client device during 802.1X authentication under ideal network conditions, where no artificial latency is introduced. Observations made here reflect the expected performance in a low-latency, well-connected environment, helping to highlight deviations in client behavior when latency is later introduced.
In the scenario below, the test environment exhibits an ICMP round-trip time (RTT) of less than 20 ms between the access point (AP) and a public server. This value may vary depending on the geographic location and the uplink quality provided by the Internet Service Provider (ISP). Under these ideal conditions, the client takes approximately 3 seconds to complete association and 802.1X authentication on the designated SSID, as provisioned by the HPE Aruba Networking Onboarding app.


Control Scenario: 100ms Latency Introduced
In the scenario below, the test environment has an ICMP round-trip time (RTT) of approximately 100 ms between the access point (AP) and a public server. Under these conditions, the client takes around 4 seconds to complete association and 802.1X authentication to the SSID.


Control Scenario: 250ms Latency Introduced
In the scenario below, the test environment has an ICMP round-trip time (RTT) of approximately 250 ms between the access point (AP) and a public server. Under these conditions, the client takes around 5 seconds to complete association and 802.1X authentication to the SSID.


Control Scenario: 500-750ms Latency Introduced
In the scenario below, the test environment exhibits an ICMP round-trip time (RTT) ranging between 500 ms and 750 ms between the access point (AP) and a public server. Under these conditions, the client takes approximately 9 to 11 seconds to complete association and 802.1X authentication to the SSID.


Control Scenario: 1000ms Latency Introduced
In the scenario below, the test environment exhibits an ICMP round-trip time (RTT) of approximately 1000 ms between the access point (AP) and a public server. Under these conditions, we observe that after multiple attempts to connect to the SSID, the 802.1X authentication process times out after approximately one minute.


Conclusion
The results demonstrate that while our authentication infrastructure is capable of supporting high-latency networks, consistent client authentication performance begins to degrade beyond certain thresholds. Based on observed client behavior across varying latency scenarios, it is recommended that the round-trip latency between the access point and the authentication servers not exceed 250 ms to ensure reliable and timely 802.1X authentication. Staying within this latency range provides optimal performance and reduces the likelihood of timeouts or excessive retries during client onboarding.
9 - Multi Pre-Shared Key (MPSK)
WPA2-PSK or pre-shared keys (PSK) are a common way to connect to WiFi networks. Admin sets up a password for WiFi network and then the password has to be entered in all the devices that need to connect. While very widely used, there are significant issues with WPA2-PSK. All devices use the same password and if its inadvertently leaked or compromised through attacks, the data exchanged between devices and the access point can be decrypted. The solution would be to change the password and this needs to be done manually on all the devices. Due to all these issues WPA2-PSK poses significant risks in an enterprise environment.
Multi Pre-Shared Key (MPSK) is a feature developed by HPE Aruba Networking to allow devices to connect securely using Wi-Fi credentials that are unique to a user or device or a group of devices. With each user or device having a unique MPSK, security is enhanced by limiting exposure if the PSK is compromised. Devices sharing similar functions can be grouped together and can share a single MPSK, thus simplifying management. MPSK improves the security profile of WPA2-PSK but without compromising on the ease of use. So this becomes a secure and easy way to connect devices where a full 802.1X deployment is not feasible.
Some common use cases with MPSK are:
- IoT and other headless devices that are not capable of doing 802.1X authentication can now connect with a unique MPSK per device
- Guest Wi-Fi for event networks that are short lived. QR codes can be printed and posted at the event venue for attendees to connect easily to the network
- Easy way for students in dorm rooms to connect all their personal devices using a MPSK that is unique per student
- Alternative to captive portal workflows for guest users with MPSKs being rotated periodically
- Provides easy connectivity option at small sites where deploying 802.1X is not feasible
MPSK Workflows in Central NAC
HPE Aruba Networking Central NAC supports two modes for MPSK:
- User Managed MPSK
- Admin Managed MPSK
User Managed MPSK
This feature allows users to generate and manage their own unique MPSK through a self-service portal. Per user Wi-Fi credentials reduce the risk associated with single shared passwords. It also allows devices to be identified on the network by the user who owns them.
Some scenarios where user managed MPSK can be used:
- dorm rooms where students want to connect their personal IoT devices
- environments where BYOD users with unmanaged devices do not want to install an app to onboard the device
- allowing contractors to connect their work devices
- allowing employees at retail locations to connect their personal devices
How it works:
- User goes to the MPSK self service portal and signs in using credentials from the configured identity provider
- Portal generates a unique MPSK key for the user. The key can be in the form of a passphrase or a randomized password depending upon how the authentication profile is configured.
- User connects all their devices to the Wi-Fi using this MPSK
- Devices are assigned roles and VLANs based on the authorization policies configured in Central NAC. Devices owned by different types of users can be assigned different roles based on group membership in IDP.
- User can also regenerate their MPSK from the self service portal
- When a user account is deleted or disabled in the identity provider, all MPSKs associated with the user are deleted and active sessions are disconnected
- With NAC subscription, an expiration policy can also be configured for user managed MPSKs
Configuring User Managed MPSK
These are the steps to configure user managed MPSK with Central NAC:
- Create a WLAN and uncheck 6Ghz band since MPSK is not supported with WPA3
- Select security as Personal, Key Management as MPSK AES and Authentication > Server Group as Central NAC as shown below

- Once the WLAN has been created, assign it to appropriate scope. For tunneled SSIDs, ensure that the WLAN is assigned to the Device Group scope
- Next create an Authentication Profile from Central NAC > Configuration > Authentication Profile by selecting the Authentication Type as MPSK, the network created previously and the IDPs where user accounts are present
INFO
Both user managed and admin managed MPSK can be used over the same SSID or it can used over different SSIDs. To use user managed MPSK, select appropriate IDPs in the authentication profile. To use admin managed MPSK, create MPSK keys under the Named MPSK Store for the WLAN.

-
With NAC subscription, there is an option to specify an expiration policy for the user managed MPSK keys. Without NAC subscription, MPSK key expiration is tied to the user account in IDP. When user accounts in IDP are deleted / disabled the associated MPSK keys are removed from Central NAC
-
Select a portal customization profile if you wish to customize the MPSK onboarding page by adding background images, terms and conditions page before login etc. Portal customization profile can be created under Central NAC > Configuration > Portal Customization
-
Once the authentication profile has been created, the MPSK self service portal would be visible within the profile and can be distributed to the users

INFO
The user onboarding or self service portal is accessible over the internet. So users do not have to be connected to a corporate network to generate MPSK keys
Admin Managed MPSK
Apart from user owned devices, MPSK can be used with devices that are corporate owned and managed. In these cases the devices are not assigned to a specific user but is part of the corporate assets. Here, the network admin can create a MPSK that can be used with a single device or a group of devices.
Some scenarios where admin managed MPSK can be used:
- Connect corporate owned IoT devices
- Provide connectivity to visitors at an event
How it works:
- Admin logs into HPE Aruba Networking Central and accesses the Central NAC Card
- Within Central NAC, admin navigates to Configuration > Identity Management > Named MPSK Store
INFO
Note the Named MPSK store only shows up only if a MPSK enabled WLAN and authentication profile has been created as described in the previous sections
- Add MPSK by providing a name to be associated with the MPSK and the role to be assigned to the devices that connect using this MPSK. The name has to be in UPN format like some-name@domain.example
 TIP
TIP
Note that the name just needs to be in UPN format. It does not have to be a valid email nor the domain name part be a valid domain.The UPN format for the name can be used to indicate location and function of the device. Example: temperature-sensor@sanjoseHQ.solararesearch
- Share MPSK with whoever has access to configure the device
- Devices connect using the appropriate MPSK
- Appropriate role is assigned based on what is selected while creating the MPSK
- If the Named MPSK is deleted, all the devices that are connected using the MPSK will be disconnected from the network
Configuring Admin Managed MPSK
Below are the steps to configure admin managed MPSK with Central NAC:
- Create a WLAN and uncheck 6Ghz band since MPSK is not supported with WPA3
- Select security as Personal, Key Management as MPSK AES and Authentication > Server Group as Central NAC as shown below
- Once the WLAN has been created, assign it to appropriate scope. For tunneled SSIDs, ensure that the WLAN is assigned to the Device Group scope
- Next create an Authentication Profile from Central NAC > Configuration > Authentication Profile by selecting the Authentication Type as MPSK, the network created previously. IDPs are not needed for Admin managed MPSK.
INFO
Both user managed and admin managed MPSK can be used over the same SSID or it can used over different SSIDs. To use user managed MPSK, select appropriate IDPs in the authentication profile. To use admin managed MPSK, create MPSK keys under the Named MPSK Store for the WLAN.
- Created Named MPSK keys under **Configuration > Identity Management > Named MPSK Store for {WLAN-Name} > Add
The name should be in the format of an email like hvac-system@dallasWarehouse.ridgeview . The format can be used to convey information about the type of device and location where it is at. It can be any arbitrary name and does not have to be a valid domain name.
Assign a role that is appropriate for the device and select expiration if desired.
INFO
With admin managed MPSK / Named MPSK, the role assigned while creating the key is assigned to the device when it connects to the network. Named MPSK authentication does not hit the authorization policy rules

Frequently Asked Questions
Q: If MPSK key is renegerated what happens to devices connected using previous MPSK?
A: When MPSK key is regenerated, all devices connected using the previous MPSK is disconnected and authentication would continue to fail for those devices until they are updated with the new MPSK
Q: Does MPSK work with WPA3?
A: Current implementation of MPSK only works with WPA2. 6 Ghz band has to be disabled in WLANs where MPSK with Central NAC is to be enabled
10 - Visitor access workflows
The visitor management feature allows visitors to connect to the network and at the same time, allows the administrator to control visitor access to the network.
HPE Aruba Networking Central allows administrators to create a splash page for visitors. For example, you can create a splash page that displays a corporate logo, color scheme and the terms of service, and enable logging in from a social networking service such as Facebook, Google, Twitter, and LinkedIn.
Guest operators can also create visitor accounts. For example, a network administrator can create a guest operator account for a receptionist. The receptionist creates accounts for visitors who require temporary access to the wireless network. Guest operators can create and set an expiration time for visitor accounts. For example, the expiration time can be set to 1 day.
To enable logging using Facebook, Google, X, and LinkedIn credentials, ensure that you create an application (app) on the social networking service provider site and enable authentication for that app. The social networking service provider will then issue a client ID and client secret key that are required for configuring guest profiles based on social logins.
Central NAC supports the following visitor workflows:
- Anonymous login: Login without any username or password
- Static password based login: Login with a common shared password
- Captive portal login using cloud identity (Google Workspace, Okta, Microsoft Entra ID)
- Visitor login using social media accounts (Facebook, Google Social, LinkedIn, X)
- Visitor login using any Open ID Connect (OIDC) identity provider
- Visitor registration: Register for an account and login
- Visitor registration with verification: Register for an account and verify phone number / email by using a verification code or link
- Visitor registration with sponsor approval: Register for an account and have a sponsor approve it
- MAC Caching with all of the above scenarios to avoid repeated logins
Configuring Visitor Workflows
THe high level steps to configure a WLAN for visitor access are:
- Configure a WLAN for visitor access with the captive portal type set to Central NAC
- Configure Authentication Profile to define the visitor workflow
- Configure Themes to define the look and feel of the visitor portal
- Configure Override profiles for overriding default labels
- Upload images to be used in the visitor portal
- Configure portal profile and select the theme and override profile to be used with the splash page
Configuring WLAN for Visitor access
Create a WLAN with the captive portal set to Central NAC as shown below. Optionally you can configure the WLAN to use enhnanced open for additional security.

Configuring Authentication Profile
Navigate to Central NAC > Configuration > Authentication Profiles and create a new profile for visitor access. Set the authentication type to “Captive Portal” and select the WLAN that was created earlier under the “Network” drop down.

Under the section “Authentication” are all the options related to configuring the visitor access workflows. You can choose between anonymous logins or logins based on registered visitor accounts, enable sponsorship approval, restrict sponsor domains and specify static sponsor email or delivery lists.

The “Default Policy” section allows you to configure MAC Caching and to enable session restrictions

The portal customization selection is to select a portal profile which determines the look and feel of the visitor captive portal page. Leave this blank initially. Once the theme, override and portal profiles have been created, the authentication profile can be updated with the name of the portal profile.

Designing the Visitor portal
Central NAC allows limited customization of the visitor portal with ability to use custom color scheme, background images and icons.

To create a visitor portal, navigate to Central NAC > Configuration > Portal Customization > Themes and create a new Theme to design the look and feel of the visitor portal. Use this page to select the color scheme, select background image and favicon images.
The text and labels on the portal can be modified by using the Override Profile. This profile allows you to select languages and to apply a message override to match exactly what you are looking for. Some of the fields accept HTML inputs and can be used for more advanced customizations. For example, the “Login Message” can be customized to add specific instructions for the visitors. The tool tip for the field override would indicate whether the field accepts “Basic HTML” input or not as shown below:

INFO
Note that only simple HTML without the head or body HTML tags can be used within the overrides. CSS or javascript is also not supported in the field overrides
Page background, Sign In and favicon images can be uploaded under the Images card
The Portal Profile is used to combine all of the other design elements by combining theme and override profile along with images. Once the portal profile has been created, you can reference it under the Authentication Profile
Visitor Store
Central NAC supports multiple visitor stores. This helps with scenarios where visitor accounts are local to specific sites or networks. For example, ACME Enterprises has self registration for any visitors to their corporate HQ and also has helpdesk create visitor accounts for contractors who visit their branches. These two sets of accounts can be stored in different stores and assigned different levels of access based on which store they are part of.
Visitor accounts can be accessed from Central NAC > Configuration > Visitors. While adding new visitors, you can select the appropriate visitor store or create a new one from the Visitor Store drop down.


Central Guest Operator
Central also supports restricted access for operators to create visitor accounts. Users can be assigned the “Aruba Central Guest Operator” role either statically or through SAML SSO which would limit them to create and manage visitor accounts only. Other Central NAC configuration screens hidden and the dashboards would be empty.

Satic assignment of roles is done from Greenlake Workspace Management > Workspace identity and access > Users

Steps to configure SAML SSO for Aruba Central and HPE Greenlake is documented here:
https://developer.hpe.com/blog/okta-sso-integration-for-green-lake-and-aruba-central/
Central NAC Visitor FAQs
Q: Does visitors count towards NAC subscription?
A: Standard visitor workflows are included as part of the core capabilities and does not require a NAC subscription. Reference for core vs subscription capabilities: https://arubanetworking.hpe.com/techdocs/NAC/central-nac/central-nac-understanding-foundation-vs-advanced-subscriptions/
However if NAC subscription is applied to enable any of the subscription capabilities, all authenticated sessions including visitors, clients and users count towards the NAC subscription
Q: Is there a limit to number of visitor accounts and visitor stores that can be added?
A: No, there is no hard limit on the number of visitor accounts or stores
11 - Air Pass in Central NAC
Air Pass offers a seamless roaming solution for devices to connect to the enterprise networks based on Passpoint / Hotspot 2.0 specifications.
Air Pass module offers two different services:
-
Air Pass - SIM is a roaming service designed to enable MNOs to extend their 5G cellular coverage and automatically roam on enterprise networks powered by HPE Aruba Networking gear. Devices with supported MNOs automatically connect to Air Pass SIM Wi-Fi network using the credentials embedded in the SIM card.
-
Air Pass - OpenRoaming adds support for the global Wi-Fi roaming standard developed by Wireless Broadband Alliance (WBA). While Air Pass - SIM only works for devices with a SIM card, OpenRoaming works for wide range of devices both with and without SIM cards and allows devices to connect to Open Roaming Wi-Fi hotspots across the world.
Air Pass - SIM
Some key use case with Air Pass - SIM is:
- Provides frictionless onboarding of guest devices to Wi-Fi without going through the captive portal.
- It is beneficial at places like schools, universities, hotels, retail stores, hospitals, and other indoor venues that provide enterprise Wi-Fi hotspots.
- With Air Pass, mobile users enjoy seamless and secure guest access to Wi-Fi networks in the enterprise venues.
- Empowers the enterprise Wi-Fi networks to serve as full-fledged roaming partners to the mobile operator’s 5G networks and in turn, allows the mobile operators to rely upon the enterprise Wi-Fi networks as a cost-effective extension of their own 5G coverage.
- Enables 5G experience with Wi-Fi 5/6/6E/7
- Provides seamless transition and authentication of 4G and 5G users to Wi-Fi networks.
- Provides role-based control and simplified device onboarding using enterprise security.
- Uses WPA2 and WPA3 Enterprise wireless security.
- Enables cellular roaming in the existing Wi-Fi network without hardware upgrades or DAS systems
How does it work?
Air Pass SIM uses the Passpoint profiles provisioned by MNOs on the SIM-enabled devices of their subscribers. While traditional Passpoint technology requires each organization to establish roaming agreements with MNOs directly, Air Pass SIM allows customers to deploy Passpoint using the agreements established by HPE with the supported MNOs.
Central NAC Air Pass - SIM authentication workflow
-
After receiving an authentication request from a guest user to connect to a WLAN network, Central NAC proxies the authentication request to the MNOs.
-
The MNOs validate and respond to the authentication request.
-
If the authentication request is passed successfully by the MNO, Central NAC then configures a role-based policy to provide guest access to the WLAN network.
TIP
Air Pass - SIM officially supports devices with AT&T (including MVNOs Cricket Wireless, AT&T Mobility and FirstNet) and T-Mobile SIM cards. Whether a device can use Passpoint / Hotspot 2.0 technology is at the discretion of the MNO. Depending upon device model and cellular plan, MNO have the option to provision Passpoint profiles or not.

INFO
Air Pass is a function of Classic Central that is only available for use in the United States. Usage of Air Pass outside of the United States may subject you to additional liability, and you acknowledge that risk through your use of Air Pass. Terms and conditions associated with Air Pass may be found on https://www.arubanetworks.com/legal/, and may be updated at HPE’s sole discretion from time to time. All devices auto-connect to Air Pass SSID. However, the following devices fail to connect automatically:
- Pixel running Android 10
- Pixel running Android 11
- Pixel running Android 12
WARNING
Devices with FirstNet will not auto connect to Passpoint / Hotspot 2.0 networks including Air Pass. FirstNet users will need to manually select the Air Pass SSID from the Wi-Fi picker during the initial connection. Once connected, the device will automatically reconnect to the SSID whenever it is available.
INFO
Air Pass service is offered as part of the foundation capabilities in HPE Networking Aruba Central.
Configuring Air Pass on New Central
Air Pass uses 802.1X EAP-SIM / EAP-AKA authentication for the WLAN which can be configured to be either in bridged or tunneled mode. The high level configuration steps are:
- Create a WLAN as shown below:

- Air Pass is enabled on a per site basis so the WLAN needs to be assigned to an appropriate site scope.
INFO
Note that for tunneled SSID, the WLAN needs to be assigned to “Device Group” scope first and then the appropriate site.
- Create a new Air Pass profile from Central NAC > Air Pass > Air Pass Profile. Select the carriers you wish to enable and the sites.


Select appropriate providers, followed by the network created earlier and select the sites where Air Pass needs to be enabled. For customer domain name, enter the domain name of your organization and select appropriate venue category for your organization.


Once the profile is created, an approval email is triggered to HPE Networking Central NAC team. You will receive an email acknowledging the receipt of the approval request. The requests are sent to MNOs for approval and the process could take up to 30 days to complete.
Once the request is approved, an approval email will be sent to the provided email address. At this point, the WLAN and the passpoint related profiles are enabled and devices should be able to start connecting as soon as the request is approved.
INFO
In New Central, changing the name of Air Pass WLAN will again trigger approvals and the approval status will revert back to pending until the approval is processed.
Creating Passpoint profiles manually and assigning to the same sites as the Air Pass WLAN will cause Air Pass profiles to be overwritten and approvals to be re-done.
Air Pass - OpenRoaming
OpenRoaming standard brings together a federation of networks and identity providers, allowing users to join any network managed by a federation member.
Companies who join OpenRoaming provide assurance that their Wi-Fi networks automatically interoperate between each other to deliver an automatic and secure connected Wi-Fi experience.
WBA OpenRoaming enables companies to accelerate and scale Wi-Fi roaming relationships. Enabled networks can automatically onboard users securely leveraging established identity providers such as operators, cloud IDs, loyalty membership, bridging the gap between Wi-Fi and cellular networks.
Some key use cases with Air Pass - OpenRoaming is:
- Globally available federation of networks that allow users to seamlessly connect to different venues like airports, hotels and resorts, stadiums and event venues, smart cities, retail and shopping malls
- Provides frictionless connection without having to go through captive portals
- Allows elevated Wi-Fi connectivity experience for loyalty customers through Apps
- Provides seamless transition and authentication of 4G and 5G users to Wi-Fi networks (with MNOs that support OpenRoaming)
How does it work?
With OpenRoaming, authentication can happen either using the OpenRoaming profiles provisioned by MNOs on subscriber devices or by having the users go through a one time onboarding process. For scenarios involving loyalty apps like the ones commonly used by retail / hospitality / event management services, the App can do the onboarding silently for end users.
Google Pixel and Samsung devices natively support OpenRoaming onboarding. When users select the OpenRoaming SSID, these devices would request users to sign in using their Google / Samsung credentials and install an OpenRoaming profile. Apple does not support native onboarding and hence must use either App based or web based onboarding methods.
Once the OpenRoaming profile has been installed, the devices will automatically connect to any OpenRoaming enabled Wi-Fi network across the world.
Central NAC Air Pass - OpenRoaming authentication workflow
-
After receiving an authentication request from a user to connect to a Air Pass - OpenRoaming network, Central NAC extracts the domain name part of the username which is tied to the IDP used while doing the initial onboarding. Example anonymous@apple.openroaming.net for a user who onboarded using their Apple credentials
-
Central NAC does a dynamic DNS NAPTR lookup with the domain name to find the AAA servers associated with the IDP. DNS NAPTR response would include details about the AAA server and other information like whether it supports RadSec or not
-
Central NAC establishes RadSec connection to the IDP using the WBA issued PKI
-
The IDPs validate and respond to the authentication request.
-
If the authentication request is passed successfully by the IDP, Central NAC then configures a role-based policy to provide access to the WLAN
INFO
Central NAC only support settlement free version of OpenRoaming where there are on fees involved for roaming between venues.
Configuring OpenRoaming in New Central
Air Pass uses 802.1X EAP-SIM / EAP-AKA authentication for the WLAN which can be configured to be either in bridged or tunneled mode. The high level configuration steps are:
- Create a WLAN as shown below:
- Air Pass is enabled on a per site basis so the WLAN needs to be assigned to an appropriate site scope.
INFO
Note that for tunneled SSID, the WLAN needs to be assigned to “Device Group” scope first and then the appropriate site.
- Create a new Air Pass profile from Central NAC > Air Pass > Air Pass Profile. Select the provider as “OpenRoaming (All)” followed by the network created earlier and select the sites where OpenRoaming needs to be enabled. For customer domain name, enter the domain name of your organization and select appropriate venue category for your organization.

There is no approval required for OpenRoaming. With this, the OpenRoaming network is ready to use.
12 - Migrating from Cloud Auth to Central NAC
Introduction
This guide provides a structured approach for migrating from Legacy Cloud Authentication and Policy in Classic Central to the Central NAC solution in New Central. It covers the migration of key authentication workflows, including 802.1X, MAC authentication, MPSK and guest access. The guide explains how existing configurations in the legacy system can be interpreted and recreated using Central NAC constructs.
To simplify the transition, this document:
-
Maps legacy configurations to their Central NAC equivalents
-
Provides step-by-step procedures for implementing each workflow
-
Highlights important considerations to preserve existing functionality
Following this guide will help ensure a consistent and predictable migration experience.
Prerequisites
Before starting the migration, ensure the following prerequisites are met:
Identity Providers Configuration
Required Identity Providers (IdPs) must be configured in Central NAC. Refer to the Central NAC documentation for supported IdPs and configuration steps: https://arubanetworking.hpe.com/techdocs/NAC/central-nac/central-nac-idps/
Expand the Identity Providers section for detailed instructions.
SMS Provider Configuration (for Guest Workflows)
If guest access workflows use SMS-based credential delivery, configure an SMS provider in Central NAC. For example, to configure Twilio: https://arubanetworking.hpe.com/techdocs/NAC/cloud-guest/cloud-guest-setting-up-twilio-sms-service/
Client Classification Setup
Client classification must be configured in advance, as legacy policies may depend on Client Insight Tags. Refer to: https://arubanetworking.hpe.com/techdocs/new-central/content/ci/ci.htm
Network Configuration Readiness
Ensure that all required network constructs are preconfigured in New Central, including:
SSIDs
AAA Profiles for Switches
VLANs
Roles
For setup guidance, refer to: https://arubanetworking.hpe.com/techdocs/new-central/content/get-started/get-started-new.htm
Migration Workflow Overview- 802.1x
The migration process for 802.1X consists of the following high-level steps:
- Identify existing 802.1X SSIDs and aaa authentication profiles for switches and list out the ones that use Cloud Auth as the RADIUS server.
- Review the identity sources in use for 802.1x authentications (e.g. Entra ID, Okta, Google Workspace)
- Analyze the User Access and Client Access Policy conditions and the Client Roles returned for every condition in the legacy system.
- Recreate equivalent policies in Central NAC
- Validate enforcement behavior and role assignment
This example demonstrates how to migrate an existing 802.1X configuration from Legacy Cloud Authentication and Policy to Central NAC. The scenario includes both a wireless SSID and a wired AAA profile using a common identity source and role-mapping logic.
The goal is to replicate the same authentication behavior, role assignment, and access control in Central NAC. We will walk through a real configuration from the legacy Cloud Authentication and Policy system and use it as the basis for migration to Central NAC.
We start by identifying:
- A wireless 802.1X SSID
- A wired AAA profile (switch configuration)
- Both using Cloud Authentication as the RADIUS server
As shown below we have identified the HPE-Corp-BLR wireless SSID which is using Cloud Auth as the RADIUS server.

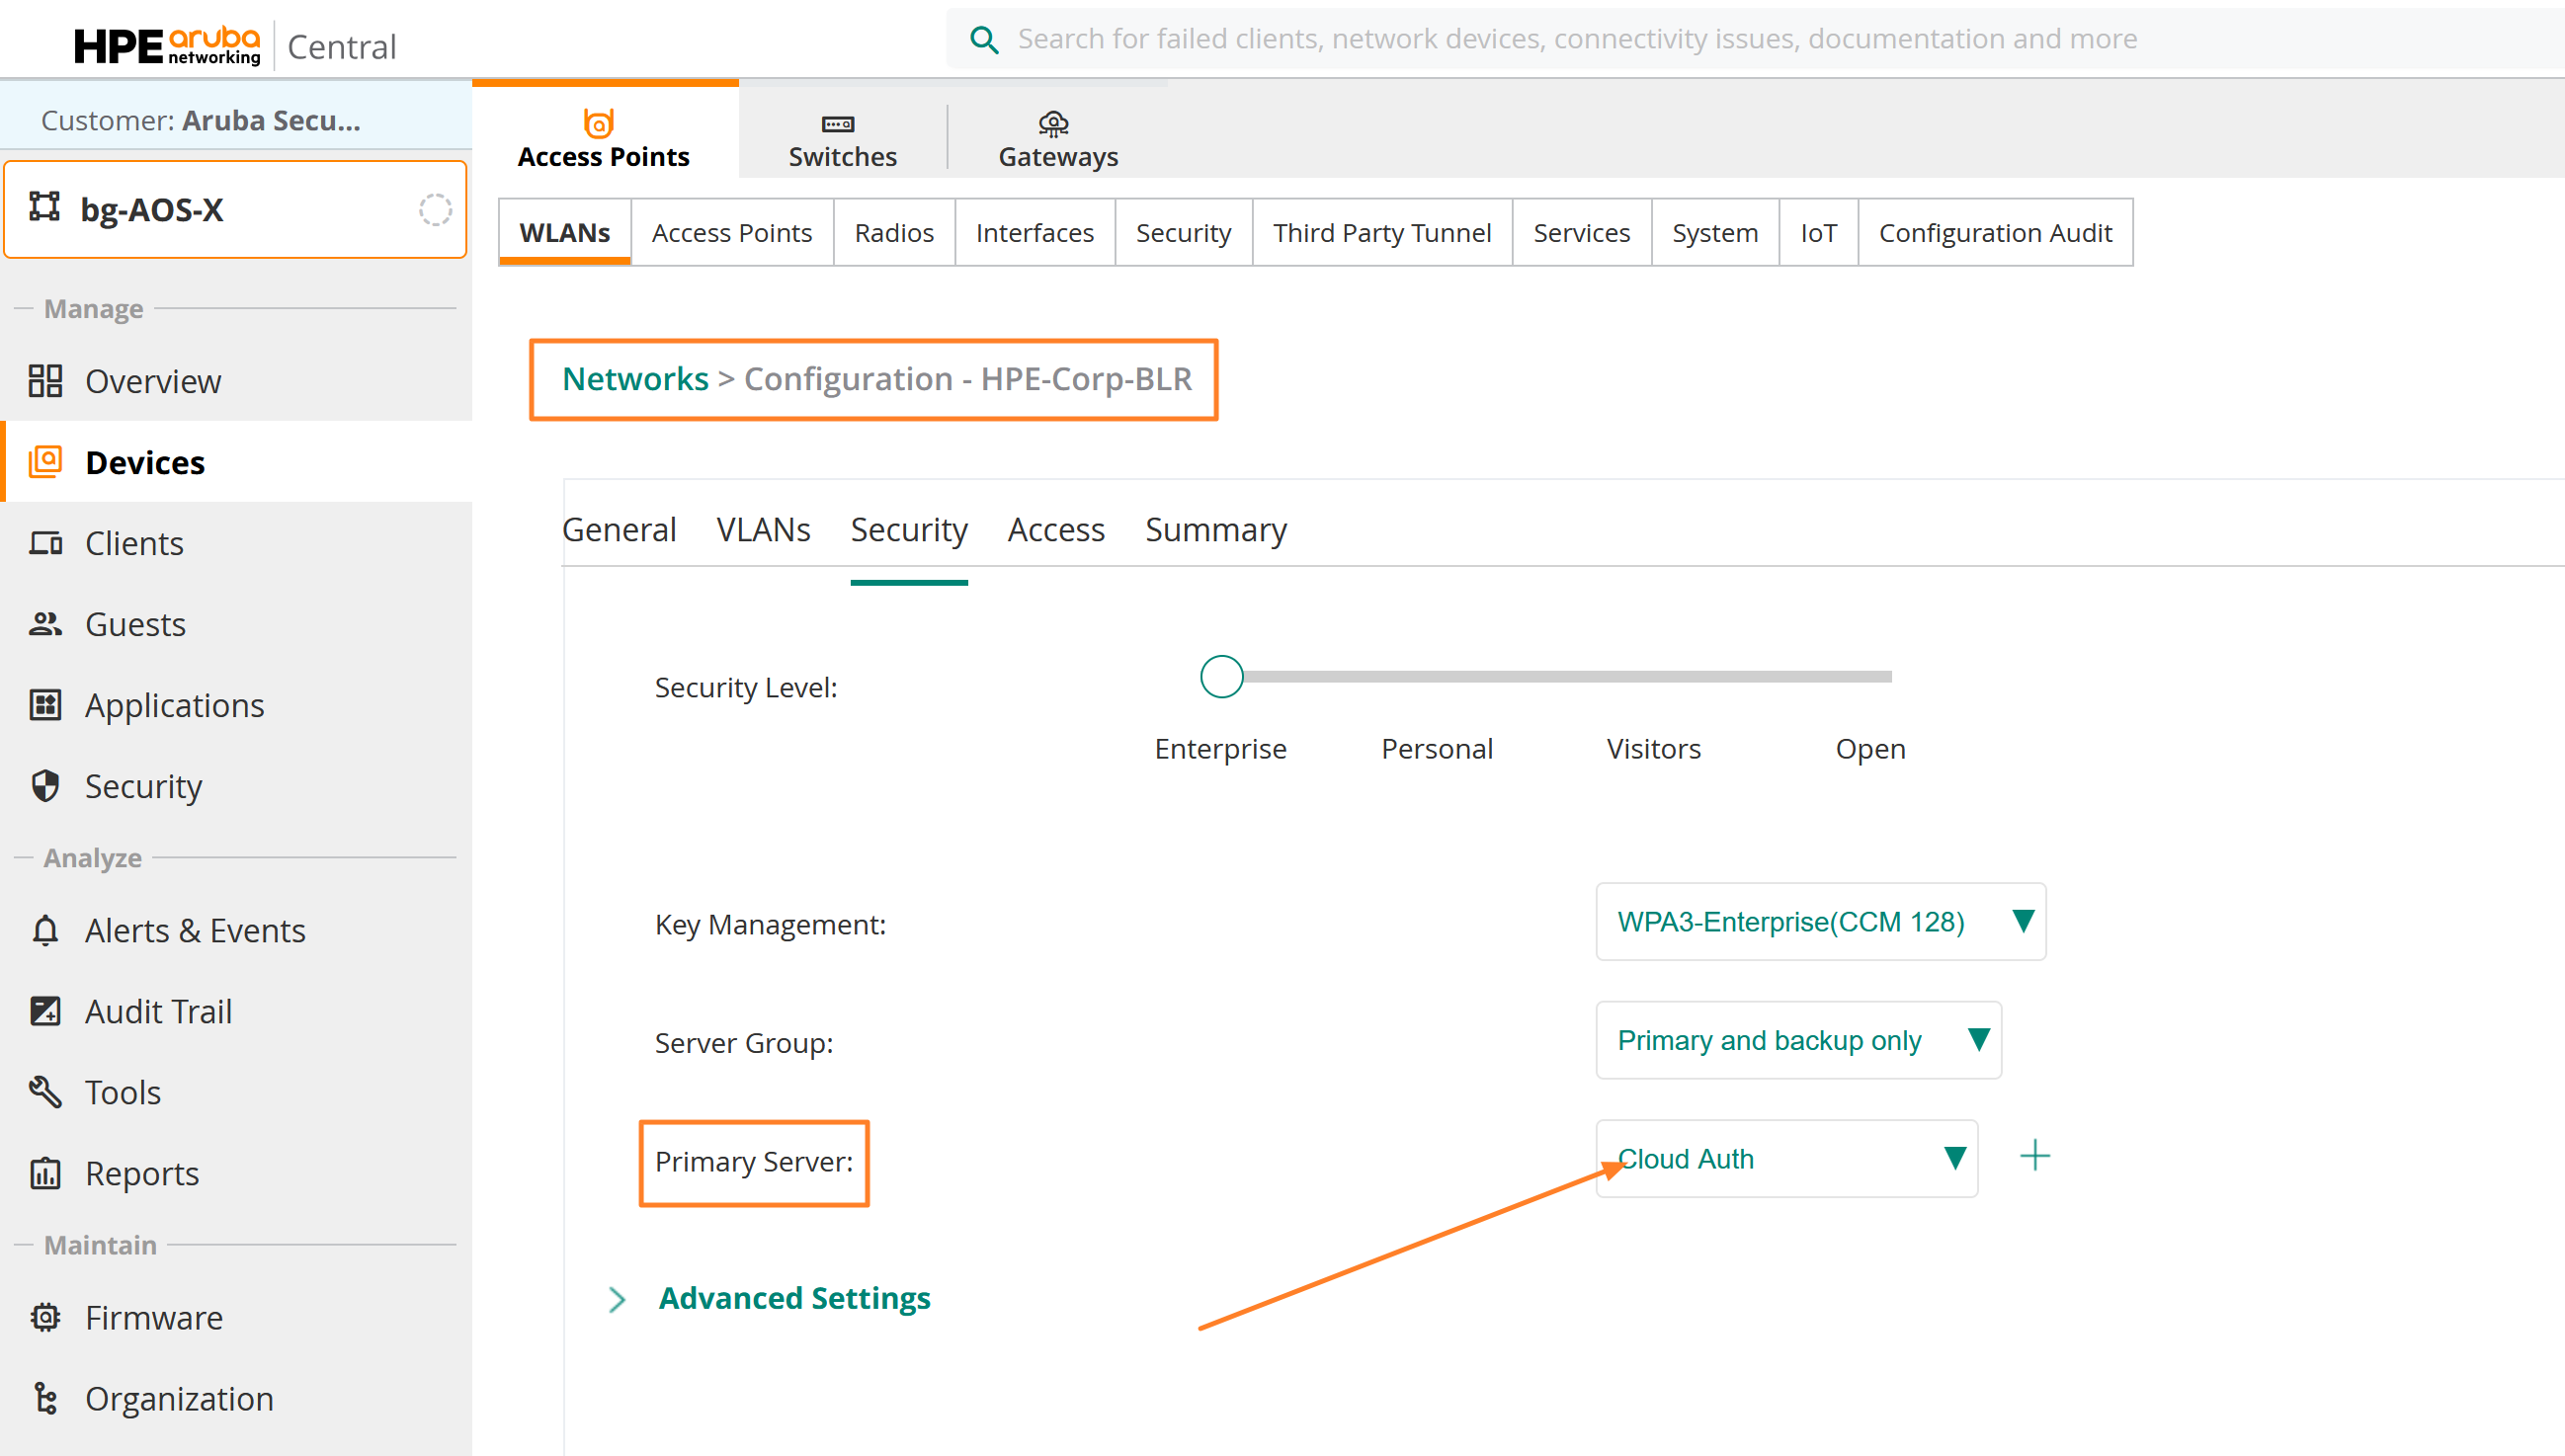
Now let us take a look and identify one of the switch configuration template that is using Cloud Auth as the RADIUS server. In this example, we have shown an Aruba CX switch template from Classic Central. This may vary based on the switch template you use between AOS-S and AOS-CX. For an AOS-CX switch the aaa authentication profile under classic is configured under Security > Authentication.


Within the Cloud Authentication and Policy configuration page, you can view all policies configured for 802.1X clients connecting to wireless SSIDs and switch ports. 802.1X authentications are handled by User Access Policies, while MAC authentications are handled by Client Access Policies.
User Access Policies combine the User Group (from the Identity Store of the authenticating user) and Client Tags to determine and enforce a Client Role.
In the example below, Microsoft Entra ID is used as the IdP, and different Client Tags are applied within the User Access Policies. It is therefore important to pre-create the IdP and Client Tags in New Central—as outlined in the Prerequisites—to ensure a seamless migration of these NAC policies.
Client Access Policies use Client Tags to assign Client Roles to endpoints authenticating via MAC address. If a MAC address is present in the MAC address store and matches a Client Tag, the corresponding policy condition is met and a Client Role is assigned.
To achieve parity with the existing NAC policies in Cloud Auth (Classic Central), we will recreate equivalent policies and conditions in New Central. These policies can later be enhanced with greater granularity using the advanced policy and rule elements available in Central NAC.


Now that we have gathered the required configuration details from Cloud Authentication and Policy in Classic Central, we can begin setting up Central NAC in New Central. With the prerequisites already in place—such as adding IdPs, configuring Client Tags, and creating SSIDs, wired AAA profiles for switches, and Roles/VLANs—we will proceed to recreate the NAC policies so they align with the existing Cloud Auth configuration. This provides a consistent starting point for the migration, after which policies can be further refined using the enhanced capabilities available in Central NAC.
Prerequisites Check
Bootstrap Central NAC service on your Central Tenant
In order to bootstrap Central NAC service in your Central Tenant visit to the Central NAC card and add IDP to ensure that the service is available. You can navigate to Menu > Central NAC > Manage and go to configuration mode.
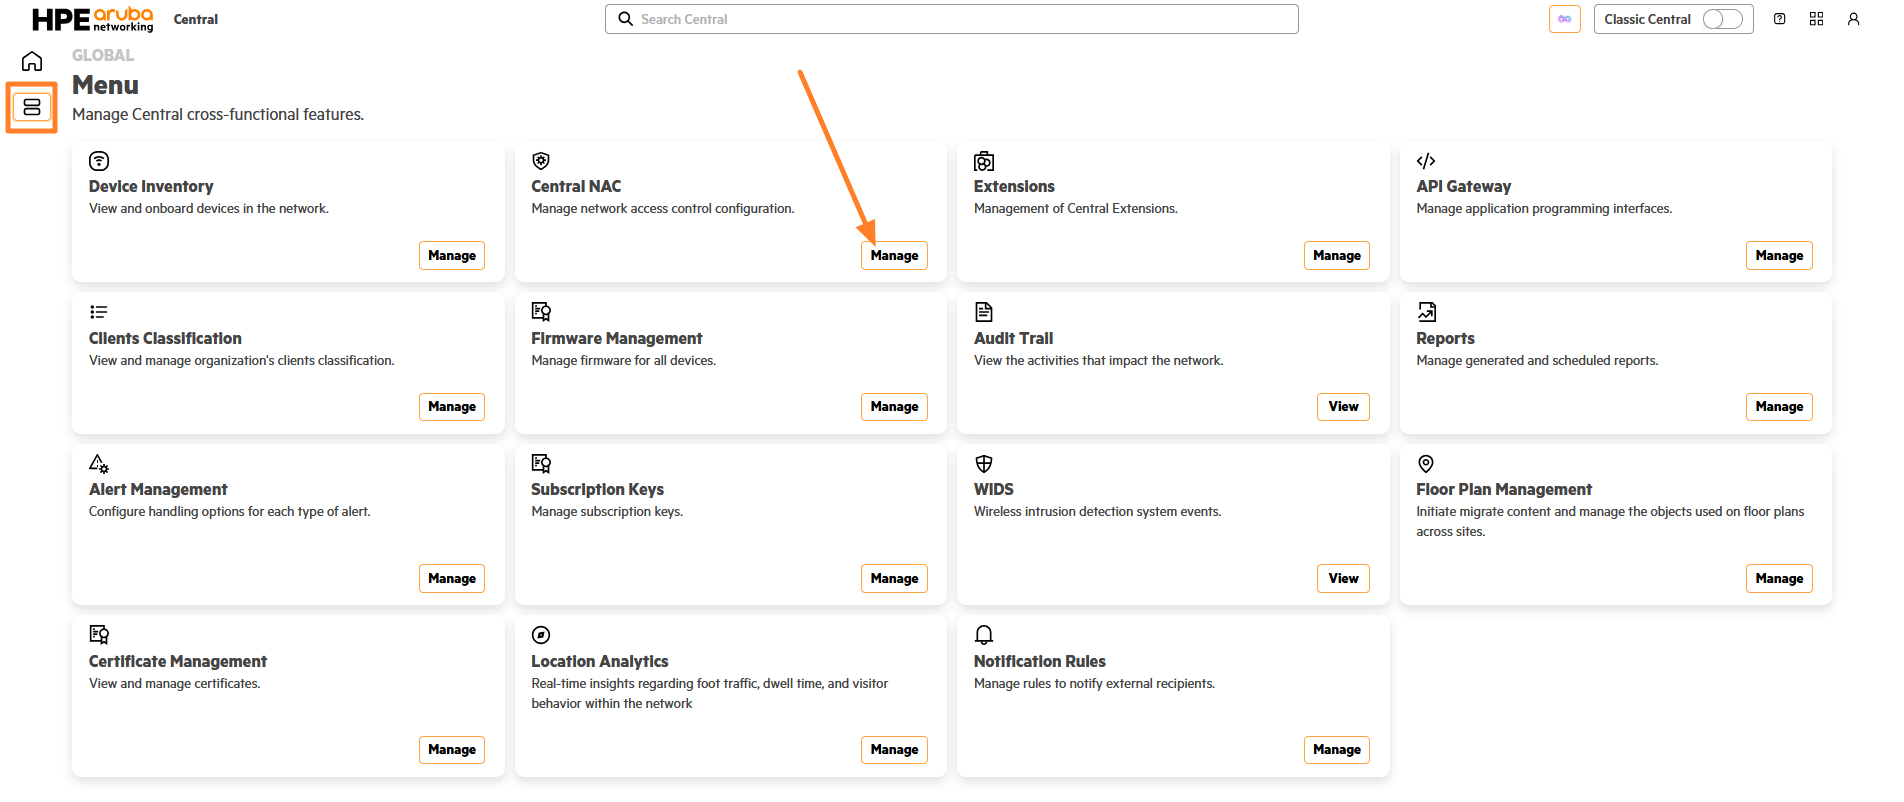
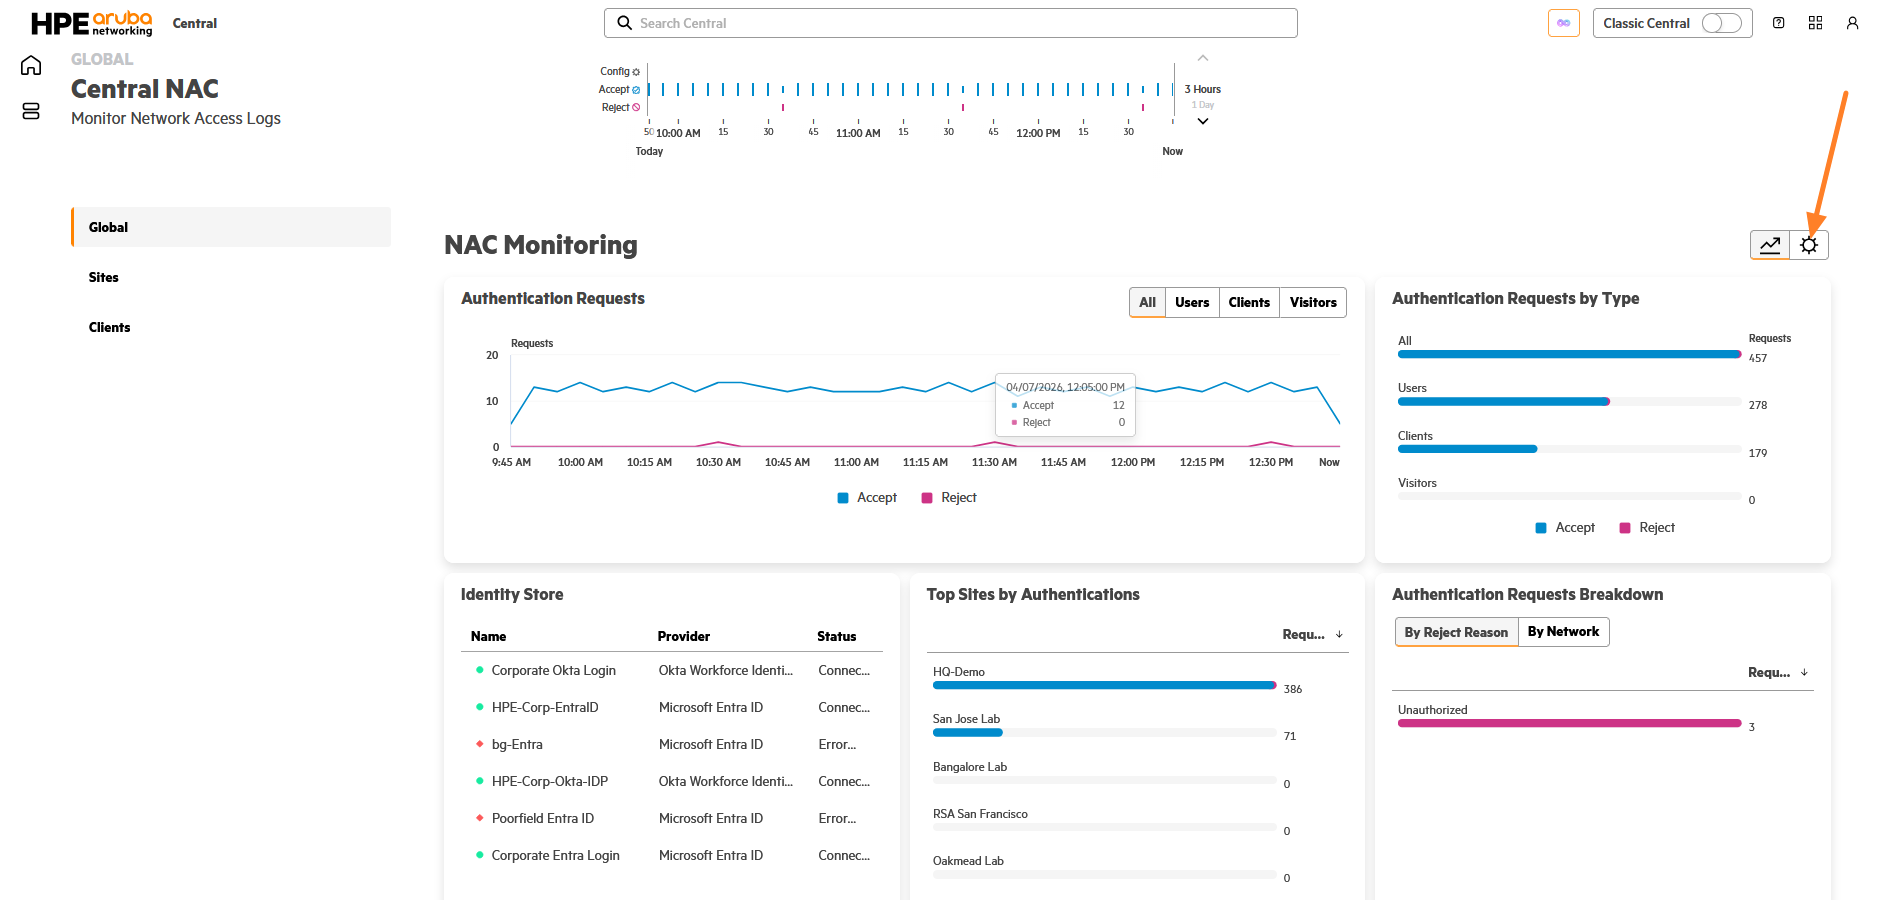
You can now add an IDP to ensure that the Central NAC service is available to work with. To add an IDP follow instructions available at https://arubanetworking.hpe.com/techdocs/NAC/central-nac/central-nac-idps/
Entra ID added as an IDP in Central NAC

802.1x SSID is created in New Central pointing to Central NAC as the RADIUS server

Switch AAA profile using Central NAC as RADIUS server

Client Tags for endpoints [Optional]
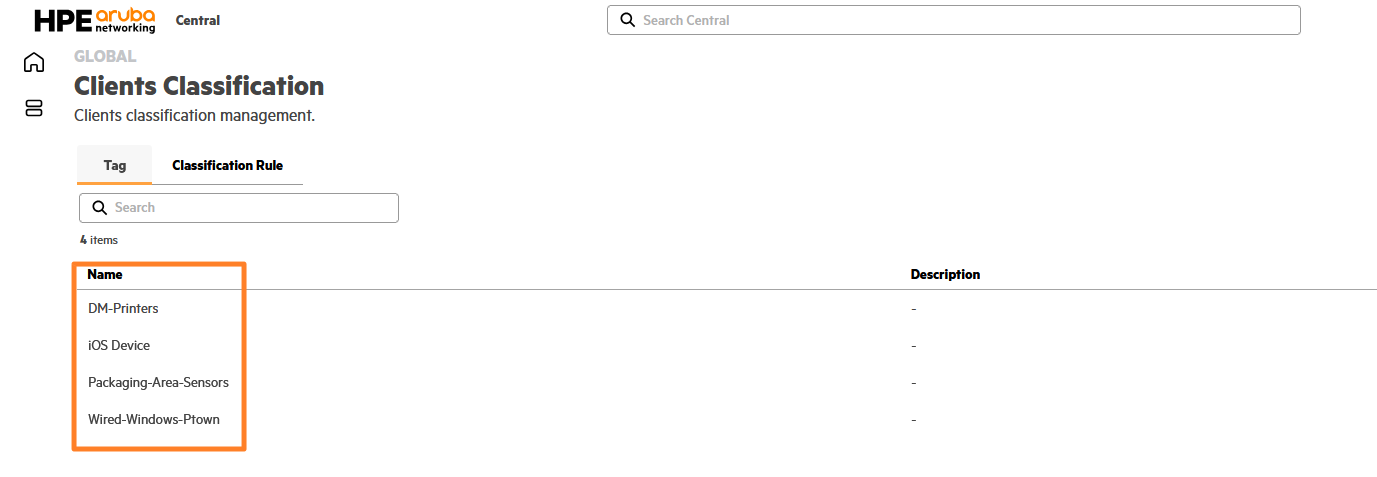
Required Roles available for use in NAC Policies in Central NAC
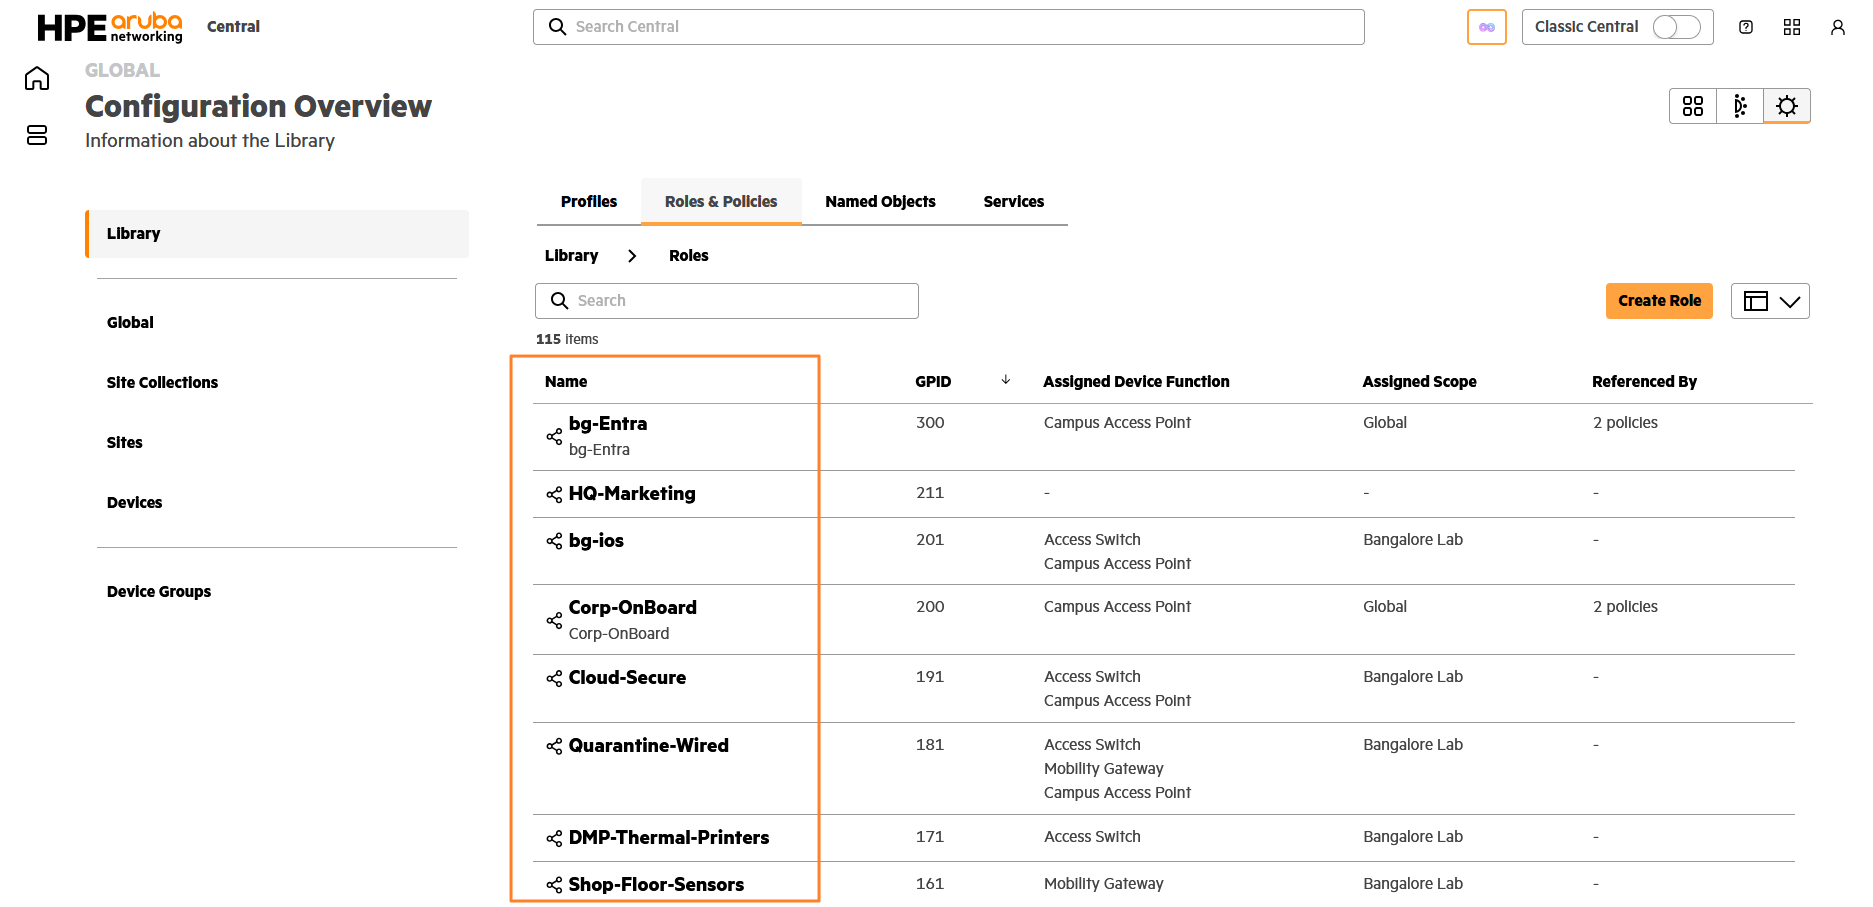
Central NAC Configuration-
1. Creating Authentication Profiles
All required prerequisites are in place on Central NAC. We can now proceed with re-creating the NAC policies. We will begin by creating two authentication profiles one for MAC authentication and another for EAP-TLS authentication. The EAP-TLS authentication profile will handle authentications from the wireless SSID configured for 802.1X, as well as 802.1X authentications from the CX switches.
The MAC authentication profile will be used for MAC-based authentications originating from the CX switches. While the same MAC authentication profile can also be used for wireless clients, to enact the exact same setup that was demonstrated earlier in Classic Central we will setup our authentication profiles in this fashion.
Create Authentication Profile (EAP-TLS)
To create an authentication profile, navigate to the Central NAC page and enter configuration mode. Then, go to Authentication Profiles > Manage and click Create.
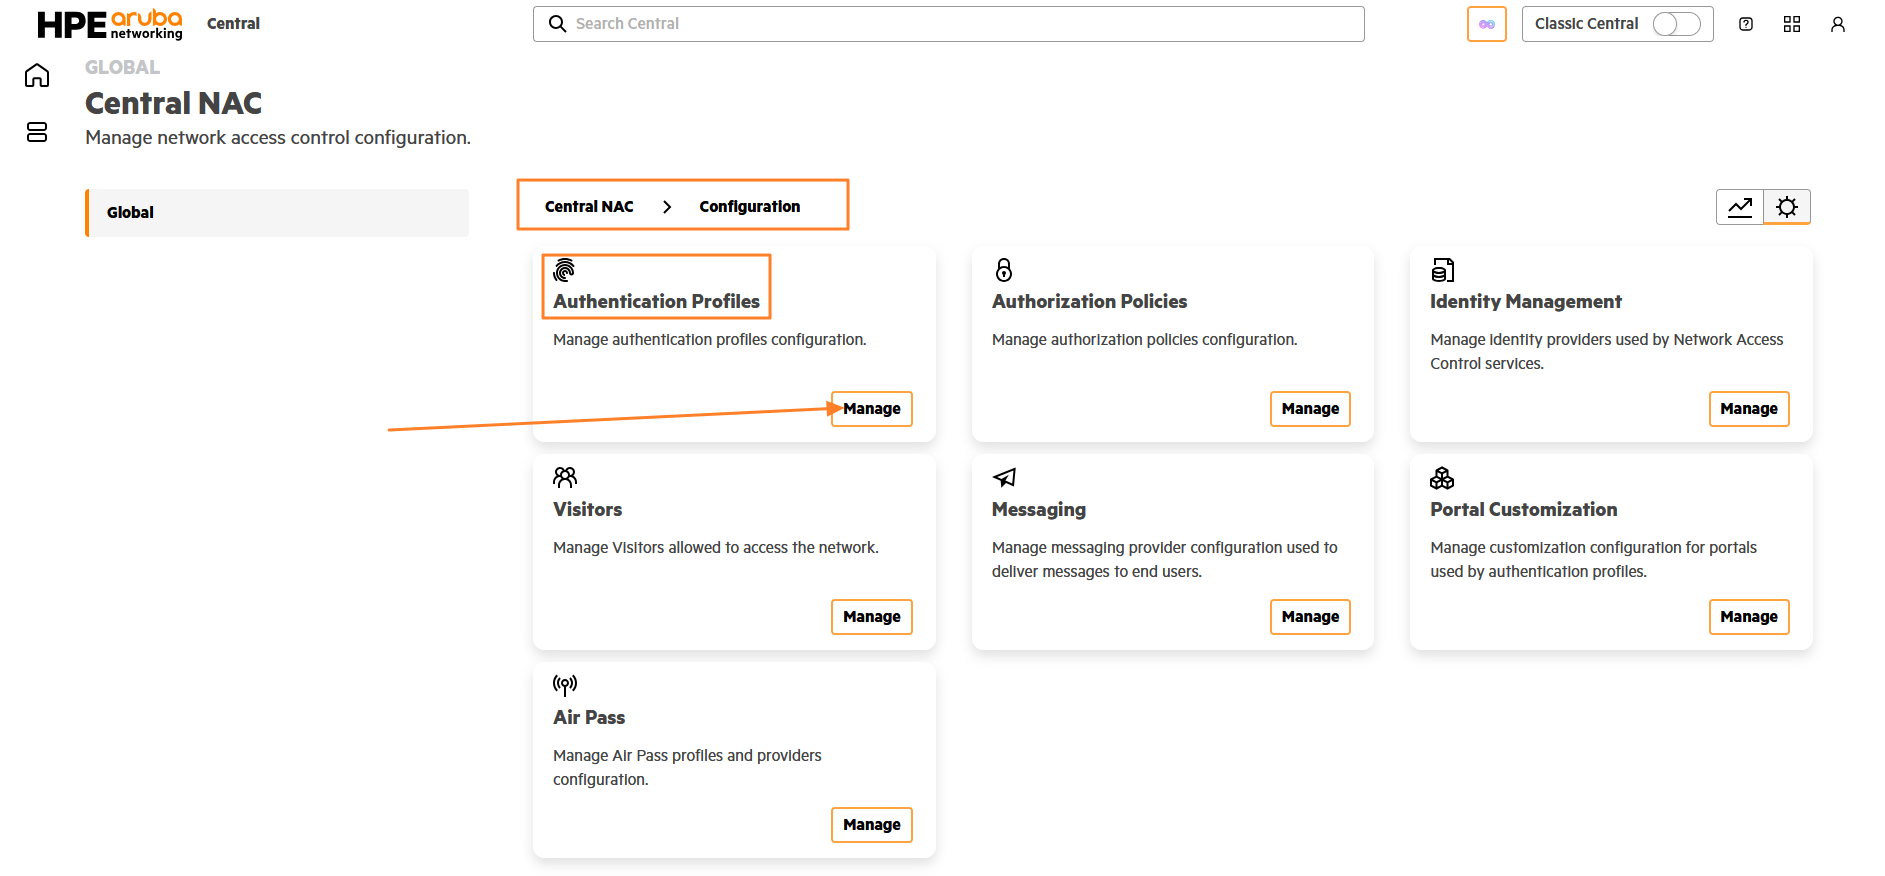
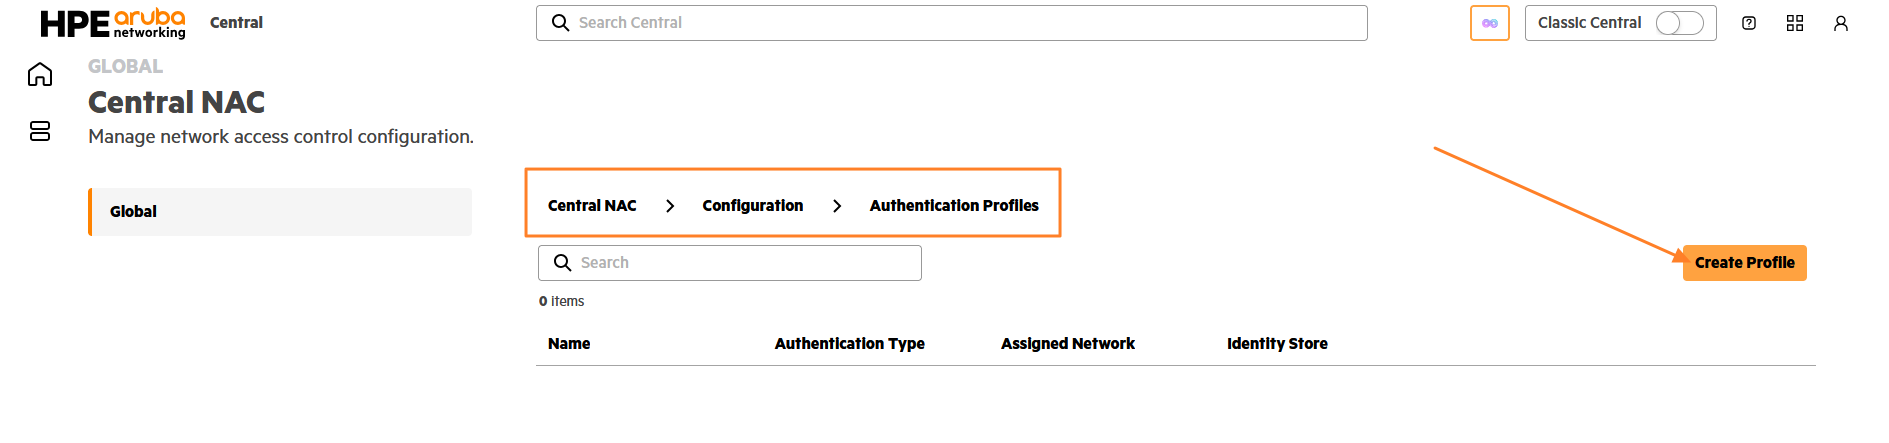
Now, let’s configure and walk through the various configuration elements of an authentication profile. Here, we are creating an authentication profile to serve 802.1X clients from both the wireless SSID and wired clients connected to the CX switch. Therefore, the authentication type is set to EAP-TLS.
Under the Network section, we select the 802.1X SSID created in New Central, which will be used by wireless clients. We also enable the Use for wired connection option so that the same profile can be applied to wired clients on the CX switch.
The Identity Store for this profile is the Entra ID tenant that we configured earlier as our IdP, which will be used to authorize users during authentication.

Scroll down further to view additional configuration fields. In the Organization Name field, provide a suitable name. This name will be displayed as the network profile name in the Aruba Onboarding App after clients are re-onboarded. In the Certificate section, you can choose between using the Default certificate or a Custom certificate. Central NAC provides the option to Bring your own certificate (BYOC), allowing customers to use their own PKI infrastructure instead of HPE’s internal CA to issue certificates for EAP-TLS authentication. This BYOC capability is part of the NAC subscription and customers who intend to use their own PKI must ensure that the NAC subscription is applied on their Central Tenants. Select Custom Certificate if you plan to use BYOC. Detailed information about this feature is available here https://arubanetworking.hpe.com/techdocs/NAC/central-nac/central-nac-byoc/
Since we are replicating the configuration from Cloud Auth in Classic Central, we will proceed with the Default Certificate option.
You can define the validity period of the client certificates using the EAP-TLS Client Valid Days field, and then click Create.
The User Onboarding URL will be generated once the onboarding portal is created. After this, you will need to return to the authentication profile to view the URL and share it with users so they can re-onboard onto the network.

Create Authentication Profile (MAC Authentication)
Once the EAP-TLS authentication profile has been created successfully, we can proceed with creating a new authentication profile for MAC Authentication.
Click Create to begin creating another authentication profile. Provide a suitable Name and select MAC Authentication as the Authentication Type.
In this example, we expect MAC authentications only from wired clients connected to the CX switch. Therefore, we will not select any wireless SSIDs from the Network dropdown. Instead, enable the Use for wired connection option to allow MAC-based authentication for wired clients.
If required, you can also select wireless SSIDs configured for MAC authentication from the Network dropdown.
The Identity Store is selected by default as the MAC Address Store. Click Create to complete the MAC Authentication profile.

2. Migrating MAC Address Entries from Cloud Auth to Central NAC
MAC Addresses must exist in the Central NAC MAC Address Store to allow authentications from clients performing MAC Auth. In order to save time and effort of adding all the MAC addresses manually you can upload a CSV of mac adddresses by exporting them from Cloud Auth and uploading it to Central NAC.
Login to your Classic Central account and navigate to Global > Security > Authentication and Policy. Go to configuration mode and click on Manage MAC Registration under Client Access Policy.

Click on the Export to CSV File icon and wait until the CSV file gets downloaded to your PC.
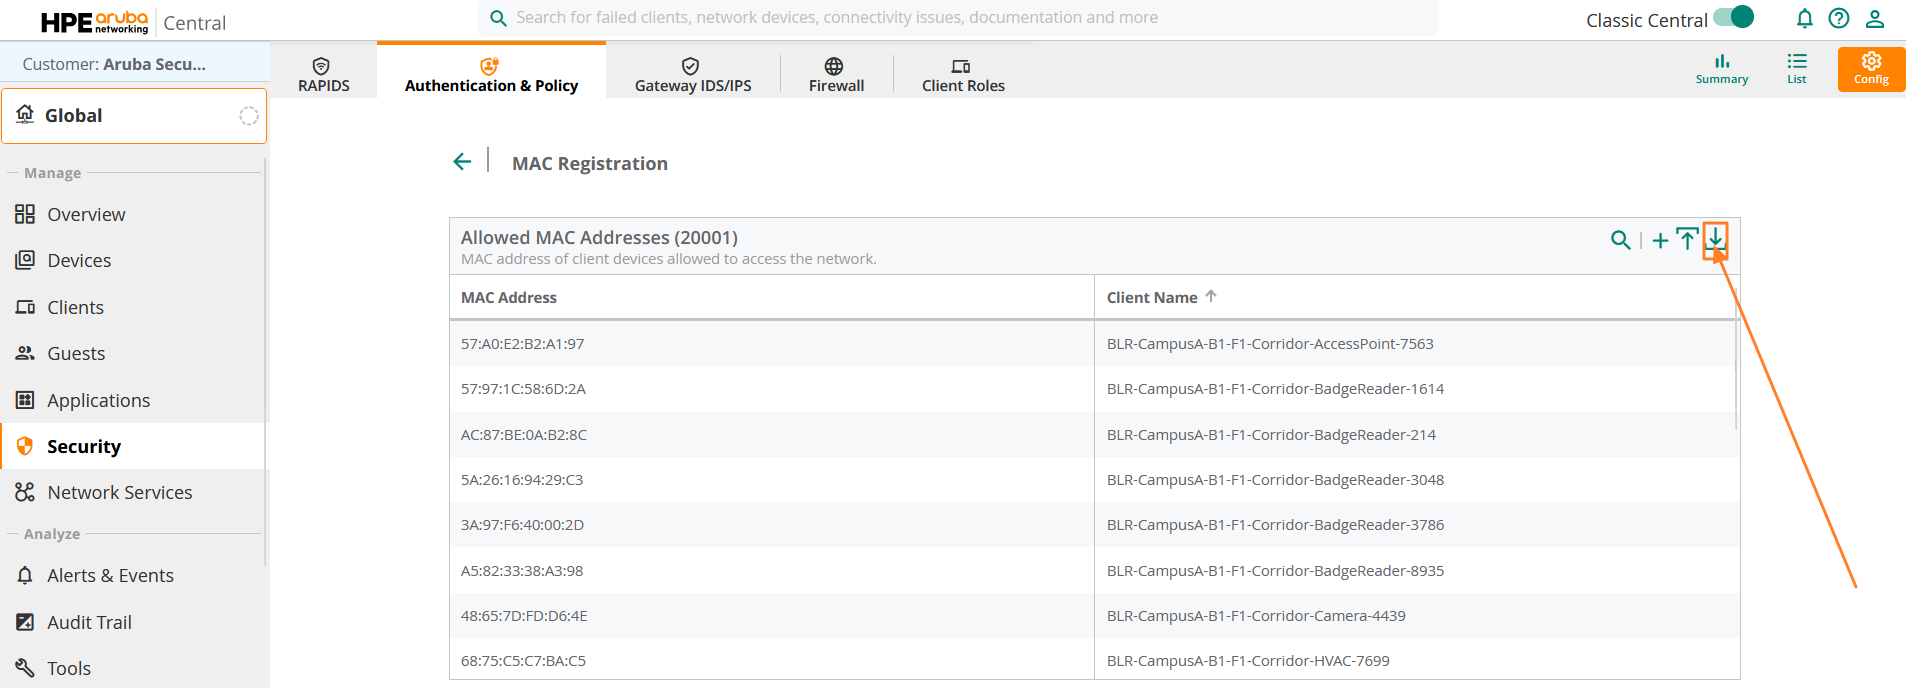
Once the file is downloaded, you can now switch back to New Central and navigate to Central NAC > Identity Management > Manage and click on the MAC Address Store.
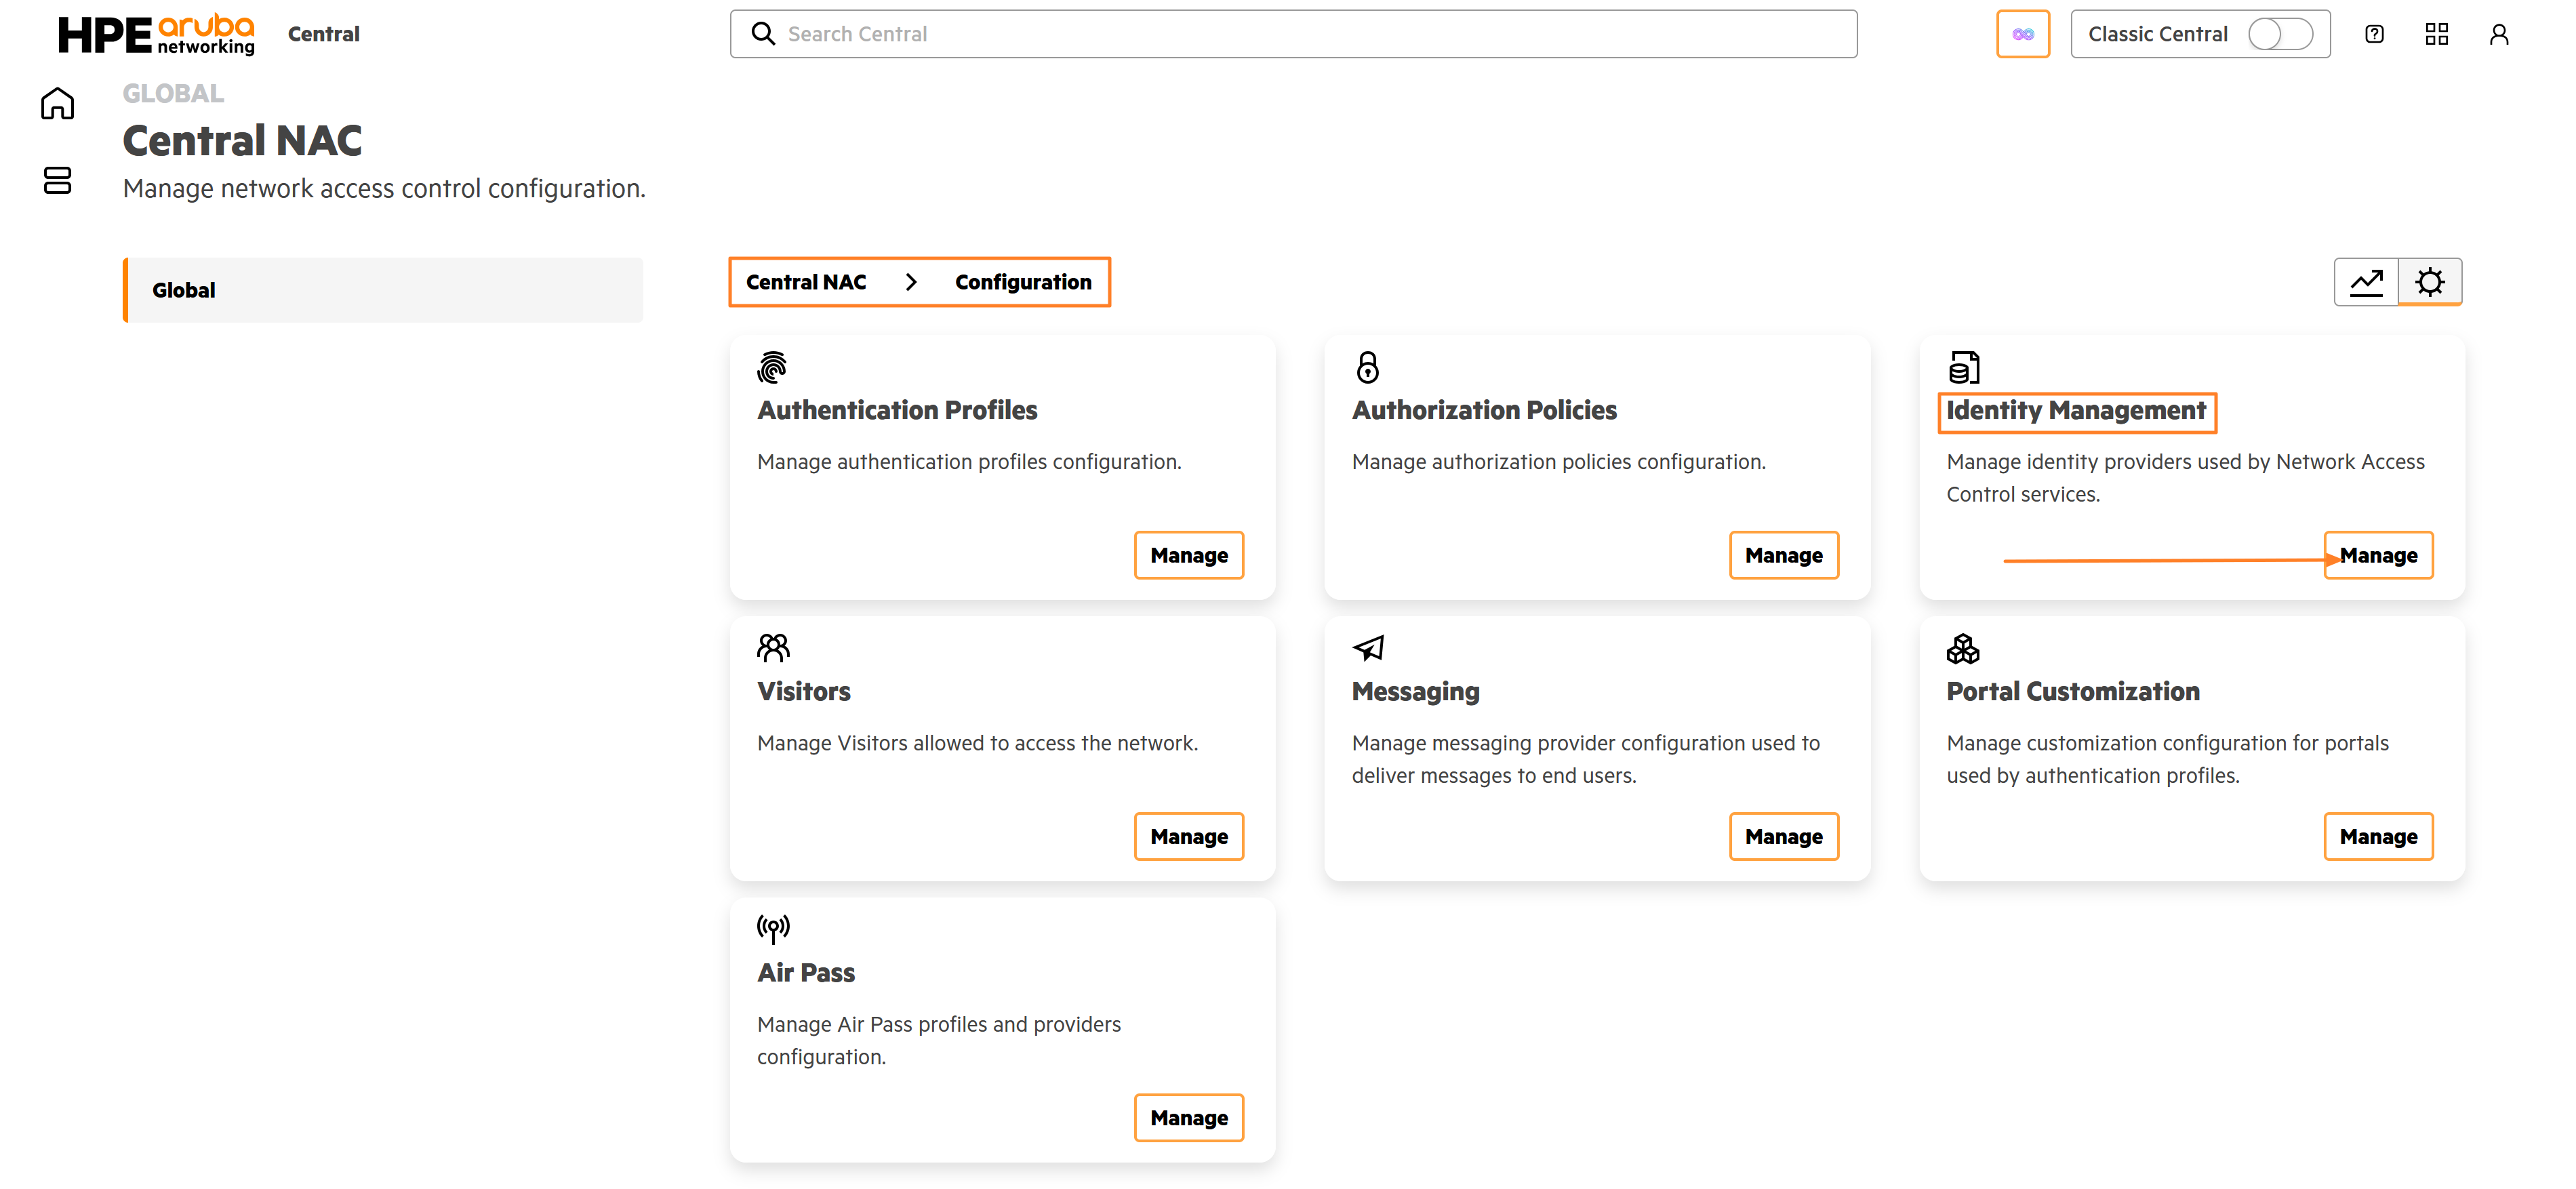
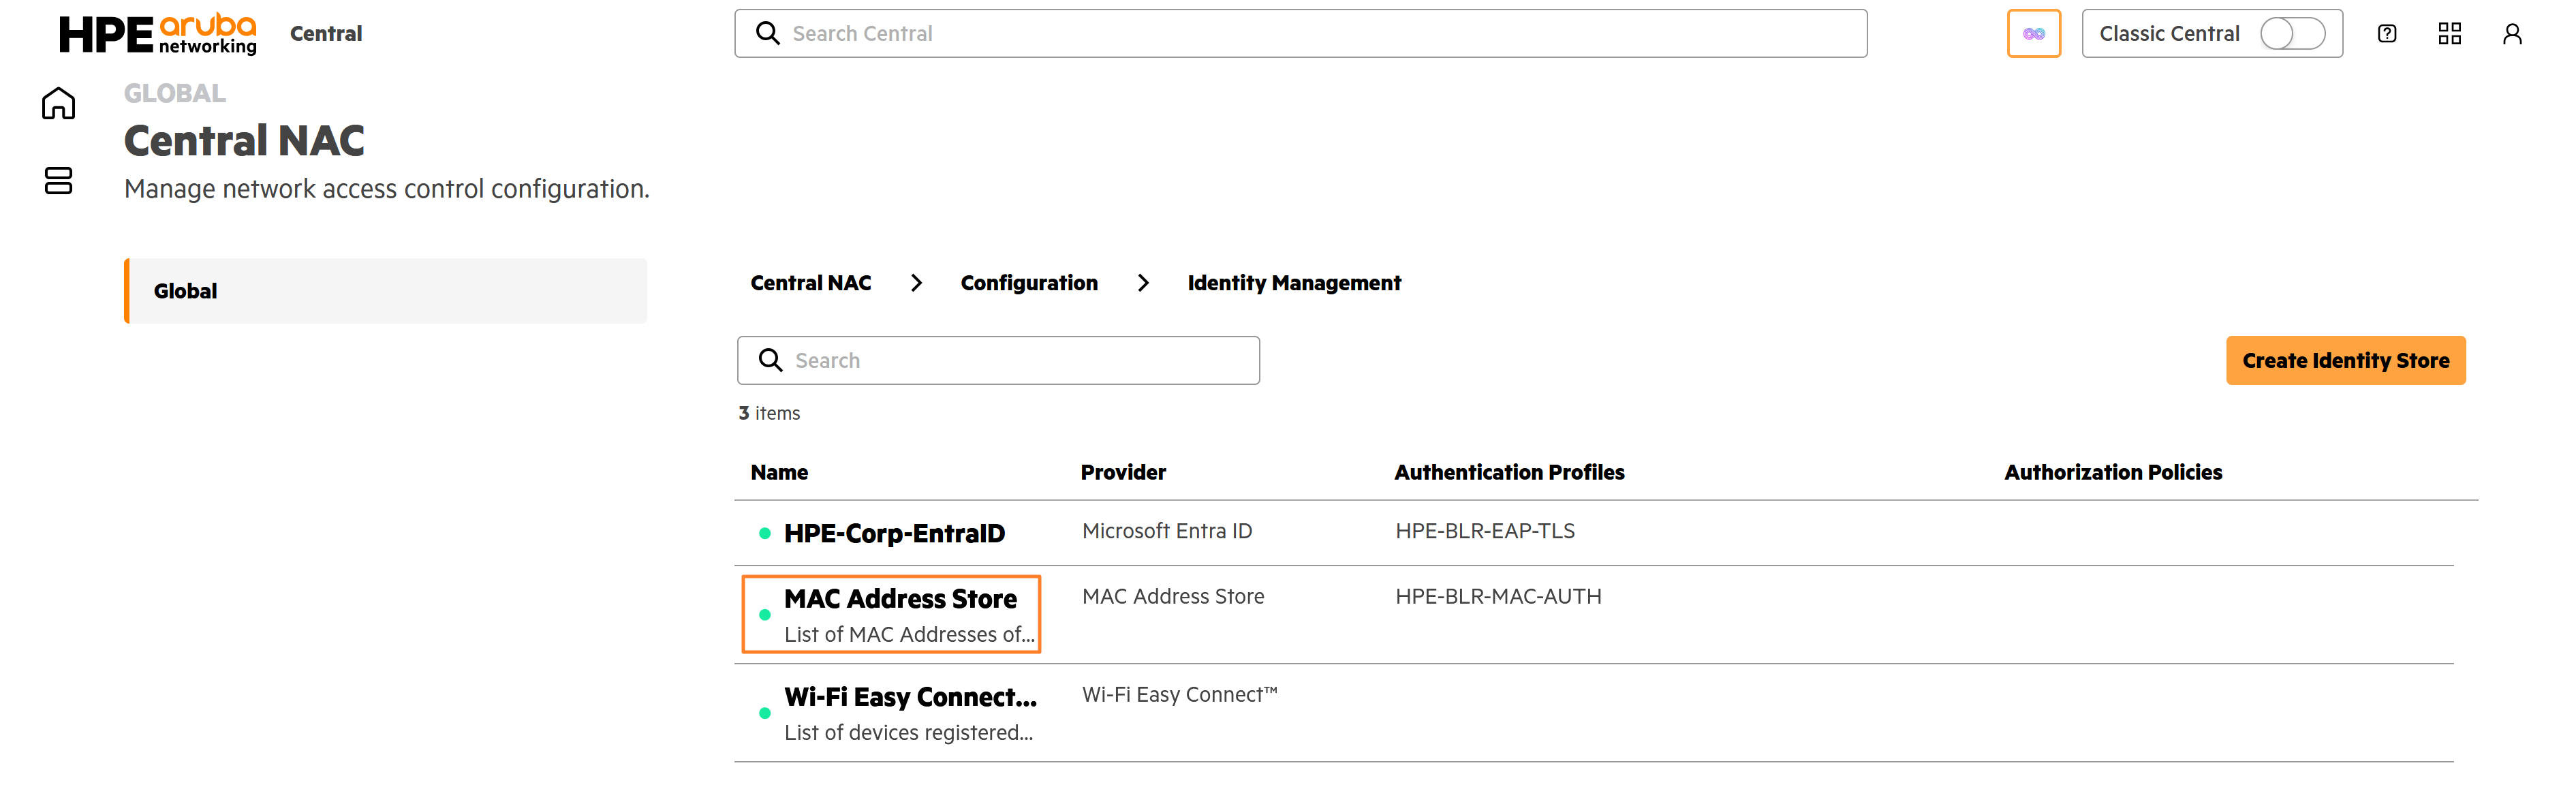
Click on Actions > Import from CSV and Select the File downloaded from Classic Central. Click on Upload to start uploading the mac addresses and wait until the upload process is completed.
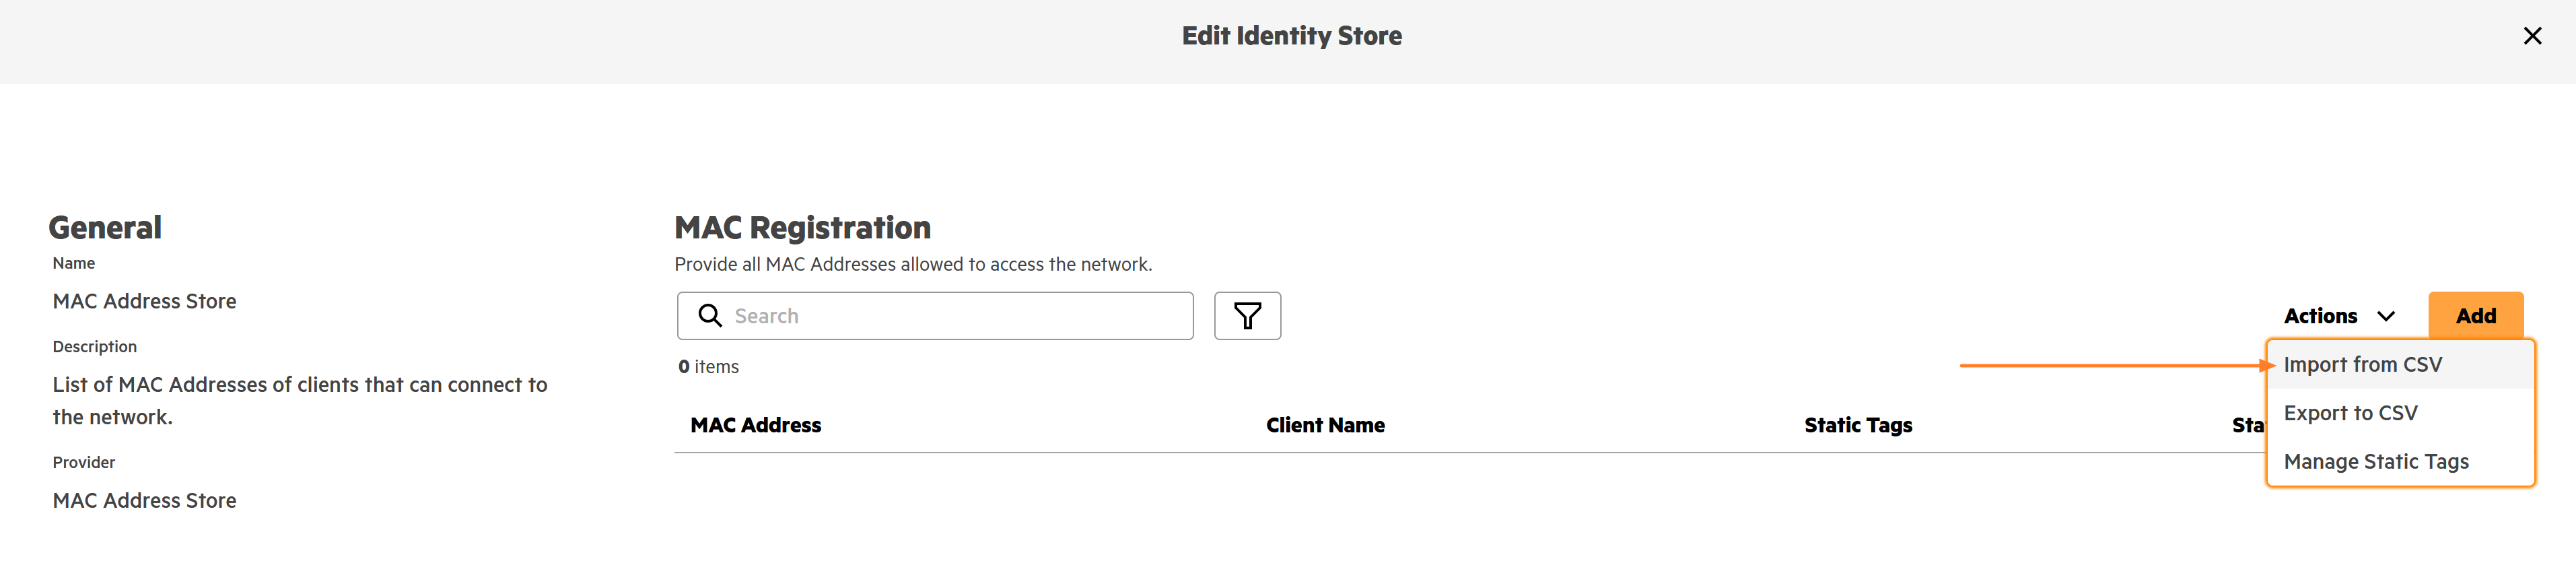
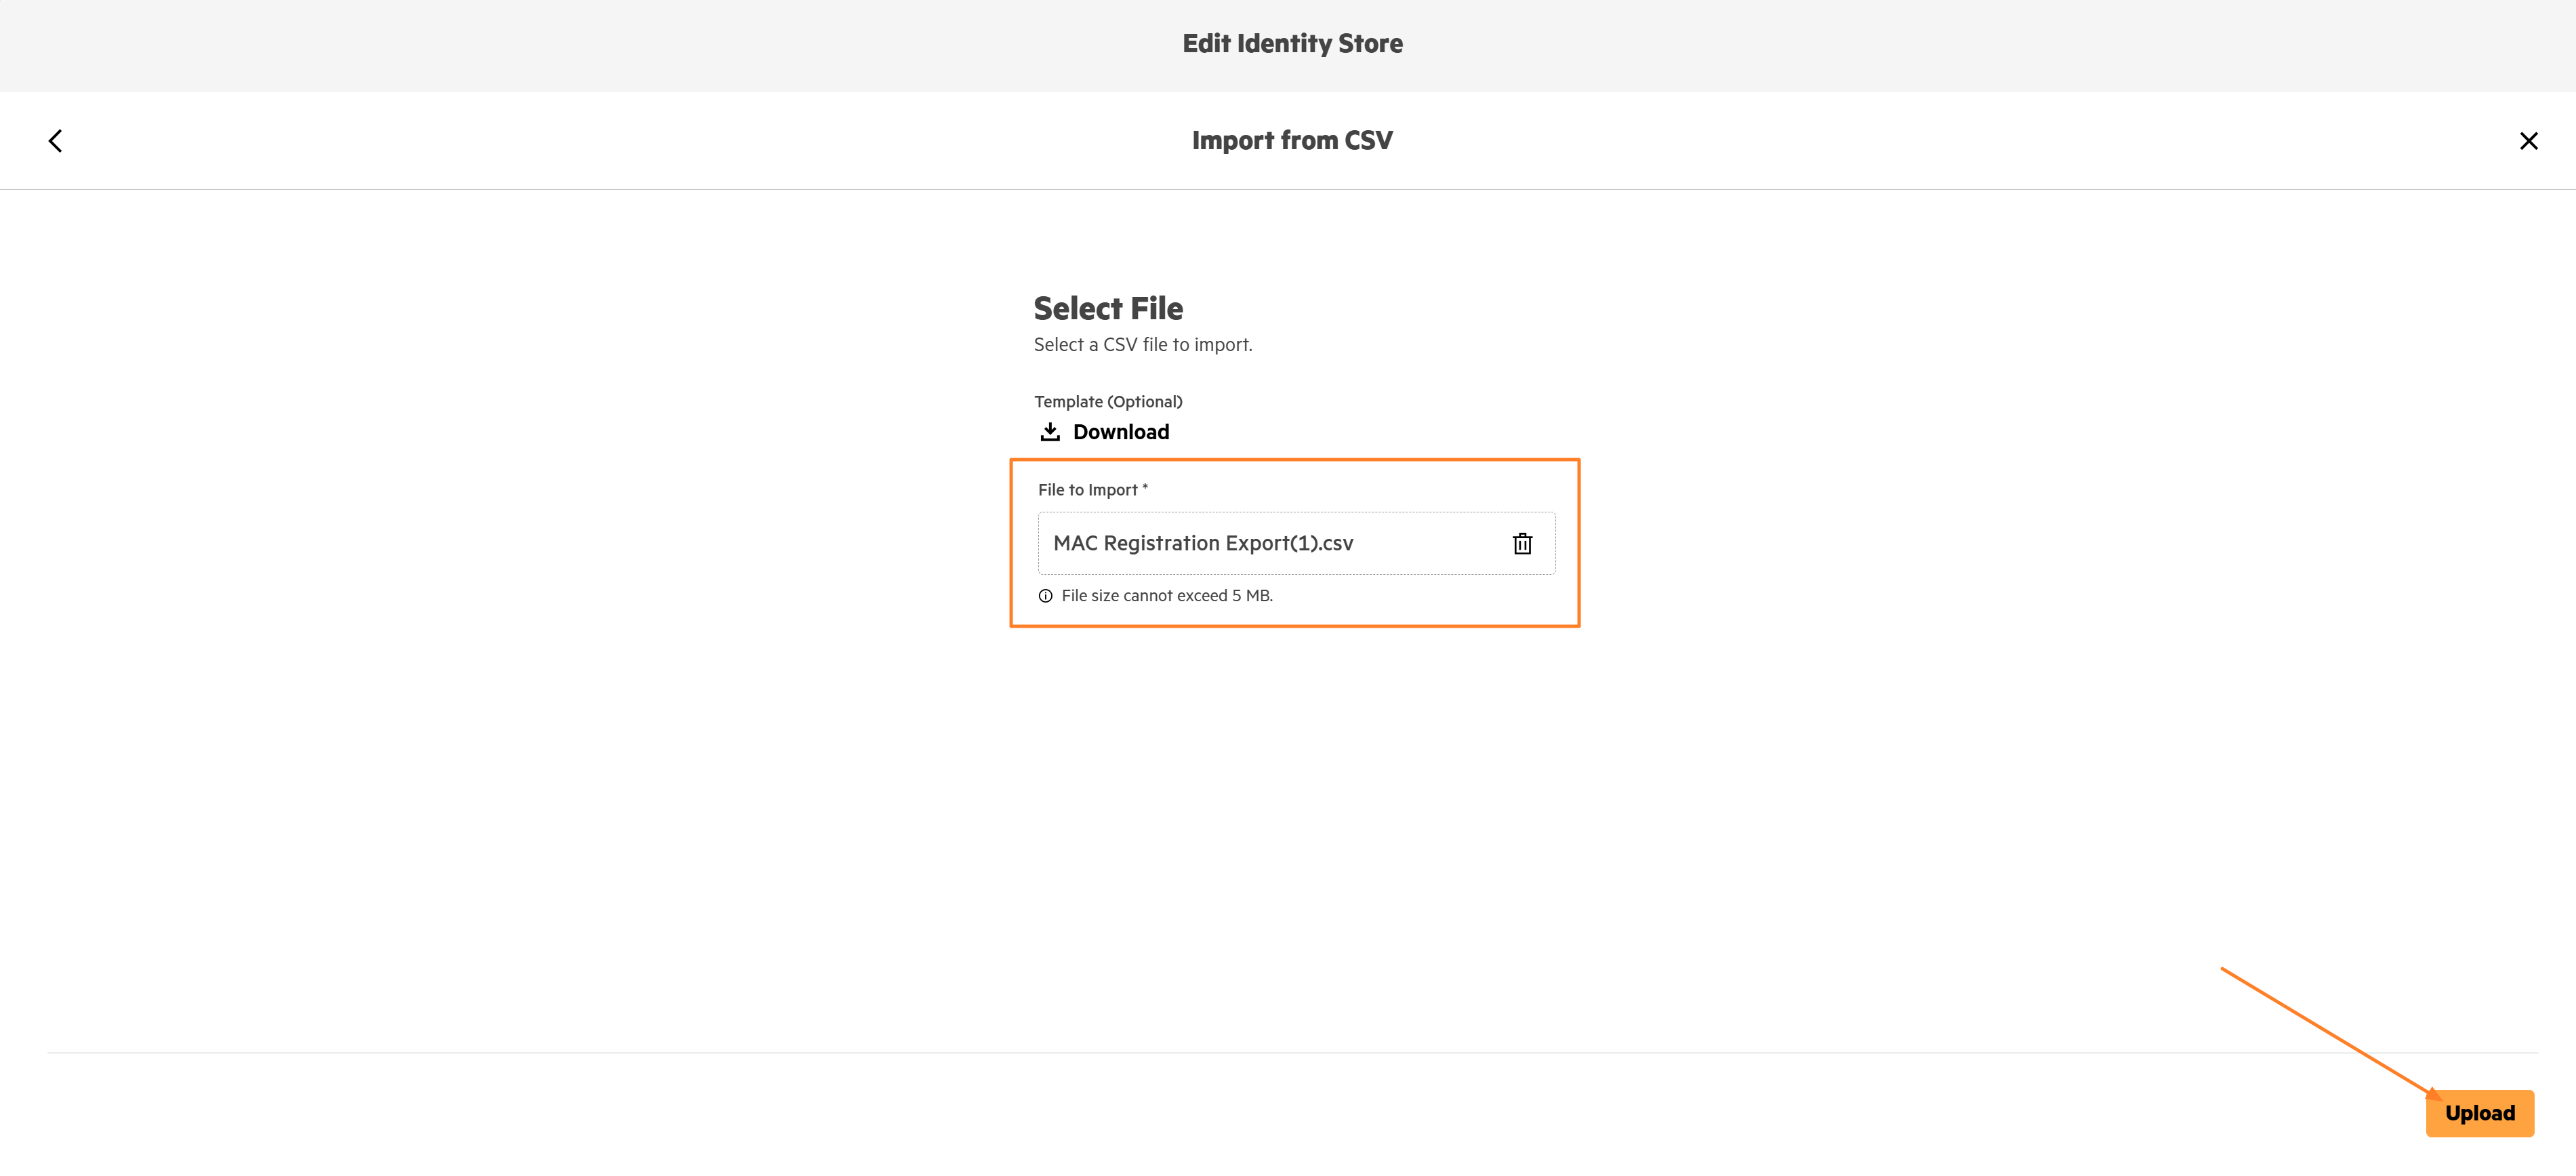
3. Creating Authorization Policies
The final step is to create Authorization Policies and Rules for NAC clients authenticating on the network. To create an Authorization Policy, navigate to Central NAC > Configuration > Authorization Policies > Create Policy.

We will create two Authorization Policies- one for 802.1X clients using EAP-TLS and another for MAC Authentication clients.
For the EAP-TLS 802.1X policy, provide a suitable Policy Name and select the Entra tenant configured as the IdP in the Identity Store dropdown. Under Pre-conditions, use the Site as the condition and set it to match a specific site configured in Central, ensuring parity with the Cloud Auth configuration. You can also choose additional conditions such as Authentication Source, Authentication Type, or NAD Vendor if you want to further segment authentication requests across different policies. Click Create to complete the policy configuration for EAP-TLS 802.1X users.

Click on Create Policy once again to create a policy for MAC Authentication and provide a suitable Policy Name and select MAC Address Store under the Identity Store dropdown. Under Pre-conditions, use the Site as the condition and set it to match a specific site configured in Central, ensuring parity with the Cloud Auth configuration. Similar to the EAP-TLS 802.1x policy you can also choose additional conditions such as Authentication Source, Authentication Type, or NAD Vendor if you want to further segment authentication requests across different policies. Click Create to complete the policy configuration for clients doing MAC authentication.

Now lets beging adding Rules under each policy to ensure parity with the Cloud Auth policies in Classic Central. We will first create rules for the HPE-CORP-EAP-TLS policy to migrate the User Access Policy in Cloud Auth for 802.1x EAP-TLS authentication.
Click on the ellipsis menu on the HPE-CORP-EAP-TLS policy and click Add Rule.

As per the Cloud Auth policies reviewed earlier, users who are members of the Entra user group HQ-Employees and have the client tag Wired-Windows-Ptown should be assigned the role Cloud-Secure.
Therefore, in Central NAC, we will use Entra User Group and Client Tags as conditions combined with an AND operator to ensure both criteria are met. If both conditions are satisfied, access will be granted by selecting the Allow Access option under the Actions field and assigning the role Cloud-Secure.
The rule below is configured to replicate the exact policy in Cloud Auth. Adjust the conditions and role as required for your environment, and then click Create.

Similarly, create the second and third rules to assign users in the Entra user groups TME and NAC-Marketing their respective roles when both the Entra User Group membership and Client Tags conditions are satisfied.
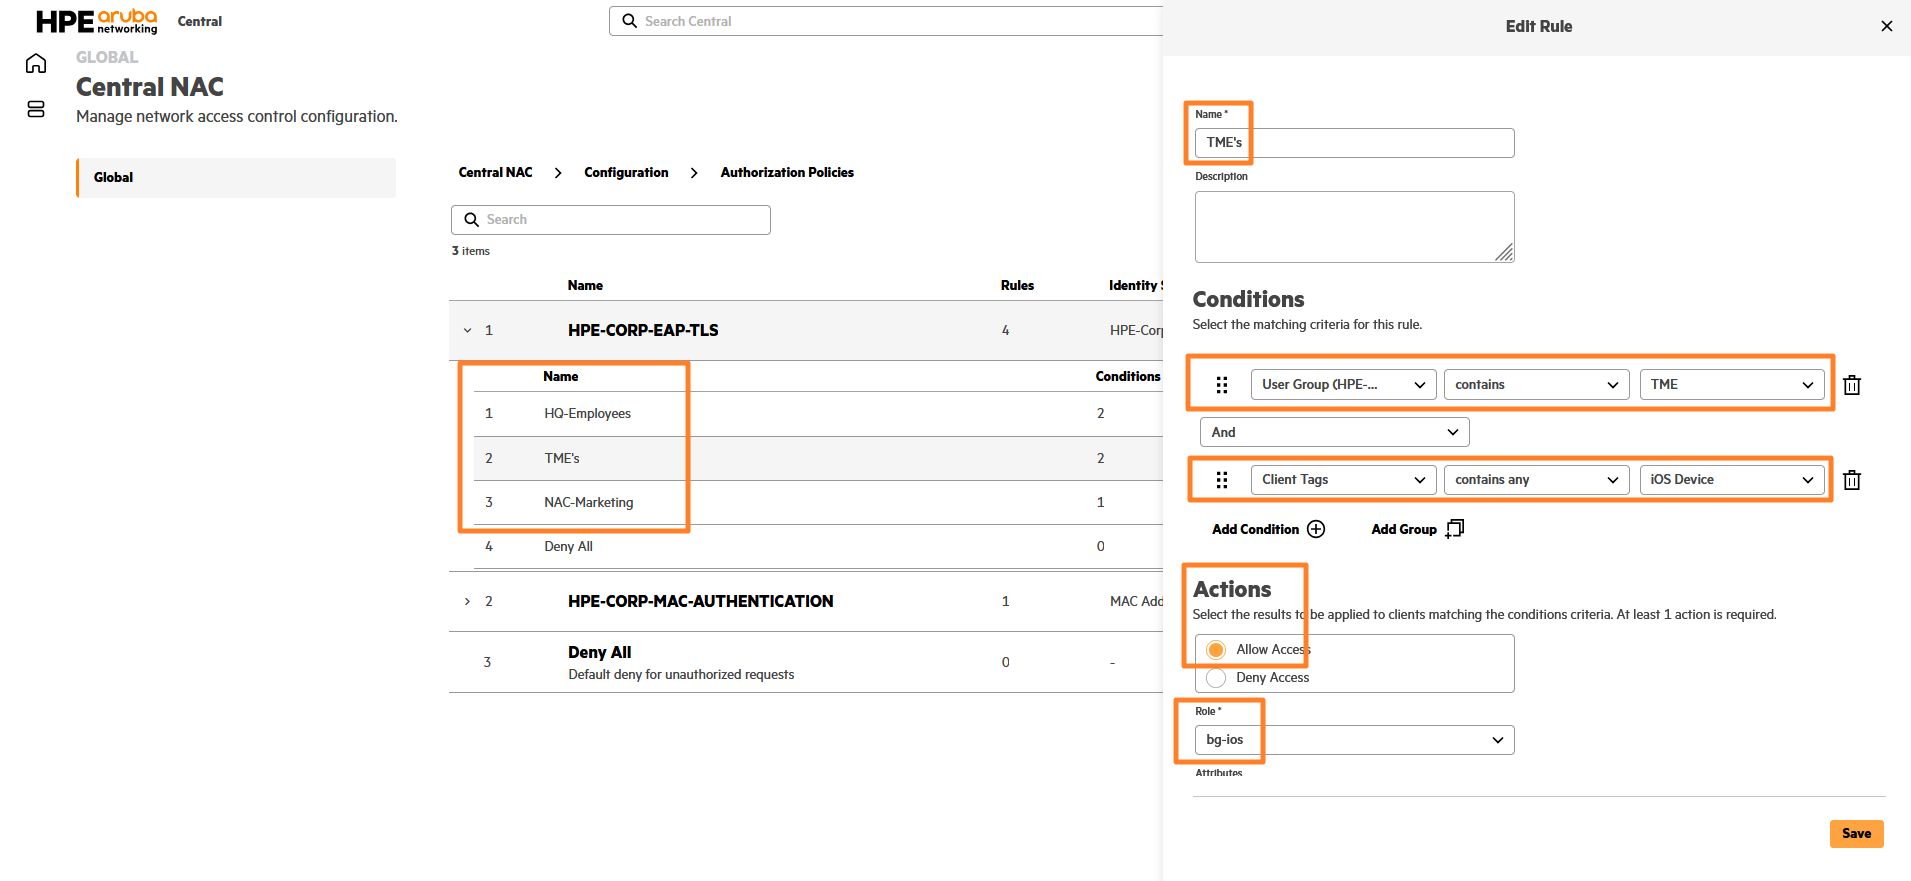
INFO
Note that as part of core features in NAC foundation Custom policy type is not available. You can define only one User and Client policy, and its pre-conditions are automatically set based on the selection and cannot be modified. You will need a NAC subscription to enable the custom policy type and define pre-conditions as per your requirements.
We can now create rules for the HPE-CORP-MAC-AUTHENTICATION policy to migrate the Client Access Policy from Cloud Auth for MAC authentication. Since the MAC address entries have already been migrated from Cloud Auth to Central NAC, no further action is required for this step. All MAC addresses present in the Central NAC MAC address store will be allowed, and authentication will succeed for those endpoints. You only need to create rules to check their respective Client Tags and assign the appropriate roles accordingly.
Click on the ellipsis menu on the HPE-CORP-MAC-AUTHENTICATION policy and click Add Rule.

Adjust the Client Tag conditions and role as required for your environment, and then click Create.

Create rest of the rules to match a MAC authentication client with its respective Client Tags and Roles.

With this, we complete the migration of Cloud Auth policies to Central NAC in New Central. Although this guide illustrates a basic migration scenario, the fundamentals of the migration process remain the same.
Once the migration is complete, you can further enhance your environment by building a more robust NAC setup using the additional, easy-to-configure features available in Central NAC. With a Central NAC subscription, you can strengthen security while also benefiting from the convenience of integrating BYOC features with your existing PKI infrastructure. You can also create more granular policies for enhanced segmentation of clients and users on the network, and leverage Central NAC to authenticate users and devices across third-party NAD systems etc.