Migrating from Cloud Auth to Central NAC
12 minute read
Introduction
This guide provides a structured approach for migrating from Legacy Cloud Authentication and Policy in Classic Central to the Central NAC solution in New Central. It covers the migration of key authentication workflows, including 802.1X, MAC authentication, MPSK and guest access. The guide explains how existing configurations in the legacy system can be interpreted and recreated using Central NAC constructs.
To simplify the transition, this document:
-
Maps legacy configurations to their Central NAC equivalents
-
Provides step-by-step procedures for implementing each workflow
-
Highlights important considerations to preserve existing functionality
Following this guide will help ensure a consistent and predictable migration experience.
Prerequisites
Before starting the migration, ensure the following prerequisites are met:
Identity Providers Configuration
Required Identity Providers (IdPs) must be configured in Central NAC. Refer to the Central NAC documentation for supported IdPs and configuration steps: https://arubanetworking.hpe.com/techdocs/NAC/central-nac/central-nac-idps/
Expand the Identity Providers section for detailed instructions.
SMS Provider Configuration (for Guest Workflows)
If guest access workflows use SMS-based credential delivery, configure an SMS provider in Central NAC. For example, to configure Twilio: https://arubanetworking.hpe.com/techdocs/NAC/cloud-guest/cloud-guest-setting-up-twilio-sms-service/
Client Classification Setup
Client classification must be configured in advance, as legacy policies may depend on Client Insight Tags. Refer to: https://arubanetworking.hpe.com/techdocs/new-central/content/ci/ci.htm
Network Configuration Readiness
Ensure that all required network constructs are preconfigured in New Central, including:
SSIDs
AAA Profiles for Switches
VLANs
Roles
For setup guidance, refer to: https://arubanetworking.hpe.com/techdocs/new-central/content/get-started/get-started-new.htm
Migration Workflow Overview- 802.1x
The migration process for 802.1X consists of the following high-level steps:
- Identify existing 802.1X SSIDs and aaa authentication profiles for switches and list out the ones that use Cloud Auth as the RADIUS server.
- Review the identity sources in use for 802.1x authentications (e.g. Entra ID, Okta, Google Workspace)
- Analyze the User Access and Client Access Policy conditions and the Client Roles returned for every condition in the legacy system.
- Recreate equivalent policies in Central NAC
- Validate enforcement behavior and role assignment
This example demonstrates how to migrate an existing 802.1X configuration from Legacy Cloud Authentication and Policy to Central NAC. The scenario includes both a wireless SSID and a wired AAA profile using a common identity source and role-mapping logic.
The goal is to replicate the same authentication behavior, role assignment, and access control in Central NAC. We will walk through a real configuration from the legacy Cloud Authentication and Policy system and use it as the basis for migration to Central NAC.
We start by identifying:
- A wireless 802.1X SSID
- A wired AAA profile (switch configuration)
- Both using Cloud Authentication as the RADIUS server
As shown below we have identified the HPE-Corp-BLR wireless SSID which is using Cloud Auth as the RADIUS server.

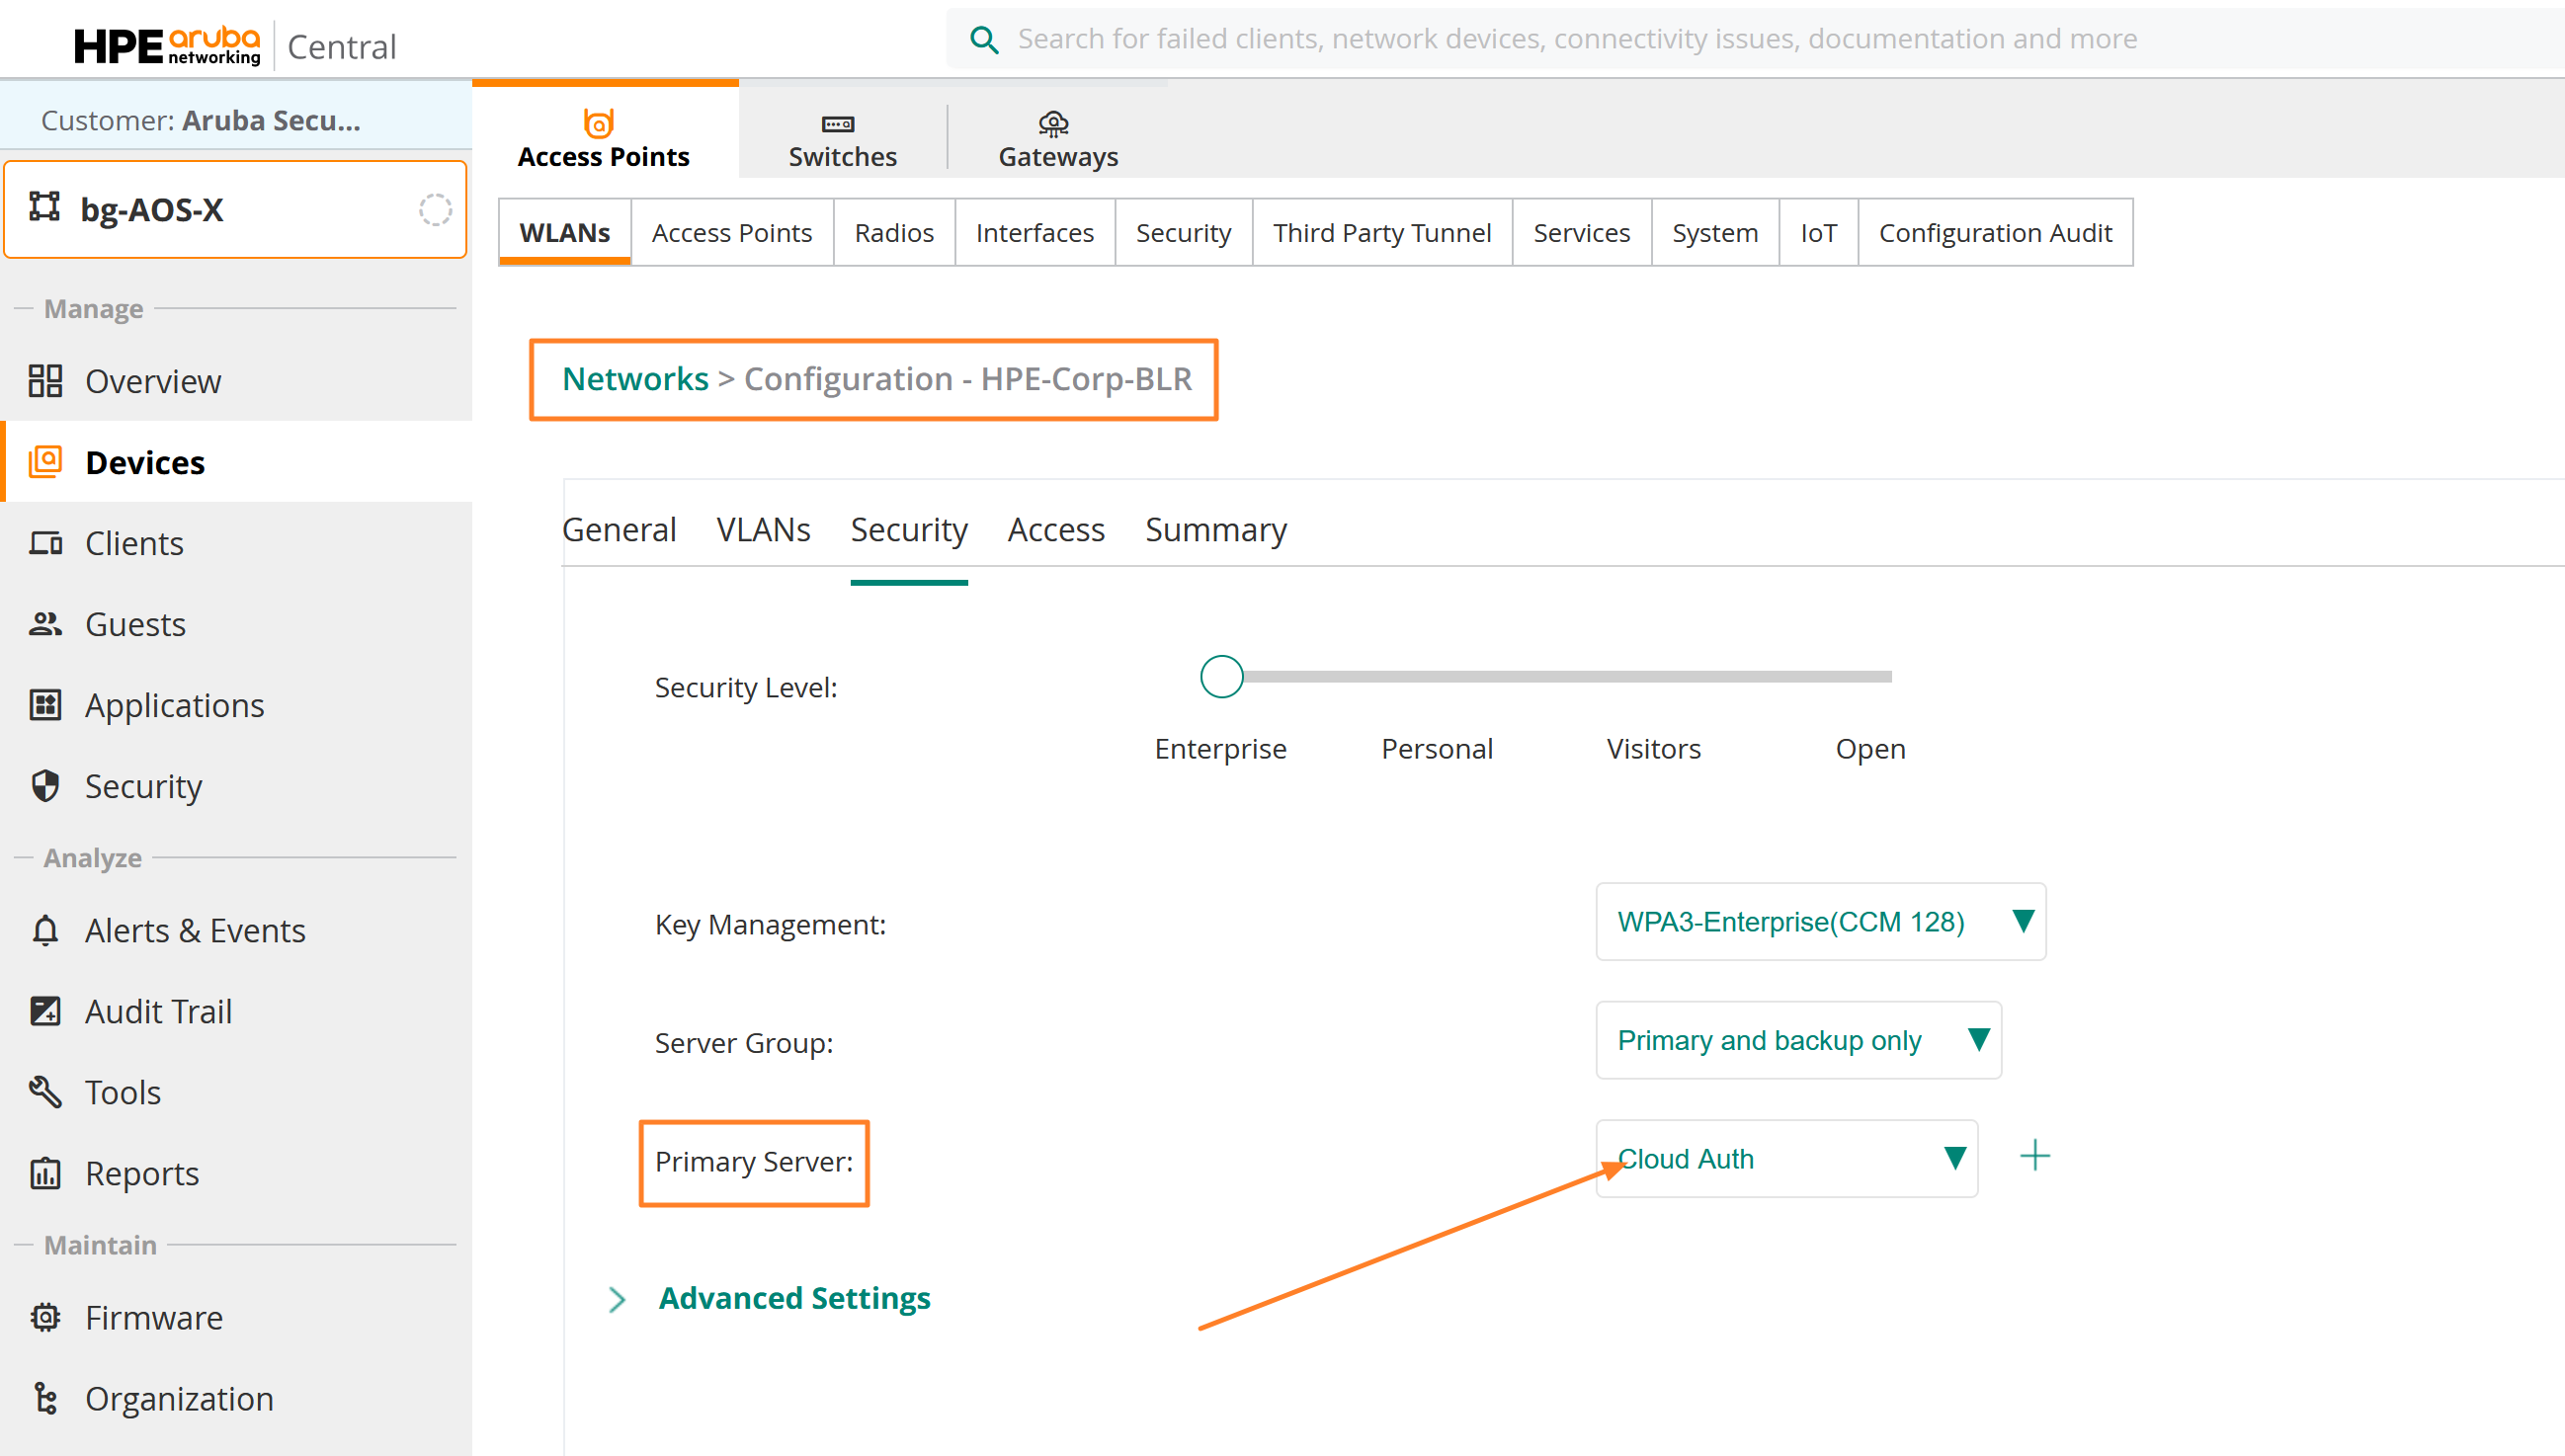
Now let us take a look and identify one of the switch configuration template that is using Cloud Auth as the RADIUS server. In this example, we have shown an Aruba CX switch template from Classic Central. This may vary based on the switch template you use between AOS-S and AOS-CX. For an AOS-CX switch the aaa authentication profile under classic is configured under Security > Authentication.


Within the Cloud Authentication and Policy configuration page, you can view all policies configured for 802.1X clients connecting to wireless SSIDs and switch ports. 802.1X authentications are handled by User Access Policies, while MAC authentications are handled by Client Access Policies.
User Access Policies combine the User Group (from the Identity Store of the authenticating user) and Client Tags to determine and enforce a Client Role.
In the example below, Microsoft Entra ID is used as the IdP, and different Client Tags are applied within the User Access Policies. It is therefore important to pre-create the IdP and Client Tags in New Central—as outlined in the Prerequisites—to ensure a seamless migration of these NAC policies.
Client Access Policies use Client Tags to assign Client Roles to endpoints authenticating via MAC address. If a MAC address is present in the MAC address store and matches a Client Tag, the corresponding policy condition is met and a Client Role is assigned.
To achieve parity with the existing NAC policies in Cloud Auth (Classic Central), we will recreate equivalent policies and conditions in New Central. These policies can later be enhanced with greater granularity using the advanced policy and rule elements available in Central NAC.


Now that we have gathered the required configuration details from Cloud Authentication and Policy in Classic Central, we can begin setting up Central NAC in New Central. With the prerequisites already in place—such as adding IdPs, configuring Client Tags, and creating SSIDs, wired AAA profiles for switches, and Roles/VLANs—we will proceed to recreate the NAC policies so they align with the existing Cloud Auth configuration. This provides a consistent starting point for the migration, after which policies can be further refined using the enhanced capabilities available in Central NAC.
Prerequisites Check
Bootstrap Central NAC service on your Central Tenant
In order to bootstrap Central NAC service in your Central Tenant visit to the Central NAC card and add IDP to ensure that the service is available. You can navigate to Menu > Central NAC > Manage and go to configuration mode.
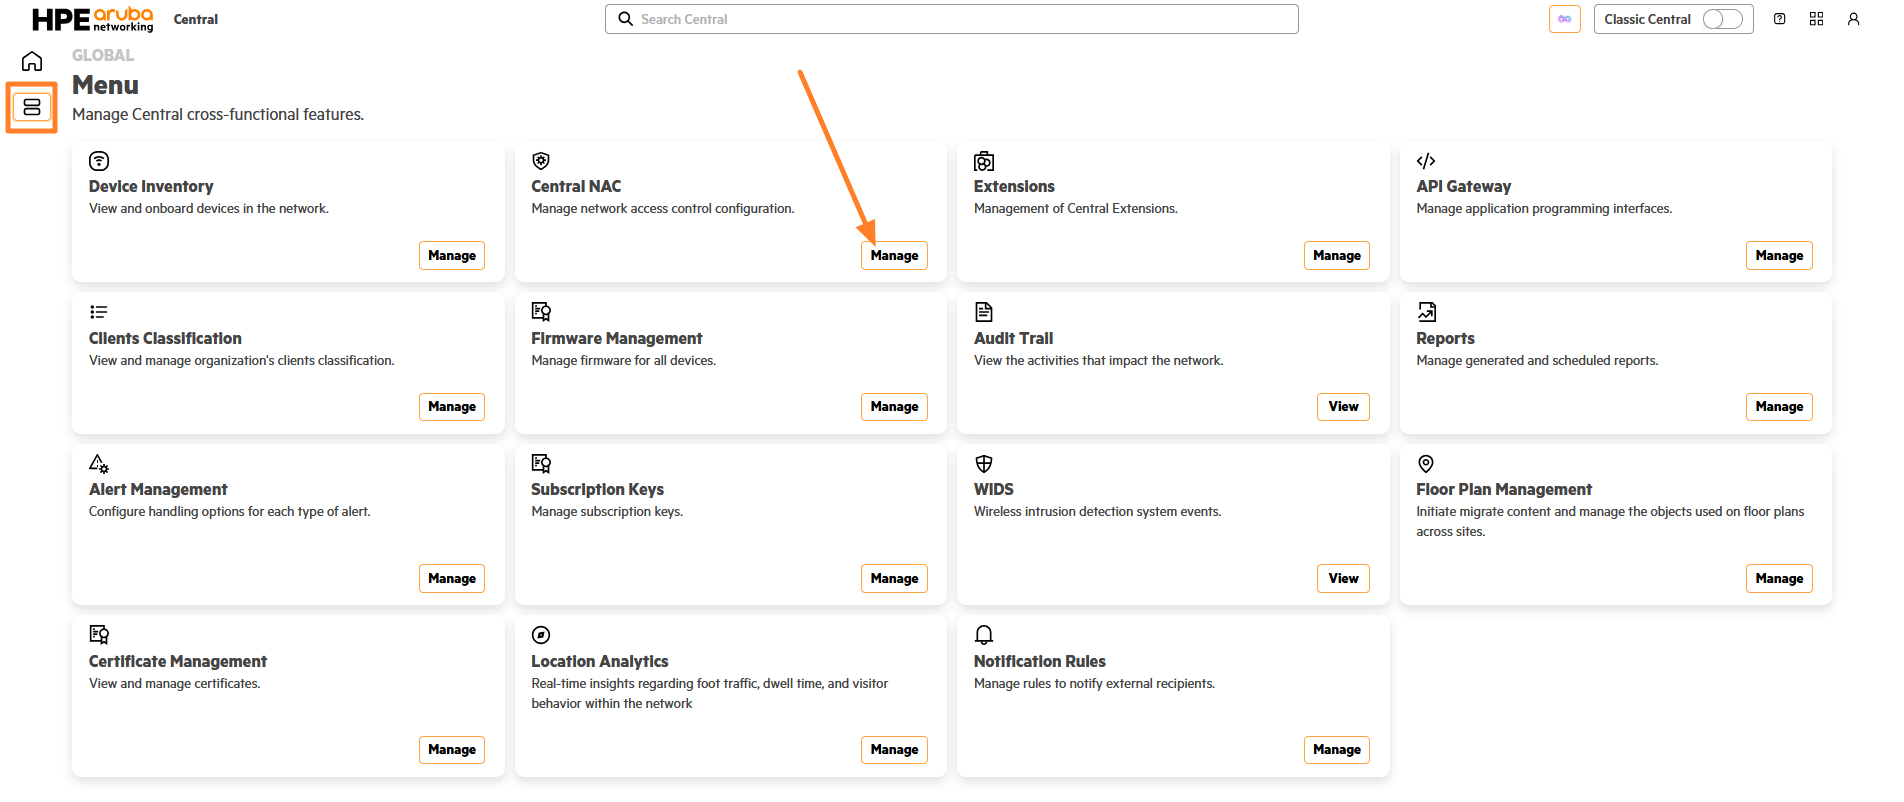
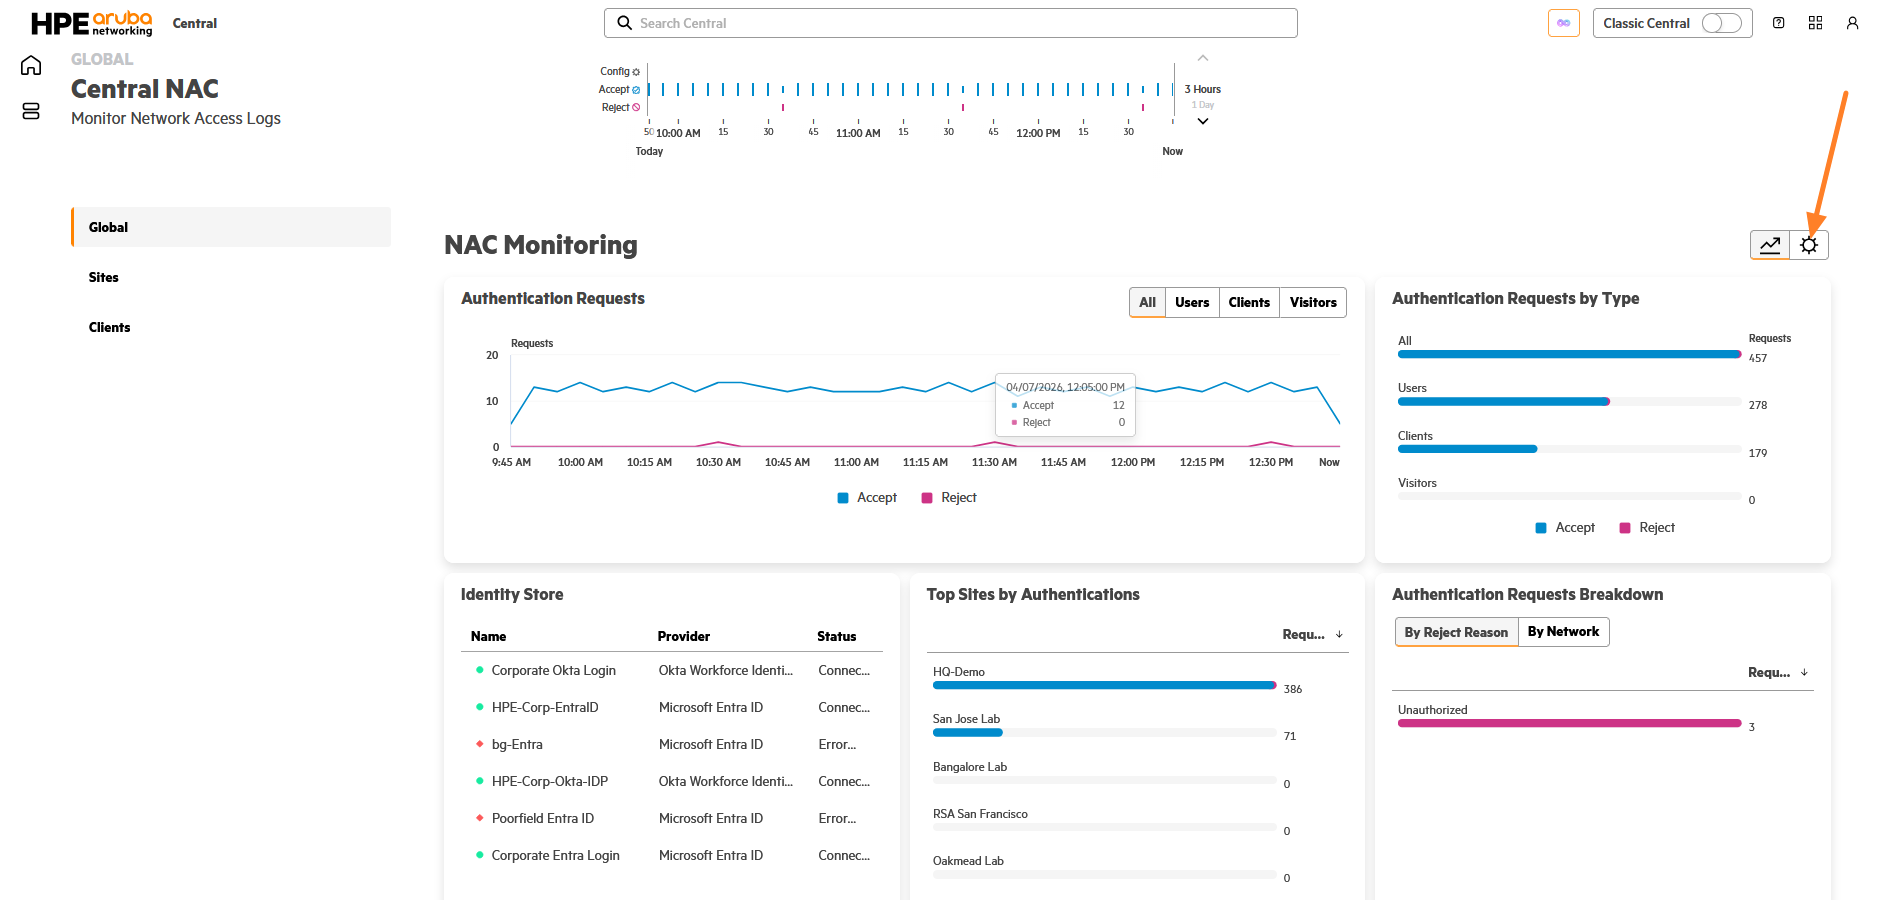
You can now add an IDP to ensure that the Central NAC service is available to work with. To add an IDP follow instructions available at https://arubanetworking.hpe.com/techdocs/NAC/central-nac/central-nac-idps/
Entra ID added as an IDP in Central NAC

802.1x SSID is created in New Central pointing to Central NAC as the RADIUS server

Switch AAA profile using Central NAC as RADIUS server

Client Tags for endpoints [Optional]
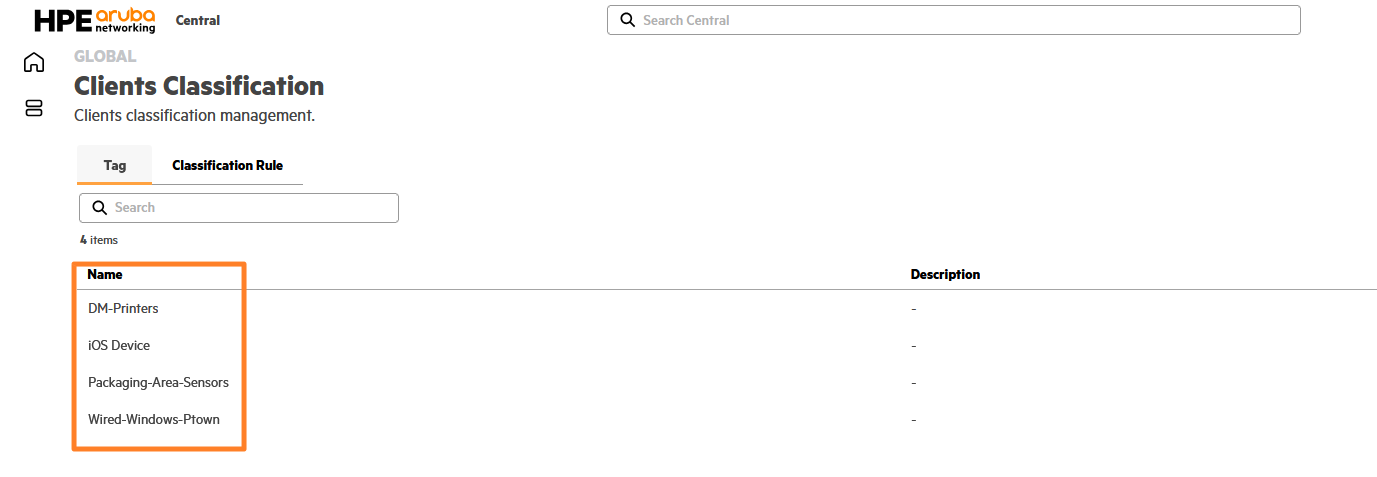
Required Roles available for use in NAC Policies in Central NAC
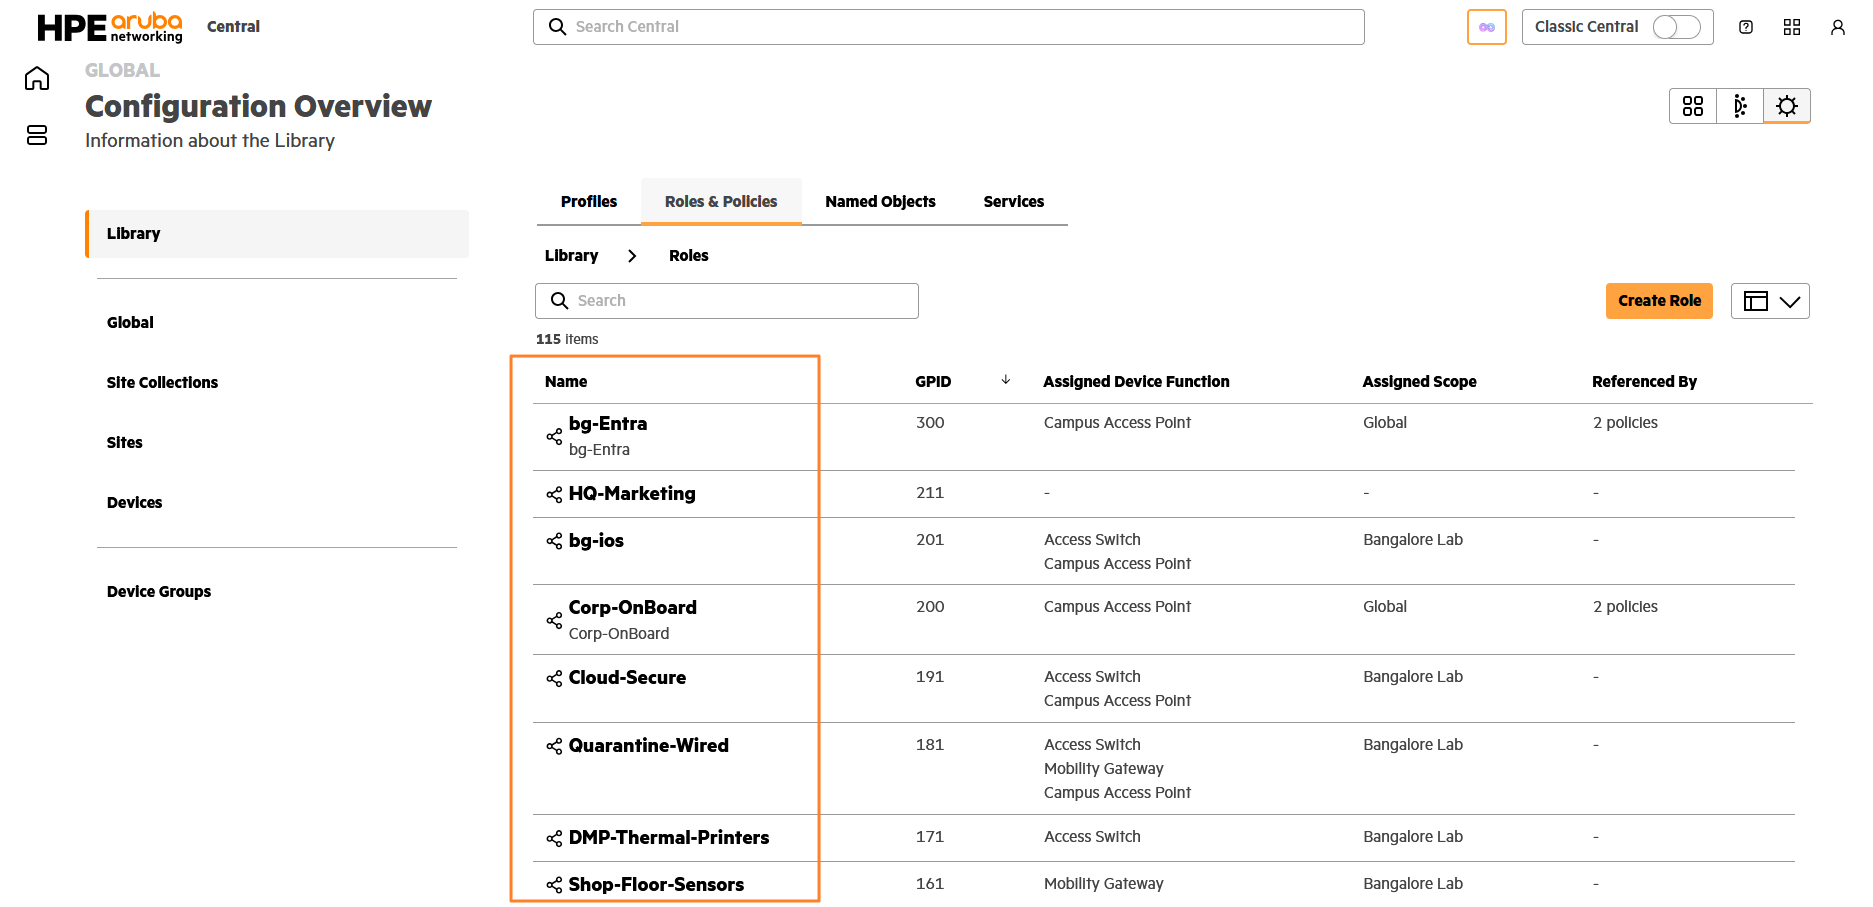
Central NAC Configuration-
1. Creating Authentication Profiles
All required prerequisites are in place on Central NAC. We can now proceed with re-creating the NAC policies. We will begin by creating two authentication profiles one for MAC authentication and another for EAP-TLS authentication. The EAP-TLS authentication profile will handle authentications from the wireless SSID configured for 802.1X, as well as 802.1X authentications from the CX switches.
The MAC authentication profile will be used for MAC-based authentications originating from the CX switches. While the same MAC authentication profile can also be used for wireless clients, to enact the exact same setup that was demonstrated earlier in Classic Central we will setup our authentication profiles in this fashion.
Create Authentication Profile (EAP-TLS)
To create an authentication profile, navigate to the Central NAC page and enter configuration mode. Then, go to Authentication Profiles > Manage and click Create.
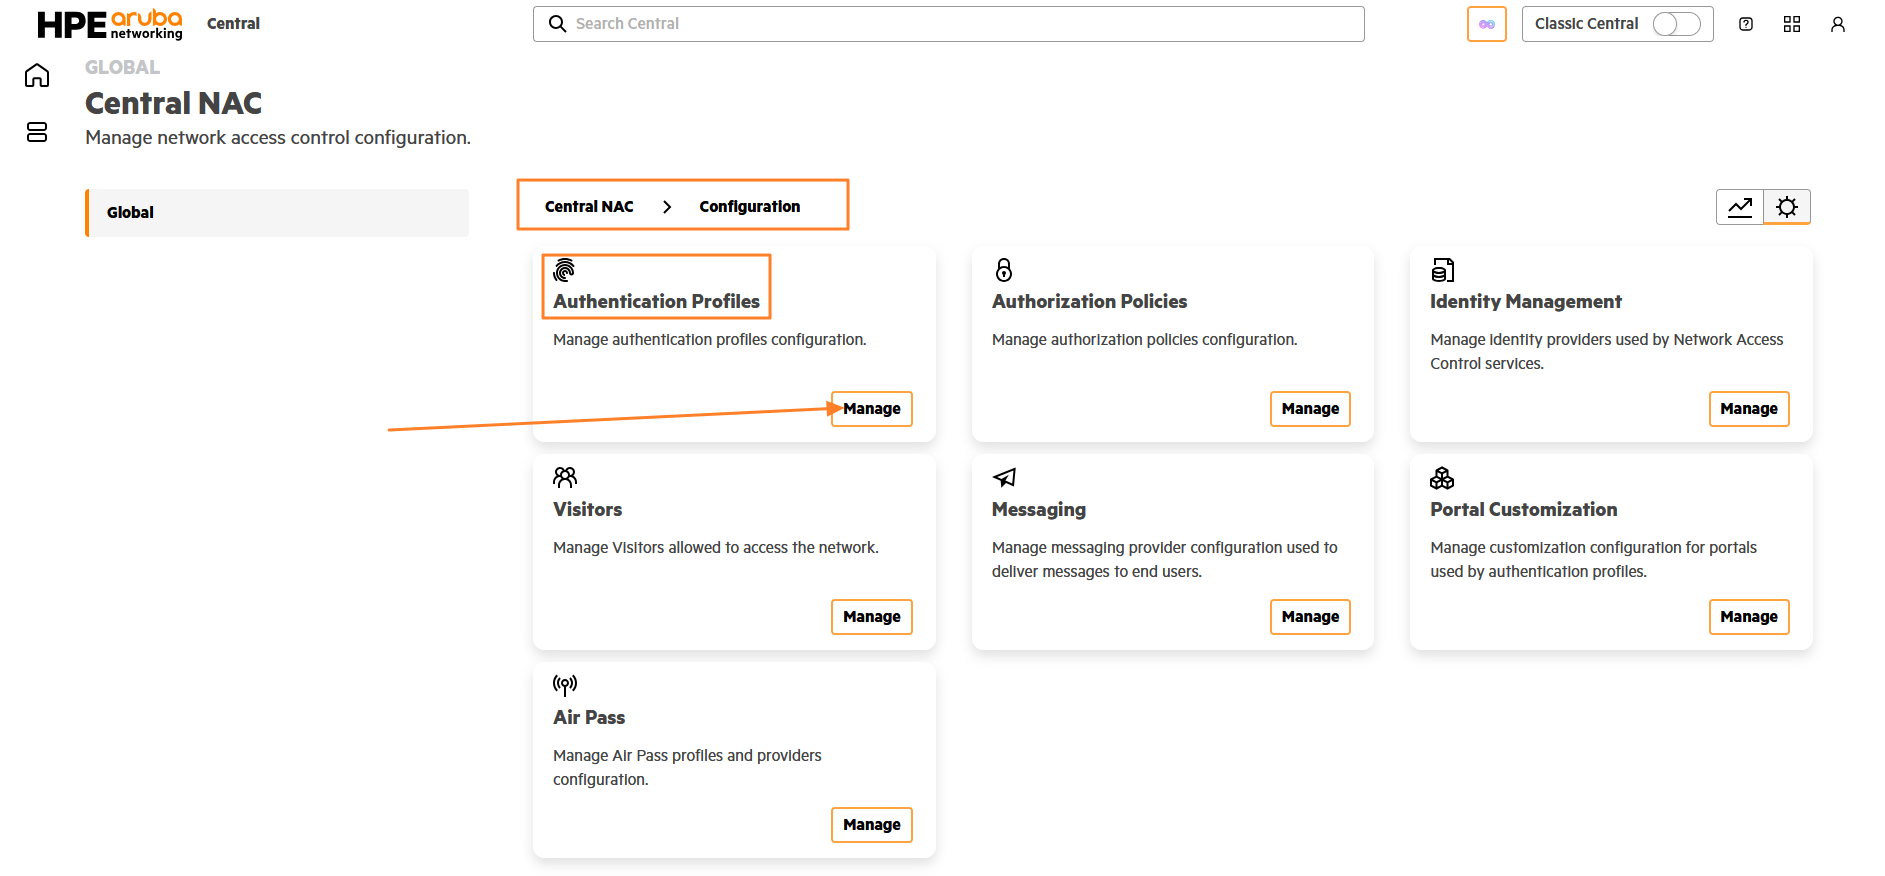
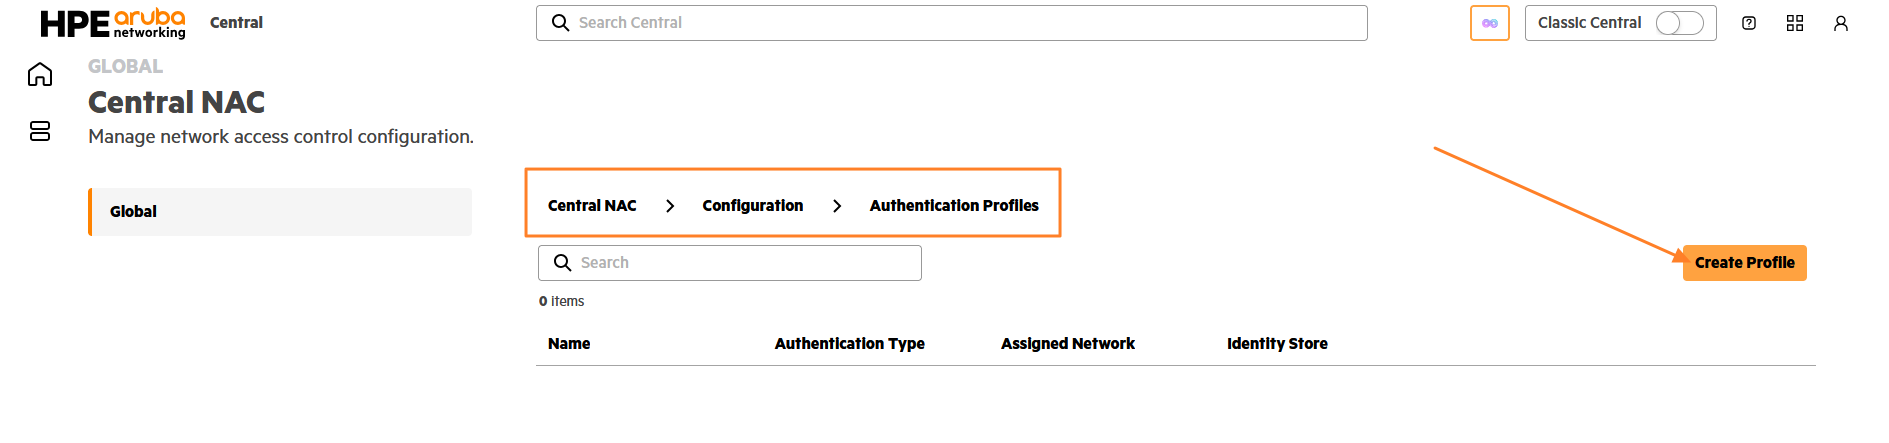
Now, let’s configure and walk through the various configuration elements of an authentication profile. Here, we are creating an authentication profile to serve 802.1X clients from both the wireless SSID and wired clients connected to the CX switch. Therefore, the authentication type is set to EAP-TLS.
Under the Network section, we select the 802.1X SSID created in New Central, which will be used by wireless clients. We also enable the Use for wired connection option so that the same profile can be applied to wired clients on the CX switch.
The Identity Store for this profile is the Entra ID tenant that we configured earlier as our IdP, which will be used to authorize users during authentication.

Scroll down further to view additional configuration fields. In the Organization Name field, provide a suitable name. This name will be displayed as the network profile name in the Aruba Onboarding App after clients are re-onboarded. In the Certificate section, you can choose between using the Default certificate or a Custom certificate. Central NAC provides the option to Bring your own certificate (BYOC), allowing customers to use their own PKI infrastructure instead of HPE’s internal CA to issue certificates for EAP-TLS authentication. This BYOC capability is part of the NAC subscription and customers who intend to use their own PKI must ensure that the NAC subscription is applied on their Central Tenants. Select Custom Certificate if you plan to use BYOC. Detailed information about this feature is available here https://arubanetworking.hpe.com/techdocs/NAC/central-nac/central-nac-byoc/
Since we are replicating the configuration from Cloud Auth in Classic Central, we will proceed with the Default Certificate option.
You can define the validity period of the client certificates using the EAP-TLS Client Valid Days field, and then click Create.
The User Onboarding URL will be generated once the onboarding portal is created. After this, you will need to return to the authentication profile to view the URL and share it with users so they can re-onboard onto the network.

Create Authentication Profile (MAC Authentication)
Once the EAP-TLS authentication profile has been created successfully, we can proceed with creating a new authentication profile for MAC Authentication.
Click Create to begin creating another authentication profile. Provide a suitable Name and select MAC Authentication as the Authentication Type.
In this example, we expect MAC authentications only from wired clients connected to the CX switch. Therefore, we will not select any wireless SSIDs from the Network dropdown. Instead, enable the Use for wired connection option to allow MAC-based authentication for wired clients.
If required, you can also select wireless SSIDs configured for MAC authentication from the Network dropdown.
The Identity Store is selected by default as the MAC Address Store. Click Create to complete the MAC Authentication profile.

2. Migrating MAC Address Entries from Cloud Auth to Central NAC
MAC Addresses must exist in the Central NAC MAC Address Store to allow authentications from clients performing MAC Auth. In order to save time and effort of adding all the MAC addresses manually you can upload a CSV of mac adddresses by exporting them from Cloud Auth and uploading it to Central NAC.
Login to your Classic Central account and navigate to Global > Security > Authentication and Policy. Go to configuration mode and click on Manage MAC Registration under Client Access Policy.

Click on the Export to CSV File icon and wait until the CSV file gets downloaded to your PC.
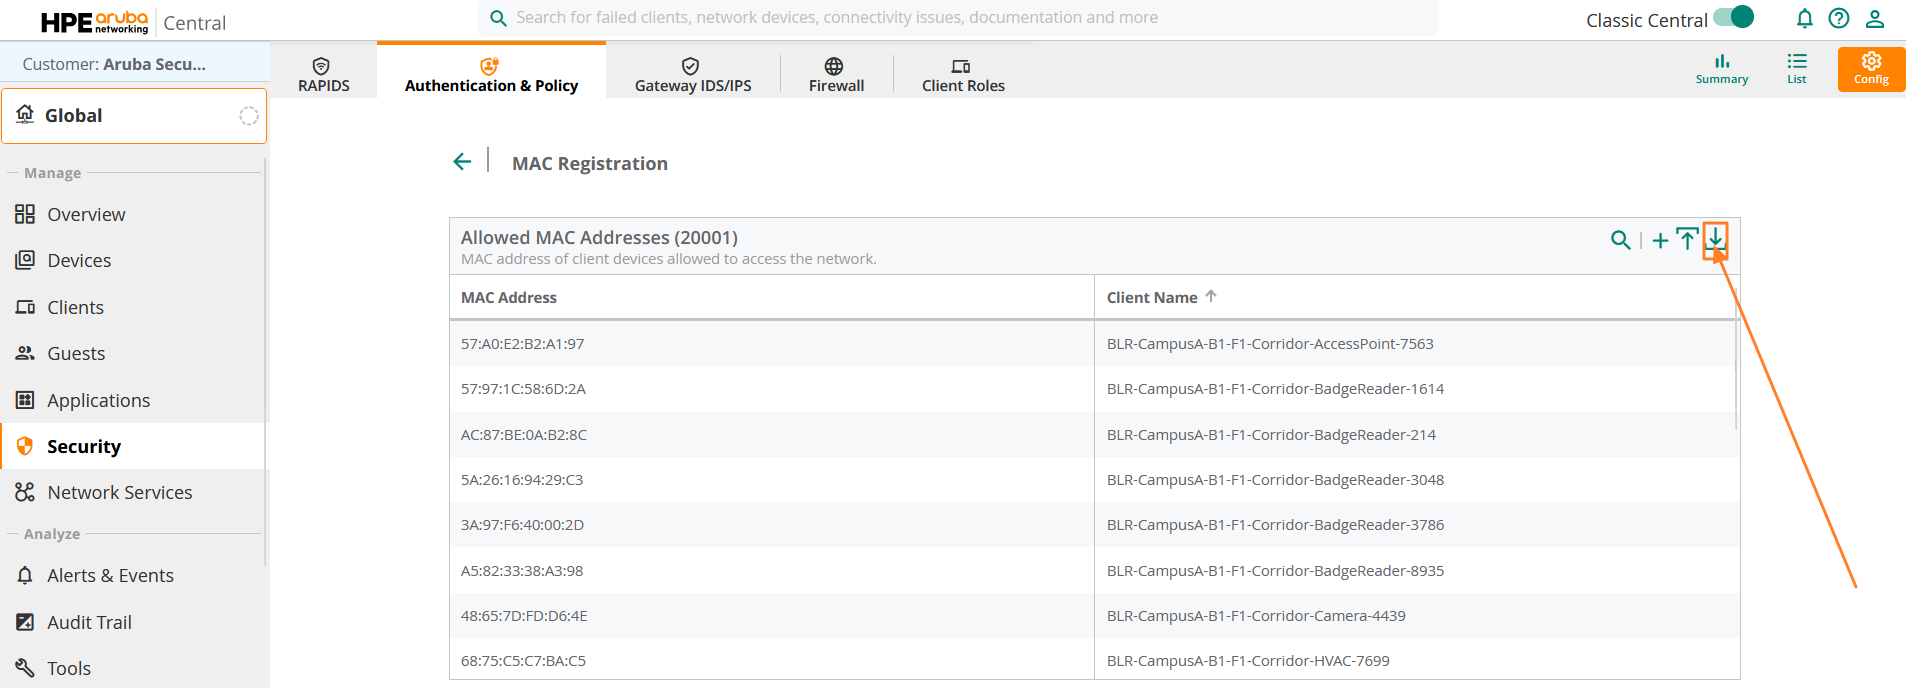
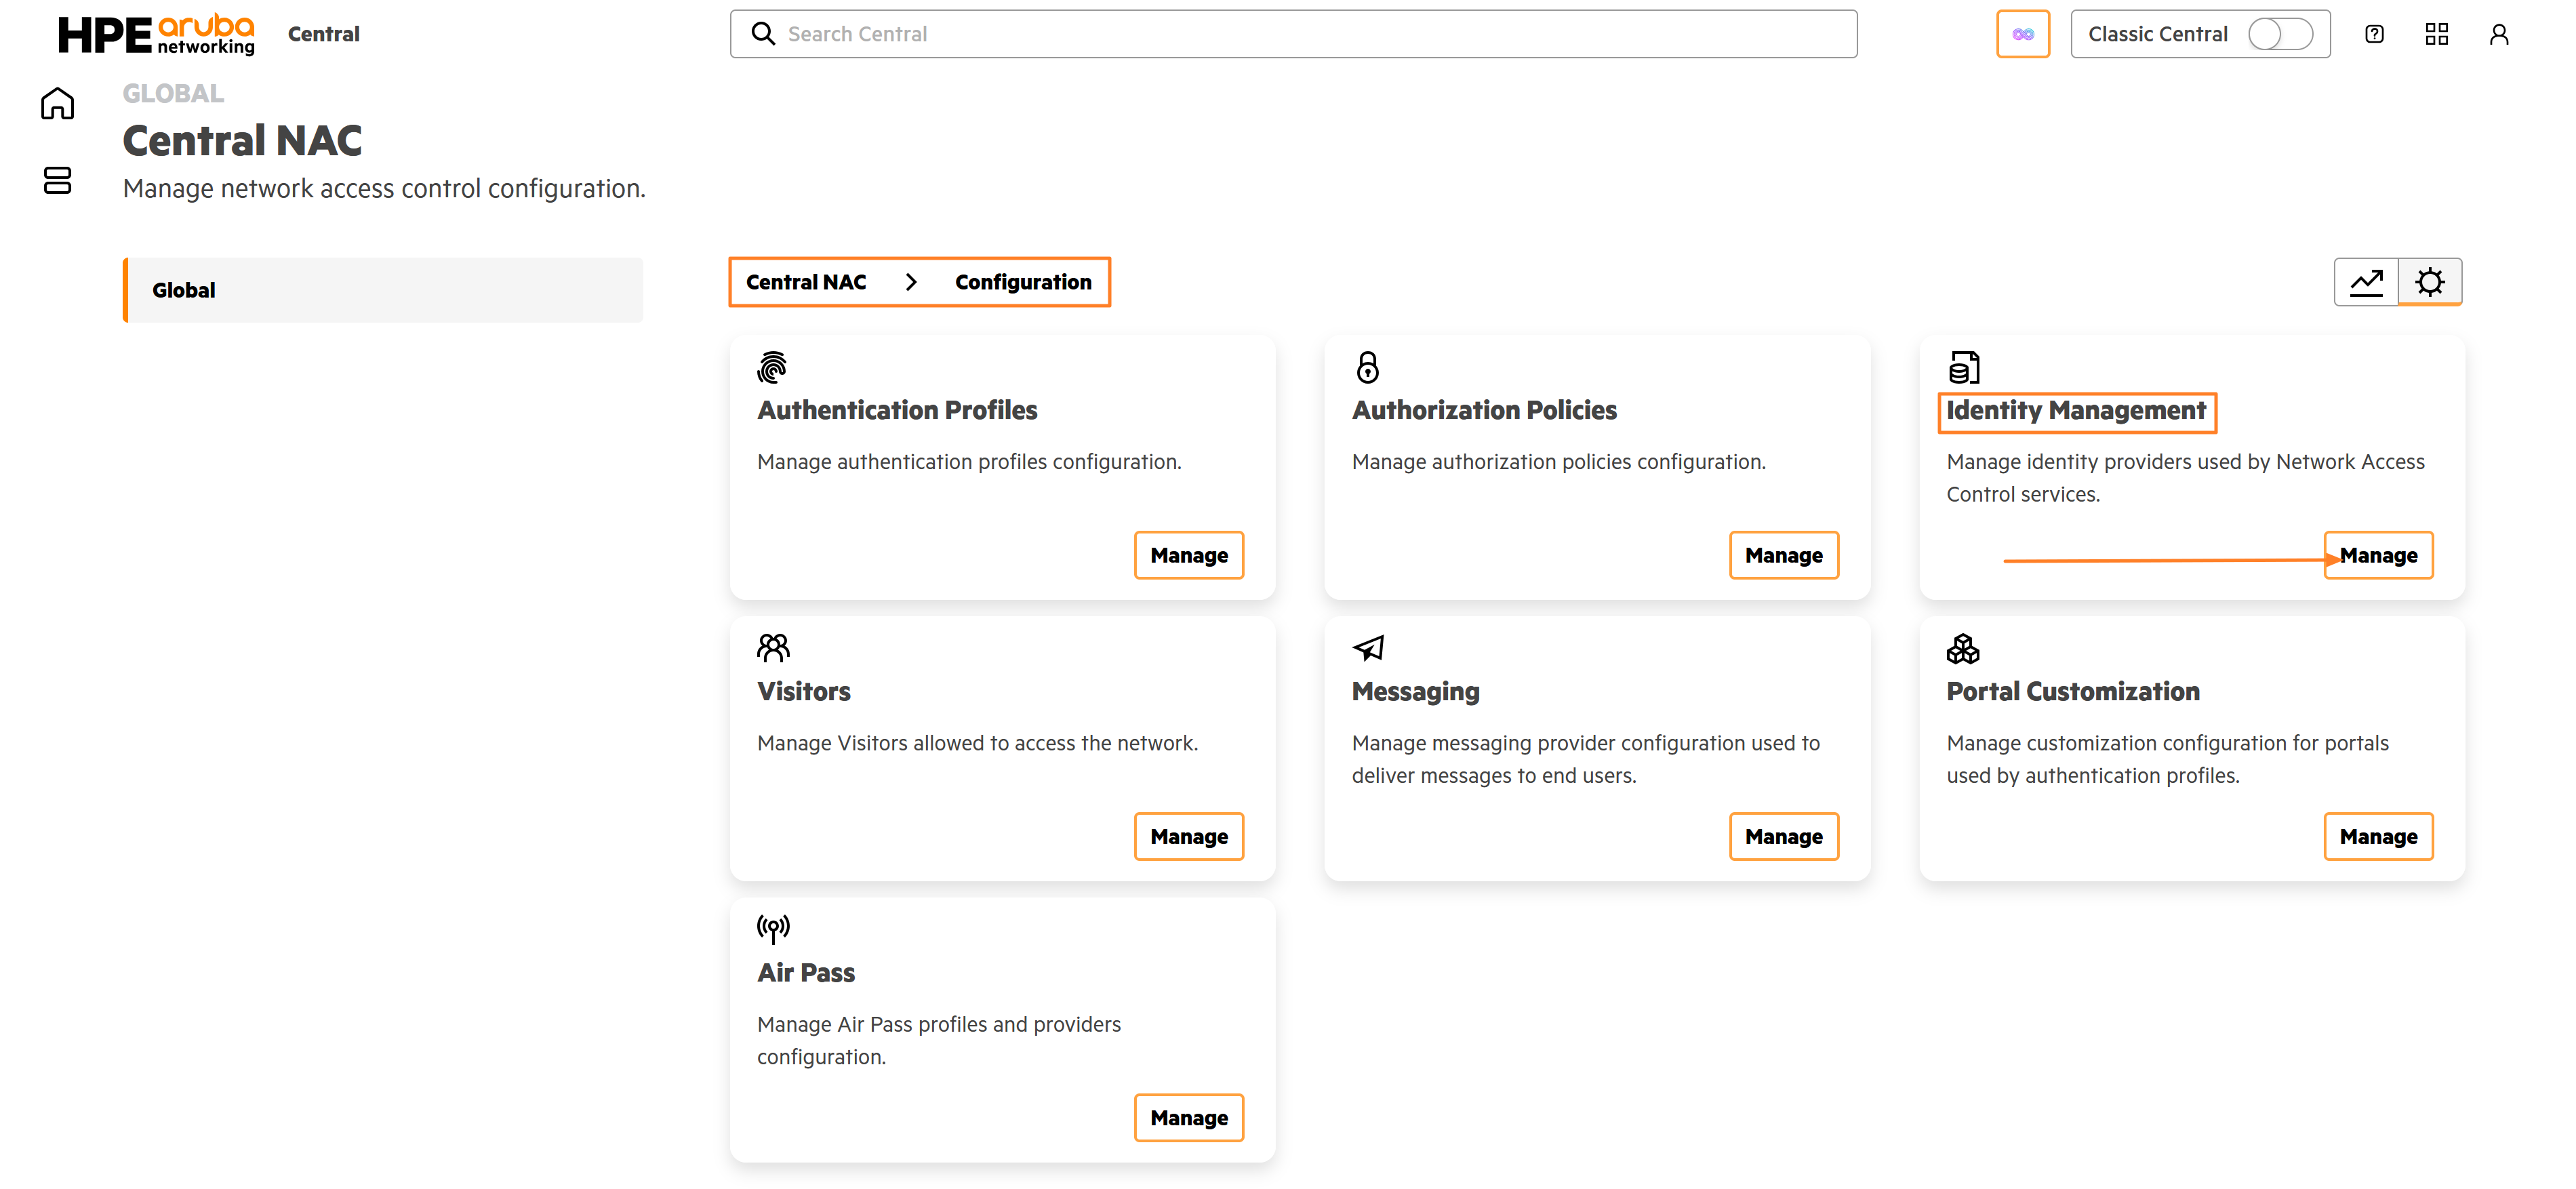
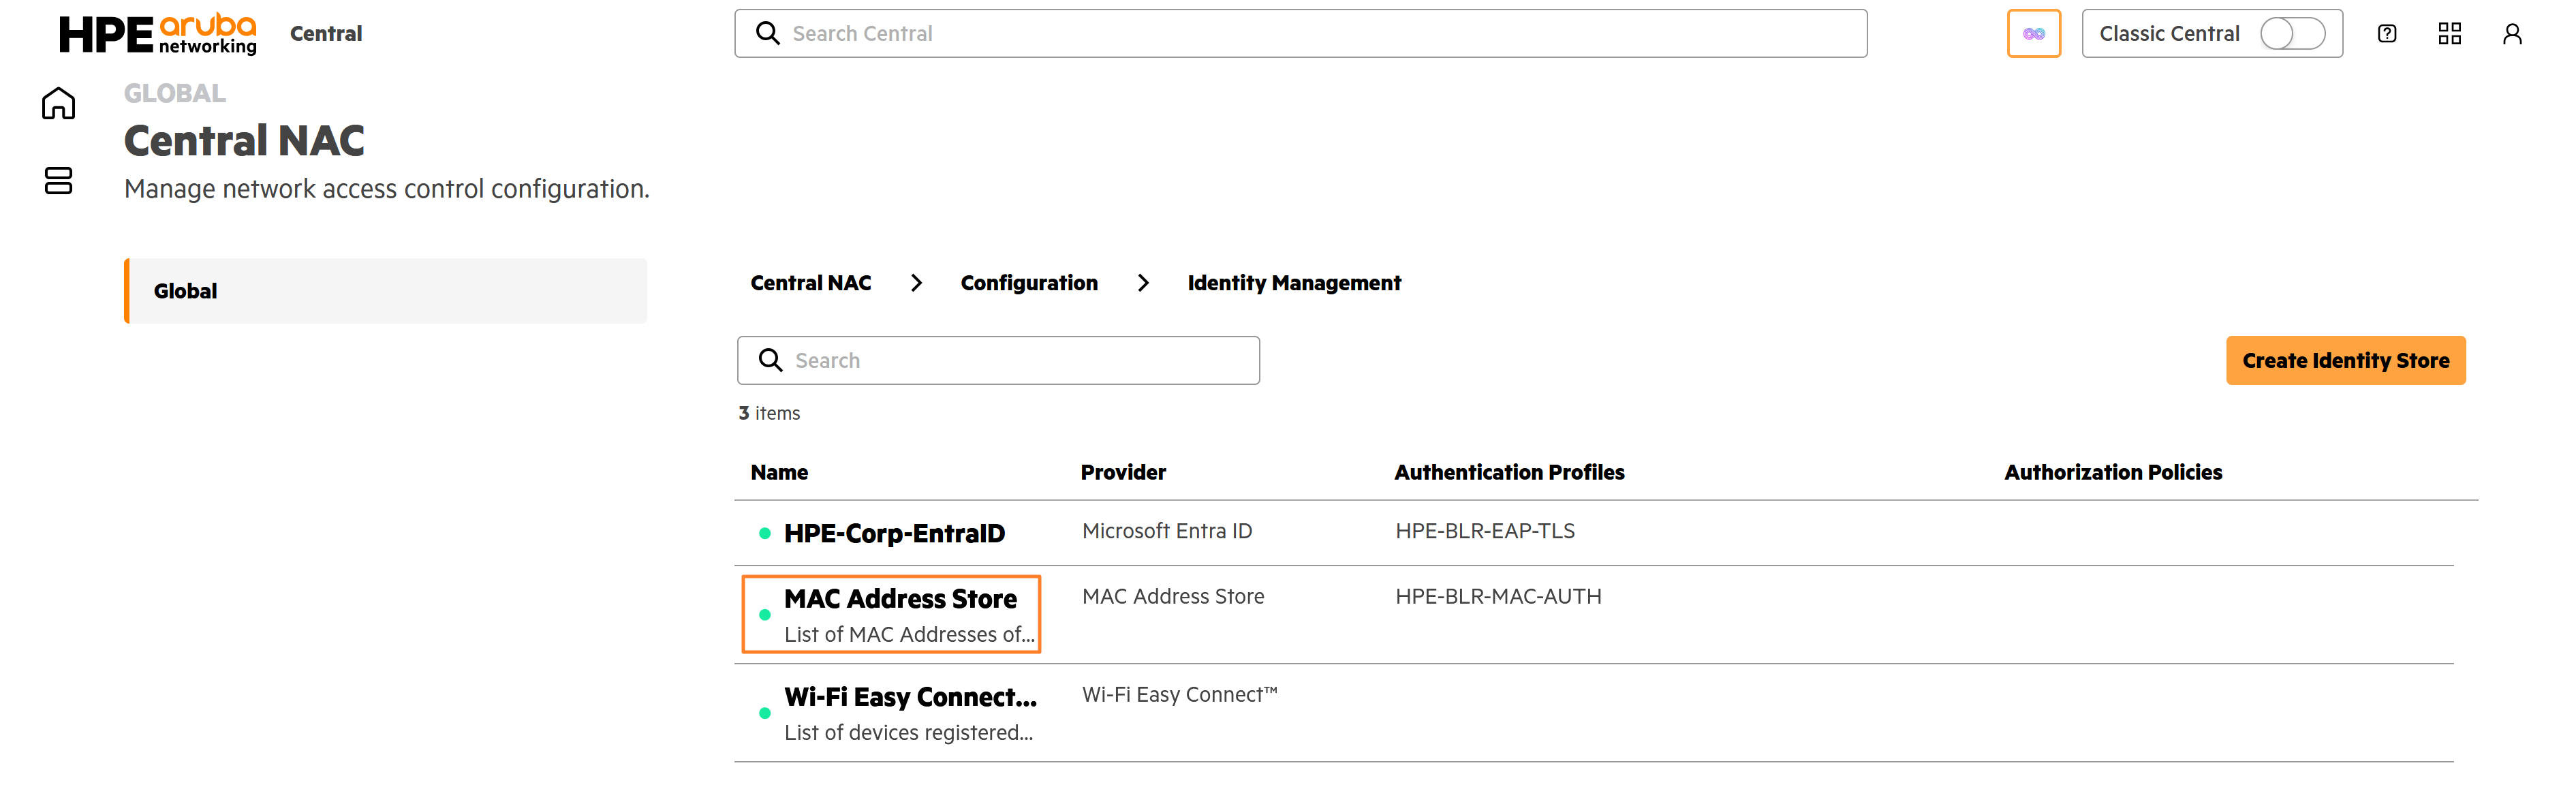
Once the file is downloaded, you can now switch back to New Central and navigate to Central NAC > Identity Management > Manage and click on the MAC Address Store.
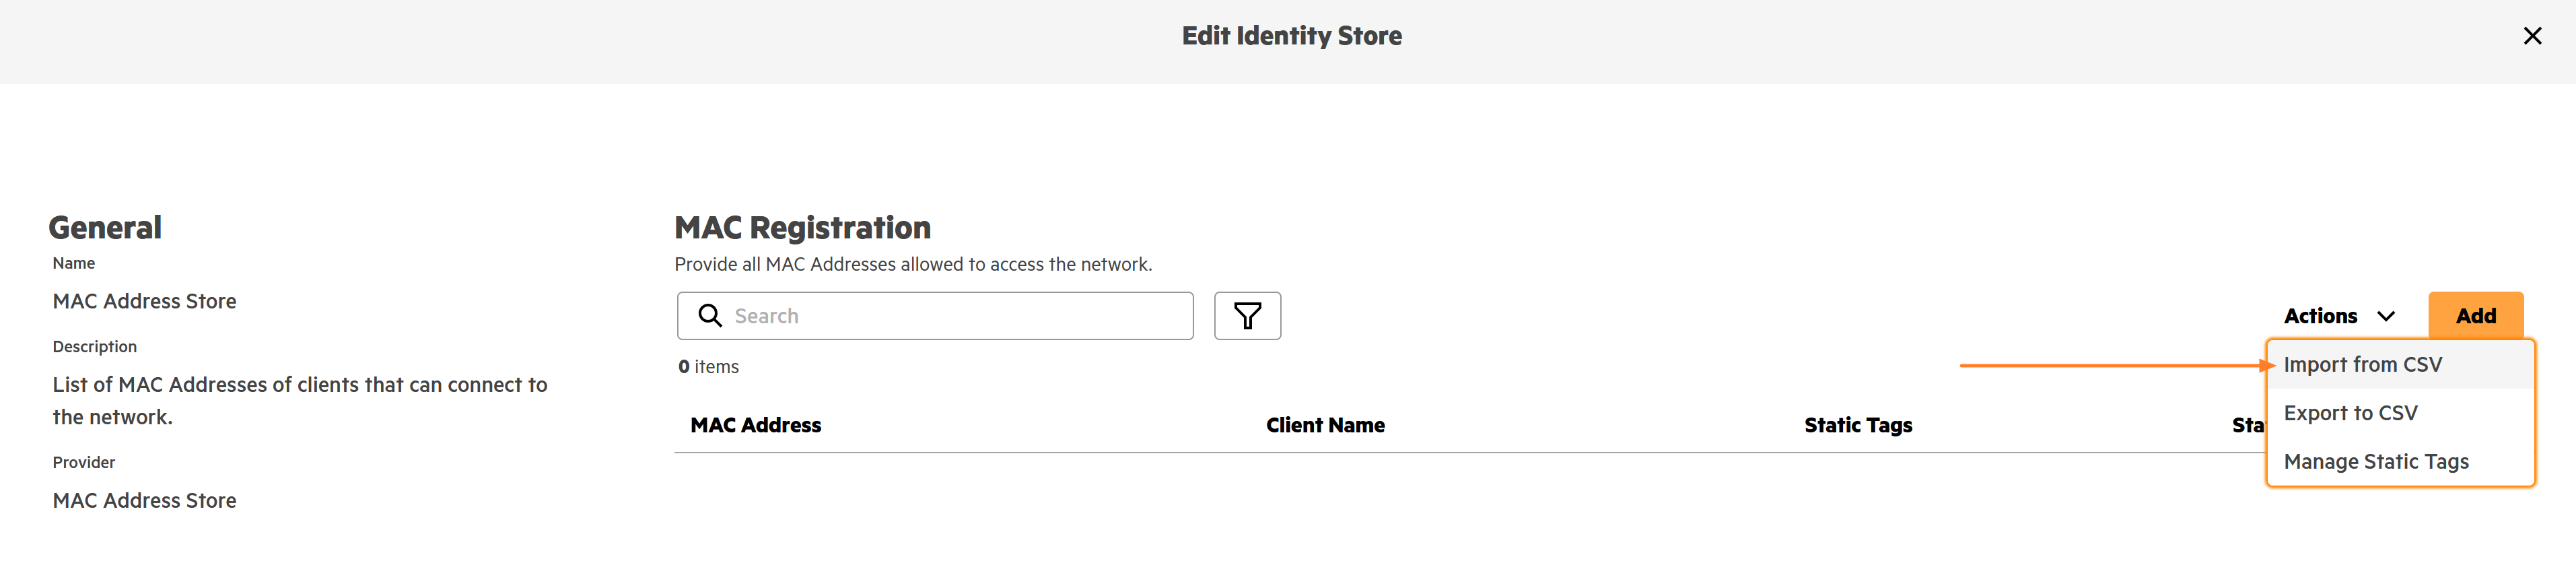
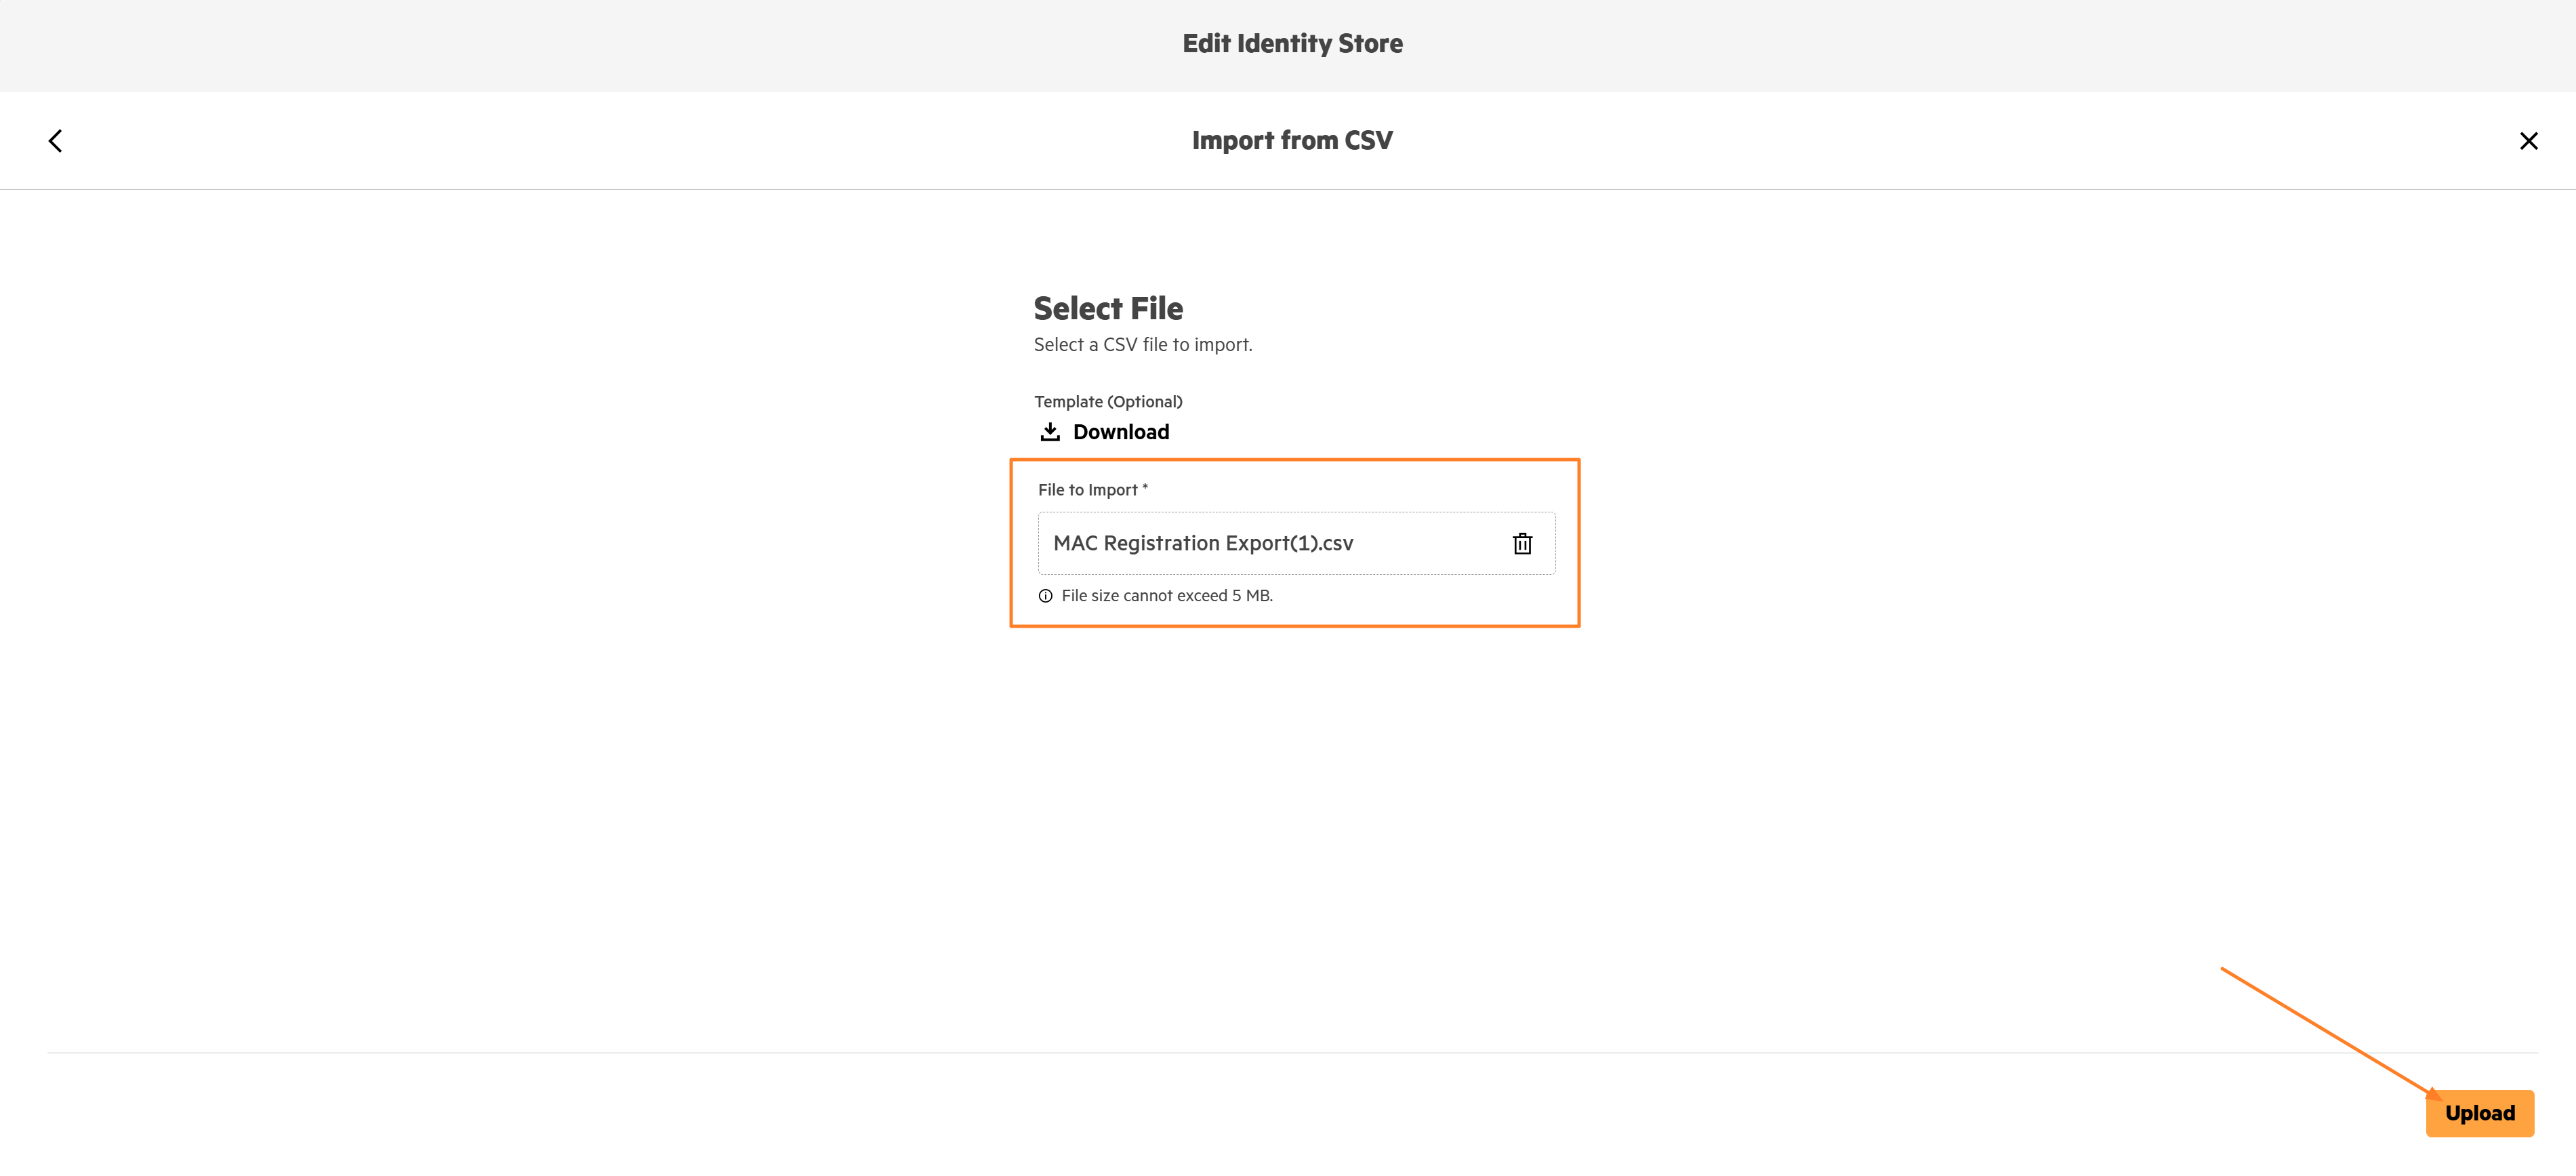
Click on Actions > Import from CSV and Select the File downloaded from Classic Central. Click on Upload to start uploading the mac addresses and wait until the upload process is completed.
3. Creating Authorization Policies
The final step is to create Authorization Policies and Rules for NAC clients authenticating on the network. To create an Authorization Policy, navigate to Central NAC > Configuration > Authorization Policies > Create Policy.

We will create two Authorization Policies- one for 802.1X clients using EAP-TLS and another for MAC Authentication clients.
For the EAP-TLS 802.1X policy, provide a suitable Policy Name and select the Entra tenant configured as the IdP in the Identity Store dropdown. Under Pre-conditions, use the Site as the condition and set it to match a specific site configured in Central, ensuring parity with the Cloud Auth configuration. You can also choose additional conditions such as Authentication Source, Authentication Type, or NAD Vendor if you want to further segment authentication requests across different policies. Click Create to complete the policy configuration for EAP-TLS 802.1X users.

Click on Create Policy once again to create a policy for MAC Authentication and provide a suitable Policy Name and select MAC Address Store under the Identity Store dropdown. Under Pre-conditions, use the Site as the condition and set it to match a specific site configured in Central, ensuring parity with the Cloud Auth configuration. Similar to the EAP-TLS 802.1x policy you can also choose additional conditions such as Authentication Source, Authentication Type, or NAD Vendor if you want to further segment authentication requests across different policies. Click Create to complete the policy configuration for clients doing MAC authentication.

Now lets beging adding Rules under each policy to ensure parity with the Cloud Auth policies in Classic Central. We will first create rules for the HPE-CORP-EAP-TLS policy to migrate the User Access Policy in Cloud Auth for 802.1x EAP-TLS authentication.
Click on the ellipsis menu on the HPE-CORP-EAP-TLS policy and click Add Rule.

As per the Cloud Auth policies reviewed earlier, users who are members of the Entra user group HQ-Employees and have the client tag Wired-Windows-Ptown should be assigned the role Cloud-Secure.
Therefore, in Central NAC, we will use Entra User Group and Client Tags as conditions combined with an AND operator to ensure both criteria are met. If both conditions are satisfied, access will be granted by selecting the Allow Access option under the Actions field and assigning the role Cloud-Secure.
The rule below is configured to replicate the exact policy in Cloud Auth. Adjust the conditions and role as required for your environment, and then click Create.

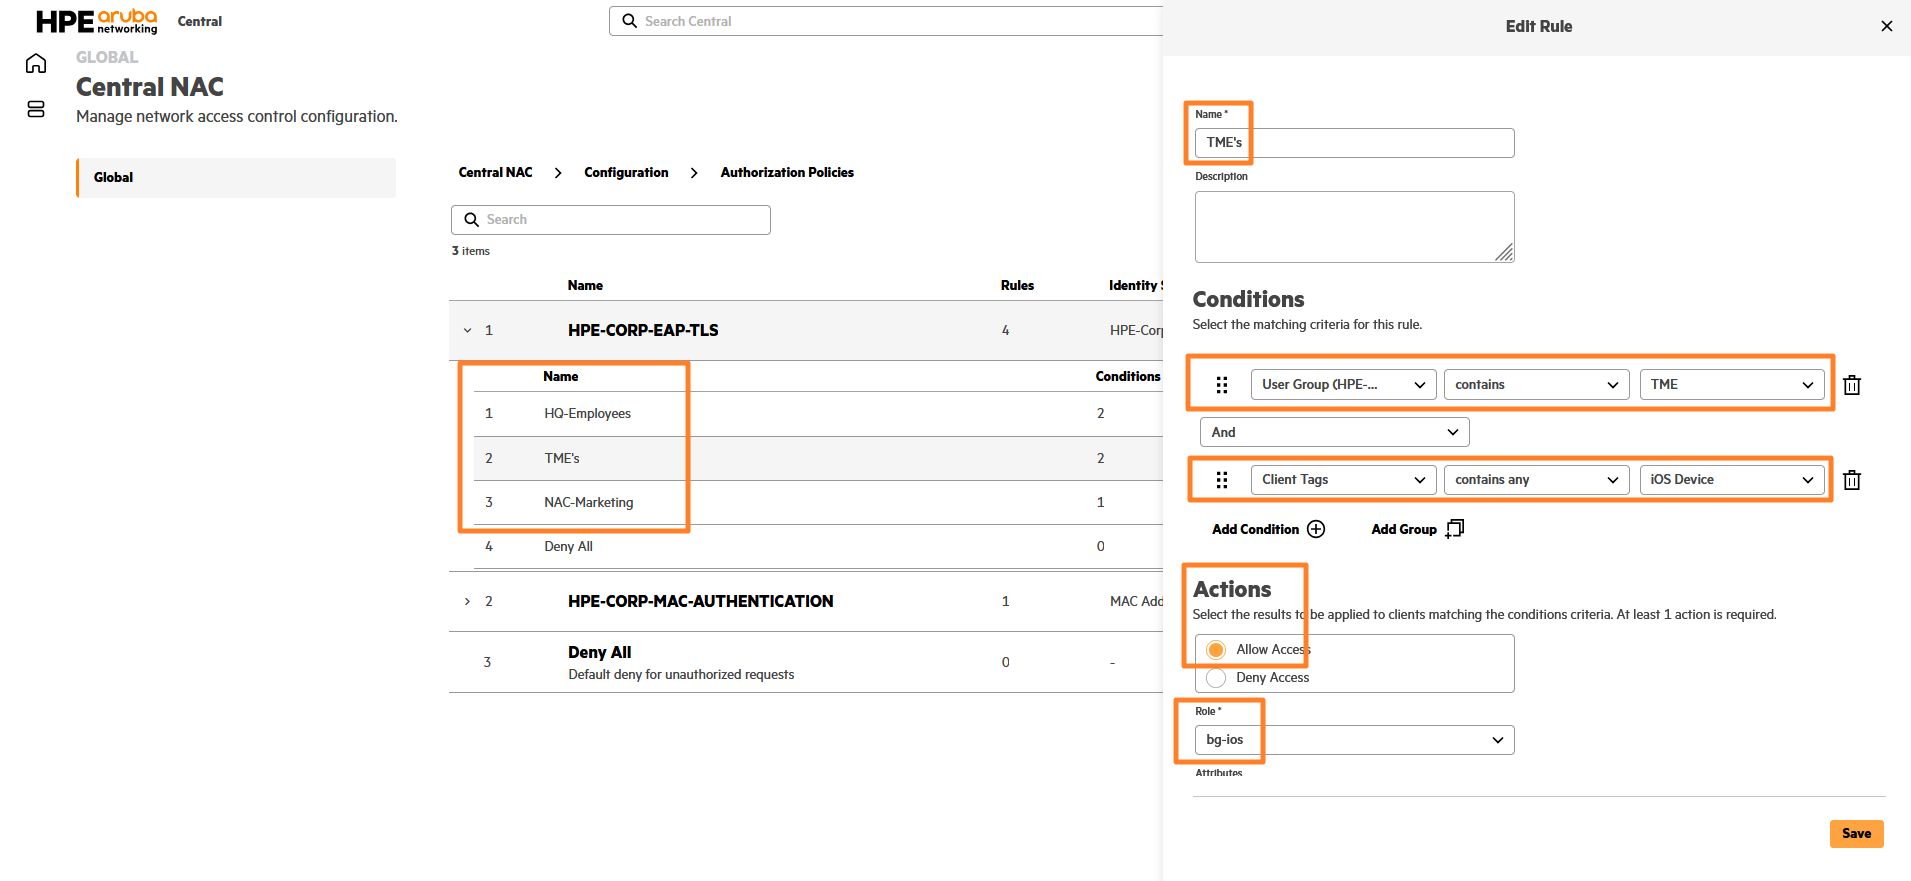
Similarly, create the second and third rules to assign users in the Entra user groups TME and NAC-Marketing their respective roles when both the Entra User Group membership and Client Tags conditions are satisfied.
 INFO
INFO
Note that as part of core features in NAC foundation Custom policy type is not available. You can define only one User and Client policy, and its pre-conditions are automatically set based on the selection and cannot be modified. You will need a NAC subscription to enable the custom policy type and define pre-conditions as per your requirements.
We can now create rules for the HPE-CORP-MAC-AUTHENTICATION policy to migrate the Client Access Policy from Cloud Auth for MAC authentication. Since the MAC address entries have already been migrated from Cloud Auth to Central NAC, no further action is required for this step. All MAC addresses present in the Central NAC MAC address store will be allowed, and authentication will succeed for those endpoints. You only need to create rules to check their respective Client Tags and assign the appropriate roles accordingly.
Click on the ellipsis menu on the HPE-CORP-MAC-AUTHENTICATION policy and click Add Rule.

Adjust the Client Tag conditions and role as required for your environment, and then click Create.

Create rest of the rules to match a MAC authentication client with its respective Client Tags and Roles.

With this, we complete the migration of Cloud Auth policies to Central NAC in New Central. Although this guide illustrates a basic migration scenario, the fundamentals of the migration process remain the same.
Once the migration is complete, you can further enhance your environment by building a more robust NAC setup using the additional, easy-to-configure features available in Central NAC. With a Central NAC subscription, you can strengthen security while also benefiting from the convenience of integrating BYOC features with your existing PKI infrastructure. You can also create more granular policies for enhanced segmentation of clients and users on the network, and leverage Central NAC to authenticate users and devices across third-party NAD systems etc.
Feedback
Was this page helpful?
Glad to hear it!
Sorry to hear that.