CrowdStrike Falcon
33 minute read
Introduction and Overview
CrowdStrike Falcon Endpoint Protection is a cloud-based security platform that combines the capabilities of a next-gen Antivirus (NGAV) and Endpoint Detection and Response (EDR) using a single cloud-delivered agent. This release of document focuses on the new SDK based CrowdStrike Falcon extension in the ClearPass Policy Manager. A few enhancements that are added with the new SDK based extension help with the efficient integration of CrowdStrike Falcon Endpoint Protection and ClearPass Policy Manager with the existing methods.
-
CrowdStrike Falcon Integration with ClearPass Policy Manager with the new SDK based extension now conform with the User Agent information that is used by CrowdStrike for internal tracking.
-
The syncing of endpoints from CrowdStrike Falcon now provides the CrowdStrike device ID as well as attribute along with MAC. The authentication source and context server action URL’s can now leverage both MAC and Device ID in real-time lookup for authorization and context server action-based containments.
-
The new extension now also supports bypassing proxy.
ClearPass Policy Manager integrates with CrowdStrike Falcon in multiple ways;
-
Perform a real-time lookup of the device attributes which can be leveraged for Authorization.
-
Bulk import of all the endpoints leveraging flexible polling definition based on crontab
-
Trigger containment or lift the containment for the quarantined devices using the CrowdStrike Falcon agent.
The above use-cases are covered in this integration and documented in this Integration Guide.
What’s new in CrowdStrike v2.1 Extension? -Important Changes
Deprecation of GET /devices/entities/devices/v1(GetDeviceDetails) - CrowdStrike has announced the deprecation of v1 GET host details operation. Integrations leveraging the v1 endpoint API’s must be updated to use one of the new v2 versions by February 9, 2023. This means that all earlier versions of extensions will fail collecting device details causing the integration to break. This release v2.1.0 is updated to use the v2 version of the GET host details operation and is a go to version before February 9, 2023 without fail to continue using the integration between ClearPass and CrowdStrike.
Support for Zero Trust Assessment attributes – CrowdStrike has supported Zero Trust Assessment of endpoints for a while which can be leveraged by this version of extension to fetch the risk scores of an endpoint as endpoint attributes. There are numerous assessment items that CrowdStrike evaluates to give evaluated results like OS assessment, Sensor assessment and Overall assessment scores. We have added support for following Zero Trust assessment attributes in this version of extension which can be called into ClearPass policies for profile enforcements based on CrowdStrike Zero Trust Assessment scores in addition to the existing attributes that we have from past CrowdStrike extension versions.
-
“CrowdStrike Assessment OS”
-
“CrowdStrike Assessment Overall”
-
“CrowdStrike Assessment Sensor Config”

A new configuration knob is added to this version of extension which can be set to true to fetch the Zero Trust scores of an endpoint. This option is set to false by default.
crowdStrikeSyncZeroTrust": true,
Pictorial View of the Integration
The diagram below shows a pictorial overview of the components and how they interact with each other.

Software Requirements
The minimum software version required for CPPM is 6.11.0 . At the time of writing, version 6.11.10 is available as the long supported release and 6.12.4 is available as the short supported release. CPPM runs on hardware appliances with pre-installed software or as a Virtual Machine under the following hypervisors. Hypervisors that run on a client computer such as VMware Player are not supported.
-
VMware vSphere Hypervisor (ESXi) 7.0 U3c and 8.0
-
Windows Server 2019 with Hyper‑V and Windows Server 2022 with Hyper‑V.
-
KVM on CentOS Stream 8, CentOS Stream 9, Ubuntu 20.04 LTS, and Ubuntu 22.04 LTS.
ClearPass Installation and Deployment Guide
This document assumes your ClearPass environment is already configured and operational. If you require assistance with basic deployment, refer to the following deployment guide:
https://arubanetworking.hpe.com/techdocs/ClearPass/6.11/Installation-Guide/Default.htm
ClearPass Extensions
The integration between ClearPass Policy Manager and external systems is driven through a ClearPass capability known as Extensions, a sub-component of the ClearPass Exchange Integration framework. ClearPass Extensions are micro-services running on top of the base ClearPass platform. These micro-services enable HPE Aruba Networking to deliver new features outside of the main software release cycle and facilitate a faster time to market for specific features and integrations. Configuration and control of ClearPass Extensions is accomplished through the ClearPass Guest GUI, as covered later in this document.
Installing Extension
ClearPass Extensions are easy to install from the ClearPass Extensions Store. In a cluster, ClearPass Extensions can be installed on a subscriber independently of the publisher. Multiple copies of the same extension can be installed if needed as well.
 INFO
INFO
Internet access is required for ClearPass Policy Manager to install the ClearPass Extensions from the Extension Store. Starting with ClearPass 6.12, extensions can be can be installed offline as well. Offline ClearPass Extension images are available on HPE networking support portal.
Access to the extension store
Access the Extension Store to download and install ClearPass extensions. The Extension store utilizes the same HPE Passport account credentials used to validate support entitlement in the Software Updates Por- tal. This is configured under Administration > Agents and Software Updates > Software Updates as shown below. Ensure that valid HPE Passport credentials have been entered in these fields to enable Ex- tension download capabilities.

Installing the Extension from Store
Extensions are installed from the extension page in ClearPass Guest, as shown below. Access it from Guest > Administration > Extensions

From here, click on ‘Install Extension’, and the search box below appears.

Enter “Intune” and click on ‘Search’, see the example below.
INFO
Here we are using Intune as an example. The installation steps are the same for all the extensions. For your deployment, please search for the appropriate extension like Jamf, Mosyle, Crowdstrike, etc.
All currently available extensions are listed in the page: https://www.arubanetworks.com/techdocs/NAC/clearpass/integrations/clearpass-extension/extensions-list/

Click on the extension name and then click “Install.”

In the “Install Extension” dialog box, set the IP address if necessary, as described in section “Extensions and IP address configuration support” below. Do not check the box to start the extension at this time. Click the “Install” button.

In this example, we’ve not entered an IP address for the extension to use, if there is intent to use the extension as an authorization source set this value and ensure its set the same on all nodes where the Extension is deployed.
The extension will download and appear in a “Stopped” state. Notice the options to Start, Delete, Reinstall, Show Logs, and view Configuration. Click on “Configuration” to view settings.
After the extension has been installed, proceed to configure the extension

A copy of the default Extension configuration is shown above, this will need to be modified for your deployment.
INFO
Password and sensitive configuration items are obfuscated when presented in both the Extension GUI or in the Explorer configuration.
 WARNING
The configuration attributes are case sensitive. It is recommended to refer the default configuration sample while editing your configuration.
Extensions and web proxy support
Extensions support communications with 3rd parties via a web proxy. This adds incremental proxy functionality. If a proxy is defined in ClearPass Policy Manager, then an extension will inherit that configuration. See later in the document on how to disable the proxy inherited configuration.
INFO
Note that the Policy Manger web proxy configuration is ONLY read by the extension at installation time. If the web proxy configuration is changed in Policy Manager, then the extension must be re-installed so the new settings are re-read and bonded to the extension.
Extensions and IP address configuration support
ClearPass uses a non-externally routed IP address range to communicate with the Extension. The default is 172.17.0.0/16. You may configure a different range, if desired. This is especially useful when deploying extensions across nodes within a cluster where there is the requirement for a fixed consistent IP address for the extension across the cluster.
Changing the “Extensions Network Address” range is only necessary if either the ClearPass MGMT or DATA interface are using an IP address in the extension default range of 172.17.x.x/12, or if ClearPass needs to communicate with some external device in that range.
To Configure the base Extension IP subnet within Policy Manager navigate to Administration > Server Manager > Server Configuration [chose your node] Service Parameters [ClearPass system service].
INFO
The subnet defined here for the extension framework must fall within the following subnet range 10.0.0.0/8, 172.16.0.0/12, 192.168.0.0/16 as defined by RFC1918. For best results, set the network address range to a subnet that does not exist in your enterprise, and restart the extension service for this change to take effect.
Never set the DATA or MGMT IP address to use an address that matches the Extension Network

INFO
Note that changing the extension base IP address will require the extension service to be restarted.
Configuration Steps in CrowdStrike to enable API communication
There are primarily 2 steps involved in getting this integration configured.
-
Configuration of CrowdStrike for Integration
-
Installation and Configuration of CrowdStrike extension using the ClearPass Policy Manager GUI
INFO
Setup and configuration of CrowdStrike is beyond the scope of this guide. Here we specify the steps necessary to configure the integration.
Getting API Credentials
Login to the CrowdStrike tenant, using your administrator credentials.
Create a new API Client. Navigate to Support > API Clients and Keys. Click on “Add new API client”.

Save the API Client ID and Client Key on a notepad. Client Key is not displayed again. This will be used while configuring the Extension in ClearPass Policy Manager.
Enter a Client Name. Under API Scopes, add the following permissions
-
Read/Write permissions for Hosts
-
Read for Event streams
Check for Managed Hosts
This configuration step is optional and is only required if there are no Endpoints managed by CrowdStrike.
Go to Hosts > Host Management. Ensure there are hosts being managed by CrowdStrike. These are the hosts that will be pulled by ClearPass Policy Manager, if the sync function is enabled in the Extension configuration.

If no hosts are managed by CrowdStrike, one needs to install the Falcon Sensor on the endpoints to be managed. These steps vary based on the endpoint Operating System. The installers are available under Hosts > Sensor Downloads.
Steps for sensor installation are available under the section “Sensor Deployment and Maintenance” here https://falcon.crowdstrike.com/support/documentation
CrowdStrike Extension Installation and Configuration on ClearPass
A Graphical User Interface (GUI) is available to make the process of interacting with the extension framework easier. To access the extension GUI, from the Guest System, under Administration find the Extension user interface as shown below.

From here, click on ‘Install Extension’, and the search box below appears. Enter the keyword “CrowdStrike” and click on Search.

INFO
In a cluster environment an extension can be installed on the subscriber nodes directly.
Click on the Extension and then the Install option.

Set a specific IP address for the extension if required. It will automatically pick an IP address if not assigned.

After the extension has been installed, review the configuration and adjust as needed. Notice the options to Start, Delete, Reinstall or Show Logs and the option to edit and set the extension configuration.
The default configuration used for the extension is shown below
{
“logLevel”: “INFO”,
“verifySSLCerts”: true,
“crowdStrikeApiHost”: “api.crowdstrike.com”,
“clientId”: “[Client ID]”,
“clientSecret”: “********”,
“crowdStrikeSyncZeroTrust”: false,
“enableEndpointCache”: false,
“endpointCacheTimeSeconds”: 300,
“syncAllOnStart”: false,
“enableSyncAll”: false,
“syncAllSchedule”: “0 2 * * 6”,
“syncUpdatedOnly”: true,
“syncPageSize”: 100,
“attributePrefix”: “”,
“bypassProxy”: false,
“enableStats”: true,
“statsUsername”: “”,
“statsPassword”: “********”
}
Each of the attributes are explained in the table below in detail.
Figure 12: Extension configuration parameters
| Configuration attribute | Description | Default Values |
|---|---|---|
| logLevel | Logging level for troubleshooting | “INFO” |
| verifySSLCerts | Should SSL Certificates be validated | true |
| crowdStrikeApiHost | The hostname or IP address of the CrowdStrike API | Default: api.crowdstrike.com |
| clientId | The Client ID used to access the CrowdStrike Oauth API | [Client ID] |
| clientSecret | The Client Secret for the provided Client ID | ******** |
| enableEndpointLookupCache | Cache endpoint attributes to optimize authorization queries, avoid repeated DB queries and reduce API calls to external context sources | true |
| endpointCacheTimeSeconds | The duration in seconds to cache the endpoint attributes | 300 |
| syncAllOnStart | If this option is set to true, when the extension starts, the system will attempt to sync all endpoints in the external context source to ClearPass. Note that if you have a large number device context to be fetched, it would take a long time for the initial sync to complete. When used along with syncUpdatedOnly, the subsequent syncs should be faster. |
true |
| enableSyncAll | Enable periodic sync of all endpoints | true |
| syncAllSchedule | The schedule for when the Sync All Endpoints process should run. Note: This uses CRON type scheduling. |
0 2 * * 6 |
| syncUpdatedOnly | If this option is set to true, only the endpoints updated after the previous sync would be fetched from the context source. Note that this option only works for the third-party context sources that have APIs to support this functionality. If this option is set to false, all endpoints are fetched at every sync interval. |
true |
| pageSize | Used to limit the amount of data returned by each sync request in a single attempt. This prevents issues pertaining to timeouts when the dataset to be ingested is large. The value should not be changed unless recommended by customer support. |
500 |
| attributePrefix | Add prefix to endpoint attributes to be able to identify attributes synced from two different CrowdStrike extension instances for parallel systems. | Null |
| bypassProxy | Bypass the web proxy configured on ClearPass Policy Manager | false |
| enableStats | Enable display of extension statistics | false |
| statsUsername | Create a username to access the extension statistics page | Give any username you want to use |
| statsPassword | Create a password to access the extension statistics page | Give any password you want to use |
| crowdStrikeSyncZeroTrust | Enable/Disable fetching of Zero Trust score attributes | false |
A copy of the CrowdStrike Falcon extension with the desired configuration is shown below, this has to be modified for your deployment. Modify the clientId, clientSecret and other options that will be specific to your environment. Change or include any other values based on the description of each in the above table
Select Restart and click on Save Changes to restart the extension.

After completing the configuration, click on ‘Save Changes’ and restart of the extension, click on Show Logs.

The above log shows that the extension has been configured and has ingested endpoints from CrowdStrike leveraging sync on start. These logs can be seen in detail if the loglevel setting is changed to DEBUG.
Use Cases
The extension can serve multiple use cases as described in the Introduction section as well as the Pictorial. Each use case would require some further configuration based on the requirement. Some example configurations are shown below for each use case.
Periodic Poll
This is a commonly used method where the extension is configured to sync all the endpoints to begin with. Once finished, the extension is configured to periodically gather updated data at fixed intervals leveraging the configuration parameters as discussed in the table in previous section. Following is the sample configuration used.
{
“logLevel”: “INFO”,
“verifySSLCerts”: true,
“crowdStrikeApiHost”: “api.crowdstrike.com”,
“clientId”: “[Client ID]”,
“clientSecret”: “********”,
“crowdStrikeSyncZeroTrust”: false,
“enableEndpointCache”: false,
“endpointCacheTimeSeconds”: 300,
“syncAllOnStart”: false,
“enableSyncAll”: false,
“syncAllSchedule”: “0 2 * * 6”,
“syncUpdatedOnly”: true,
“syncPageSize”: 100,
“attributePrefix”: “”,
“bypassProxy”: false,
“enableStats”: true,
“statsUsername”: “”,
“statsPassword”: “********”
}
The above configuration enables periodic sync and triggers it every 2 hours. This could be aggressive and should be changed based on the requirement in a particular scenario to ensure that CrowdStrike is not inundated with requests and also to manage the resource utilization on ClearPass Policy Manager.
A parameter that further helps with optimization is syncUpdatedOnly. Set this value to true to get updates only if there is a change associated with the endpoint. The value of pageSize should not be changed unless recommended by customer support.
Validation of the endpoint context being updated after the initial sync can be done by navigating to Configuration > Identity > Endpoints. Filter using the attribute Source = CrowdStrike as shown below.

Shown below is a sample of security contextual parameters obtained from CrowdStrike for an endpoint, these attributes can be evaluated by the enforcement policy within ClearPass Policy Manager. These attributes are obtained leveraging the default policy on CrowdStrike. The Falcon agent should be capable of capturing further attributes which could be leveraged as well. The full list of endpoint attributes is documented in Appendix C on Page 27.

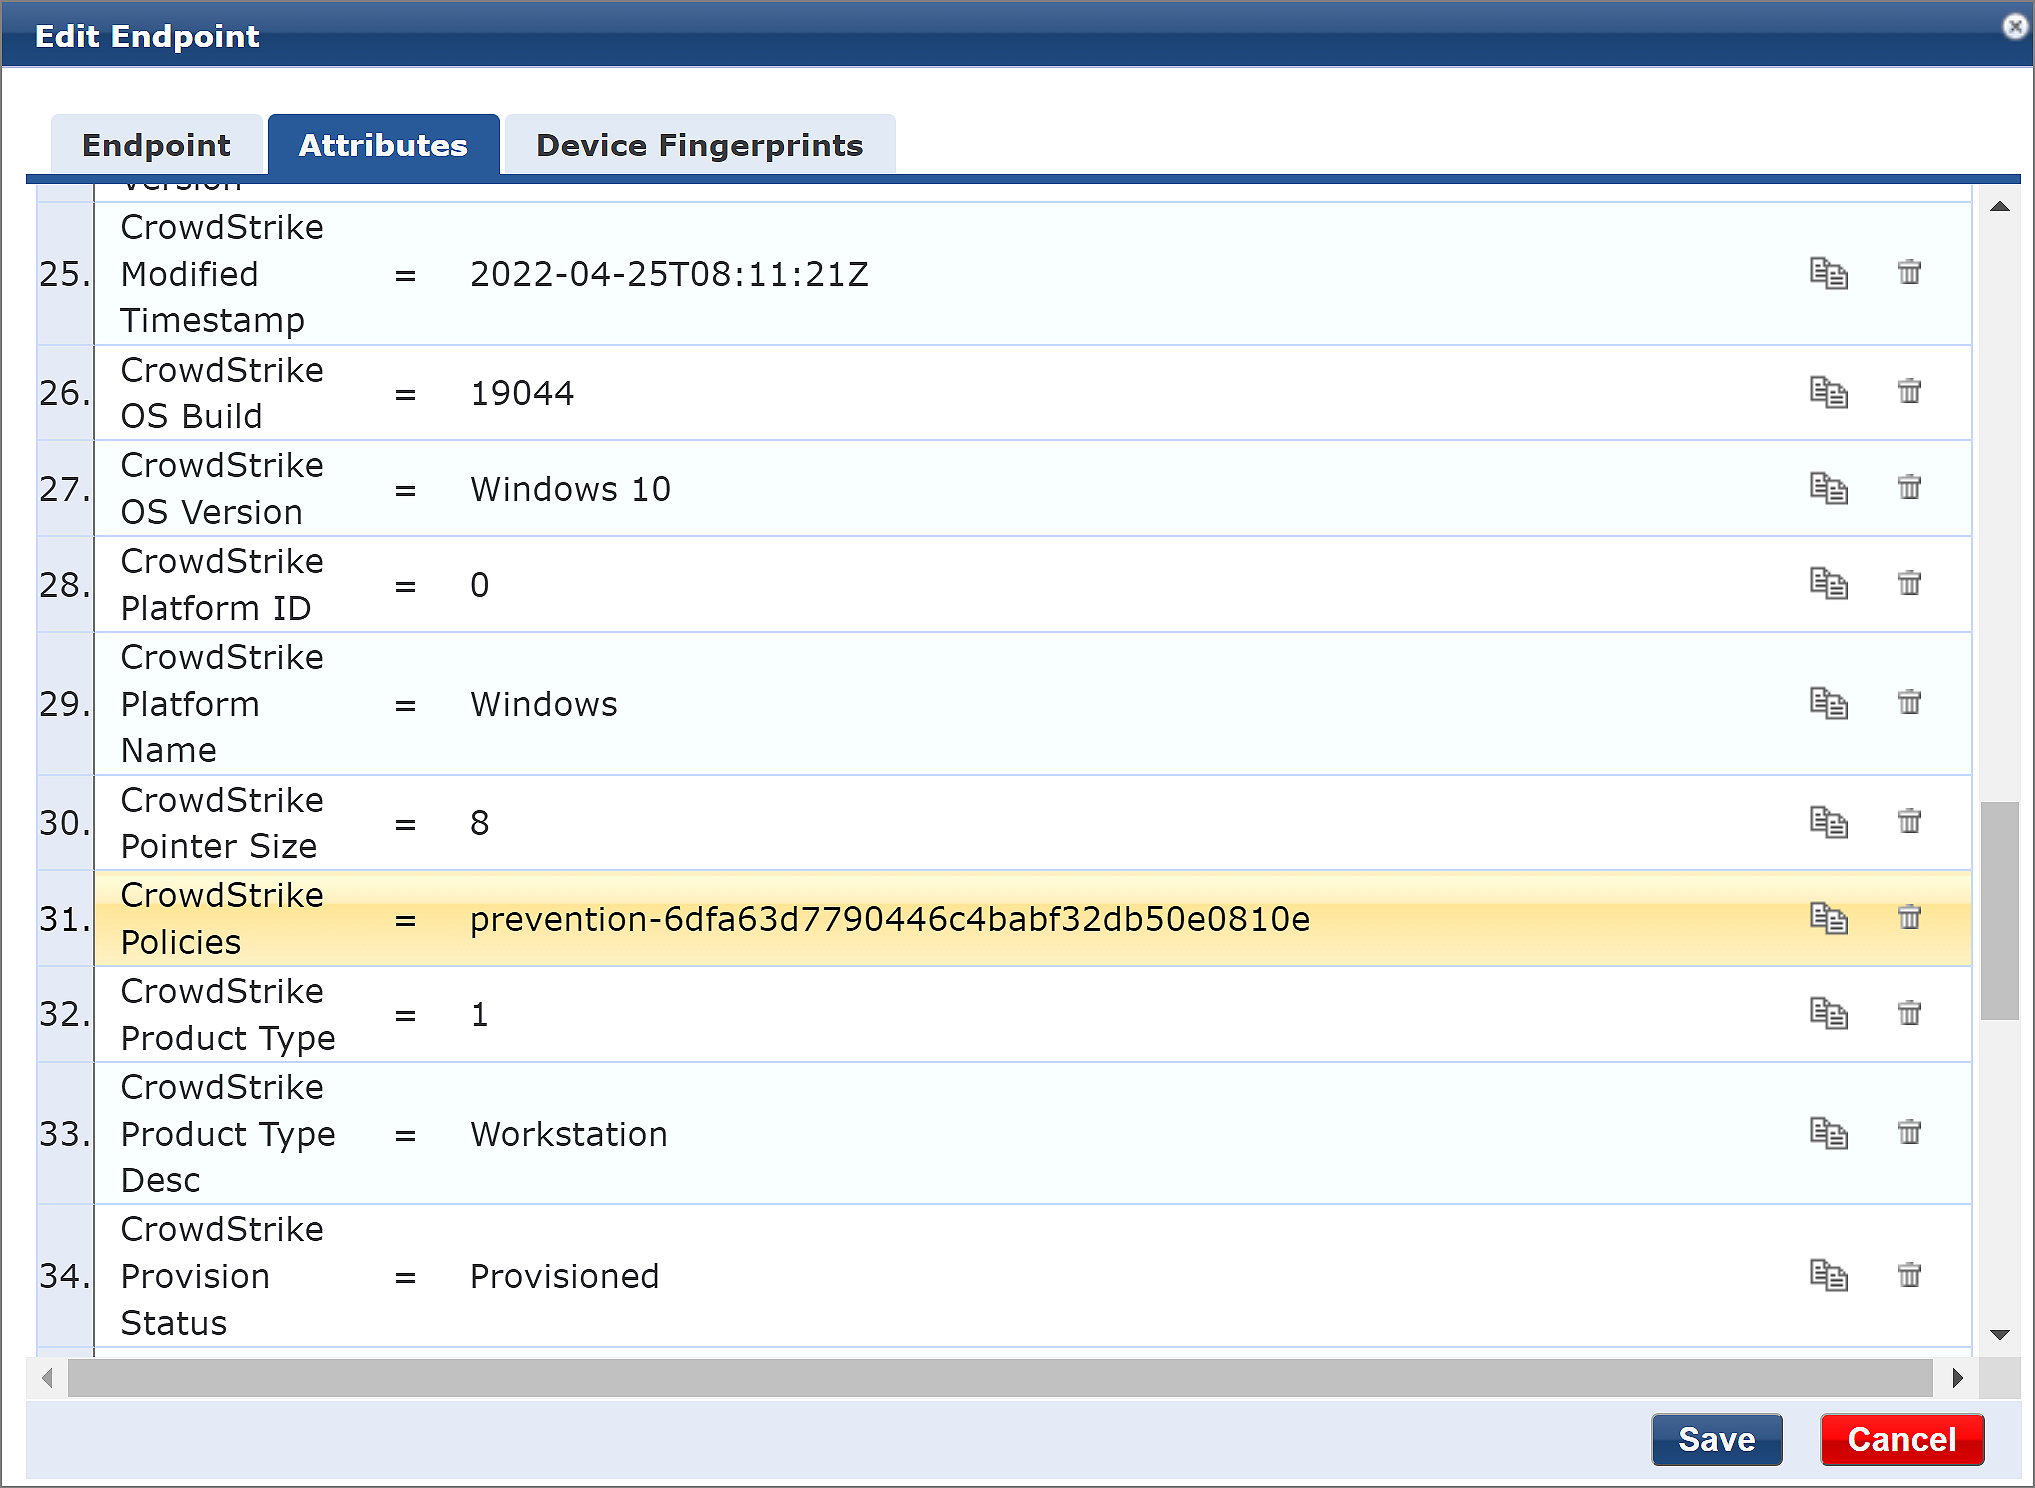
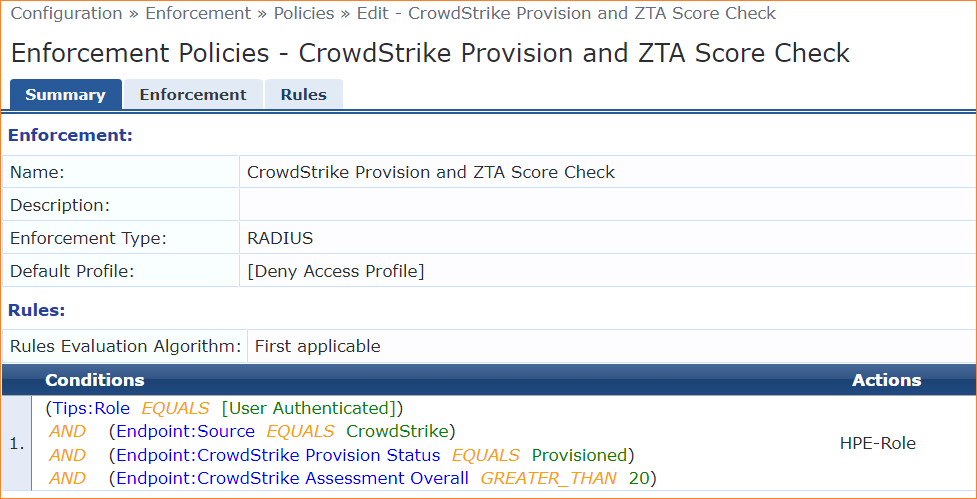
A sample enforcement policy leveraging the endpoint attributes which can be used in a service is shown below.
Note that the common endpoint attributes related to Zero Trust Assessment would make sense in enforcement policies when they are of data-type integer. For example, if one needs to check if the overall Zero Trust Assessment score of an endpoint is greater than 20 then such policy conditions will need the attributes to be of type integer. By default, all the attributes sent by CrowdStrike get added as data-type String for an endpoint. Therefore, for certain use cases such attributes need to be deleted from the Dictionary attributes and re-added with the data-type set to integer manually.
To delete the attributes, one needs to first stop the extension, delete the existing endpoints from the ClearPass DB as the endpoints will be referencing these attributes from the dictionary preventing an administrator to delete them. After which these attributes can be added manually as shown below with the data-type set to integer.
Since the Zero Trust Assessment scores are available as endpoint attributes only starting version 2.1.0 of the extension one needs to first upgrade the extension. So, the step to delete the endpoints and dictionary attributes can be done prior to the upgrade which will prevent restarting the extension multiple times.

CrowdStrike as an Authorization Source
With CrowdStrike as an Authorization Source, ClearPass Policy Manager can query CrowdStrike Real-Time to determine if the endpoint is managed by CrowdStrike at the time of Authorization and grant access accordingly. It can leverage other security attributes returned by CrowdStrike within the enforcement policy. For example, a contained device can be denied access, a device with Last Update higher than the expected value can be quarantined etc.
This use case requires further configuration which includes an addition of Authentication Source which will be used for Authorization. It also necessitates modification of a service to use this new source for Authorization and a modification of Enforcement Policy to use this Authorization source which will be covered below.
The addition of Authentication source can be easily configured by importing the XML available on HPE Aruba Networking GitHub. Kindly refer Appendix B for details.
Adding CrowdStrike as an Authorization source can be done under Configuration > Authentication > Sources, click “Add”.

Click on Next. This will advance to the Primary Tab which requires connection details. Here an internally POST is made to the extension. The extension then calls CrowdStrike APIs to retrieve the security attributes associated with the endpoint.
The Base URL is http://<Extension IP>. The extension IP is highlighted in Figure 14. The Login Username and Login Password are mandatory fields but never used here since the contents are posted internally to an extension. This value has to be defined and could be anything.

Click on “Next”. This will advance you to the Attributes Tab where you need to provide the authorization attributes. Click on “Add More Filters”. Provide a Name for the filter and then a Filter Query. It’s extremely important that the Filter Query is defined correctly. This is the query string that is sent to the CrowdStrike extension asking for context about the endpoint. The query is indexed off the mac-address of the authenticating endpoint. For completeness, the filter query is provided here, copy it carefully.
/%{Connection:Client-Mac-Address-NoDelim}
Next build out the definitions of the attributes that will be returned from the Filter Query. These attributes will subsequently be used within our policy-evaluation and ultimately the enforcement policy applied.

For. Zero Trust Assessment Score attributes below are the definitions of the attributes from a second query that needs to be added.
/zero-trust/%{Endpoint:CrowdStrike Device ID}
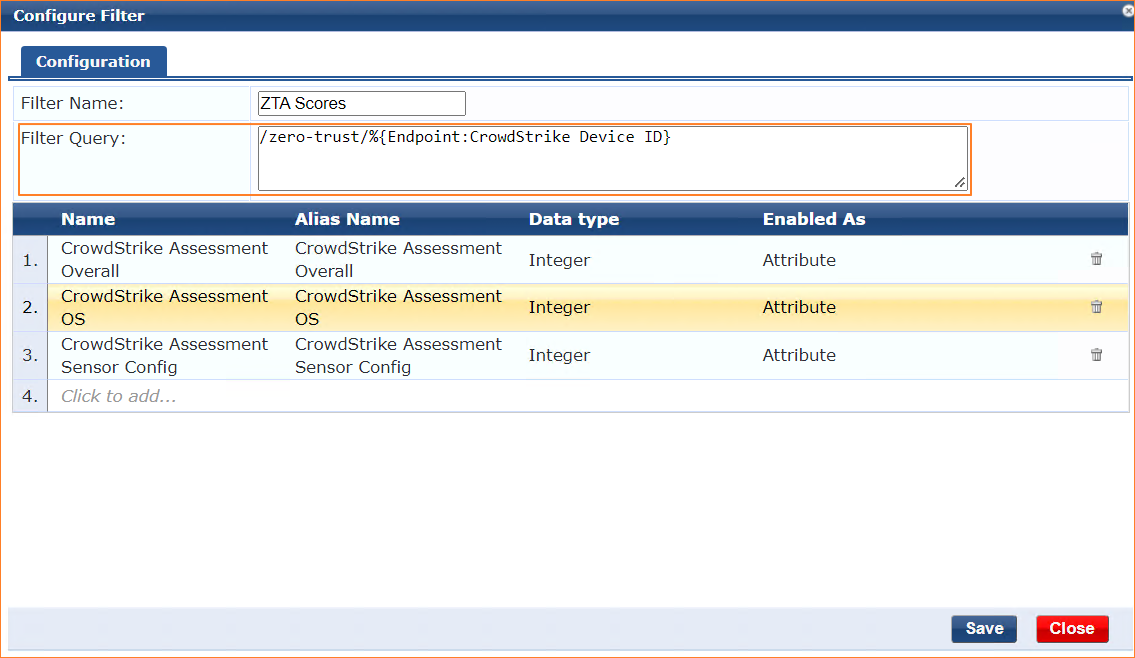
Further attributes can be added here if necessary for the policy. Appendix C has a list of attributes captured by the extension.
Once the HTTP authorization source is defined, the returned attributes can be leveraged in a service using an enforcement policy or role mapping. A sample enforcement policy is shown below. Remember to add the newly added Authorization Source under the Authorization tab of the service.

The above policy grants full access to an endpoint if it is provisioned with a CrowdStrike Falcon agent and the agent has not contained the endpoint and the Zero Trust Overall Assessment score is greater than 20.
INFO
A point to note is that ClearPass Policy Manager would query the Authorization Source every time it authenticates. The problem with this approach is that if there is a latency in the response from CrowdStrike which is hosted in cloud, it would result in a delay for an endpoint to get onto the network. If the delay is beyond an acceptable limit it would result in timeouts. Also, for best performance it is always recommended to leverage the ability of ClearPass to cache the attributes for a configurable time period.
Let’s revisit the configuration parameters of the extension. The parameters of interest are enableEndpointLookupCache and enableCacheTimeSeconds. The values are explained in the table under the section “Configuration Steps”.
{
“logLevel”: “INFO”,
“verifySSLCerts”: true,
“crowdStrikeApiHost”: “api.crowdstrike.com”,
“clientId”: “[Client ID]”,
“clientSecret”: “********”,
“crowdStrikeSyncZeroTrust”: false,
“enableEndpointCache”: false,
“endpointCacheTimeSeconds”: 300,
“syncAllOnStart”: false,
“enableSyncAll”: false,
“syncAllSchedule”: “0 2 * * 6”,
“syncUpdatedOnly”: true,
“syncPageSize”: 100,
“attributePrefix”: “”,
“bypassProxy”: false,
“enableStats”: true,
“statsUsername”: “”,
“statsPassword”: “********”
}
The access tracker results with the Authorization attributes are shown below.
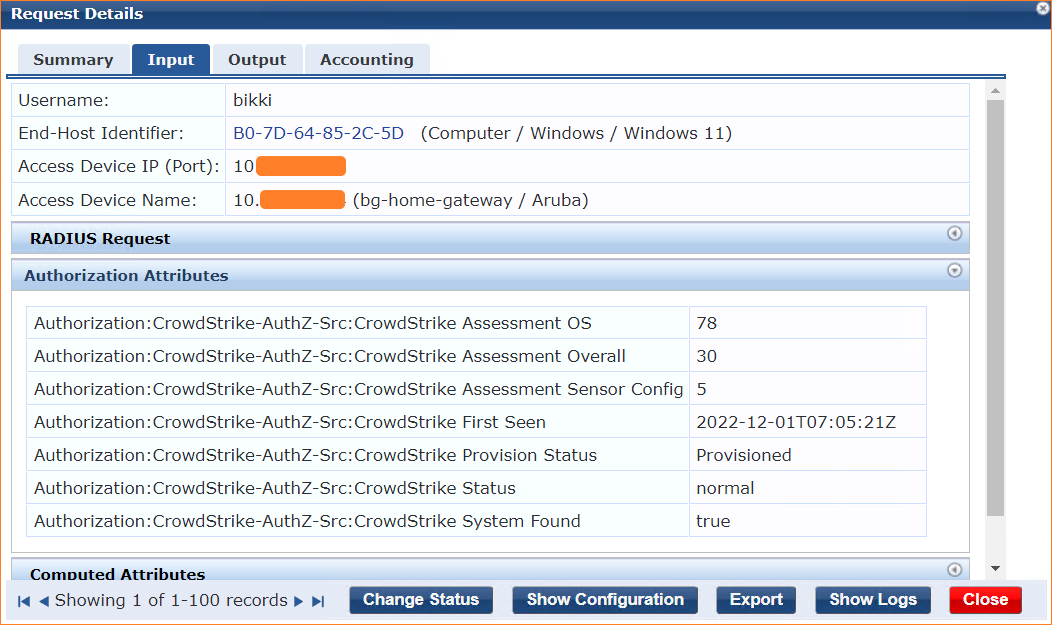
Leverage the benefits of caching the attributes for faster authentication results. This is particularly useful in scenarios where clients roam frequently triggering frequent authentication requests. Use these parameters best suited in a customer environment based on their requirements.
Contain an endpoint using CrowdStrike APIs
ClearPass Policy Manager extension can call the CrowdStrike APIs to trigger containment on the endpoint leveraging the Falcon agent. APIs can also be leveraged to lift the containment.
Configuration for containment includes 3 steps on ClearPass Policy Manager. These steps can be ignored if the Enforcement Policies are exported directly as an XML. The steps are available in Appendix B.
-
Define Endpoint Context Server
-
Add Context Server Action
-
Create an Enforcement Profile to trigger the action
Endpoint Context Server
The first step is to define an Endpoint Context Server. This can be added under Administration > External Servers > Endpoint Context Servers click on Add and use the extension IP address highlighted in Figure 14.

WARNING
Select the Server Type as “Generic HTTP”. The Server Name is the IP address of the Extension. Once you enter that, the Server Base URL gets automatically populated and adds https to begin with.
Ensure you change this to http else the internal POST fails. Please note that this is an internal post within ClearPass from the Policy Manager to the Extension.
Context Server Action
The next step is to define a Context Server Action within ClearPass Policy Manager which will internally POST to the extension. The extension will trigger an API call to CrowdStrike and fetch the information associated with it which can be used for Authorization. The context server action allows us to define the HTTP Method, the URL and the JSON contents that will be used to post the mac address to the extension.
This can be added under Administration > Dictionaries > Context Server Actions. Click on Add and use the details shown below. All the other tabs are blank.
The URL used below has to match for the API calls to be successful. Kindly copy paste the URL from below
Contain: /contain/%{Connection:Client-Mac-Address-NoDelim}
Lift Containment: /lift-containment/%{Connection:Client-Mac-Address-NoDelim}

Similarly, a Context Server Action for lifting the containment is shown below.

Enforcement Profile
The next step involves using the Context Server Action in an Enforcement Profile as below. The Enforcement Profile for containing an endpoint leveraging CrowdStrike APIs action is shown below.

INFO
Containment would only work if the attribute CrowdStrike Device ID exists in the Endpoint repository in CPPM. The attribute is not stored if CrowdStrike is only used as an Authorization source without poll/sync and enableEndpointLookupCache is set to false.
The Access Tracker result is shown below. CPPM triggers an internal API call to the extension configured.
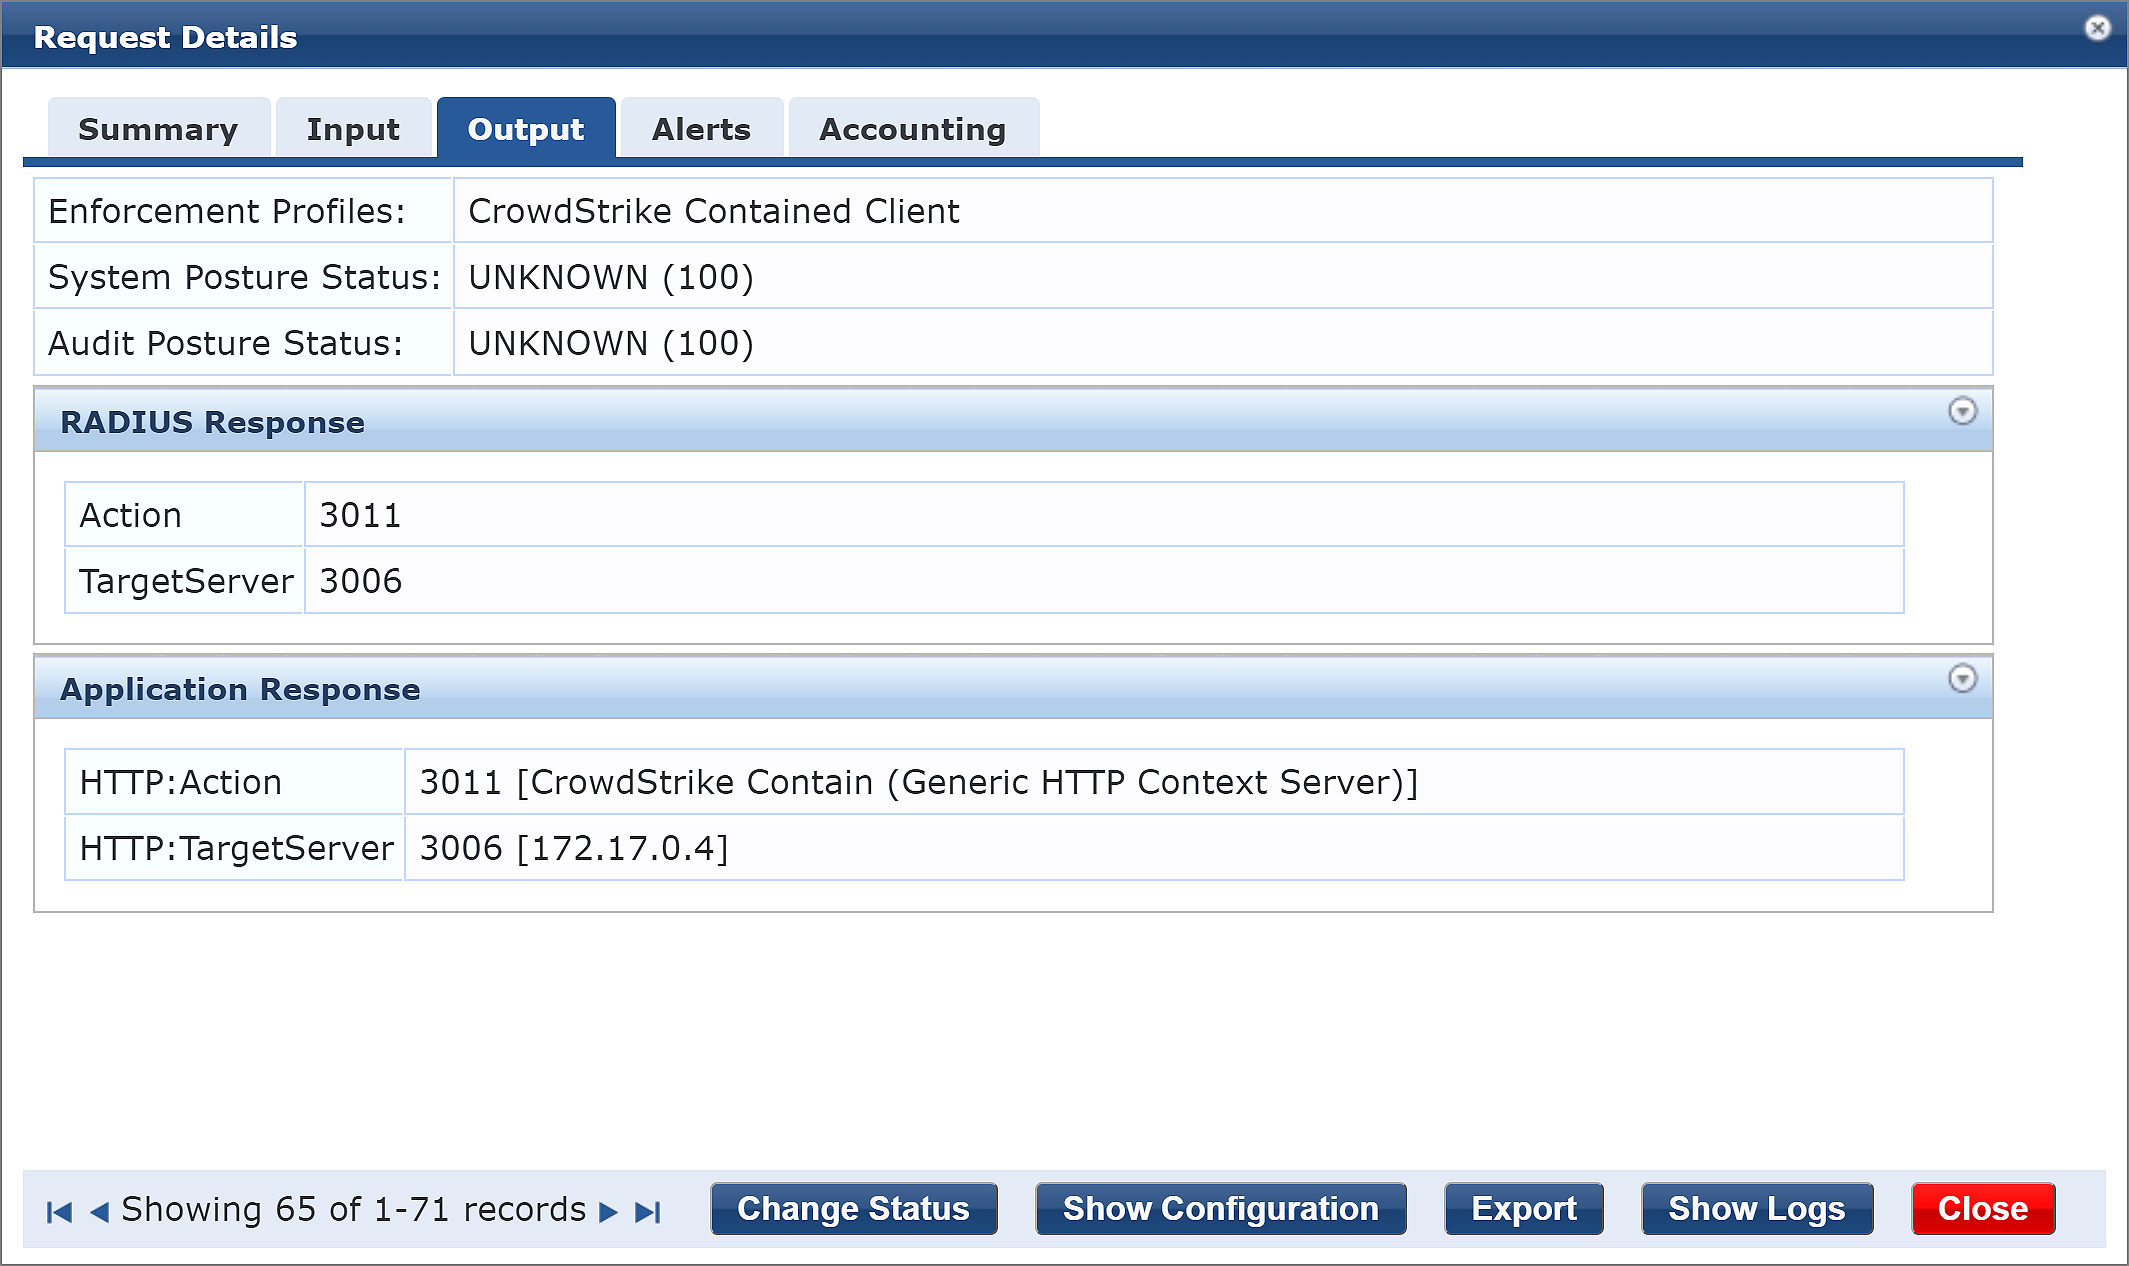
Similarly, containment can be lifted from the hosts using the Lift Containment action or Enforcement Policy within CPPM.
Appendix A – Troubleshooting and Support
Here we list some basic troubleshooting steps. If you need any help beyond this, please reach out to HPE Aruba Networking Support.
Check API Access Application Control restrictions
If you’ve previously hardened your ClearPass deployment with Application Access Controls, it’s possible that the Extension will not work. Reviewing the Extension Log might show something like the following after immediately starting the Extension. This likely indicates the ClearPass Application API’s are in place.
Example of Extension authorization failure due to Policy Manager Application Control:
[2020-03-16T15:42:21.083] [INFO] Intune - Server listening on port 80.
[2020-03-16T15:42:21.243] [DEBUG] Intune - Request “GET ‘https://172.17.0.1/api/server/version’” took 51.91ms.
[2020-03-16T15:42:21.245] [DEBUG] Intune - <!DOCTYPE html><html>
<head>
<title>
Error 403 (Forbidden)
</title>
<script language=“javascript”>
function reloadPage() {
var locHref = window.location.protocol + “//” + window.location.hostname;
window.location.href = locHref;
}
</script>
To resolve this issue, add the IP address of the Extension to the list of nodes permitted to access the API by navigating to Administration > Server Manager > Server Configuration {choose your node} > Network

INFO
For this reason its good practice to fix the IP address of the extension at installation time such that it doesn’t change over time and break the application controls.
Checking on the Extension Service
The ClearPass Extensions are supported by a system service which must be running.
Restarting this service will affect all deployed and running extensions.
To check on the state of the Extension Service, or to restart the service, go to Administration > Server Manager > Server Configuration > [SERVER] > Service Control. By default this service is automatically started.

Extensions and web proxy / firewall whitelisting
If ClearPass Policy Manager has been configured with a proxy, it’s still possible that domain whitelists are required, the same for some datacenter firewall to allow the installation of Extensions. Some enterprise customers maintain a whitelist of domain that are allowed to transit the proxy/firewall. The underlying docker configuration process uses standard docker registry access to pull images (hosted in docker hub). In general, the following hosts are used:
INFO
-
extensions.clearpassbeta.com
-
registry-1.docker.io
-
index.docker.io
-
auth.docker.io
-
production.cloudflare.docker.com
This is all also geo dependent to some degree and based on various AWS services, so AWS redirects and geo location services will vary. Finally, this all runs via standard HTTPS (port 443).
Extension Logs/Enable Debugging
If you have a requirement to access and view the logs from the Extension, you can turn on different logging levels from the Extension GUI. Adjust the logLevel to ‘DEBUG’ and restart the extension as shown below.
Logs can then be viewed from the ‘Show Logs’.

Remember after changing the logging level, as with any extension configuration change the extension will need to be restarted for this change to take effect.
Accessing the extension logs using ‘Collect Logs’ system function
In addition to viewing the logs as shown above, logs can also be collected and examined via the Policy Manager Collect Logs system function (Administration > Server Manager > Server Configuration > [Select SERVER] > Collect Logs). This is extremely useful should you have a need to call for technical assistance.
If the support team needs to investigate a system issue, one of the items they regularly ask for is the system logs to aid with their diagnostic investigation. By default the “logLevel” is set to INFO, but TRACE, DEBUG, INFO, WARN, ERROR, FATAL can also be set as required. Any of the levels will display the information for the selected state and lower; if INFO is selected, it will show messages for INFO, WARN, ERROR, FATAL.
After the logs have been collected, downloaded and expanded, you can locate the extension logs in the following location in the folder structure PolicyManagerLogs > extension > your-extension-id as shown below. Note the file-name is the same as the running instance ID of the extension.

Monitoring extension statistics
There is a way to monitor extension’s critical resource statistics with the configurable parameter added as part of the extension’s configuration. To enable extension statistics set the “enableStats” parameter to true. Remember a restart of the extension is need to activate the change anytime the config is modified.

To navigate to statistics page, click Show Details.


This will show statistics similar to the following:


Monitoring authorization performance
Since we are authorizing against an external system, it could be relevant to monitor the performance of these transactions as you setup and deploy. If you suspect there is a performance issue, ClearPass provides a way to monitor the authorization processing time. The graph below shows an example of this data, navigate to Monitoring > Live Monitor > System Monitor [click on ClearPass Tab, then select [Authorization]….

Appendix B – Considerations for Installing in a Cluster
Extensions are not synced between ClearPass cluster members, and thus must be installed on each member separately.
Some Extensions can run in two modes: Periodic Sync Mode and Authorization Source Mode.
Periodic Sync Mode
If you are configuring the extension to poll external system periodically and utilize the resulting ClearPass Endpoint database during endpoint Authorization, then you only need to install the extension on one cluster member, often the publisher.
You may wish to install the extension on a second cluster member as a backup, but remember that both extensions will individually be updating the endpoint database. You may want to stagger the updates between the two extensions, for example, Subscriber1 updates at the top of the hour and Subscriber2 updates at 30 minutes after the hour.
Also, in this mode there is no need to explicitly enter an IP address during installation. The defaults will suffice and ClearPass will select an IP in the range specified in the server configuration.
HTTP Authorization Source Mode
In this mode we configure an HTTP Auth source that results in a HTTPS call to external system during endpoint authorization. In this deployment model the extension must be installed on every cluster node that process authentications. Also in this scenario every cluster member’s extension must be set to the exact same IP address during installation time, as the HTTP Auth source configuration is propagated globally across all cluster members.
For example, if the extension IP range is 172.17.0.0/16, we would set the extension to 172.17.0.5 on every cluster member during installation of the extension.
While we normally want to avoid duplicate IP addresses in a network, this is not a concern with ClearPass extensions. Each ClearPass node communicates internally only with its own extension, and this traffic is not routed outside of ClearPass.
Subscriber nodes support the same ability as publishers to install an Extension from the Extension store.
Appendix C – endpoint sync schedule settings
The syncSchedule and similar scheduling parameters sets how often ClearPass executes certain actions like syncing or pushing endpoints. This setting is based on a slightly modified version of the CRON job scheduler found in Unix-like operating systems. It can be used to schedule jobs to run periodically at fixed times, dates or intervals.
A ‘cron’ is a job scheduler. Any scheduled task is called a ‘cron job’. The syntax for a cron job schedule is as follows:

In our use of the cron scheduler, we’ve dropped the use of the last instruction ≤command to execute> and use only the time/date functions, see below for a number of examples of scheduling a sync process.
-
Schedule a sync to run at 2am daily:- 0 2 * * *
-
Schedule a sync to run twice a day at 5am and 5pm:- 0 5,17 * * *
-
Schedule a sync to run on every Sunday at 5pm:- 0 17 * * sun
-
Schedule a sync to run every 30 minutes:- */30 * * * *
-
Schedule a sync to run at 5pm on selected days:- 0 17 * * sun,fri
You can see from the above that the scheduling process is extremely flexible, alternatively https://crontab.guru/ is a great page for learning more about CRON scheduling.
Appendix D – Extension performance optimizations
Extensions are a critical part of ClearPass deployments today and with the increased dependency on extension interactions that involve periodic polling or real-time lookups, here are some of the best practice recommendations around optimizing overall performance when using extensions:
-
If the extension is used to periodically poll external systems and populate endpoint repository, ensure that it is not installed in all the nodes in the cluster. Ideally these type of extensions should only be installed on the publisher node since only publisher node can add endpoint entries to the database. For redundancy, it can be installed on another additional node but it is recommended to stagger the polling interval so that both do not attempt to poll and update endpoint database at the same time.
Example: 0 * * * *, This cron job runs at minute 0 of every hour (e.g., 00:00, 01:00, 02:00, etc.).
30 * * * *, This cron job runs at minute 30 of every hour (e.g., 00:30, 01:30, 02:30, etc.). -
If the extension is used for looking up attributes from external systems in real time during authentication, it should be installed in all the nodes handling authentication. Note that the context server config is replicated from the publisher. When using extension for real time lookup, ensure that the extension has the same IP address in all the cluster nodes.
-
If the extension is expected to do both real-time lookup and periodic polling, ensure that polling is enabled only on the publisher while the extension in subscribers can have the polling disabled by setting the “enableSyncAll” attribute to false.
"enableSyncAll": false,
WARNING
Having the extension installed on all the cluster nodes with enableSyncAll set to true would cause each cluster node to independently poll the external system and update endpoint repository. This could impact the performance of ClearPass. Hence it is strongly recommended to enable endpoint sync only on the extension installed on the publisher and on another cluster node for redundancy.
-
Some 3rd party systems support fetching delta updates vs fetching all of the device information every polling cycle. The extensions that support fetching delta updates are: Workspace ONE Crowdstrike Falcon Microsoft Intune Mosyle SentinelOne Service Now
For these extensions, the syncUpdatedOnly attribute should be set to true in extension config so that the number of DB updates in ClearPass is minimized
"syncUpdatedOnly": true,For extensions that do not support syncUpdatedOnly, ensure that the sync interval is not aggressive. We recommend syncing at most twice a day and that too during off peak hours whenever a full sync is performed.
-
Some 3rd party systems can be very noisy in terms of attribute updates. There could be certain attributes that keep changing every sync interval like “Free Memory in Bytes”, “Last Check in Time” etc. There is no value in updating endpoints when such trivial attributes change for the device. Hence it is recommended to use “ignoreEndpointDifferences” attribute in extension configuration to ignore change in attributes that you do not care about in terms of ClearPass policies.
You can review the Audit Viewer in ClearPass under Monitoring > Audit Viewer to see what attributes are being updated for endpoints to check if there are unnecessary updates.
Sample for JAMF extension:
"ignoreEndpointDifferences": "Last Update, Report Date UTC, Last Contact Time UTC, Last Inventory Update UTC, Last Reported IP, IP Address",Default for Microsoft Intune extension:
"ignoreEndpointDifferences": "Last Sync Date Time, Free Storage Space in Bytes", -
To further optimize the number of endpoints being updated in ClearPass, you can specify which attributes are being used in the ClearPass policies so that only changes to those attributes would trigger an update to the endpoint. This is done by listing out the specific attributes under endpointAttributes in extension configuration.
Sample for JAMF extension:
"endpointAttributes": "Group names, MDM Enabled, Managed, Remote Managed, Supervised, Serial Number", -
Setup extension to restart unless it was intentionally stopped. A restart policy can be defined in extension configuration to ensure that the extension starts up automatically after server reboots and such. Restart policy of “unless-stopped” would ensure the extension always starts up unless it was manually stopped.
“restartPolicy”: “no” — The extension will not be automatically restarted after the server is restarted.
“restartPolicy”: “always” — The extension will always be restarted after the server is restarted.
“restartPolicy”: “unless-stopped” — The extension will be restarted unless it was stopped prior to the server restart, in which case it will maintain that state.
“restartPolicy”: “on-failure:N” — If the extension fails to restart, the value for “N” specifies the number of times the extension should try to restart. If you do not provide a value for “N”, the default value will be “0”.
The “restartPolicy” parameter is not present by default in extension configurations. When it is not present, if the system is restarted a default policy is applied to the extension to maintain the state it was in before the restart. If the “restartPolicy” parameter is added to the configuration but later removed, the extension will then revert to the default restart policy.
Appendix E – XMLs
The following steps are required to add CrowdStrike as an Authentication Source by importing it into ClearPass Policy Manager using the XML file available in our GitHub repository
https://github.com/aruba/clearpass-exchange-snippets/tree/master/extensions/CrowdStrike
-
Download the XML profile > “clearpass-extension_crowdstrike_auth-source.xml”.
-
Open the XML file using a simple editor and replace X.X.X.X with your EXTENSION IP ADDRESS (Refer Figure 14).
-
You can also import the XML without making any edits and then change the “Base URL:” from “http://X.X.X.X” to your extension IP address using the ClearPass Policy Manager UI. This can be changed under the Primary tab of the imported Authentication Source (Refer 0).
-
The XML file can be imported into ClearPass by navigating to Configuration > Authentication > Sources. Click on Import and use the file downloaded.
The Enforcement Profile, Context Server Action and the Endpoint Context Server configured in the section “Contain an endpoint using CrowdStrike APIs” can easily be imported using the XML available on HPE Aruba Networking GitHub
https://github.com/aruba/clearpass-exchange-snippets/tree/master/extensions/CrowdStrike
- Download the XML profile > “clearpass-extension_crowdstrike_enf-profile.xml”.
- Open this file in your favorite editor. Use the Find and Replace feature of the editor to replace “<<Extension IP>>” with the actual IP address of the extension configured. Refer Figure 14.
- The XML file can be imported into ClearPass by navigating to Configuration > Enforcement > Profiles. Click on Import and use the file downloaded.
Appendix F – Attributes Fetched from CrowdStrike
Following is the sample list of the default attributes fetched from CrowdStrike using the default policy. {
“CrowdStrike Cid”: “643b2392ec494d948e9c879c4fe11f3a”,
“CrowdStrike Status”: “normal”,
“CrowdStrike Hostname”: “B07D64852C5D-BG”,
“CrowdStrike Local IP”: “10.x.x.1x”,
“CrowdStrike OS Build”: “22000”,
“CrowdStrike Policies”: “prevention-6dfa63d7790446c4babf32db50e0810e”,
“CrowdStrike Device ID”: “27b832e592ab4e739583acfba1aaa004”,
“CrowdStrike Last Seen”: “2023-01-04T16:42:31Z”,
“CrowdStrike First Seen”: “2022-12-01T07:05:21Z”,
“CrowdStrike Group Hash”: “e3b0c44298fc1c149afbf4c8996fb92427ae41e4649b934ca495991b7852b855”,
“CrowdStrike OS Version”: “Windows 11”,
“CrowdStrike External IP”: “49.205.32.38”,
“CrowdStrike Last Update”: “2023-01-04 16:45:00”,
“CrowdStrike MAC Address”: “b0-7d-64-85-2c-5d”,
“CrowdStrike Platform ID”: “0”,
“CrowdStrike BIOS Version”: “X571GT.311”,
“CrowdStrike Build Number”: “22000”,
“CrowdStrike Pointer Size”: “8”,
“CrowdStrike Product Type”: “1”,
“CrowdStrike System Found”: “true”,
“CrowdStrike Agent Version”: “6.48.16205.0”,
“CrowdStrike Assessment OS”: “78”,
“CrowdStrike Connection IP”: “10.x.10.x”,
“CrowdStrike Cpu Signature”: “591594”,
“CrowdStrike Major Version”: “10”,
“CrowdStrike Minor Version”: “0”,
“CrowdStrike Platform Name”: “Windows”,
“CrowdStrike Serial Number”: “M4N0CX12R927169”,
“CrowdStrike Config ID Base”: “65994753”,
“CrowdStrike Kernel Version”: “10.0.22000.1335”,
“CrowdStrike Config ID Build”: “16205”,
“CrowdStrike Device Policies”: “Prevention-6dfa63d7790446c4babf32db50e0810e, Sensor Update-b7178b018dcb4a8d83cec39401acfb5c, Device Control-5d3813ac29c44e54b48987b25c361bda, Global Config-67643d17e357489c8d6a08d38c07f1b4, Remote Response-22b6b4e42b6b4333bdb2f8112d1f7dea, Firewall-671577970e284f019faf83d9fa690842”,
“CrowdStrike Agent Load Flags”: “1”,
“CrowdStrike Agent Local Time”: “2023-01-04T19:36:42.247Z”,
“CrowdStrike Provision Status”: “Provisioned”,
“CrowdStrike BIOS Manufacturer”: “American Megatrends Inc.”,
“CrowdStrike Product Type Desc”: “Workstation”,
“CrowdStrike Assessment Overall”: “30”,
“CrowdStrike Assessment Version”: “3.5.1”,
“CrowdStrike Config ID Platform”: “3”,
“CrowdStrike Default Gateway IP”: “10.234.1.1”,
“CrowdStrike Modified Timestamp”: “2023-01-04T16:44:16Z”,
“CrowdStrike Sensor File Status”: “not deployed”,
“CrowdStrike Service Pack Minor”: “0”,
“CrowdStrike System Manufacturer”: “ASUSTeK COMPUTER INC.”,
“CrowdStrike System Product Name”: “VivoBook_ASUSLaptop X571GT_F571GT”,
“CrowdStrike Connection MAC Address”: “b0-7d-64-85-2c-5d”,
“CrowdStrike Assessment Modified Time”: “2022-12-30T07:55:03Z”,
“CrowdStrike Assessment Sensor Config”: “5”,
“CrowdStrike Reduced Functionality Mode”: “no”
}
Feedback
Was this page helpful?
Glad to hear it!
Sorry to hear that.